
Drawing latitude and longitude lines on a homemade globe
Published by Manning on December 10th, 2017
These are the steps I used to measure and draw the latitude and longitude lines for my paper maché globes project.
The globes I designed were intentionally somewhat simple and cartoony, and so I decided to do just 7 latitude lines and 8 longitude lines.
I should mention, I first drew the latitude and longitude lines onto my finished paper maché spheres before adding the continents. Later when I added the raised continent shapes, I re-drew the latitude and longitude lines over them.
Figuring out exactly where to draw the lines was harder than I expected! I started with the longitude lines — that’s the vertical ones. First, I measured the diameter of the sphere by placing it between my kitchen counter and a chair, and setting the ruler on top of that; the diameter was about 15.75″.
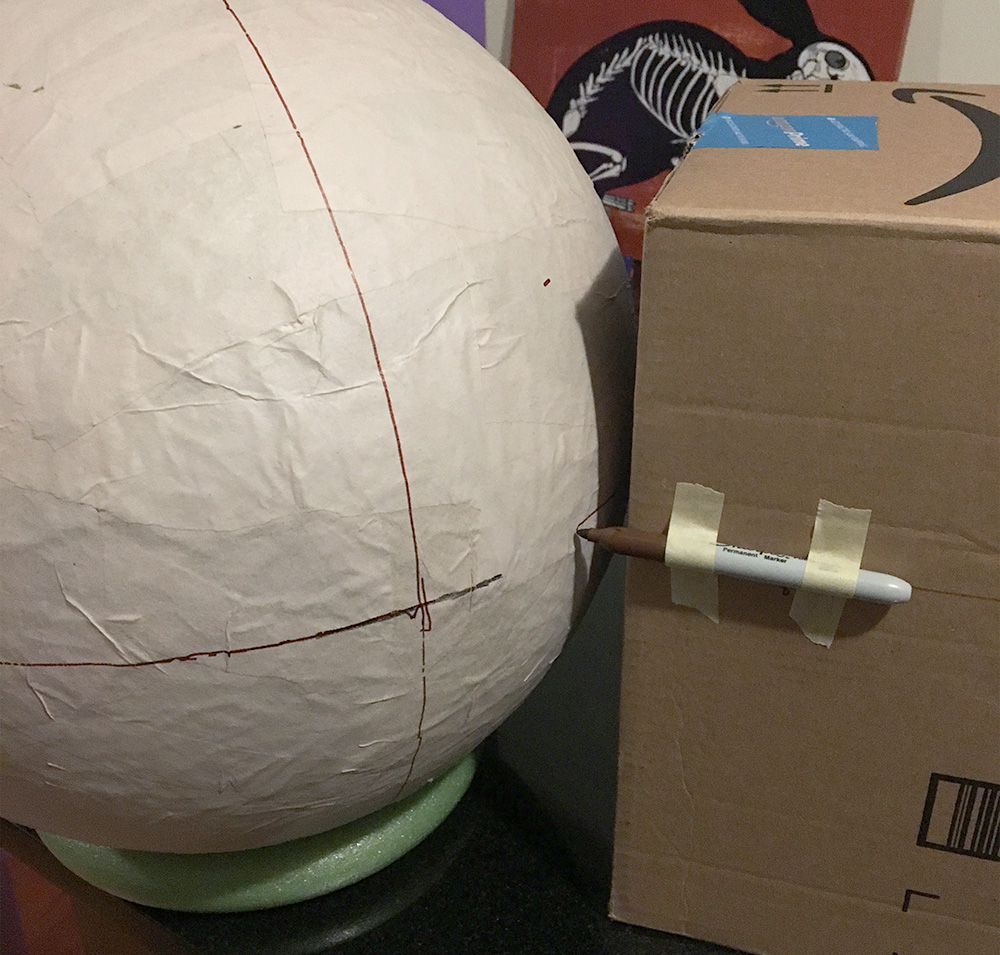
Now, how to draw a perfectly straight line that goes all the way around this sphere at its widest point? Here’s my dumb method: I set up a cardboard box on my counter and drew a horizontal line on it at a height that’s half the diameter of the sphere, i.e. 8.875″. I then taped a marker to the box at that height, sticking out to the side. I set the sphere on a ring of foam to keep it stable, and I pulled the sphere toward the box, carefully turning it and letting the marker draw a line all the around.
I then used a T square to make a small line that crosses my first line at 90 degrees, and then I turned the sphere and used the cardboard box and marker to draw that whole line all the way around. I then did the same thing to make the remaining two lines at 45 degrees from the first. With that, I had all 8 of my longitude lines.
Now, the latitude lines. The equator was relatively easy; I could use the same method with the box for that one. I could’ve measured different heights on the box for the other latitude lines, but I decided to cheat a little bit and do something easier. I used a tape measure to find the distance from the equator to the North Pole; this turned out to be about 12 inches. I then marked off dots along one of the longitude lines at 3″, 6″, and 9″. I did this for all eight longitude lines for the Northern hemisphere, and then flipped the globe over and did the same thing for the Southern hemisphere. I then connected all the dots to make the latitude lines, just by eyeballing it and drawing long curved lines as carefully and evenly as possible. This worked out okay! Definitely good enough for a simplified globe design. If I were trying to be more precise, I’d go back to the box-and-marker method for all the lines.
Anyway, check out my article the paper maché globes to see how they turned out!
Incidentally, I wrote about basically the same method for my paper maché baby chicks a while back, and I included a sketch of the box/marker set-up; it’s about six paragraphs down.
 About Manning Krull
 How to make a 4-foot paper maché alligator
 My violin skull mask, Mardi Gras 2015
 Three-headed paper maché dragon sculpture
Leave a comment