
Making Fortunato's brick wall
Published July 13th, 2026
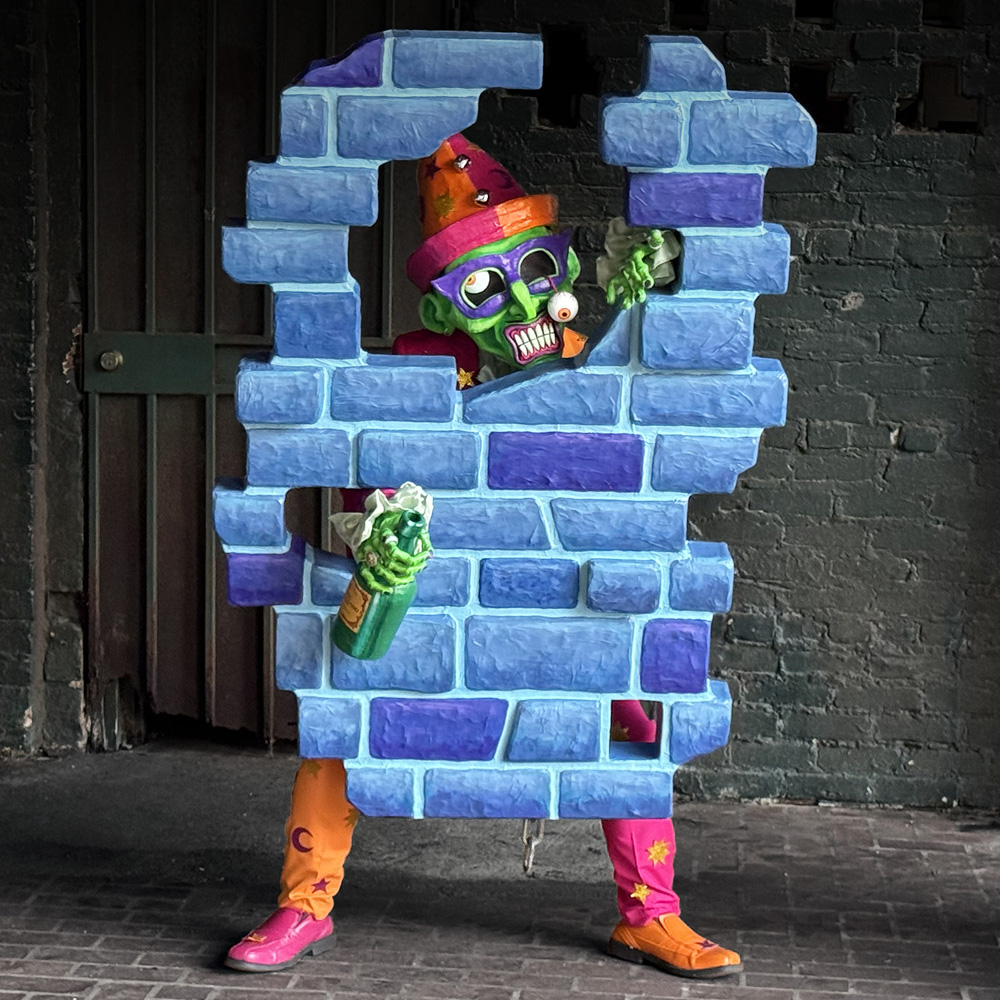
I designed Fortunato's broken brick wall in Photoshop, using a somewhat convoluted technique. This part is pretty technical and boring, so feel free to skip a couple paragraphs. I took a photo of myself, full body, wearing my Fortunato mask, and holding a 36" ruler vertically at my side. I took this photo from far away so that my proportions are accurate; if you take a pic like this closer up, your proportions will be distorted, like the inches near the top of the ruler will be larger than the inches at the bottom, and the same goes for your body.
I brought this pic into Photoshop at high-res and cropped it to just me and the ruler, and I put the pic onto its own layer. Then I made a separate document that was 10x360 pixels. I copied and pasted that into my the document with my photo. Then I manually shrunk the photo down to make the ruler line up perfectly with the 360-tall rectangle. Once that was done, that meant that in my photo, one inch equals 10x10 pixels. Get it? Then I made a huge grid of 10x10 squares and laid that over the photo. So now for anything in the photo, or anything I draw onto it, I can easily determine its real-life size; the grid of 10x10 pixels is now a grid of real life inches. So, I then drew the wall with my Wacom tablet onto the photo, and then it was easy to determine what the dimensions of the wall would be in real life: roughly 40"x60".
My plan was that the basic shape of the wall would essentially be a big flat box, which I would make out of cheap foam board from the dollar store.
I started by taping some 20"x30" sheets of foam board together to make some bigger panels. I put four sheets together to make a panel that's 40"x60". I used heavy duty shipping tape for this, on both sides.
I made three of these 40"x60" panels for the basic box shape of the wall. Why three? One is the front of the wall. One is the back of the wall. And the third serves a few purposes:
1. This is where I'll draw the overall shape for the wall, to trace onto the other two panels.
2. I'll cut out all the individual brick shapes from this panel to glue onto the front of the wall, to make the bricks 3D.
3. Once I've cut out the bricks, the remaining negative space is the shape of the mortar. It's one large piece and several smaller ones. I can trace these onto the front and back surfaces of the wall so I have a guide for where to glue all the individual bricks. Then this mortar shape can be discarded.
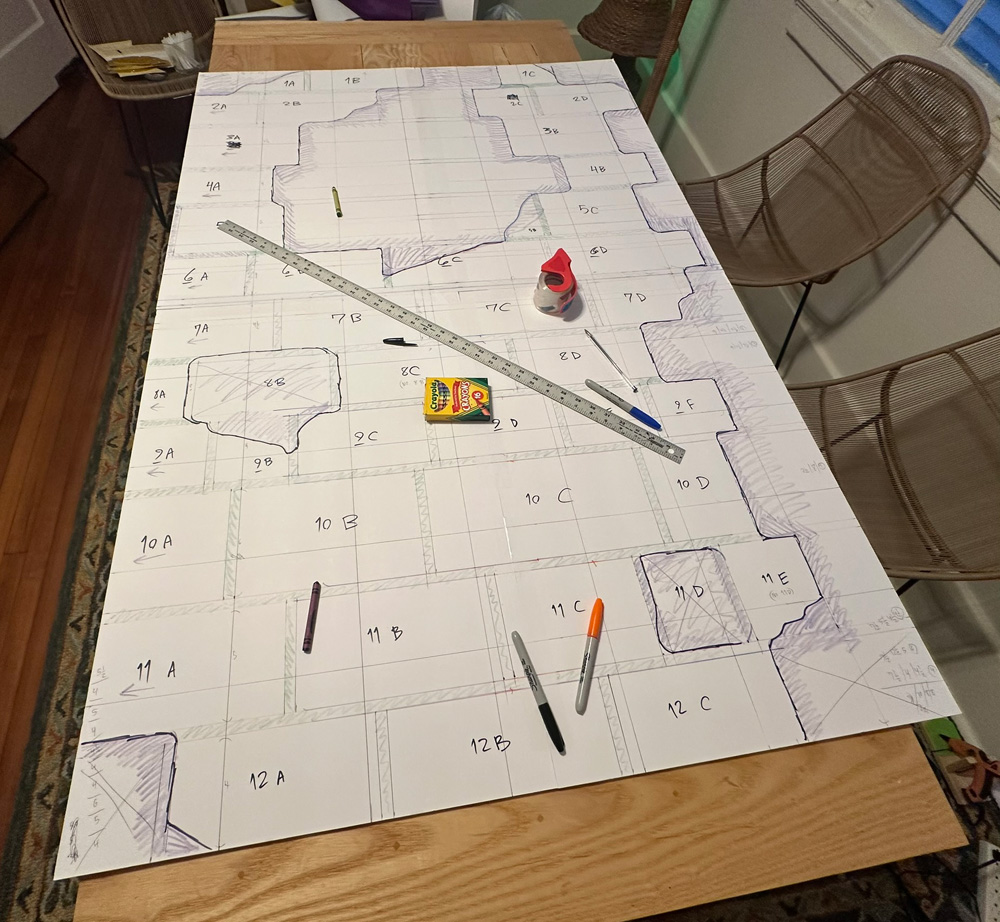
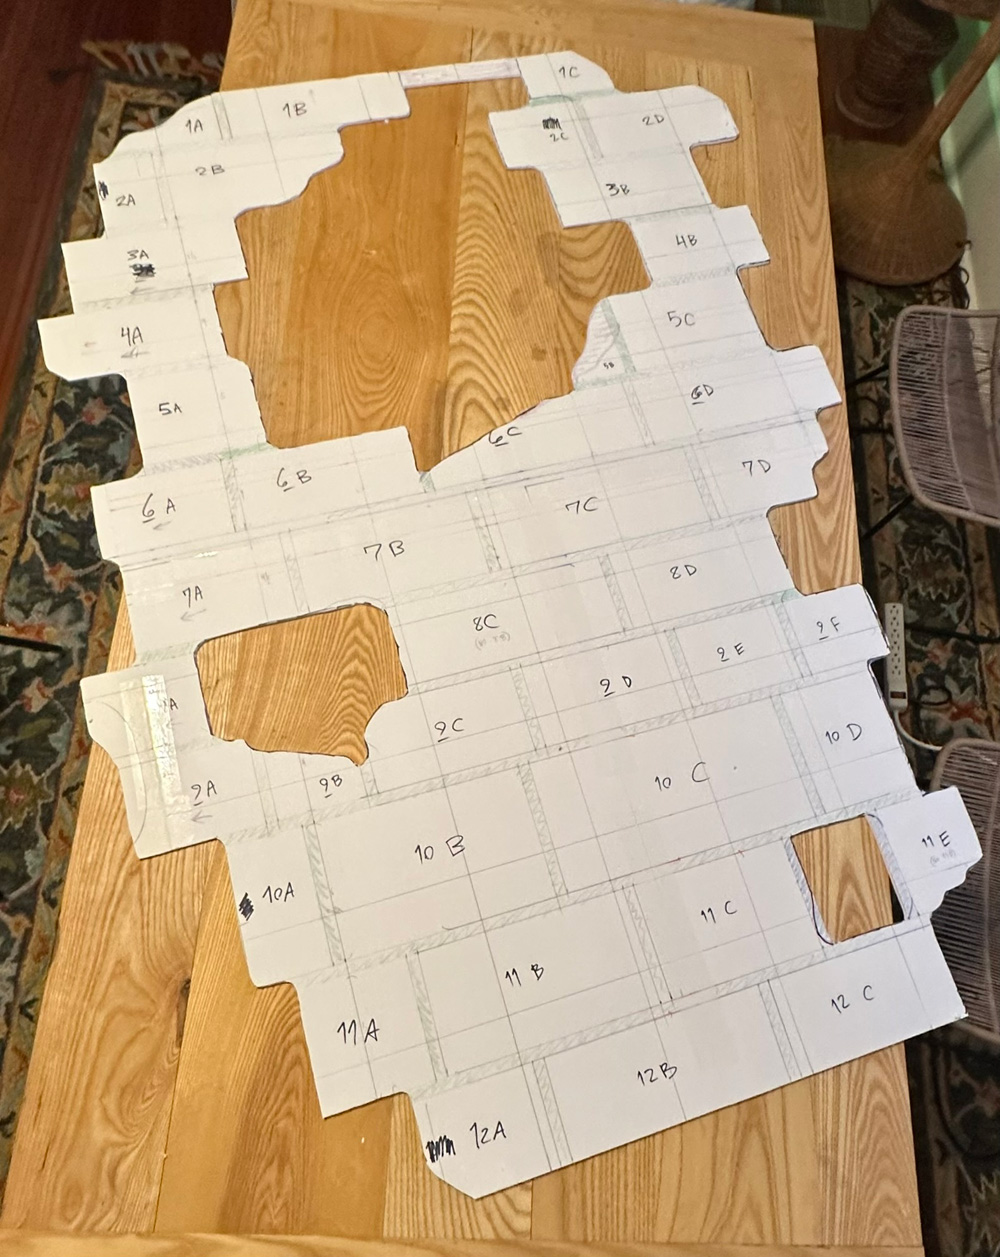
So, I used my Photoshop file and a ruler to transfer the drawing of the wall onto one of these big foam board panels at the correct dimensions. I drew the shapes for all the bricks and the mortar. Then I used my X-acto knife to cut off everything else; all the parts that make up the negative space outside the wall.
I traced this wall shape onto the other two panels, cut them out, and set them aside.
Back to the drawing. I put letters and numbers on all of the bricks so I could keep track of which is which, and also to note which side is the front. I cut out all of these bricks shapes, leaving the lines for the mortar. I set those aside for later.
I then traced all of the bricks onto sheets of craft foam (colorful 2mm EVA foam) and cut those out. These will be for the back surface of the wall, which will be much flatter than the front. I lettered and numbered these too, of course.
I set all the bricks aside, and then I traced the mortar shapes onto the front panel for the wall. These lines will be my guide for gluing the foam board bricks in place.
For the back panel, I flipped over the mortar shapes and traced them onto the back surface. These lines will be my guide for gluing on the thinner craft foam bricks later on. At this point I was done with the mortar shapes, so I trashed 'em.
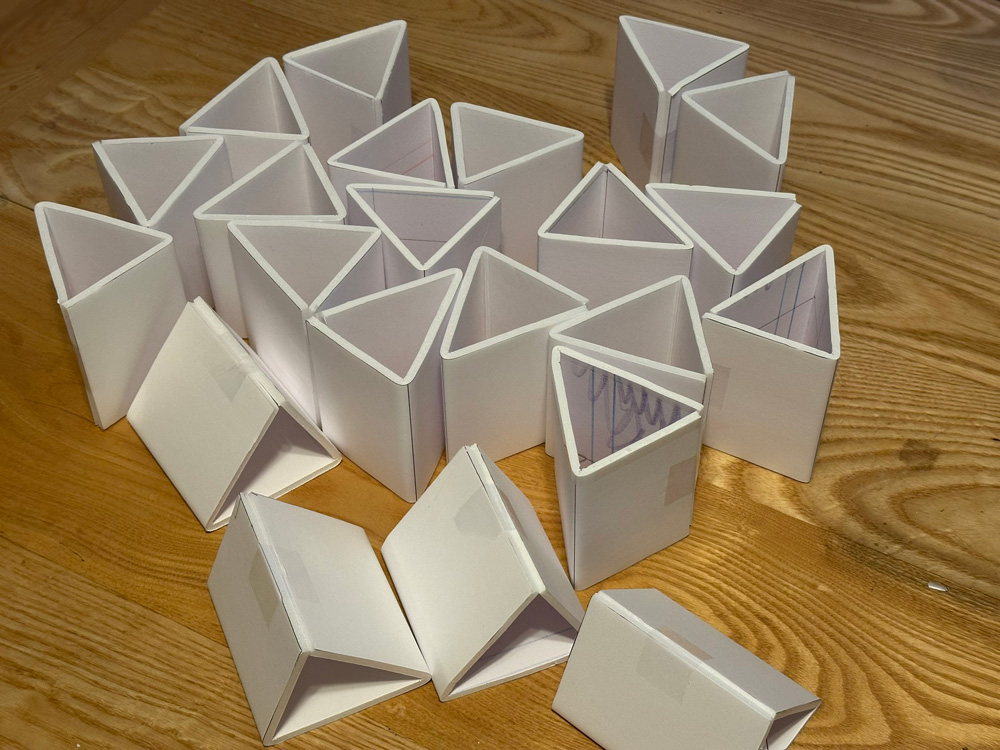
Next, I built a ton of little triangular supports out of foam board. I'll use these to hold the front and back panels of the walls apart at the right distance; four inches in this case. I cut these shapes out of foam board, folded them, and taped them closed.
Soon I would hot-glue these supports all over inner surface of the back panel of the wall. But first...
The box shape of the wall is going to have four objects that need to poke all the way through it: the post where I'll hook the wall to my chest, the support a bit lower down that will hold the wall against my waist at the right distance, and the two handles at the sides for my hands. I did some measuring and some Photoshopping and some trial and error with holding the wall panel up to my body to determine exactly where these things will need to go. I marked those locations with a pen, and I cut out these four rectangular shapes from both the front and back panels of the wall.
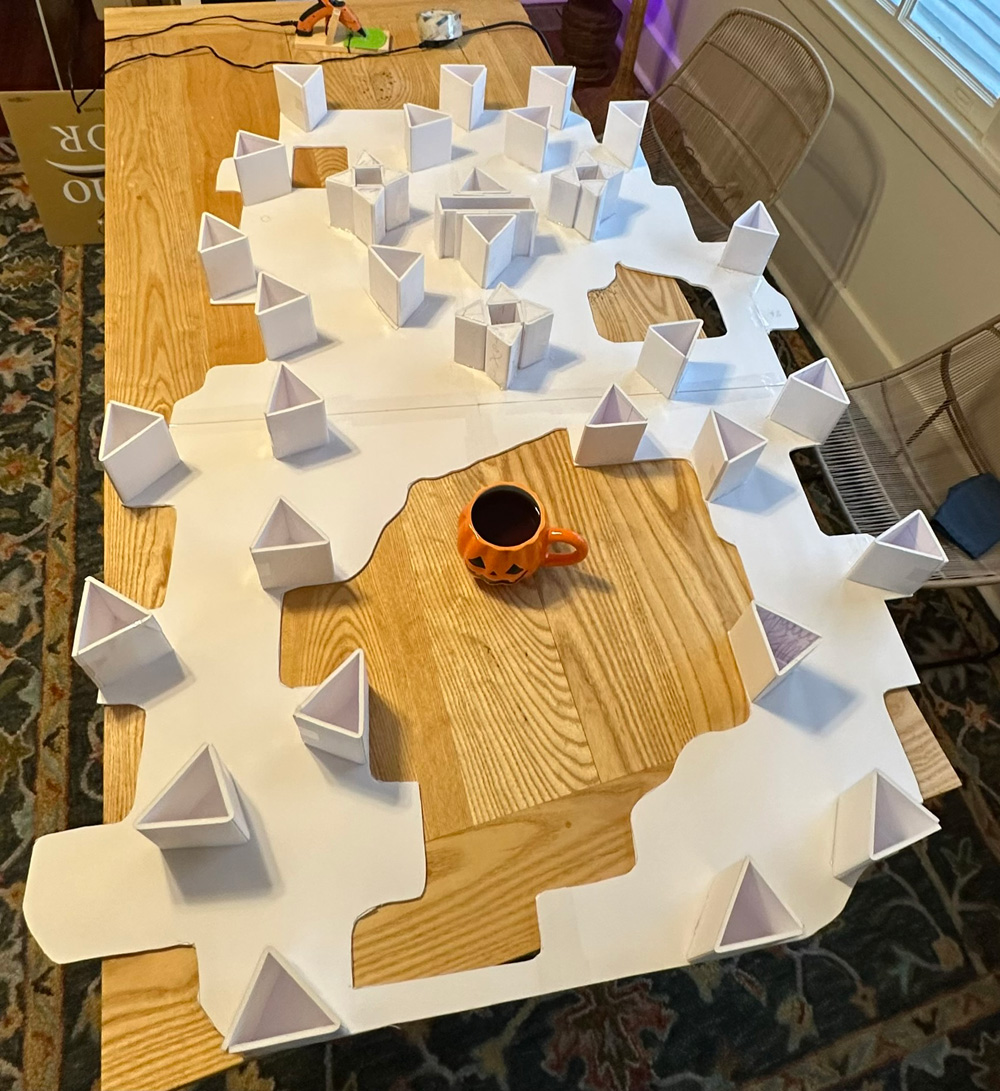
I hot-glued all the triangle supports in place on the inside surface of the back panel of the wall. I also built some extra shapes to protect the holes where the handle and things will poke through; I want those areas to be extremely strong.
Next, I built up most of the outer edges of the wall using tons of little pieces of foam board; all four inches tall, like the triangular supports. I left the curvy areas open; I'll cover those with other materials later.
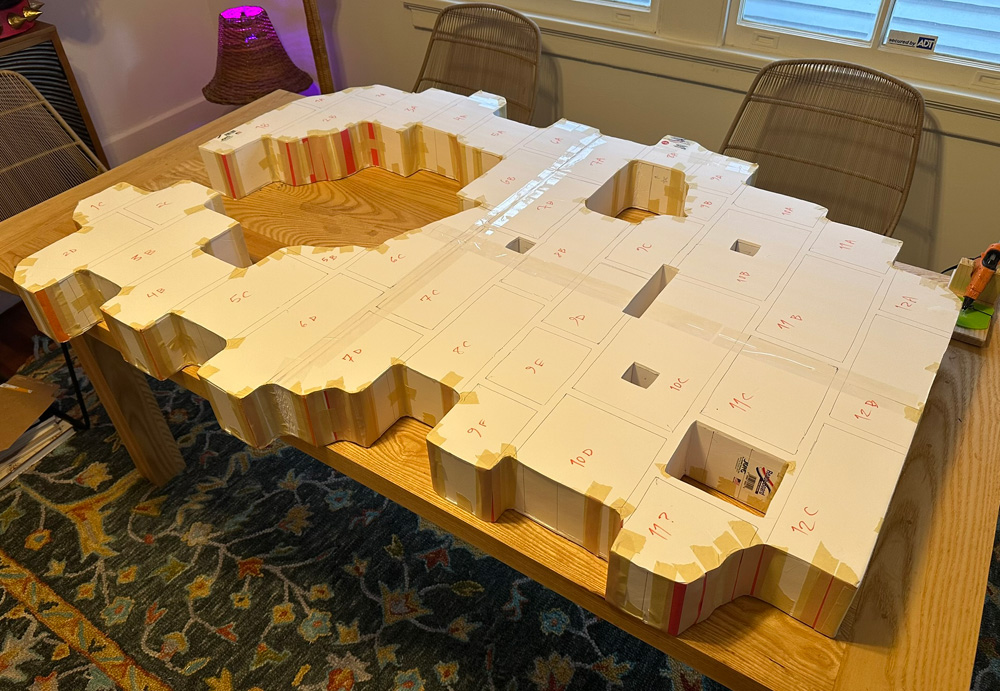
Then it was time to glue the front panel of the wall onto all the triangular supports using drops of Gorilla Glue. I used Gorilla Glue for this because it takes a long time to set, which gave me plenty of time to slide the front panel around and get it into exactly the right position. So, I put some big drops of Gorilla Glue on all the triangular supports, and I did not put any on the outer edges, because this glue expands a lot as it sets, and if I put any on the outer edges it would definitely expand and drip onto the outside edges of the wall.
After I laid the front panel onto the supports and slid it around to get it into the right position, I used some masking tape to quickly lock the panel in place. Then I set some books on the panel and let the Gorilla Glue set for a few hours.
The books are important because, like I mentioned, Gorilla Glue expands a huge amount as it dries, and it can push your objects apart if they're not weighted down with something.
A few hours later, I removed the books, and then I completed the outer edges of the wall with a few different materials: Some panels of foam board and hot glue for the larger open areas, and some bits of construction paper and masking tape for the more narrow and curved open areas.
Bricks
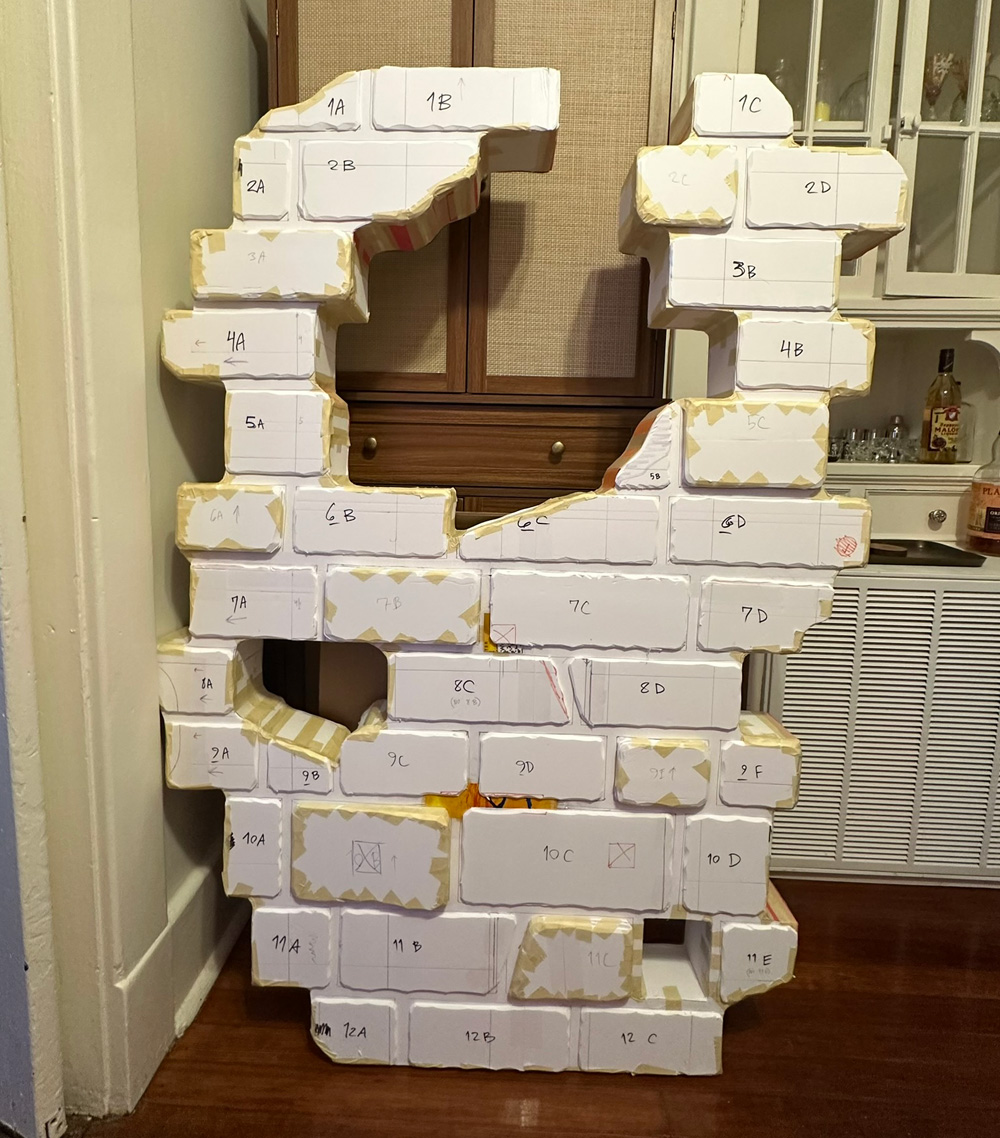
I grabbed that pile of foam board bricks and laid them in place all over the front of the wall, using the letters and numbers to make sure each went in the right place. I decided on a few of them to make a lot thicker, to look like the bricks are poking out. I grabbed those and traced some more foam board copies and cut them out, and then I stacked those up and taped them together. Then I hot-glued all the bricks onto the front panel of the wall.
Then I flipped the wall over and hot-glued all the thinner craft foam bricks on the back side. I had to trim some of these to fit around the holes for the handles and supports that will be sticking out later, of course.
On the front of the wall, I used foam clay to build up the front surfaces of the bricks a bit, to make them bumpy and irregular-looking. We're talking, tiny pieces like the size of a penny, haphazardly squished in place. I let the clay set for a few hours, and then I covered it with masking tape, to smooth it out a bit. You can see the bumps in the next pic.
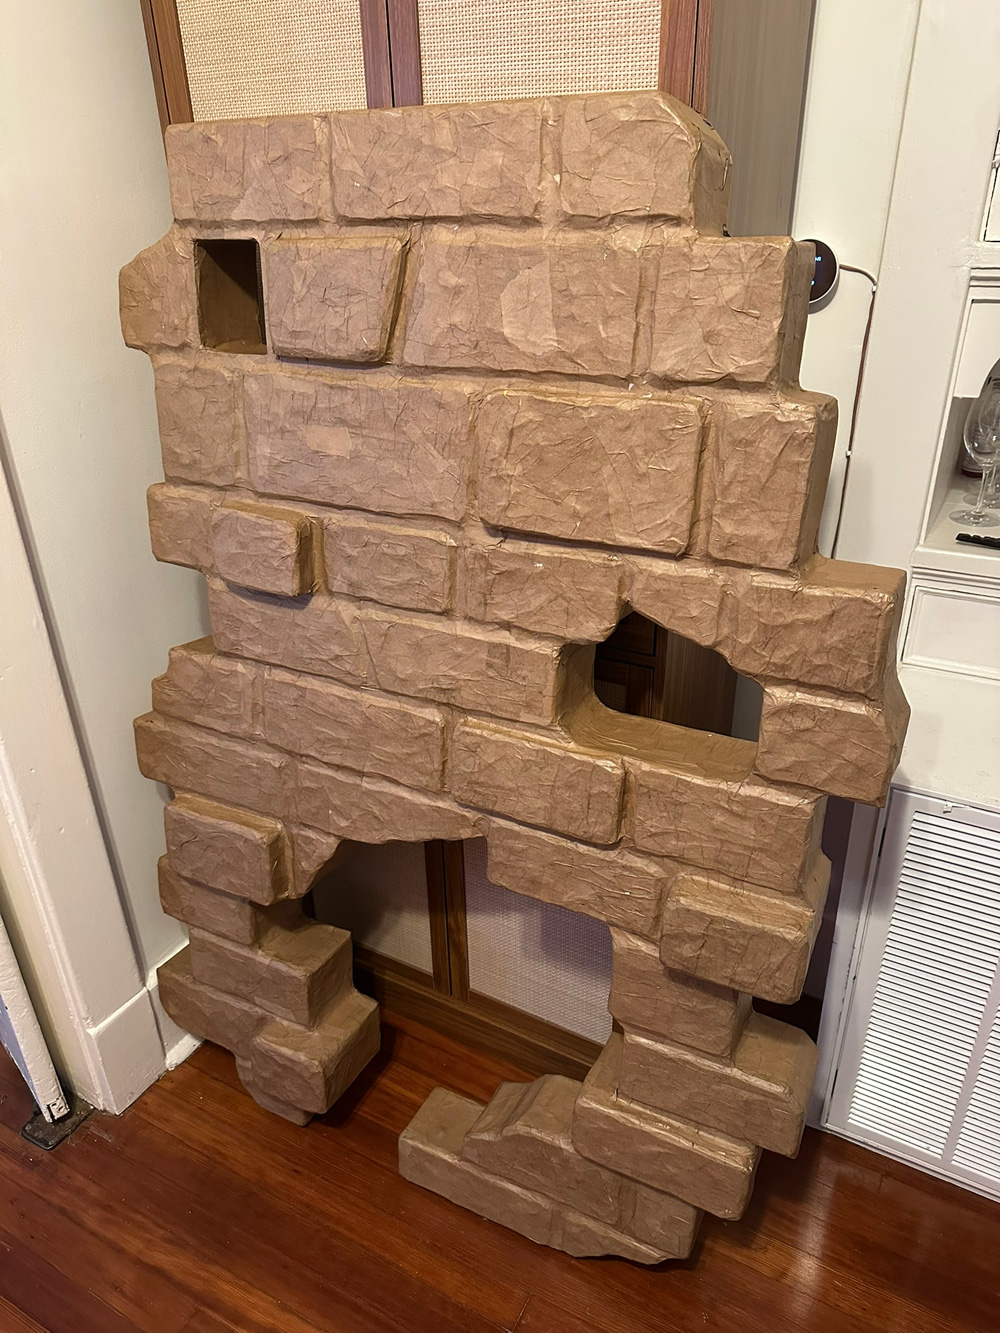
Then I covered the entire wall with two layers of paper maché. This is mainly just to give it a nice uniform surface for painting.
Handles and supports
As I mentioned above, the wall has four objects that poke all the way through it: the post where I'll hook the wall to my chest, the support a bit lower down that will hold the wall against my body at the right distance, and the two handles at the sides.
I wanted to come up with a system where these supports would all be removable, for easier transport. The idea would be that on Mardi Gras morning I could take the wall and supports out of my car and quickly assemble them. If all the supports were permanently attached, the wall would be a much more awkward shape and it wouldn't fit in my car as well — we have to pack a lot of other things in there for Mardi Gras morning.
I initially wanted to come up with some sort of system involving wires and stuff so I could stick the supports in the holes and then lock them in place by wrapping the wire around. I ended up doing something much simpler: I just made the supports fit the holes as tightly as possible so they stay put with just friction.
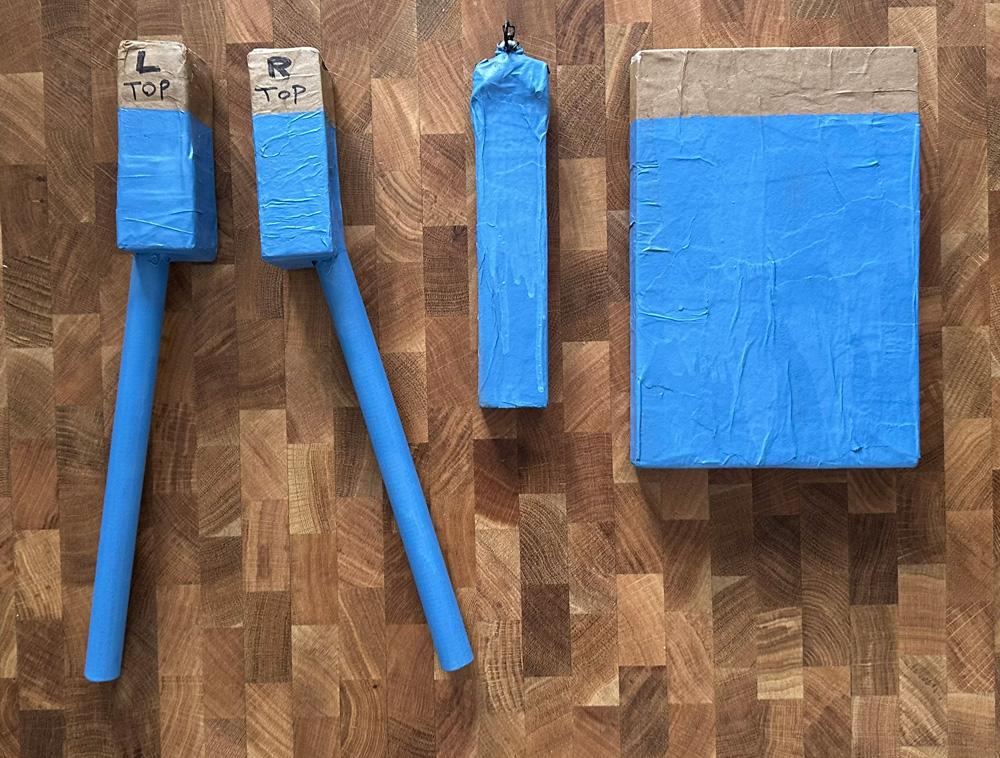
I made the supports out of different materials: The thing that connects to my chest is a piece of wood with a thick eye screw in the end with a tiny carabiner on it. The thing that pushes against my waist is just some layers of foam board put together to make a thick rectangle, which I covered in paper maché. The handles at the sides are thick wooden dowels which I've embedded into basically little foam board boxes that fit into the holes in the wall; you can see I designed these so the dowels are pointing outward a bit. All of these pieces are covered in two layers of paper maché.
Painting
I applied a coat of Mod Podge to the wall to smooth out the surface a bit. I always mix a few drops of paint into the Mod Podge so I can more easily see where I've covered.
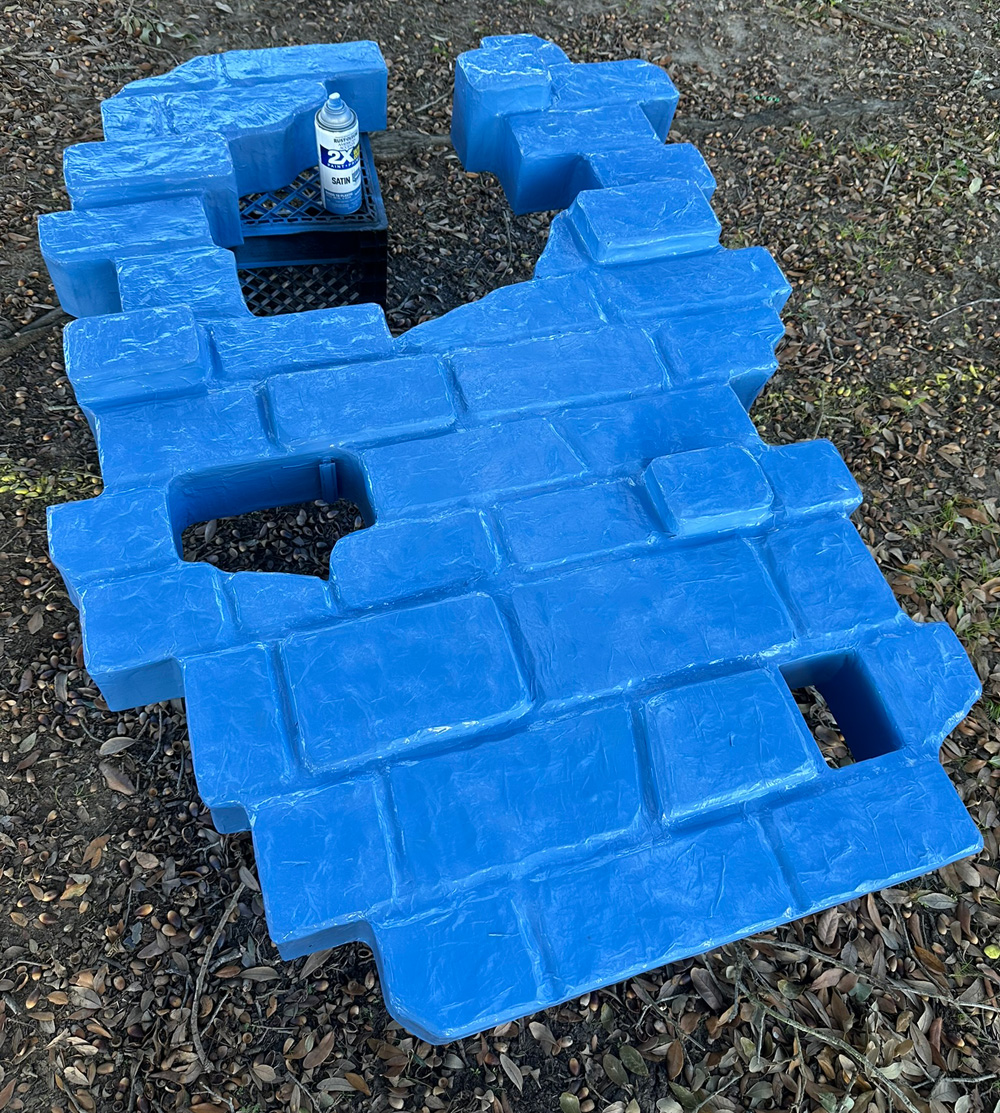
Then I spray-painted the wall blue. After that was 100% dry, I painted the bricks very roughly with some different mixtures of acrylic paint.
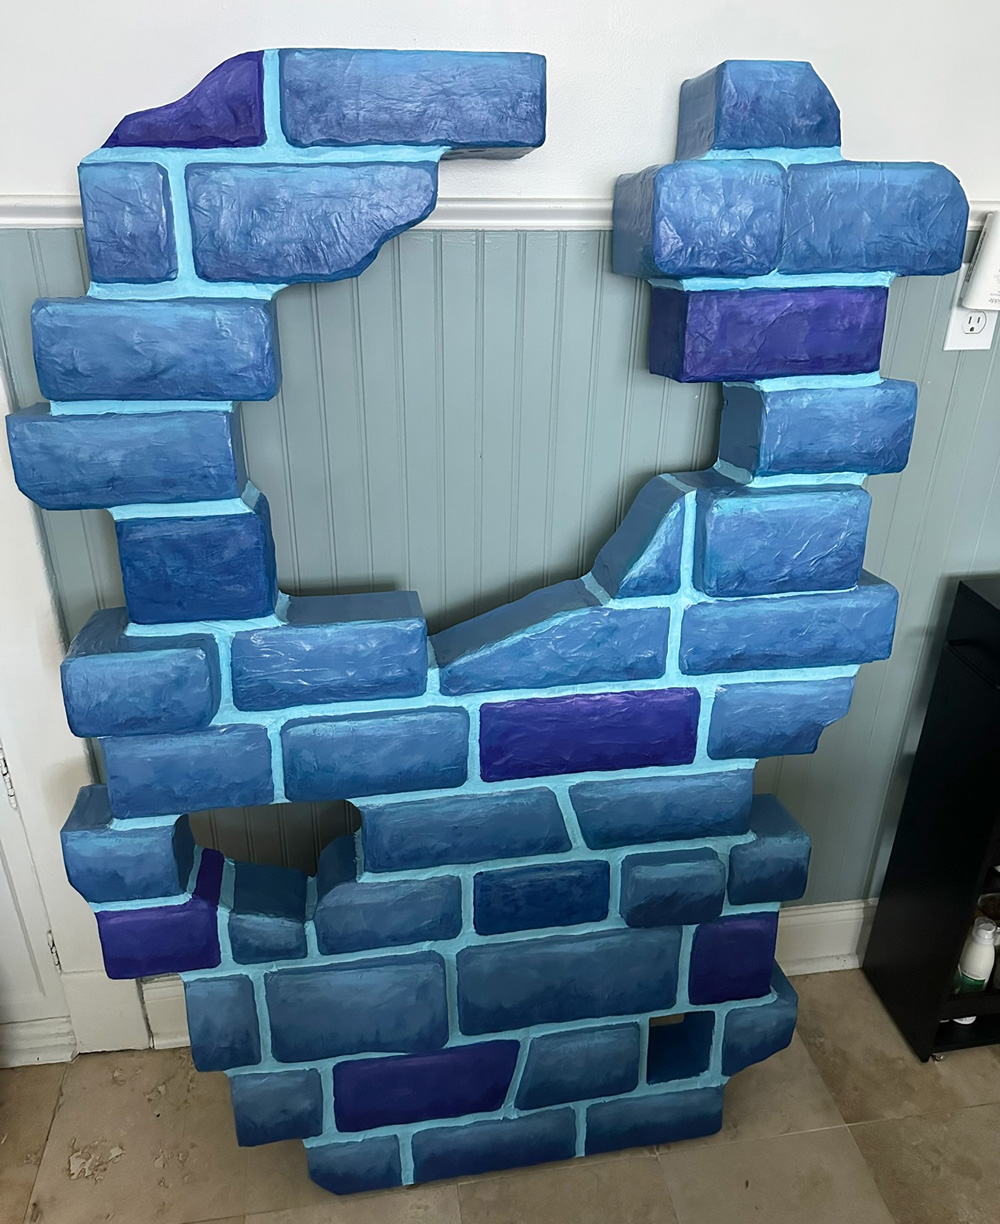
Last step, I painted all the mortar with acrylic paint; lots of steps, lots of different mixtures of slightly lighter and darker colors, and slightly warmer and cooler colors, to create some variety.
Wearing the wall
I used two nylon straps with plastic buckles to create a sort of harness that goes under my clothes. One strap goes around my chest, and the other one is like a necklace that goes down and connects with the first one. Where the two meet, in the middle of my chest, I attached a big keyring. The idea here is that, in theory, this central point can't move too much. The strap around my chest prevents the keyring from pulling forward, and the strap that's like a necklace prevents the keyring from pulling downward. So, to wear the wall, I just have to pick it up and connect the carabiner on the main support on the wall to the keyring in the middle of my chest. (And the keyring just sticks out between two of the buttons on my shirt.)
The wall is pretty darn lightweight and pretty easy to pick up and put on, and it's surprisingly easy to walk around in. The weight of the wall is supported on that main connection at my chest, and the support below that presses against my waist, which prevents the wall from leaning forward. I can hold the handles at the side to "steer" the wall however I want; it's fun to walk around with it and make it wobble and tilt left and right.
This thing worked out pretty well! It was actually easier to wear and walk with on Mardi Gras day than I expected. It was a little difficult to put on, especially while wearing my mask; with the mask on, I couldn't see my hands right below my face when I was trying to connect the carabiner on the wall to the keyring on my chest. (And drinking didn't help!) Not a huge problem though; I managed.
Next: the zombie hands for the wall, the bottle of amontillado, and my colorful Fortunato suit...