
Fortunato (zombificato) mask, part 1
Published July 12, 2026
For Mardi Gras 2026 I made a costume of Fortunato from The Cask of Amontillado, with the twist that he's become a zombie and he's smashed his way out of his prison and is walking around with a broken brick wall stuck to him. Fun! ("Zombificato" is my cute translation of "zombified" into Italian; it may or may not be correct, but it rhymes!)
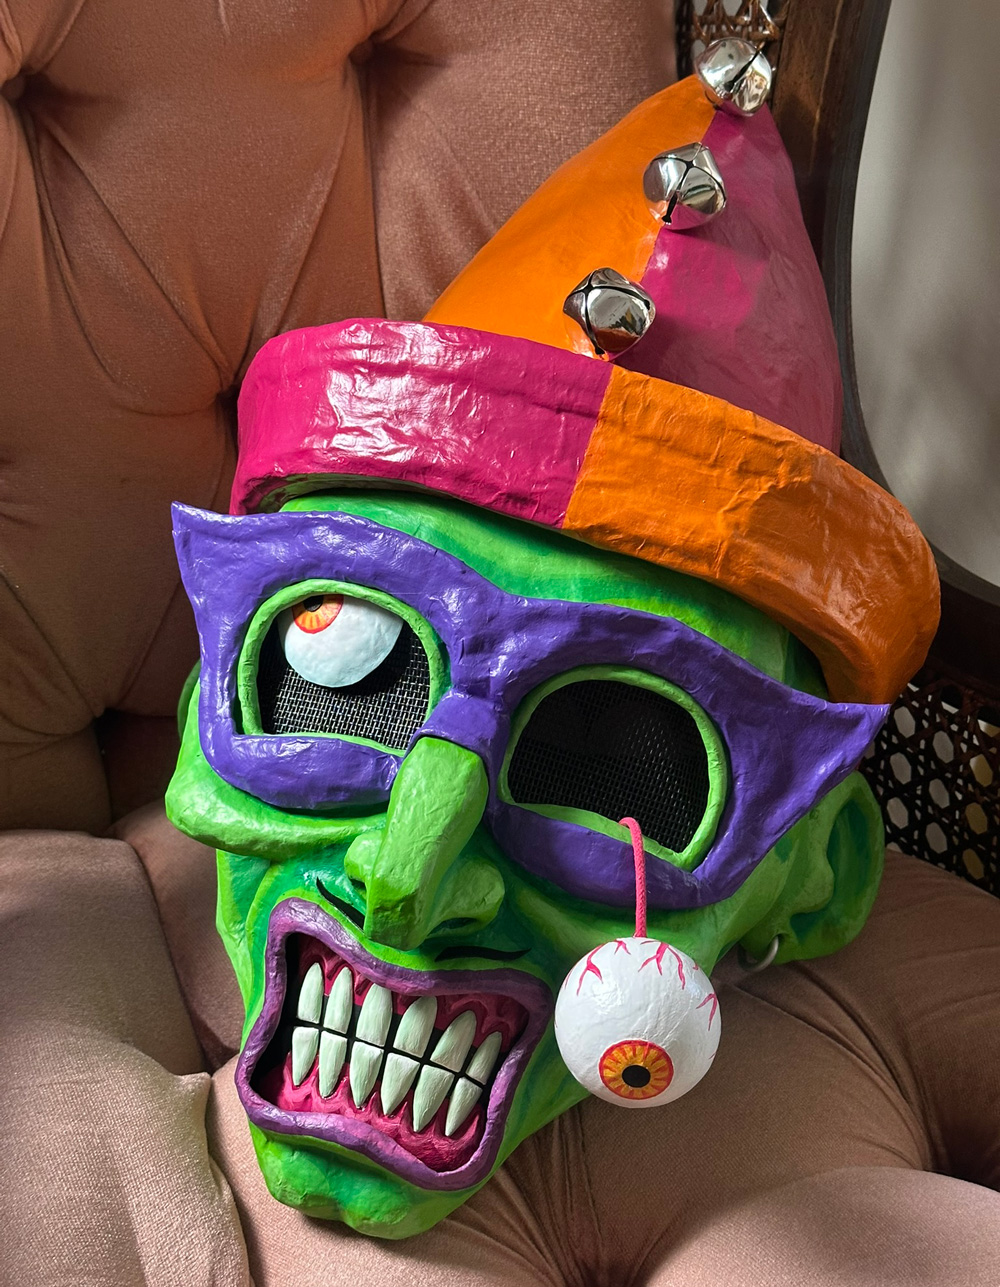
I started with the mask. This was actually my first time making a somewhat normal human being mask, like with regular human features. For instance, I'd actually never made a mask with a proper human nose before! Nostrils are complicated! Same for ears. I sure did learn some neat things on this project.
Foam board armature
Last year for my gargoyle mask I made up a method for designing and assembling a foam board armature that helped me keep all the pieces symmetrical and aligned correctly. I did something similar this year, but I figured out a way to simplify the process slightly. This all might be boring, so feel free to skip this part! I mean, you can do whatever you want!
The head armature is assembled from a bunch of foam board slices that are basically cross sections of the profile of the head; the full profile shape is the middle slice, and then the other slices get smaller as they go out toward the sides.
I designed the head shape in Photoshop and worked out the sizes and positions of all the profile slices. I put this onto a grid representing one-inch squares, and I put a four-inch square in the middle of the smallest slice. What's the square for? You'll see.
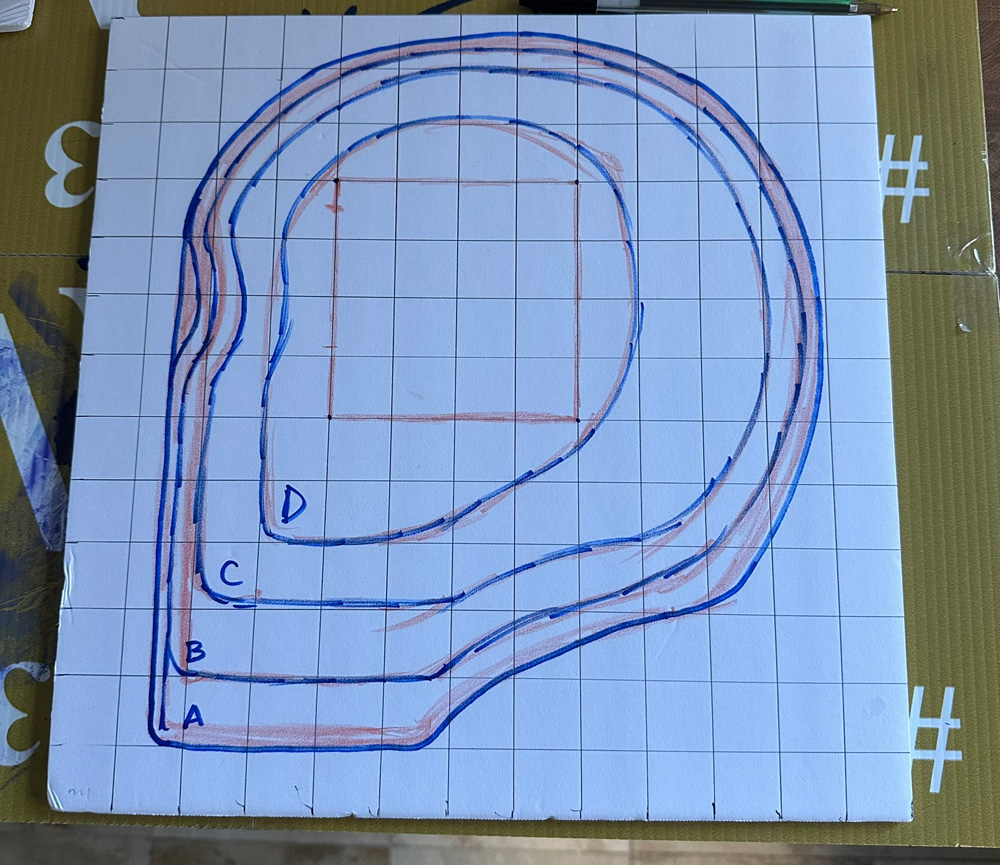
Then on foam board I used a ruler to draw this same grid of squares, and then I sketched all the profile slices onto this grid by eyeballing my Photoshop image on screen. I did this loosely at first with a crayon, and then I redid the lines with a marker. I also drew the four-inch square in the middle.
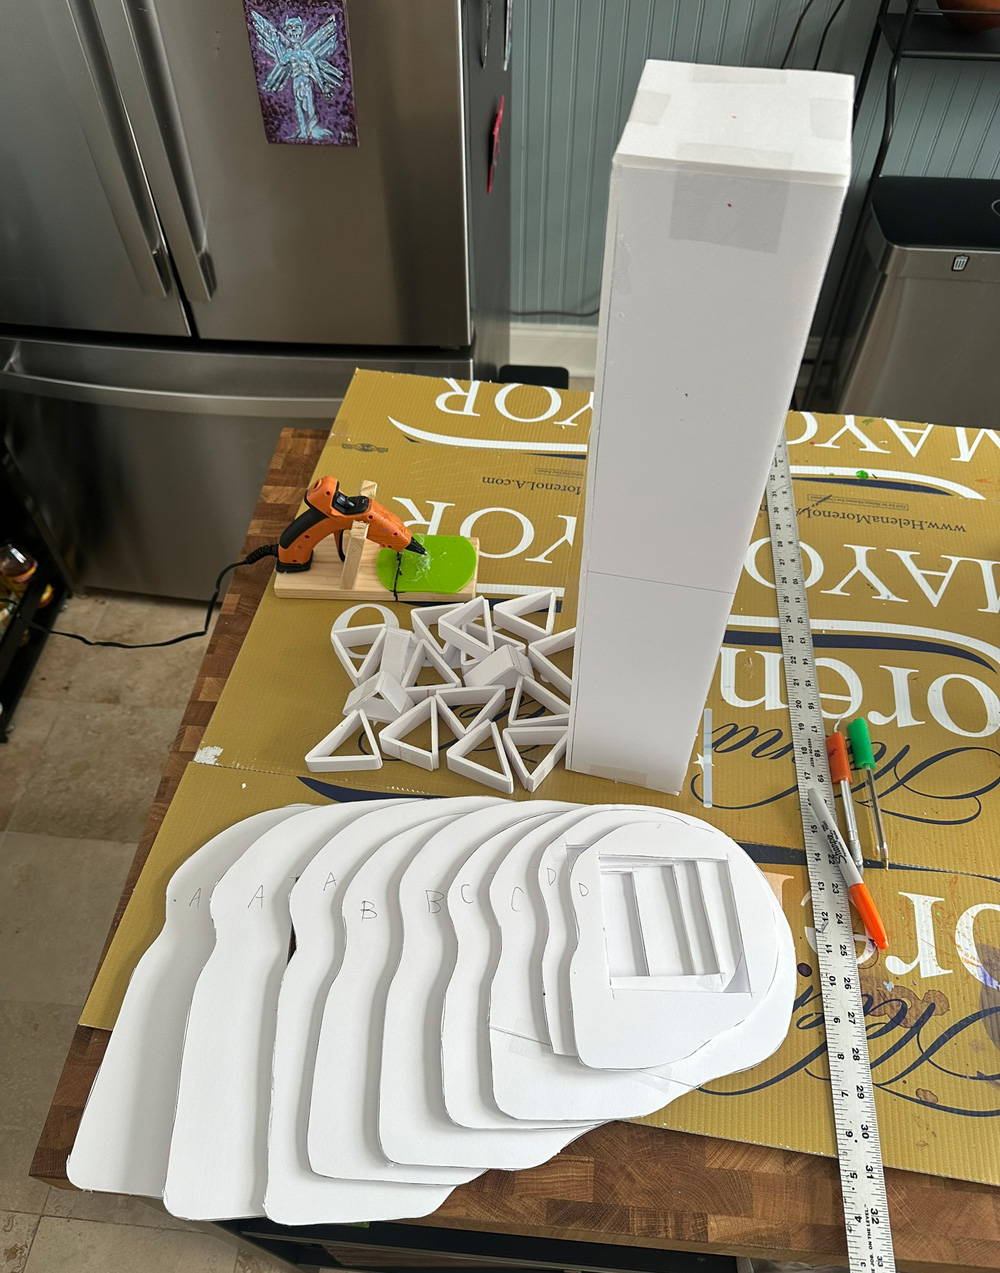
I labeled these slices A, B, C, and D. I cut out slice A, including the square hole, and then I traced and cut out three copies of this slice. Then I went back to my original sketch and cut out B, and then I made two copies of B. Then the same steps to make two copies of C, and two copies of D.
The tower
I built a sort of square tower shape out of foam board; this thing will serve as a central column through all of the head slices, so they all stay (more or less) perfectly aligned as I assemble them. The hole in the slices is four by four inches, so I made the tower just slightly smaller than that. The length isn't important; I left it pretty long to make it easy to work with; I'll cut off the extra bits later.
When drawing the "walls" of the tower, I drew a line on them to mark the center. I'll use this line as a guide for where to place the central slice of the head.
Along with the four walls of the tower, I attached two squares to be the top and bottom; adding these prevents the square shape of the tower from getting squished into more of a diamond shape.
Here's a fun thing: I put a couple handfuls of rocks in the tower before closing up the ends. The weight from the rocks lets me work on the head shape sideways without it falling over, and when I finish with one side of the head, I can flip the tower over and the rocks slide into the other end, so then I can stand it on that end to work on the other side of the head. I feel like a freakin' genius when I come up with techniques like this!
Triangles
I measured and cut out and assembled a bunch of little foam board triangle shapes. These will serve as supports to hold all the head slices away from each other at the correct distance.
Assembling the slices
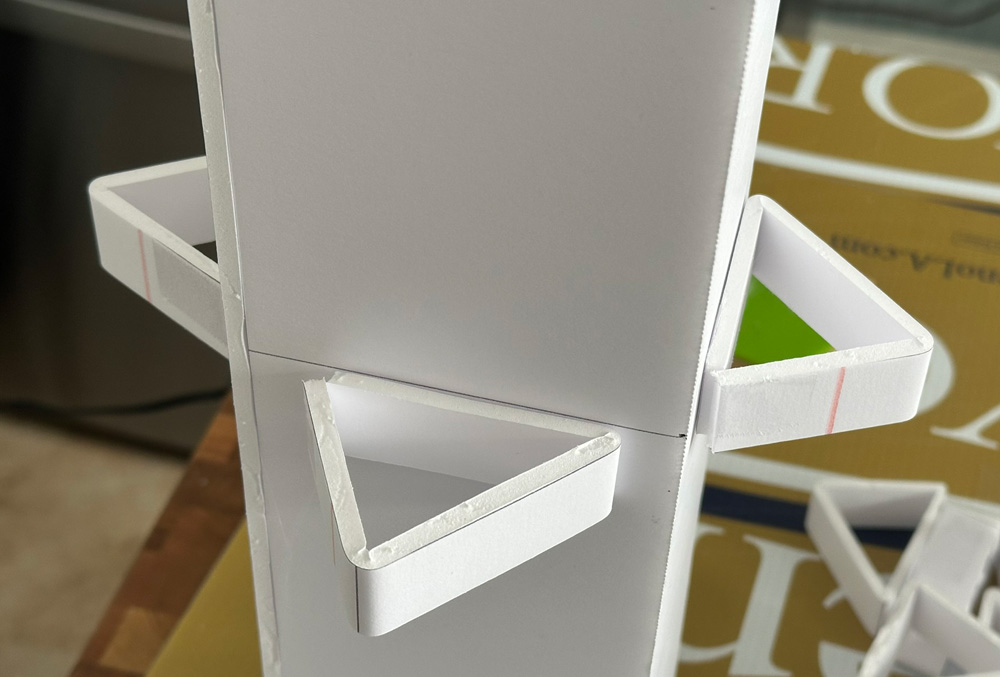
I stood the tower up on its end and hot-glued some of my triangles around it, just below that central line I'd marked. Then I laid the central slice (A) onto these triangles, and I hot glued the slice to the triangles and to the tower.
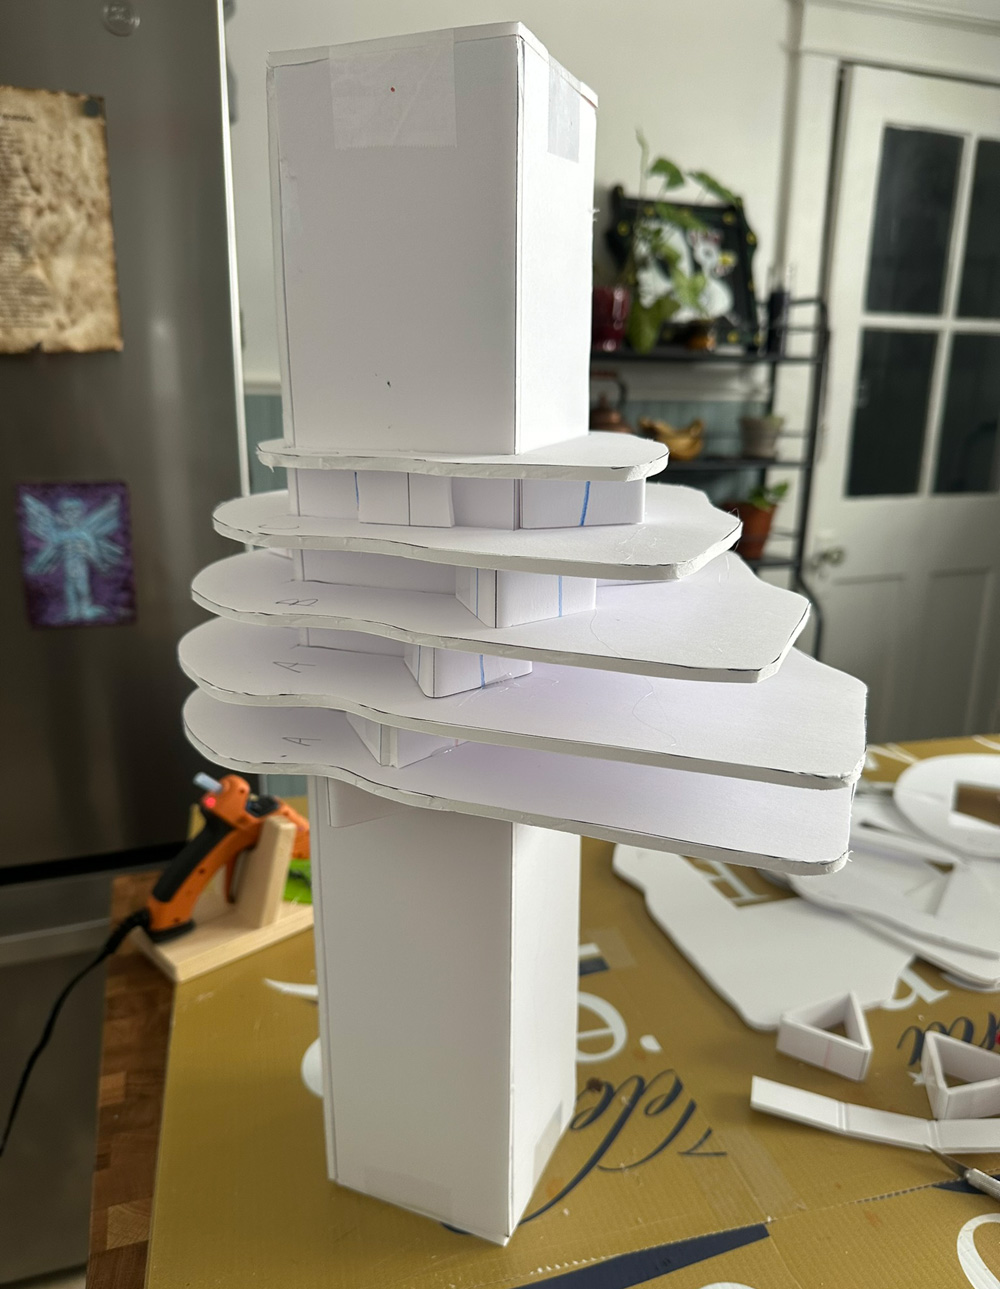
Next, I laid some triangles onto this central slice, hot glued them in place, and then set the next slice (also A) onto here. I hot-glued all the stuff together.
And so on! More triangles, then lay down slice B, and hot glue it in place. Then more triangles and slice C, and then more triangles and slce D. Note, for this last slice, the triangles are too big; they stick out wider than the slice itself. I just trimmed them a bit with my X-acto knife to keep them from jutting out.
That's half of the slices assembled; now I flipped the tower over, let the rocks slide into the other end, and repeated all these steps for the other side of the head.
After assembling all the slices, I added some extra triangles toward the outer edges of the slices, to give them more stability. There's a step coming up soon where I cover the whole head with tape, and if I do that without these additional supports near the edges, the slices tend to lean in toward each other and get squished together a bit as I stretch tape across them. So more triangles means the whole thing is a lot more sturdy while I work on it; everything remains straight and rigid.
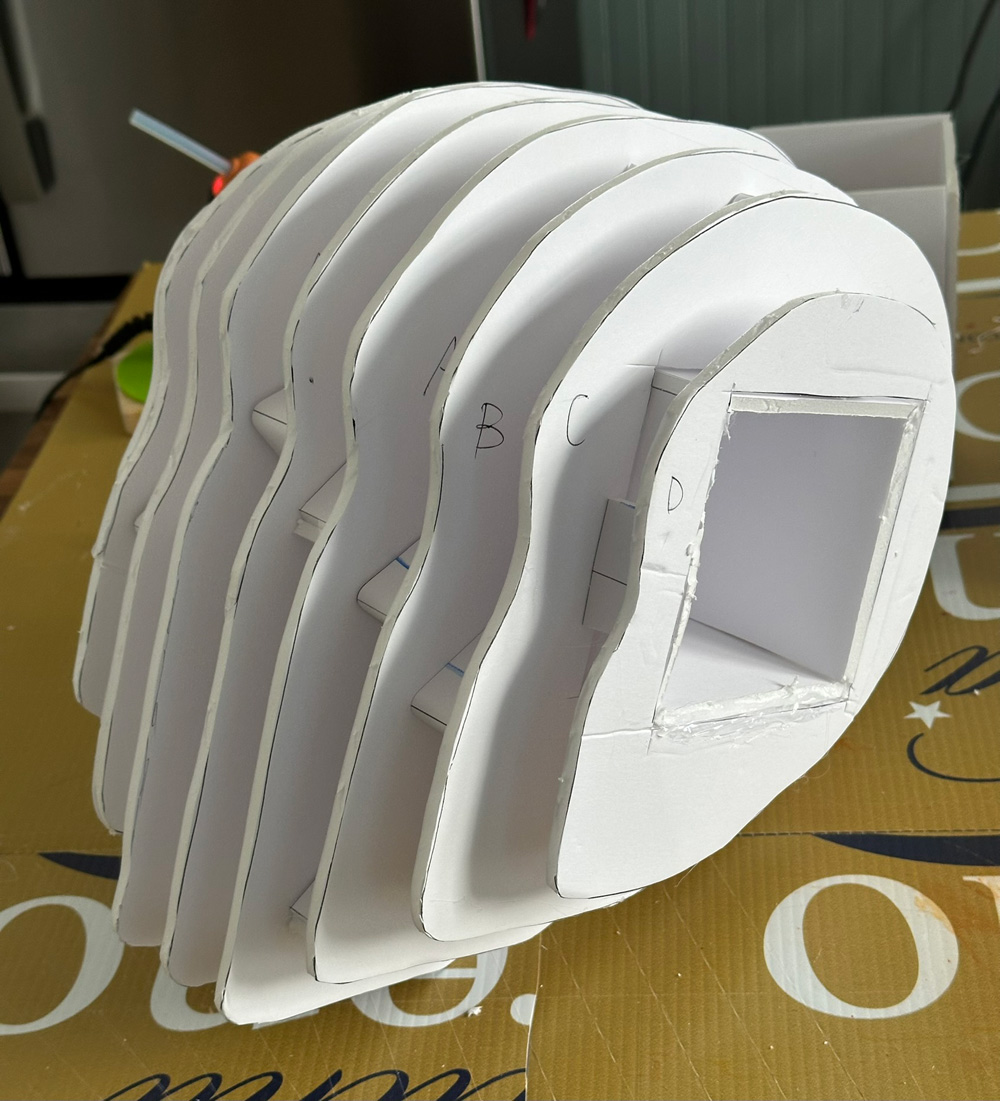
When that all was done, I used my X-acto knife to slice off the ends of the tower that were sticking out from both sides of the head. Finally, something resembling a head shape! The rocks go back in my bucket of rocks.
I wanted to add a little more width to the sides of the head, so I cut out some smaller foam board shapes and hot-glued them in place on the sides, over the square holes.
At this point I looked at my finished armature and thought about where it might need to be adjusted, and I ended up trimming off some pieces here and there with my X-acto knife, especially around the lower-front jaw area, and under the cheeks.
Smoothing out the armature
Next, I did a bunch of steps that I do on just about every one of my mask projects: I wrapped the foam board armature in a few layers of materials in order to smooth out the ridges that are created by the slices.
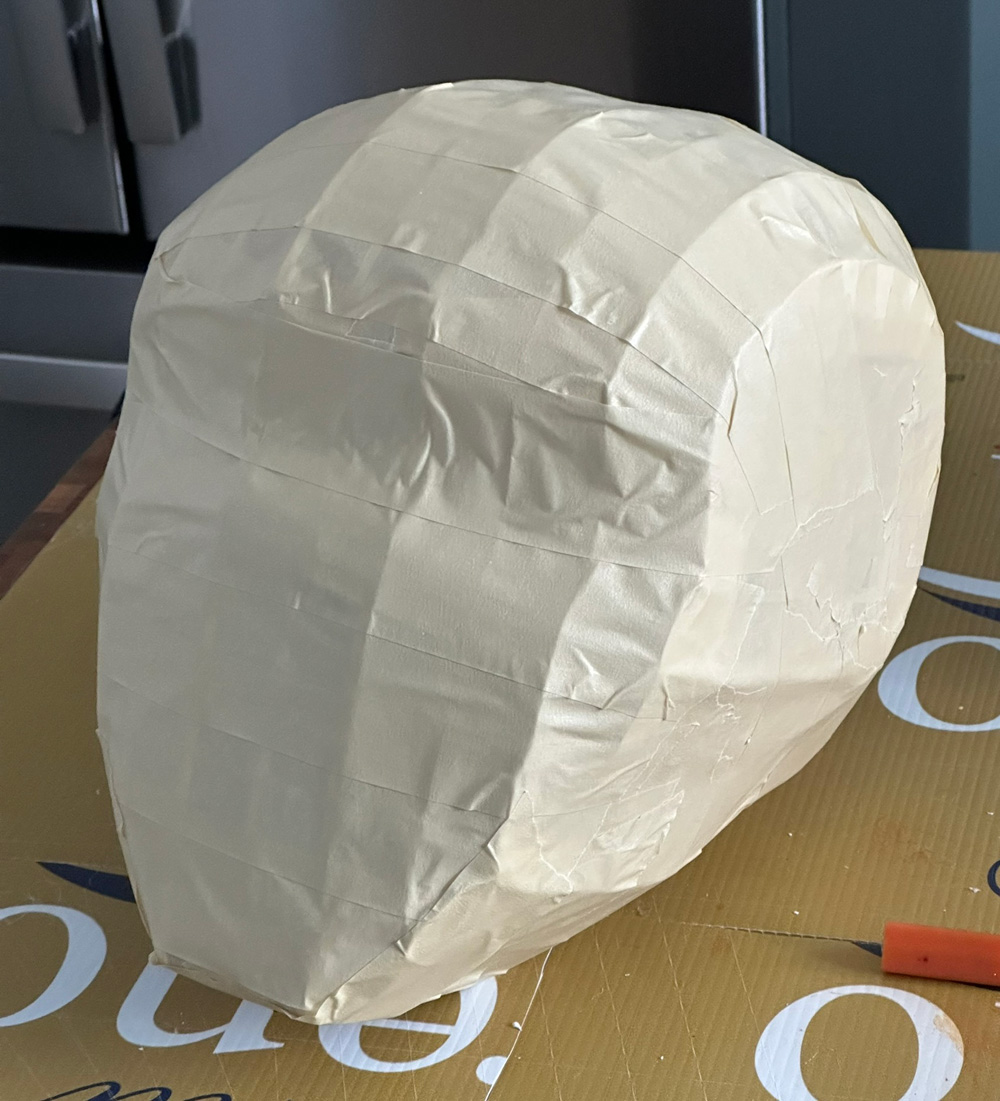
First, I covered the entire head armature with masking tape. Then I covered the head with strips of construction paper, taped in place. The first layer of masking tape gives me a good surface to tape the construction paper strips onto.
Sometimes at this stage I cover the head with a layer of bubble wrap, but I opted not to this time. Instead, I just covered the entire head with two more layers of masking tape. The ridges remain somewhat visible in some places, but the ones in the front are going to be hidden by the facial features, and the ones on the top amd back will be hidden by the hat.
Facial features
Next, I thought about which facial features I wanted to include as part of the initial paper macheé head sculpture, and which ones I wanted to make separately and attach later.
For example, the eye mask, the ears, the eyes, and the gums/teeth will be separate pieces that will get stuck on later. The eyelids, cheeks, nose, lips, chin, etc will be part of the main sculpture.
I drew the eye holes onto the face, and then I drew ridges around them — basically eyelids. I built the ridges around the eyes with thin slices of foam board, and I sculpted the lower eyelids with foam clay.
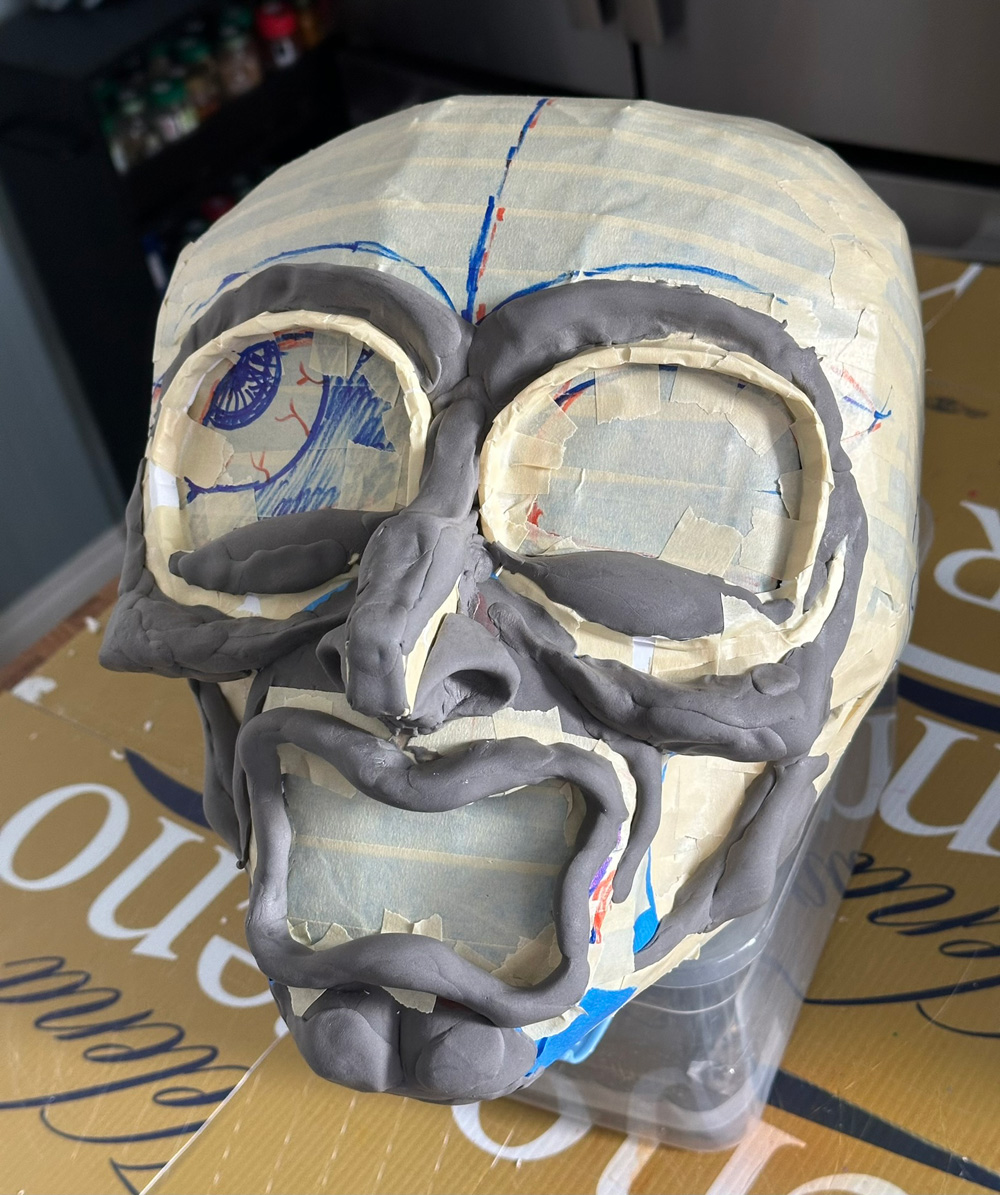
I sculpted the lips onto the head using foam clay. I first built up a small ridge of foam board to define the mouth shape, and to give the foam clay something to hold onto so it doesn't sag while it sets.
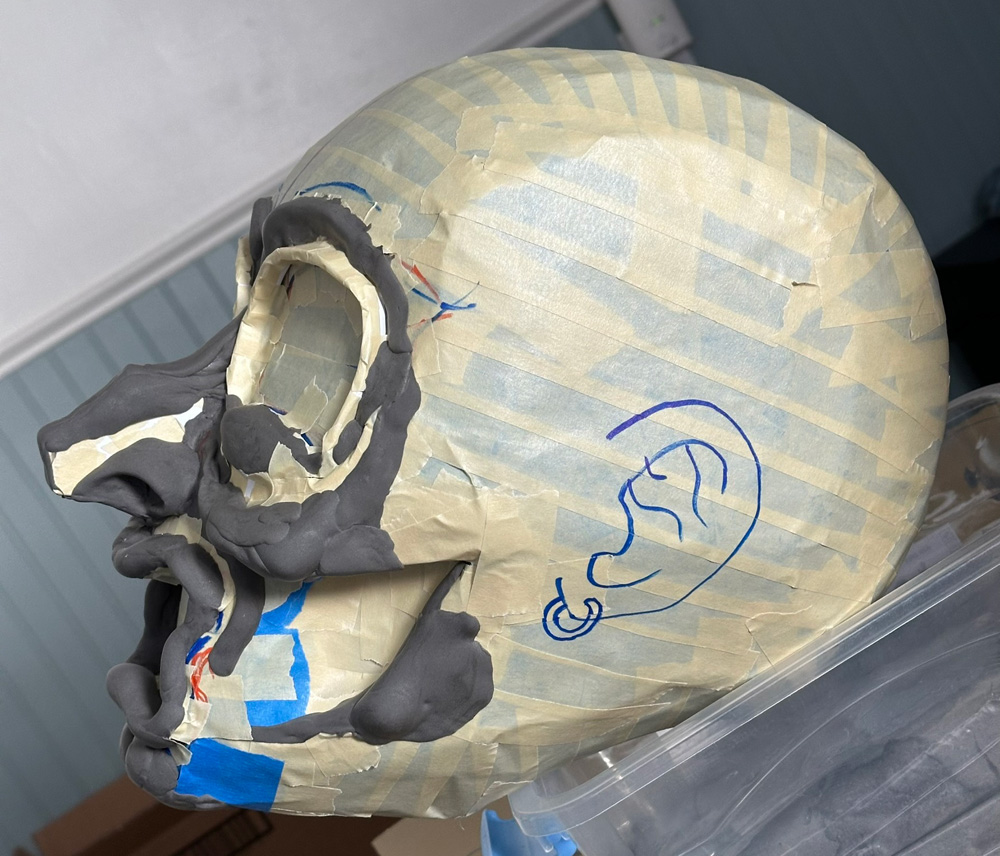
I made the nose from three layers of foam board and, then some foam clay and masking tape.
I built up the cheekbones with some scraps of foam board, which I taped in place and then covered with foam clay and masking tape.
I built up a cleft chin with foam clay and covered it with masking tape.
Modifying the sculpture
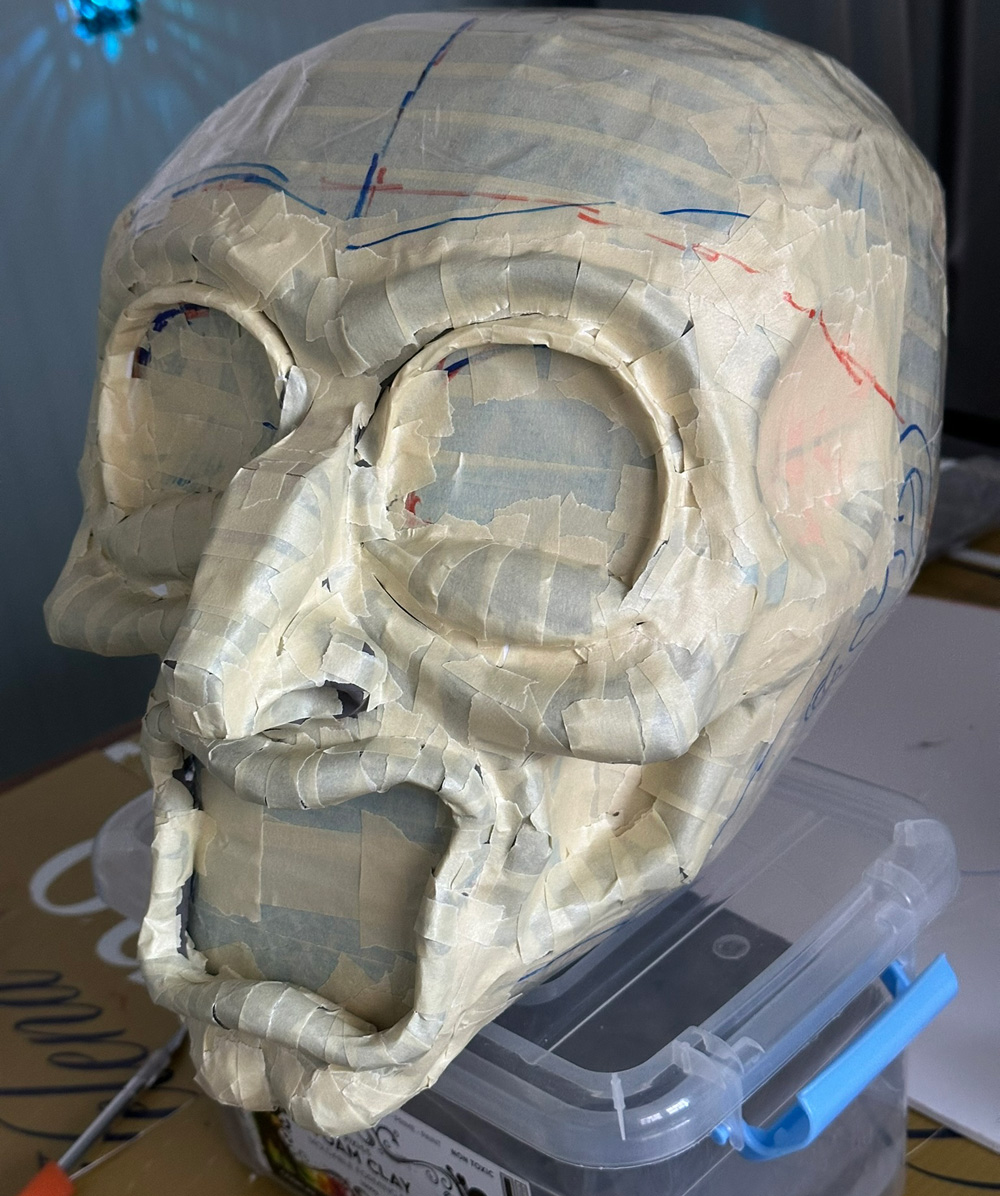
At this point a few things about the face and head were bothering me. The problems, I figured out, went all the way back to the foam board armature; things with the basic proportions of the head. So I took my X-acto knife and performed some surgery. I chopped out some recessed areas under the cheekbones — actually I see I've already done that in the pics above — and I also cut out some areas at the temples. I repaired these areas with foam clay and tape to get them to look how I wanted.
This here was pretty intense: I also cut off the bottom half of the mouth and the chin and moved them down about half an inch. Scary, but it worked out fine. I taped everything back together, and I added a tiny bit of foam clay in the lips, like at the sides where I'd cut them apart.
I ended up reducing the size of the eyes a little bit by removing the ridges and adding them back on a little smaller. I also made the nose a bit bigger, and a little narrower at the top. Lots of little adjustments, all involving some foam clay to build up or fill in some areas, and then masking tape to lock everything together.
Finally, the head itself is ready for paper macheé!
Paper macheé
I covered the head with eight layers of paper macheé over a few days, ending with a layer of white paper bags. You can read about my paper maché process and materials here.
After three layers of paper macheé, I noticed that it seemed like the top of the head flared out a bit too much on the sides. I was worried that this would cause the hat to be very wide and look weird. Once again, this problem comes from the initial base shape, but I didn't notice it 'til now. So, I sliced out some long oval pieces along the of the sides of the head, and then I used my X-acto knife to dig out the foam board and stuff that was underneath. Normally I never adjust anything like this after I've started paper macheé! So, I cut out these two big pieces, covered over the open spaces with tape, and then continued with paper macheé. It doesn't look perfect, but this will all be concealed under the hat; the main thing was making the top of the head less wide, and this was an easy way to do that!
Anyway, I attached the two inside-out pieces with masking tape, and then covered over the whole line around them with two layers of paper macheé, and then I continued with the remaining five layers of paper macheé for the whole head. So, for those keeping score, while most of the head is eight layers of paper macheé thick, these cuts I made ended up having seven layers total (like basically the first three don't count). Not bad, and this will definitely all be strong enough. Whew!
Next: teeth, ears, eyes, hat, painting, etc!