
Jabberwocky relief sculpture!
Published April 8th, 2025
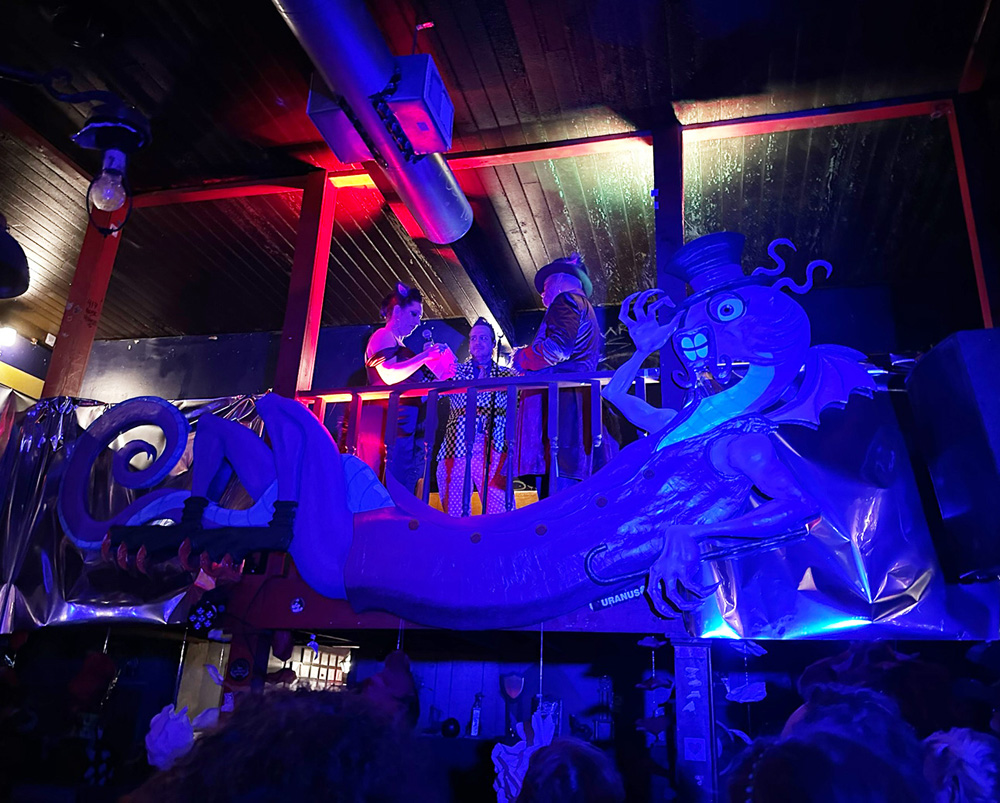
I made this ~13(!)-foot-long Jabberwocky relief sculpture to serve as a decoration the wedding of a couple of dear friends of mine! Here's how I did it!
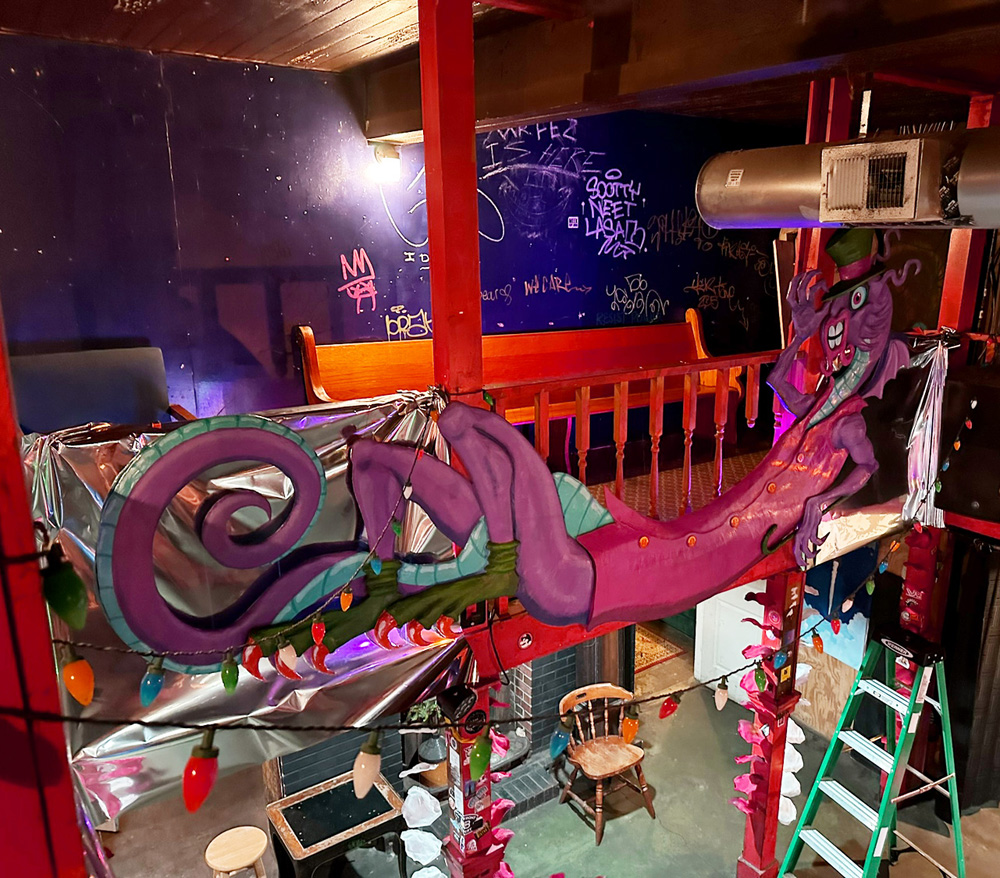
I was asked to make this Jabberwocky to hang along the upstairs railing of the wedding venue, so the first thing I did was meet the couple there and (have some drinks and) look at the space and take some photos. I brought a tape measure and a notebook! I felt like a professional artist! Kind of crazy.
I took a ton of measurements of the railing area and wrote 'em all down. I took photos of the space so I could do my sketch in Photoshop right on that.
Back home I drew the Jabberwocky onto the photo in Photoshop. I sent the sketch to the couple and we agreed on some adjustments. Once that was all settled, I did some Photoshop tricks, and some math tricks, to figure out the exact dimensions that the Jabberwocky would need to be.
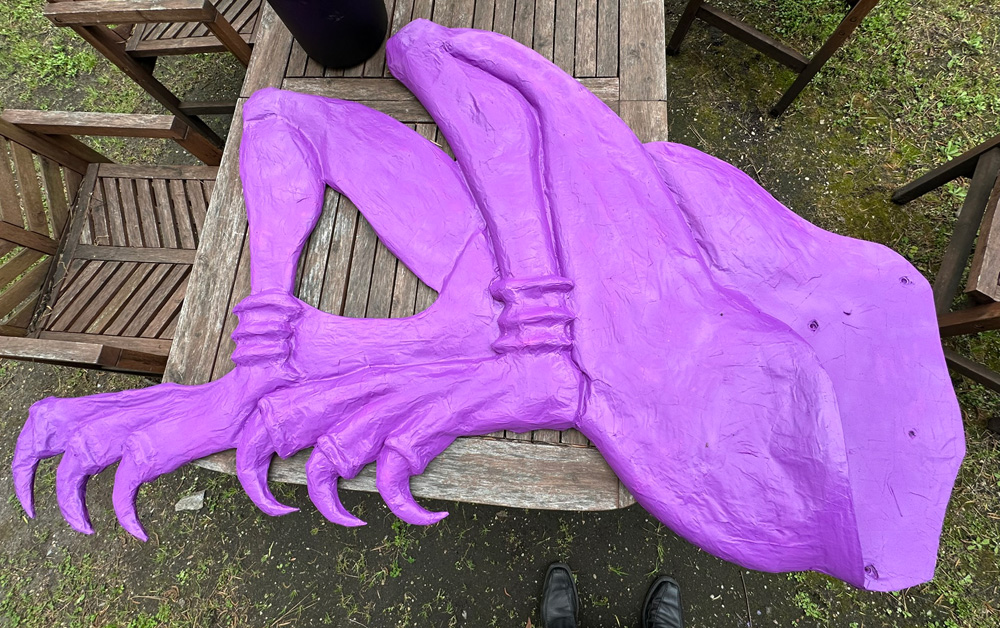
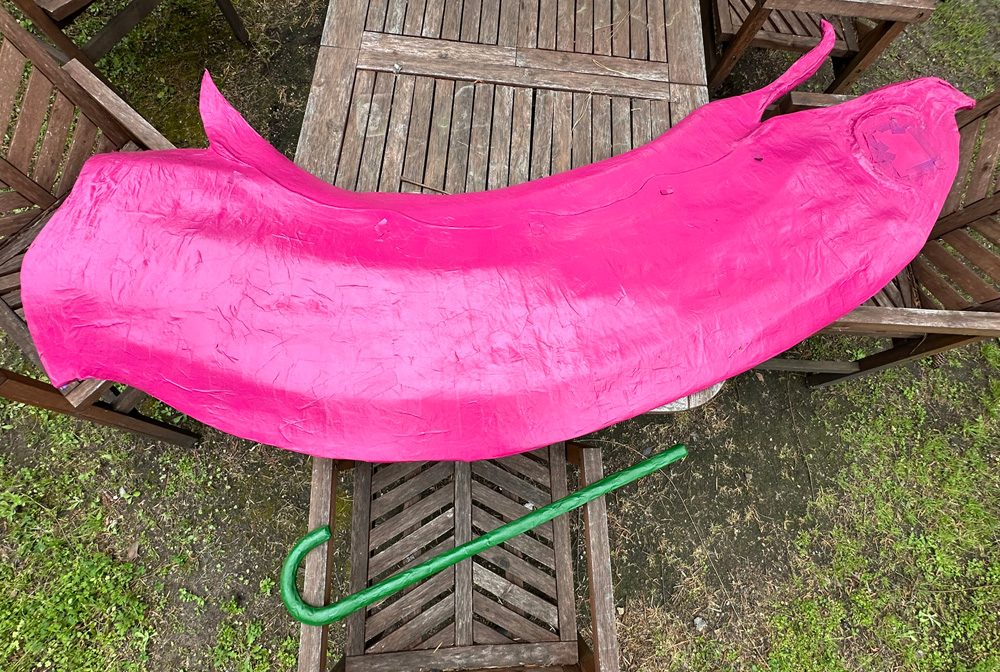
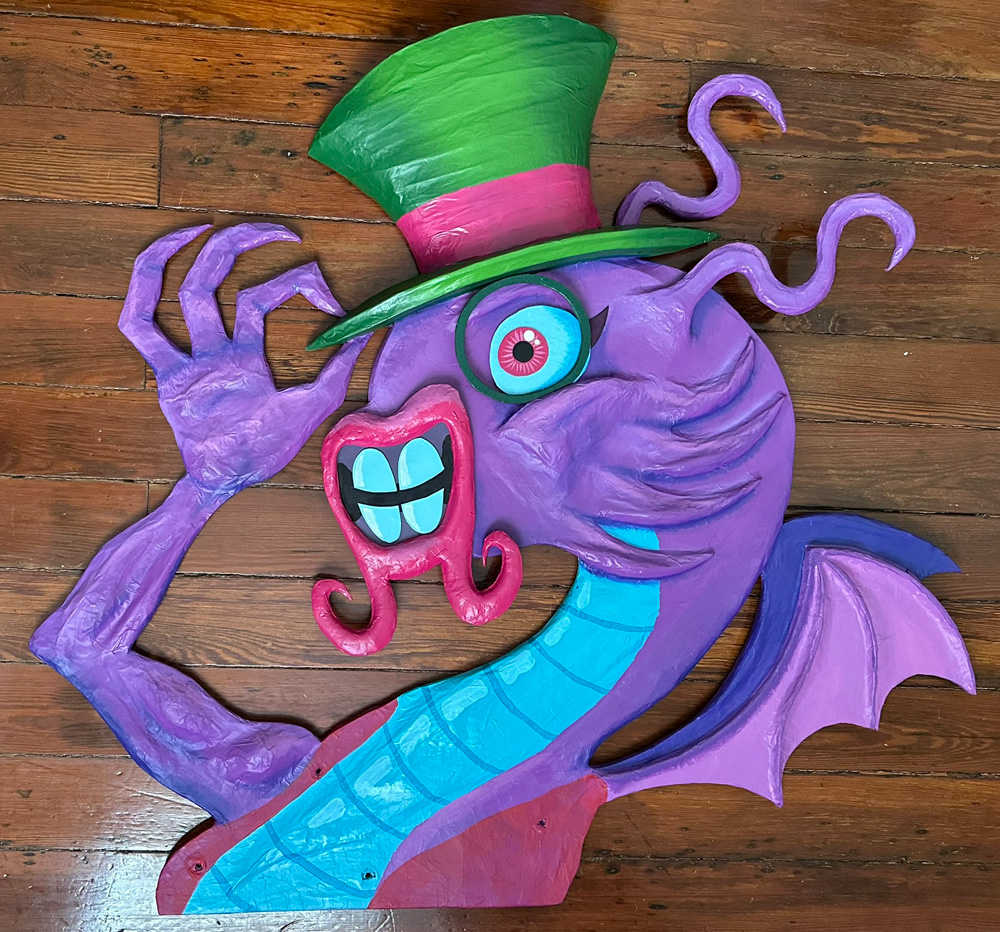
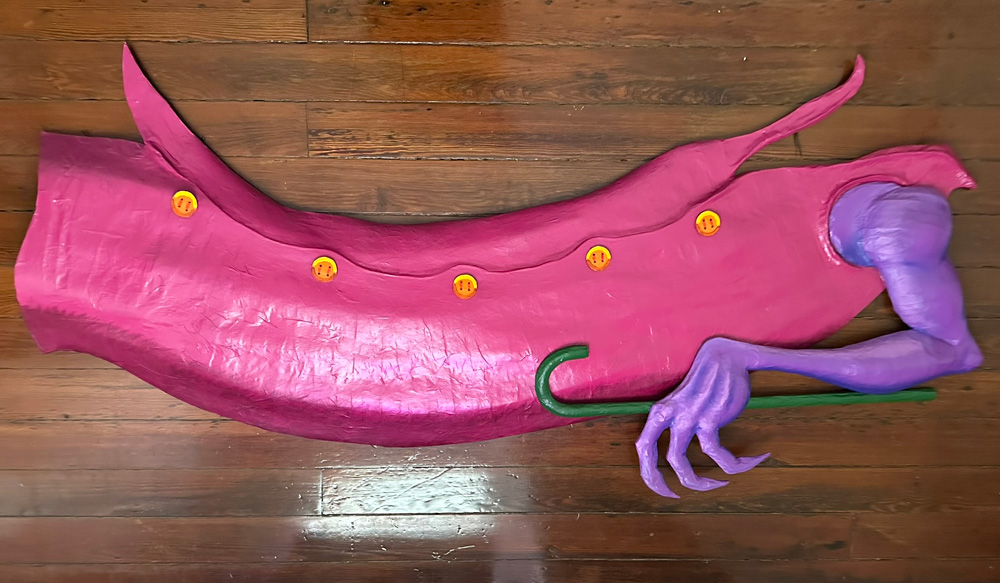
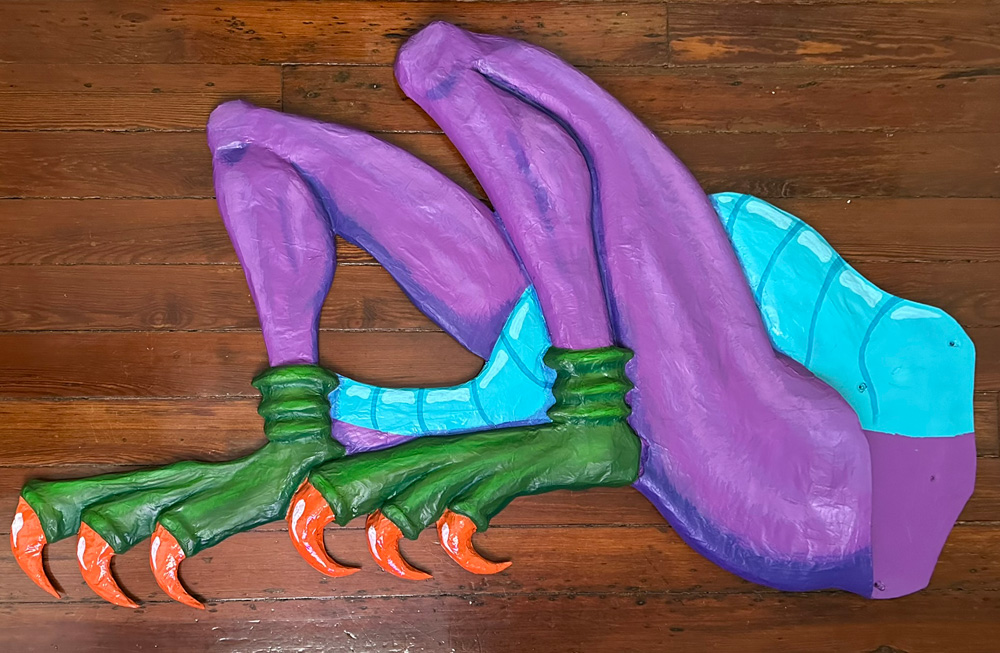
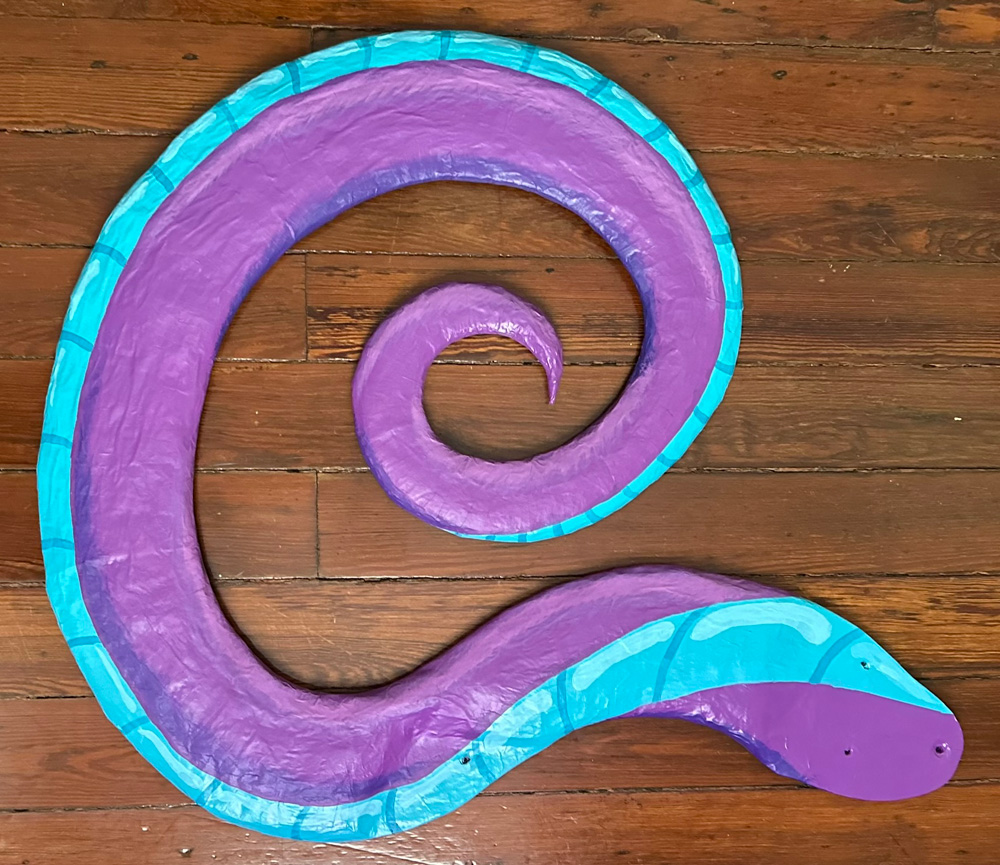
I planned out the Jabberwocky to be big four components that could be quickly assembled at the wedding venue. The components are: 1) the head and wings and right arm, 2) the long torso, 3) the belly and legs, and 4) the tail.
Foam board panels
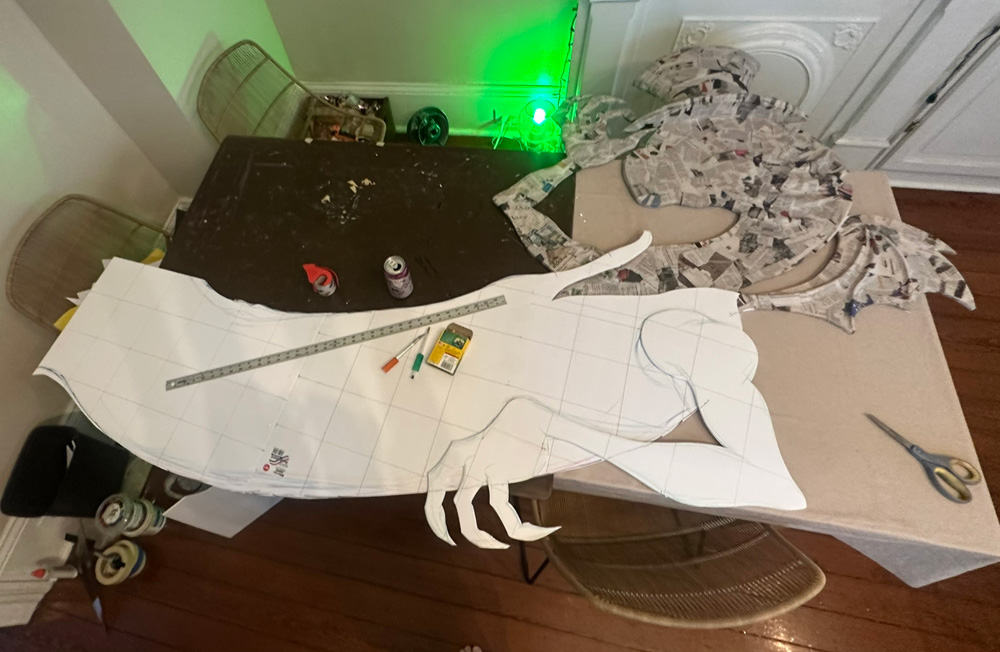
Each of the components started as a drawing on foam board — I had to tape multiple sheets of 20"x30" foam board together (as well as some scraps) for each huge piece.
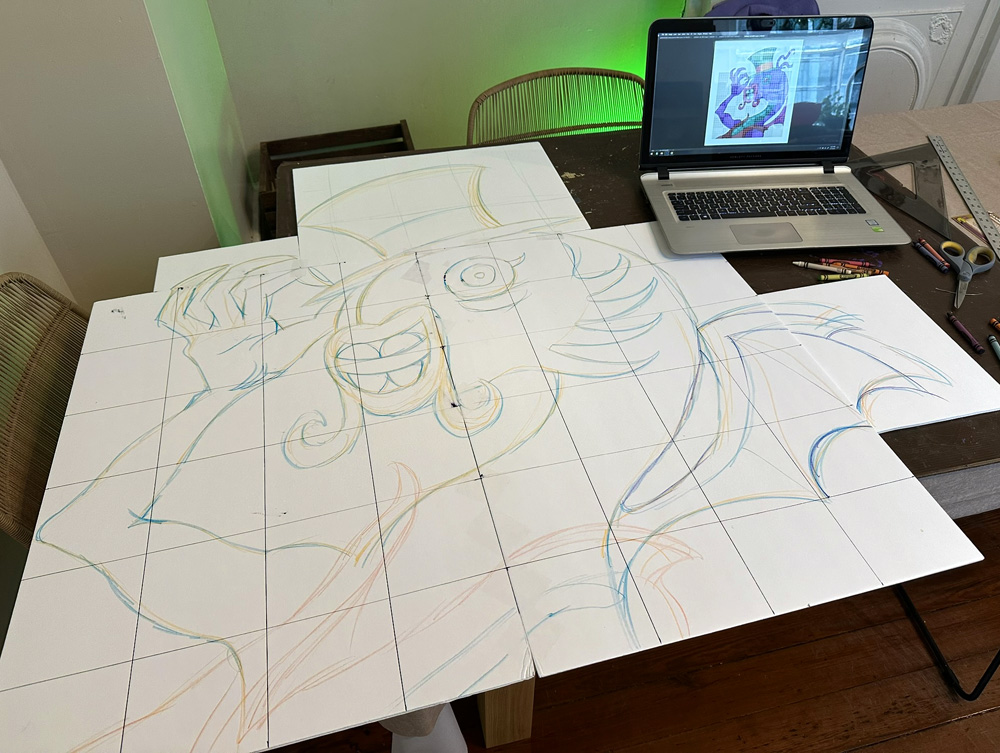
I transferred my drawing to the foam board panels using the good ol' grid method — basically, I put a grid representing five-inch squares over the drawing in Photoshop, then I measured and drew the grid of five-inch squares onto the foam board panel, and then I drew the drawing into the squares, one square at a time. It's actually pretty easy to do! It just takes some patience.
I wanted each of the foam board panels for the four big components to be two layers thick, so after drawing all the components onto the foam board, I cut them out with my X-acto knife, and then I traced them onto a second set of foam board pieces and cut those out. I glued each pair of panels together with small dots of Elmer's glue. I then set books on them to let them dry flat overnight — without the books there's a chance they would warp a bit.
Note: when doubling up large panels of foam board this way, it's important to make sure the seams between the sheets of foam board don't line up with each other. If the seams do line up, you end up with a weak point in the panel; it can easily get bent by accident. Making sure the seams don't line up makes the whole panel stronger.
Later on I would do a bunch of steps to sculpt and build a relief sculpture on each of the panels...
Arranging the connection points
I made up a method for connecting the four big components to each other using twist ties, washers, bits of wood, and hot glue.
First, I lined up the panels and poked holes through them with an awl, making sure to go all the way through all the layers of foam. Then I separated the panels and did the following steps...
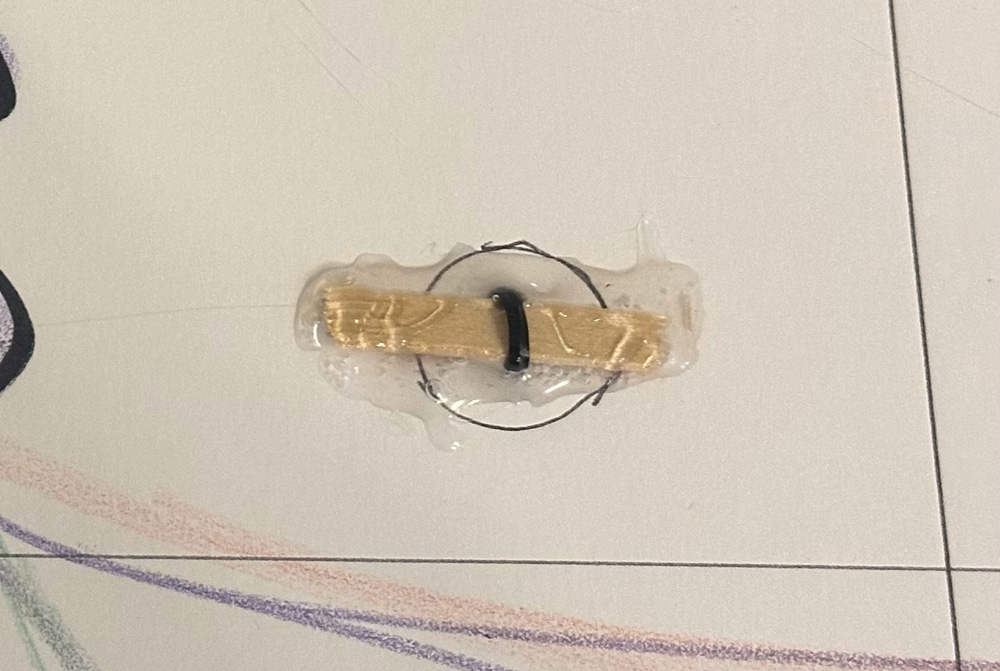
For the panel that would be in the front, I took some twist ties and twisted them around little segments of wooden coffee stirrers. I inserted these through the holes, and then I put a bunch of hot glue on them to lock them in place. The bits of wood are there to anchor the twist ties in place so they can't tear through the foam.
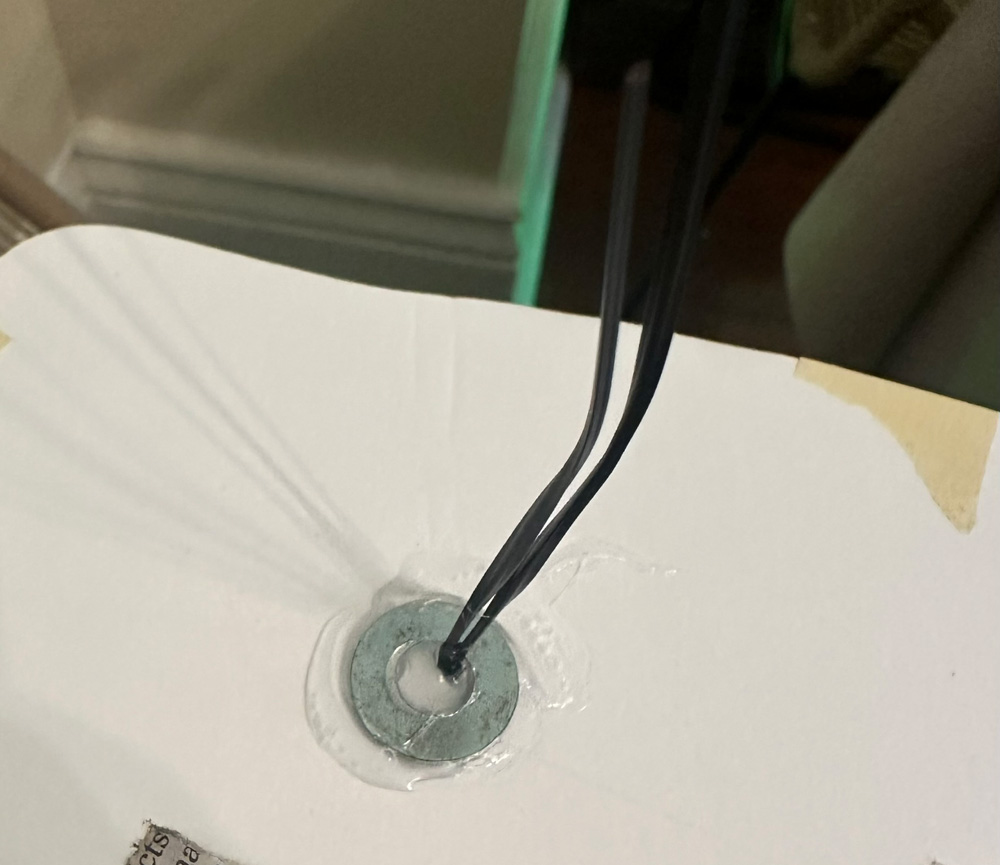
On the back of this panel, I then put metal washers over the twist ties and hot-glued those in place.
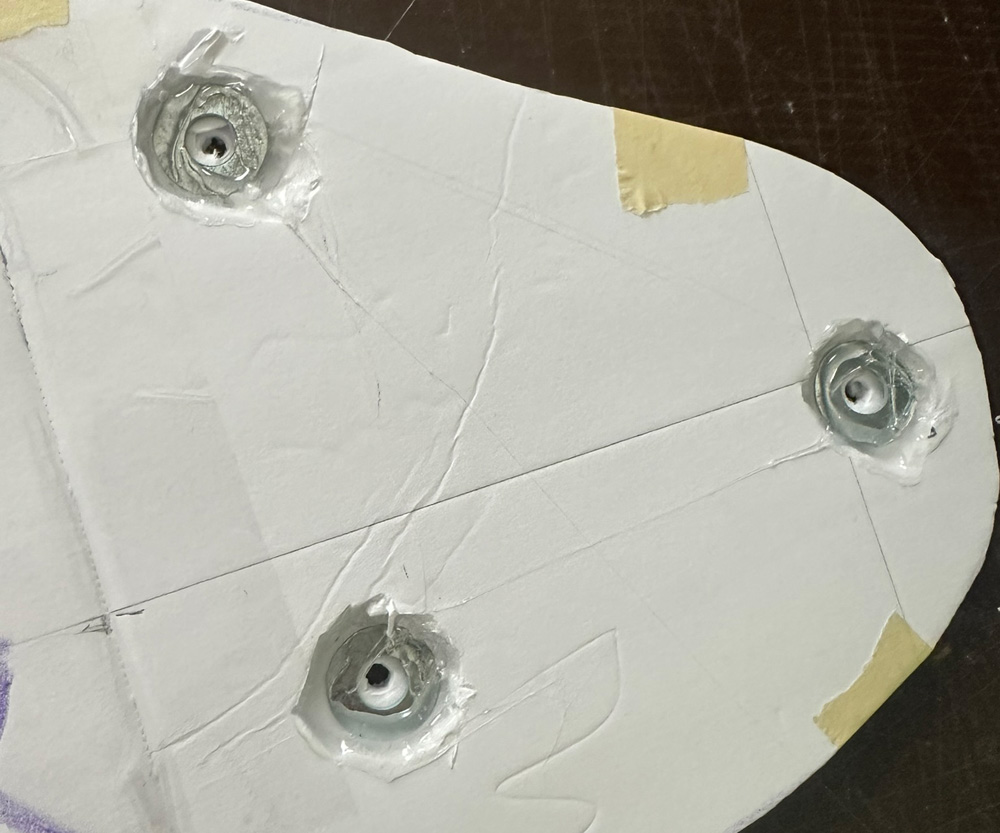
For the second panel, i.e. the one that would be in the back, I cut out round holes where the washers would go, then inserted washers and hot-glued them in place. I wanted these washers to be recessed a bit so that the washers on the front panel could fit into these recessed areas when the pieces are assembled.
Then on the back of the panel I hot-glued more washers. So for each connection point, there are materials on both sides of both pieces of foam to protect them from tearing.
When it was time to assemble the sculpture, I could just slip the twist ties from the front panel through the holes in the second panel and then twist them around some paperclips to lock them in place. Repeat for all components.
While building all of this, I realized there would be an interesting challenge in assembling the components! Imagine this: panel one has twist ties poking out of the back at four points that are close together. Panel two has four holes that these twist ties need to go through. When moving the panels toward each other, it would be very difficult to get all four relatively short twist ties to go throuh all four holes. So here's the solution I made up. Ahead of time, I cut four long (18"?) pieces of steel wire and twisted little loops in one end. When it was time to assemble the panels, I twisted the twist ties onto the loops. Then, with an assistant, we held the panels relatively close to each other, let's say 8" apart. I slipped the long steel wire through all the holes. Then we could move the panels closer together and pull on the wires to get all four twist ties to go through all four holes, basically at the same time. It wasn't 100% smooth, but it totally worked. Then we could bring the panels all the way together, remove the steel wires, and proceed to twist the twist ties onto the paperclips, locking the panels together securely. (All of this worked, but not as well as I would've liked; I'll write more about that at the end. Here, I'll put an asterisk: *)
Making it hangable
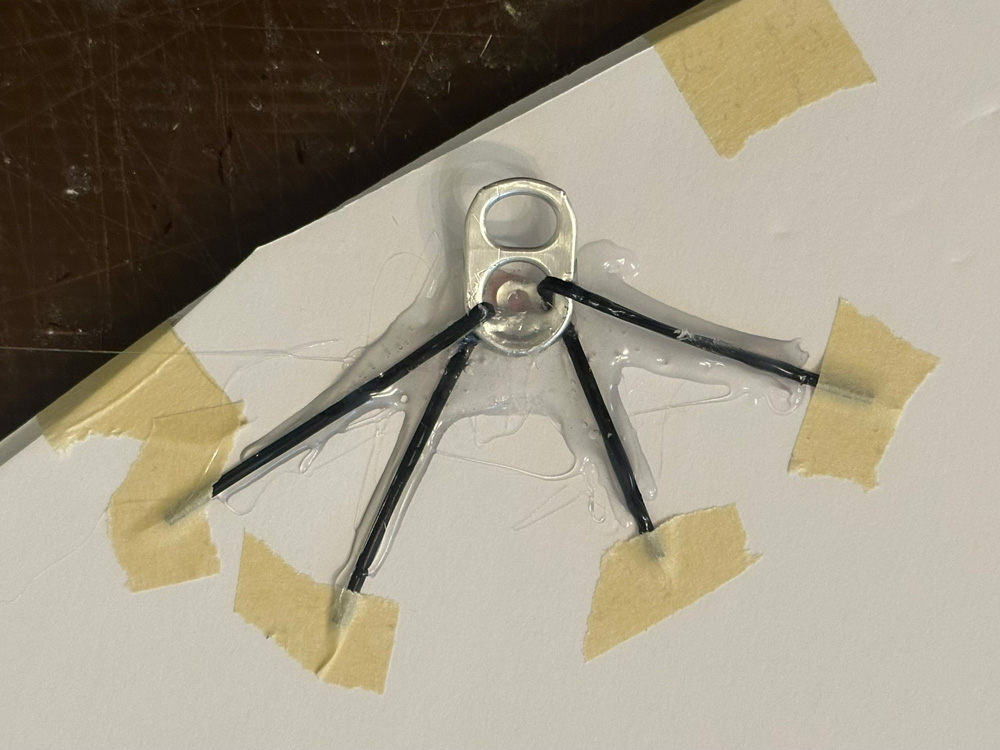
To make the sculpture hangable, I made up a method using pull tabs from soda cans as hooks for hanging, and I attached those to the components using twist ties and hot glue to lock them in place (and this all gets covered over with paper maché later, which locks them in place even more firmly). I placed a lot of these pull tabs along the top edges of all four components, as I'm not sure exacty where I'll be able to attach these pieces to the railing where the sculpture will hang — so I figured the more of these hooks I put on the sculpture, the better. There are about sixteen of these hooks in all; probably more than I needed, but I was glad to have extras.
Paper maché on the back
Before starting the relief sculpture on the front of the panels, I wanted to apply a layer of paper maché on the back. One important thing to note here is that paper maché will definitely warp a big semi-flimsy foam panel like these. There are two things I do that help prevent that:
One is to put small pieces of masking tape all the way around the edges of the panels, holding the two layers of foam board together. I put these every six inches or so all the way around.
The other method I use is weighing the panel down with books while I apply the paper maché. The way to do that is to place books at a few points on the panel, then apply paper maché to the areas where the books are not, then let that paper maché dry, then move the books to the paper maché'd parts, and then apply paper maché on the rest. This is a little annoying because it adds a lot of time, but it's totally worth it to avoid warping. It really works.
Relief sculpture
Okay, now the fun(?) part! I used a ton of my usual tricks to create the various bits of relief sculpture on the panels.
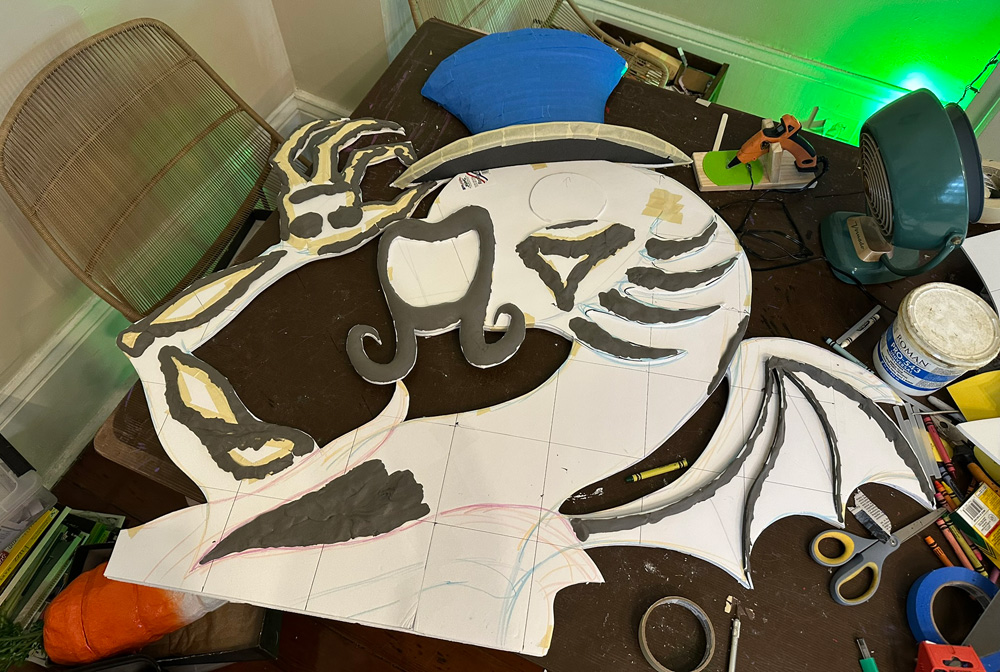
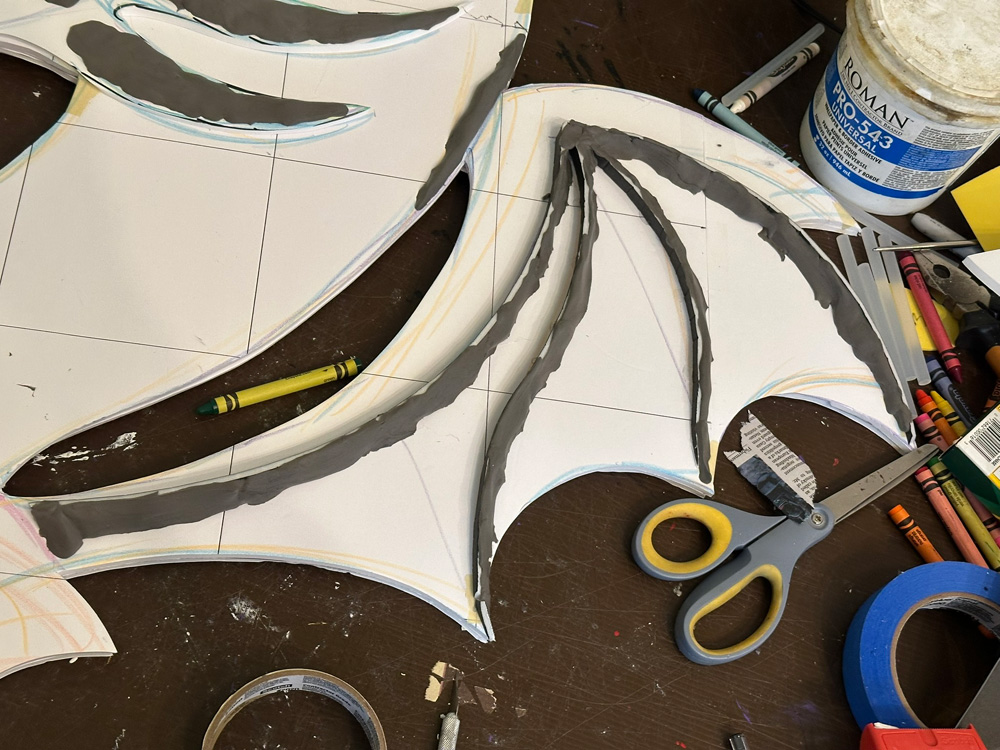
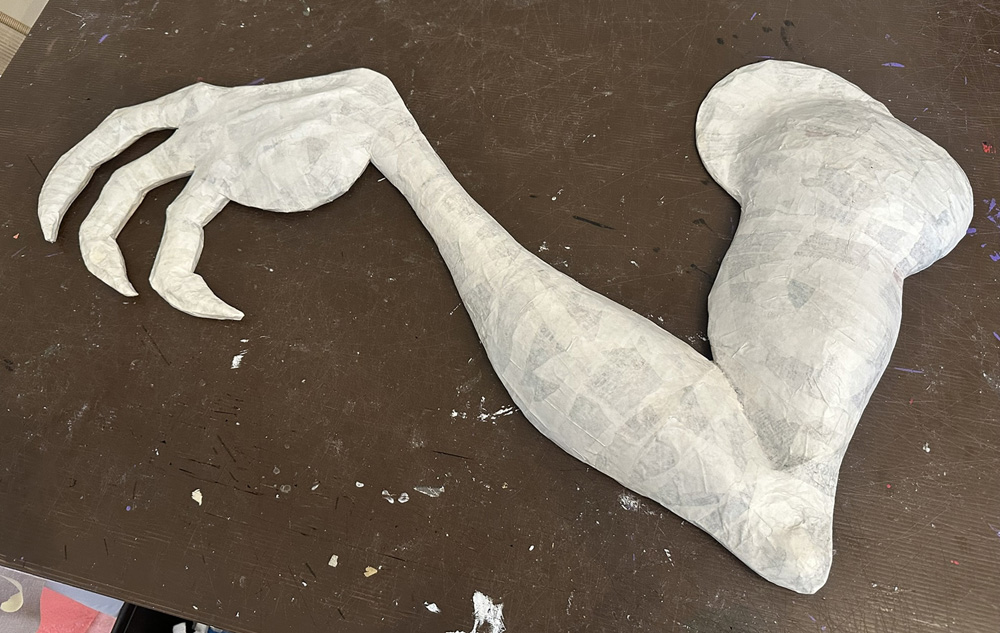
The simplest method was just blobs of foam clay to build up various irregular shapes. You can see in some places, like the wings, I first added very thin ridges of foam board and then molded the clay along the ridges.
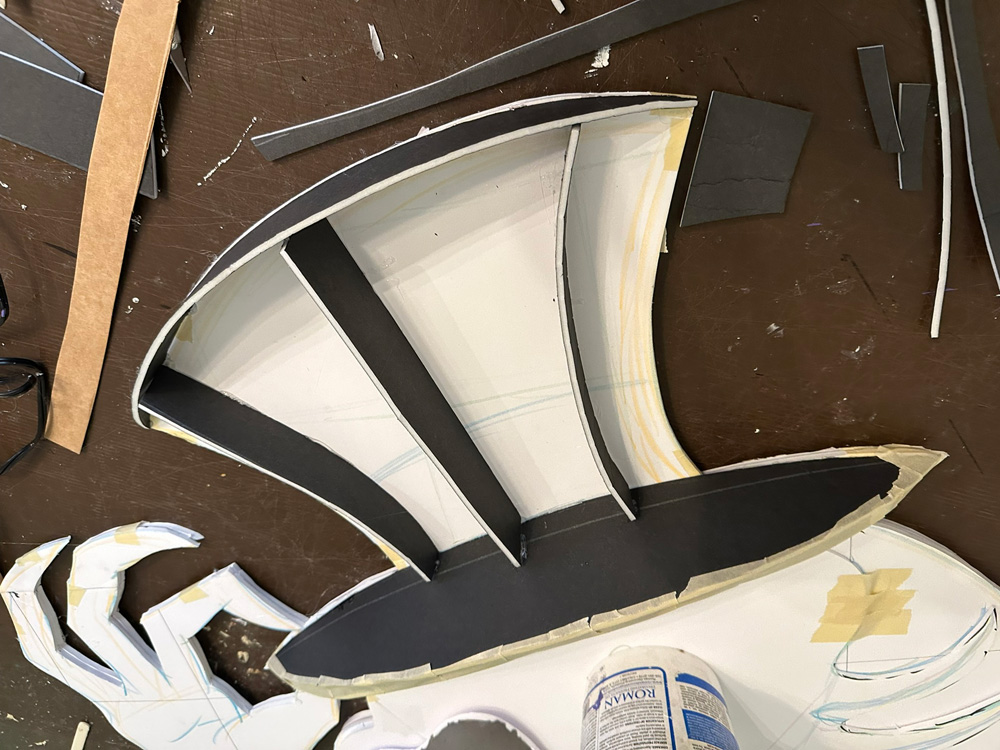
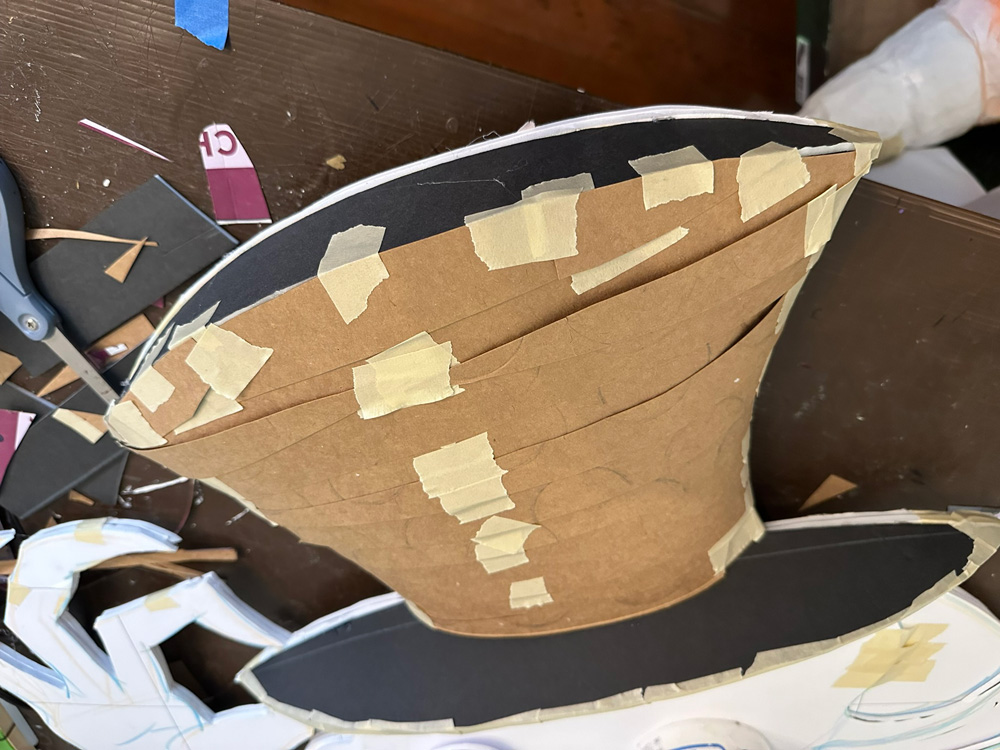
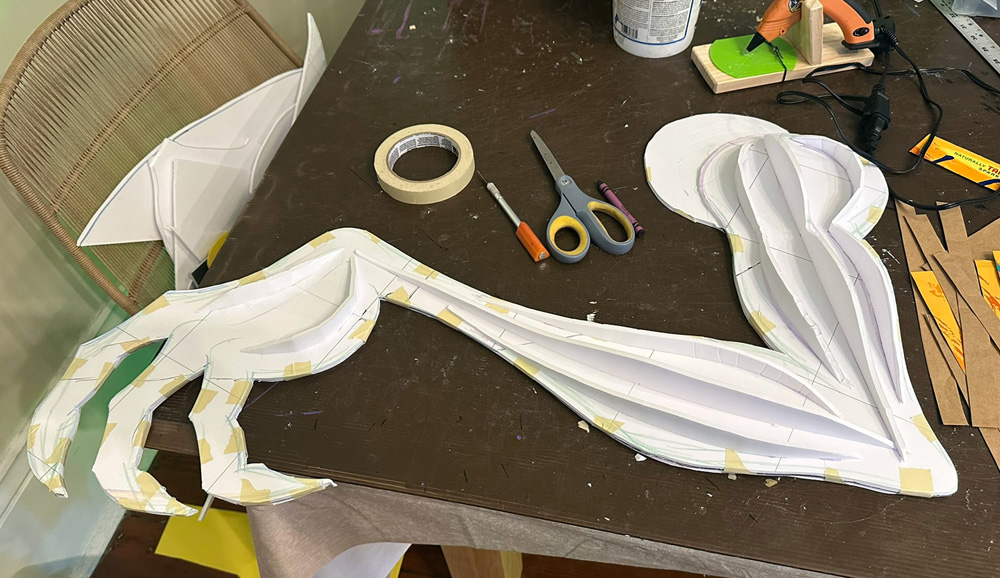
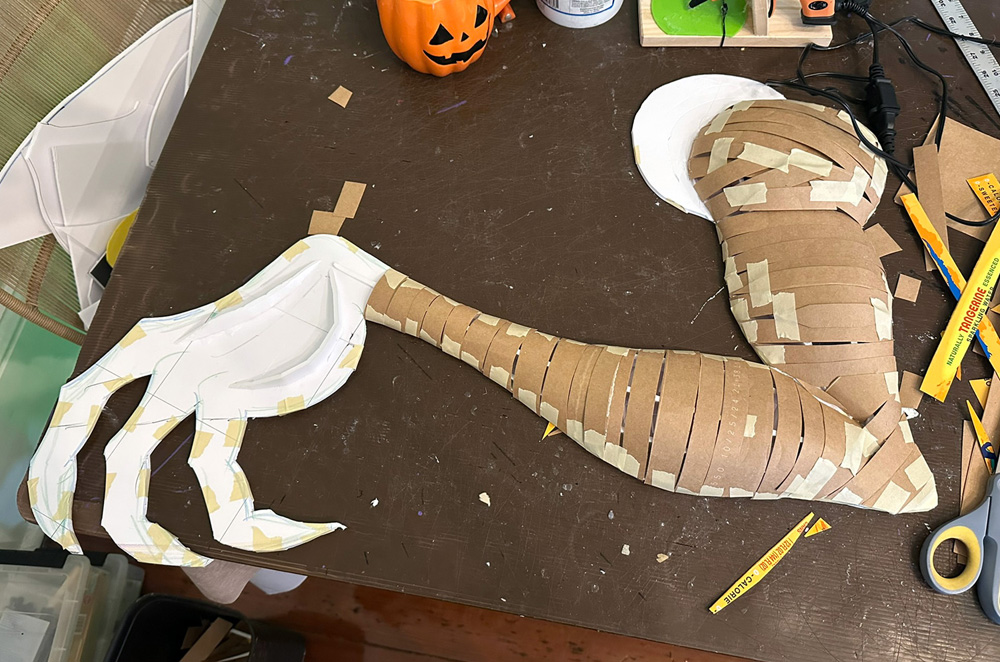
The most complicated method is this thing I made up with ridges of foam board hot-glued in place and then strips of LaCroix boxes or poster board spanning over the ridges and taped in place. I used that method for the "front" arm, the hat, and the whole torso. It's a lot of work but it can produce really nice results. Once I've added the strips of whatever, I then cover the whole piece with tape to stabilize and smooth everything out.
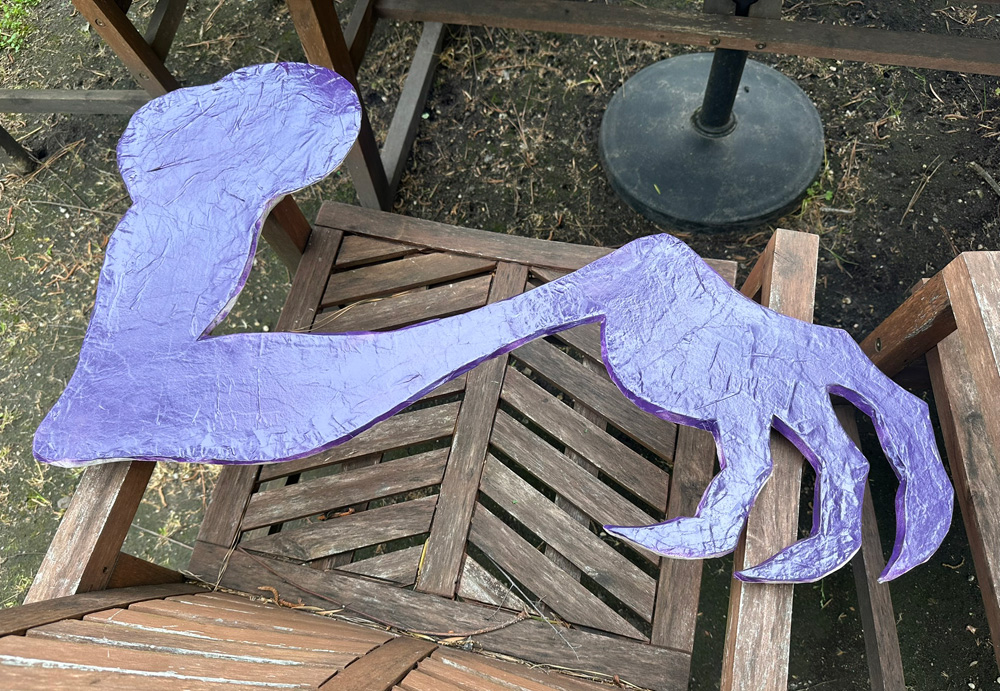
To pad out the "front" leg (the one closer to the viewer) I used a simpler method with lots of pieces of pipe insulation foam tubes. I sliced the tubes down the middle and then cut them to size and laid them flat on the panel. Then I covered the tubes with strips of construction paper to span over the spaces between them. Then lots of tape.
For the "back" leg (farther from the viewer), I used foam clay to created a low rounded ridge all the way around, let that set, and then I filled in the interior area with various pieces of thin foam packaging materials. Then I covered all of that with pieces of construction paper and tape.
I built up some more shapes with foam clay, like the wrinkled parts of the socks, as well as the claws, some little ridges on the legs to define kneecaps and calf muscles, etc etc.
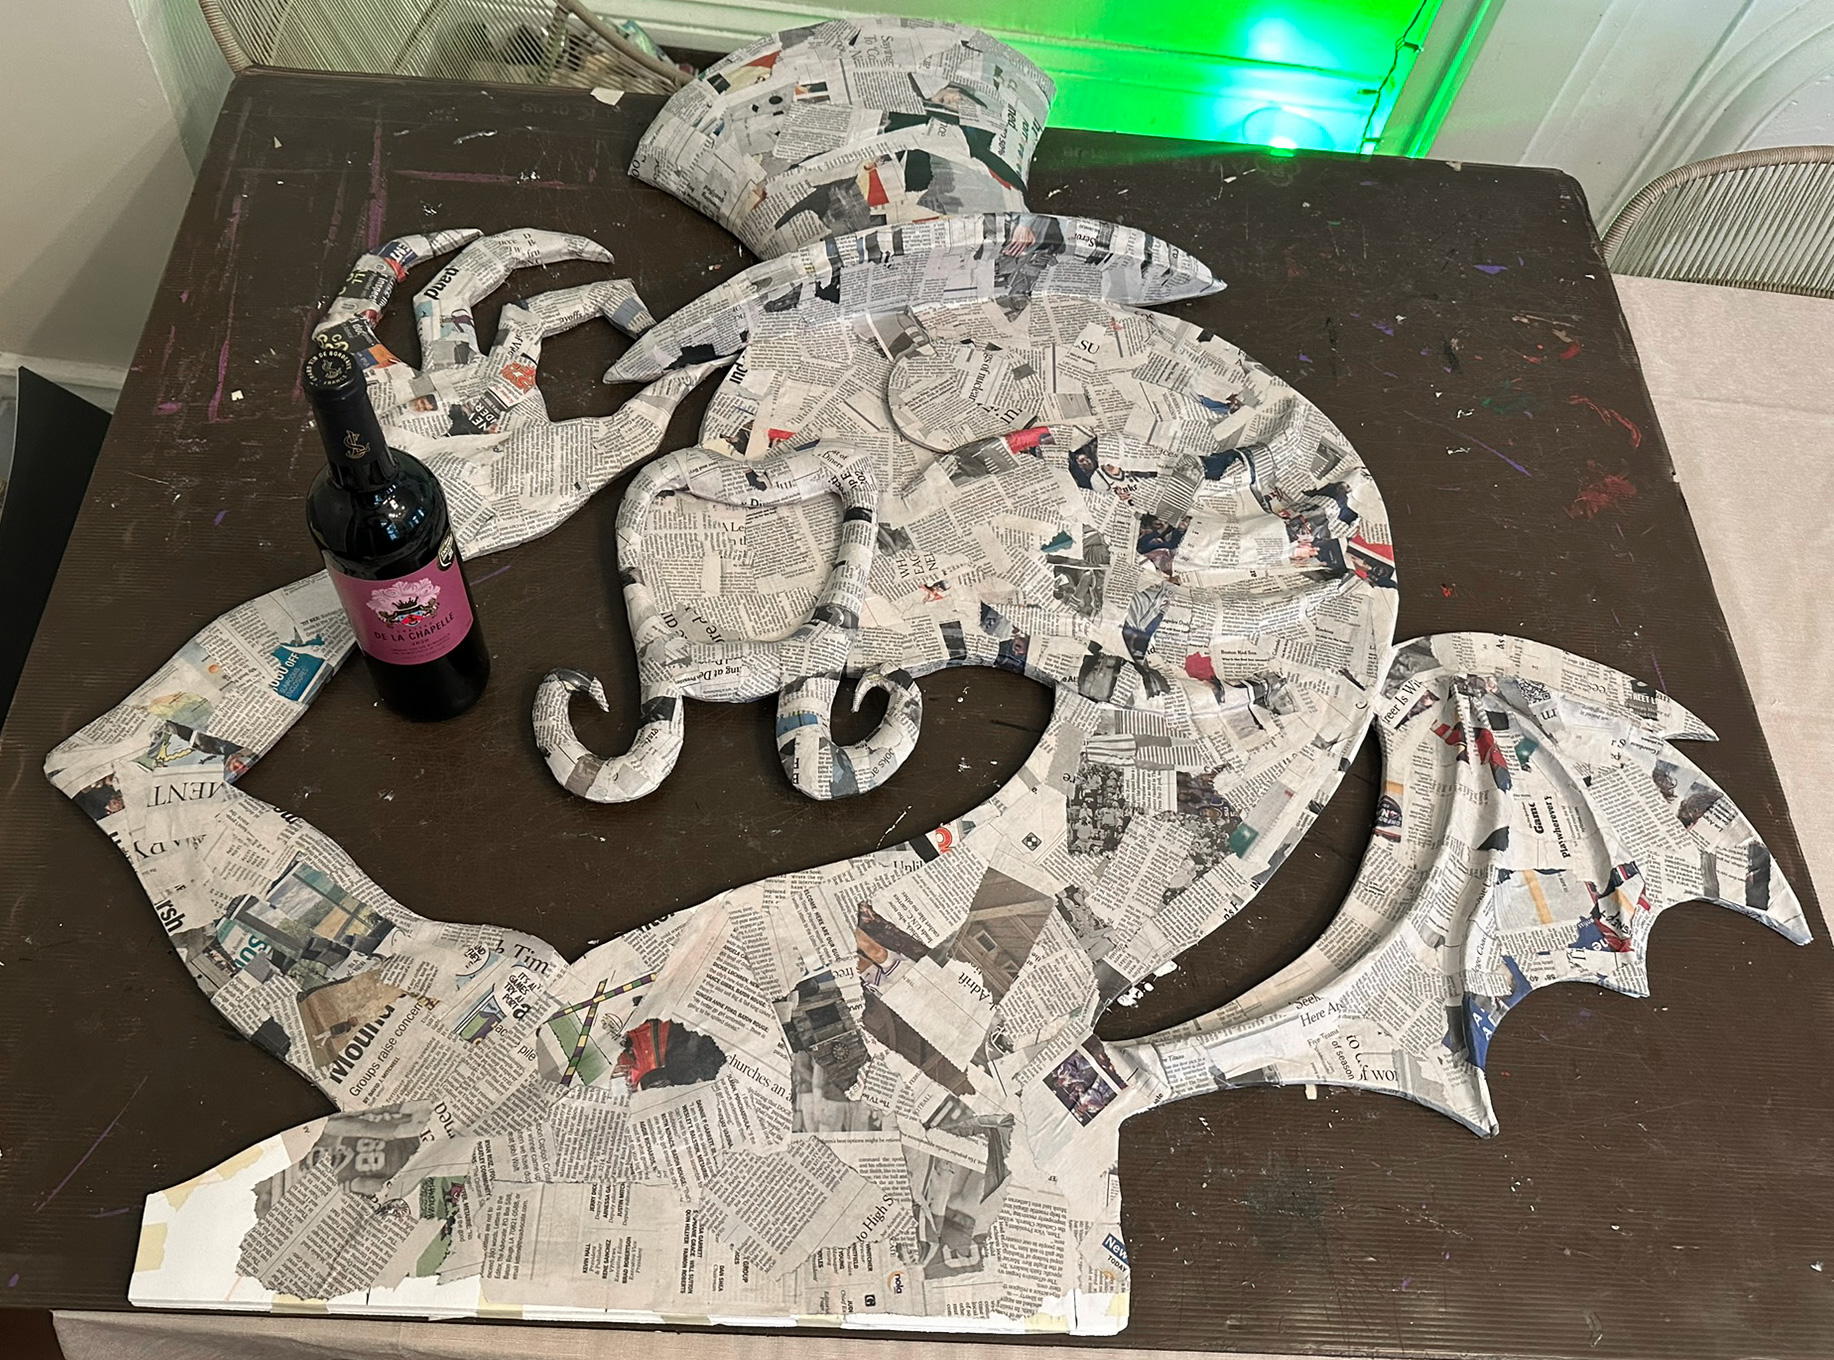
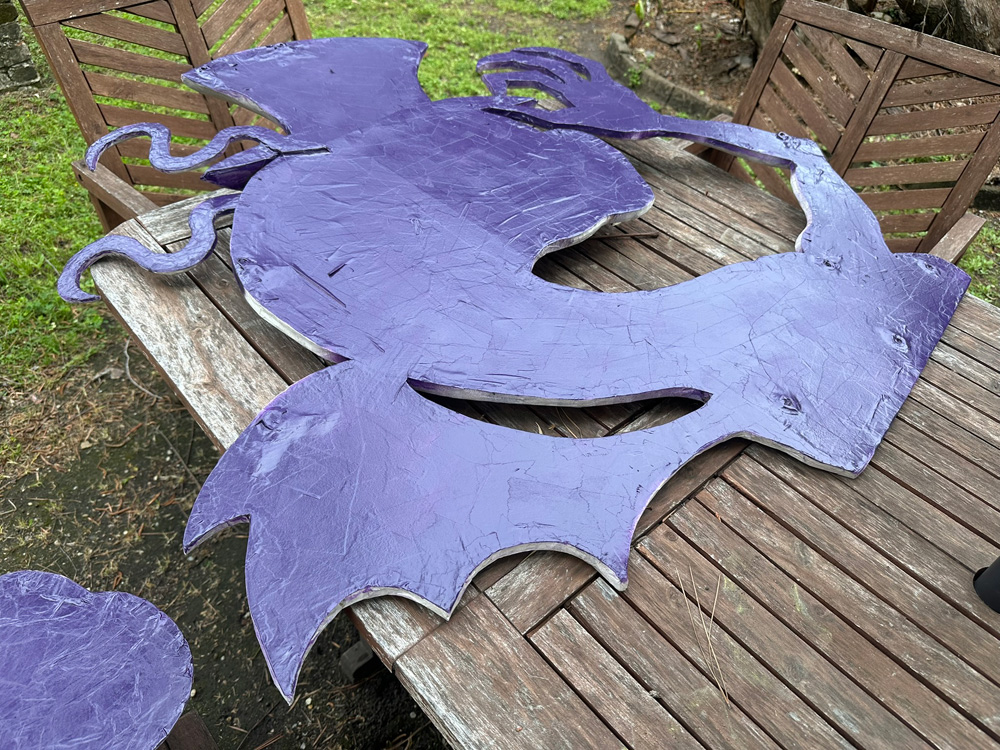
I covered all of the components with two layers of paper maché — and then I added another layer or two of paper maché on all the areas that felt like they were the softest or weakest — basically the biggest flattest areas.
If I'd had more time and if I'd wanted the sculpture to be very strong and truly permanent, I would've done about eight to ten layers of paper maché on the whole thing. But for this project the timing and budget didn't allow for that, which is fine!
Other separate details

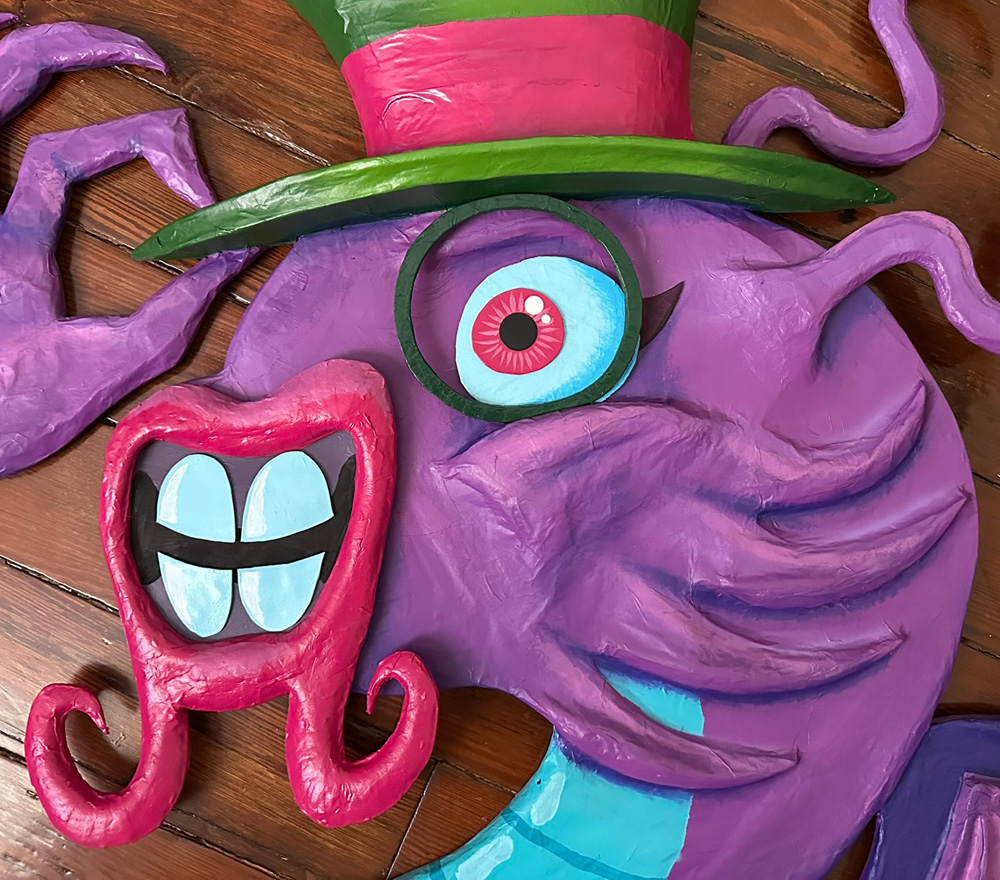
I made the eyeball separately from the head; it's just a piece of foam board with paper maché on it. Then the iris is a piece of craft foam, and the pupil is cut from a LaCroix box. I painted these separately and glued them together. The little round highlights are punched out from a glossy magazine cover; no paint on those. By the way, I've bought a bunch of different-sized hole punches over the years, and they are super handy for tons of projects. I've got them from around 1/4" all the way up to 1 1/2".
The mouth is a separate piece; it's a flat piece of foam board with foam clay to round out the lips, and then a panel from a LaCroix box in the back, and the teeth are pieces of craft foam. I glued it onto the sculpture after painting.
I made the cane from two layers of foam board, then foam clay to round out the front surface, and then tape and four layers of paper maché to make it somewhat rigid.
The monocle is a piece of foam board with very tiny pieces of paper maché applied to it. A piece this thin tends to warp, so after it was dry I set some books on it for a couple days to squish it.
The buttons are foam board with tiny pieces of paper maché. I poked holes in them with an awl after the paper maché was dry.
On the torso, I made a 3D ridge along where the buttons go, like to show where the one side of the vest overlaps the other. I did this with a long piece of string, taped in place, and then strips of construction paper and tape attached all along the lower side to smooth out just that side, leaving a more distinct edge at the upper side. Then two layers of paper maché on all of that.
Oh yeah, there are also those little wavy tendril things on the head; I made those separately and attached them at the very end, just before painting, because I was concerned that all of the handling and moving of the components would create a risk of breaking/damaging them. The tendrils are a base of foam board, covered with foam clay to round them out, and then a layer of tape and two layers of paper maché. I hot-glued them in place on the head and then covered the connecting areas with about six layers of paper maché, to make the connections really strong.
Painting
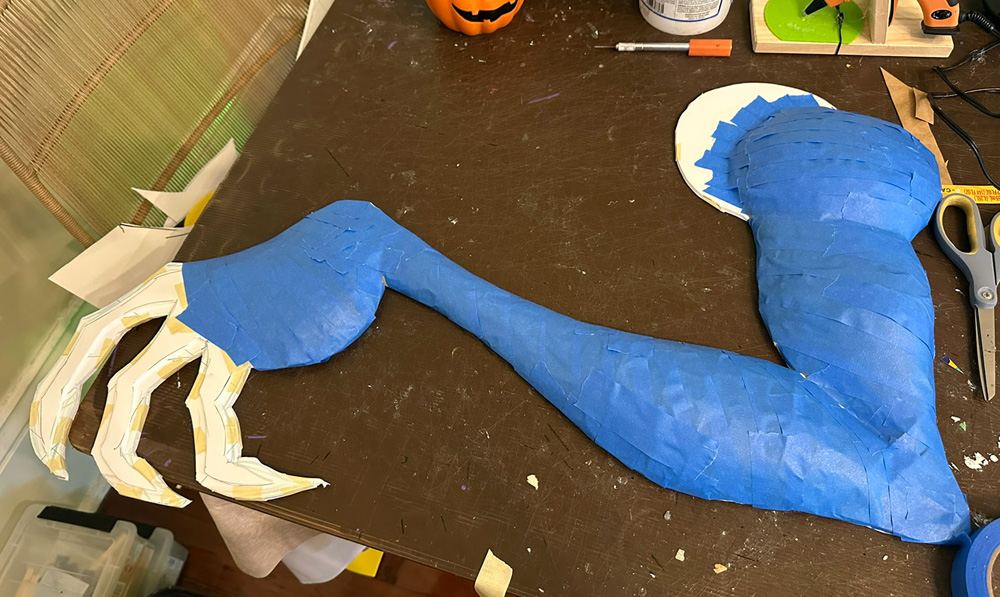
Before spray painting, I protected a few areas of the various components with blue painter's tape — I did this wherever I would be gluing a piece on later: the eye, the mouth, the arm, the cane, and the buttons. The reason for this is that hot glue will hold better on plain paper maché than it will on spray paint.
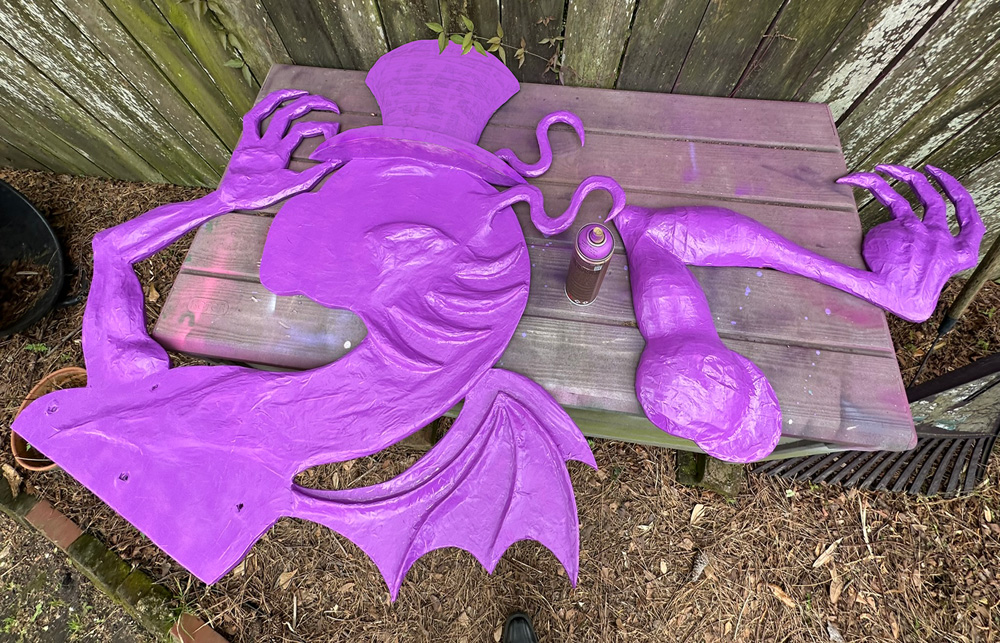
I spray-painted all the individual pieces and let them set overnight. Then I did lots of painting by hand with acrylic paint various brushes and sponges. All the usual stuff: highlights mixed with a lighter and slightly warmer color than the base color, and shadows mixed with a darker and slightly cooler color than the base color. I've been using Liquitex paints recently and I really like 'em; they're fairly thin and easy to move around, and they're fairly opaque with just one or two coats usually.
When I was done painting, I removed those painter's tape bits and then I hot-glued all the individual pieces in place: eye, mouth, arm, cane, buttons. (Also, before hot-gluing, I scrape up the areas a little bit with a knife to give the glue a more complex surface to hold onto.)
When gluing the arm onto the torso, I wanted to make that connection really strong, because I was really worried about something bumping the arm and snapping it off. So, two things for that: One is that I use Gorilla Glue hot glue sticks for anything important like this; they're much much stronger than the cheap-o hot glue sticks I use for most things. The other is that, before applying hot glue to the big round panel behind the upper arm, I first put a few drops of regular ol' Gorilla Glue (not hot glue; the stuff in the bottle) in the middle area. So, dots of Gorilla Glue in the middle, then a ring of hot glue around that. The hot glue sets quickly, and then the Gorilla Glue sets over the next couple of hours, creating an extremely strong connection.
I also put tons of hot glue on the back of the hand where it attaches to the torso, as well as tons of hot glue where the cane attaches to the hand and to the torso. I really tried to use absolutely as much hot glue as possible in those areas without letting it be visible from the front of the sculpture. These would be the overall weakest points of the sculpture so I wanted to protect them as best I could. It all worked out fine; nothing broke during transport no hanging nor the event.
*Notes on assembling and hanging
So, my idea with the twist ties and wooden bits and washers was totally fine; those bits were very strong and I was pleased with them. But when I inserted the twist ties through the washers and twisted the paperclips in place, I just wasn't able to lock the pieces together as firmly as I wanted. The paperclips and the twist ties had too much give to them, and even though we'd held the panels tightly together while twisting everything together, when we would let go the pieces would move away from each other by a quarter inch or so, and there was no way to get them to truly stay locked together. The connections overall felt a bit flimsy. This made me very worried when we were hanging the sculpture, but in the end there was no problem: once the sculpture was hung up with wire and secured along the railing in a bunch of places, the tension of the wires made the piece feel very stable overall; not flimsy at all. So it all worked out fine, but if I were to do something like this again I would make up a different method for connecting the pieces.
(The best solution would really be to connect all the pieces permanently with glue/etc and then transport it as one piece in a big truck. I was set on fitting the four separate components in my car and assembling them on-site, which worked out okay in the end.)
The way we hung up the sculpture was to have four or five people lift it up together, so that there were at least one pair of hands on each component, and then two people up on the second floor quickly attached wires to the hooks (that is, the pull tabs) on the back and secured these to the railing. Luckily the sculpture is super lightweight and it wasn't difficult for people to lift it up and hold it up for a while. I didn't weigh the components but each is light enough that you could easily lift it with one hand; probably even one finger. Once it was hung up with all the wires attached, it felt very firm; it didn't move or swing or sway at all, and it felt very much locked in place along the railing. Honestly a huge relief! (See what I did there?)
I was extremely proud to make this Jabberwocky for my friends and see it up there during their wedding; a really cool moment for me as a quote-unquote artist. I learned tons of stuff during this project, and I would love to have an opportunity to make another giant thing like this.