
Three-headed paper maché dragon sculpture! — part 1
Published by Manning on September 5th, 2017
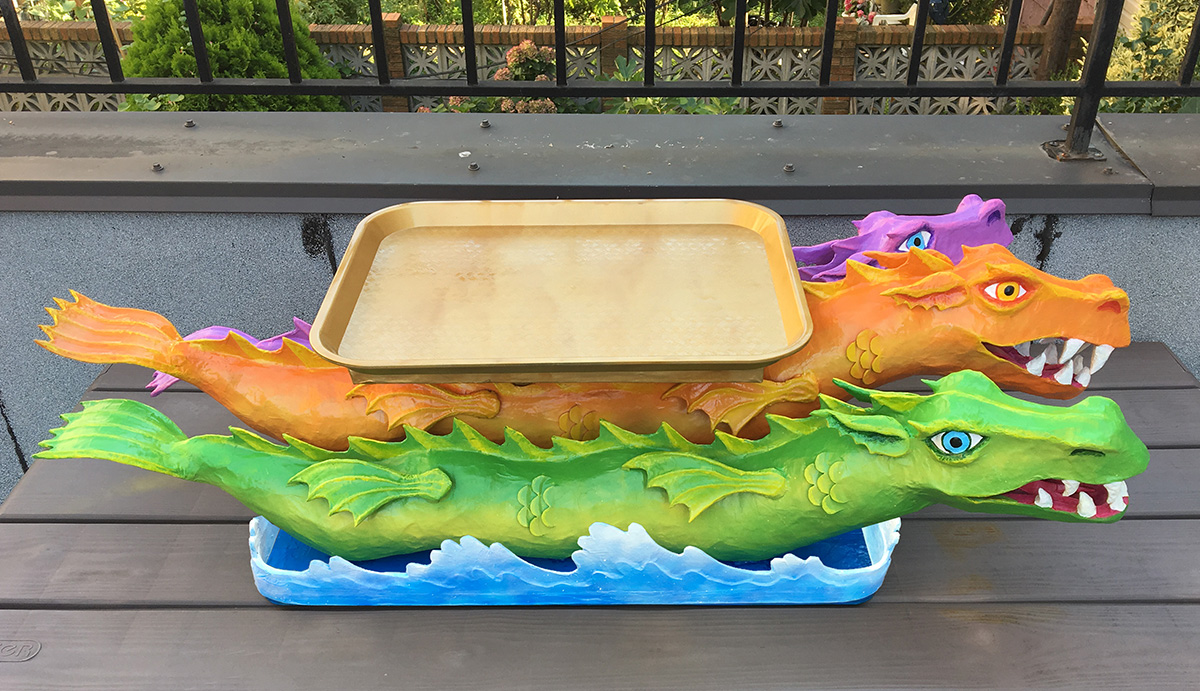
This was an incredibly fun commission piece I got to work on! I was contacted by a member of the Crewe of Columbus, a Mardi Gras crewe in Mobile, Alabama, and asked to make a sculpture of one of their parade floats — a very charming three-headed sea serpent(/dragon) named Isabella. The sculpture would have a serving tray area on top and be the centerpiece on one of the buffet tables at the group’s annual ball. The client sent me tons of photos of the Isabella float and asked for a sculpture that was approximately 40″ long from head(s) to tail(s). I couldn’t wait to get started!
I received some pics of the Isabella float to use for reference and found some others online; I made a collage of a few of them here.
There were a lot of neat considerations and challenges for this project. I had to make the tray area very strong so it could support a lot of weight, but the whole sculpture also had to be very lightweight in order to keeping the shipping cost down. I wanted to make the overall sea serpent sculpture as sturdy as possible so it’ll last for many years of Mardi Gras celebrations. And I wanted to keep the cost of the materials down so as to keep the project profitable. It was fun figuring out solutions for all of this stuff!
I tackled the sculpture as several large parts, built separately and later combined. Those were:
- the dragon bodies
- the dragon heads/tails/fins
- the tray area and its pedestal
- the base with the water motif
Here’s how I did all this! I should mention I did tons of sketching and measuring on graph paper and in Photoshop before starting on any of this; I always do a lot of sketching things out to get the proportions right. Almost every piece was carefully diagrammed so I could create it at the exact right size to fit with the other pieces.
In reality I had to skip around a lot from piece to piece, rather than make each piece completely on its own. There were a lot of steps where I thought: I can’t figure out exactly how big to make this piece until I make this piece, to make sure they’ll fit together okay. For the sake of efficiency I’ll focus on these big pieces like they happened on their own.
Making the dragon bodies
Isabella is known as a three-headed dragon, but in studying photos of her I realized she actually has three separate serpentine bodies (in green, orange, and purple) that are attached alongside each other. I built these bodies separately, starting by drawing the wavy serpent-like shapes onto foam board and cutting them out. I’d already measured everything in Photoshop and knew that I wanted the serpent-like bodies to be about four and a half inches thick, so I drew the shapes a bit narrower than that, because I knew I’d be padding out the shapes with various materials. The black pen lines below are the real size I wanted the sea serpent bodies to be, and the smaller shape in pencil is what I actually cut out of the foam board.

The shape in the above pic is for the left and right bodies, so I traced and cut it out twice, and then I made a slightly longer one with a neck that tilts up more for the middle body.
I wanted the left and right sea serpent bodies to curve outward slightly, so the three heads together would be a little bit fanned out. I used my usual trick for curving foam board (not shown here); I added a lot of masking tape on each side of the foam board to protect it from breaking, and then carefully rolled and curves the shapes. This left them curve-able but pretty flimsy, but the next steps would fix that. The curves I made are so subtle you probably can’t see them in these initial pics, but they’ll be more obvious once the heads are on there, facing outward a bit.

I then used styrofoam cups to round out the wavy shapes. I took a ton of cups and sliced the top inch and a half off of each one with an X-acto knife, and discarded the bottom parts. This left me with just the wide lip at the top of the cups, and a little bit of the narrower part below. I then put each of these over the foam board body shapes one by one, and they fit into each other nicely. I used some tape here and there to hold them in place.
The tail area tapers to a fine point, and I built that out with some of the leftover bottom parts of the cups, sliced into various shapes and held together with lots of tape.
The basic body shapes were done, but the edges of the cups formed ridges along the body that I wanted to get rid of; I wanted the bodies to be as smooth as possible. So, I added a few layers of other materials. This is why I started with a foam board base that was thinner than the end result I wanted — I knew I’d be padding it out with several layers of other materials.

I took a roll of this dish protection material that I bought at Staples — it’s basically very thin, rubbery foam padding, in a roll about 12″ wide. I unrolled about half the roll and sliced it into very long 3″ wide strips. I then taped one end of a strip in place and wound it around the whole body shape, carefully making sure the edges overlapped and that the strip was wrapped as tightly as I could get it. Right away, the shape was much smoother. The tail area was a little more complicated so I cut an even thinner strip — 1.5″ wide — and wound that onto the tail using lots of tape.

Then I covered the bodies with packing tape, to smooth them out even more. I use brown packing tape for this kind of thing, so I can easily see what areas I’ve covered — it’s much harder to tell with clear tape. Packing tape is great for this kind of thing because it’s not very stretchable or flexible and it holds onto itself very firmly, so wrapping the shape completely in tape makes it all lock together and feel much more sturdy. So now the basic shapes were becoming nice and smooth and strong, but the packing tape also creates some weird folds and angles, which is another problem.
Finally, I added one layer of masking tape (not shown) very carefully to smooth out the shapes even further. It’s amazing to see the progress from step to step; at this point the ridges of the cups had disappeared and the shapes are extremely smooth, sturdy, and lightweight.
For the left and right dragons, I added three little square pegs on the bottom curves of each. These will get glued into holes in the base much later. I made the pegs from foam board; they’re each two little 3/4″ squares of foam board stacked up and taped together. The middle dragon doesn’t need these pegs on the bottom because it’ll have the central column of the tray/pedestal area sticking through it — you’ll see what I’m talking about in a bit. (I forgot to take a picture of the pegs at this stage, but you can fast-forward to this crappy pic to see them on the finished paper maché.)
Now it was time for paper maché! I covered all three dragon body shapes in seven layers of paper maché. You can read about my paper maché process and materials here. The short version is: I use Roman PRO-543 universal wallpaper adhesive (paid link) and alternating layers of newspaper and brown wrapping paper.

Later on I’ll add tails and fins and stuff, but for now I set these bodies aside and moved onto the heads.
Making the dragon heads
My plan for the three sea serpent heads was to build one base and apply papier maché to it three times to make all the heads — that way they can all be as close to identical as possible; I doubt I could get them very close if I were to make them separately. (See my article about making a pair of twin skull masks to see my first experiment with making a reusable base for papier maché.)
I measured and designed the heads on paper, and I decided to make them from two separate parts — the upper head and the lower jaw — and attach them later. The reason I chose to do this was so I could easily add stuff like the teeth and tongue without having to work in the narrow space of the mouth; I could add that stuff to the head and jaw separately before attaching them.

I cut out four shapes from foam board: the profile of the top of the head and the profile of the jaw, and then a flat shape for the base of the upper head part and another flat part for the top surface of the jaw. I attached these with packing tape — packing tape is less flexible than masking tape so it’s better for holding things together at precise angles.

I wish I’d taken more pics of the next step but I was too wrapped up (somewhat literally) in tons of pieces of tape all over the place. I cut a long strip of poster board to create the top surface of the head, and taped it in place running from back to front, over that central ridge of foam board. I bent it down a bit around the central ridge, and taped it down tightly on the sides. Then I wrapped the whole shape in masking tape. The edges were still a little sharper than I wanted them to look, so I wrapped the whole shape in a layer of packing tape, and then another layer of masking tape. Now the shape felt nice and sturdy and the angles were all smoothed out a bit.
I did the same thing with the lower jaw — a strip of poster board over the ridge to round out the shape a bit, and then the three or four layers of tape.

After that last layer of masking tape, the bases were done and ready for papier maché. I wrapped both of these shapes in aluminum foil — the foil is there to act as a release agent, so that when the papier maché is done, I can easily slice open the shapes and remove the base. The papier maché sticks to the aluminum foil a decent amount, but then the foil isn’t stuck to the base at all, so it’s super easy to remove.

I applied seven layers of paper maché over both parts of the head and let them dry for a couple days. I then sliced them down the middle with an X-acto knife, popped the halves apart, and the base came right out! It’s always kind of a relief when that actually works! I peeled most of the aluminum foil out of the paper maché but a lot of it didn’t want to come out, and that’s fine; it’ll get covered over soon.

I actually have a permanent reminder to be careful with this kind of job: a small scar on my wrist that’s exactly the width of an X-acto blade, because I was trimming an irregular paper maché shape and the knife jumped and stabbed directly into my wrist, straight in at a perpendicular angle! It went in perfectly between two blood vessels; a couple millimeters to either side and it would’ve severed something. It was terrifying; for that first second I was expecting to see blood spurt out like a pulse, but luckily it didn’t. The blade went in so deep that the whole area became a huge bruise that covered my whole wrist for a week. I’m extremely lucky it didn’t cut an artery. Anyway, so I’ve got this scar, and every time I see it I remind myself to be more careful.
If you’re a kid and you’re working on a project like this, get an adult to do the X-acto knife parts for you! Let them hurt themselves! They probably deserve it for something.
Something I need to look into is trying these cutting tasks with a dremel tool with a saw attachment or something like that. I just ordered one so we’ll see if that might be a good fit for this kind of work, hopefully on the next project.
Okay, back to the project…
In slicing open the paper maché I slashed up the masking tape on the base quite a bit too, so I repaired that stuff with more tape before moving on to making the next head. I did the same steps to make two more copies of the basic head shapes, for three heads total.

Going back to the first head, I used scissors and an X-acto knife to trim the edges of the mouth to get them to the exact shapes I wanted. I created a sort of flat U-shaped gum area with foam board and taped it in place; this will be the base where I’ll stick the teeth later.

I created the roof of the mouth and the bottom surface of the inner jaw with masking tape spanning across the empty space.

I made the teeth out of aluminum foil, covered them with masking tape, and taped them in place on the jaws.
I actually made the eyes out of ping pong balls that I cut up; I had some lying around. These made it easy to get a perfectly round, smooth, sturdy shape. I made the ridges above and below the eyes with aluminum foil and tape. I also made the nostrils out of aluminum foil and tape.
I also made the three tongues out of craft foam and covered them with masking tape. I set these aside to attach in the mouths later.


Then I covered all this head/jaw/face stuff with a couple layers of paper maché! I did the paper maché on the tongues and set them aside; they’ll get attached in the mouths later.

I made the ears out of craft foam — I designed the shapes on poster board, cut them out, and traced them onto craft foam six times for the three heads. Each ear is made up of three pieces. I attached these with very thin strips of masking tape, then covered the whole shape over with masking tape, and then covered the ears with two layers of papier maché. I decided to attach the ears to the heads later, after the heads are on the bodies, to make it easier to work on the connection between the heads and the necks without the ears getting in the way.

Before attaching the head to the jaw, I did a little bit of painting. I painted the tongues and the interior of the mouths with acrylic paint, and when all that was dry I glued the tongues in place in the lower jaws. This was way, way easier than trying to paint all that junk when the jaws are attached. (The only downside here is that now I’ll have to protect these painted parts when it’s time to spray paint the heads later on.)
Finally it was time to attach the heads to the jaws! I attached them with a couple layers of tape to smooth out the connections a bit; this will get covered paper maché in a bit.

This might sound weird, but I also added little circles of brown paper for the eyes. Even though the paper lays really flat, it’s got enough of an edge that it serves as a great guide for painting later on. Much easier than trying to paint all those circles totally by hand.
Fins, tails, etc

I made the tailfins mostly out of craft foam. I used an easy trick to get a nice curve to the craft foam: I taped the foam in place over a round vase, and then added a layer of packing tape right onto the foam. I then added a layer of poster board, and then another layer of tape. I removed the whole shape from the vase and it retained the curve perfectly! The layers of packing tape and poster board that you curve onto there don’t want to uncurve, so they holds the foam in that curved position, nice and strong.

I used string for the long thin bones in the tails and fins. I taped the strings in place with masking tape, pinching the tape tightly alongside the string to keep its shape nice and visible. I then covered the tails with three layers of paper maché. Here are the three finished tails…

I made the side fins the same way…

I cut out eight fin shapes, and did the same trick of curving the fins onto the vase with tape, and then adding string and tape to make the bones.


These also got three layers of paper maché, with a few extra layers of the back to make them stronger.

I made the long dorsal fins out of craft foam as well. I made the thin bones with small pieces of these long balsa wood craft sticks, taped in place; the wood is so soft and so thin you can cut it with scissors. (The sticks I bought were about 36″ long; they’re broken up in this pic.) I taped the fins in place on the bodies with lots of masking tape, then covered all of this with two layers of paper maché.

Scales
I made a few patches of scales on the sides of the bodies. I made these with craft foam and the same brown paper I use for all the paper maché. I traced a penny onto craft foam many times, then cut out those circles and cut them into crescent shapes. I then traced the penny onto the brown paper in groups of two and three, and cut those out. Each patch of scales consists of seven scales, and I made eight sets of these in all. That’s a lot of little shapes!

I layered the scales onto the body with the same wallpaper adhesive I use for paper maché, and then used a few little bits of paper to smooth out the edges.
And with that, all the sea serpent parts were done, except for assembly/painting! That’s all for part one! Next up is the pedestal and water base, in part two…
 About Manning Krull
 How to make a 4-foot paper maché alligator
 My violin skull mask, Mardi Gras 2015
 Three-headed paper maché dragon sculpture
June 5th, 2018 at 5:43 pm
it is amazing
June 5th, 2018 at 8:50 pm
Thank you Cameron!!
April 18th, 2019 at 8:47 pm
While I think that this is amazing, i feel the need to point out that this is three dragons, and not one three-headed dragon. Again, they look amazing, i mean no disrespect when i point this out.
April 18th, 2019 at 9:55 pm
Haha, you’re absolutely right! The first email from the client explained it was a three-headed serpent — with just one name! Isabella! — and then when I saw the photos of the float with the three bodies that aren’t even touching, I was very surprised/confused. ¯\_(ツ)_/¯
December 15th, 2021 at 12:44 am
Absolutely stupendously gorgeous! Would love to be able to afford a smaller version for a coffee table. And I love your suggestion to kids to let the grownups help with the Exacto parts, because if they get cut they probably deserve it for something!
December 15th, 2021 at 11:23 am
Thanks Lynn! :D
February 16th, 2023 at 3:20 am
Hola ! Buenos noches! Me podrías decir, cómo puedo hacer un molde de cabeza de cebra.
Muchas gracias un saludo.
October 18th, 2025 at 3:58 pm
This looks incredible. You’re so talented and creative! The process seems so detailed and meticulously done, and the final result is absolutely beautiful and high-quality. Thank you for documenting and sharing it so we can follow the steps—and maybe even try to recreate them, though not with the same level of talent. Wow, I’m truly amazed by your skill!