
Giant scary clown Pez dispenser!!! — part 1

I made this 6-foot scary-ass clown Pez dispenser for my Halloween party in 2018! The idea came to me when I was working on some other giant candies and realized this would be a pretty easy project that would really add to the overall ambiance.
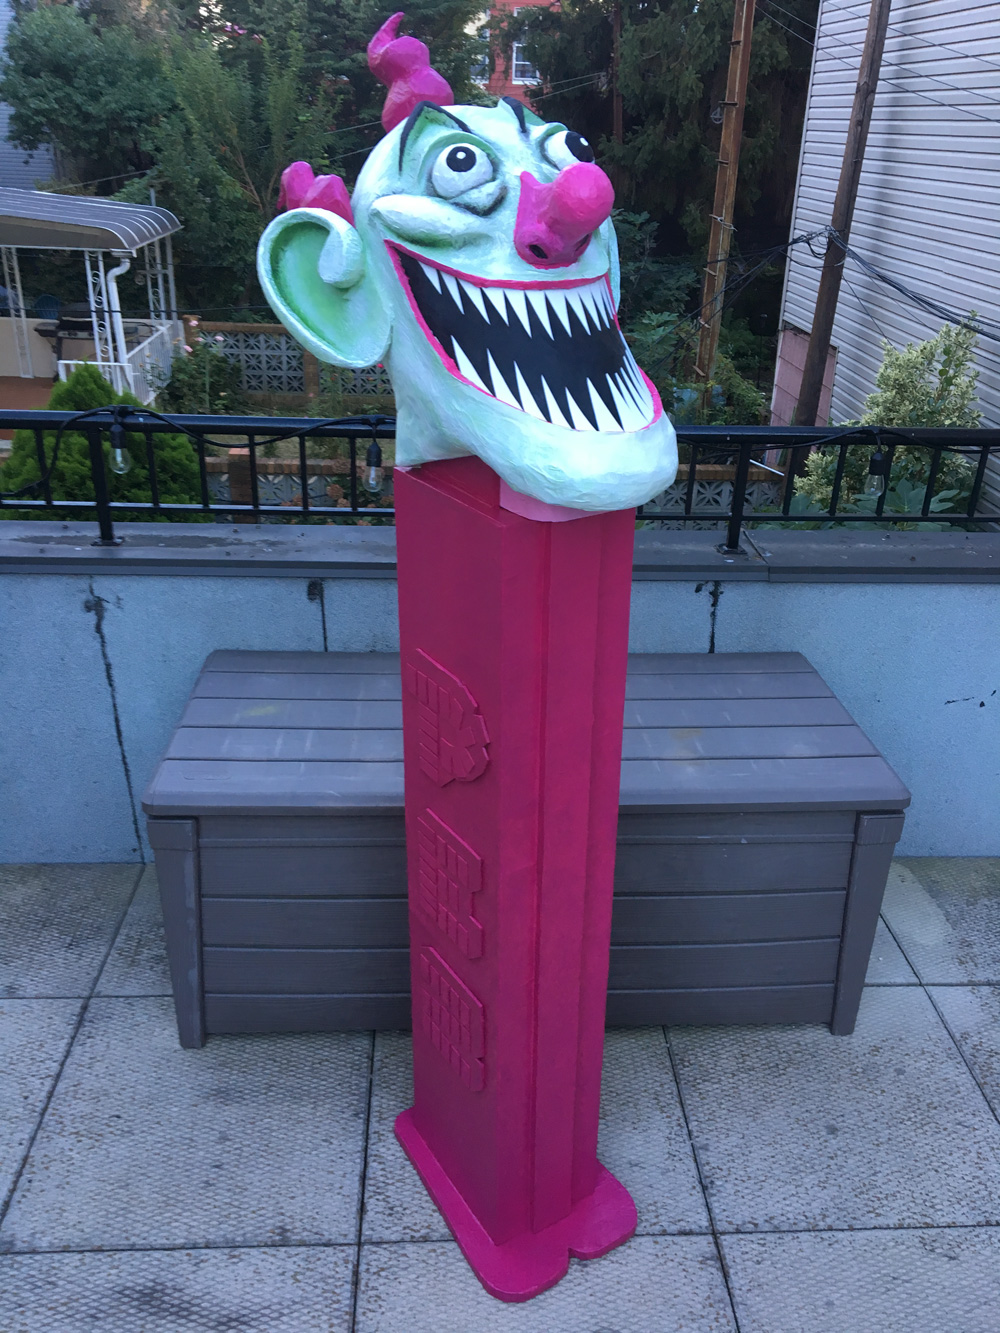
My first step for this project was laying everything out in Photoshop and figuring out the exact measurements for the “body” of the Pez dispenser — the evil clown head I pretty much just freestyled!
Paper maché giant gummi bears!
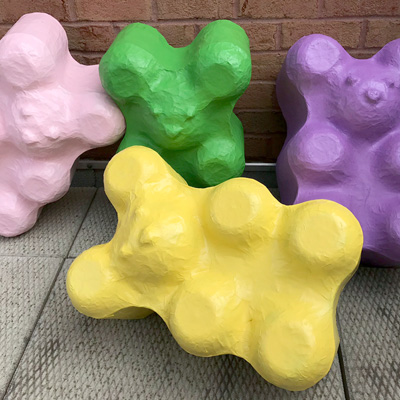
These were so fun! I made these paper maché gummi bears as part of a set of giant candy decorations for my haunted gingerbread house Halloween party!
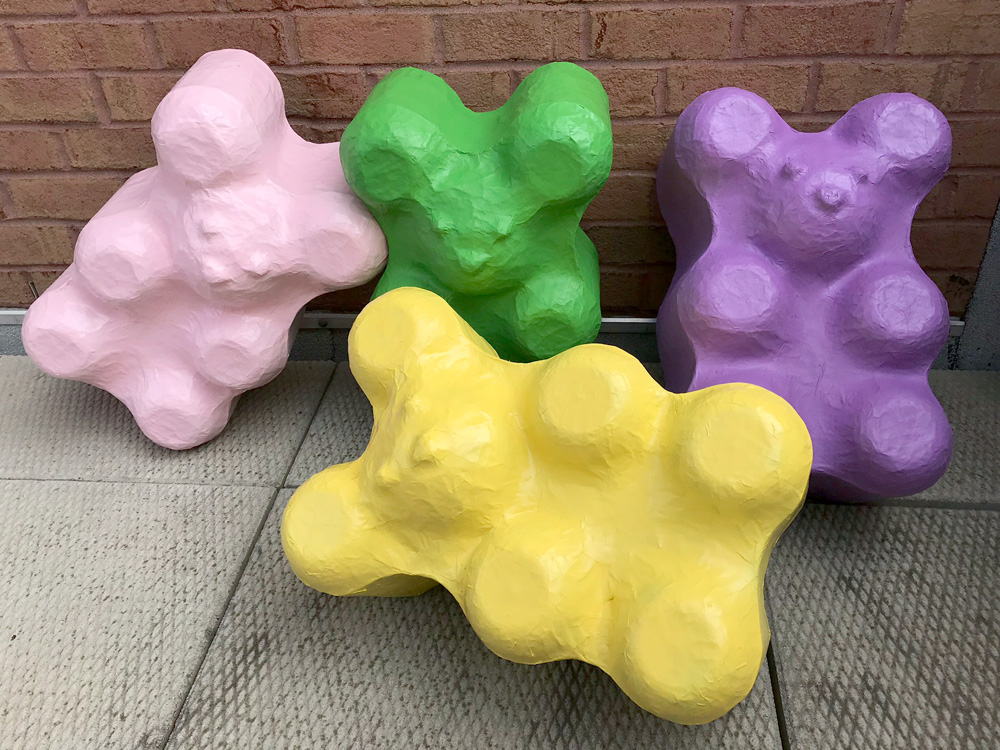
I created a reusable base for the giant gummi bears; I built one nice solid gummi bear shape and then used it to make multiple paper maché copies. (Other projects where I used a reusable base: paper maché baby chicks, twin skull masks)
Paper maché candy corn decorations!
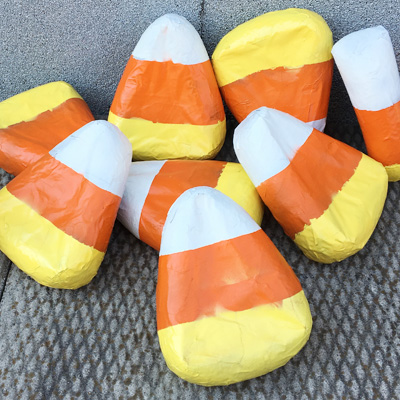
I made these candy corn decorations as part of a set of giant candy decorations for my haunted gingerbread house Halloween party! They were easy and fun! My main goal for the candy corn was to keep them super cheap and super quick, so I could make a ton of them!
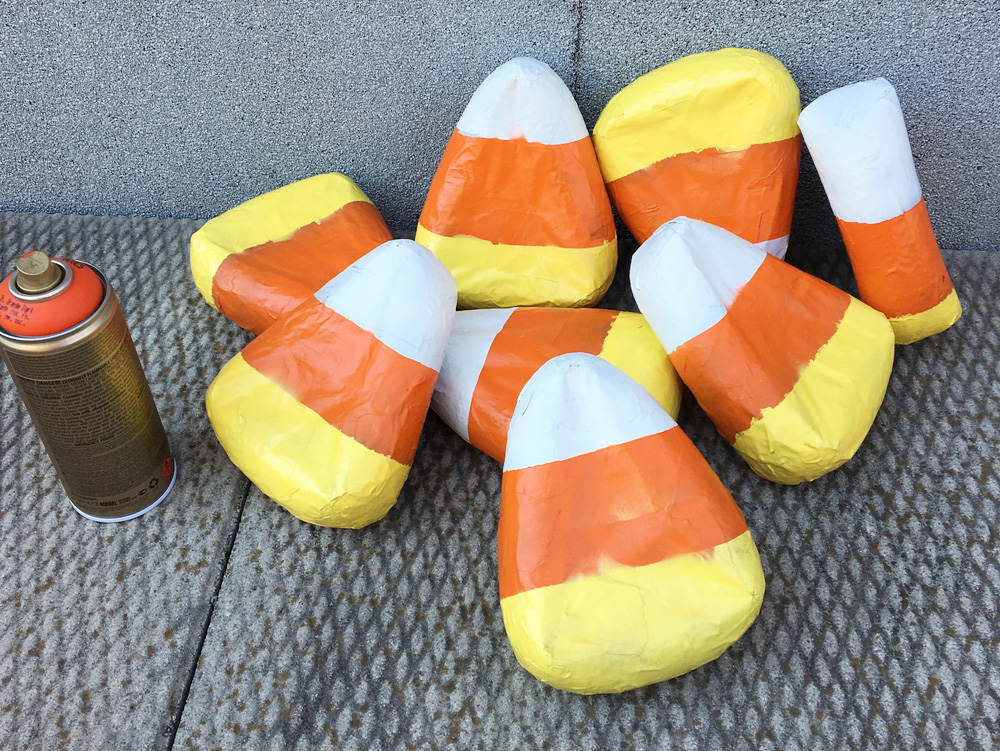
I started with a bunch of foam pipe insulation; I use these things for tons of art projects. I buy them at Home Depot in bags of four 36″ tubes for about three bucks each. Read more…
Giant candy cane decorations!
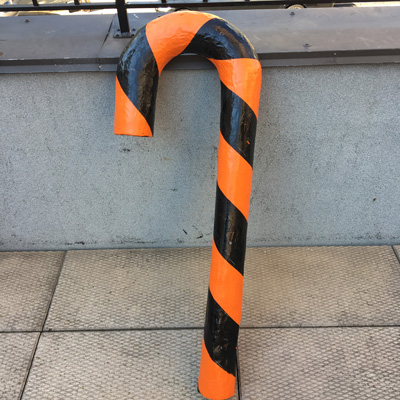
I made these giant 4-foot paper maché candy cane decorations as part of a set of giant candy decorations for my Halloween party — that’s why they’re orange and black rather than red and white! Our theme was basically “haunted gingerbread house” so I made lots of different kinds of giant spooky candies. I did these in Halloween colors but of course you could do them in more traditional colors for Christmas!
Making an oversized medieval key prop
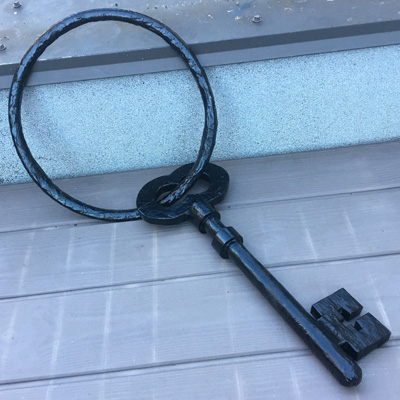
Check out my giant medieval key! I made this for our spooky gingerbread house themed Halloween party, to hang on our bathroom wall across from the bathtub-converted-into-a-cage-full-of-bones. This thing was so easy to make, and it only took one day (besides painting).
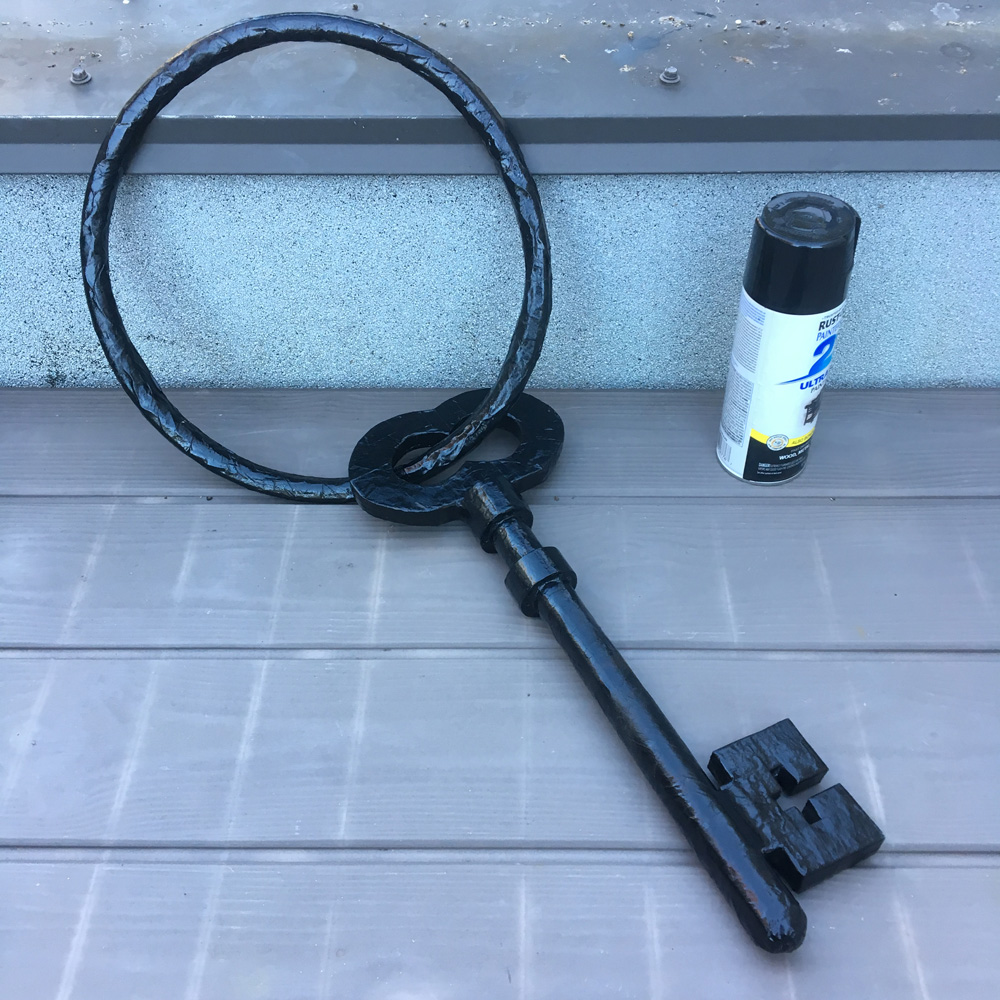
I started out by doing a Google image search for medieval keys. There are so many cool styles to choose from; I sort of mixed and matched some elements from a few keys, with the goal of keeping the design simple and iconic. Read more…
Halloween 2018 theme revealed: Gingerbread house!

This year for our Halloween party we’ll be transforming our apartment into a haunted gingerbread house, à la Hansel and Gretel but Halloween-ified, with tons of giant paper maché candies, a huge witch statue and an oven, and probably some bits from other spooky fairytales mixed in. Check out the invitation video, with art and animation by me and music and sound by Robbie Davis:

You ain’t invited but you can watch the video!
“Good enough for Halloween!”

“Good enough for Halloween” is a phrase I say all the time; it’s basically my mantra during all of August / September / October, and I do not say it lightly!
I hope I don’t need to explain that Halloween is my favorite time of year, and I care about it so deeply that I can get super emotional about it if I’m not careful! So you might think that I’d want to obsess over every detail of my Halloween projects, but it’s really the opposite! I honestly try to cut as many corners as possible for my Halloween stuff. Read more…
Hot glue gun tips!

For some reason I avoided getting a hot glue gun for years, and when I finally did it kind of changed my life! Now I rely on my hot glue gunS — that’s right, plural — for practically all my creative projects, and some real-life stuff too.
Different sizes
So yeah, I have two hot glue guns, which take different types of hot glue sticks; I use the two different kinds for for different types of tasks.
Experiment: Elmer’s Paper Maché Art Paste
After several years of doing all my paper maché projects with my trusty Roman PRO-543 universal wallpaper adhesive (paid link), I’ve decided to try some experiments with other kinds of adhesives. First up: Elmer’s Paper Maché Art Paste.
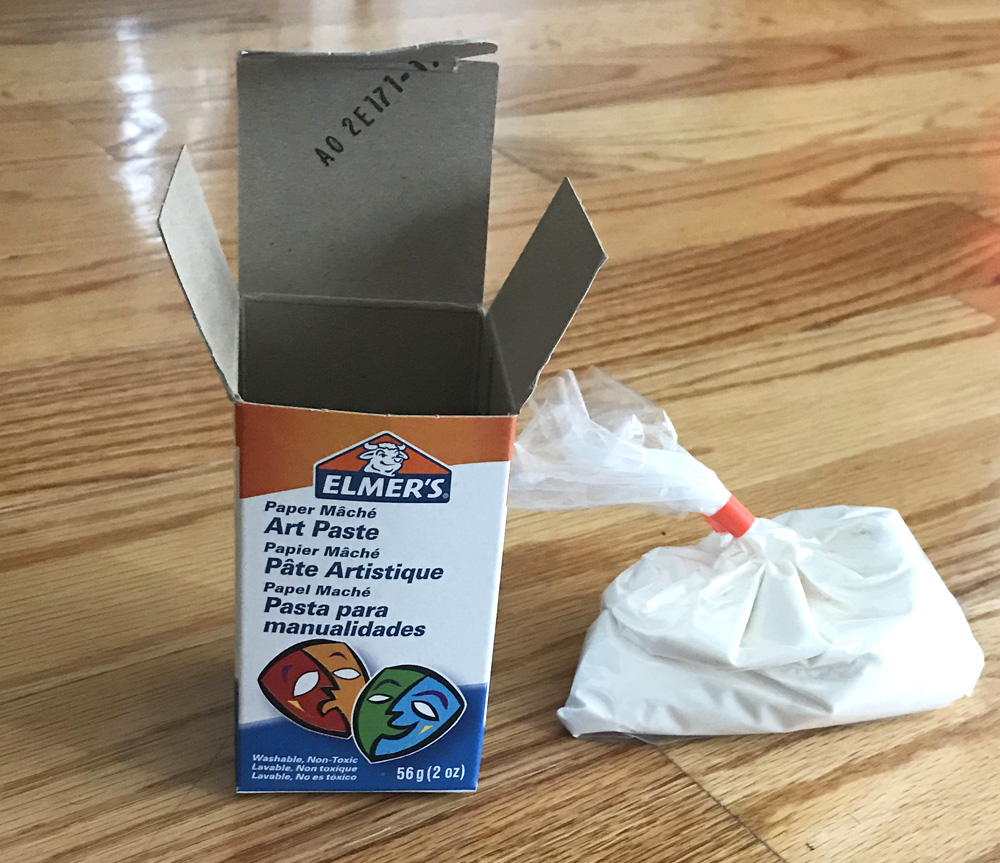
Elmer’s Paper Maché Art Paste (paid link) is a powder that comes in a small bag packed into a small box. As of this writing it’s around $5.50 on Amazon (sometimes available at 3 for $10.50!), and the instructions say to add one gallon of water, meaning you get about a gallon of paste after mixing, which is great! However, the math ends up being a little less favorable than that; more on that below. Read more…
Making paper maché shapes with a reusable base
This is my method for creating multiple paper maché copies of a shape using a reusable base. I’ve tried different variations on these steps over the last few years and have settled on this process as my favorite.
Start with a base
First, you wanna build a base for your sculpture, so that you can cover it in paper maché and make copies of it. Read more…
Attaching a hard hat in a paper maché mask
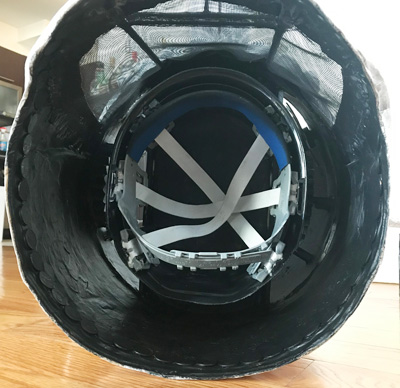
Hello! I’m just putting this long boring article here so I can link to it from other posts rather than explain the same thing every time. I mount almost all of my big paper maché masks on a hard hat. Obviously all my masks are very different shapes and sizes, so a lot of this can vary, but this is my basic method that I’ve settled on…
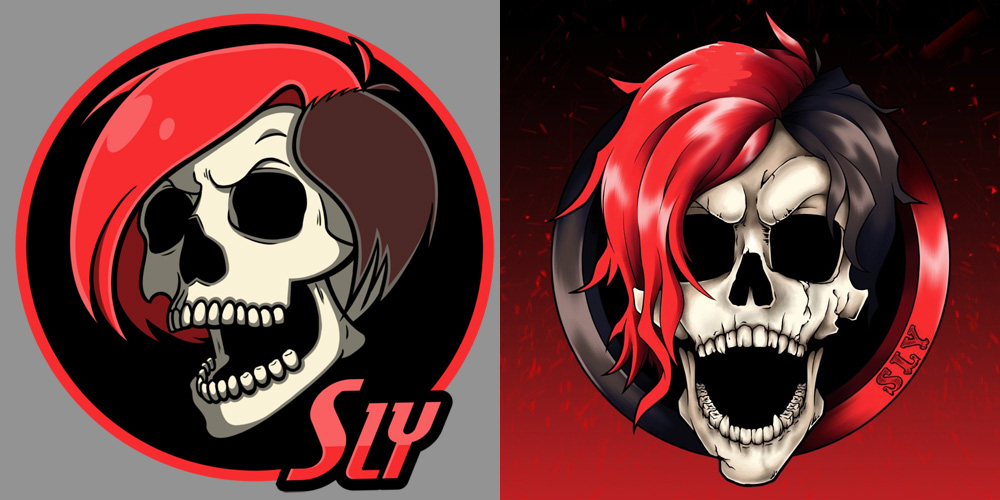
Custom SLY skull trophy sculpture
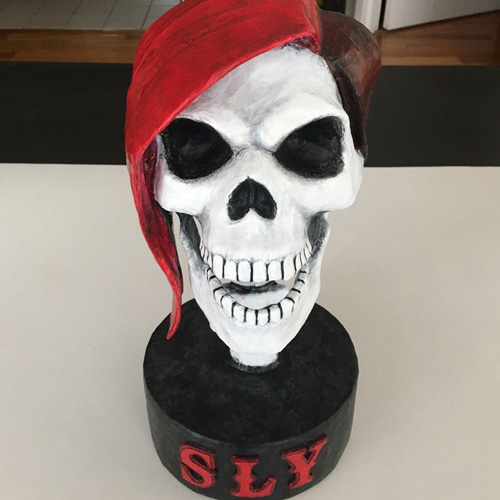
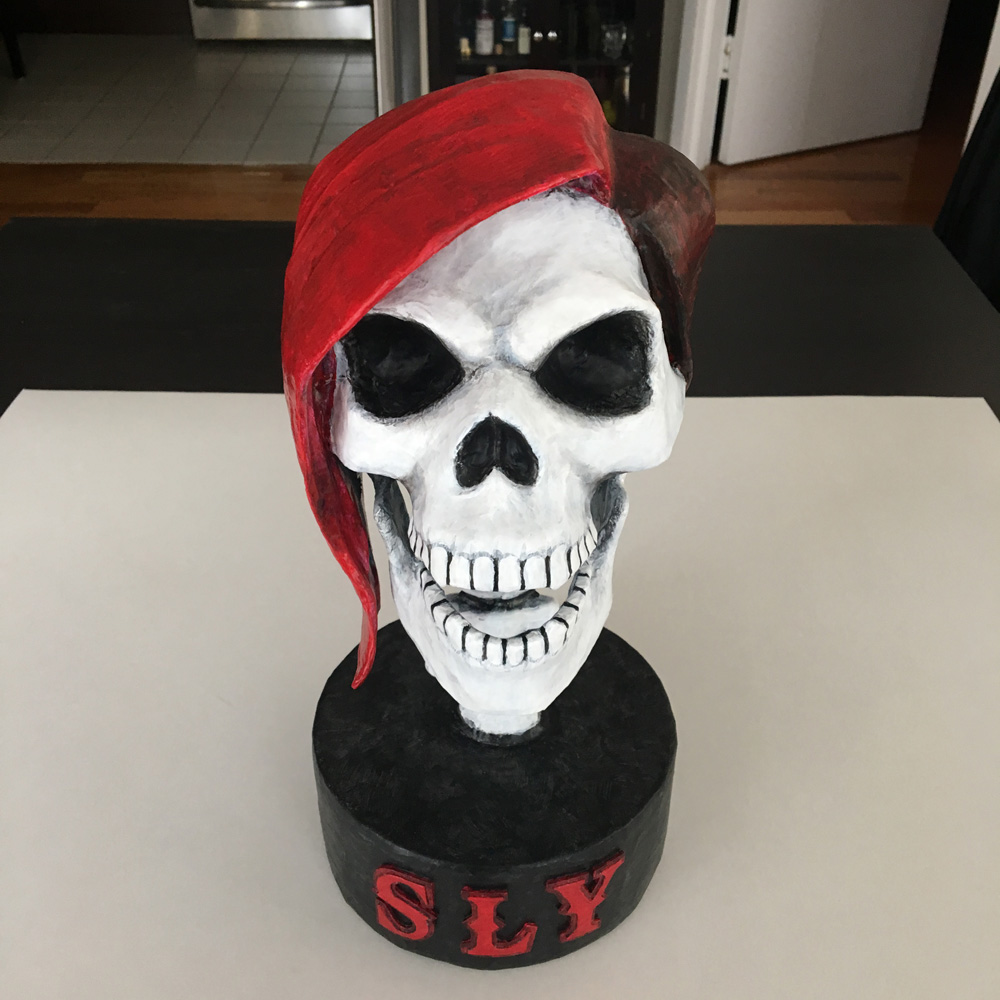
I made this skull sculpture (skullpture??) for my good friend, Twitch superstar Slyvinlisha, aka Sly. I made the sculpture based on two different versions of her logo illustration, pictured below.
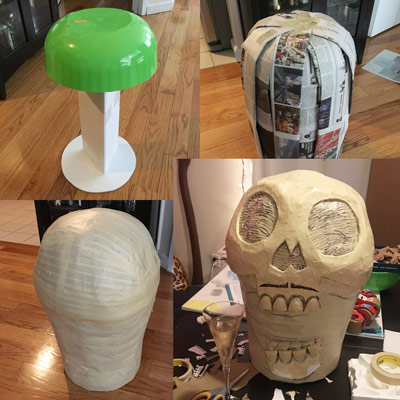
I started with a nice plastic skull from one of my Halloween skeleton decorations that broke in half due to a spooky Halloween mishap! I broke the neck off at the base and put the rest of the bones away to use for other Halloween decorating purposes. Read more…
My mask making process
Hooboy, I’m finally typing all of this up! Here’s my basic process for making big paper maché masks, including materials, my paper maché process, etc. These are just guidelines, and I change parts of this process for almost every mask, but this the basic stuff right here.
Design
I always design my mask on paper, through tons and tons of sketches. I always draw it from the front and sides, and sometimes other angles if they’re important to the design. Read more…
Axeman skull mask! — part 2
This is part two of my Axeman paper maché skull mask for Mardi Gras 2018; see part one here.
Making the mustache
You may remember from part one I wanted to make the mustache attach to the skull with magnets so it’s removable. Here’s my convoluted process for designing the mustache, getting it to match the curvature of the skull, and getting the placement of the magnets correct.
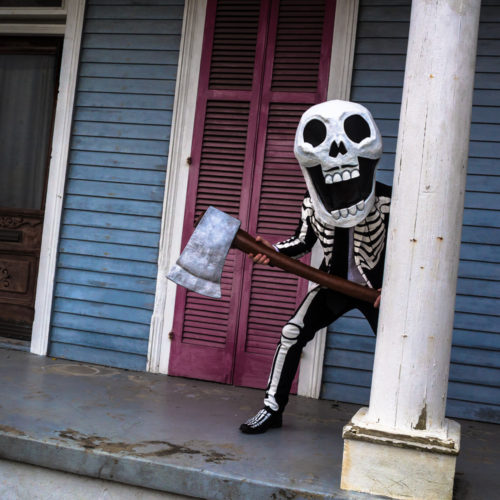
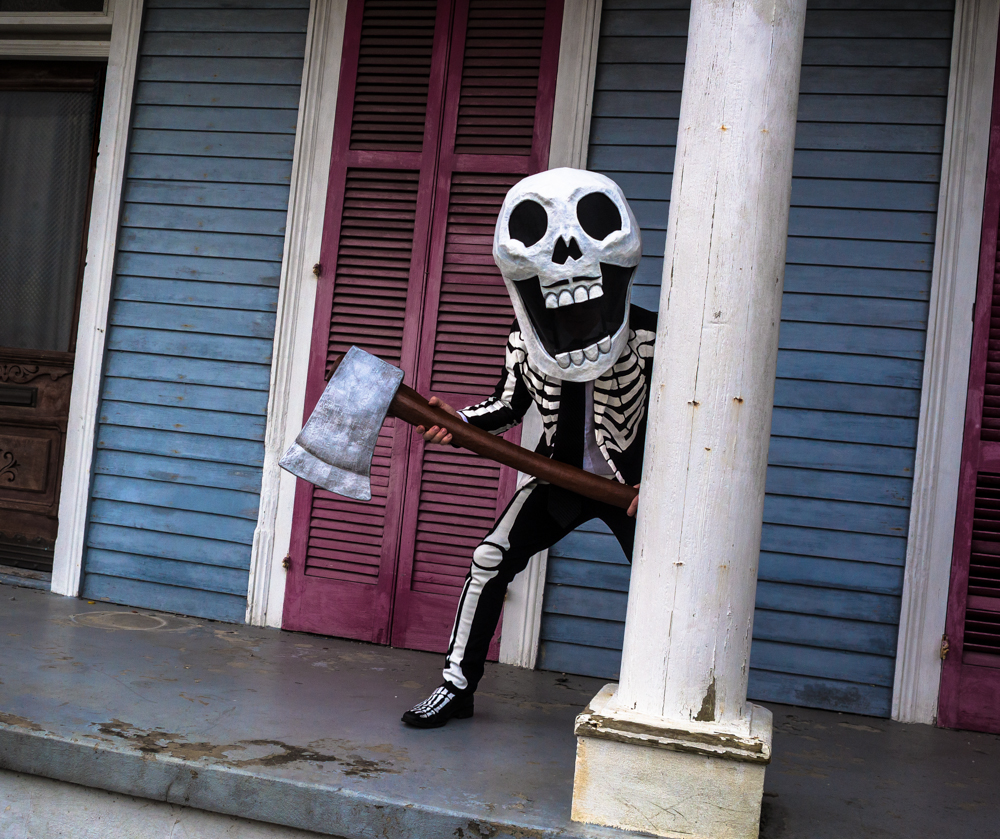
Axe Man skull mask for Mardi Gras 2018
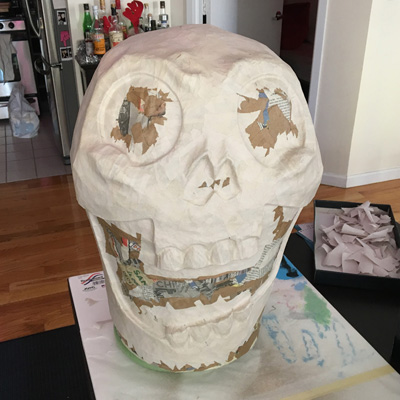
Here’s my Axe Man skeleton costume for Mardi Gras 2018! The Axe Man was a semi-legendary serial killer in New Orleans in 1918-1919; you can read all about him here. This year our skeleton group designed skulls and costumes based on figures from New Orleans history, to celebrate the city’s tricentennial, so of course I picked the creepiest guy I could find. Here’s how I made his skull mask, and don’t miss my other article about making the oversized paper maché axe prop.
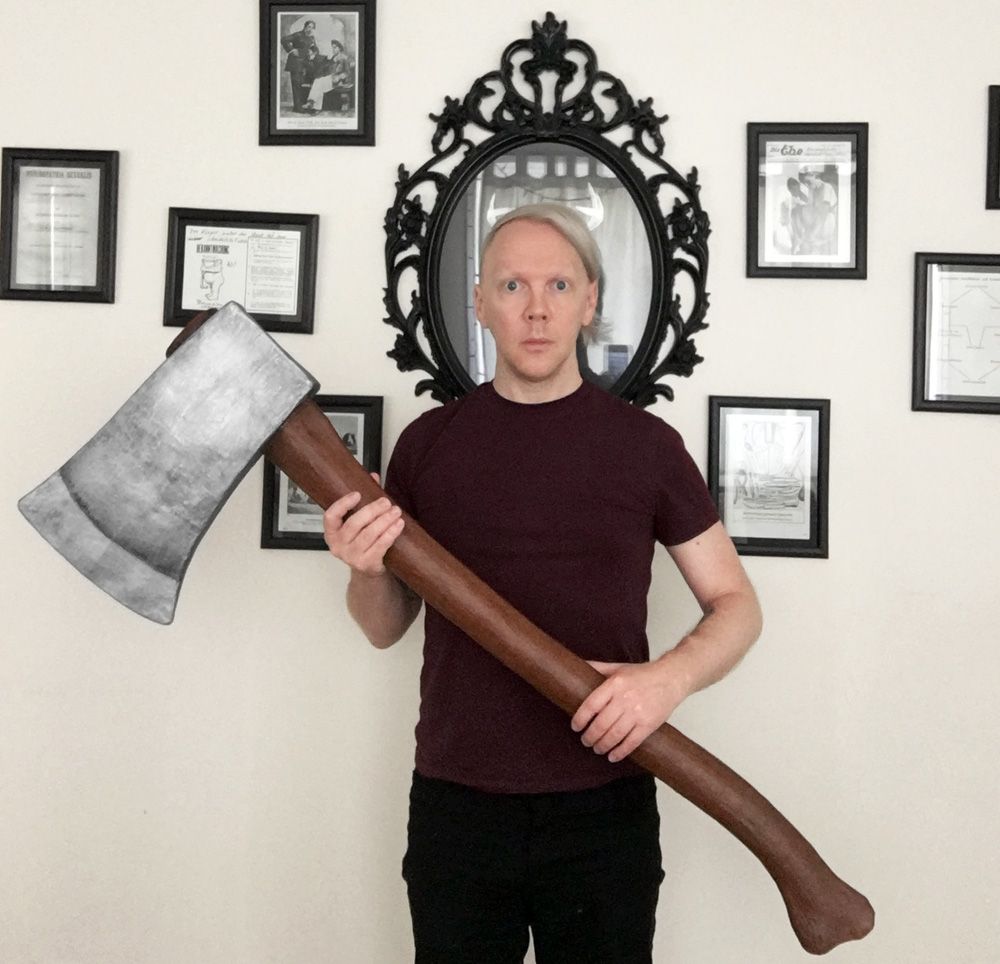
Making an oversized paper maché axe
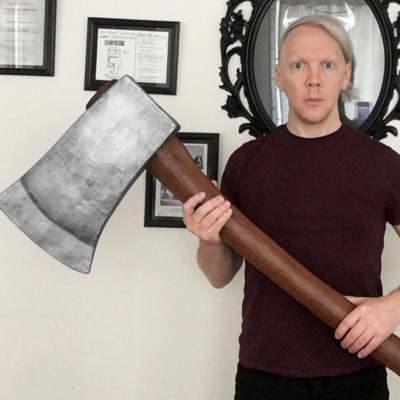
I made this big ol’ paper maché axe prop for my Axe Man skeleton costume for Mardi Gras 2018 (read about the real Axe Man here!). It was easy to make! Here’s how I did it…
(Wax mannequin for scale.)
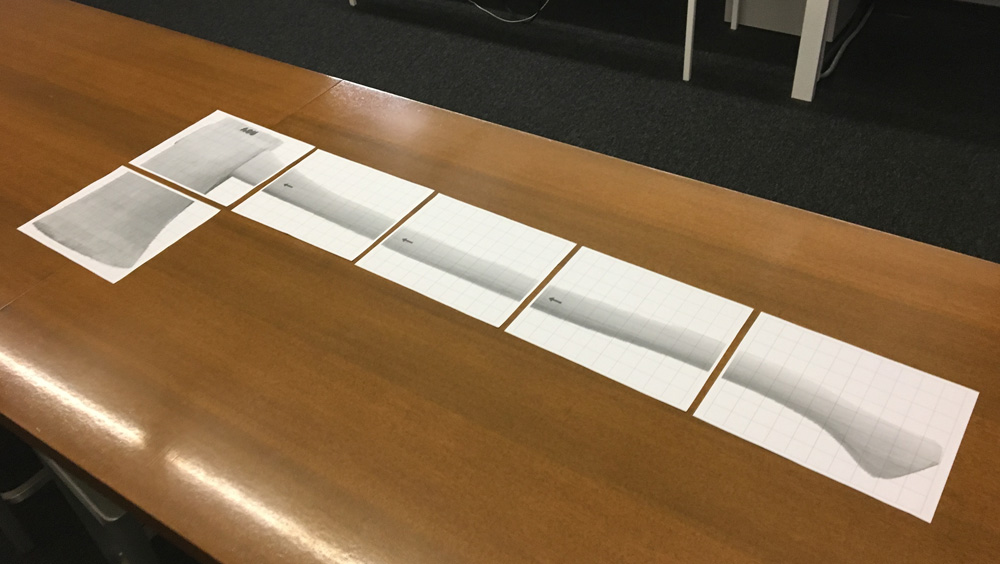
I started by grabbing a photo of an axe online and editing it in Photoshop to be the size that I wanted; about 48 inches long total with an oversized blade that’s about 16 inches long. Read more…
Tiny hand-made crown for my bunny rabbit!

I made this tiny crown for my old blind bunny rabbit, Acide, for this 13th birthday! It was a quick last-minute project and I didn’t take any pics of my steps, but it was really easy; I’ll explain how I made the thing…
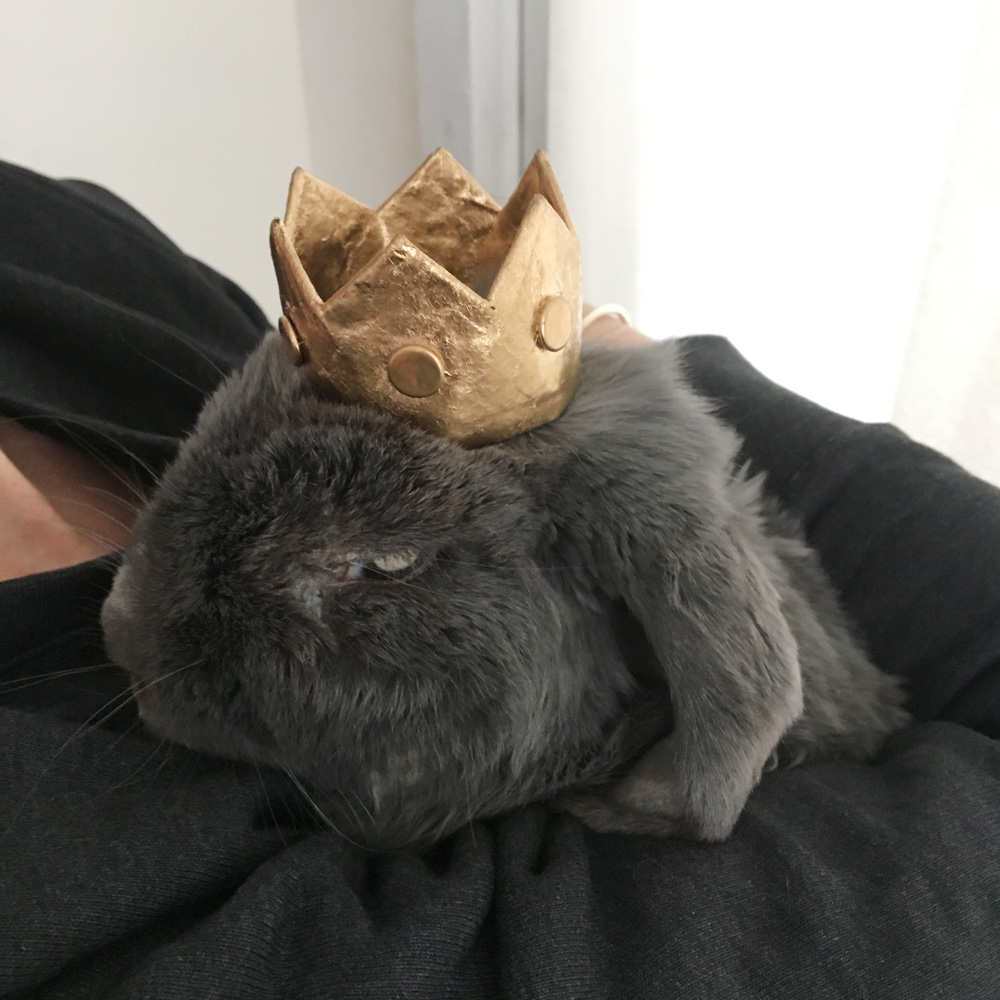
I designed the basic shape for the crown on paper and then traced that onto craft foam and cut it out.
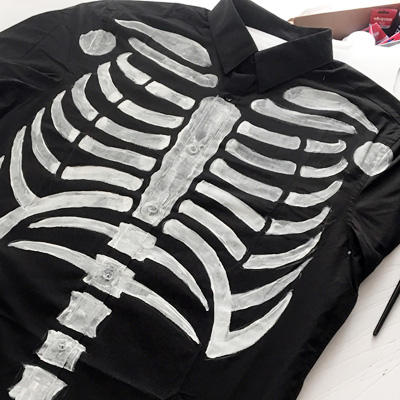
Painting a skeleton shirt with fabric paint
I’ve already posted two articles about painting skeleton clothes — my first skeleton suit, and a new pair of skeleton pants — and I learn something new every time I paint up some new clothes.
I’ve been wearing my skeleton suit every Mardi Gras for years now, usually with a black dress shirt, sometimes with a tie and/or vest, but last Mardi Gras (2017) was so warm it made me realize I also need an option that doesn’t involve layers. So I decided to paint this skeleton dress shirt. Read more…
Drawing latitude and longitude lines on a homemade globe

These are the steps I used to measure and draw the latitude and longitude lines for my paper maché globes project.
The globes I designed were intentionally somewhat simple and cartoony, and so I decided to do just 7 latitude lines and 8 longitude lines.
Craft foam sea serpent and other relief shapes
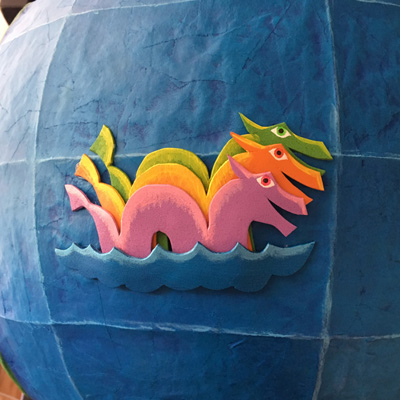
I made these layered craft foam reliefs to use as decorations on the paper maché globes I made recently.
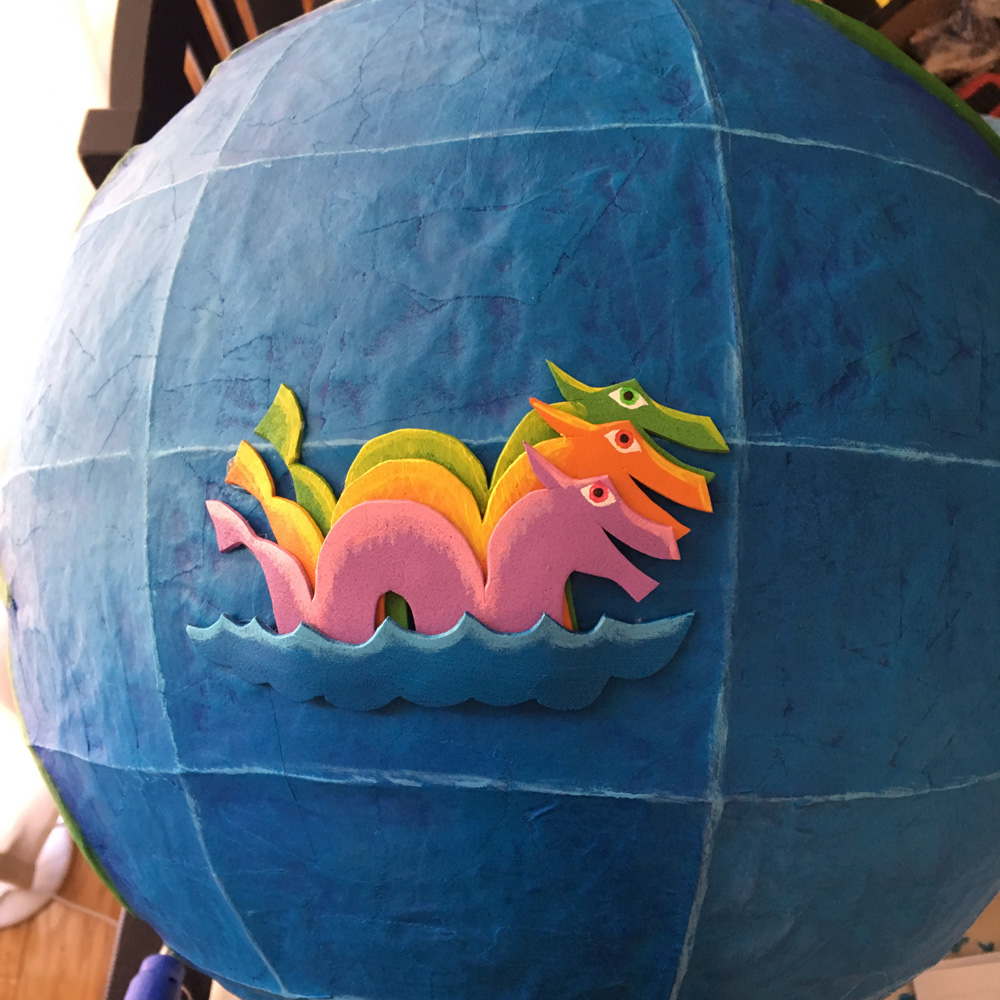
I designed three different relief elements for the globes: Isabella the three-headed sea serpent, a ship based on the Crewe of Columbus logo, and a simple compass shape. I decided to make two copies of each, so each of the two globes could have all three elements.
 About Manning Krull
 How to make a 4-foot paper maché alligator
 My violin skull mask, Mardi Gras 2015
 Three-headed paper maché dragon sculpture