
Posts tagged "paper mache":
Now offering custom paper maché masks and sculptures
Interested in a custom papier-mâché mask, sculpture, cosplay armor/accessories, etc made by yours truly? I’ve been getting a lot of requests about paper maché commissions lately so I’ve added a page about custom pieces, with some guidelines about timing and pricing. Drop me a line and let’s talk!
Stabby ghost costume!
This was the second of the two “person getting killed by a ghost” costumes that I designed. Read about mine here for most of the basic info. I made my fiancée’s ghost second, using most of the same steps and materials, with a few important differences. I’ll cover those below…
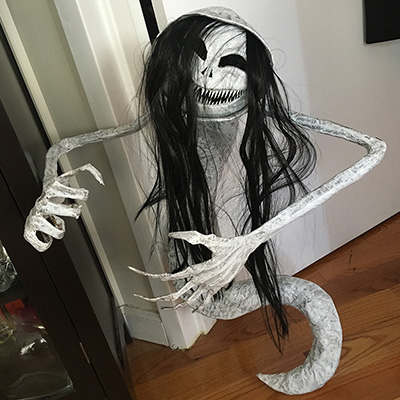
Strangler ghost costume!
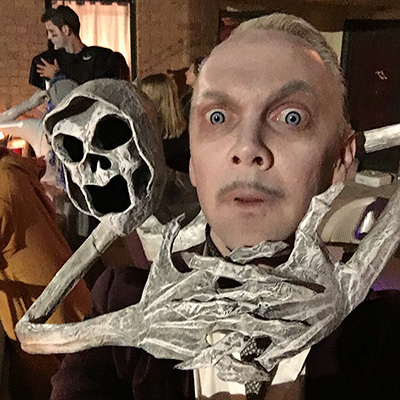
Hooboy, this costume was a big undertaking! The basic concept for this costume is a lightweight ghost sculpture, made with wires inside to make it somewhat adjustable, and it’s attached to a harness worn under one’s clothes. There were so many different parts to build and so many problems to solve, and I basically made up the whole thing as I went along, jumping around from part to part in a weird order. So, I’ve put together as much info as I can about how I made this thing here…
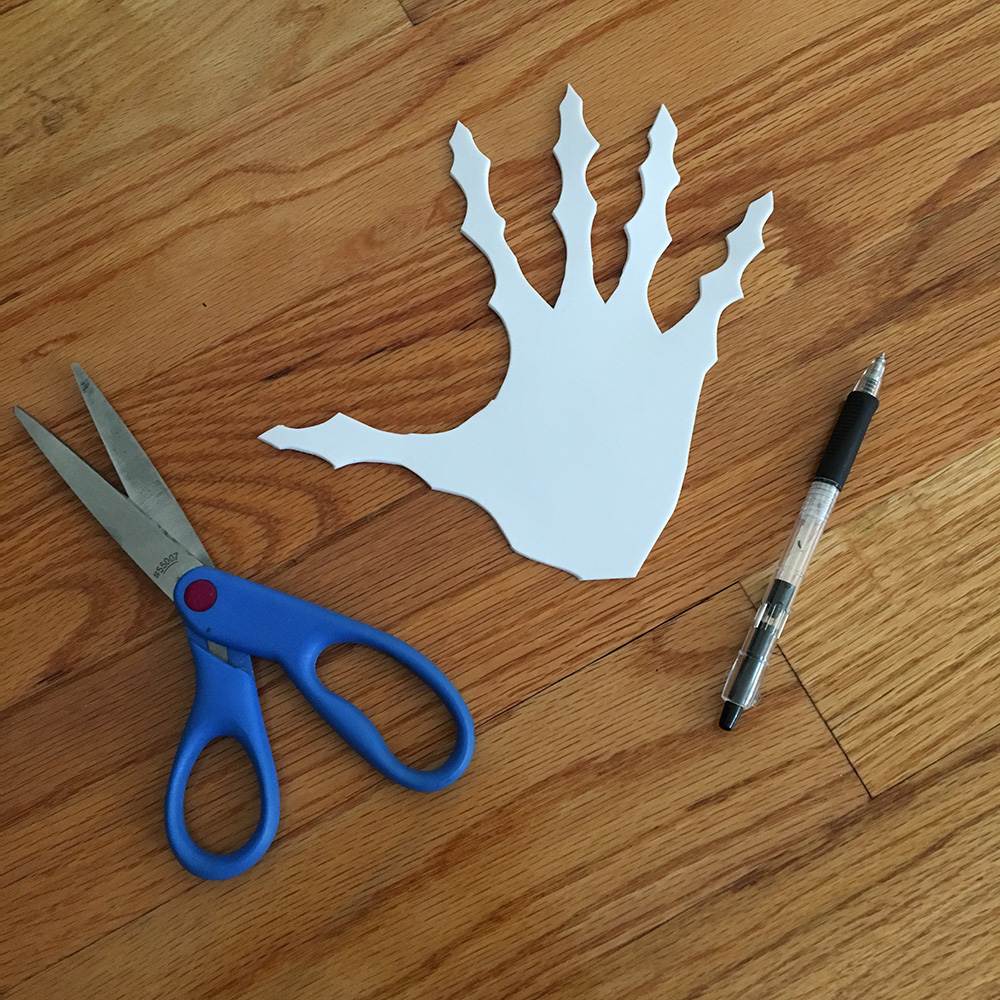
Creepy paper maché hands for my ghost costume

I made these creepy hands for my “guy being strangled by a ghost” costume! (Article about that whole thing coming soon.) You could use this same method for posable, realistic hands for any kind of monster decoration: a witch, a vampire, a zombie, etc!
First, I traced my own hand onto a sheet of craft foam (aka Wonderfoam). I kept my thumb stretched way out since ultimately I wanted these hands to be in a strangling position around my neck.
Paper maché spooky lamp prop
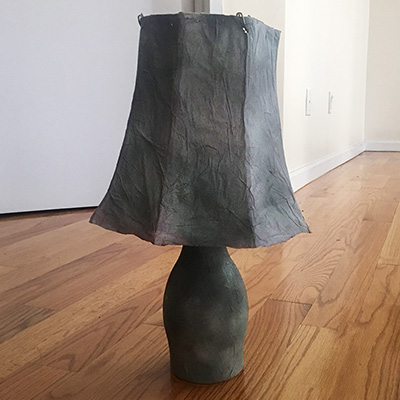
This is part five of my paper maché furniture projects for my séance Halloween party; see part one; chairs, part two; table, part three: mantel, and part four; nightstand.
I got the idea for this lamp when I saw this plastic bottle of almond milk in our fridge; it’s a neat bowling-pin shape that’s perfect for an old-timey lamp. I decided to add this lamp project to the list of lightweight paper maché furniture that we’re hanging from the ceiling for our spooky séance party.
Paper maché Victorian nightstand
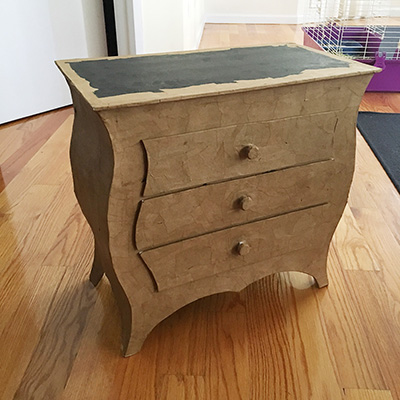
This is part four of my paper maché furniture projects for my séance Halloween party; see part one; chairs, part two; table, and part three: mantel.
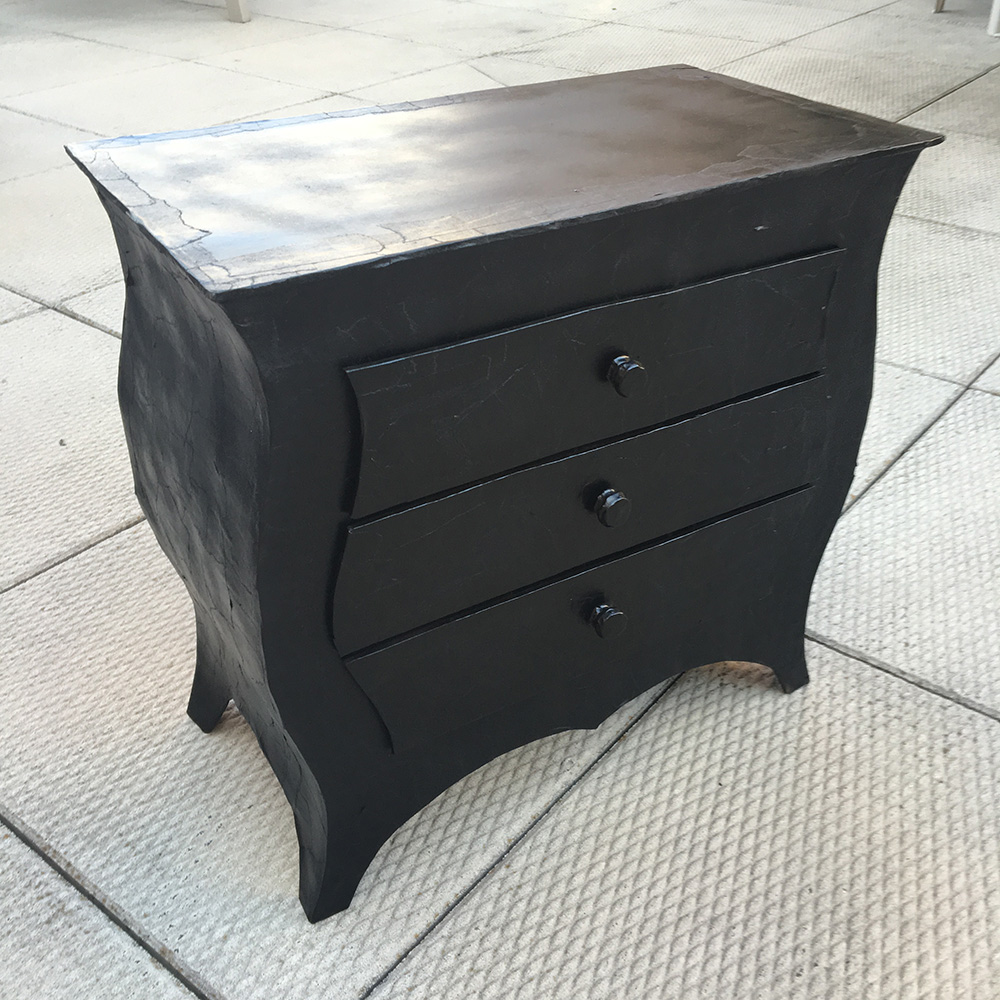
Okay, one last piece of furniture before I lose my mind! This time, a floating haunted nightstand with a floating haunted lamp.
I started the nightstand with three big pieces of foam board — the front, back, and top.
Mantel prop for my séance Halloween party

This is part three of my paper maché furniture projects for my séance Halloween party; see part one; chairs and part two; table.

This mantel is possibly the biggest paper project I’ve ever made! (Well, this or the giant spider.) I don’t have a ton of work-in-progress photos for the construction of the mantel — I did a tremendous amount of sketching and measuring beforehand, and a lot more along the way as the thing came together and I kept adding things. Almost all of the pieces are foam board, with a little bit of poster board, all held together with lots and lots of packing tape and masking tape.
Paper maché table for my séance party
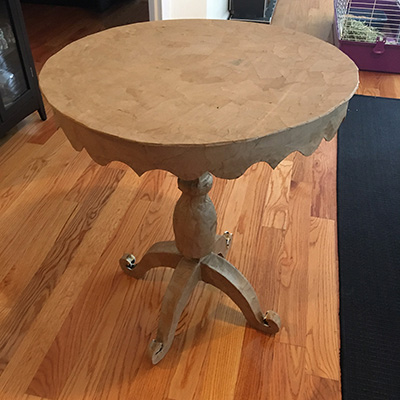
This is part two of my paper maché furniture projects for my séance Halloween party; see part one (chairs!) here.

With the chairs done, I moved on to the table! Unlike the chairs, I didn’t have a real table handy to use as a model for this, so I just made up a table based on some Google image searches for victorian round table.
Teeth-making tips for big paper maché masks
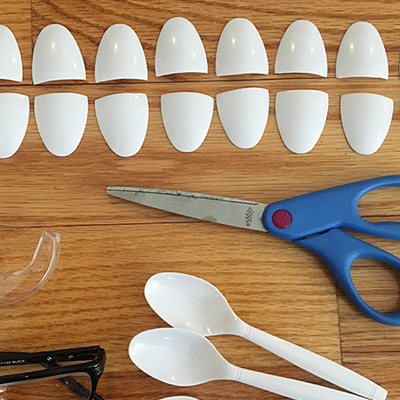
In all of the large paper maché masks and heads I’ve made, the teeth are always, always the most labor-intensive and challenging (and sometimes frustrating!) part. I’m always amazed at what a large proportion of my time and effort go into such a small part of the head! I’ve tried a few different methods for making teeth over the years, with varied success. Here are the methods I’ve used, and some pros and Cons:
Making big paper maché masks — advanced tips
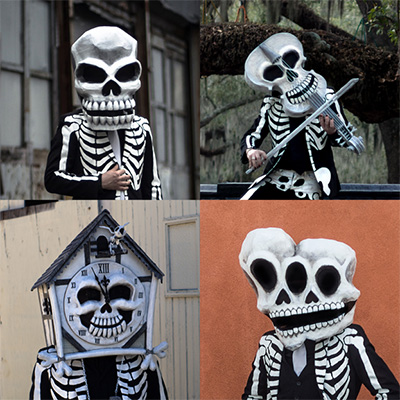
In making all my big paper maché masks I’ve learned a lot of important things along the way — things I could only figure out through trial and error, but now that I know about them they’re a huge help in every subsequent mask I make. I’m by no means an expert! I’ve only made four big skull masks so far, and I have two more in the works (one skull and one non-skull) but with each one I can see them getting easier and easier to make and to wear, thanks to these tricks I’ve worked out over the years. Here are some of them…

Tips for working with gesso
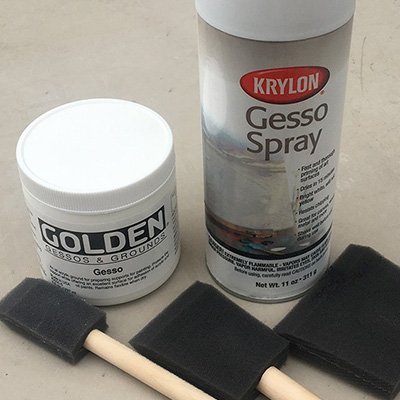
If you’ve ever created any paper maché projects and then painted them, you’ll surely have noticed that the edges of your paper are often still visible, sometimes even after several layers of paint. I hate seeing those paper edges in my stuff, and I’ve learned I can reduce this with a few techniques, like being really precise with my last layer of paper, and doing a final layer of just paste smoothed over the whole shape with my hands. Still, even when I do that stuff I end up still seeing those paper edges through the paint sometimes. It drives my crazy.
A video of my cuckoo clock skull mask in action!
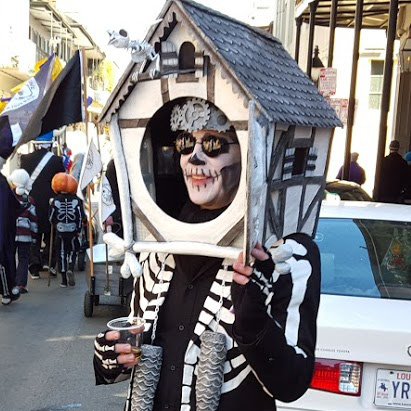
A friend of mine took this video of me opening and closing my mask on Mardi Gras morning, around 9am at Jackson Square. The hinge mechanism in the door (made from a plastic file folder and some magnets) held up great over the course of the long day. Check out parts one, two, and three of my process for making this mask, and the article I wrote about making the little cuckoo bird skeleton. Fun!
Making the bird skeleton for my cuckoo clock mask
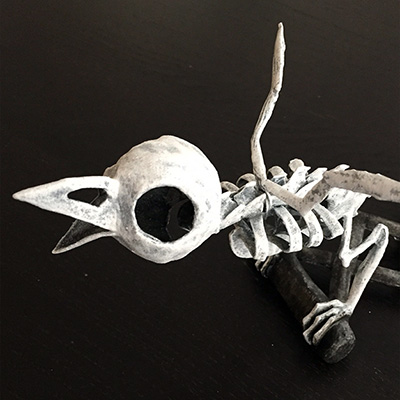
I made this bird skeleton for my cuckoo clock skull mask for Mardi Gras 2016. Making this skeleton was extremely challenging, and I basically made up all the steps as I went along. I had no idea what I was doing, but I learned a lot and I’m very happy with the end result. I didn’t take as many pictures as I should’ve along the way, so I’ve done some sketches to explain certain steps.
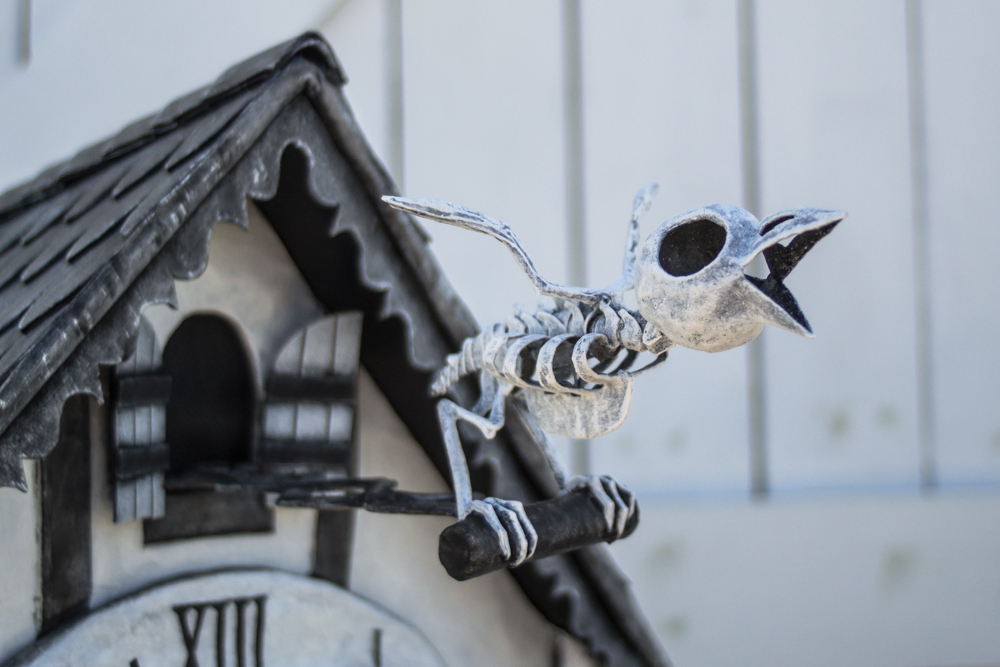
The main materials in the bird skeleton are:
Cuckoo clock skull mask — part 3
This is part three of my cuckoo clock skull mask project. See part one and part two.
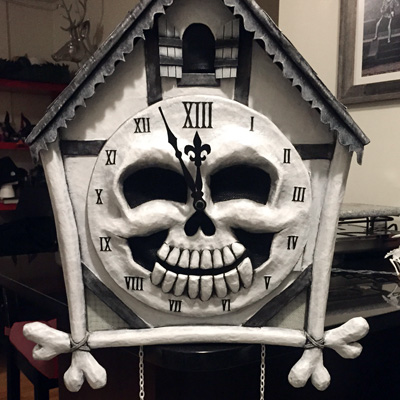
Where were we? Oh yeah, it’s time to paint!
Painting the mask
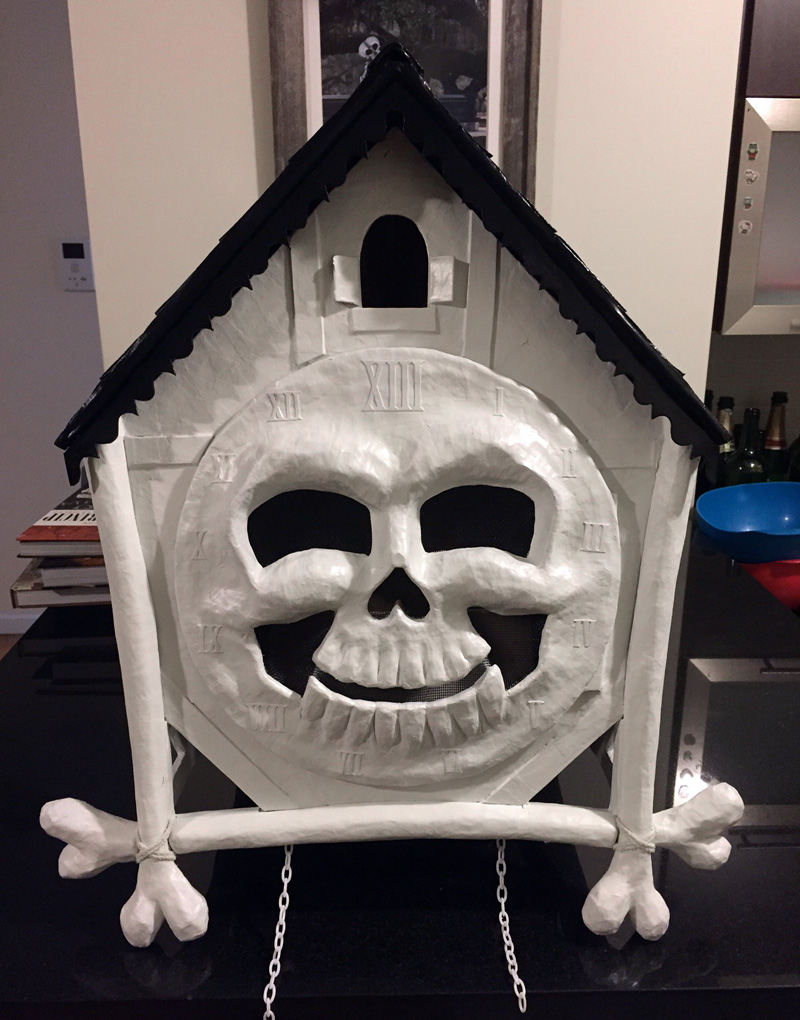
I painted the clock body and the roof separately for the most part before joining them together. I first protected the screen in the eyes/nose/mouth with blue masking tape (the kind that’s really easy to remove), and then I spray painted the entire exterior of the clock white. I separately spray painted the roof black. I let these pieces air out for about three days outside.
Cuckoo clock skull mask — part 2
This is part two of my cuckoo clock skull mask project. See part one and part three.
Scale-pattern shingles on the roof
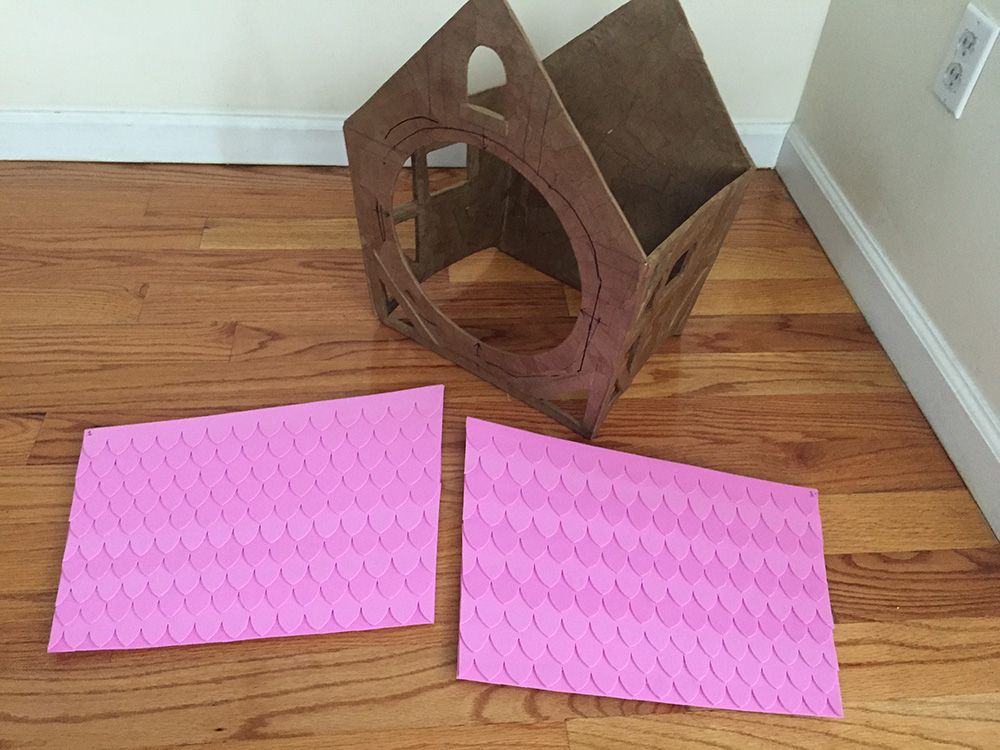
I started the roof with two foam board panels. My process for creating the scale-shaped shingles was kind of convoluted…
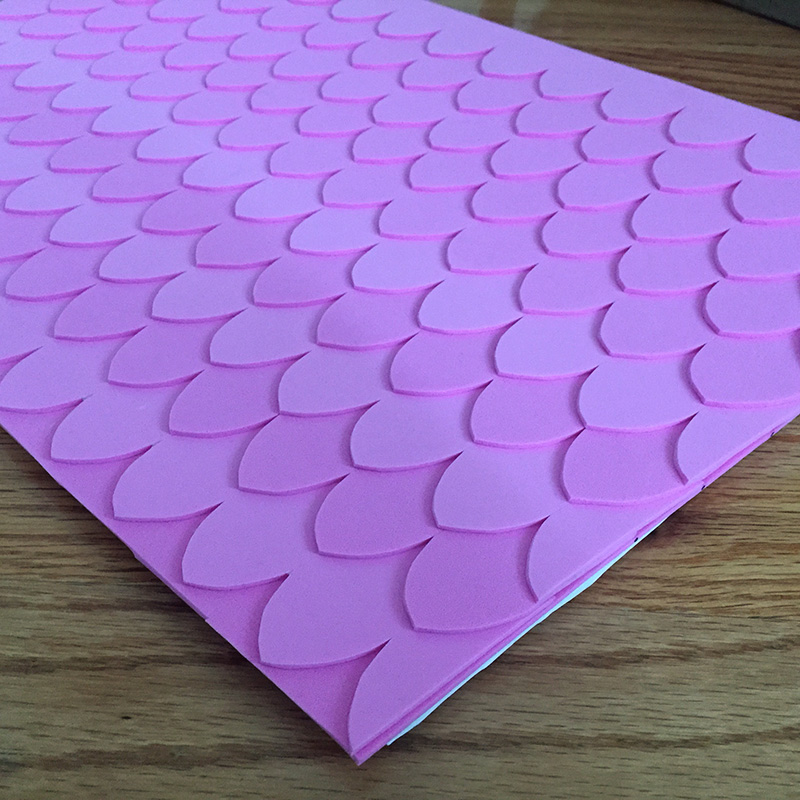
The pattern on the roof is made with a few layers of craft foam (aka Wonderfoam). I made this way harder for myself than it needed to be! Since all my wall and roof panels were irregular shapes — there isn’t a single 90-degree angle on this whole mask — I needed the scale-shaped roof tiles to start out larger near the top of the roof and get smaller toward the bottom. I ended up designing the whole roof surface in Photoshop, starting with a nice regular scale pattern on a rectangular shape (figure 1). Read more…
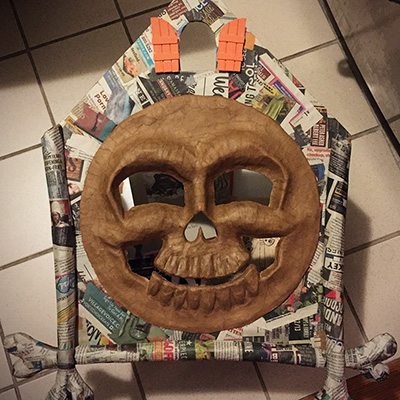
Cuckoo clock skull mask, Mardi Gras 2016
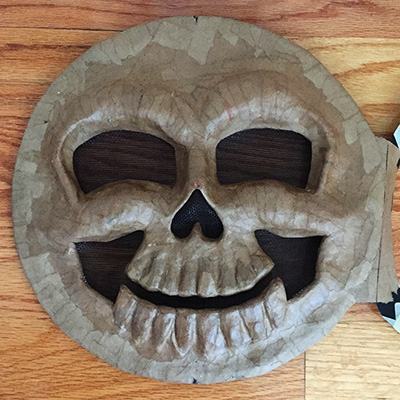
Behold my cuckoo clock skull mask for Mardi Gras 2016! Wow, this one was complicated and fun! Here’s the short version…
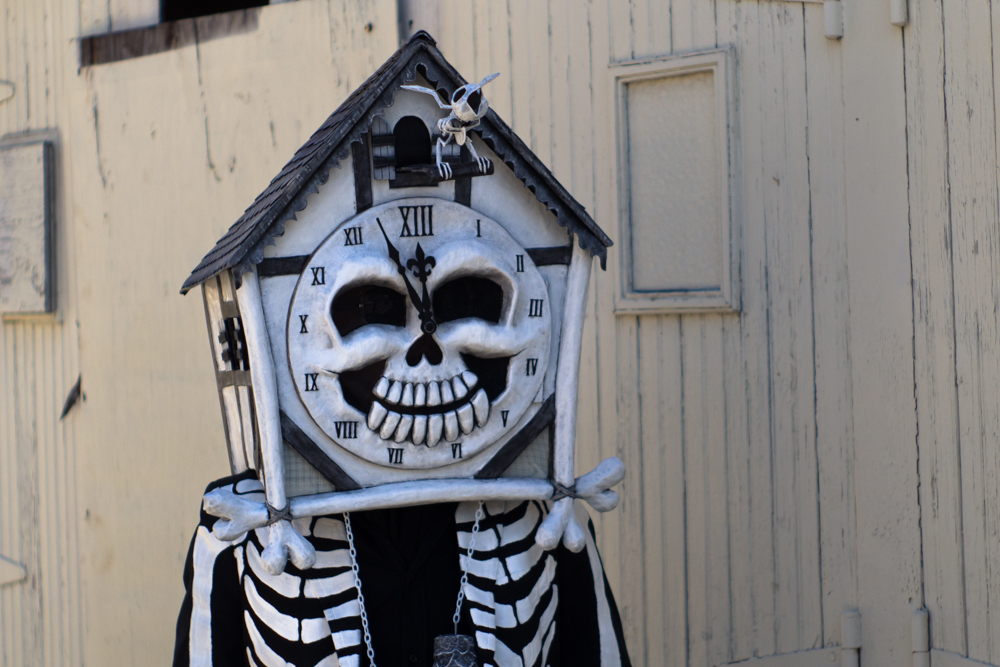
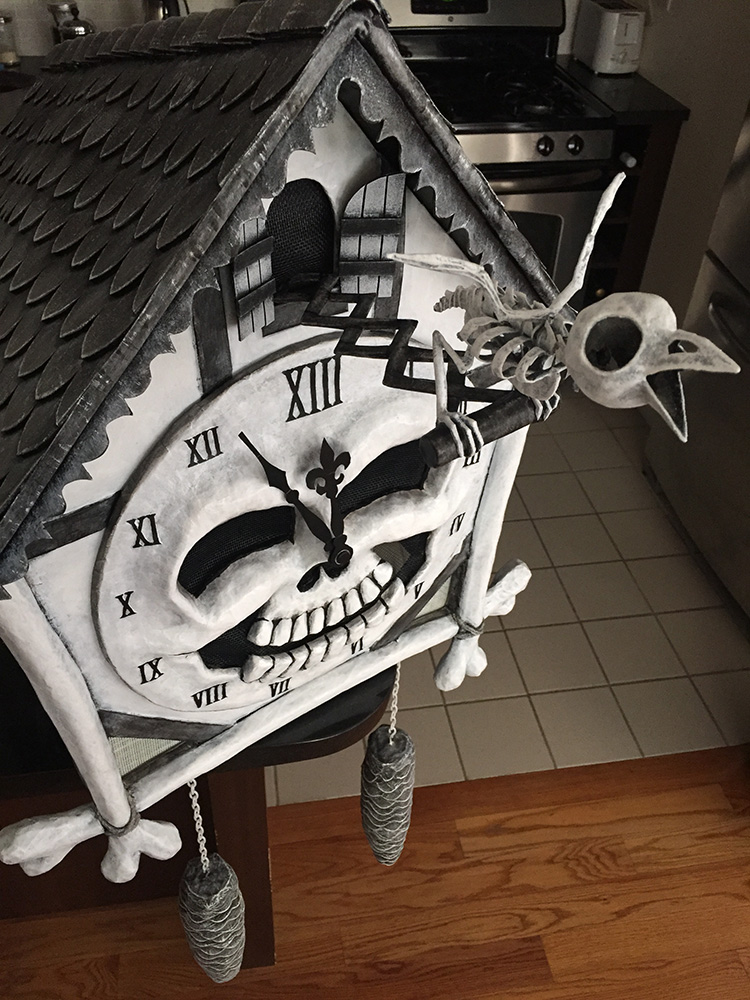
This mask was made up of a lot of individual paper maché parts that I built separately and assembled. Here’s a very quick rundown of the parts and what they’re made of:
Devil Man mask with horns — part 2

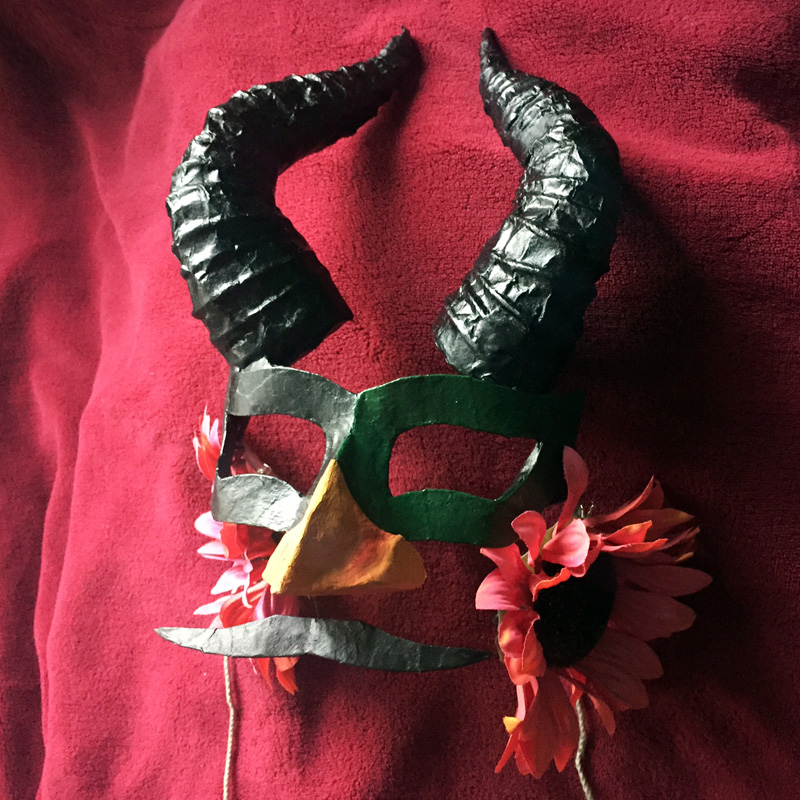
Okay, when we last left off, I’d finished the horns and the base for the mask. I neglected to take a lot of pictures of my process for putting the whole mask together, so I’ll explain all the remaining steps here.
Making foam board antlers
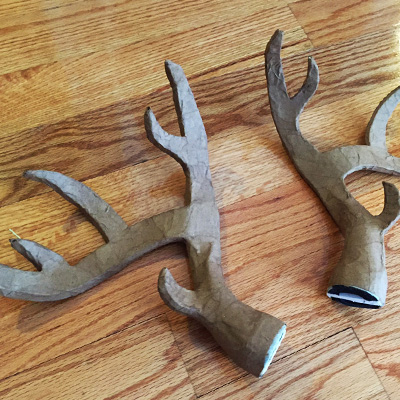
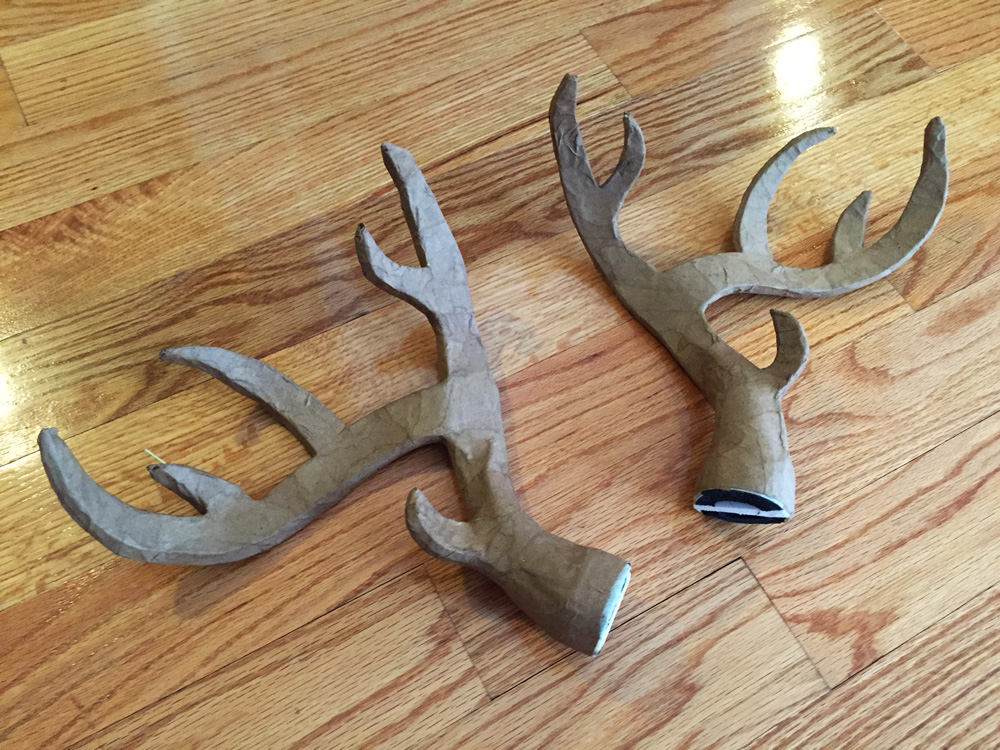
My fiancée needed antlers for her Halloween costume — swamp goddess; it’s a long story — and I made up this method that worked great!

First I drew an antler shape on drawing paper and got the lady’s approval. I kept the shape a little bit on the thick side; I thought this would be important in order to keep the antlers from being too fragile, but it turned out to be unnecessary. If I were doing this again I’d draw the antlers a little thinner.
9-foot paper maché snake prop!
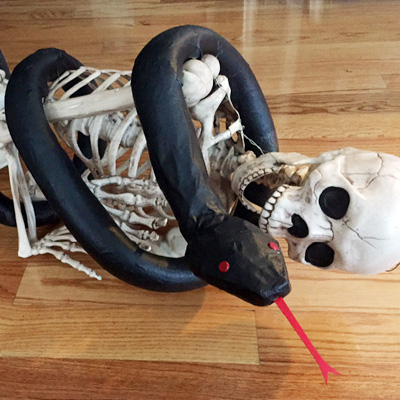
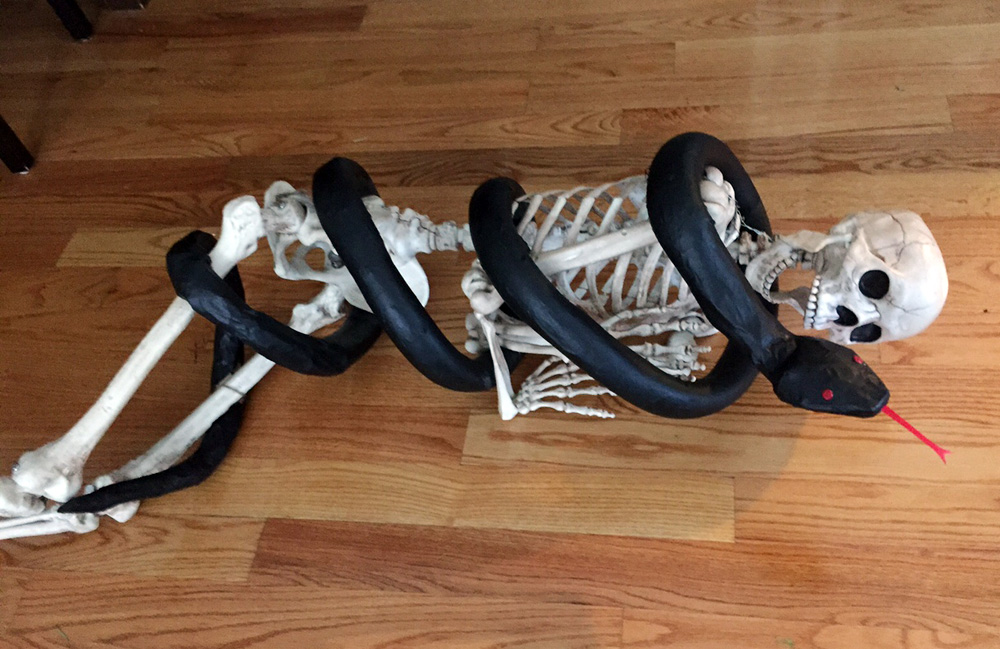
My latest project for my Voodoo Bayou Halloween party: I made this big ol’ snake! He’s made of foam tubing, wire hangers, tape, paper maché, paint, and a few other odds and ends.
I started with a package of black pipe insulation from Home Depot; four one-meter foam tubes for just $3! This stuff is fantastic to work with; extremely lightweight, sturdy, flexible, easy to cut, etc. It’s so great for creating organic-looking shapes that I ended up using a bunch of it on two projects before I tackled the snake: my six-foot bat decoration and a pair of horns for a devil mask I’m working on (pics coming soon). When it was time to start on the snake, I only had two and a half of the one-meter tubes left, so that’s about seven and a half feet for the snake. (I later added a tail made of bubble wrap for a total of about nine feet; more on that below.)
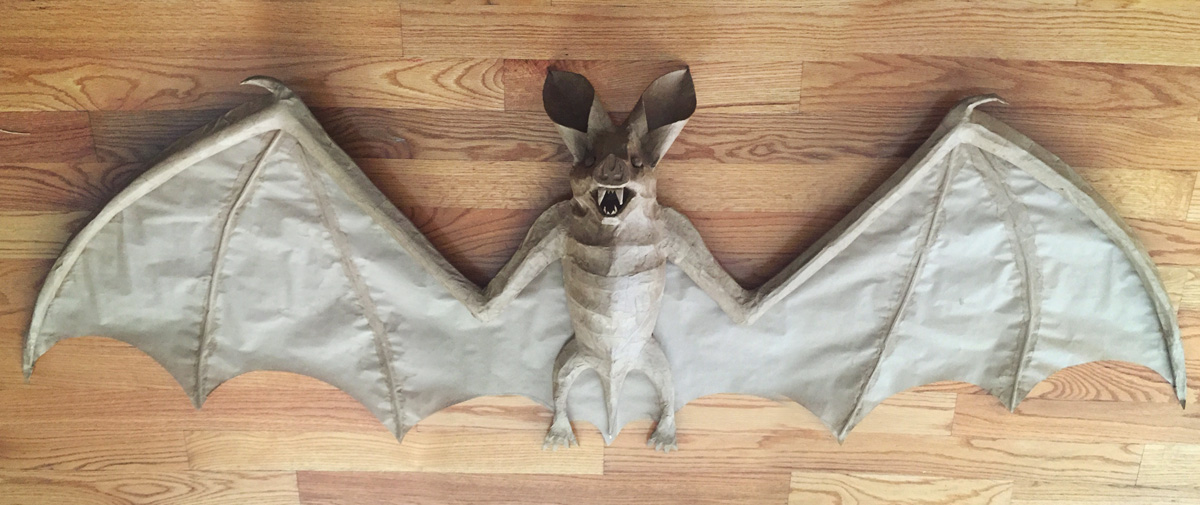
Giant paper maché bat — part 3
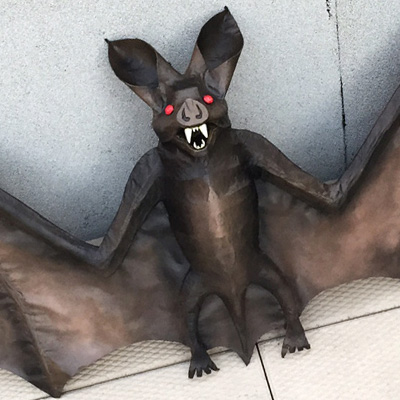
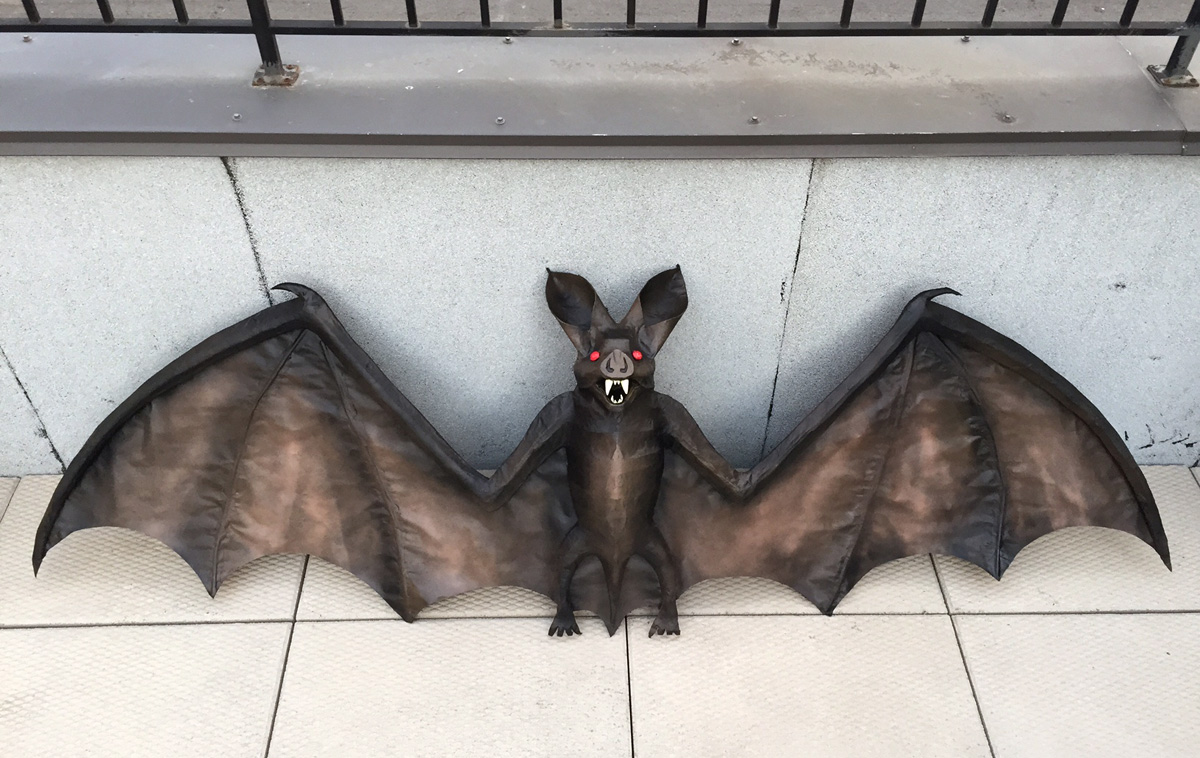
See part one and part two of my giant paper maché project. When we left off we were here:
Now then, it’s time to paint!

I started my paint job on the bat by bringing him outside and protecting my work area with a cheap shower liner from the dollar store.
First, I simply applied a coat of black spray paint all over the whole bat.
 About Manning Krull
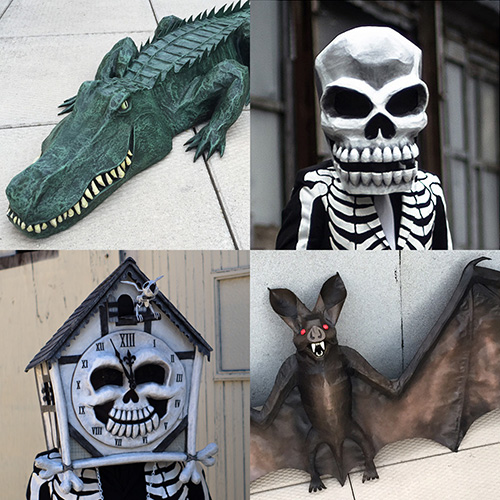
 How to make a 4-foot paper maché alligator
 My violin skull mask, Mardi Gras 2015
 Three-headed paper maché dragon sculpture