
My first big paper maché skull mask, Mardi Gras 2013
Published by Manning on June 18th, 2015
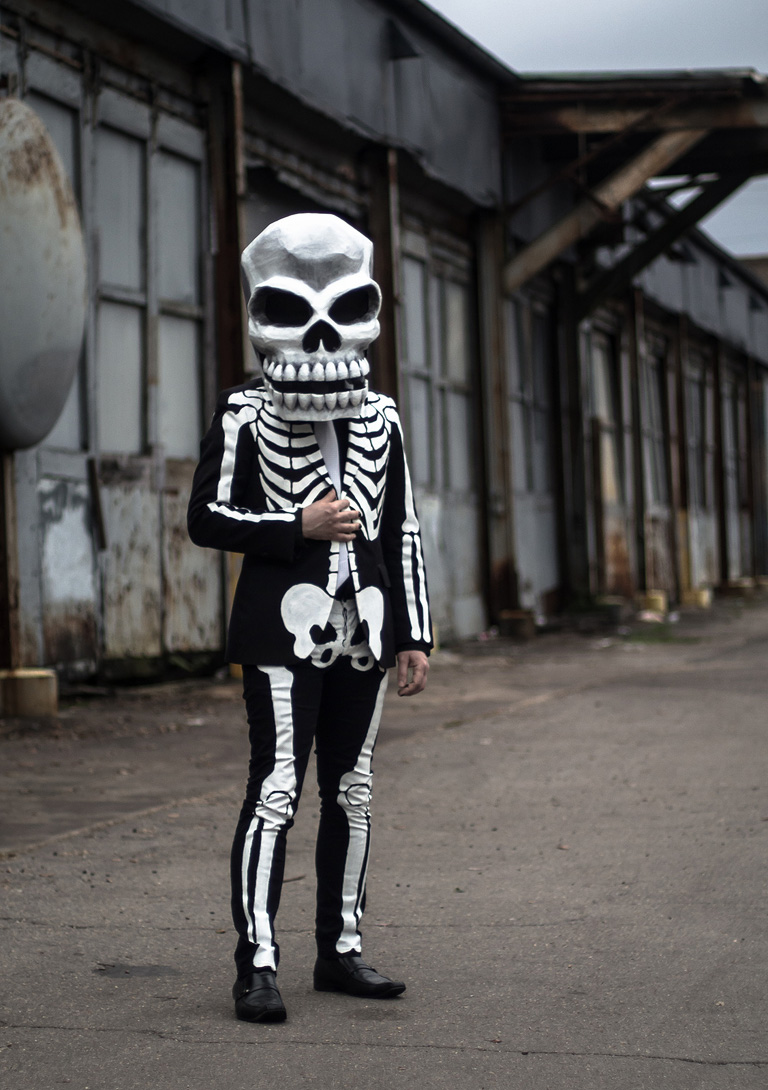
This was my first big paper maché project!
I started off by buying some chicken wire and trying to shape it into the skull shape I pictured in my head. It didn’t work out at all; I had no idea what I was doing and I just couldn’t get the chicken wire to do what I wanted. So I gave up on the chicken wire for this mask. (I used chicken wire again, with much better results, the next year!)
So, after my chicken wire failure, I had to figure out a different way to make my base. I decided to try a combination of bowls, baskets, styrofoam cups, etc, all taped together into a big skull shape (more details on that below). I went to the dollar store and tried out a bunch of objects together and found a good combination. I took everything home, taped it all together, and… the skull was WAY too big! Ha! I put that skull base aside and used it a couple years later as part of my giant spider decoration for Halloween. Here’s a pic of that giant skull, covered in masking tape but not yet paper maché’d:

(I ended up using this giant skull in later years as the head of my giant spider for Halloween 2013 and as the centerpiece in a voodoo altar for Halloween 2015.)
Okay, third time’s the charm! I went back to the dollar store and simply bought smaller versions of all those cups, bowls, etc. I taped them all together and this time the skull was just the right size.
Unfortunately I started this site a few years after I made this mask, so I didn’t take pictures of all the steps. However, I’ve been asked a lot about how I made the base for the skull, so I whipped up these very rough sketches of the basic steps.

The first three views are from the side…
1. First, I started with a simple skull profile shape, cut out from foam board, with the bottom part measured to fit nicely in one of the plastic baskets.
2. Then I attached the two plastic baskets, one for the jaw and one for the back of the head. I attached these with tons and tons of packing tape. This whole thing was a big ugly mess of tape by the time I was done with it; that’s fine! The paper maché covers everything.
3. Then I cut out a couple dozen long strips of poster board, about 1.5″ wide by 20″-30″ long. I curved these around the mask from the front, and taped them in place toward the back. These will help round out the shape of the face. You might even want to do two layers of these, to help the base be a little stronger.
Backing up a step, you can see where I added a little triangle foam board shape at the bottom left to give the jaw some more dept; I put a dotted line there to show where it is. I think I made this out of foam board and then packed some wadded up newspaper or paper towels around, all taped in place, and then I did the poster board strips over it.
The back of the head was flat, since it’s the bottom of a basket. I put a dotted line there to show where it was. So I rounded that out with more poster board strips, gently curved over and taped in place.
4. Now we’re looking at the front. When all the poster board strips were done, I covered the ENTIRE base with masking tape, to smooth it out and make everything a little stronger (this whole project probably used three or four rolls of masking tape!). Then I added five shapes; these were made of wadded up paper towels, taped on with masking tape. Two shapes for the eyebrow ridges, two big shapes for the cheeks, and one for the bridge of the nose.
When those shapes are done, I covered them with masking tape as well. The masking tape is important because it won’t stick to the paper maché very well, and you’ll hopefully be able to remove all of it from the inside when you’re done.
With the base done, I applied about eight layers of paper maché. See my article about my paper maché method here. The short version is: I use Roman PRO-543 universal wallpaper adhesive (paid link) and alternating layers of newspaper and brown wrapping paper.

5. Profile again. When the paper maché was dry, I opened the bottom of the base and cut out all of the base materials; the baskets, the foam board, and even all the masking tape (be careful not to tear the paper maché!). This is a lot of work! When that was done, I trimmed away the bottom part of the jaw; the part I shaded in my pic above is the part I cut away.
I went through a ton of masking tape and packing tape for all of this. The more tape you use, the smoother the shape will be, the stronger it will be, and the more easily you’ll be able to pull everything out when you’re done.
After all that stuff was done, the basic shape of the mask was looking pretty finished, but there were still several steps to do…
I reinforced the interior bottom edge of the mask with plastic zip ties, taped in place all the way around the opening and then paper maché’d over.
I cut the holes for the eyes, nose, and mouth with an X-acto knife, and then reinforced the edges with small strips of paper maché.

For the teeth, I used plastic spoons, cut to size, covered in paper maché, and glued in place.
I installed a hard hat inside the mask with lots of Gorilla Glue and some styrofoam blocks to hold the thing in place.
Then it’s time to paint! See my article about my painting method for my paper maché skull masks here.
I installed black plastic mesh (like for a screen door; you can buy this in a roll at Home Depot) in the eyes, nose, and mouth holes with a hot glue gun.
And that’s it!

Along with the mask, I wore my hand-painted skeleton suit that I’d originally made for the previous Mardi Gras; and I’ve worn it every year since.

Work-in-progress photos by me. Pretty photos of the completed costume by Kevin O’Mara.
 About Manning Krull
 How to make a 4-foot paper maché alligator
 My violin skull mask, Mardi Gras 2015
 Three-headed paper maché dragon sculpture
January 27th, 2016 at 1:57 pm
Woah. That’s very cool. Planning a big procession for Dia de Los Muertos this fall. Hoping to make lots of big heads and skeletons for it. Thanks for the info!
January 27th, 2016 at 3:01 pm
Hi Mary! Good luck! I’d love to see what you end up making.
August 21st, 2016 at 3:46 pm
way cool – can you show the infrastructure ($$ store stuff)??? I had the same prob with chicken wire
August 21st, 2016 at 7:34 pm
Hello Paris! Unfortunately I started my website years after I made this mask, so I didn’t take a lot of picture of all the steps. I have your email address from your comment so I’ll email you some rough sketches I made…
October 20th, 2016 at 6:35 pm
Manning,
Would you mind emailing me your rough sketches as well? I’m going to attempt to make this skeleton head this weekend!
wish me luck :)
Lindsay
October 20th, 2016 at 11:10 pm
Hi Lindsay! I’d be happy to; I’ll email you shortly.
October 25th, 2016 at 2:10 am
Hey Manning. Awesome skull! Would love it if you can send me the step by step that you have. My wife and I want to make this for an annual Halloween party we go too. Would appreciate it.. Thanks.
November 11th, 2016 at 4:36 pm
Hello lovely readers! After receiving many questions in the comments here about how I constructed the base for this mask, I went ahead and added sketches and descriptions of the steps, above. So now everything’s right here in the this blog post. Good luck and have fun!
January 25th, 2017 at 2:06 pm
I’m about to start a similar project, but I have a question! This says packing tape and masking tape. If I’m thinking correctly, packing tape is clear, while masking tape is (usually) white, correct? What is the difference? Do you use packing tape on the last layer?
January 25th, 2017 at 3:48 pm
Hey Jamie! Good question, and you’re right; the packing tape I use is clear (there’s also the opaque brown stuff which would work just as well) and the masking tape is off-white/yellowish. Packing tape is good because it covers large areas quickly, but it’s less stretchy and it gets some ugly angles and wrinkles when you’re wrapping it around curved shapes. One thing that’s GREAT about packing tape is that it tapes objects *together* really well; if you tape things tightly (like your base materials) they really stay put. Masking tape, on the other hand, is great for covering large curved shapes because it’s very flexible and can stretch to make nice curves. However, if you tape things together with it, \they can feel kind of flimsy, because the tape stretches and gives a bit.
Really, you could use all packing tape, or all masking tape, and be just fine. I always have a ton of both on hand so I use them as described above: packing tape to connect shapes, and packing tape to quickly cover huge areas where detail isn’t that important. Masking tape to cover finer areas and get better curves. Hope that helps!
January 15th, 2018 at 7:55 pm
What did you use for the bones on your suit? Is it fabric paint and did you use a stencil. Your costume is awesome!
January 16th, 2018 at 3:53 pm
Thanks MJ! The bones are just acrylic paint, not fabric paint, and I did not use a stencil; I just sketched the bones very lightly with a white grease pencil (aka China marker) and painted them on by hand.
February 12th, 2018 at 2:32 am
I don’t have a question…yet. Haha. But I just wanted to say how impressed I am that 3 years later you’re still replying to people and trying to help. That’s to be commended. I’m gonnna try to tackle this. Will let ya know how it pans out.
February 16th, 2018 at 3:46 pm
@Nigel Haha! I like helping! Good luck and let me know if you have any questions!
September 6th, 2018 at 9:50 am
Do you make and sell these mask. Thank you
September 6th, 2018 at 11:42 am
Hello Kelly Ann! I do make and sell custom masks; please see my page about custom work. Thanks!
September 16th, 2018 at 4:10 pm
Hi I think this is perfect for what I am trying to make. I was wondering what size baskets did you use where they round or oblong and how deep and the foam center piece is how long. Thank you
September 16th, 2018 at 9:57 pm
Hi Ann! This project was many years ago so I’m not sure, but I’ll guesstimate: the baskets were definitely round, they were probably about 15″-16″ across on top and about 12″-14″ deep, and the finished mask was probably about 18″ tall so the foam centerpiece would also be about 18″ tall. If this is helpful, I did a very similar-looking mask with different materials more recently: Twin paper maché skull masks. Good luck!!
October 29th, 2018 at 5:02 pm
Hello –
Thanks so much for taking the time to publish your work! Using your instructions I was able to make something acceptable for Halloween!
https://s3.amazonaws.com/halloweenr570sv/title+picture.png
October 30th, 2018 at 1:58 pm
Oh man, this looks incredible! I love the details around the eyes! What did you use for the teeth?
October 31st, 2018 at 1:14 am
I was copying yours but I missed the part about using plastic spoons.
I cut the shape from a foam board then used a rasp & sand paper to shape them. Then I covered them with masking tape and hot glued them to the mask. I was trying to do the same number of teeth as you did but it would of been a few too many.
They were pretty painful to paper mache but I used the same wall paper paste as you did (from home depot – good stuff) and the paper I used wrapped around them very nicely.
Thank you for responding! Without your example and site I never would of attempted this!
Cheers!
October 31st, 2018 at 9:06 pm
Well your teeth look better than spoons but I’m sure they were ten times the work. Hopefully worth it! :)
November 1st, 2018 at 7:40 pm
I think this is really awesome therefore yes I am so interrelated towards another life forms as much as anything else in the world and under the moon and the stars.
November 3rd, 2018 at 5:05 pm
Uh, thanks!!
March 31st, 2019 at 4:57 pm
Your skull is awesome! We will be building and decorating a Dia De Los Muertos float next year for Mardi Gras. I would love to know the step by step instructions. I this this will be a key asset to our float.
Thank you!
April 2nd, 2019 at 11:47 am
Thank you Carmen! I ended up trying to replicate the look of this skull a few years later, and I have an article on that too — it’s here. I learned a few things that might be helpful to you! I managed to make a similar shape with different materials, and I think it was a bit easier. Good luck!
October 3rd, 2019 at 5:51 am
Hey looks great gonna give this a try can you send the blue prints please
October 3rd, 2019 at 2:42 pm
Hey Joe, sorry, all my info is in the article above! I don’t have any other plans or blueprints.
October 19th, 2022 at 6:33 pm
Hello. These are very cool. I am not skilled enough to male these myself but if I offered to pay you could you male these for me ?
September 30th, 2023 at 2:34 am
How does the mask sit on or attach to your head?
Thanks!
January 7th, 2025 at 4:19 pm
Hi… I love this!
I see you were answering questions for quite a while after posting and hopefully you will again.
I followed you all the way up to the mouth. You didn’t state what you did to create the mouth/jawline to place the teeth into. Was it more paper and tape? Did you do it separately and then add on to the head?
Help is appreciated?
January 7th, 2025 at 7:10 pm
Hi Cece! For this simple mask I didn’t really do any sculpting or building at all for the jawline and gum line. Take a look at the pic above where I’m wearing the skull and it’s just brown paper with no mouth. From there, all I did was cut out the mouth hole, and then I glued the spoons onto the surface above and below the mouth hole. There’s no 3D gum line, although I did some shading with paint to try to give that illusion. I hope that answers your question! Let me know if not. (Fyi, for more recent masks I *did* build up a 3D gum line; my recommendation for that these days would be foam clay. I used other materials in the past that were more complicated.)
March 5th, 2025 at 10:34 pm
Thank you so much for all of the great tips. We made a super last-minute skull very similar to yours. I literally studied your comments and techniques before I began, and it all paid off. Thank you again. I love your work!