
Paper maché Anubis mask
Published by Manning on October 31st, 2017
I made this paper maché Anubis mask for Halloween 2017, for my ancient Egypt-themed Halloween party.
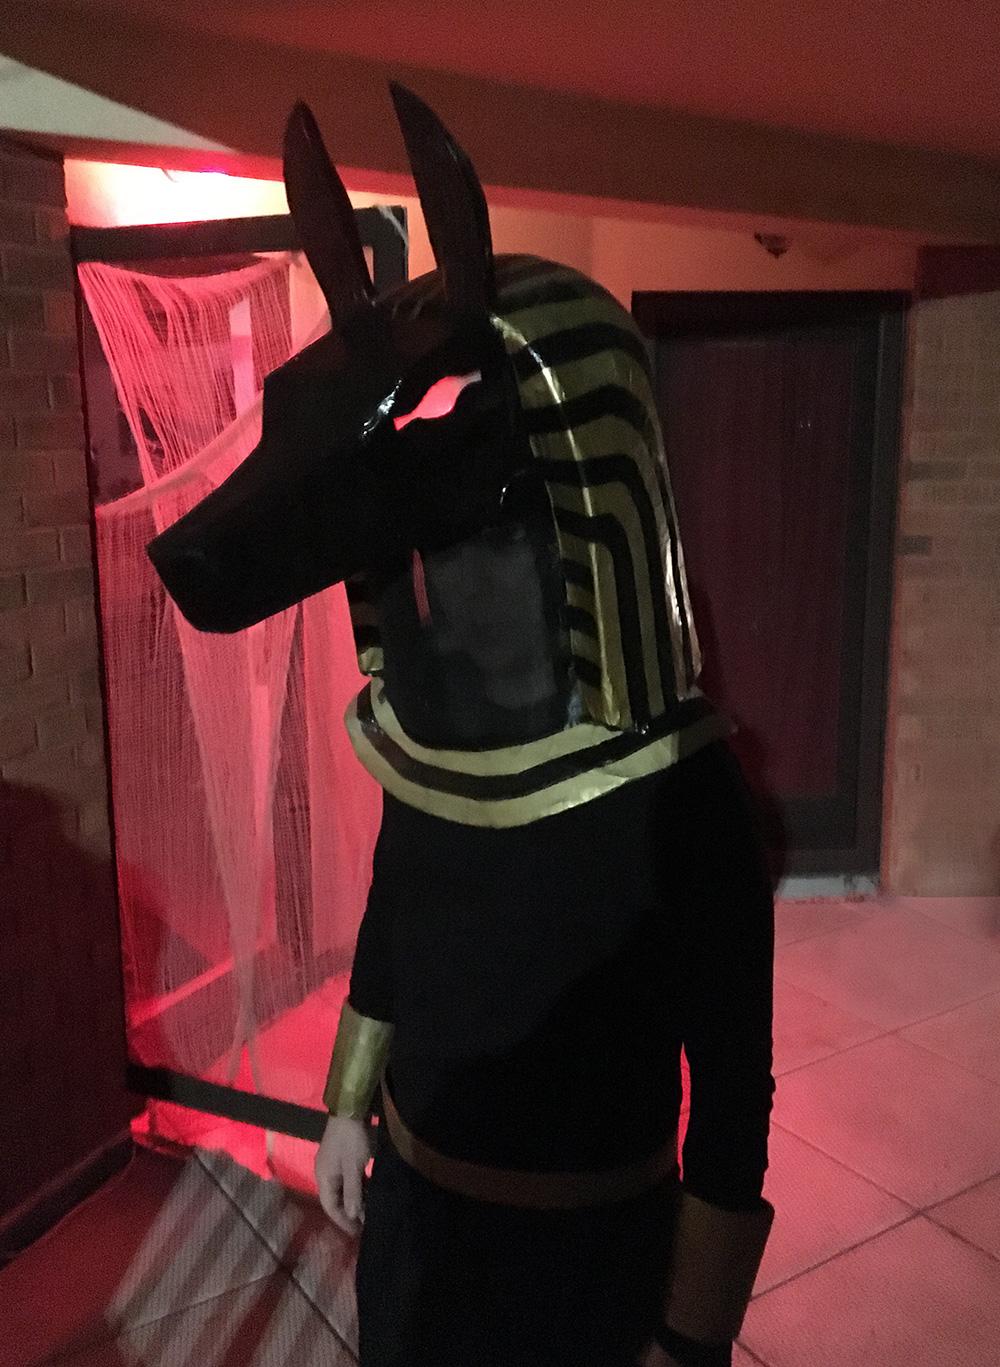
My main goals for this mask were to make something that would be wearable for all or most of my party; I wanted to figure out a way to make a large paper maché mask like this that allowed me to hear very well, see very well, and have good air circulation. I’d never worn a full head mask like this for my Halloween party, and I know from experience with my big Mardi Gras skull masks that seeing and hearing can be a challenge! So, I planned out a mask design that would address these things — that mostly meant lots of holes! The entire face area is a door that opens (great for seeing/talking/drinking), and there are lots of holes cut into the stripes all around the headdress to help with hearing and air circulation.
Another goal I had for this mask: For the first time, I wanted to try making a large mask that rested on my shoulders and allowed my head to move freely inside, rather than be mounted on a hard hat or other support inside. More on that below.
Oh yeah, my Anubis mask also has light-up eyes! More on that below.
I’ll be honest, I didn’t take a ton of pics of my process for this mask because I was doing it very last minute and I was in a rush! I made this entire mask in just three days, which is way too fast! I’m generally okay with rushing my Halloween projects because they only need to survive one night and they’re always seen in low lighting. I take a lot more time with my Mardi Gras skull masks and all my commission pieces, because I want them to last and I want people to notice and enjoy all the details. Anyway, this thing ain’t bad for three days’ work, but I had to cut a lot of corners.
Making the base shape

I sketched my design on paper but didn’t really do a lot of precise measurements, which is unusual for me. I just winged it and figured things out as I went along. I started with the main shape for the headdress; I knew I wanted a sort of dome shape with a flat front (where the jackal face would attach) and with a half-cylinder area for the neck, where my (real) face would be. I built this shape starting with a large plastic bowl from the dollar store which I cut a piece out of, I mounted that on a big tube of poster board and attached it to a base of foam board. I attached all of this with lots of tape.
The next big step (not shown) was to cut tons of long 1″ strips of poster board and gently arc them from the top of the dome down to the edge of the base. I did two layers of these and secured them with tons of tape. This helped round out the dome shape of the back Anubis’ headdress. When all the strips were in place, I covered them completely with a layer of packing tape and then a layer of masking tape. If you’re interested in what this process looks like, I did something similar to round out the head of the paper maché baby chicks I made a while back. The strips feel very very flimsy for a while, but as you add more strips and more layers of tape, they begin to get more solid and stable, and finally the surface is strong enough that you can add paper maché without crushing it — I mean, you wanna crush it in the good way, but not in the bad way.

Once this base shape was finished, I covered it in a layer of aluminum foil attached with tape, and then covered that with one more layer of masking tape. The foil is there to act as a release agent; the paper maché will stick to the tape and foil, but the foil won’t stick to the base, so when the paper mahe is dry I can easily remove it.
I covered this base shape with five layers of paper maché — you can read about my paper maché process and materials here. The short version is: I use Roman PRO-543 universal wallpaper adhesive (paid link) and alternating layers of newspaper and brown wrapping paper.

I’d normally do more than five layers for something this large, but I was in a big rush! Five layers would be enough for a mask that only has to survive one night of partying.
Making the face

While the base shape was drying, I started on Anubis’ face. I made this out of four relatively simple shapes of foam board, which I drew and cut out and bent and taped together. I didn’t bother to go for a precise fit because I knew I’d be covering this shape with other stuff. I wanted my Anubis mask to look halfway like a statue or a hieroglyph, and halfway like a living thing; Anubis is supposed to have a jackal head but I didn’t want to make him look like a realistic jackal. So I was fine with building a face shape that had a lot of hard angles in it. (See my wolf skull mask for an example of a project where I went for a more organic, realistic look.)
To smooth the angles out just a little bit, I cut a bunch of 1″ strips of craft foam and wrapped the head shape with those, taping them in place. That helped make the hard edges a little softer while retaining the overall simple, geometric shape of the face. I then covered the whole face in a layer of aluminum foil, and then a layer of packing tape, and then I applied five layers of paper maché to the whole thing.
Making the collar
You’ve probably seen how in ancient Egyptian drawings and sculptures, people are always wearing those circular collar things; I bet there’s a name for ’em but I ain’t lookin’ it up! I wanted to make one of those out of foam board and mount the mask on that.
Getting the shape for the collar right was a lot harder than I expected; I started by just measuring and cutting out a perfectly circular ring of foam board and bending that into shape (first covering it in masking tape to make it bendable without breaking) but that just didn’t work; no amount of bending would get it to sit on my shoulders correctly. I ended up making a better, more fitted ring shape out of four pieces of foam — two small segments to cover my shoulders, and two longer curved pieces to make up the chest and back parts. I bent and curved these with my hands and taped them together and then curved the whole thing into place on my shoulders. I ended up cutting them apart and trimming some edges and taping them back together a few times in order to get the fit right. It worked out okay but even my final version wasn’t a perfect fit! Good enough for Halloween, I keep telling myself, good enough for Halloween.

Assembling the head
Back to the base shape! The paper maché was dry on the base so I sliced the bottom surface open with an X-acto knife and was able to pretty easily slide the whole base shape out of the paper maché. Always a relief.
I did the same thing for the Anubis face; sliced the back open and slide the base shape out; easy! I removed as much of the aluminum foil and tape from the inside of the head shape and the face as I could easily get out, just to remove a tiny bit of weight.
I cut eye holes in the face shape with an X-acto knife, and I taped magnets inside under the eyes; these will hold the fixtures for the lights later on. Rather than tape the magnets directly inside the face, I taped them onto a strip of poster board and taped that inside the face. The reason for this is that I wanted to make sure the magnets were a precise distance apart — I arbitrarily chose four inches. It was easy to make two dots at exactly 4″ apart and tape the magnets onto that. That would’ve been impossible if I were trying to do that in the small area inside the face. Anyway, the reason for precision here is so that when I make the removable light fixtures later, I can also set the magnets at exactly 4″ apart on those, so that they’ll fit perfectly when I put them in the mask.
I cut open the neck shape for where my face would go, and I taped the jackal face in place on the head with lots of masking tape. I also taped some magnets along the side of the neck; these will hold the screen door I’ll be adding later.
I taped the whole head shape onto the collar thing with lots of tape as well.
I then covered all these taped areas with three layers of paper maché to lock everything firmly in place.
When all that was dry, I could try on the mask for the first time. It required some adjustments — I had to bend up the shoulder pieces more, which meant I had to slice open the paper maché a bit with an X-acto knife, adjust the shoulders, cover the slices with more tape and more paper maché. I also had to add some thick pieces of packing foam inside the collar to help it fit my chest and back better. I used a lot of tape for all that, and then covered the tape with more paper maché. Finally I got the collar shape to feel like it was locked in place on my shoulders/chest/back, and the whole mask still felt really lightweight. The mask was a little bit forward-heavy, so I taped a roll of 50 pennies inside the back part of the collar to serve as a counterweight. That helped the mask feel really well balanced on my shoulders.
Making the ears

I made Anubis’ ears out of foam board with pieces of foam pipe insulation taped in place to round them out; I sliced up the pipe insulation with an X-acto knife to get the tapered shape I wanted. I covered all of this with tape and then paper maché; no need to make the base materials in the ears be removable, since they’re really lightweight. I attached the ears to the head with lots of tape and then paper maché.
Screen door and light-up eyes
I added a screen door for the face, made from screen material like you’d buy for an actual door. I made a border of black masking tape and attached magnets in one side, and then attached the door in the mask with a hot glue gun.
I made the little fixtures for the lights out of poster board and tape. The little battery-powered lights I bought last for a long time (usually over 24 hours), so I just turned them on right before the party, taped them inside the fixtures in a row, and attached them inside the mask with the magnets I’d embedded earlier. Ah, I forgot to mention, I taped a strip of wax paper inside each of the eye holes, to diffuse the light evenly across the entire eye.
Painting

I spray painted the Anubis mask black and let that set for a couple days, and then I did the gold details using masking tape and gold spray paint.
Ventilation
After the stripes were painted, I cut tall vertical holes where a lot of the black stripes are, all the way around the headdress. I hot-glued a few wooden coffee stirrers inside the mask to reinforce the whole structure, now that so much of the outer surface was gone. I then hot-glued screen door material all around the inside of the headdress. Adding these holes really helped me hear a lot better with the mask on. I know from wearing lots of big paper maché masks, there’s usually a lot of echo in there; your head is basically inside a cardboard box! Trying the mask on before cutting the holes, and then after, it really was a world of difference. With those vertical holes all the way around, everything sounded totally normal inside the mask. One last thing, I quickly painted the edges of the holes with black acrylic paint, since the original paper color was visible at the edges where I’d cut open the paper maché.
Accessorizing
I wore my Anubis mask with plain black clothing, and I added a kind of skirt using a yard of black fabric I’d bought; I didn’t alter it at all — sewing is one area where I have no talent or experience! I just wrapped it around like a towel and connected it with a safety pin.
I made a simple belt and bracers out of foam board and paper mache, and painted them gold.
And that was it! Not bad for three days’ work!
 About Manning Krull
 How to make a 4-foot paper maché alligator
 My violin skull mask, Mardi Gras 2015
 Three-headed paper maché dragon sculpture
Leave a comment