
Paper maché baby chicks! — part 1
Published by Manning on July 17th, 2017
Another fun commission project: three big paper maché baby chicks!
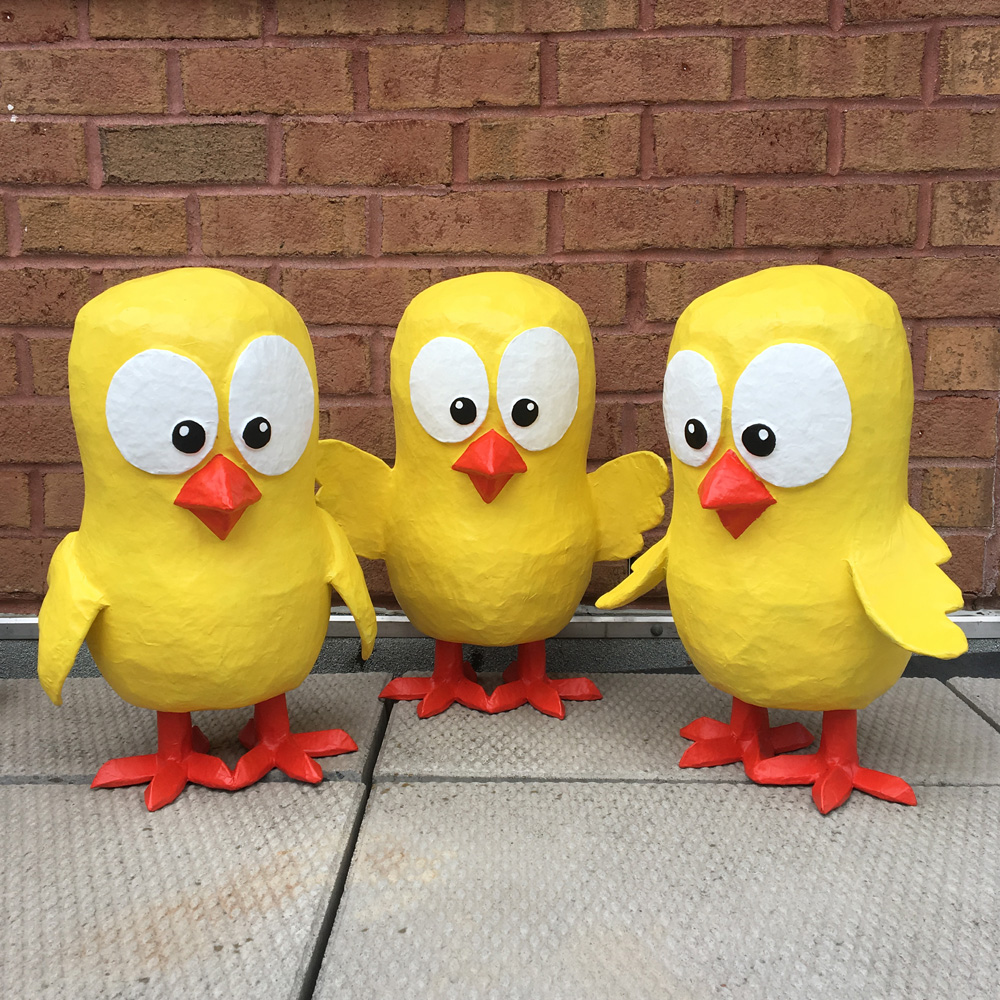
I was contacted by a wonderful new client at Canadian Crane who commissioned three sculptures of these cartoon baby chicks that their company has in some of their marketing materials. They sent me a pic and I started planning…
I did a lot of measuring and planning in Photoshop, and went shopping for materials at the dollar store. I bought four plastic buckets (well, they look like buckets or waste baskets but I think they were with the flower pots) to serve as the main form of the basically peanut-shaped body for the chicks.

Making the base for the chicks’ bodies
I probably could’ve just used two plastic bags full of wadded-up newspaper, but that would be much less precise and symmetrical. I wanted the body shape to be as regular and symmetrical as possible, to match the nice smooth graphical style of the drawings of the chicks. Using the buckets as a foundation would give me a much more precise and even shape.

I measured and cut the buckets to size, based on my diagram in Photoshop. Two buckets (cut down to about 3″ tall) would become the head and the other two (cut to be a little taller, around 3.5″) would be the body.
(Here’s a dumb tip: If you ever try to mark a line at a certain height on a surface that isn’t perfectly vertical — like these tapered buckets — you’ll find that it’s basically impossible to do with just a ruler and marker. Here’s my trick for that. Take a cardboard box and measure the height you want on that; let’s say three inches. Draw a horizontal line on the box at the 3″ mark. Then tape a marker along that line, perfectly horizontal, with the tip sticking out away from the box. Now, bring the bucket or whatever toward the box and marker. Hold the box steady with one hand and let the marker draw a line on the bucket as you turn the bucket with your other hand. You now have a perfectly straight line at exactly 3″ tall on the bucket. Make sense? Here’s a sketch of the setup. Of course, if you were to measure the distance from the bottom edge of the bucket to the line, it’d be a little bit more than 3″, due to the angle of the bucket’s surface. But if you measure vertically from the surface the bucket is sitting on, up to the line, the line is at exactly 3″ tall. It’s like, geometry or somethin’! Whew!)

I wanted to add some sturdy shapes inside the buckets to hold them perfectly steady when adding all the other materials, so I measured and cut out six rectangles of foam board, to build some supports. I taped these together into triangle shapes and put them in between the buckets. When I’m writing these articles I don’t usually go into the specific measurements I use (most of the time I don’t even remember!), but I want to stress that measuring and planning is very important for this stuff; I needed these supports to be the exact right heights to hold the buckets together the right way. I almost never eyeball anything (probably to the point of overkill).


I taped the bucket shapes closed around those supports, and then stacked them up and taped them together. This is finally starting to look like something!
(A funny note: I’ve switched to brown packing tape from clear for a lot of my recent projects, mostly because of this website! The brown tape is much easier to see in photos, but it’s the same Scotch heavy duty packing tape I’ve always used.)

I rounded out the top and bottom surfaces with a few different materials. I cut some foam board disks in various sizes (again, all measured in Photoshop) and taped them in place. See my dumb article about drawing and cutting precise circles here. I then cut out some thin strips of poster board and taped them in place over the foam board disks, creating a nice rounded shape. I then did the same thing for the bottom, leaving it a little flatter so the body can stand up on its own.

I cut out some long strips of bubble wrap, about 3 inches wide, and wound them around the top and bottom parts of the body to pad out the whole shape, but mostly avoiding the middle part in order to keep the shape somewhat thinner in the middle. The bubble wrap rounded out all the edges nicely. The edge of the top bucket was still a little too visible for my taste, so I taped on some thin strips of this dish packing material I found at Staples — it’s basically very thin, rubbery foam.
Anyway, getting there!

I then wrapped the entire shape in a layer of heavy duty packing tape (not shown) and then one very carefully placed layer of masking tape; all of this is to smooth out the surface as much as possible. The packing tape conceals big imperfections in the bubble wrap surface, but then the packing tape is really wrinkly, so the masking tape smooths out the surface of that. Pretty much perfect!
After this pic I decided the middle part was looking a little too skinny, so I added a little more bubble wrap, packing tape, and masking tape. The finished shape is nice and smooth and sturdy — just about ready for papier maché!

Oh yeah, I also added a tiny tail made out of some wadded-up aluminum foil and taped in place with more masking tape.
Paper maché and re-using the base
Since I needed to make three papier maché copies of this base, I added a layer of aluminum foil to serve as a release agent before applying the paper maché. I carefully wrapped the base with the aluminum foil along with a little bit of tape here and there to keep it in place. The aluminum foil ends up being kind of lumpy, so I then applied another layer of packing tape over that and then a final layer of masking tape; jeez that’s a lot of tape! The paper maché will go over this; the idea is that when the paper maché is done, I can cut it open, and the paper maché will stick to the masking tape, the masking tape will stick to the packing tape, and the packing tape will stick to the aluminum foil… but then the aluminum foil won’t stick to the layer of masking tape underneath that, so the whole paper maché shape can easily fall away from the base — you’ll see that in a couple steps. The outer two layers of tape will remain permanently stuck in the paper maché, and that’s fine; they actually help make it a tiny bit stronger.

So anyway! I applied seven layers of papier maché on the entire body over the course of several days. Check out my article about my paper maché process and materials here. The short version is: I use Roman PRO-543 universal wallpaper adhesive (paid link) and alternating layers of newspaper and brown wrapping paper.


When the papier maché was completely dry, I sliced it open with an X-acto knife and popped the base out — it’s important that the paper maché is 100% dry all the way through before this step; if it’s even a tiny bit damp inside it’ll get all torn to shreds when you try to cut it with the X-acto knife. You can see I drew this weird shape on the bottom to cut out; that’s for this box thing that holds the legs — you’ll see that in part two of this project.

I always cut a wavy line rather than a straight one when I’m opening up a paper maché shape like this; the waviness makes it easier to line the pieces back up perfectly when reconnecting them.
As predicted, the base shape came right out; it separated easily from the aluminum foil. (Whew! Always a relief.) The aluminum foil plus the two outer layers of tape remained permanently stuck inside the paper maché. I was able to peel some of the aluminum foil out, but there was really no reason to, as it adds practically nothing to the overall weight.
(I discarded that piece on the lower left; that’s the hole I cut out for where the legs will go into the body.)

I put the two halves of the paper maché body back together with a few layers of tape along the seam.

The holes for the legs are part of these box things that I built to hold the legs in place — more on that in part two.
I added two more layers of papier maché over all these connection points to seal the body up permanently. When everything was all done and dry, the finished shape was very lightweight and sturdy.
Then it was time to make the second body! The base got a little bit sliced up by my X-acto knife when I removed it from the first body, so I repaired those areas with some masking tape first. Then I did the same process again: covered the base with aluminum foil and then packing tape and then masking tape, and then seven more layers of paper maché. Let that dry, slice it open, remove the base, and then do all those steps again for the third body.
Here are two of the three chicks, minus the wings, but otherwise with the paper maché all done.

That’s all for part one! Next up, part two: legs/beaks/eyes/wings/painting/etc!
 About Manning Krull
 How to make a 4-foot paper maché alligator
 My violin skull mask, Mardi Gras 2015
 Three-headed paper maché dragon sculpture
Leave a comment