
"Gras-goyle" gargoyle costume, WIP part 4: mask finished!
Published January 31st, 2025
This is the second half of my gargoyle mask project for Mardi Gras 2025 — here's the first half of this mask project. You can also check out part 1: column and part 2: wings.
In my last article, I'd made the basic gargoyle head shape and lots of parts: ears, horns, nose ring, tongue, etc. Just a couple more pieces and it's time to put it all together, and to make the thing wearable...
Eyes
The Christmas ornaments that I used as placeholders for the eyes while building the base of the mask ended up getting covered in a lot of wallpaper adhesive during the whole paper maché process, so I just discarded them and grabbed two more identical ones to use for the permanent eyes (I'd bought a pack of like eight). I popped these into the eye sockets and they stayed in there pretty well on their own, for now.
Boring insane-person detail: the ornaments have an almost-invisible seam that goes around them. In positioning the eyeballs, I was careful to make sure that seam was hidden from view.
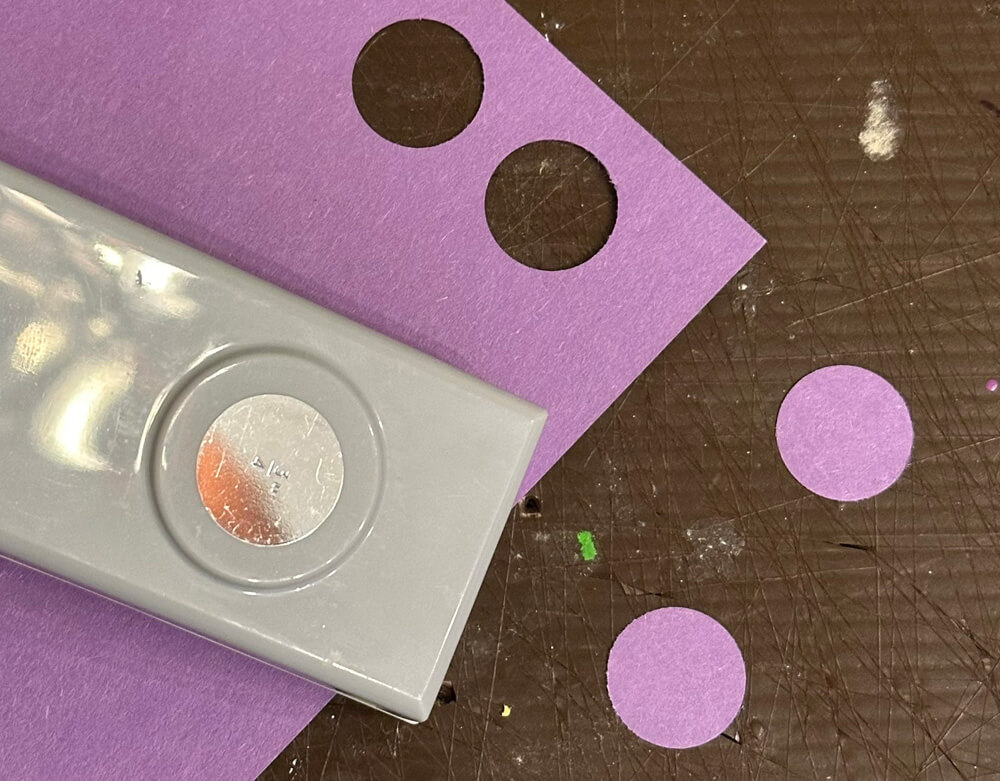
I cut out two circles of construction paper using a 3/4" hole punch (paid link); these will be the irises. I held these up to the eyes in the mask to decide where they would get attached, and marked the spot on the ornaments with a marker.
These flat circles won't want to sit nicely on the domed shape of the ornaments, so I cut four slits in each circle, from the outer edge almost to the middle. (I drew these lines just so you can see; as the slits were invisible.)
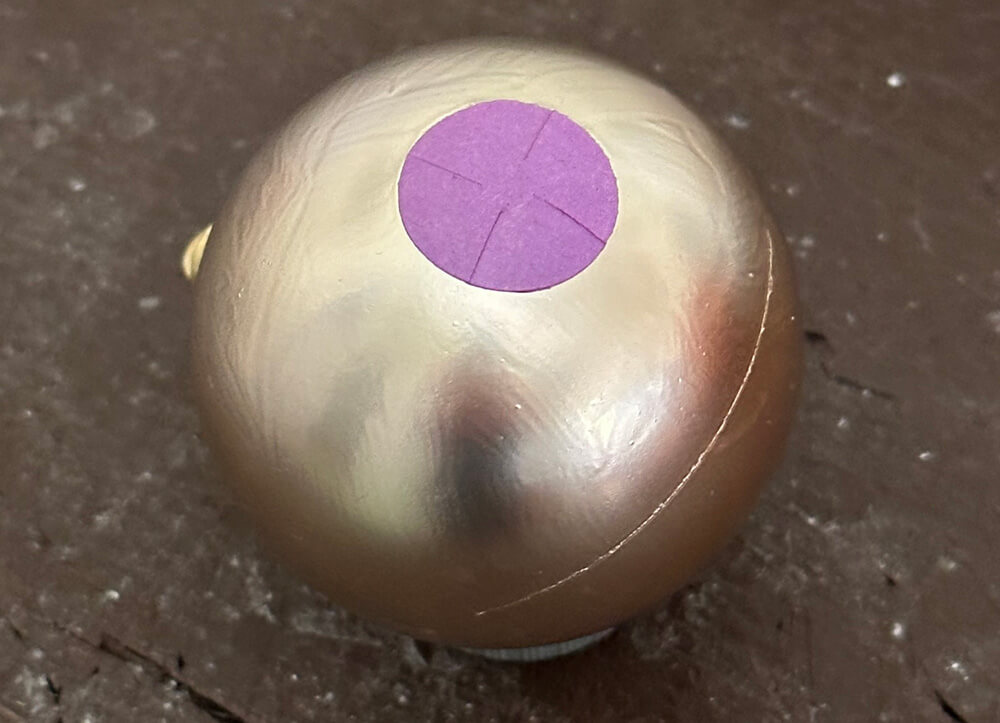
I removed the ornaments from the eye sockets, and I used Mod Podge (paid link) to glue the paper irises onto the spots I'd marked, making sure to get the paper nice and saturated so it would become soft and mold to the shape of the eyeballs. Then I gave the whole eyeballs a coating of Mod Podge. The idea here is that the paper circles will give me a slightly raised surface to guide me when I'm painting the irises later.
I set the eyes aside for now...
Attaching the ears
I hot-glued the ears onto the mask using a ton of hot glue. Then, I built up a sort of 3D shape behind each ear using random bits of foam. I covered that over with two layers of paper maché, as well as the area at the front of the ears where they attach to the head.
Attaching the horns
I hot-glued the horns onto the mask, and then built up a bit of a lip around them with foam clay, filling in the spaces where the horns didn't sit neatly on the head. I covered over the foam clay with six layers of paper maché; I want this connection to be really strong, so the horns can't easily get knocked off.
Adjusting the jaw
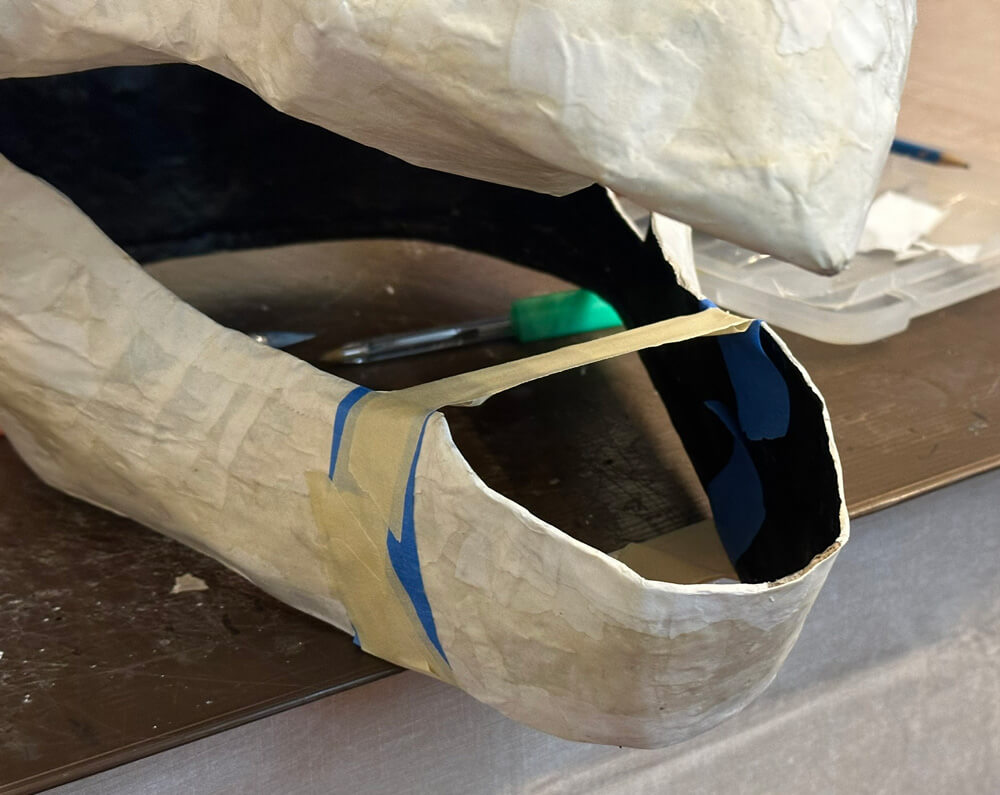
In looking at the finished paper maché mask, I felt like the lower jaw had become wider while I was working on it; this will happen as paper maché can sometimes warp. But there's an easy fix for this that I discovered years ago: I put some blue painter's tape on the jaw to protect it, then I rubbed a bunch of wallpaper paste (the same stuff I use for paper maché) along the jaw, letting it saturate into the paper. I then squished the jaw with my hand to make it a bit more narrow, and I wrapped some regular masking tape around it to hold this shape. (Blue masking tape tends to tear under pressure.) When the paste dried, I removed all the tape, and the jaw remained in this new shape. Easy!
Teeth
I made the teeth out of foam clay (paid link), which I molded right onto the inner edge of the mouth and let it stick there while it set. Important: I immediately set the head upside-down after adding the teeth, because foam clay is so soft it'll sag and droop a lot if you build any kind of structure that has to stand up; even something small like this.
After a few hours, the smooshed base of the foam clay that was stuck to the inner jaw started to shrink a bit and separate from the jaw, so I covered it in masking tape to help hold it in place.
I let the teeth set for 24 hours and then I added a bunch of paper maché to cover the connecting area inside the jaw, to really lock them in place.
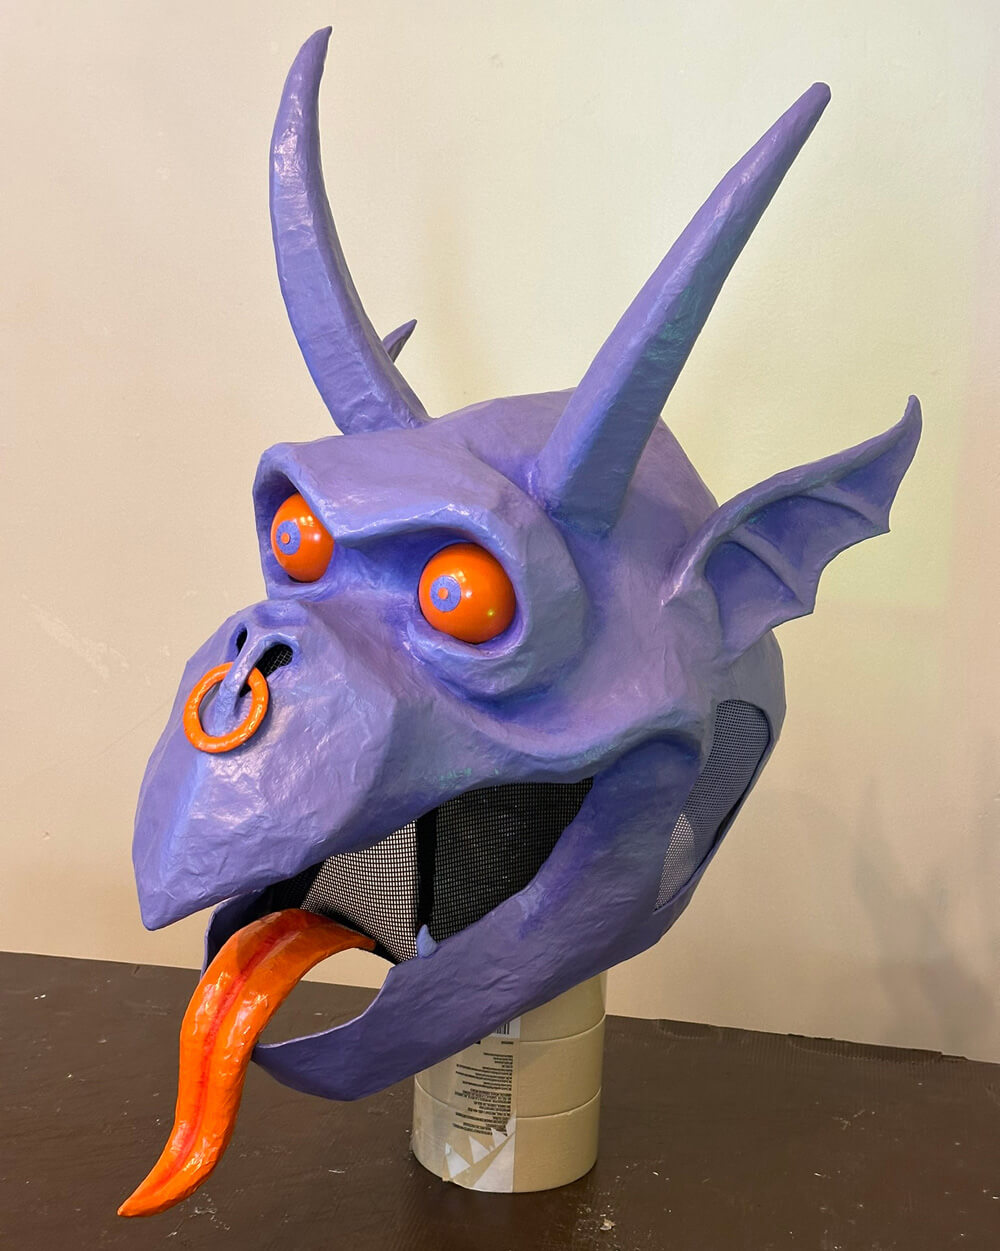
Painting and assembling
I painted the interior of the mask black with acrylic paint and a big ol' brush.
As for the exterior: I always put a coat of Mod Podge on my paper maché projects before painting, to smooth out the surface a bit. Since Mod Podge goes on clear, it's tough to know if you've missed any spots, and it's easy to accidentally let some big blobs of it pool up 'cause you don't see 'em. For this project I had a minor ephiphany: why not add a few drops of paint to the Mod Podge? Duh! I put a little bit of purple acrylic paint in and mixed it up, and it made this whole step a lot easier. It doesn't look great but it'll get covered with spray paint so it doesn't matter. Anyway, I'll probably be doing this every time from now on!
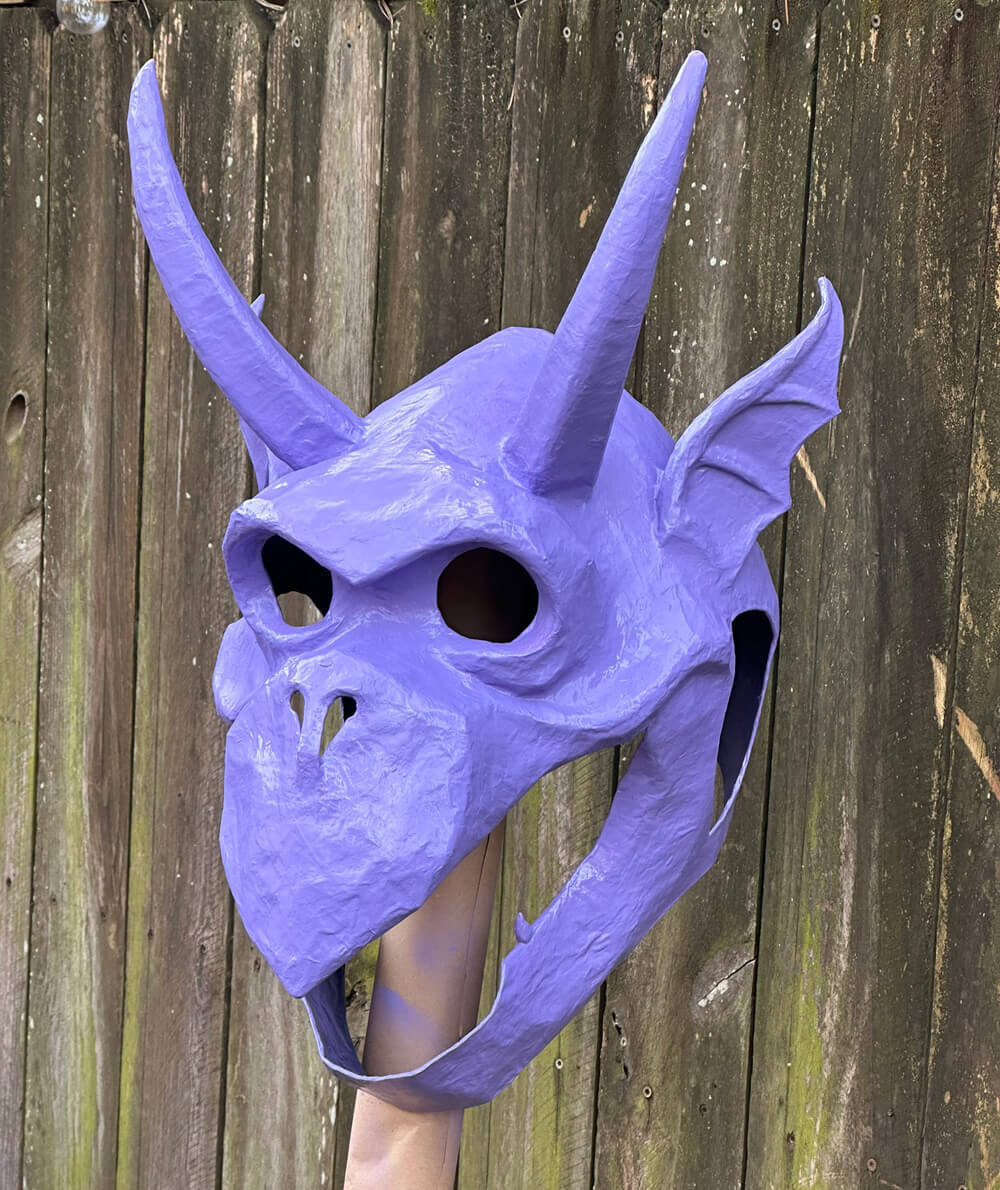
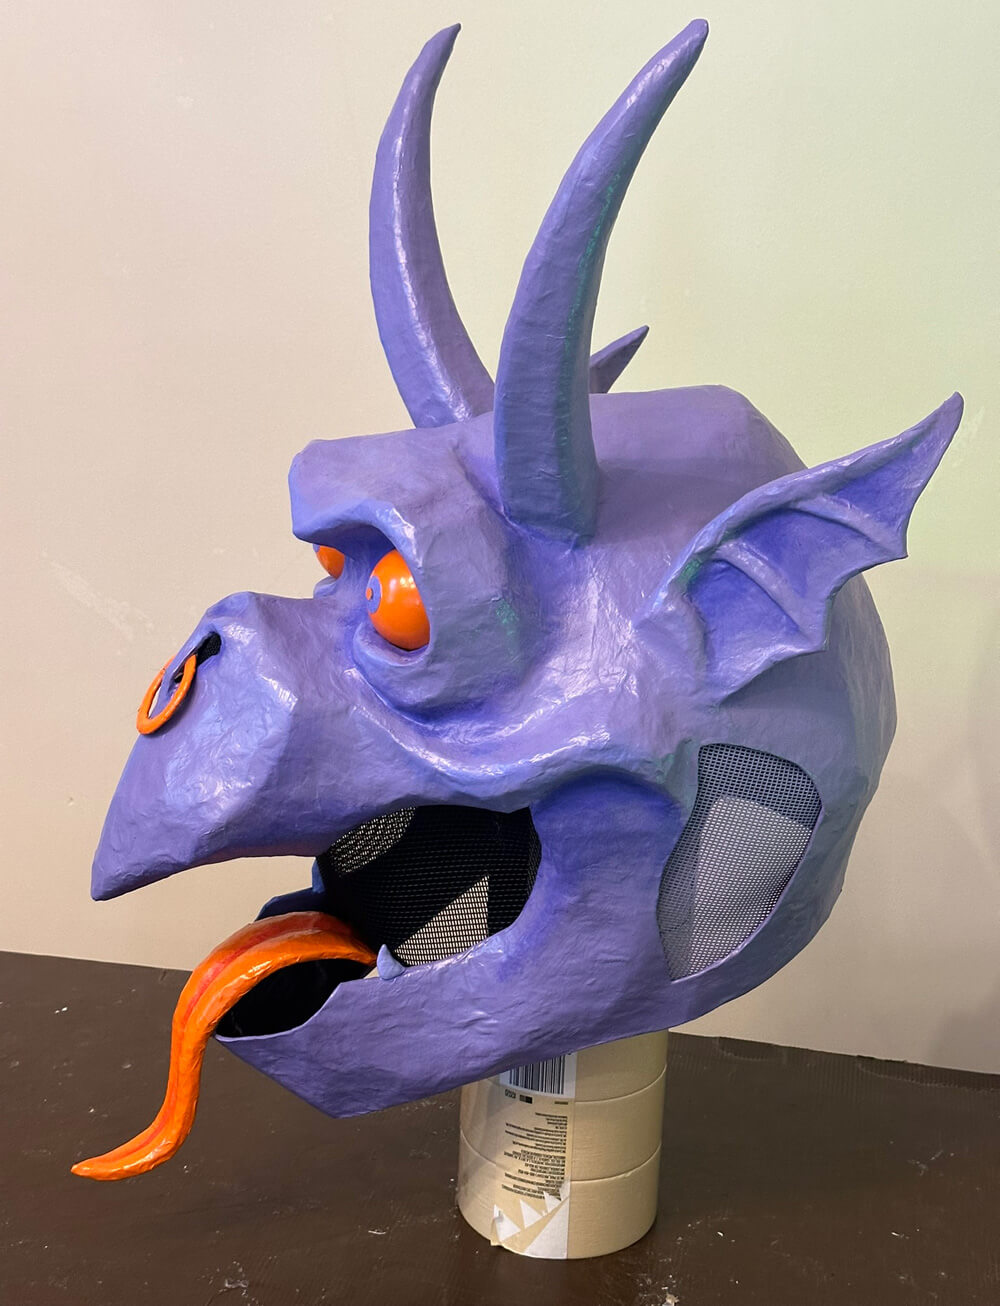
So, I let the Mod Podge set for a day, and then I spray painted the mask purple, using Montana Gold spray paint; the color is called Teen Spirit. I often use cheap spray paint (from Lowe's or whatever) for a lot of my projects, but the nice thing about Montana Gold spray paint is that they have a very wide range of colors and you can usually find the specific color you're looking for. Here's their color chart for the Gold series; scroll down a bit. For this whole costume, I started with a cheap purple suit I'd ordered, and then I looked at Montana paint colors to find the closest match. I ended up ordering six cans of Teen Spirit purple, since I needed to cover this mask, and the wings, and the stone column, and the legs.
I let the spray paint set for a day, and then I added a little bit of shading with acrylic paint and a stiff brush.
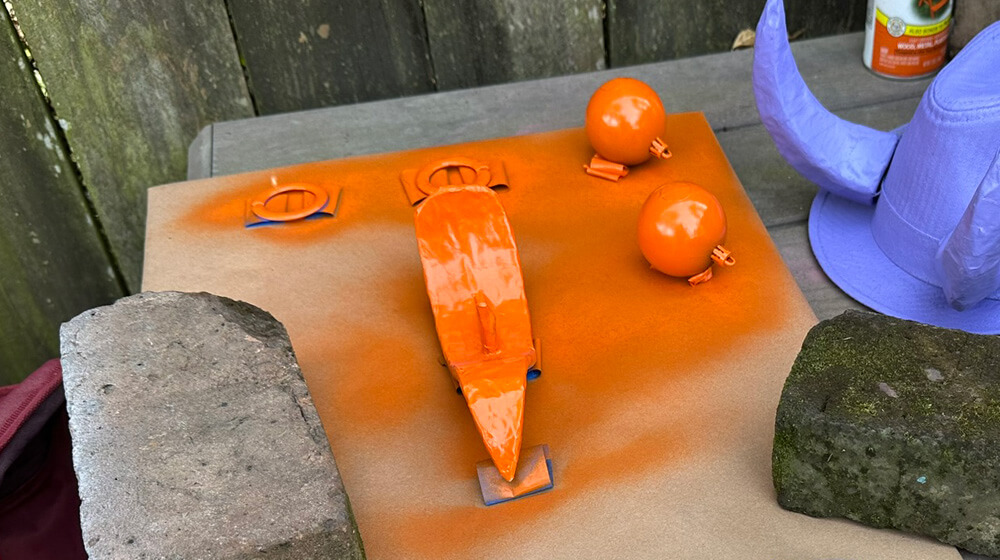
For the eyeballs, nose ring, and tongue, I applied a coat of Mod Podge to all of them, and then I spray-painted them all gloss orange.
For the eyes, I painted the irises by hand with a base coat of white gesso and then purple acrylic paint. When they were dry, I placed the eyeballs back into the sockets, being careful to arrange them so the irises are positioned properly. I then added some hot glue inside the mask, behind the eyeballs, to lock them in place.
I inserted the nose ring in the nose and added some hot glue inside the mask to lock it in place.
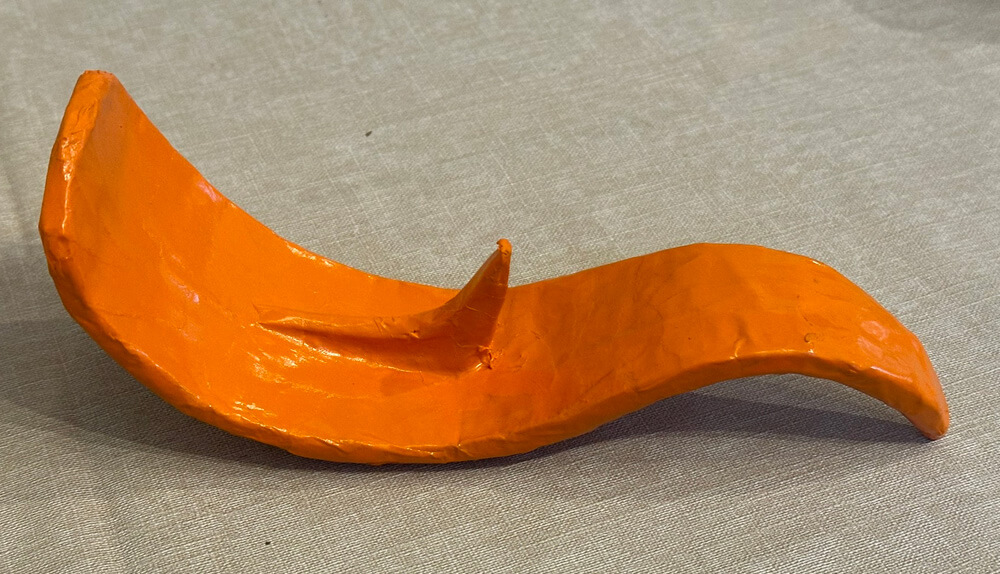
Oh yeah, a note about the tongue: before painting, I ended up building a little foam structure under the tongue to go behind the lower lip, a lot like a shelf bracket. I hot-glued that in place on the tongue and covered it with some paper maché. Then, after the tongue was painted, I used tons of hot glue to connect this bracket thing behind the lower lip.
Last thing, I painted the teeth with a lighter color of purple acrylic paint.
Part 10: adding screen
Remember in part one when I talked about cutting out the holes for the sides of the head, and keeping those pieces? (Why on earth would you remember that?) I traced those paper maché bits onto some screen with a white paint marker, and then I drew a second outline around them, about half an inch larger. I cut out these pieces.
By the way, I usually use a type of screen door material called pet screen (paid link) because the little... filaments? ...are thicker and they take paint better than regular, thinner screen.
I painted these pieces of screen with purple spray paint. Two tips for that:
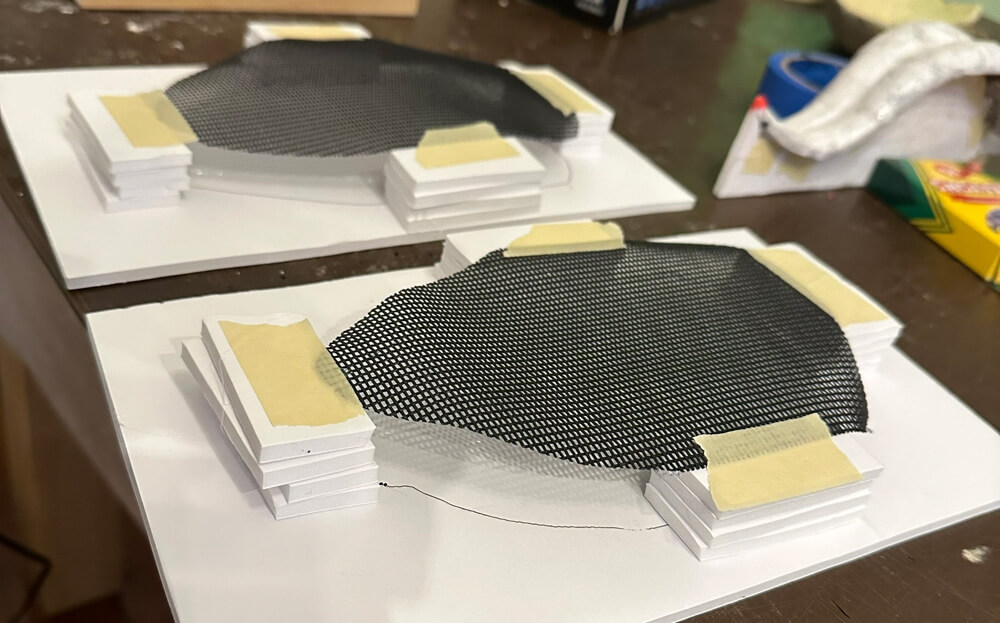
1. You don't want to spray paint screen while it's laying flat on a surface; the paint will pool in the holes and the screen will get glued to the surface. So I always build a little support out of foam board so the bits of screen can be suspended over an open space.
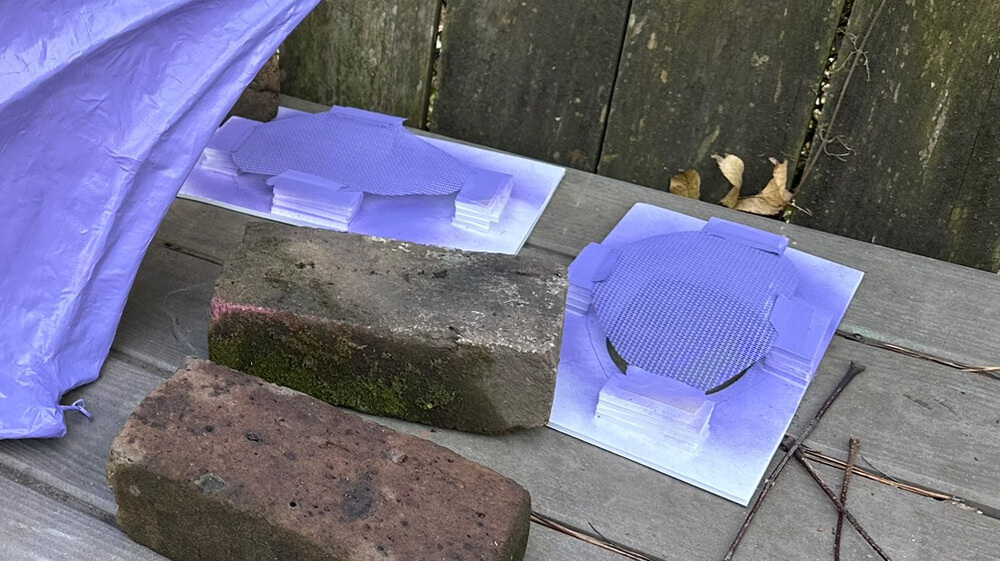
2. When spray painting screen, sometimes the holes will become clogged with paint. The solution to this is to just blow on them. You have to do this immediately! But it's usually an easy process; paint a bit, blow on the screen as needed, continue.
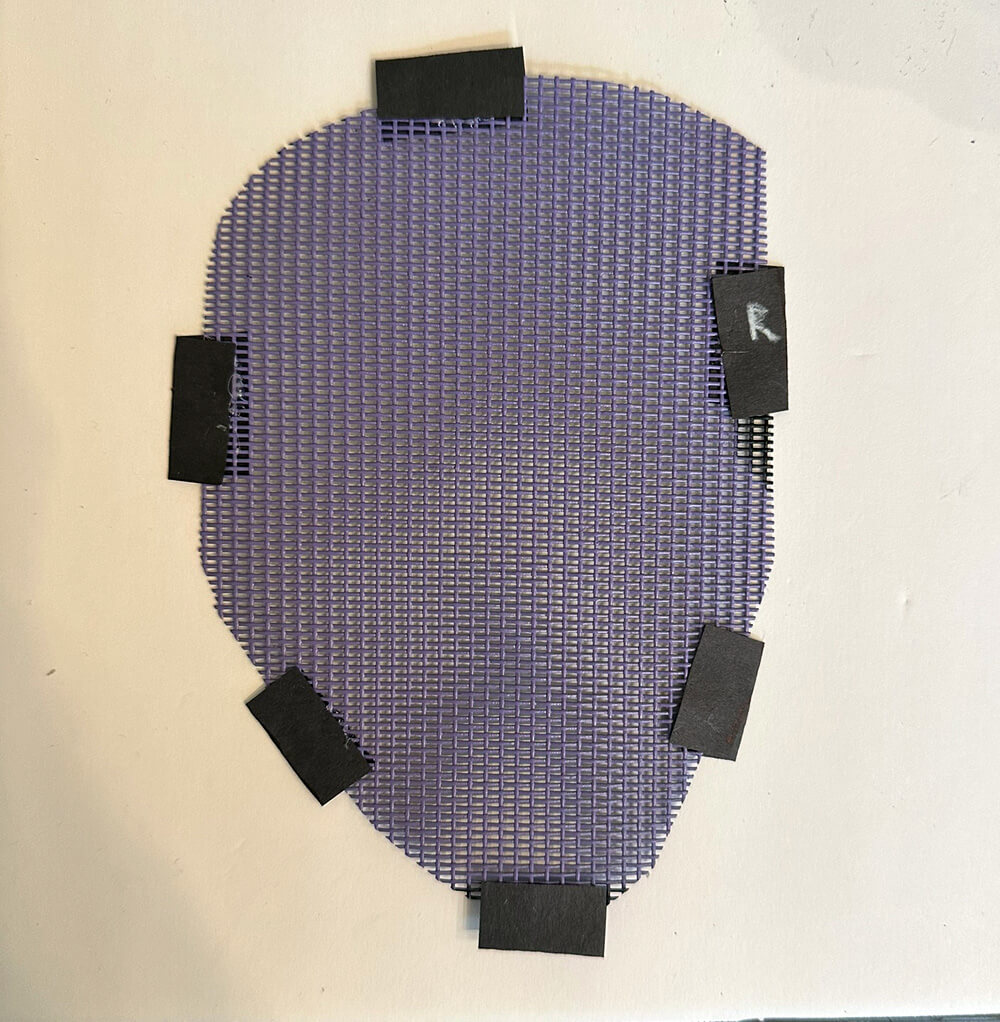
When the pieces of screen were dry, I hot-glued some folded bits of black construction paper onto the edges. These paper tabs makes the screen much easier to install in the mask. I used to just hot-glue the screen directly into the mask, but the glue goes through the screen and it'll either burn your fingers or you have to hold it down with a pencil or something, and then pencil gets glued into the mask, etc etc. I can't believe how many years I did it this way before I came up with this method with the paper tabs. Once the tabs are on there, it's easy to just hot-glue them into the mask.
I also glued a large piece of plain black screen in the mouth hole to conceal my face, and a small piece behind the nostrils.
Making the mask wearable
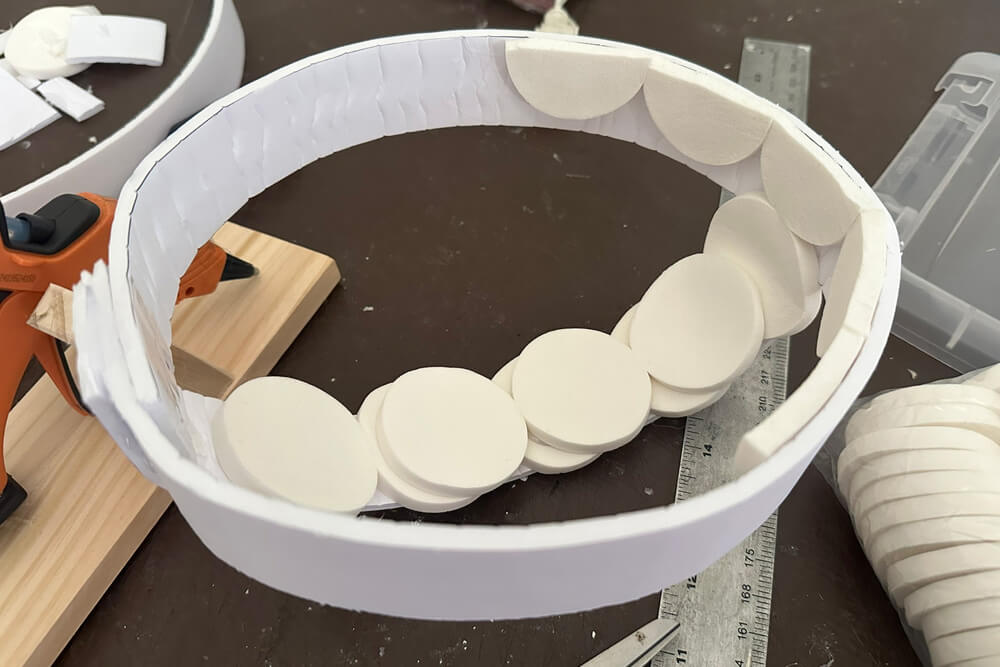
I built a structure to fit onto my head using foam board and makeup pads (paid link). I started with a headband shape made from a strip of foam board, and hot-glued some makeup pads in the front where it'll touch my forehead. Then I added a second strip as a crest across the top, also with makeup pads that'll sit on my head.
Maybe the biggest challenge in every mask is figuring out how to install the headpiece (or hard hat; I often use a hard hat) in the mask in a way that holds it at the right height and the right angle and is nice and solid. I've tried doing this a million different ways, they're all a huge pain, and luckily none of them have been a colossal failure (yet).
Here's what I did for this mask:
In turning the mask upside down and inspecting the interior, I realized it would be pretty easy to install a flat panel in the top pointy dome of the mask; that's not the case with most weird-shaped masks. So I went ahead and cut a piece of foam board at the right size and hot-glued it in there.
I attached a similar panel on top of the headpiece thing.
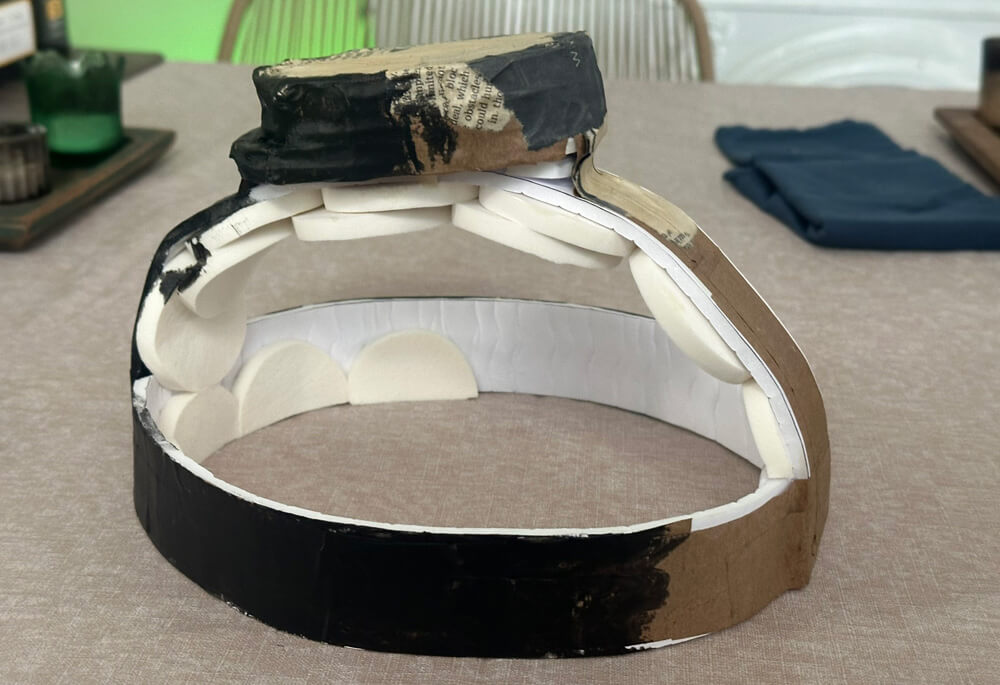
Then I did some trial and error with lots of layers of foam board, stacked up on top of the headpiece, to figure out the right size to hold the mask up at the right height. I got lucky on this mask; this whole process was easier than usual.
When everything was worked out, I added some paper maché on these two surfaces: the flat area in the ceiling of the mask, and this foam structure on top of the headpiece. This is so they'll both be nice and strong when I glue them together. Foam board by itself is easy to accidentally tear; the paper coating comes right off.
When those bits were dry, I used Gorilla Glue (paid link) to attach the structure permanently in the mask. Gorilla Glue expands a huge amount as it sets, so I set the mask upside down and put a bag of rocks in the headpiece to hold it in place.
I also set some random pieces of foam in the sides and back of the mask, wedged between the headpiece and the inner walls of the mask, to hold the headpiece in the right position as the glue set.
When the glue was set, I removed the placeholder chunks of foam, and then I cut precise-sized pieces of foam to permanently hot-glue in there. Adding additional points of contact like this helps keep the headpiece nice and stable.
Counterweight
This mask is somewhat front-heavy due to the jaw jutting out, so I added a simple counterweight in the back. My back yard is full of these weird flat rocks (forgot to take a pic!), so I grabbed some and cleaned them off and attached them in the back of the mask. I hot-glued 'em in there, and then I covered them over with paper maché — yes, I occasionally do paper maché over an area that's already painted. Not ideal, but it works. Then when it was dry I painted this area black again.
Adding a counterweight to balance out a mask makes it much easier to wear. It's kind of amazing; the mask is (obviously) heavier than it was before, but it actually feels lighter when you wear it, because it's balanced and there's no strain on your neck.

Done! This is one of my lighter and easier-to-wear masks. Visibility is pretty good; I can see pretty well to the sides and down — being able to see down is the most important thing in a mask like this, as you need to see where you're walking. The one direction I can't see very well is straight in front of me, as the nose blocks that part of my view. But since I have good visibility to the sides and down, this really isn't a problem.

I've still got a few pretty big steps left in finishing this gargoyle costume! Next up: legs (probably)! And I still have to make the stone column wearable and stuff...