
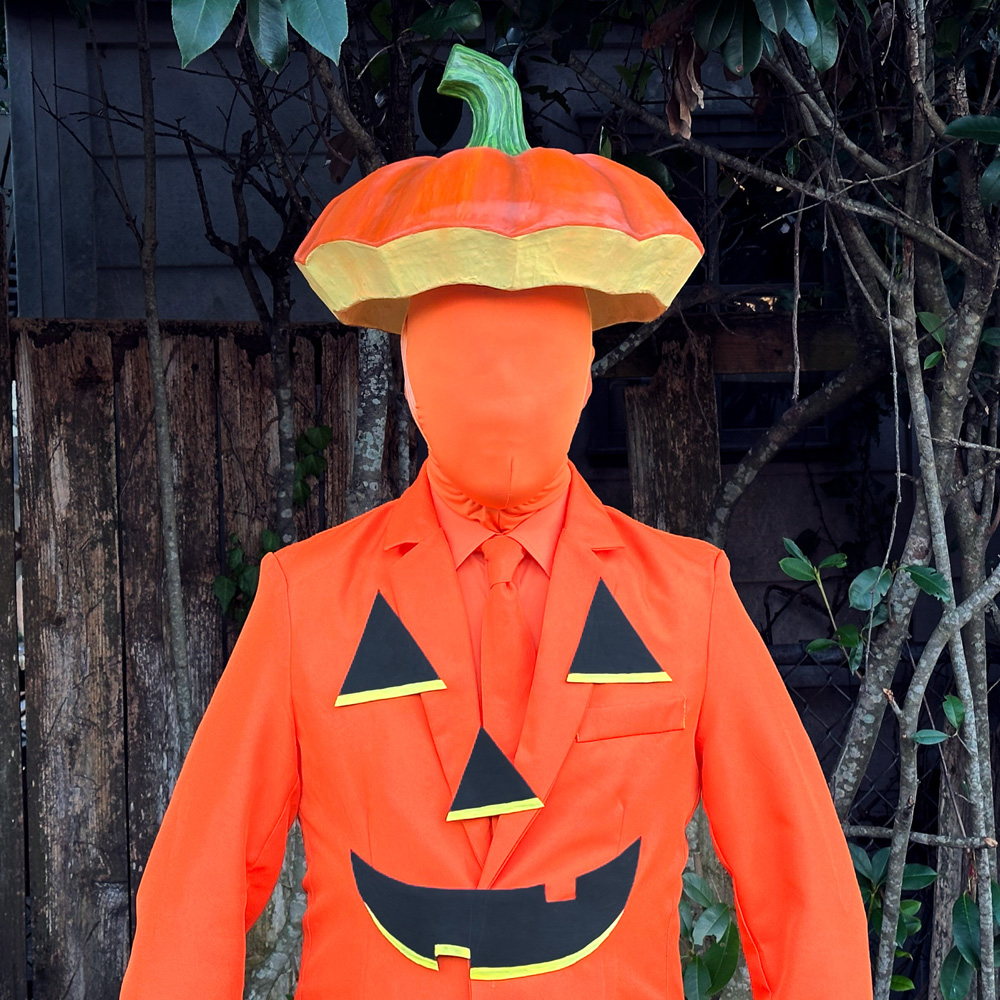
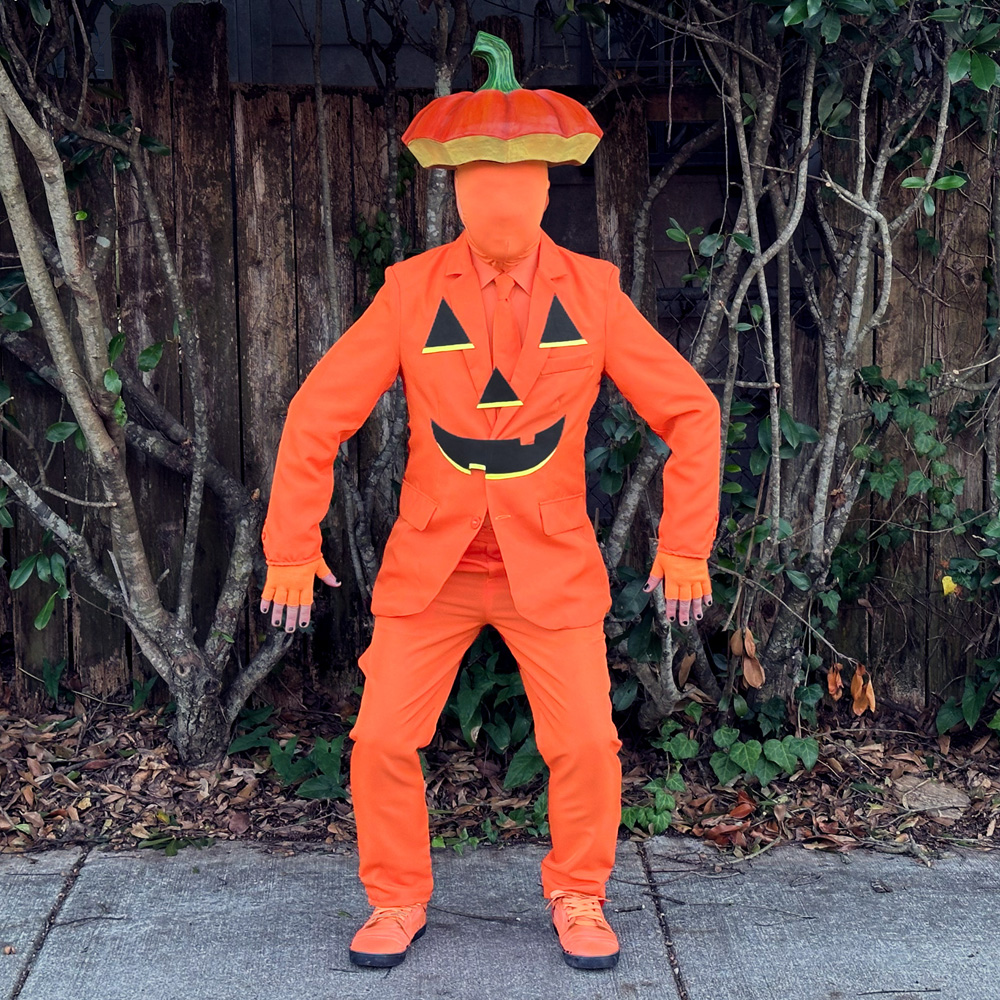
Paper maché pumpkin lid hat!
Published by Manning on October 30th, 2025
Haha, this is the most basic Halloween costume I’ve ever done! Making this pumpkin lid hat was really fun though, check it out…
Building the base, part 1
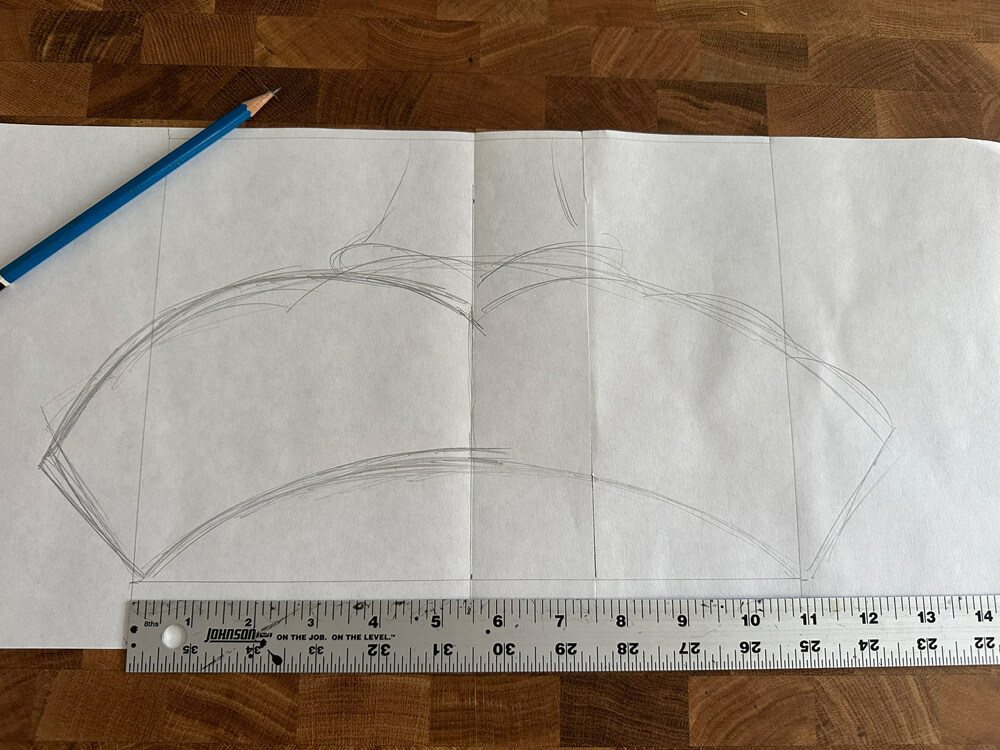
I started by holding a ruler up to my head and looking in the mirror to figure out how wide I wanted the pumpkin lid to be — I decided on an eleven-inch diameter for the bottom edge, and it would flare outward toward the top. I then sketched a cross-section of the basic lid shape at the correct dimensions. I chose the side that looked nicer and decided to use that to make the whole 3D base…
Okay now, for some projects I get carried away with striving for precision and symmetry, which, honestly, is often less about how I want the finished thing to look and more because I really enjoy the challenge and process of it all. The method I made up to build the base shape was incredibly convoluted and I don’t even know if I can explain it in a way that makes sense — although the execution was very easy! Just a ton of steps. I’m going to show you what I did here and I think by the end you might see the why and the how of it. In the end I realized I really could’ve probably just used a bowl and saved myself a lot of effort. But all this was a lot of fun to do — fun for me, maybe not fun for you! Anyway, here goes…

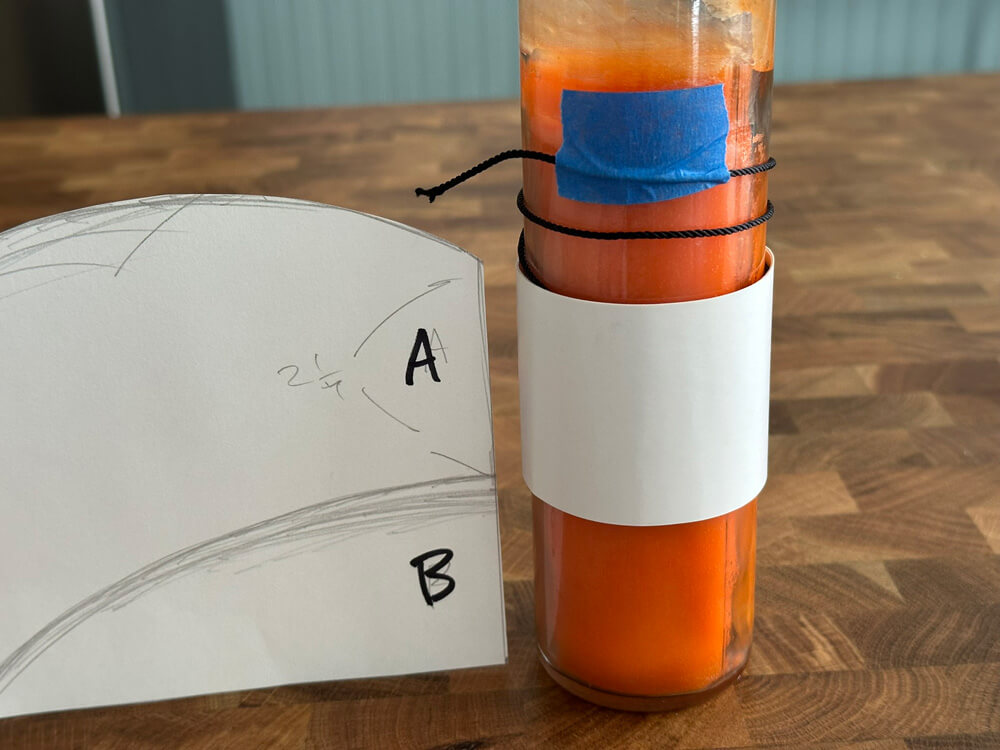
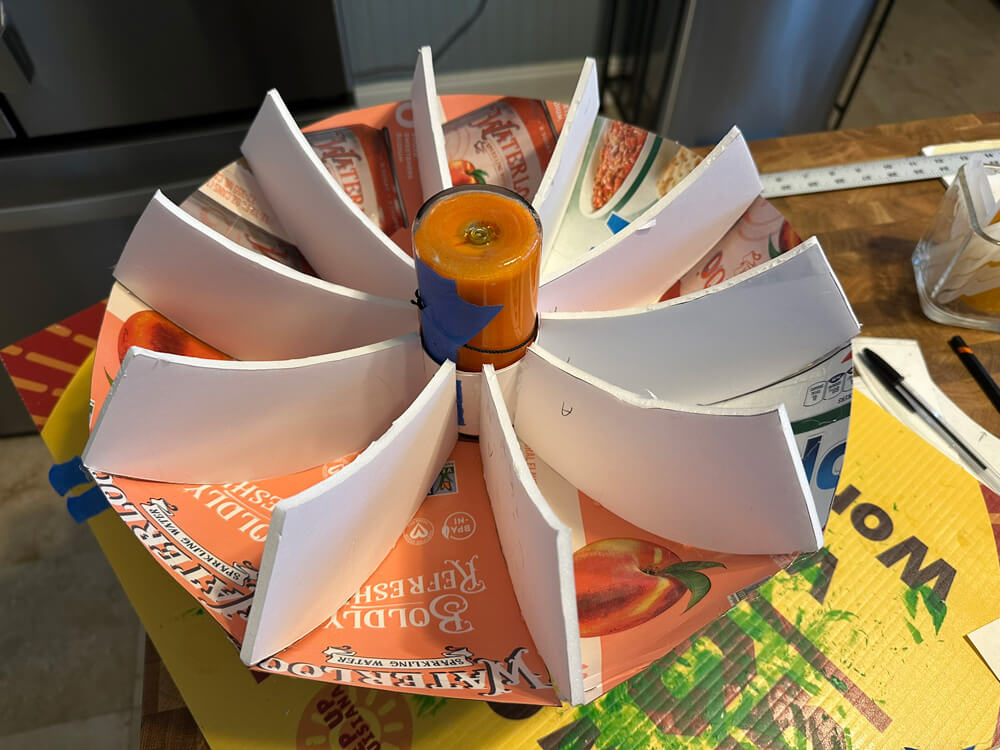
I started with a candle, some string, a strip of poster board, and some tape. I wrapped some string around the candle and taped it in place. Then I wrapped the poster board strip around the candle as tightly as possible and taped it closed. What’s the string for? I’ll explain in a bit.
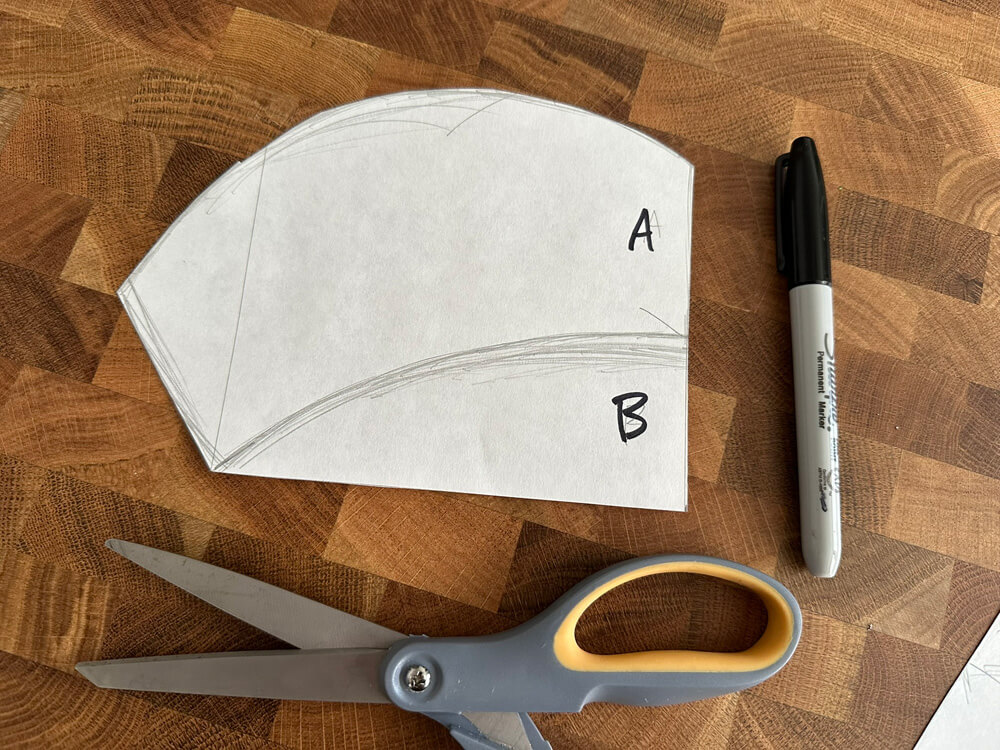
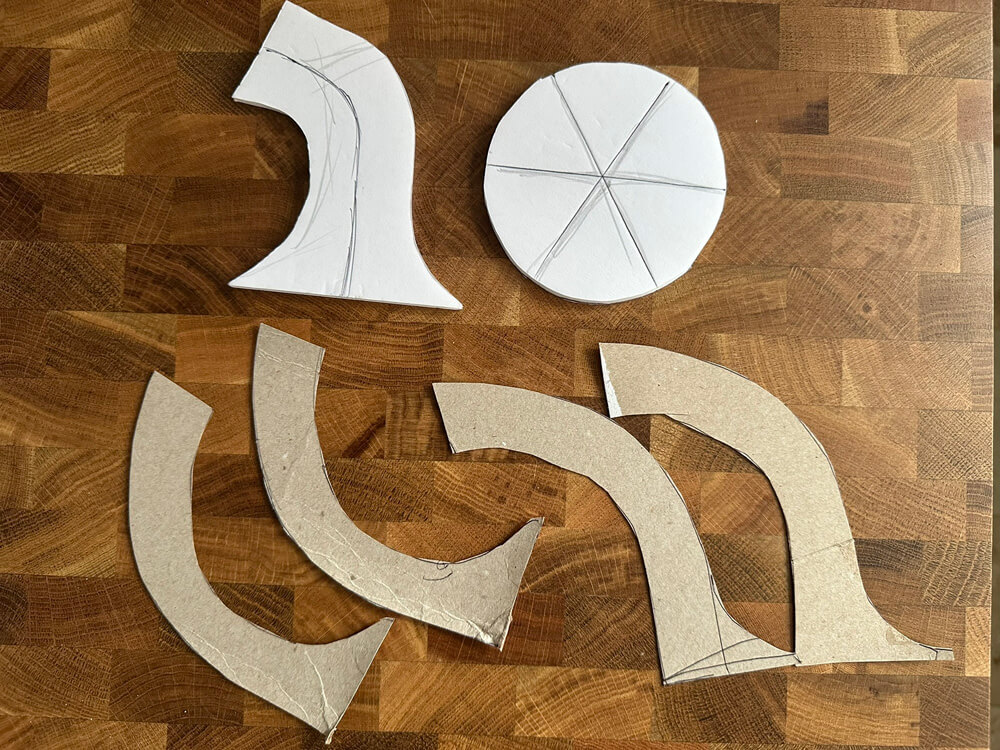
I went back to my drawing and cut out that one side of the pumpkin lid cross section. In cutting out the paper shape, I included a piece at the bottom which is negative space; that’s “B” here. “A” is the piece that will remain in the base, and “B” is there for temporary support and will be discarded later.
I traced this paper shape onto foam board ten times. That gave me the exterior outline, but I needed to add the curved line that separates “A” from “B.” So I cut the “B” part off of the paper shape, placed that onto the foam board outlines, and traced that middle line. I have no idea if I’m making any sense here.
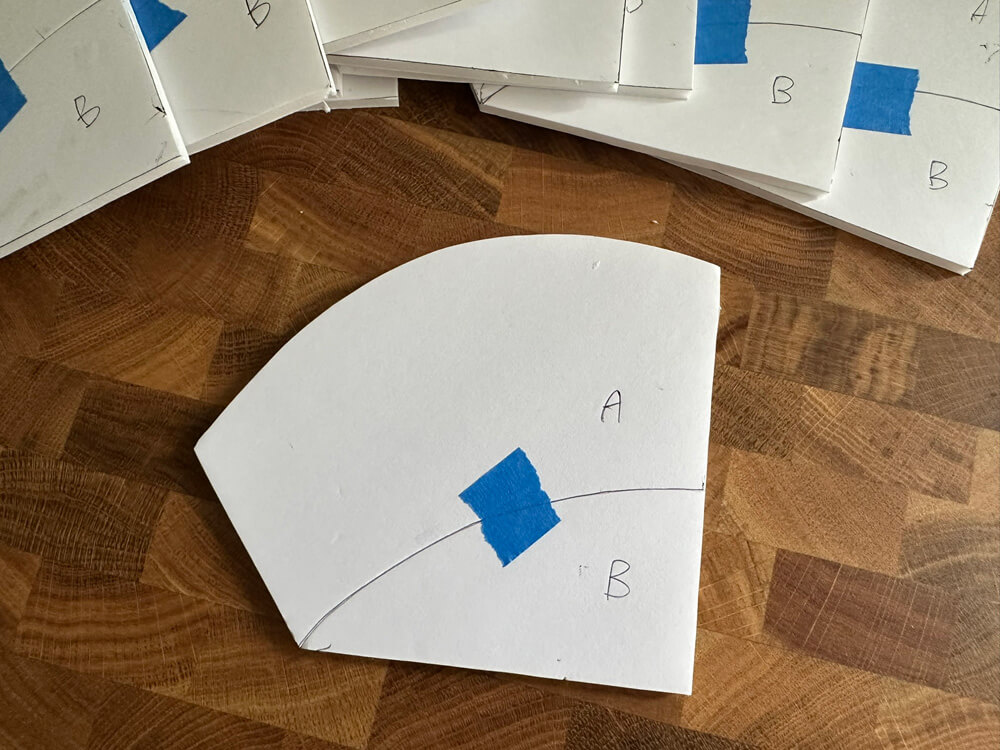
I cut out these foam board pieces with my X-acto knife. However, for each copy, I first cut along the curved middle line that separates “A” from “B”. I then put some tape on this cut, on both sides of the foam board. Then I cut out the rest of the outer line around the whole big shape. So this meant I ended up with ten copies of the whole shape, each already cut in half and taped back together. Get it? This is a lot more precise then just cutting all the shapes apart and taping them back together after. I was proud of myself the first time I thought of doing this! This method comes in handy for some things; you’ll see below…
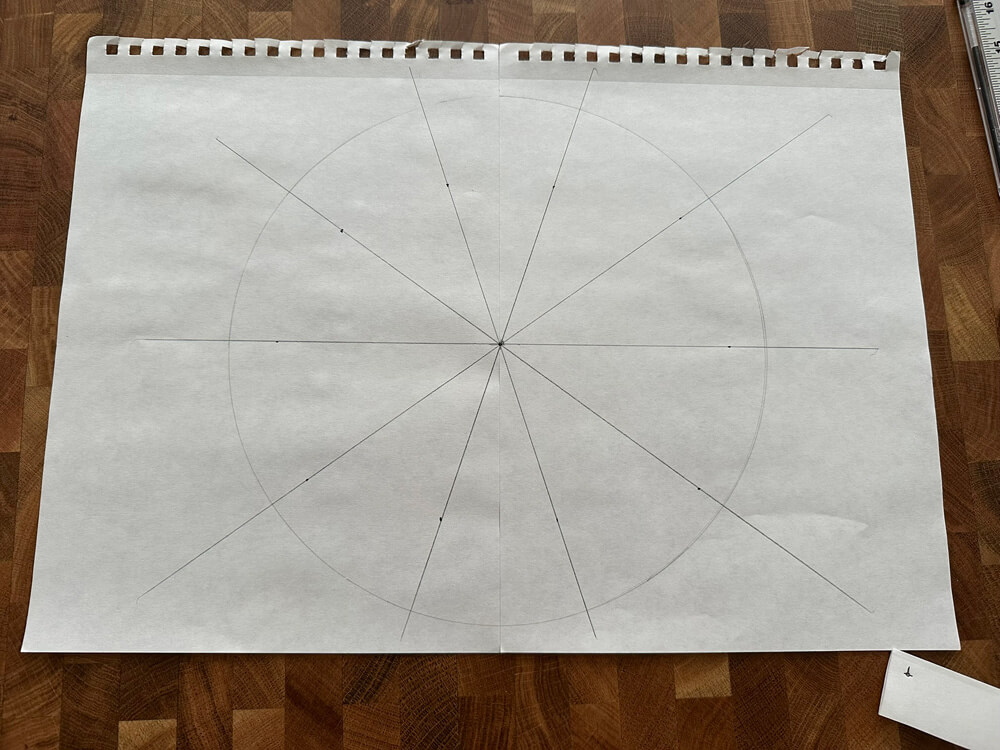
I took some paper and drew a circle with five lines crossing it in the middle. Each wedge shape is 36 degrees. (This involved some Photoshop and then tracing lines onto the paper while holding it right on my computer screen, like a cheap-o light board!)

I set the candle in the middle of the circle and taped it in place. Then I hot glued all my foam board shapes onto the poster board tube, lining them all up with the lines on the circle below. This may or may not be obvious: I put hot glue on the edge of the “A” part, but not on the “B” part, because that part is going to get discarded in a bit.
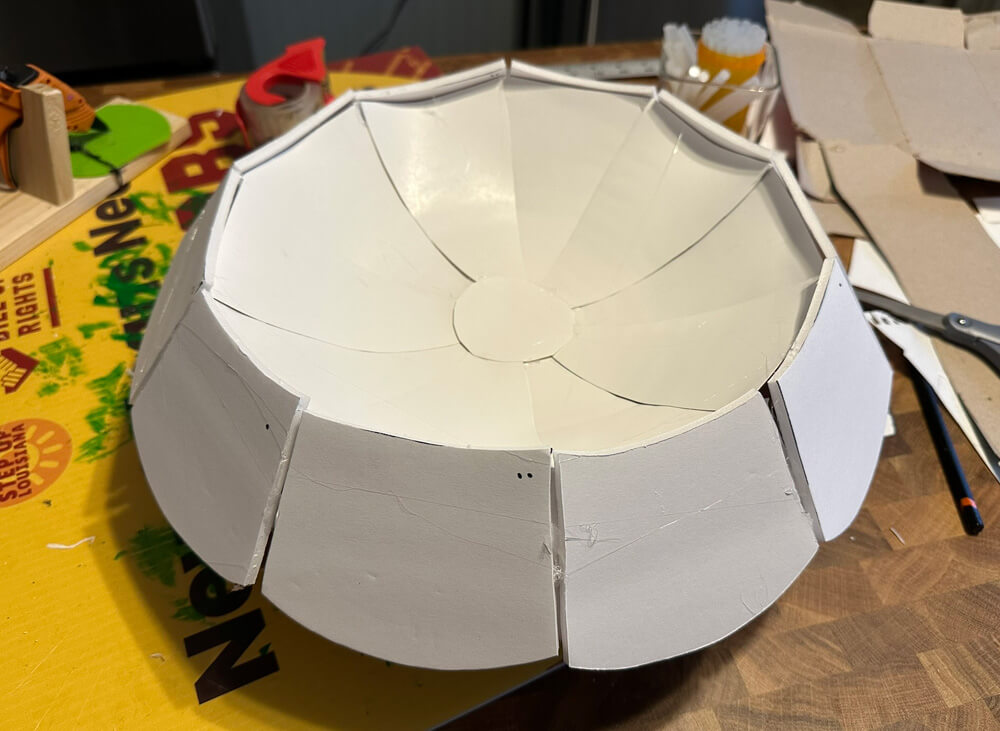
When that was done, I used tracing paper to draw a shape to cover one of the open spaces on top between the slices of foam board.
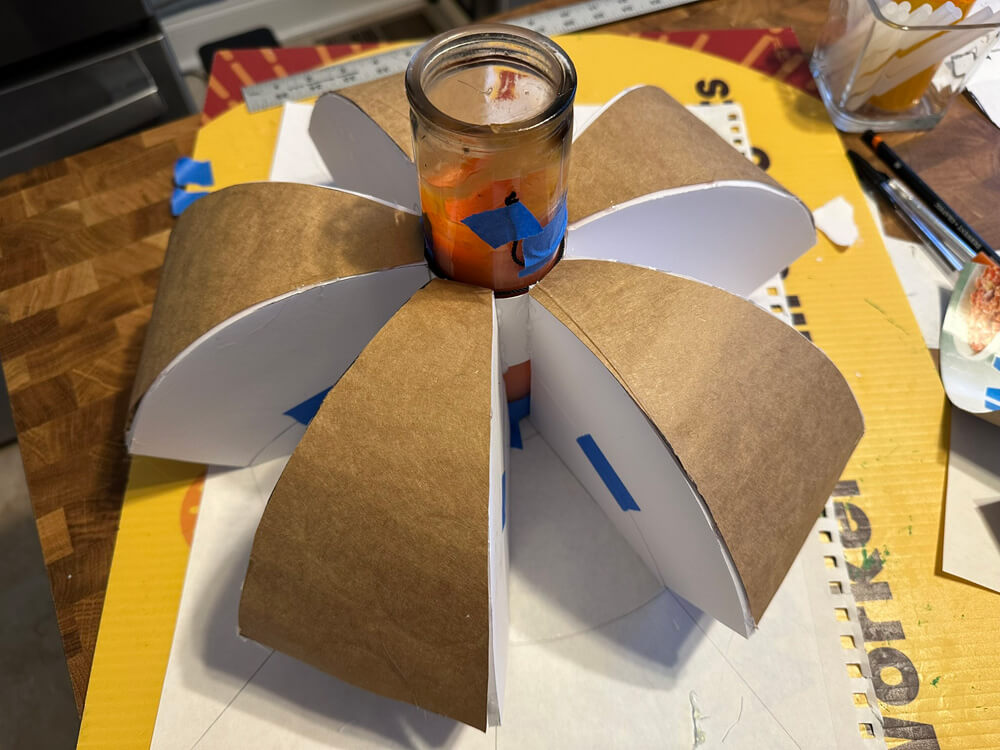
I cut out this shape, then traced it onto pasteboard (a LaCroix box and a saltines box) ten times, and cut out the pieces. I curled up these pieces in my hands to give them a permanent curve, and then I hot-glued them over top of all the open spaces. Before gluing each one in place, I laid it in place to see if I might need to trim the edges a bit. For some I did, for some I didn’t — even though I shoot for precision and symmetry there are always some things that are inexact. Anyway, let’s call these the “roof” shapes, because they cover those open spaces on top; I’ll mention them again later.
Once the roof pieces were glued on, the whole shape was stable enough for me to remove the candle. I pulled the string out of the poster board tube, and this allowed me to easily remove the candle. Without the string, it may have been difficult to slide the candle out.

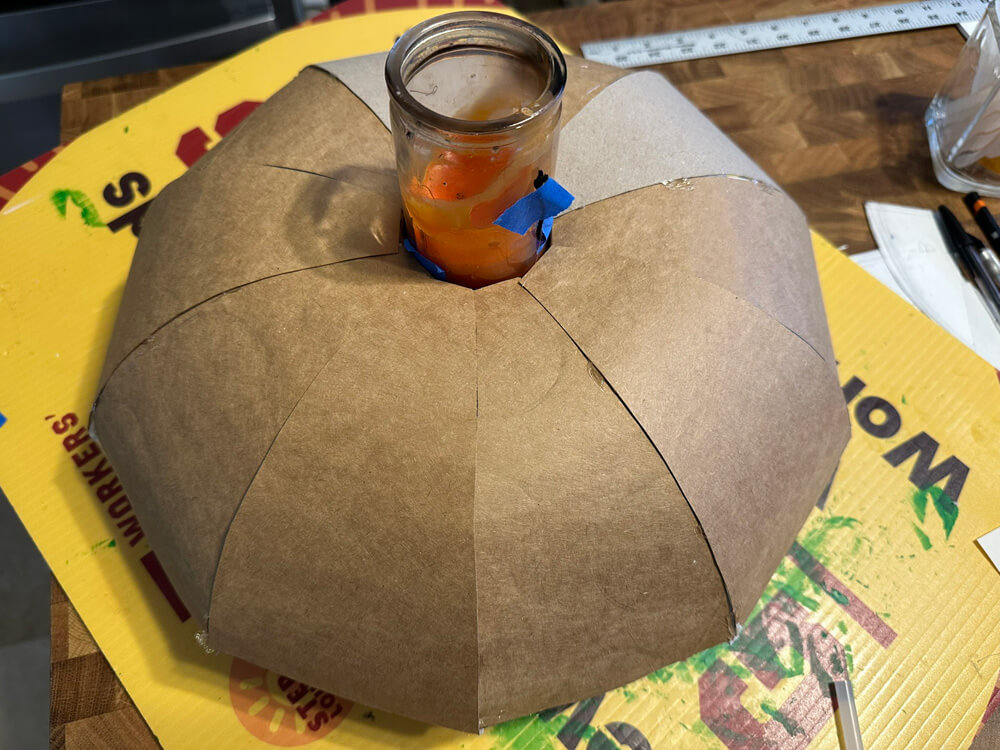
I then turned the whole base upside down and removed all the tape that was holding those “B” parts of the foam board onto the “A” parts. I removed and discarded all the “B” shapes. With the B shapes on there, the bottom surface of the whole shape was flat. Removing the B shapes meant the bottom surface was now concave, like a pumpkin lid.
I then repeated the steps with the tracing paper and a LaCroix box and hot glue for the bottom of the base. Ten more pasteboard wedges, all hot-glued in place.
Then I cut out circles of poster board to cover the holes at the top and bottom of the base where the candle was; I hot-glued those in place.
Whew! That’s how I managed to create a fairly precise, symmetrical lid shape. Lots of steps, but very easy. Luckily I enjoy all this stuff! This thing ended up feeling very sturdy. Anyway, still a few more steps to do on the base before paper maché…
Base, part 2
With tracing paper, I worked out a curved shape to go on the outer edge of the lid — basically a rectangle, slightly wider at the top, slightly taller than the space it’s going to cover, and with a convex curve at the top and a concave curve at the bottom. I cut out ten of these from poster board and hot-glued them in place all the way around. Like with the “roof” shapes, I found that I had to trim some of these slightly in order to make them fit. No big deal; the difference isn’t visible or noticeable at all in the finished piece.
Okay, this is when things got a little complicated (ha!). I decided I didn’t like how thick the whole pumpkin lid was, like in terms of the height of the outer edge. No matter how much I plan up front, there are always surprises like this! I needed to find a way to make the whole thing less tall, or, in terms of the pumpkin shell, less thick.
So at this point I ended up ripping the whole bottom surface off, and then trimming all the outer edge pieces to be less tall. The I carefully cut those “A” pieces of foam board to be less tall as well; this was not easy due to the angle I had to work at with the X-acto knife! Rather than adding more LaCroix box wedges I just covered the interior surface with lots of masking tape to create a simple bowl shape. Good enough for this area that people aren’t really going to see.
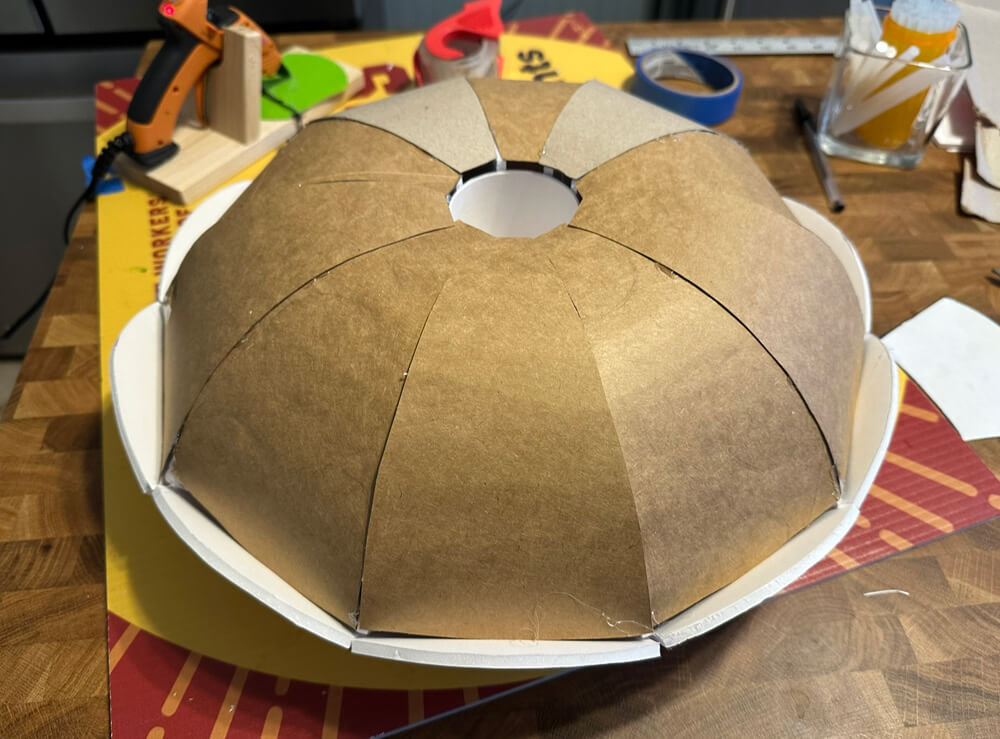
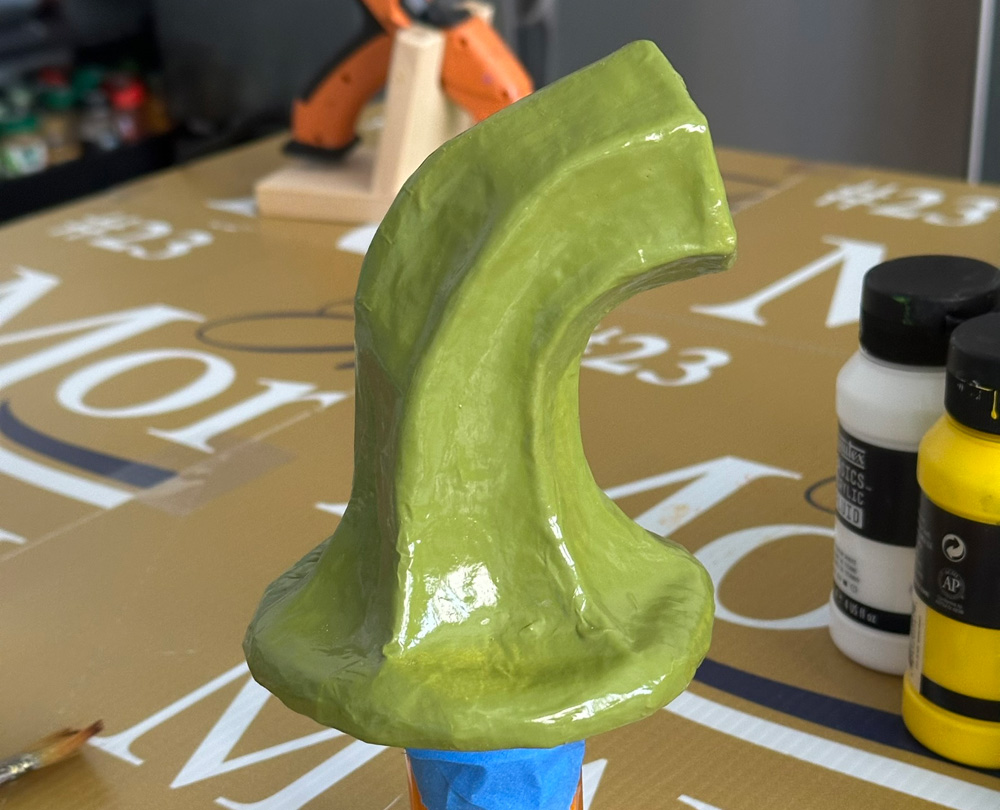
Remember the “roof” shapes across the top spaces? Where these roof shapes cover the top of the base, I wanted to add a bulging shape to each of them — you know, like how a pumpkin’s wedges each have a bulge to them, with a recessed valley in between the wedges.
My first step for this (not shown) was to cut out some pieces of foam board and craft foam and glue them in place in layers — the first piece is a bit smaller than the “roof” shape wedge, and the second is a little smaller than that.
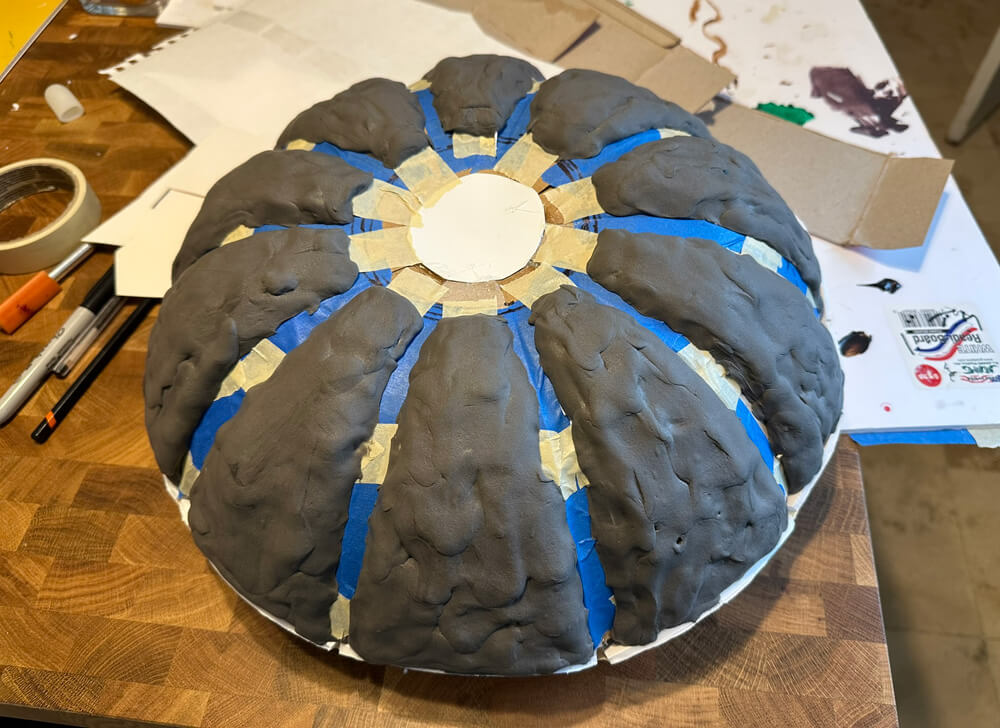
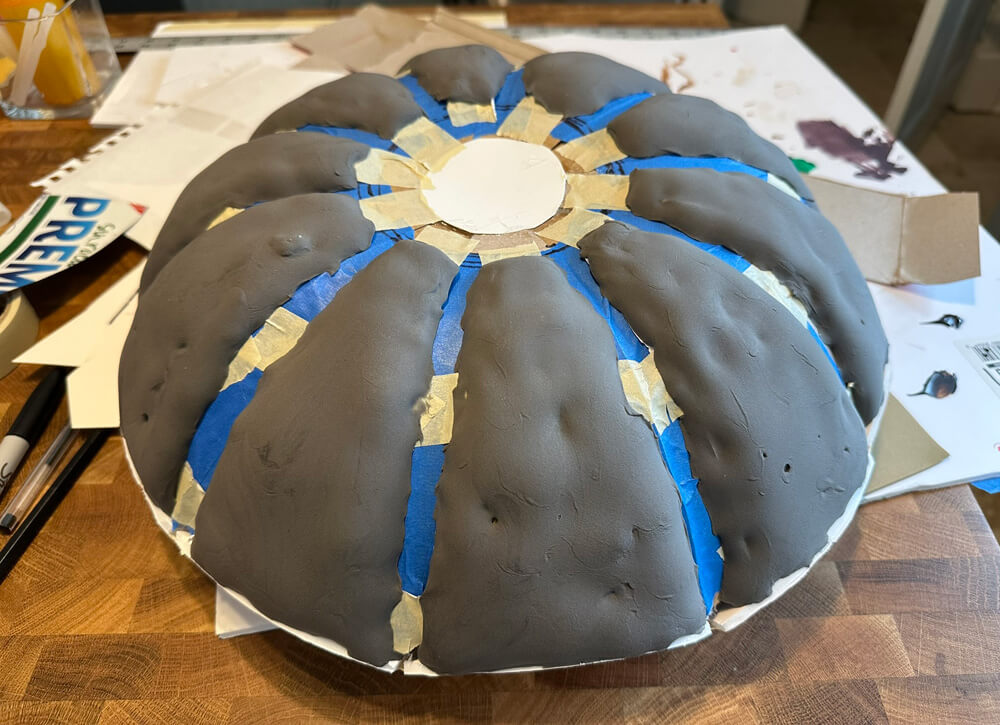
Then I covered these craft foam shapes with foam clay to smooth them out. I let the foam clay set overnight. You can see in these before and after pics how the foam clay smoothes itself out quite a bit while it sets. The remaining imperfections will get smoothed out in some later steps with shipping tape and paper maché.
(Why add those foam board and craft foam wedges before the foam clay? Why not just use all foam clay? A few reasons. Cutting out the solid shapes first means I have more control over making all the bulging wedges the same size and shape. Also, foam clay is more expensive; starting with the other materials means using less foam clay overall. Also, with foam clay, the thicker the shape you make, the more likely it is to sag or warp as it sets. And lastly, with foam clay, the thicker the shape you make, the longer it takes to set. Anything more than about a quarter inch thick can a couple take days to fully set.)
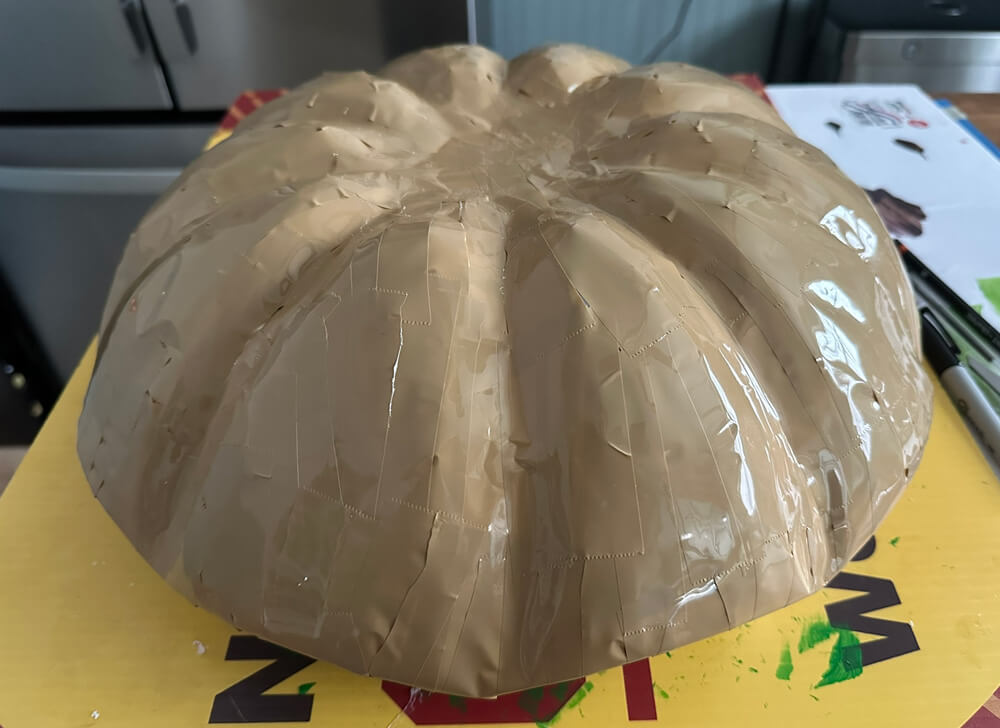
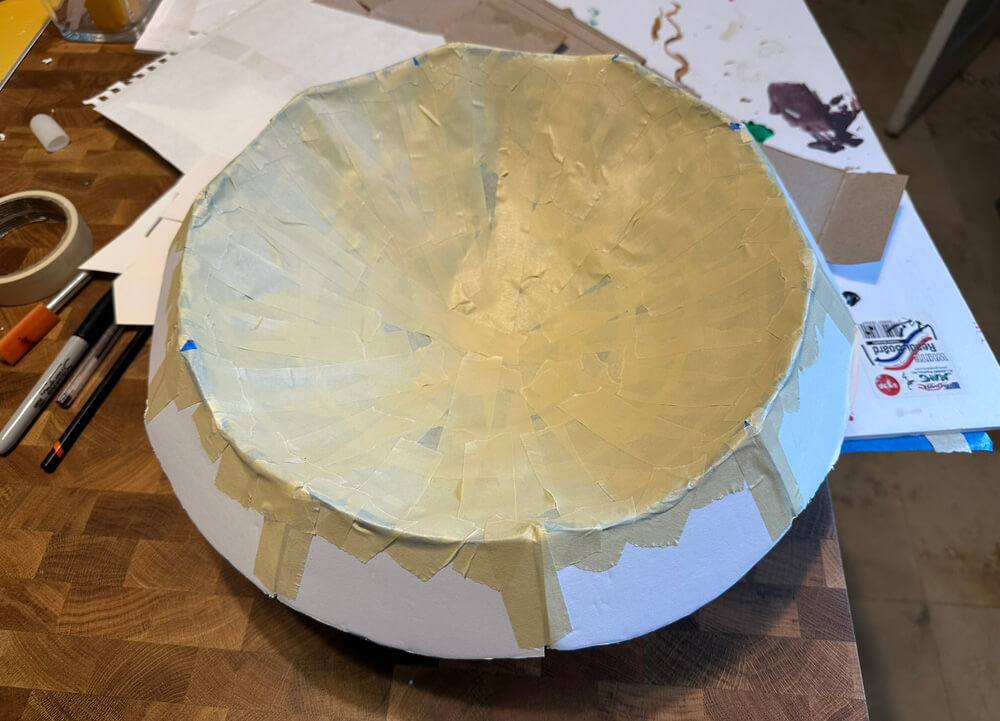
After the foam clay had set, to prepare for paper maché, I covered the entire base with very thin strips of heavy duty shipping tape. The tape is there to act as a release agent so I can remove the paper maché from the base later on. My method for working with shipping tape over a complex, curved shape is to tear off a piece about two inches long, and then with my fingers I tear that into narrow strips; maybe three or four from one piece of tape. These narrow strips will lay much smoother on a curved surface than a normal wide strip will. With the normal width of shipping tape, you end up with lots of ugly wrinkles and pointy bumps.
Whew! Getting there!
Paper maché
I covered the whole base shape with six layers of paper maché, using very thin strips to accommodate all the curves without getting lots of wrinkles and bumps and folds. You can read about my paper maché process and materials here. I did these layers over a couple of days and used an electric fan to speed up drying.
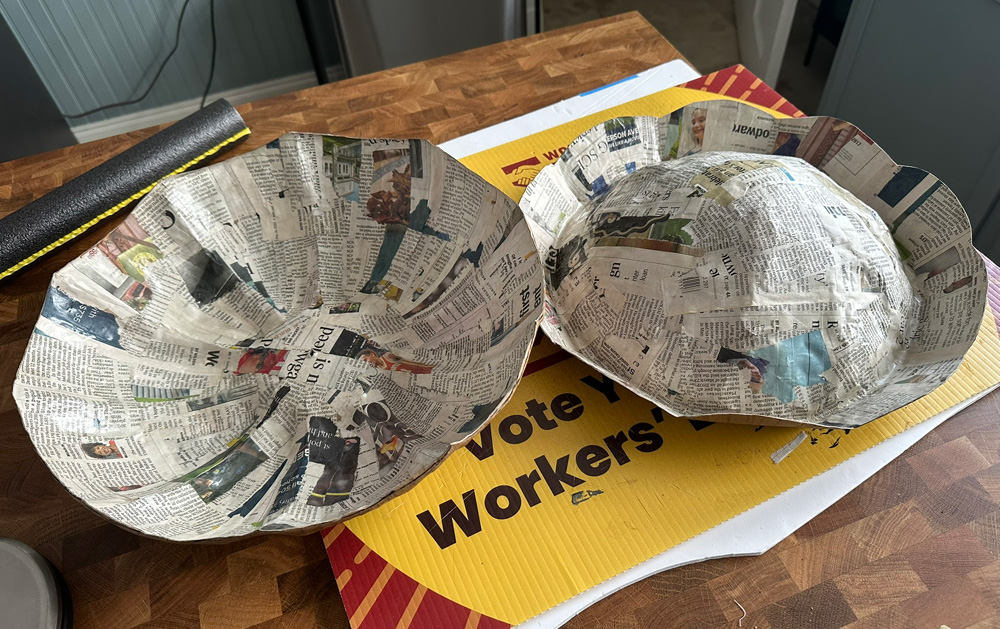
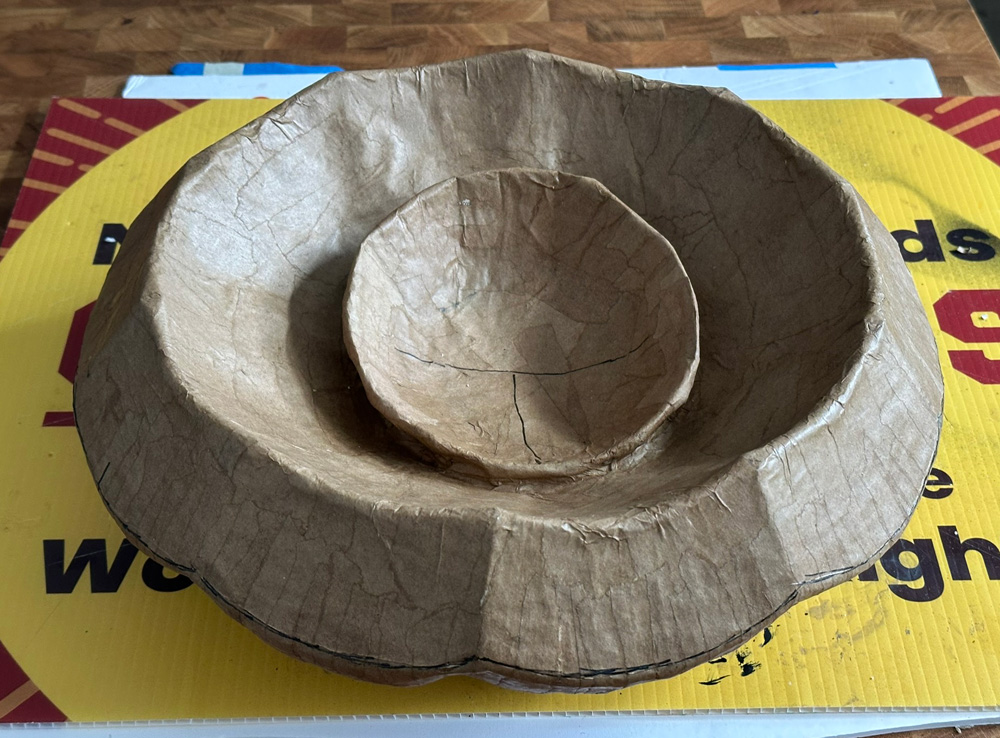
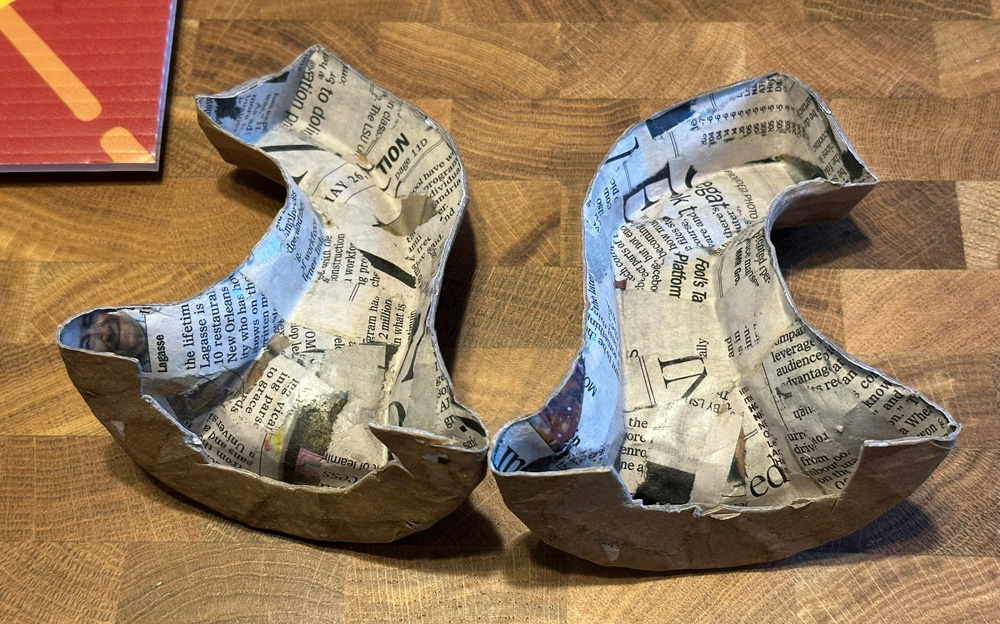
When all the paper maché was finished and 100% dry, I cut open the pumpkin lid and removed all the base materials.
Oh yeah! Before doing cutting the thing open, I drew a vertical line on the edge of one of the wedges, so that when it was time to put the pieces back together I could line up these lines. Without this step, it might be difficult to know exactly how the top and bottom pieces are supposed to fit together.
Before closing up the sculpture again, I added a small piece of foam tubing inside, to hold the top and bottom at the correct distance. I was a little worried about the hollow sculpture being easily crushed or squished from top to bottom, so this foam will prevent that.
How did I determine the height of the foam to go in there? There’s no way to look at the pumpkin lid from the top or bottom or side and get an idea of the distance between the top and bottom surface. So what I did was poke a hole in the top of the lid with an awl, dead center, and stick the awl in until it touches the top of the bottom surface. Then I held my finger on the awl to mark how deep it went, pulled the awl out, and measured that length. I cut out a piece of foam pipe insulation tubing at that size, and then hot-glued it onto the top of the bottom shape. I put some more hot glue on top of the foam piece, and then I set the top part in place.
Then I taped the pieces back together, and then I covered these connection areas with a two layers of paper maché.
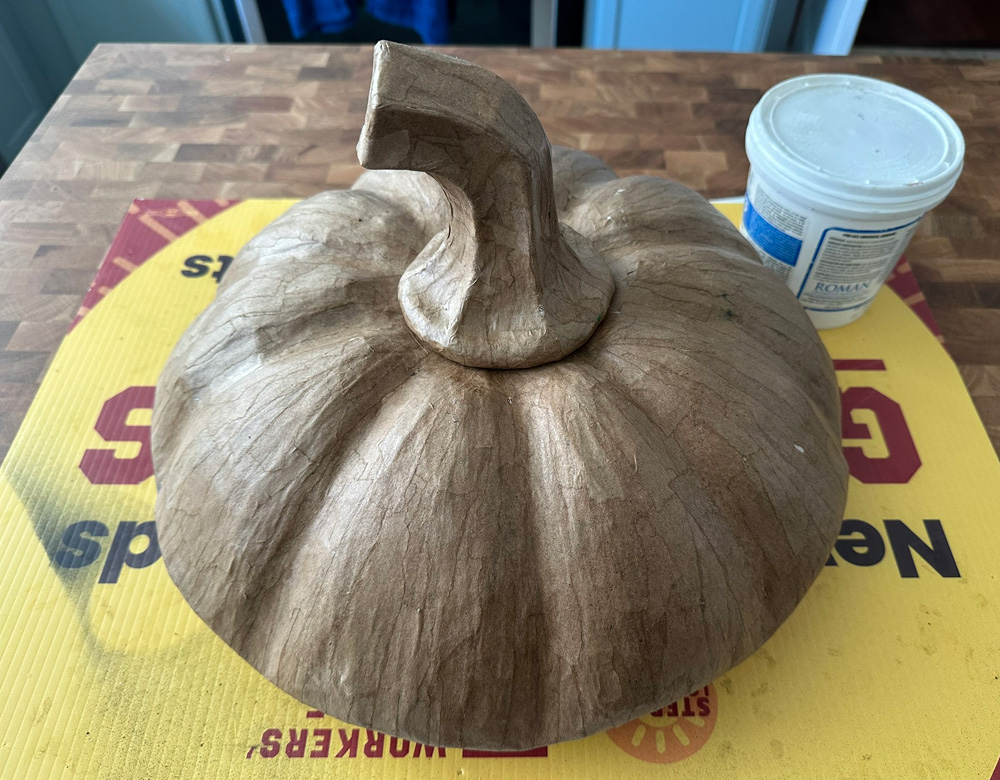
When all that was done, the finished shape felt very lightweight and sturdy.
Interior bowl shape for my head
In putting the pumpkin lid on my head, I decided it wasn’t really staying in place the way I wanted, due to the wide inner bowl shape, so I added a piece. I made a simple, smaller bowl shape out of a piece of foam board with some wedges cut out of it and then curved up and taped together. With some trial and error I figured out how to make this thing the right shape to fit nicely on top of my head. I covered this thing with six layers of paper maché, and then glued it into the lid with Gorilla Glue. Note: this bowl shape doesn’t sit directly in the middle of the lid; it’s set quite a bit closer to the front. This is to make the pumpkin lid sit on my head at the correct position. I see a lot of people designing masks and headpieces and just assuming their head should be dead-center in the thing. This often results in a piece that sits way back on your head and leaning way back / pointing upward. If I were to glue this little bowl shape in the middle of the lid, then the lid would’ve sat on my head in a way that it would be angled back quite a bit. I wanted it to sit pretty much flat, so that meant that the part that goes on my head needed to be closer to the front and angled a bit diagonally. This is very hard to explain! You gotta take my word for it.
I set a bunch of rocks in the bowl shape while the Gorilla Glue was drying. Gorilla Glue expands a crazy about as it sets, so if you don’t use any weight, it’ll push your pieces apart.
Making the stem
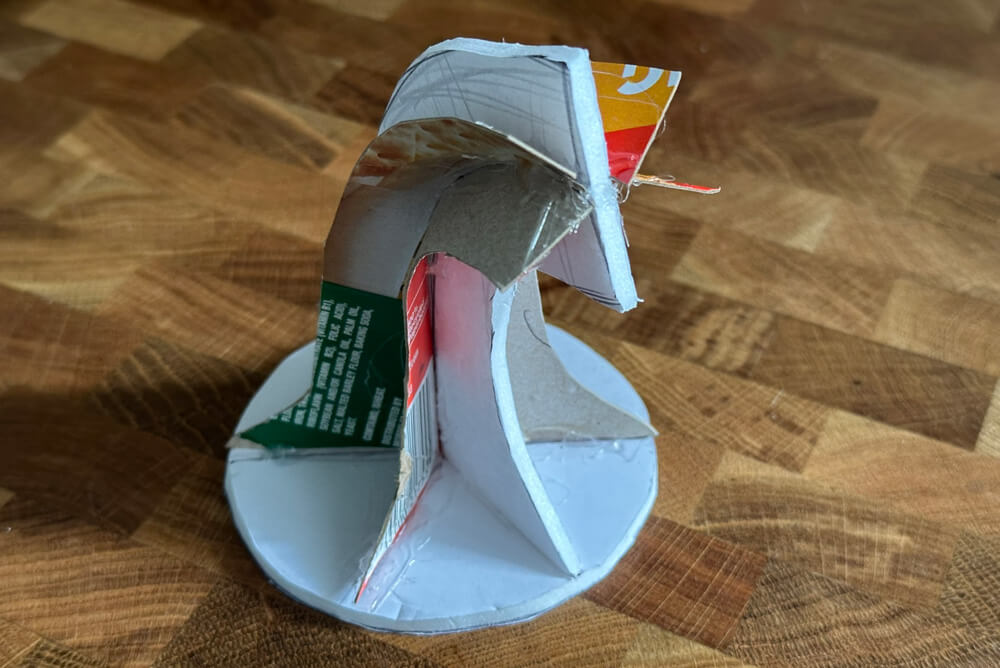
I made the stem out of foam board and pasteboard. As you can see, there’s a circle of foam board for the base, and a sort of “profile” shape of the stem made from foam board as well. Then four curved pieces of foam board to create some outer ridges; figuring out the curvature to assemble this 3D thing took some trial and error! It was a fun challenge.
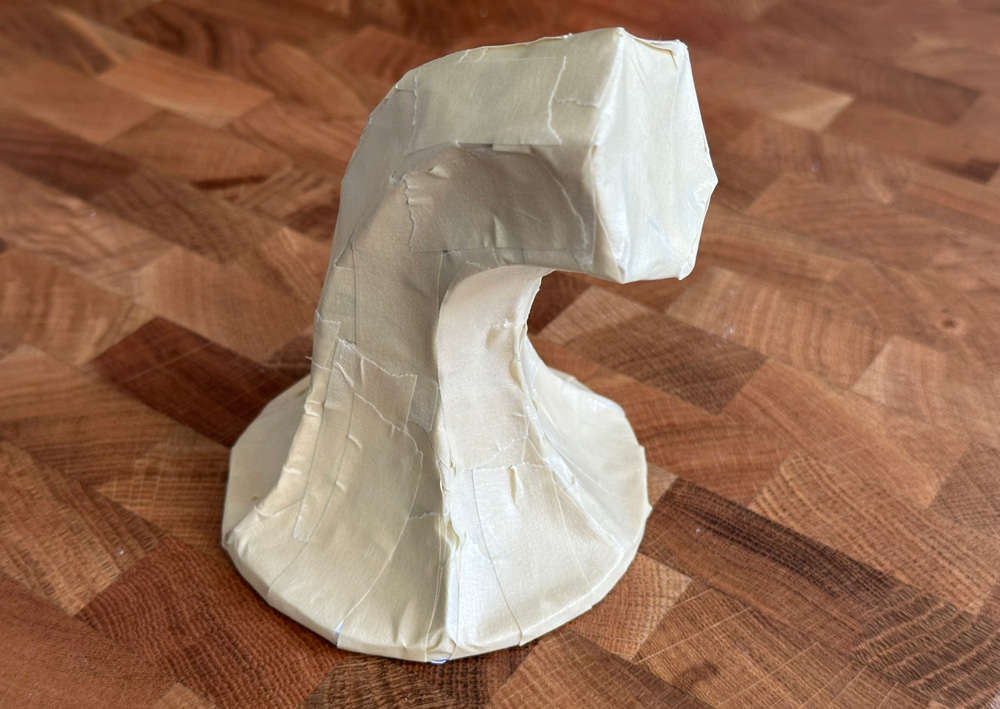
I hot-glued all these pieces together. Then I wrapped the whole thing in masking tape, to create “walls” that span across all the empty spaces between the ridges. I then covered this whole thing in very thin strips of shipping tape, just like I did with the pumpkin lid, to act as a release agent for the paper maché.
Then I covered the stem in six layers of paper maché, let it dry, cut it open, removed all the inner junk, taped the two halves back together, and then covered over the taped areas with four layers of paper maché. The finished stem is very sturdy and extremely lightweight.
For some pieces, I wonder if it’s even worth it to remove the interior stuff; why not just leave it all in there to make the piece stronger? In this case, weight was important. When I tried the whole lid shape on my head with all the base materials inside, it wanted to slide and fall off. After the piece was hollow, it was much lighter and sat on my head much more easily, without moving around much. I actually weighed the piece before and after removing the interior: the whole pumpkin lid was almost 30 ounces with all the stuff inside, and then a little more than 10 ounces after it was hollowed out and attached back together.
Here’s the stem sitting on the pumpkin lid, not yet glued in place:

Holes for the elastic strap
I cut some holes in the sides of that inner bowl shape that will sit atop my head. These holes are where I’ll attach an elastic band to go under my chin. Now, the holes were just going through some paper maché and some foam board, meaning the tension of the elastic would surely make it tear right through. So, to reinforce the holes, I hot-glued some twist ties in place over the edges of the little bowl shape, and then covered all of this over with a few layers of paper maché.
I bought some white elastic and an orange permanent marker. I cut a length of elastic and colored one side of it with the marker; I also did my best to color the edges. I didn’t color the other side because that’s the part that will touch my face, and I figured there’s a chance the ink might rub off on my skin. Who knows!
I attached the elastic to the lid after painting…
Painting
I started with some blue painter’s tape to protect the bottom of the stem, and a small circle shape on top of the pumpkin lid. These are (obviously) the areas that will get glued together when I attach the stem later. Un-painted paper takes glue better than painted paper.
I also used blue tape and some paper to protect the interior of the bowl-shaped piece that will sit on my head.
I applied a coat of Mod Podge on everything to smooth out the paper maché surfaces before painting. I did my usual trick of mixing a few drops of acrylic paint (orange and white in this case) into the Mod Podge so I could see exactly where I’d covered. (Note: you don’t want to use just white for this, as the liquid Mod Podge is white and you won’t be able to see how well you’ve mixed it.) The paint also serves as a bit of a primer before spray painting. I applied this mix to both the pumpkin lid and the stem.
Now, if I had any pale yellow or peach-colored spray paint I would’ve used it on the interior and the outer edges — but I didn’t, and it wasn’t worth buying a color of spray paint I’ll probably never need for anything else. So instead I just used white spray paint, with the plan to cover this with a better color of acrylic paint later on.
I spray painted the whole top of the pumpkin lid orange, and the stem green, of course.
I mixed up some light yellowish-orange acrylic paint and painted the interior and the outer edge. This took two coats to get good even coverage.

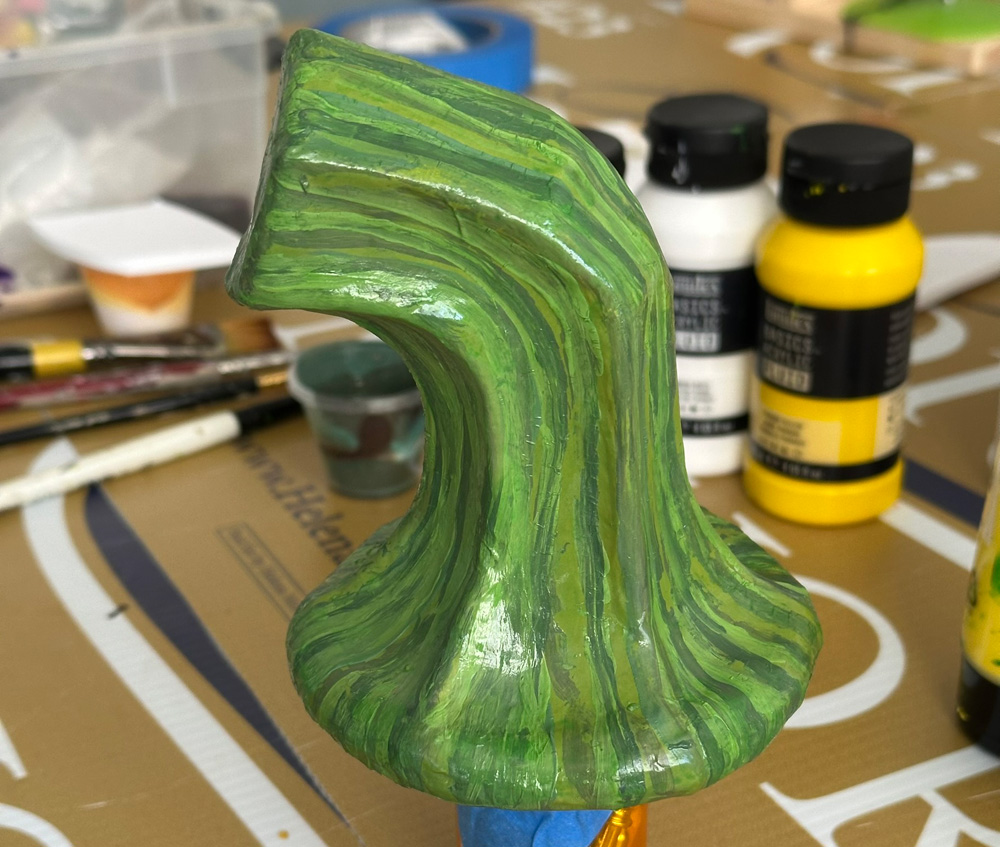
I actually busted out my airbrush for the second time ever to do the shading on the pumpkin lid! I’m terrified of this thing. I mixed up some brown and black and did the shadows in between the wedges, and then I used some orange to do some subtle blurring over where I’d screwed up the shadows. I also used some yellow to do some almost-invisible highlight and lines in the middle of the wedges. The two colors of orange along with the yellow made the surface somewhat uneven in a very natural looking way. I’m really pleased with how it came out.
I spray painted the stem and olive green color, and then I did lots of lines running along the stem with different mixtures of green, yellow, some black, some brown, etc. Very haphazard, but I love how it came out.
Making it wearable
The reason I left the inside of the bowl shape unpainted is that I wanted to hot-glue some foam in there, to make the thing a little more comfortable and also to make it hold onto my head a little better. I cut out an oval of craft foam and then cut some wedges around the edges to let it curl up a bit, and I hot-glued the thing in there.
Then I took the elastic band and worked it through one of the holes, using a wooden coffee stirrer to help push it through. I folded the end of the band onto itself, and then I hot glued it together to make a small loop. Then I did some trial and error with putting the thing on my head to figure out the right length for the whole elastic band. When I’d figured that out, I hot-glued the other side as well, and then I cut off the excess length.
Last step: gluing on the stem
I left this step for absolute last because the lid was much easier to work on without it — especially for anything where I need to work on it upside down, like attaching the elastic, gluing the foam inside the headpiece, etc.
I wanted the connection between the stem and the lid to be really strong, so if anyone else picks up this thing by the stem, or if it gets bumped into something, it won’t break off. Hot glue on paper maché sometimes doesn’t hold as well as one would like it to. So I used a few methods here to attach the stem as firmly as I could.
I scratched up the two surfaces with a pointy metal sculpting tool. This gives the glue more surface area to grab onto and more little recessed shapes to ooze into.
Then, I used two kinds of glue: A drop of Gorilla Glue in the middle, and then a ring of hot glue around the outer edge. I like combining Gorilla Glue and hot glue like this, because the hot glue sets immediately and holds the pieces together while the Gorilla Glue takes a few hours to set. Gorilla Glue expands a crazy amount as it sets, so without the hot glue, the Gorilla Glue would push the stem out of place. When gluing two flat surfaces together you have to use a very small amount of Gorilla Glue; otherwise it will seep out the sides as it expands. The drop you place in between two flat surfaces is going to grow outward into a wider thin disk of glue, holding the two shapes together.
Note: for the hot glue part of this step, I used Gorilla Glue brand hot glue sticks; they are much, much stronger than the cheap glue sticks I buy in bulk. (They’re also quite a bit more expensive, but they’re worth it for things like this.)
Oh wait, one more step! I didn’t like how shiny the paint job was, so I added a coat of matte spray over the whole lid and stem.
That’s it! This thing ended up nice and sturdy and very easy to wear. This pumpkin lid hat is essentially for a joke costume and I should’ve cut every corner on it, but instead I got obsessed and gave it way more energy than it needed and I ended up making one of the sculptures I’m most proud of in terms of overall quality and symmetry and smoothness and paint job, etc. Another fun project done!
 About Manning Krull
 How to make a 4-foot paper maché alligator
 My violin skull mask, Mardi Gras 2015
 Three-headed paper maché dragon sculpture
November 2nd, 2025 at 10:39 pm
Always tickled that your small projects morph into big ones because you can’t just not care about doing a good job. This one was particularly enjoyable to follow along with, especially that killer paint job. Hope you had a happy Halloween!
I’m asking Santa to bring me Eric Hart’s Prop Building Guidebook – I probably won’t ever make anything based on it, but watching what you do is so fun, I wanted to learn more