
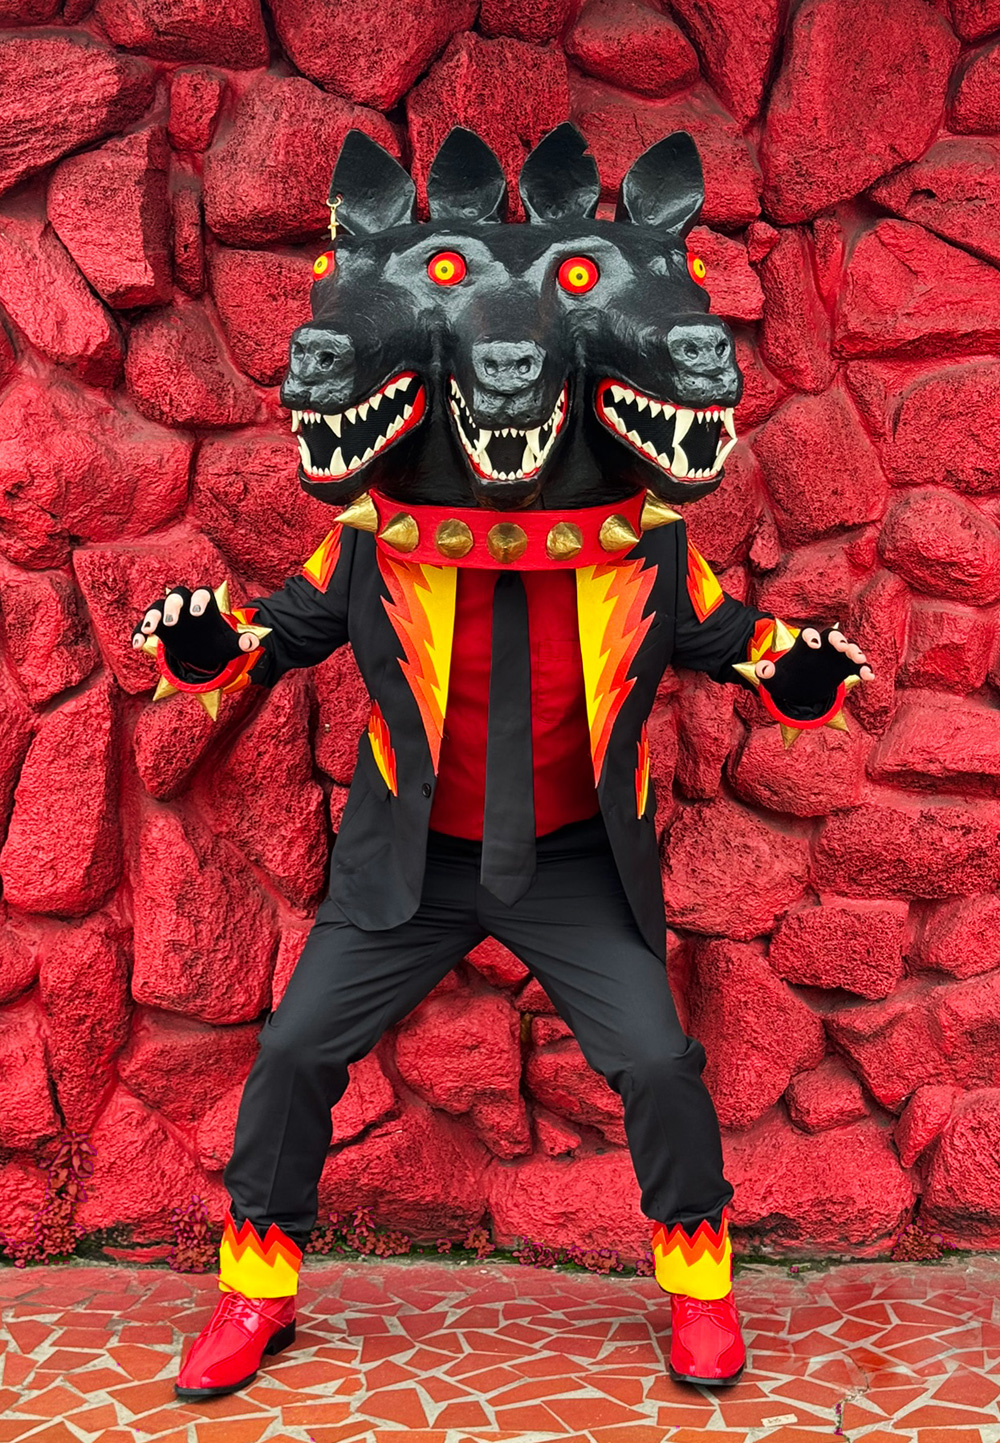
Cerberus mask for Mardi Gras 2024, part 2
Published by Manning on February 23rd, 2024
See part 1 of my Cerebus mask project here. As I mentioned in that first bit, I had to do a few steps of this project in a weird order, but for the sake of keeping this article neat I’ve grouped things by major sections — so for instance you might see some parts painted before I get to the whole section about painting, etc.
Okay, so I built the base for the head, put paper maché on it, cut everything out, and installed a hard hat inside. What’s next?
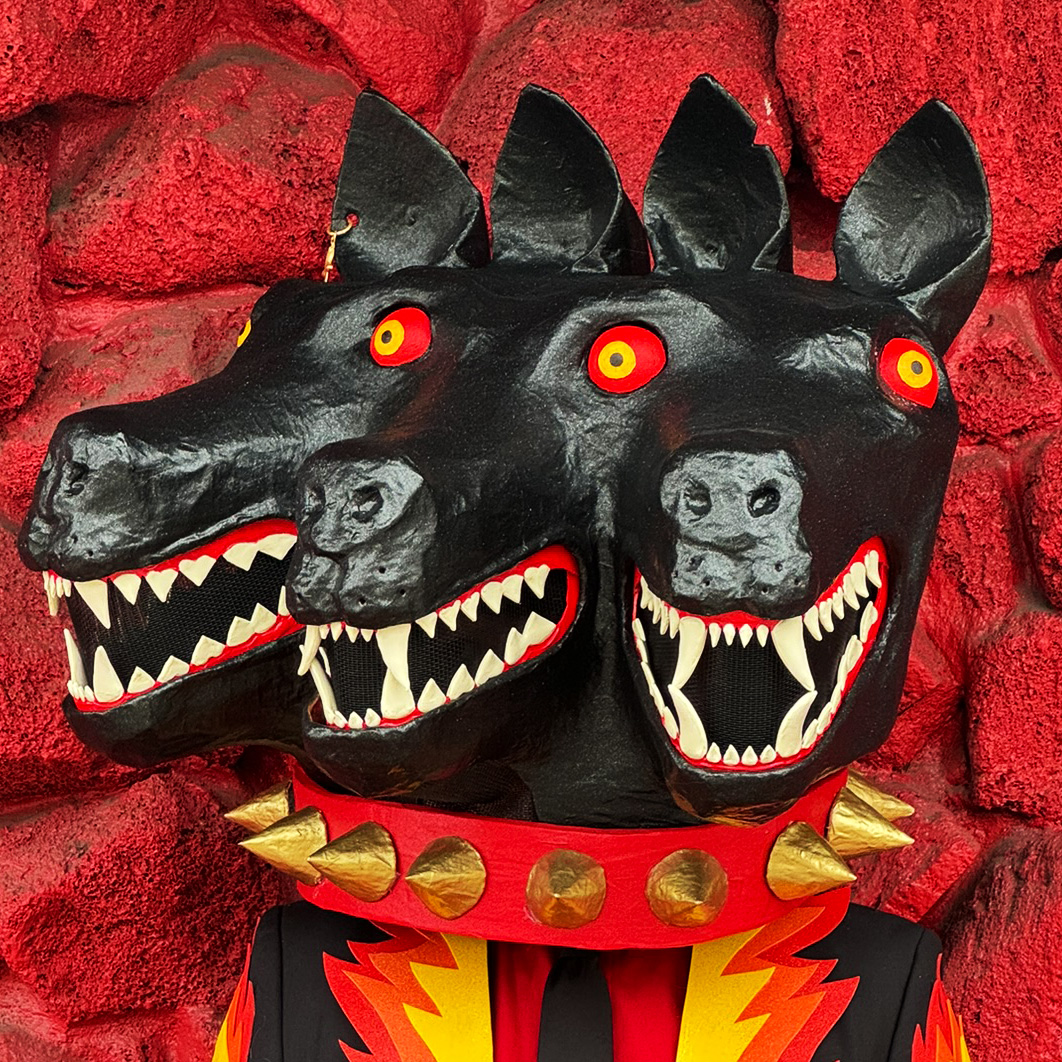
Ears
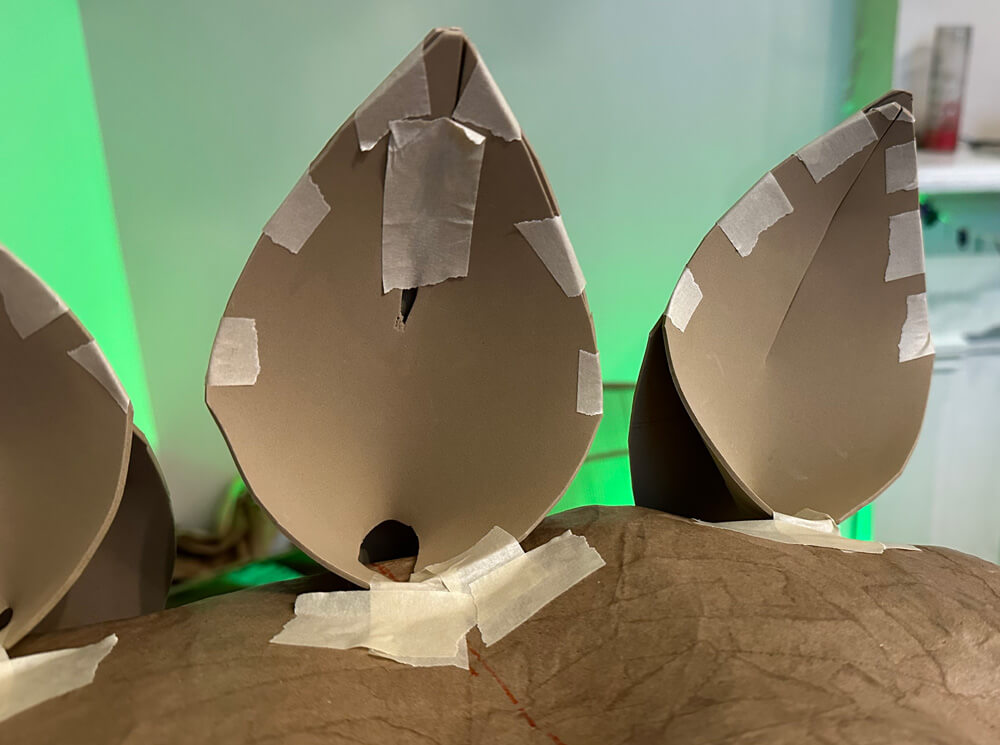
I made the ears out of two layers of craft foam (paid link) each; the front layer curls inward to form the shape of the ear, and the back layer goes downward behind the head. I taped these in place on the head and then used lots of masking tape to carefully span across the open spaces and build up walls there. Since the ears will (hopefully) never need to bear any weight or withstand any pressure, I just put two layers of paper maché on them.
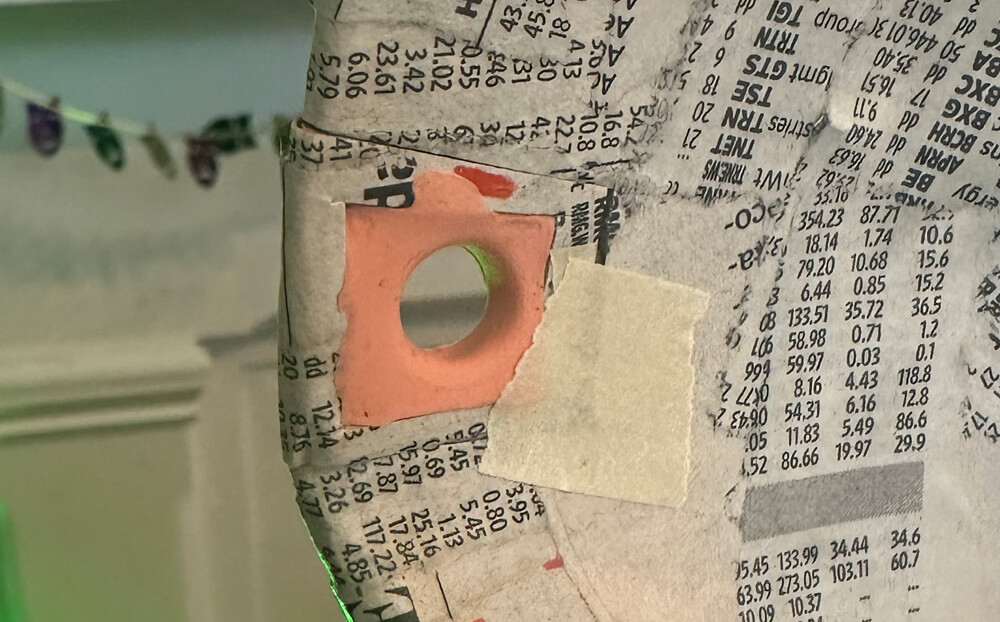
I knew I wanted to add an earring, but I wasn’t sure how to make a hole for it that was perfectly round, so I came up with this weird idea. I cut out a square section of the ear that was larger than I wanted the hole to be, and then I filled in that section with a small amount of foam clay (paid link). I punched a hole through the foam clay with a hollow plastic tube, with my finger on the other side of the ear to keep the foam clay in place. Punching the hole through made the clay bulge and warp a bit, but I easily smoothed it out with my fingers. I let the clay dry, and then I paper maché’d around it. Easy! The hole stayed more or less perfectly round.
Earring
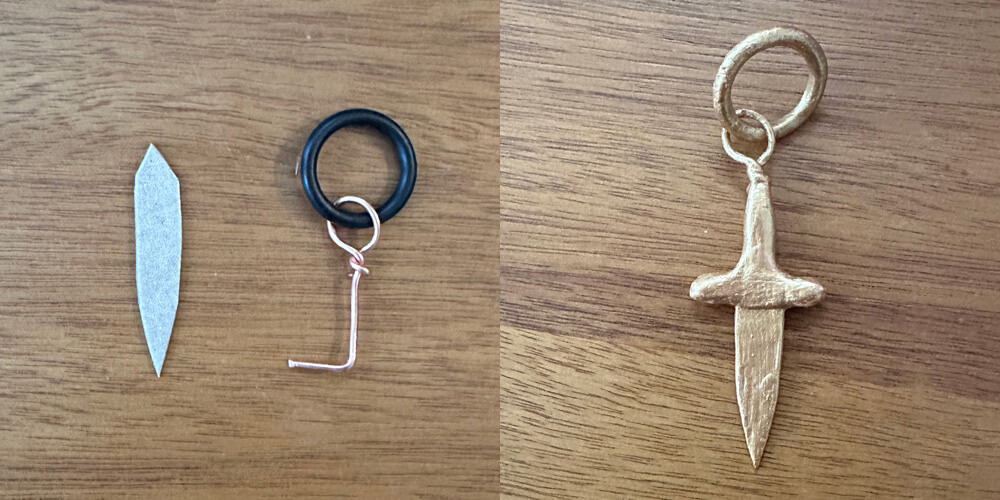
To make the earring, I started with a rubber O-ring from the hardware store, and then I made a little copper wire loop to go onto it. The wire goes down and bends into an L shape — this side bit will go in the cross guard of the dagger, to prevent it from slipping out.
I cut the blade from a piece of thick pasteboard that was part of some packaging for… something. I put a small point at the non-stabby side so I can shove this part into the cross guard.
I made the handle and cross guard out of foam clay, molded right onto the copper wire. It’s a very primitive shape and that’s fine! I then stuck the blade into the cross guard, and let the foam clay dry.
I covered the whole thing with a thick coating of Mod Podge; that’ll help hold the blade in place a bit. You can see I’d already painted it here. After the Mod Podge, I did a coat of white gesso (to make the color pop) and then two coats of gold acrylic paint, and then gloss spray to protect it.
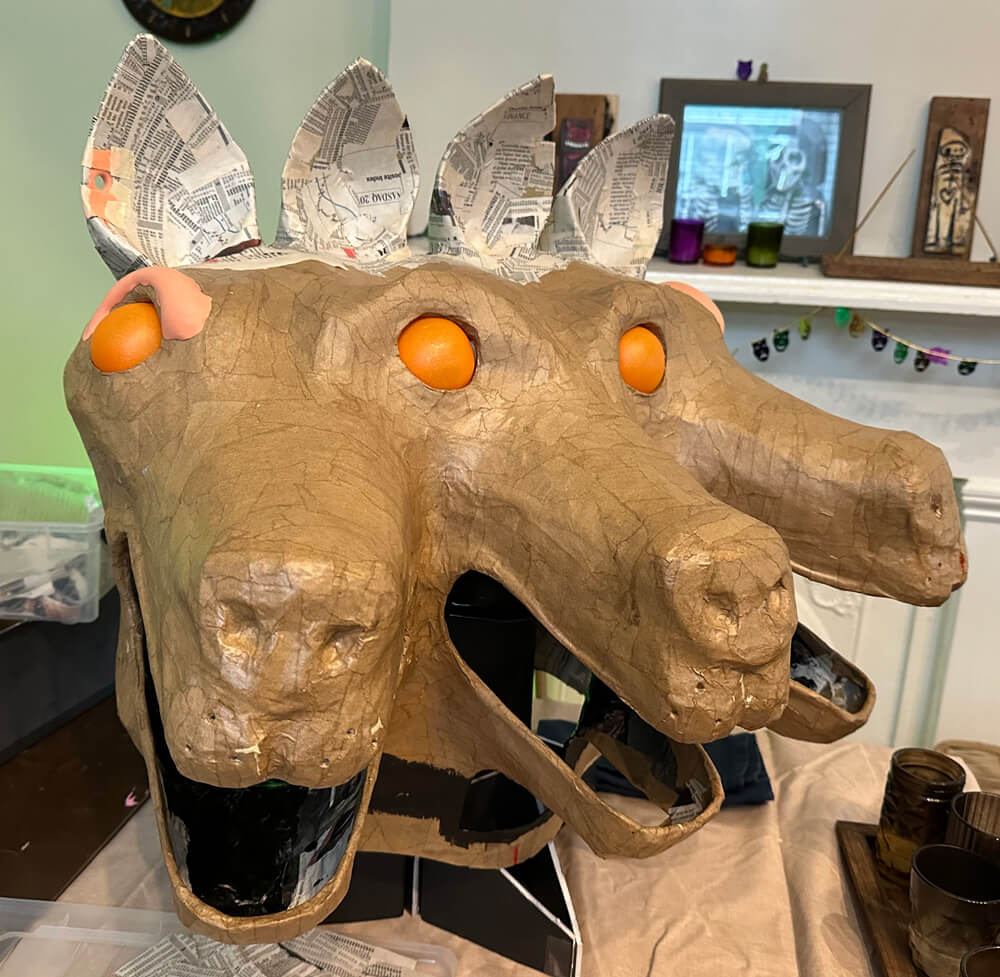
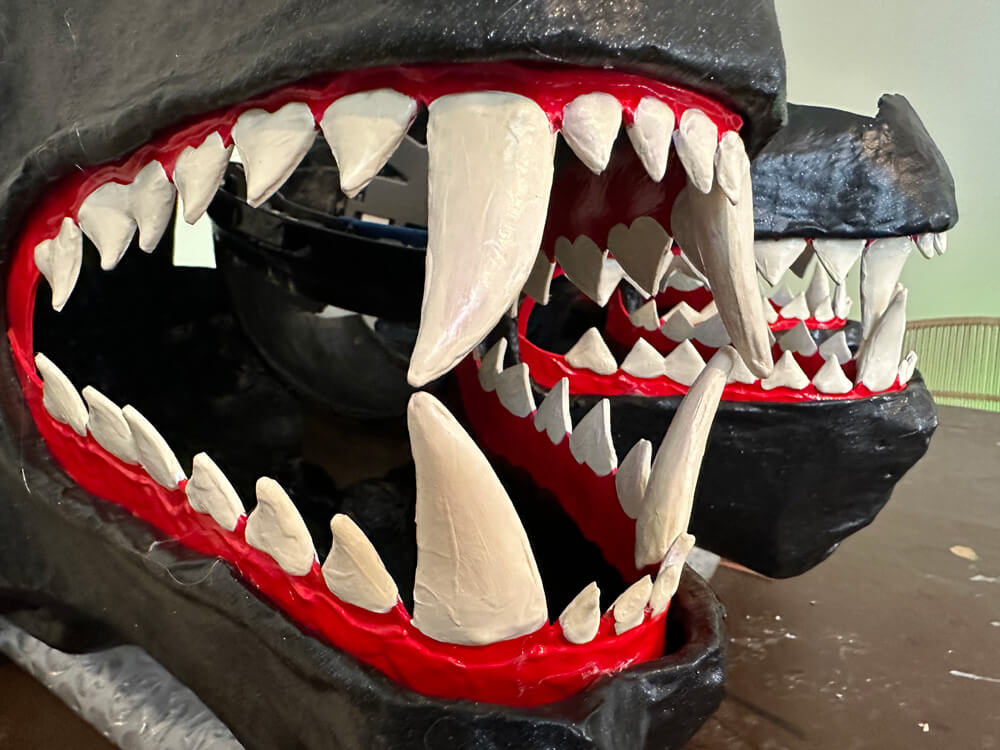
Teeth and gums
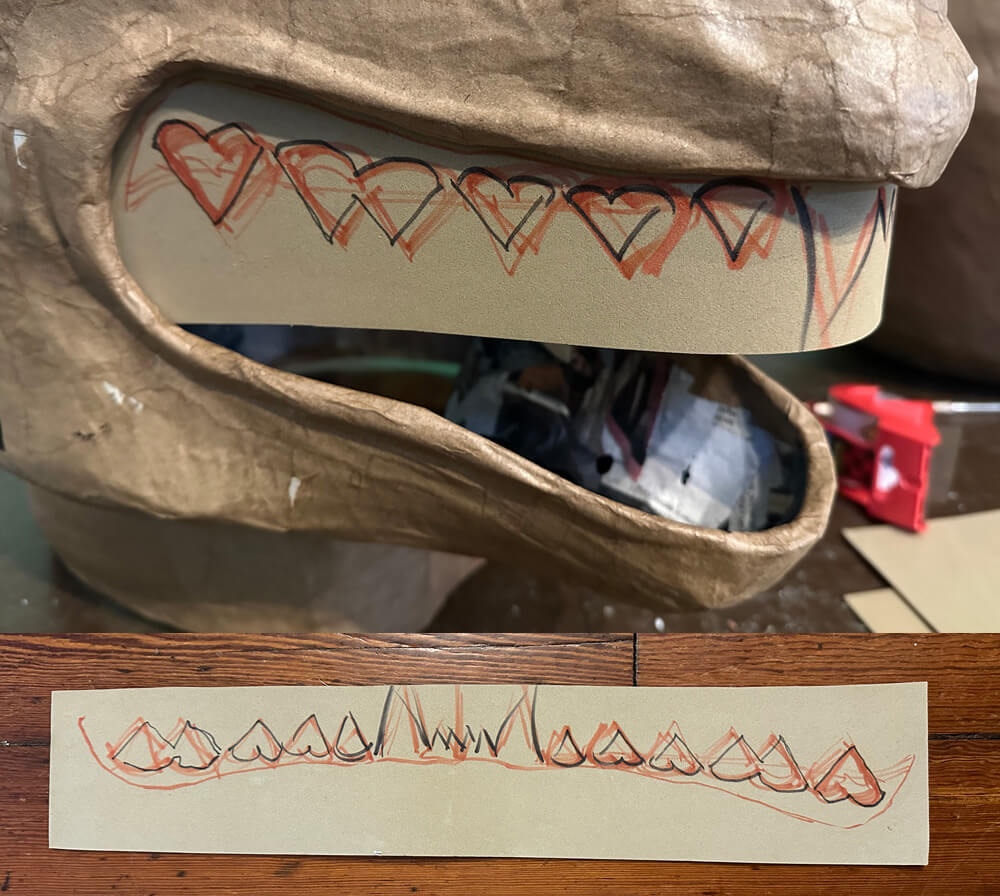
The teeth were surprisingly easy, but they involved a lot of steps. I started with strips of craft foam, which I taped into the mouths and then traced where the lip line was. I then drew where I wanted the exposed gum line to be, and then I drew the teeth.
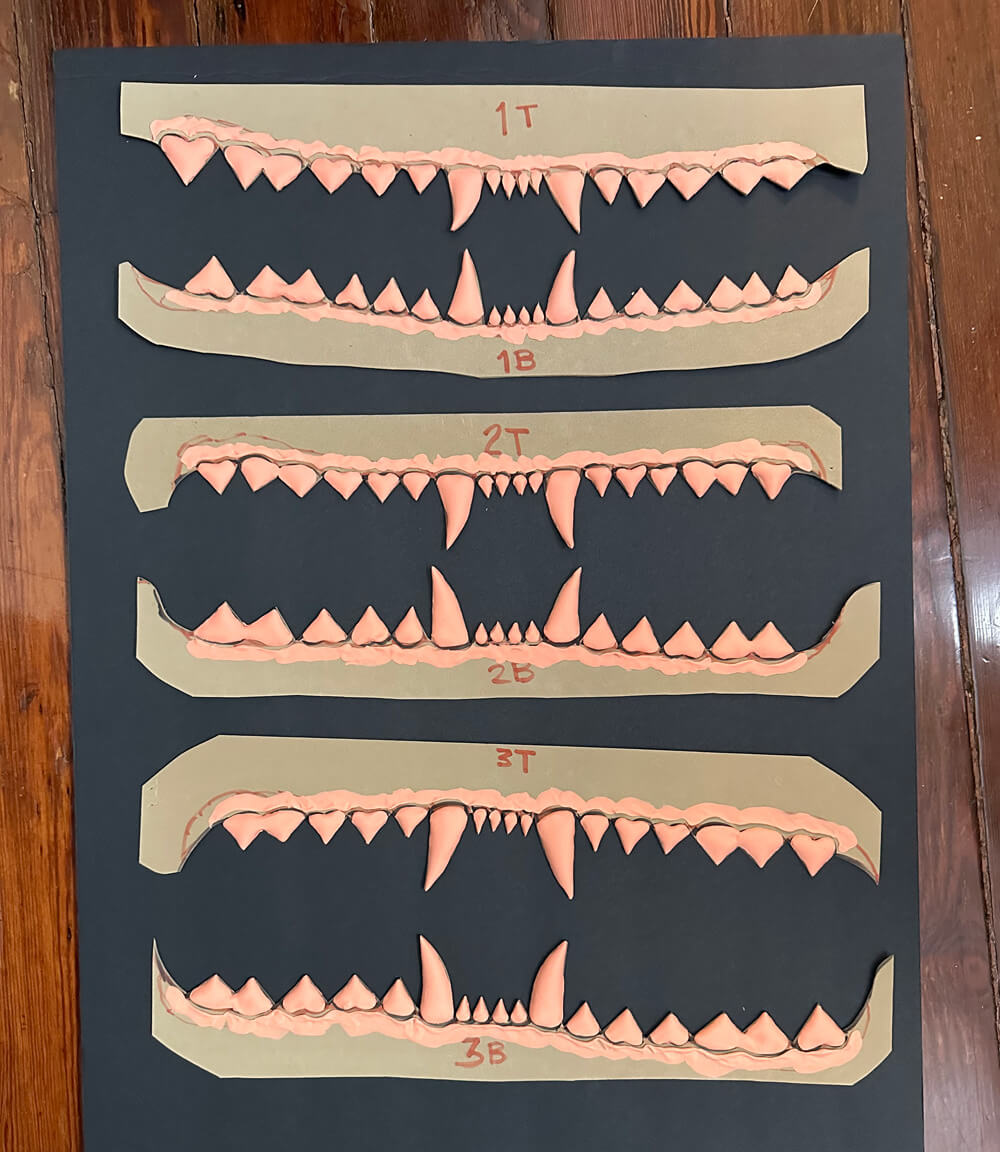
I removed the craft foam strip from the mouth, cut out the line of the gums and teeth with scissors. I then used foam clay (paid link) to sculpt all the individual teeth, right onto the craft foam strip. I tried to do my best to smooth down the teeth to form a seamless edge with the edge of the craft foam. I also built up some little ridges of craft foam to form a 3D gum line under the teeth.
I let all the teeth set for 24 hours. I was pleased that the foam clay did not shrink away from the edges of the craft foam as it set; modeling clay tends to do that.
One unexpected result was that the large fangs curled outward a bit as they set. (Science: the exposed surface of the foam clay dried/set faster than the back surface that was on the craft foam — so it shrunk a tiny bit as it set, and that made the front part curl in on itself as it hardened… and then when the back part set a little later, it couldn’t curl as much, because it had the resistance of the already-hardened front part preventing it from doing so.)
To counteract this curling a little bit, I added more foam clay on the backs of the fangs. I’d wanted to do that anyway, to make the fangs look more rounded and 3D. When this second round of foam clay hardened, it un-curled the fangs a little bit; not all the way but enough that they don’t look weird. I actually like the subtle curve; it looks a little more organic and natural.
Making the collar
The collar is just two layers of foam board, rolled up. It’s fairly easy to roll and curve this cheap foam board I buy from Dollar Tree; this doesn’t work as well with good foam board from an art store. I rolled one strip of foam board right onto the neck of the mask, taped it in place, and then rolled a second layer onto that, also taped in place. While the collar was on the mask, I applied four layers of paper maché onto it, but only on the wide outer surface, not the edges. Once it was dry, I removed the collar from the mask and added two layers of paper maché on just the edges. The initial four layers on the outer surface make the collar hold its shape perfectly so I can set it aside and glue it onto the mask later. If I were to do all the paper maché with the collar not on the mask, the shape would definitely end up a bit wrong.
Fyi, I didn’t make the collar from perfectly straight strips of foam board; I wanted the collar to have a curve to it so it goes higher in the back and lower in the front. I figured out the correct shape for this with a little measuring and a little trial and error.
Spikes
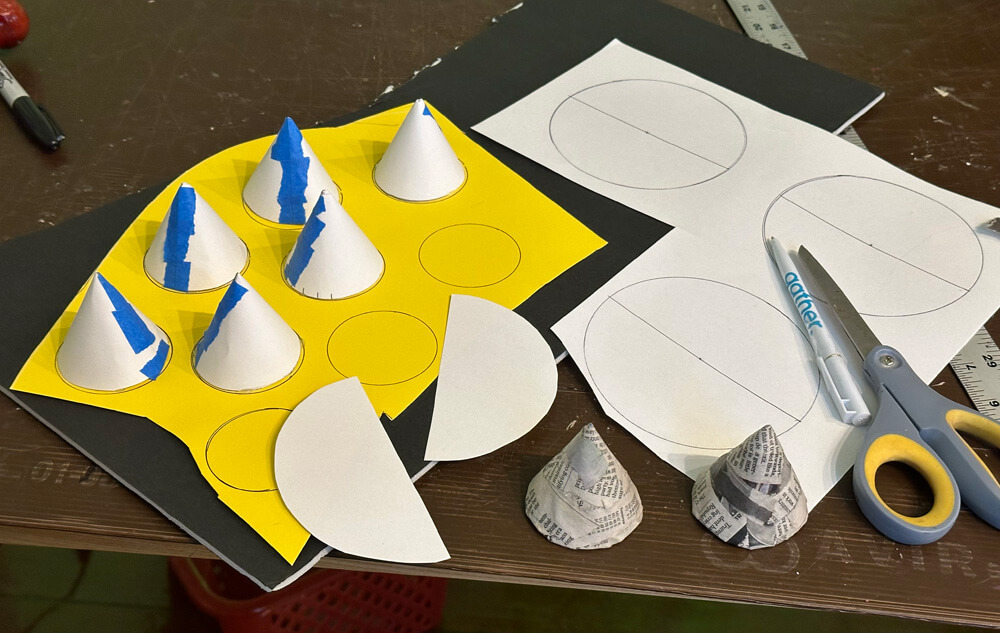
To make the spikes, I figured out an easy method for making paper cones at a precise size (I’ll throw together a separate little article for that; coming soon!). The spikes are two inches wide and two inches tall. The sides are thick construction paper and the bottoms are poster board. I covered them with a layer of masking tape and then four layers of paper maché.
(Note: I made these spikes with a flat bottom surface, and realized later they would fit better on the collar if the bottom surfaces of the spikes were curved to fit the collar. I figured out a good method for doing that on my spiked bracelets; that’ll be a separate article coming soon.)
I figured out where to place the spikes by measuring the diameter of the collar, and then doing some math to figure out the right distance between all the spikes. I thought I was going to go with 16 spikes, but I taped a few on to see how that would look, and they felt slightly crowded, so I went with 15 instead.
I put the spikes aside to glue onto the collar after everything was painted. More on that coming up.
Painting
I painted the interior of the mask by hand with black acrylic paint and a big ol’ brush. I did some of this before installing the hard hat, and some after. I avoided painting the areas where I knew the hard hat would be glued in place; I find that glue tends to work better on plain paper maché than on painted surfaces; probably because the plain paper is more porous.
(Why do I paint the inside of my masks? I dunno, it just looks nicer; some of my masks are shaped in a way that I end up setting them down upside-down when I’m not wearing them, like after a parade or whatever. Also, I have a theory that painting the inside black might reduce the amount of light that could reflect onto my face inside the mask and make my face more visible to the viewer.)
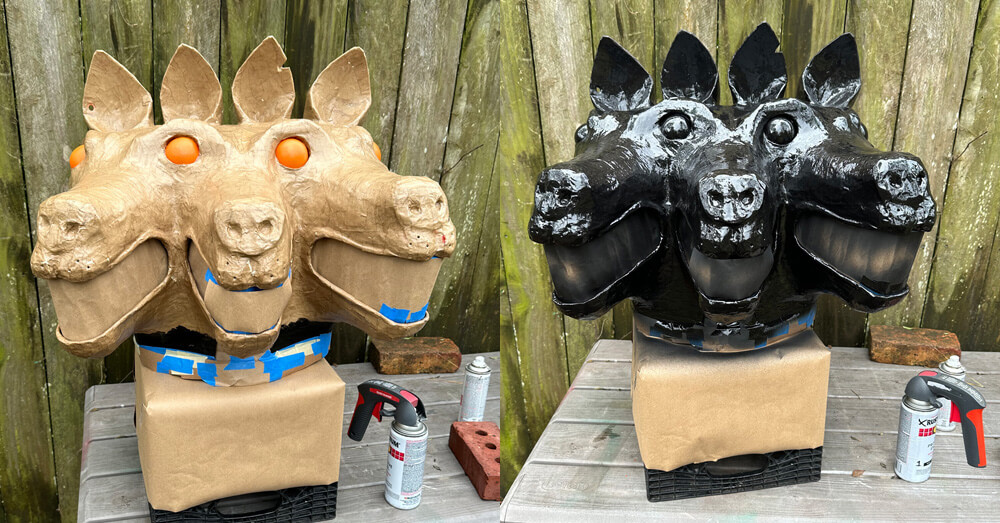
For the main big outer surface of this mask — basically all the black stuff — I first did a coat of Mod Podge to smooth out the surface a bit, then black spray paint, then midnight black glitter spray (paid link), then spray glitter sealer (paid link), and then a very light coat of gloss spray (waiting a few hours between all these steps, of course). Before all this, I masked out all the holes in the mask with blue painter’s tape and newspaper. The main reason for this is that I didn’t want some of the glitter spray getting into the mask and then not getting sealed with glitter sealer. You end up with lots of loose glitter in the mask that rubs off every time you handle it.
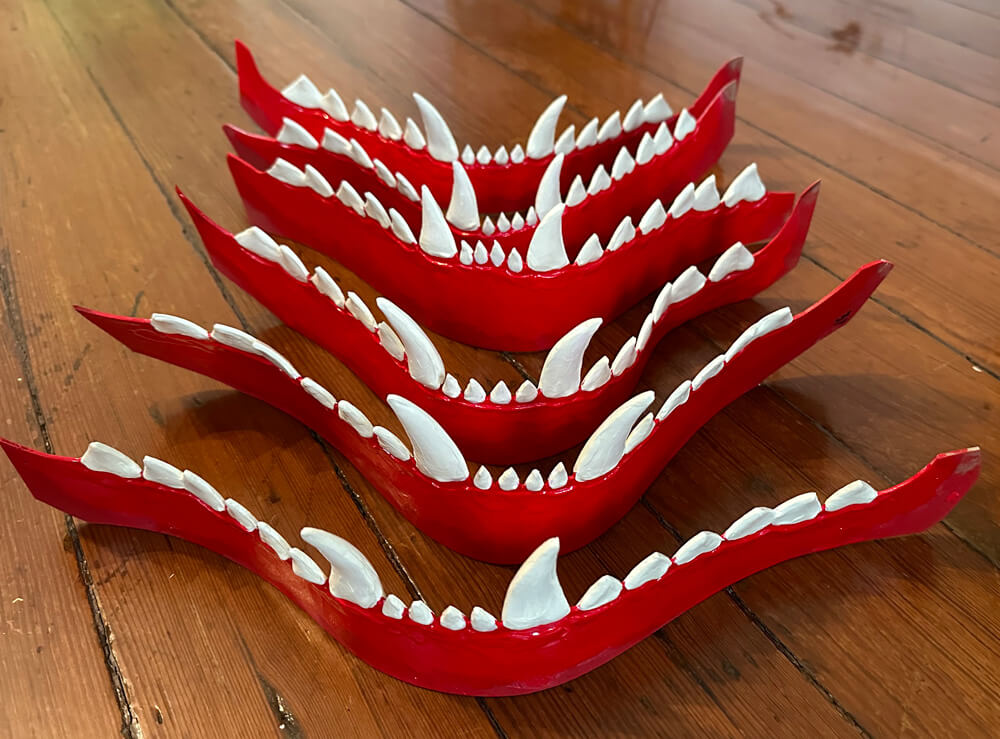
For the teeth and gums, I did a coat of white gesso (paid link) (to smooth out the surface and to make the color pop) and then a coat of Mod Podge. I spray painted the whole teeth/gum parts red, and then when that was dry I painted all the teeth by hand with acrylic paint; three coats. Once these were all done, I hot glued them into the mask.
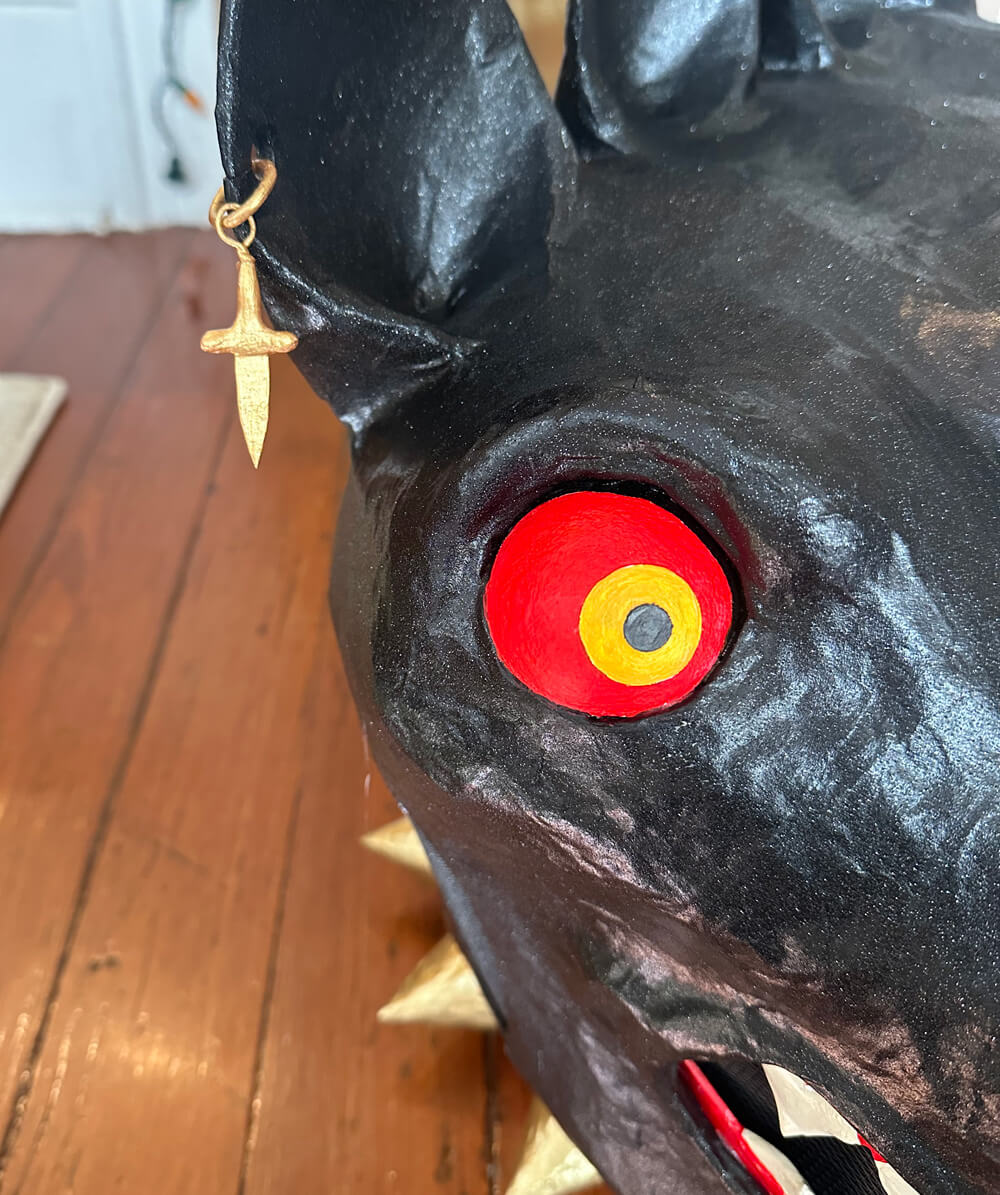
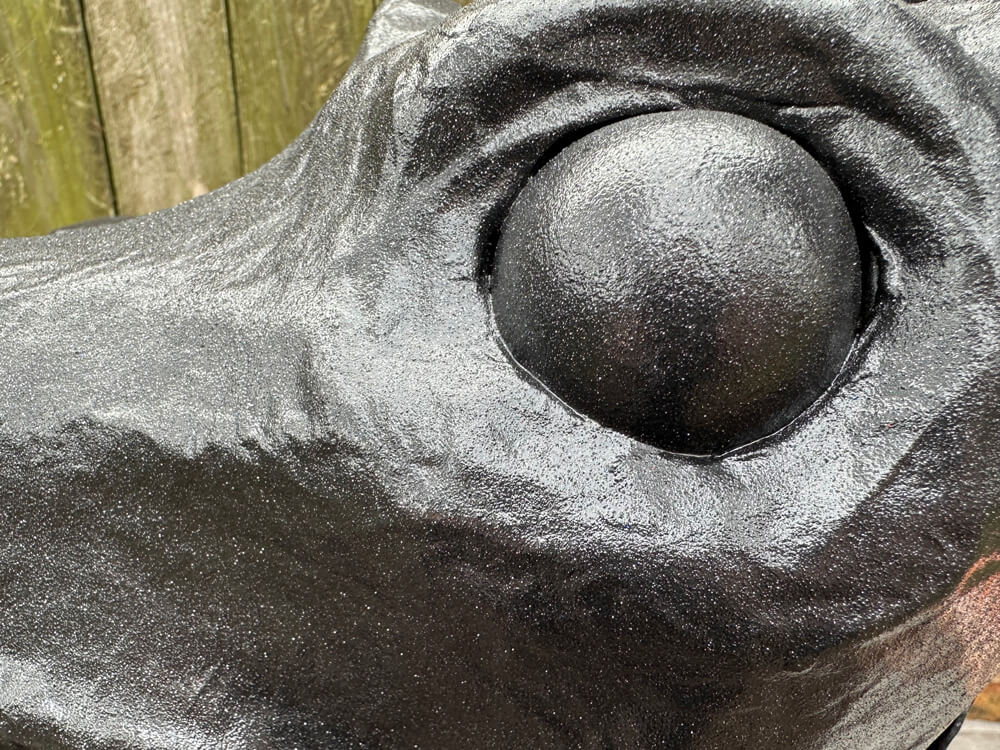
For the eyes, first I covered them with a coat of gesso, and then I did a trick to help me paint the (nearly) perfect circles: I used some different sized hole punches to cut out circles for the irises and pupils. For the irises, I cut a line from the outside to the center, to let me mold these onto the eyeballs so they’ll sit more or less flat. I glued these on with Mod Podge and the covered the whole eye with more Mod Podge. I then placed the little circle for the pupil in the middle, and covered that with Mod Podge too. All of this gave me a slightly 3D surface to paint onto. I painted all the parts of the eyes with acrylic paint by hand.
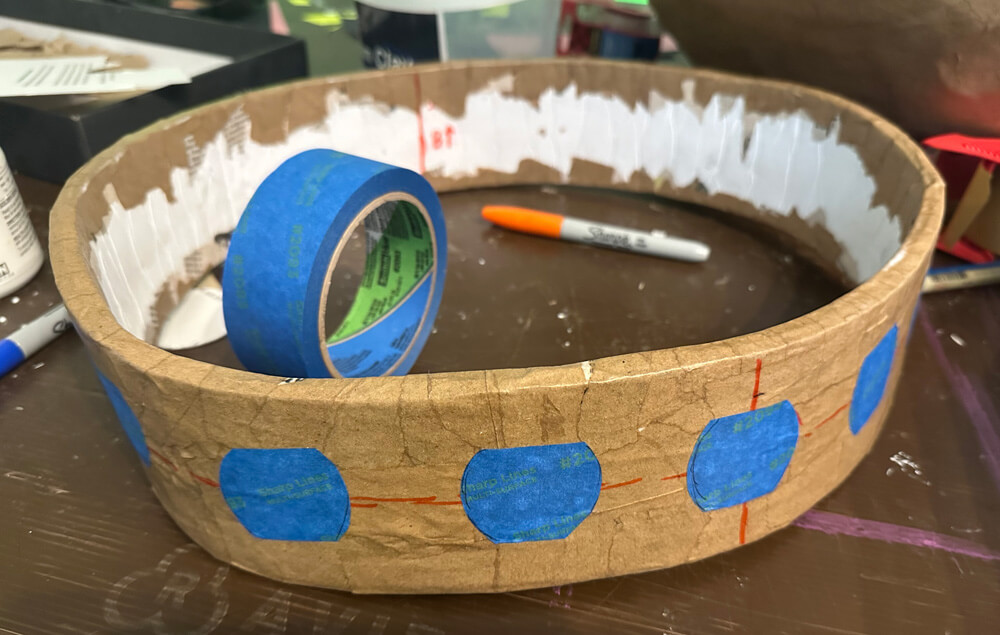
For the collar, I first put some painter’s tape on the areas where the spikes will go, to keep those areas unpainted. The reason for this is that hot glue holds better on plain paper than it does on paint. (The blue shapes are weird because I used this wide tape that wasn’t quite as wide as the circles I wanted to trace. Not important.)
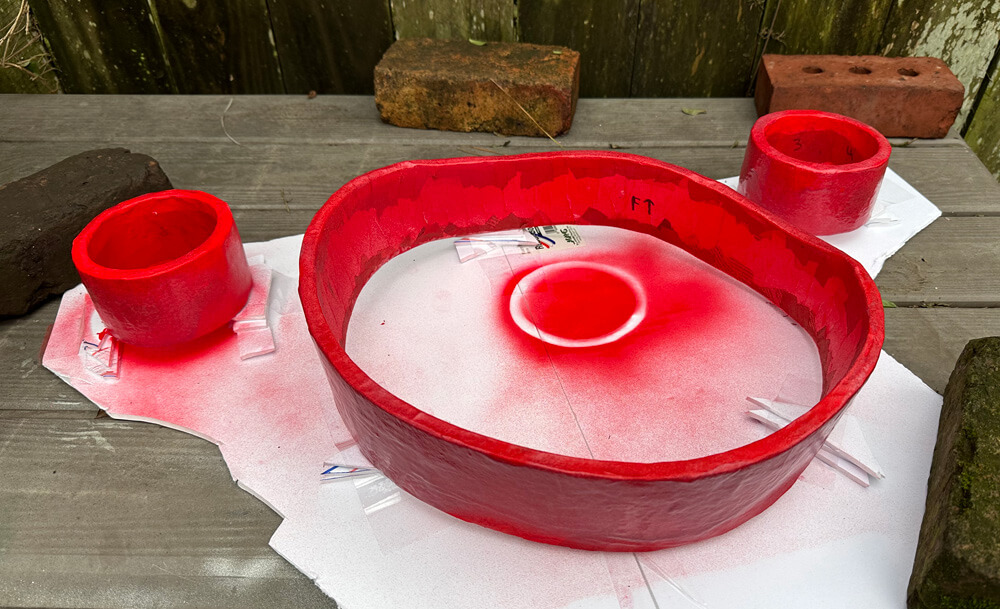
I applied a coat of gesso onto the collar, then a coat of Mod Podge, then red spray paint, then red glitter spray (paid link), then spray glitter sealer. I then peeled off the painter’s tape to expose the paper maché underneath, where the spikes will go.
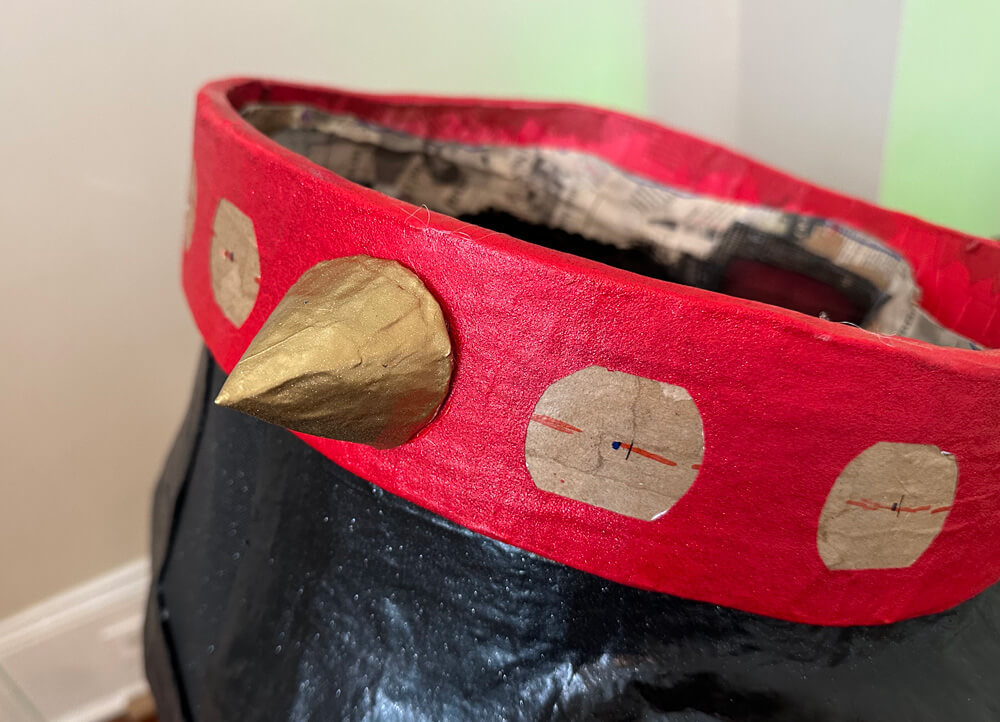
For the spikes, I did gesso and then Mod Podge and then gold spray paint, and then gold glitter spray and glitter sealer. I let them set for a day, and then I hot-glued them onto the collar.
The spikes ended up not being as flat on the bottom as I expected; the paper maché has a tendency to cause shapes like this to to become warped and concave on the bottom, so the spikes didn’t want to sit very flat on the collar. I was worried that the hot glue wouldn’t touch both the collar and the spikes very well, so I used a simple trick I’ve done plenty of times: Before gluing each spike onto the collar, I glued a smaller circle of craft foam onto the collar, and then glued the spike onto that with a big blob of hot glue. The hot glue and then foam circle and then more hot glue gives you enough height under the concave surface of the spike that everything fits together perfectly. Easy!
As I mentioned above, for the earring I did gesso, Mod Podge, gold acrylic, and gloss spray.
By the way, to put the earring in the ear, I simply snipped the ear with scissors where I’d created the hole, and shoved the earring in. I didn’t bother to close up the snipped part; it looks fine, and the earring stayed in with no problem.
Installing screen
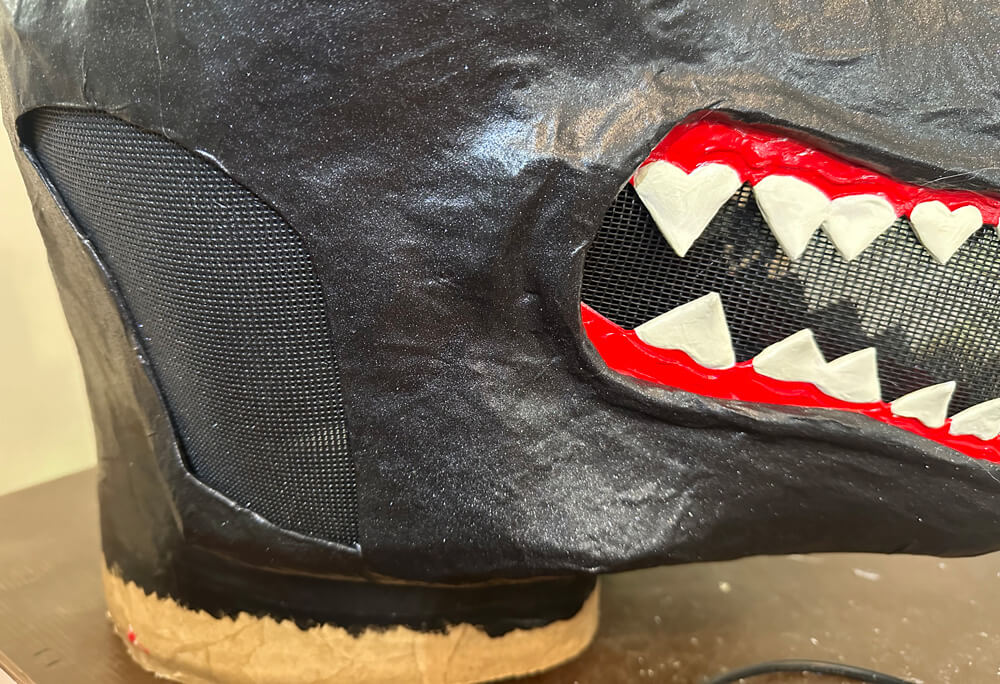
I used two kinds of screen for the different holes in the mask: pieces of screen door material in the holes of the mask that I need to see out of, and sheets of much thicker plastic mesh (paid link) for the holes in the sides and back of the mask.
For each hole in the mask, I used tracing paper to figure out exactly what size and shape of screen I would need, then marked that on the screen with a white paint marker, and then cut it out. Of course I cut out each shape with an extra half inch all around the edge, to give me a border to put glue on. I hot glued little tabs of folded paper onto the edges; these are there to make it easier to hot glue the screen into the mask. Then I simply hot-glued the tabs into place inside the mask.
No counterweight this time
Most of my masks need some sort of counterweight to make them sit nice and balanced on my head, but this one didn’t! Just dumb luck. It’s a little front heavy but not too unbalanced overall.
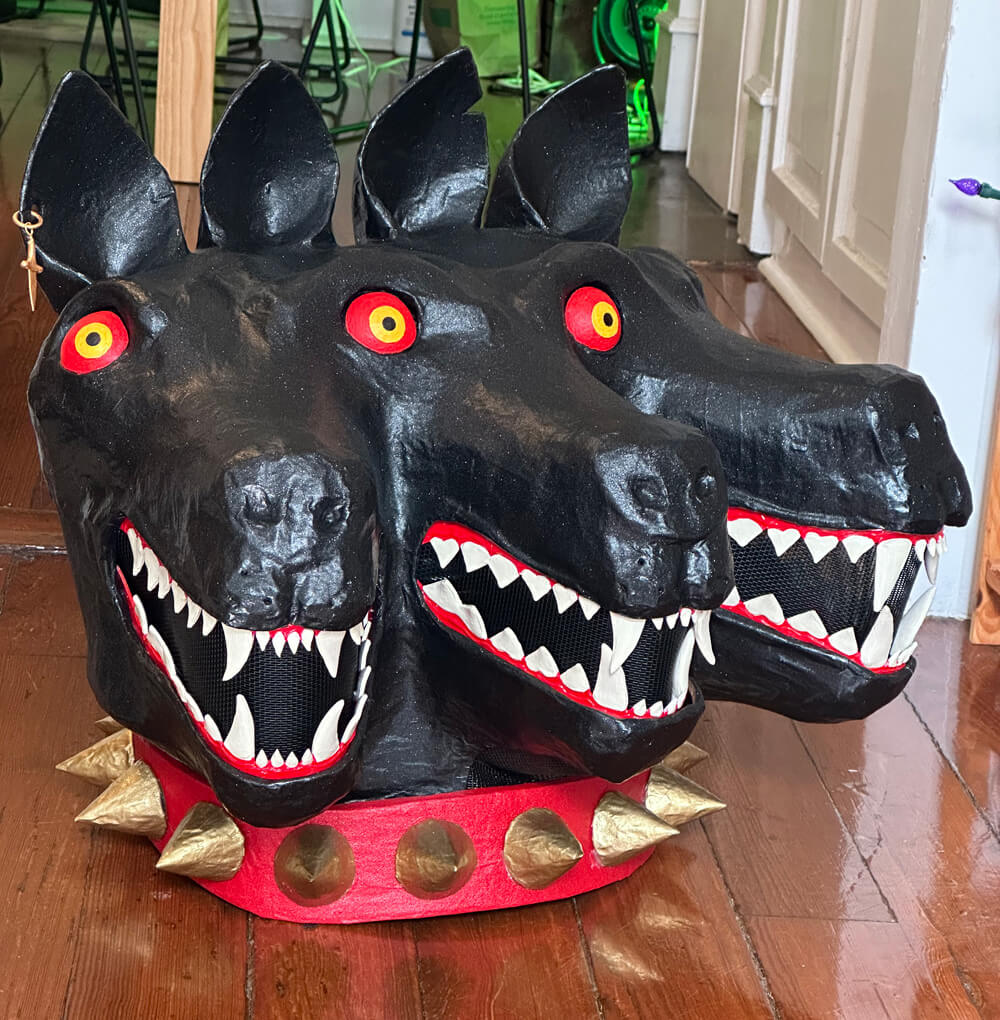
For whatever it’s worth, this mask ended up being heavier than most of my masks. I usually try to end up with a mask that’s nothing but paper, paint, hard hat, and screen. This one contains a lot of foam parts that couldn’t be removed — the ears, the teeth, the foam board in the collar, some foam clay details on the face, and also the plastic eyeballs, etc. All good! It’s still very comfortable and it was no problem to wear it for our two-mile parade.
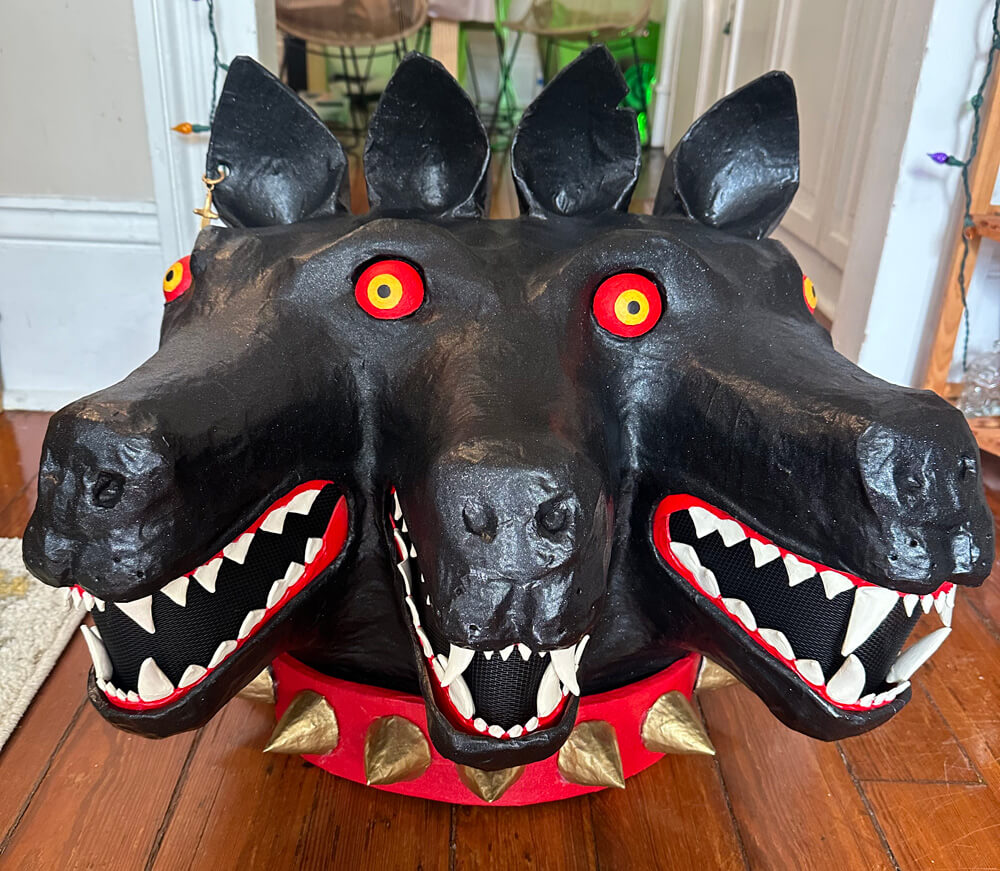
Overall I think this thing came out pretty cool! It was neat to see it coming together little by little since I didn’t have a very clear vision for it at the beginning. It was really, really fun to wear this mask and costume on Mardi Gras day!
Special thanks to this tire joint down the street for painting their rocky wall red a couple months back!
Next up: making a flame suit to go with this Cerberus mask! Coming soon!
 About Manning Krull
 How to make a 4-foot paper maché alligator
 My violin skull mask, Mardi Gras 2015
 Three-headed paper maché dragon sculpture
April 27th, 2024 at 5:55 pm
Amazing work!! I saw this costume on Instagram.
July 16th, 2024 at 9:07 pm
Thank you for showing your process. I doubt that I will ever reach your level of skills, but seeing the process might help me later with my own ideas. Thanks a million!