
Cerberus mask for Mardi Gras 2024, WIP part 1
Published by Manning on January 27th, 2024
I’m working on this Cerberus mask for Mardi Gras 2024! I’ll try to explain how I did it! Unlike most of my projects, I didn’t have a detailed sketch for this one, and I had to do a lot of trial and error to figure out certain bits. It was fun working this way, and terrifying! Boring note: I had to do a few steps in a weird order, but for the sake of keeping this article neat I’ve grouped things by major sections — so for instance you might see some parts painted before I get to the whole section about painting, etc.
Building the base
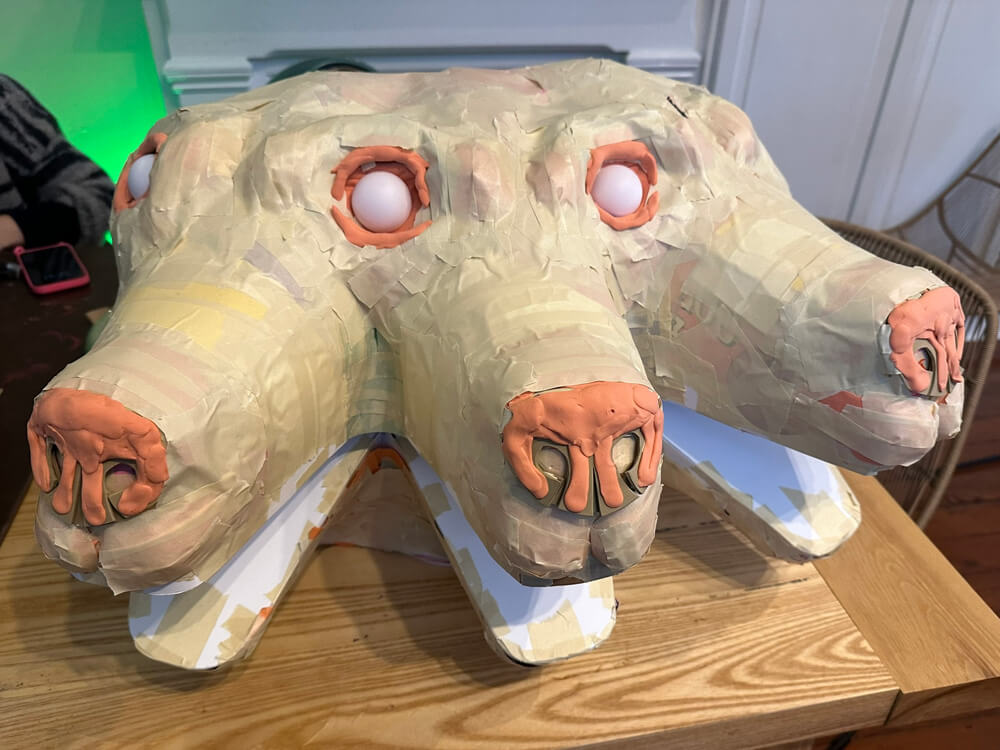
I decided that rather than make three separate dog heads that are next to each other, I wanted to create a design that merges the heads together, so there are three dog snouts, but just four eyes and four ears. The two innermost eyes and ears are shared between two of the heads.
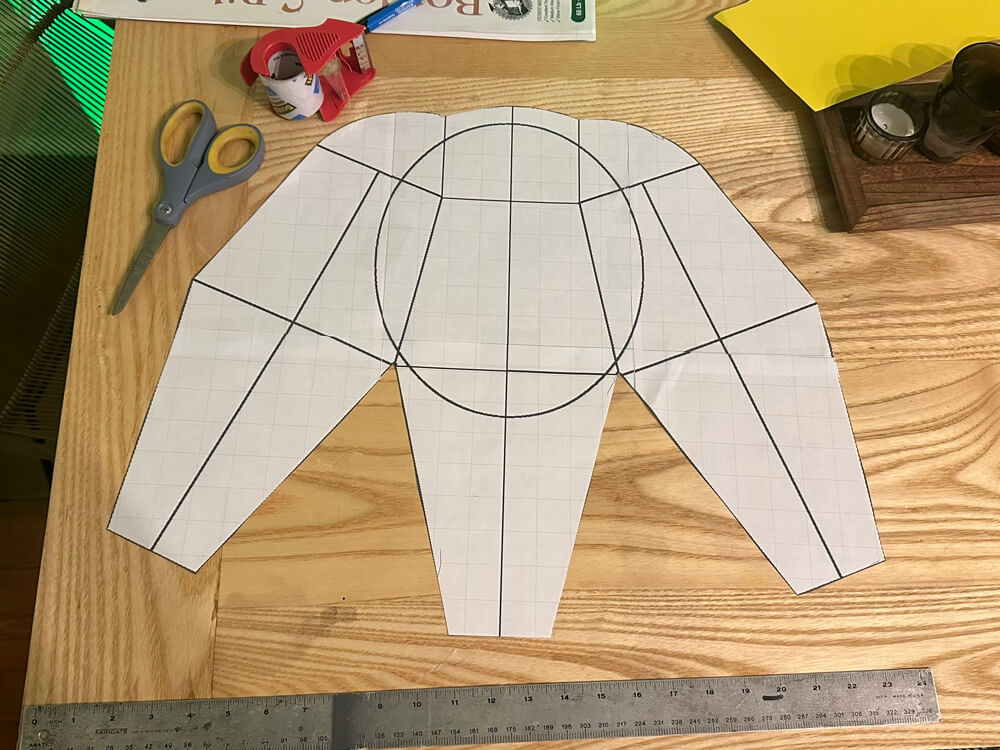
I laid out the three-snouted head from an overview head; I did this in Photoshop and then printed it out, using dimensions that I guessed/prayed would be a good size to fit my head inside. This was the only drawing or diagramming I did for this whole project — again, very unusual for me! I traced this shape onto a sheet of foam board and cut it out with my X-acto knife.
At this point I decided I would be building the whole top half of the head(s) first, and then make the bottom half separately, and connect them later.
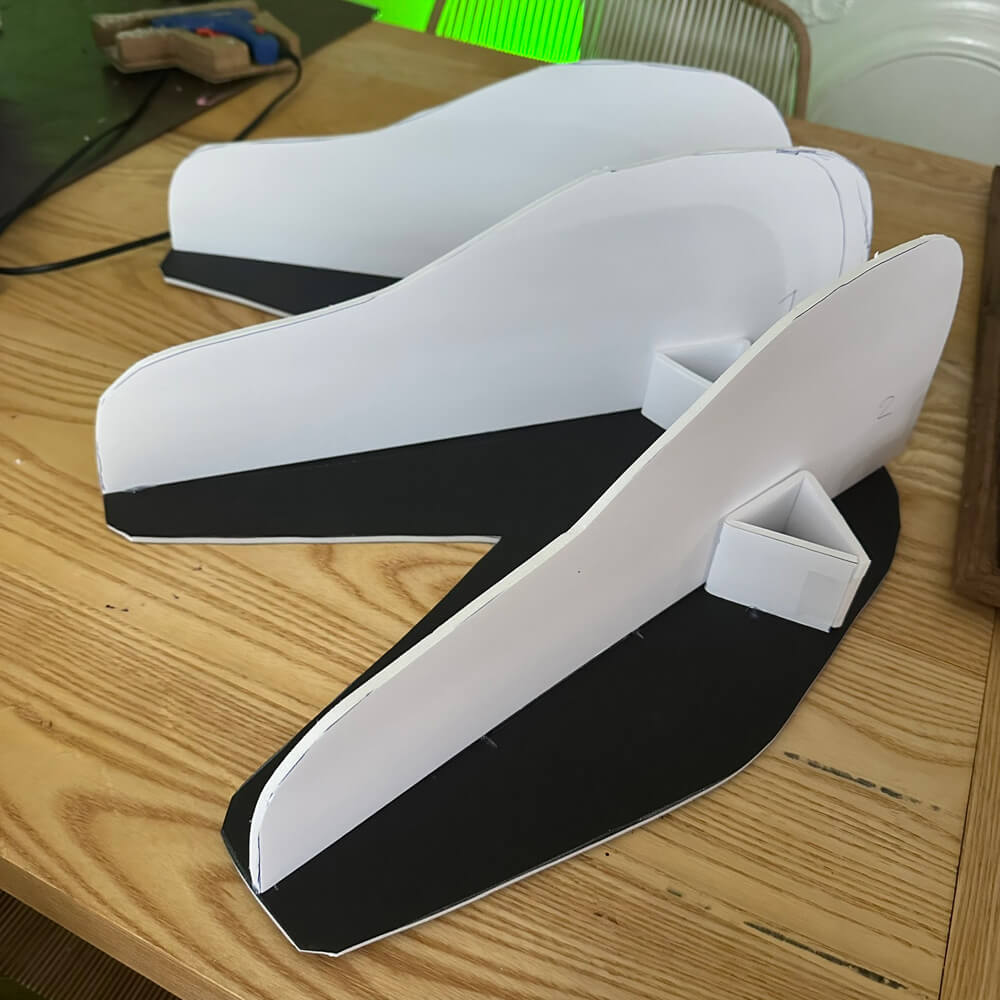
I measured the length of the heads and then drew a dog head profile at that size, and then I traced that three times onto foam board and cut them out. I hot-glued these onto the base. I made six little triangular structures to hold these profile shapes perpendicular to the base. I use these kinds of triangular supports all the time; I just cut a strip of foam board, fold it up, and tape the ends together.
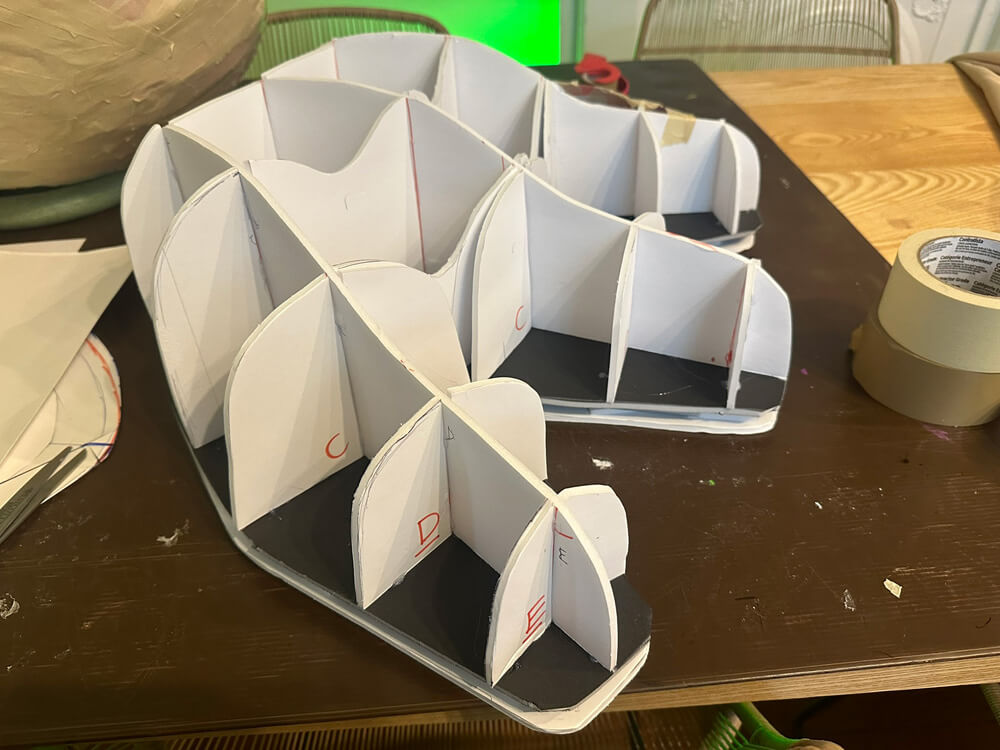
Next, I measured and marked a bunch of vertical lines along the head shapes, and then I drew all the side bits based on those measurements. I traced and cut out six copies of most of these (two for each face), with a few exceptions for the pieces toward the back of the head(s), where some of the segments only needed two pieces because they’re shared. Anyway, I hot-glued these all in place.
At this point I had a good idea of what the head would look like — well, the top part, at least. I decided I needed to give this shape a little more height, so I traced a second copy of the base shape and cut that out. I hot glued some scraps of foam board in between this new base and the old base to give the whole shape about 3/4″ more height.
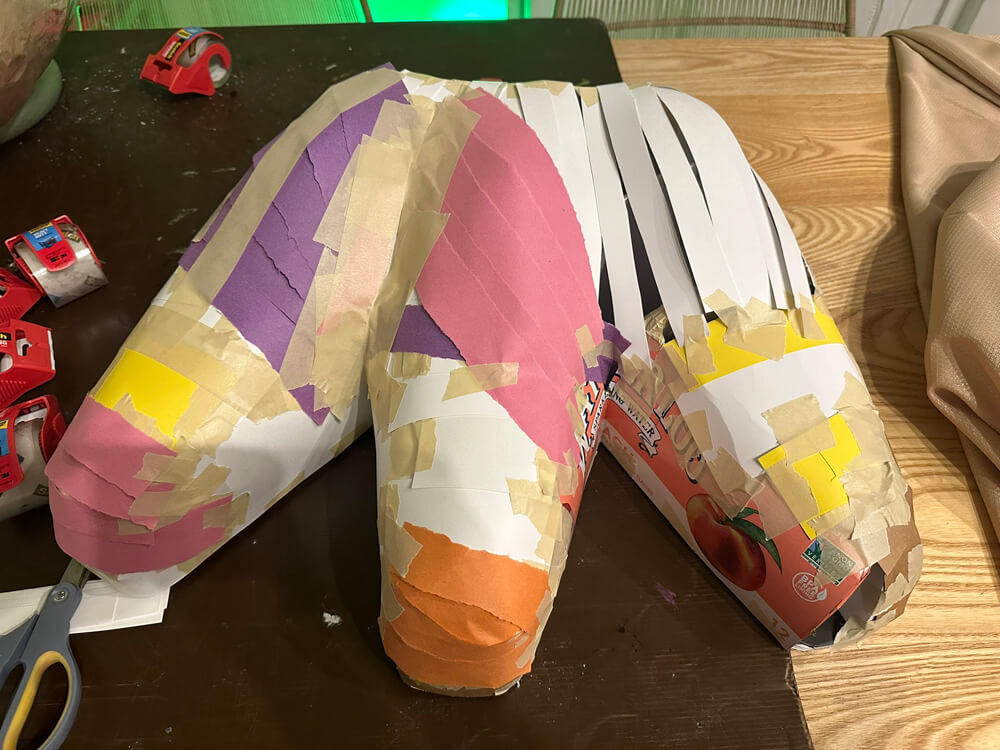
With this sort of skeletal armature shape built, I then started taping strips of scrap materials in place all over. I used some pieces of pasteboard from LaCroix boxes, as well as strips of poster board and construction paper and other types of scrap paper. The idea here is to have these materials smooth out the overall shape and hide the edges of the foam board.
I then made the lower half of the head in a similar way. I started by tracing the same base shape again, but this time I bent all the snouts, so that the mouths can be open. I did the same steps with vertical ridges, then smaller side segments, and I also added these side jaw shapes. Then I covered everything with strips of scraps materials and tape.
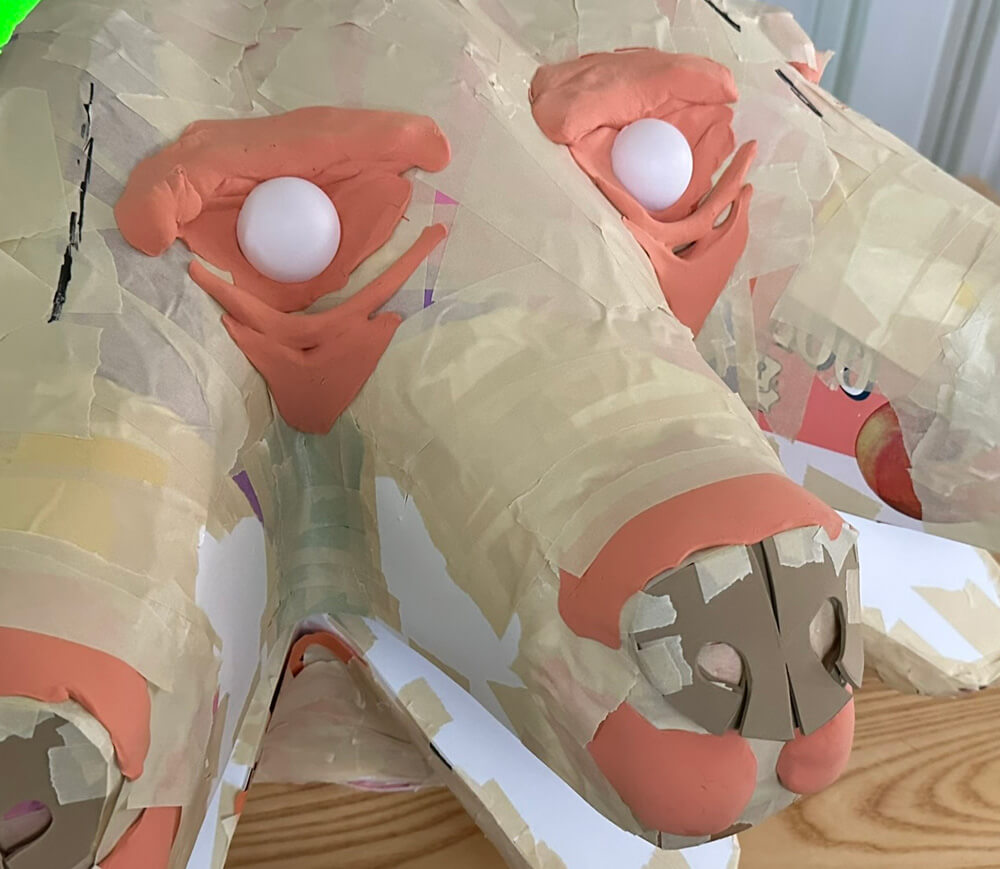
I made the noses out of craft foam and taped them in place. I made a bunch of other details out of foam clay (paid link). This was my first time using foam clay and it was really great; it’s easy to work with and dries pretty fast. This stuff was kind of a game changer for me; I will probably be using it in all my masks going forward.
Oh yeah, and I used ping pong balls for the eyes (for now…).
I decided to add ears much later; my reason for this is that I often have to turn the mask upside-down to work on it, and ears would get in the way. Teeth will come later too.
To prep the mask base for paper maché, I covered it entirely in Scotch heavy duty shipping tape (paid link). The tape is there to act as a release agent; the paper maché doesn’t stick to it very well, so when it’s all done I can remove all the base materials. I’ve tried a bunch of different types and brands of tape, and this is the one that works the best. It’s a shame they don’t sell it in tan anymore; these days you can only get clear. The tan stuff made it a lot easier to see what areas you’ve covered. Anyway, I’ve tried other brands of tan tape and they just don’t work well.
Okay, once the whole base was done, it was time for…
Paper maché

I covered the mask in eight layers of paper maché over several days; here’s some info about my paper maché process and materials. The short version is: I use Roman PRO-543 universal wallpaper adhesive (paid link) and alternating layers of newspaper and brown wrapping paper.
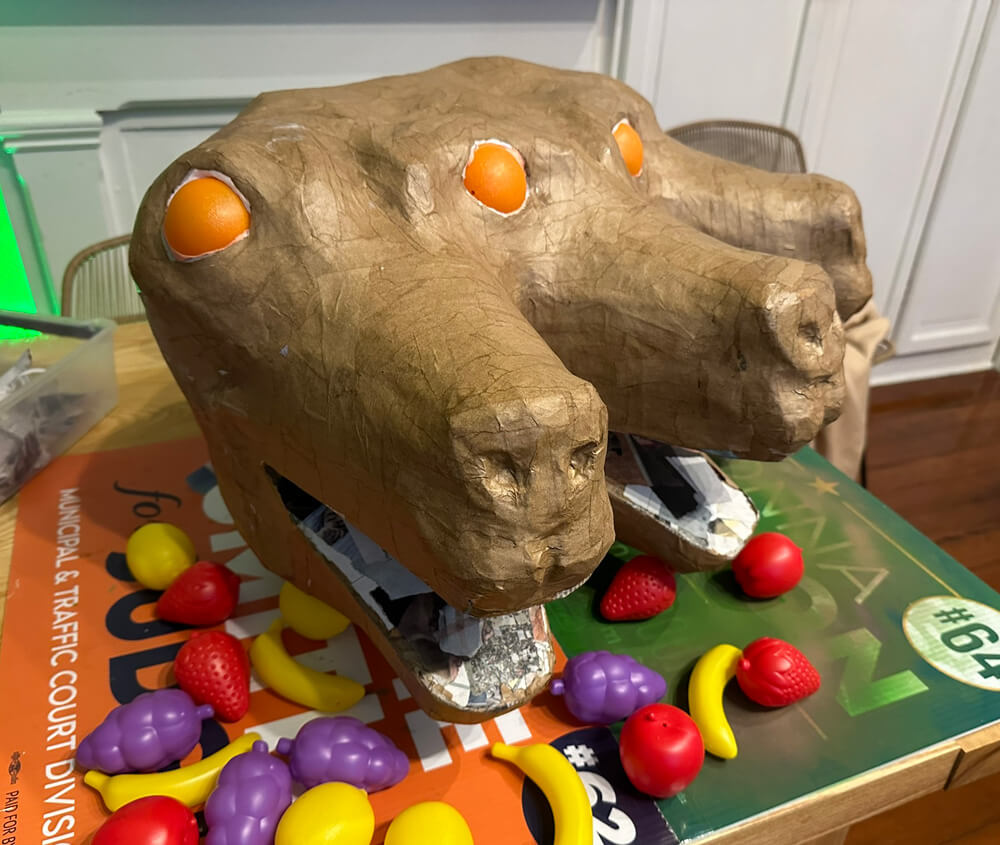
After the first layer of paper maché went on, I suddenly felt like the eyes were too small, so I pulled out the ping pong balls and cut the eye sockets to be bigger and stuck some plastic oranges in there; I found these at the dollar store in a little bag of plastic fruits. There was just one orange per pack and so I had to buy four packs and now I have all these other fruits left over! There’s gotta be something funny I can do with those later…
These new bigger eyes (the better to see you with!) also meant I had to put some more foam clay around them to build up the brow a bit; no big deal.
Okay, so back to paper maché. I added my other seven layers and let them dry.
Cutting the mask open
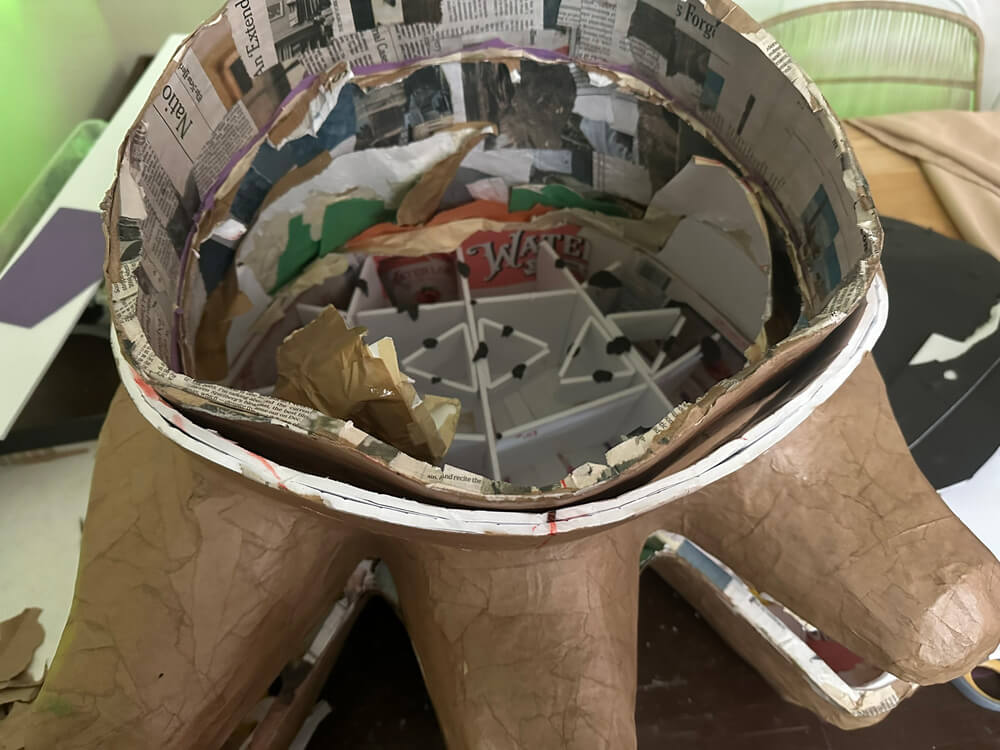
This step is a lot of work but it’s always fun! I used my X-acto knife to cut open the bottom surface of the mask, and I removed all the inner materials. Even with the tape in there as a release agent, some pieces are always really stubborn coming out. In the end it always feels extremely rewarding when you’ve got this shape that’s all just paper (well, plus plastic oranges in this one), and it feels nice and sturdy and incredibly lightweight.
Face details
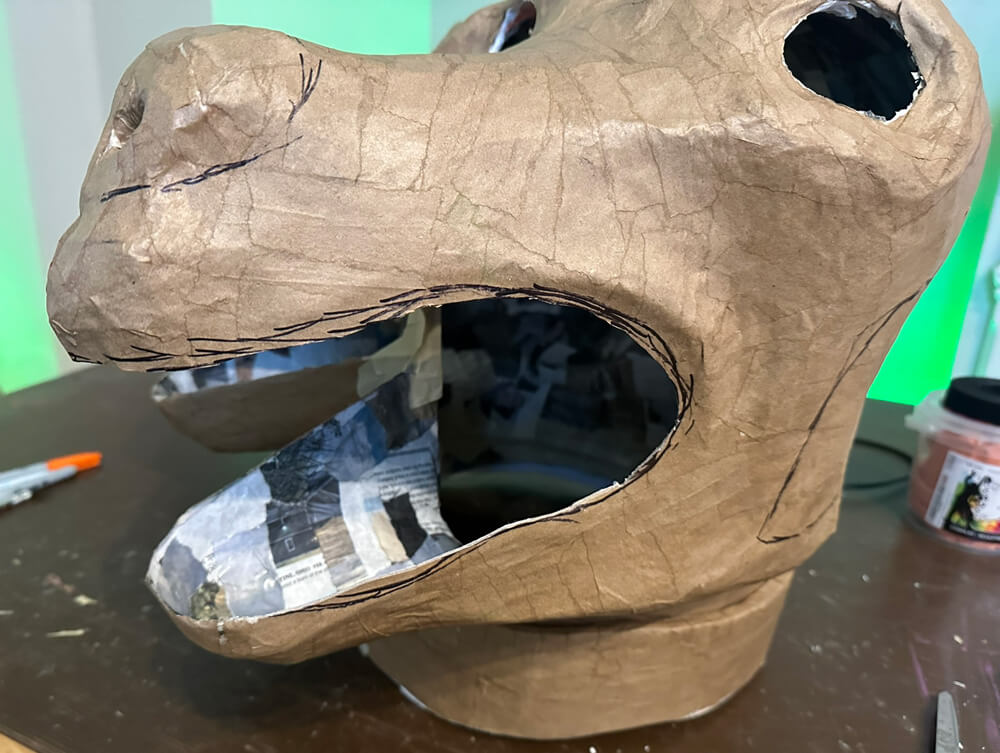
I cut out the sides of the mouth to be a more curved, natural, snarling shape.
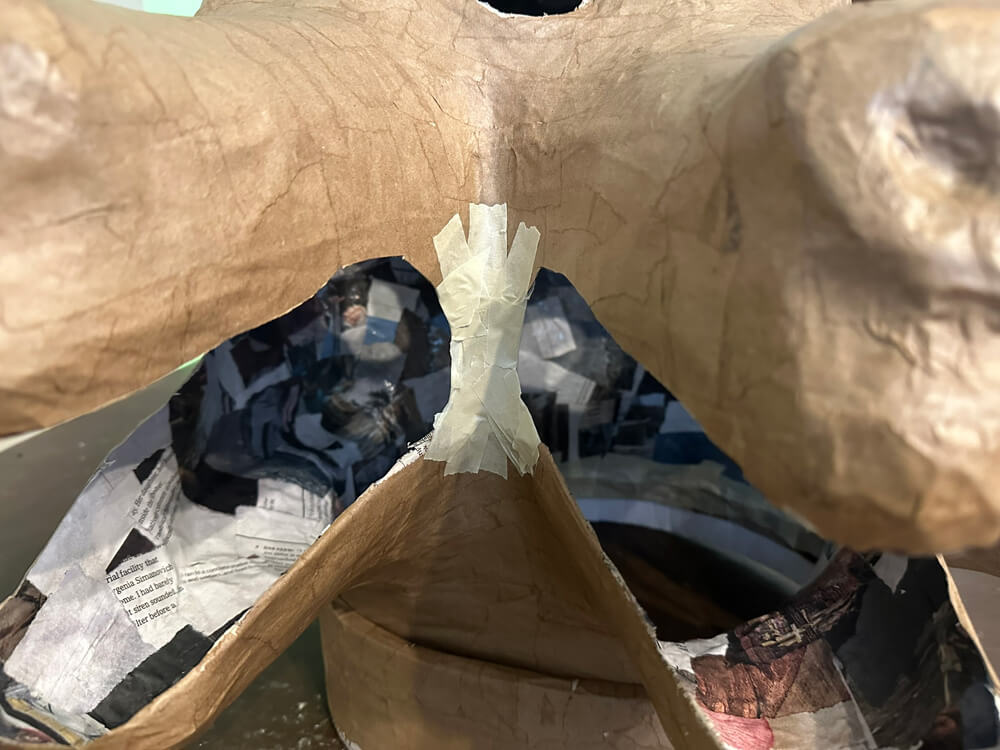
At this point I had to build little vertical… let’s say columns of paper maché, in between the mouths, where the sides meet. Before this step I wasn’t sure if I wanted all three mouth holes to be connected as one big hole or not. I ultimately decided it would be better to have them separate. So I created these little areas with masking tape. I was concerned about these narrow bits sagging or warping under the weight of the mask, so I hot-glued segments of wooden coffee stirrers behind them, to make them nice and strong. I then paper maché’d over the columns; just two layers.
I added some foam clay snarling lips. At this point I also decided to build up the eyebrow ridges a bit more with some foam clay. I covered these with four layers of paper maché. All this foam clay will remain in the mask; this is not my usual process! But this stuff is very lightweight and I ain’t worried about it.
I also removed the eyes at this point, so I could add one layer of paper maché around the eye sockets (later), so they’re a lot neater and smoother.
The eyes sit nicely in the eye sockets, but there were some tiny gaps where you could see through to inside the mask. So I ended up flipping the mask over and adding a layer of paper maché over the back of the eyeballs, to lock them in place and to remove these gaps.
I cut out two big holes on the sides of the mask, and one big hole on the back, to help with hearing and air circulation. If you don’t do this, everything sounds really echo-y inside the mask. I try to add as many big holes like this as I can get away with.
Last thing: I cut out a hole in the bottom of the middle mouth and throat, to allow me to see the ground in front of me. I’ve learned with masks like this that’s it’s really important to be able to see downward when you’re walking — just as important as being able to see in front of you, or maybe more!
Reinforcing edges
I added one layer of tiny bits of paper maché on most of the cut edges of the mask: the eye holes, the side holes, and the hole in the bottom of the mouth.
For the mouths, I added three layers, to protect the soft foam clay lips.
I didn’t bother reinforcing the bottom edge of the mask, because that will be hidden by the spiked collar later on.
Hard hat
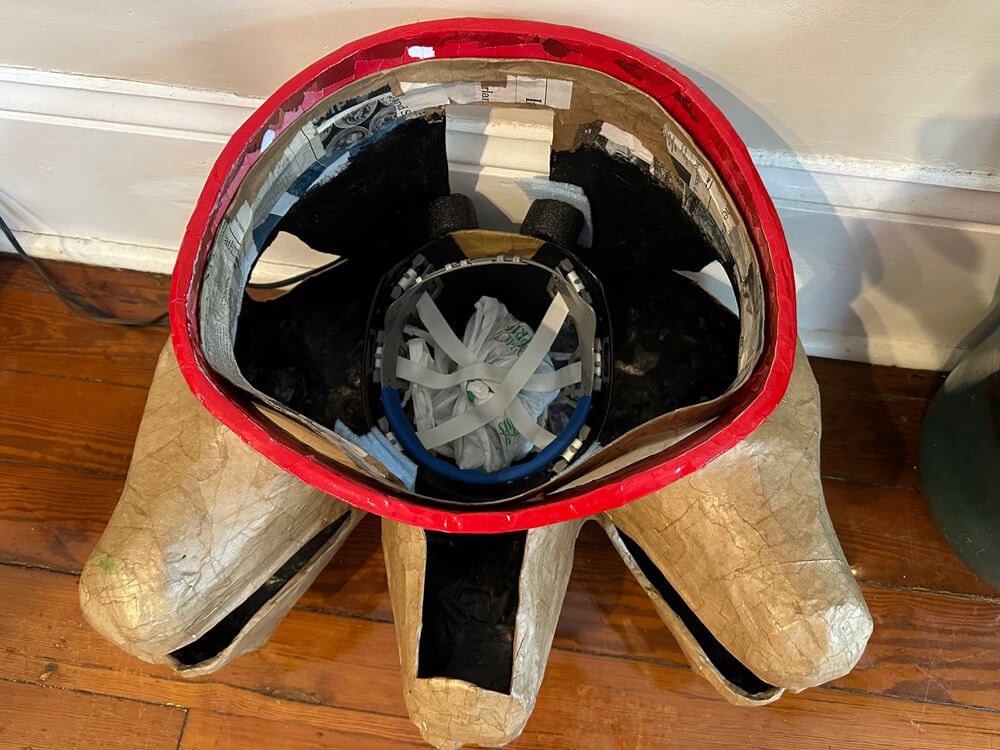
I usually like to install a hard hat in my masks as the absolute last step, but in this case I decided to do it earlier. The reason is that the mask needs to be upside-down for this step, and I thought the ears would make this difficult or impossible, so I decided to do the hard hat at this point and the ears afterward.
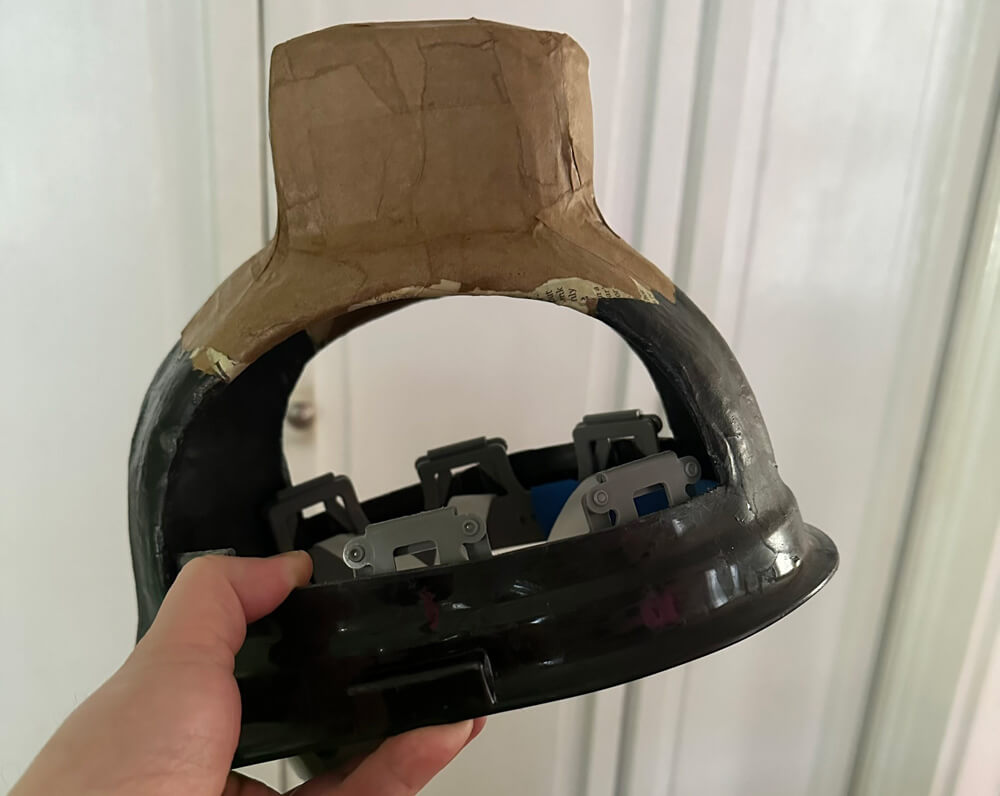
I prepared the hard hat by sawing two big panels off the sides with my Dremel tool. The main reason I do this is that it gives me a surface to wrap paper maché around. Paper maché doesn’t stick to the outer surface of the hard hat very well on its own, but these holes let me wrap the paper around so that it’s perfectly locked in place. Removing these side panels also reduces weight a little bit.
(I also sawed off the brim, just to help the hard hat fit inside the mask better, and to reduce weight by a tiny bit.)
Figuring out how to attach the hard hat firmly in the mask is always one of the most complicated steps of any mask. This time it involved lots of trial and error with stacking up pieces of foam board on the hard hat with tape and putting the mask on to see if the height was okay. To create this “tower,” if you will, I felt around inside the “ceiling” of the mask and drew in there with a marker to determine what part of it would be flat enough that I could glue a flat shape in there. I ended up with this sort of half-oval shape, which sits right behind the two middle eyebrow ridges. I cut out about a dozen foam board copies of this half-oval shape, and stacked them up with tape on the hard hat. I simply put the mask on over that and tried to figure out if I needed more height or less height. Obviously what I’m looking for here is making sure I can see well out of the mask — like my eyes aren’t higher or lower than the mouth openings — and to make sure the mask isn’t going to bump into my shoulders too much or float too high above my shoulders.
(Boring note: Like I mentioned above, I had to do a bunch of steps in a weird order. I’ll write about the spiked collar in part 2, but at this point I had already made the collar shape, because I needed to put it on the mask while determining the height that the mask has to float above my shoulders. The collar adds a little height so I had to make sure I was accounting for that.)
When I worked all that out, I covered this foam board tower thing with six layers of paper maché; this thing needs to be really strong.
When I was ready to permanently attach the hard hat, I set the mask upside down, put a bunch of Gorilla Glue in there (right in the half-oval shape I drew earlier), set the hard hat in place, and then weighed it down with a plastic bag full of rocks. The reason for this is that Gorilla Glue expands by a crazy amount as it sets, and it can move things out of place if they’re not firmly weighted down.
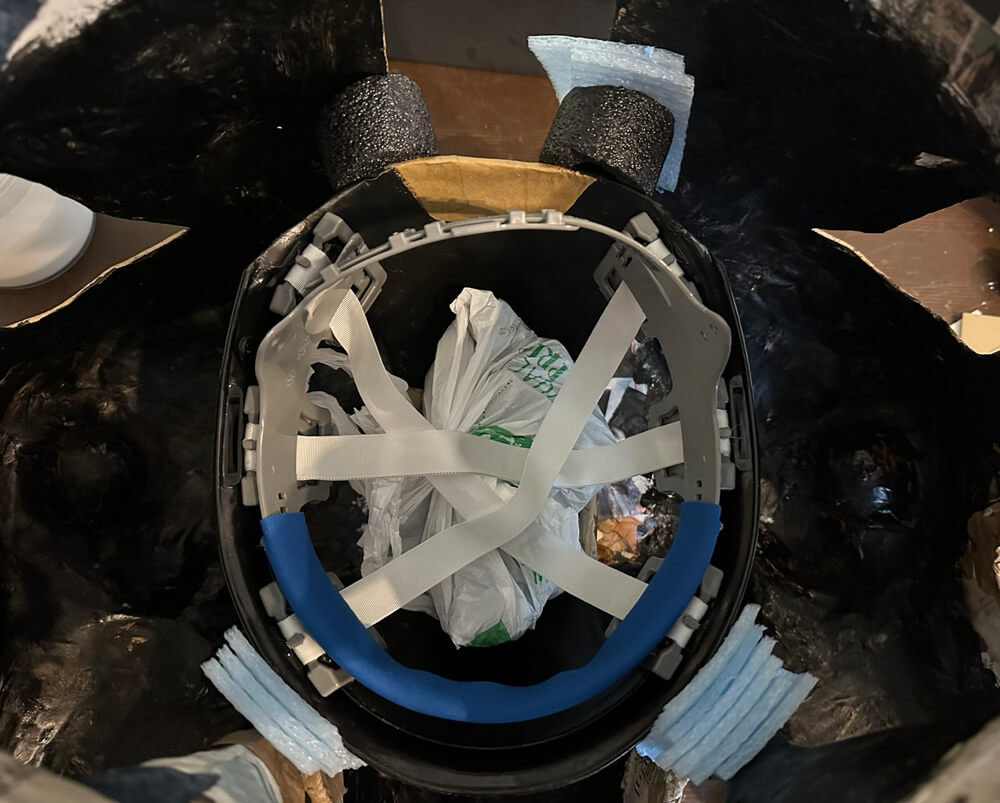
I also set random pieces of foam around the hard hat, vertically, to try to maintain the right positioning in the mask. If you don’t do this, the hard hat might twist a bit, or lean a bit to one side, etc. So I just stuff foam scraps in there until they’re fairly tight on all sides. In these pics, it’s the little blue foam pieces wedged in there, and some segments of black foam pipe insultation tubing.
(You can see the collar is already in place in this pic; it’s not attached yet. I’ll write all about the collar in part 2.)
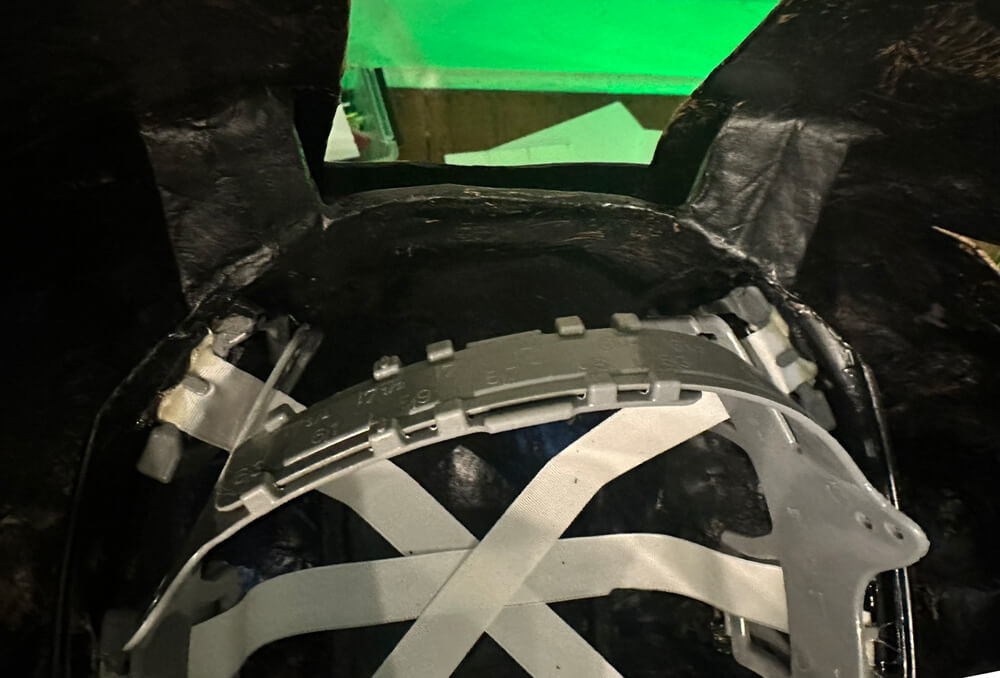
Once the glue was completely set (this usually takes about 2-4 hours but I’m always nervous and I give it more like 8), I also built two little supports at the back of the hard hat that connect to the back wall of the mask. I first hot glued little pieces of foam board in there to span across, and then I taped a twist tie onto each of them, with part of the twist tie bent up along the inner wall of the mask, and part of it bent inside the hard hat. I covered this over with tape and a few layers of paper maché. When these were dry, they felt very sturdy.
Building a stand
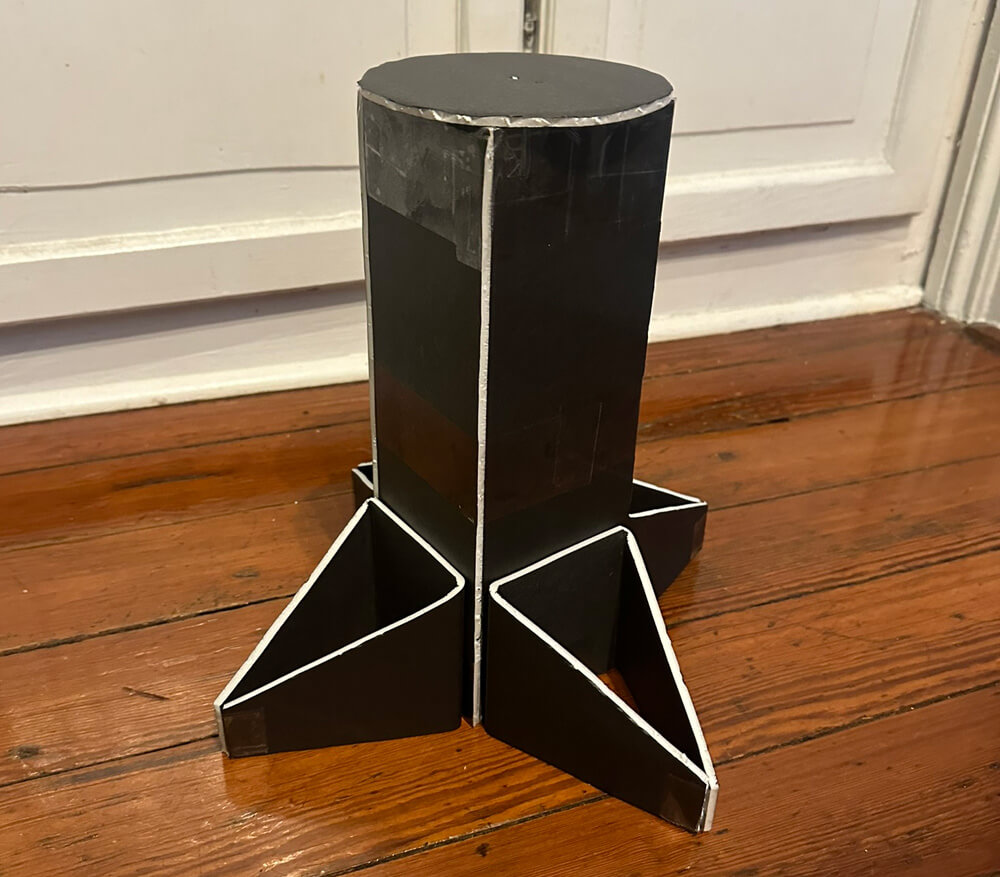
At this point, it was important that I build a stand for the mask. Why? Before the hard hat was installed, the mask was very lightweight, and could just sit on my work table with no problem. But once the hard hat is in place, you now have this weight that’s pulling down from the inside-top of the mask, which can cause the paper maché of the mask to warp over time — especially wherever there are thin sections of paper maché, like around where all the many holes are cut out. This isn’t something that happens within hours; it’s more like days/weeks. So anyway, I made a simple stand out of a sheet of foam board and some tape and hot glue. From now on, when I’m not working on the mask, it will sit on this stand.
Okay, that’s all for part one! Next: Part two; ears, teeth, spiked collar, paint, glitter, etc!
 About Manning Krull
 How to make a 4-foot paper maché alligator
 My violin skull mask, Mardi Gras 2015
 Three-headed paper maché dragon sculpture
Leave a comment