
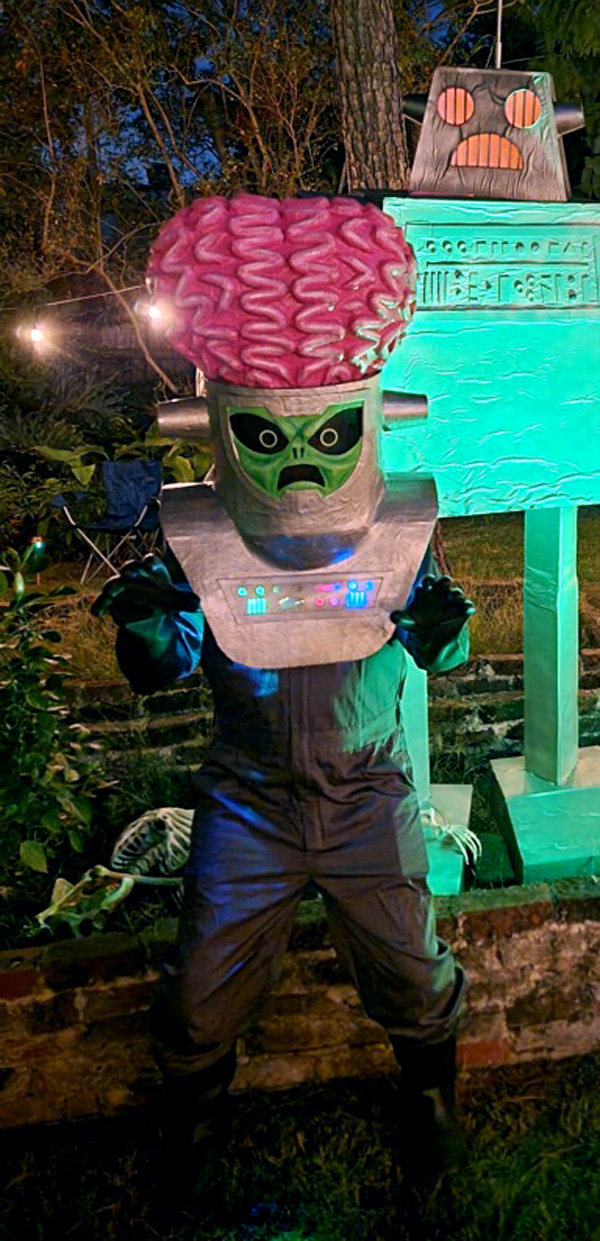
Big brain alien costume!
Published by Manning on October 31st, 2023
I made this big-brain alien costume for Halloween 2023! Here’s how I done did it!
Hooboy, this was one of those projects where I was in such a rush I didn’t take nearly as many process pics as I usually do. But I can give you the gist of how I did all this. I started out with the three basic big shapes: the shoulder armor, the head tube thing, and the brain.
As with any big project, I find along the way that some little steps need to happen in between other big steps — for example, painting the interior of the head before attaching it to the shoulders — so some of these pics show some steps already done that I end up writing about later on, like I put all the painting steps in the same place below. Anyway, you get the idea.
Shoulder armor
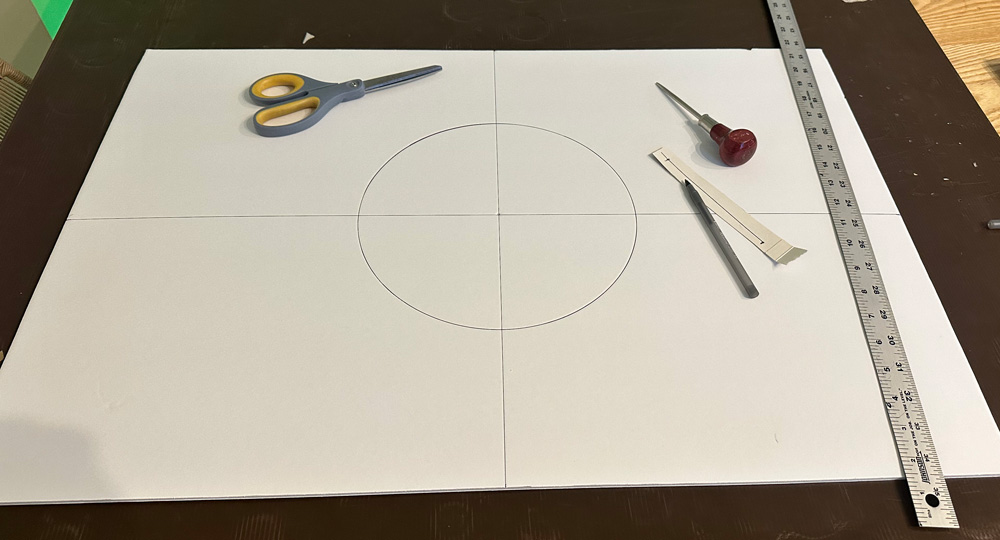
This bit was easy! I started with a sheet of foam board, and I drew and cut out an 10″ circle in the middle. See my method for drawing precise circles. I measured and drew and cut some lines to make the armor somewhat tapered toward the bottom of the chest and back.
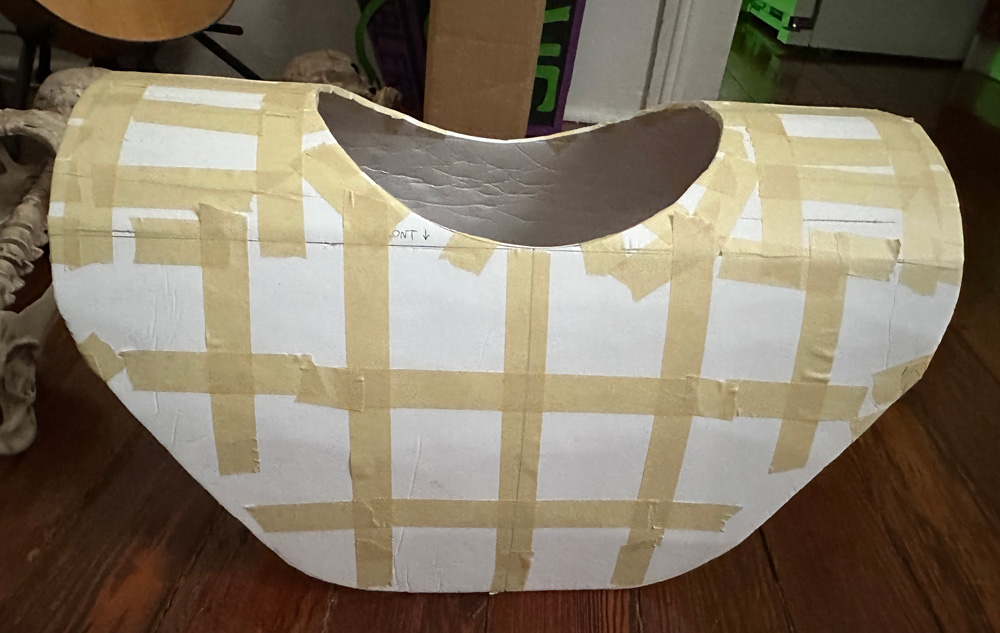
To curve the foam board, I used the dull side of a butter knife to score a lot of horizontal lines, and then I carefully curled and crunched the foam to give it a nice curve. This is always inexact, and the foam cracks in some places; this is no problem! I just reinforce all the cracked areas with masking tape.
I took the 10″ circle I’d cut out and cut it into two C-shapes, and taped them in place under the shoulders. I also added some hot glue to make this connection really strong.
When I tried on the armor, I realized I couldn’t move my arms in front of me without knocking the armor all over the place, so I trimmed the front surface to be more tapered, and I trimmed the front edge of the C-shapes to give my arms more clearance. All of this will help me move around more easily (and drink!) during our Halloween party.
At this point, I covered this whole big thing with one layer of paper maché; here’s some info about my paper maché process and materials. The short version is: I use Roman PRO-543 universal wallpaper adhesive and alternating layers of newspaper and brown wrapping paper.

I didn’t bother to paper maché the interior surface. Note: before paper maché, I put some long strips of masking tape on the big foam surfaces in a large grid pattern. When you’re doing paper maché on a large flat sheet of foam board, there’s a risk of the foam board warping in a weird way as the paper maché dries and it starts to peel the paper surface off of the foam board. Hard to explain. But breaking up the large surfaces with masking tape like this prevents the warping.
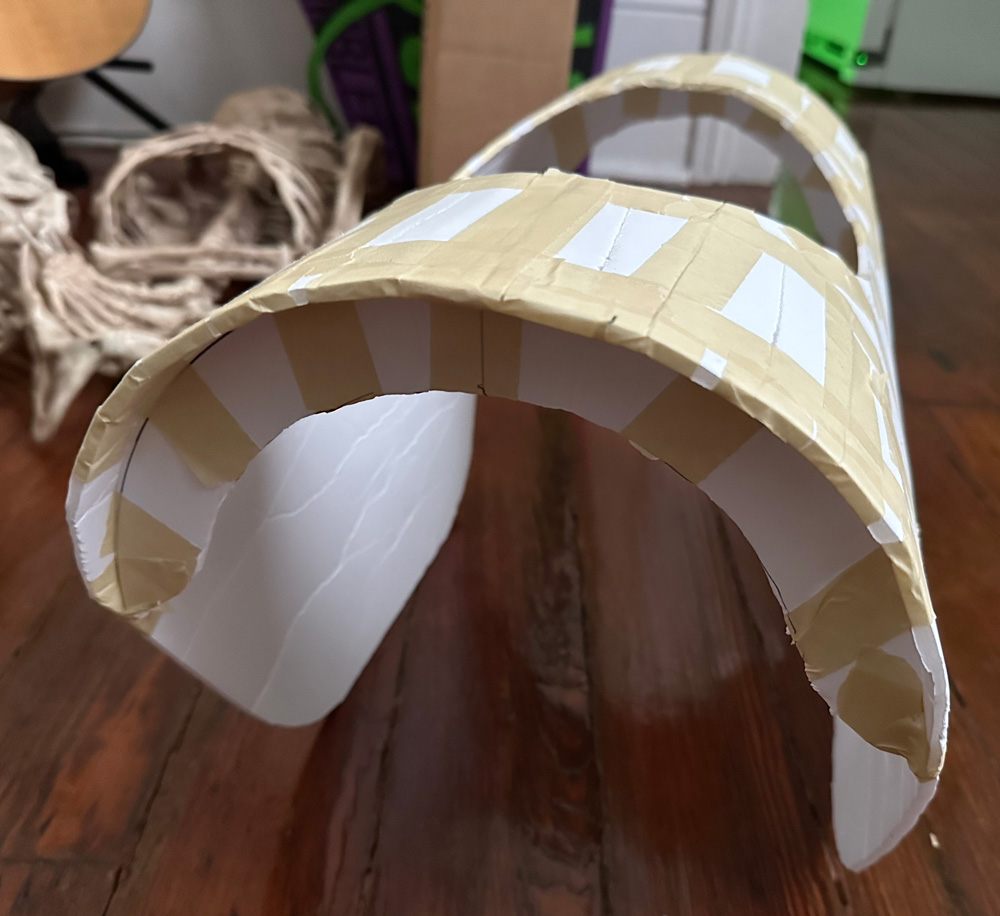
Head tube thing
The tube for the head is mainly a big piece of foam board, carefully curved into a tube and then covered with just one layer of paper maché. To make the tube perfectly round, I built a base of foam board, using some 13″ circles, connected in the middle with a box shape. I carefully curved the big sheet of foam board around that, taping it in place with heavy duty shipping tape. (The foam board wasn’t quite long enough to go all the way around so I cut out and inserted a narrow panel of foam board in the back.)
I put one layer of paper maché on the tube shape. I then set this part aside to finish later, after the brain and face were done.
Making the brain shape
This was the most complicated part of this costume, but fun to do. I first created the basic brain shape as an armature of a few sheets of foam board. Sorry I didn’t take pics! But it’s exactly the same idea as these:
Nosferatu head:
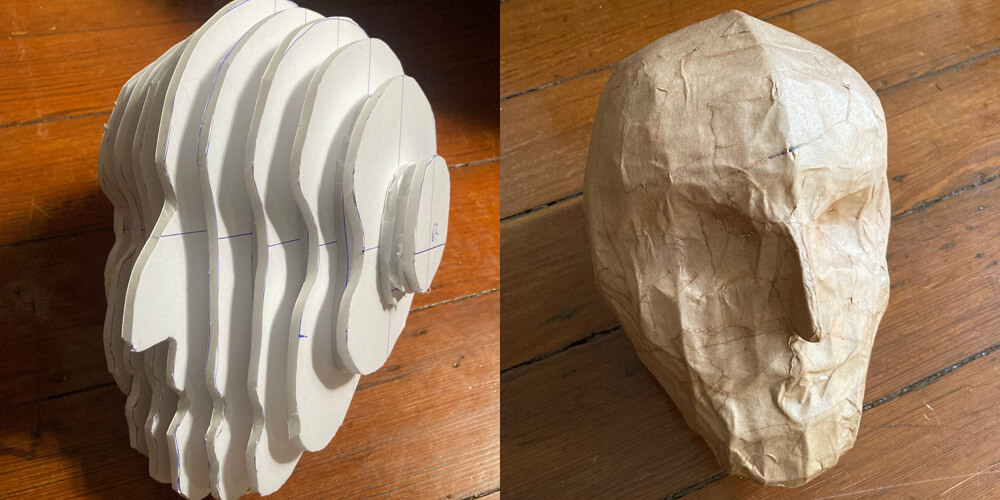 Here’s the full article about this Nosferatu head
Tiger pinata:
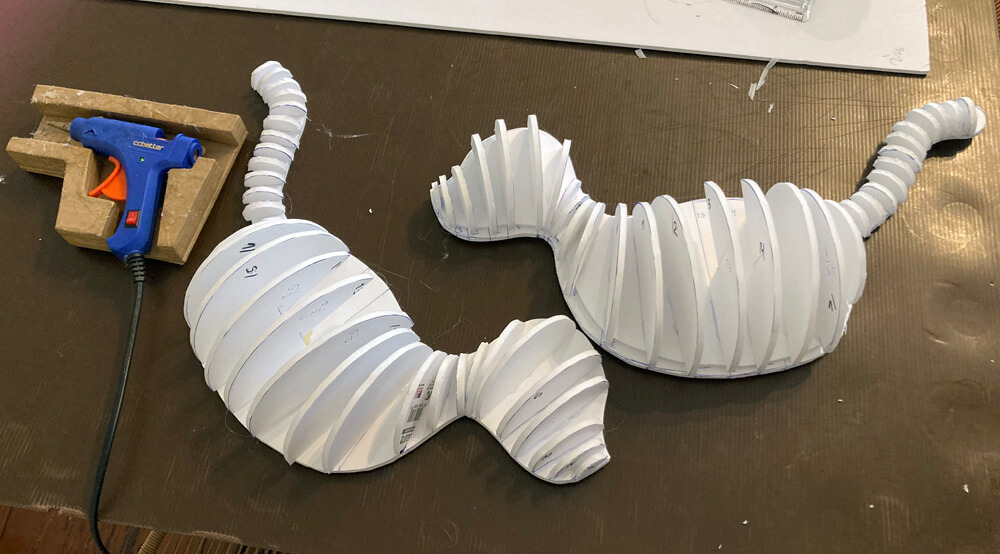 Here’s the full article about this tiger pinata
Spider skull:
 Here’s the full article about this spider skull mask
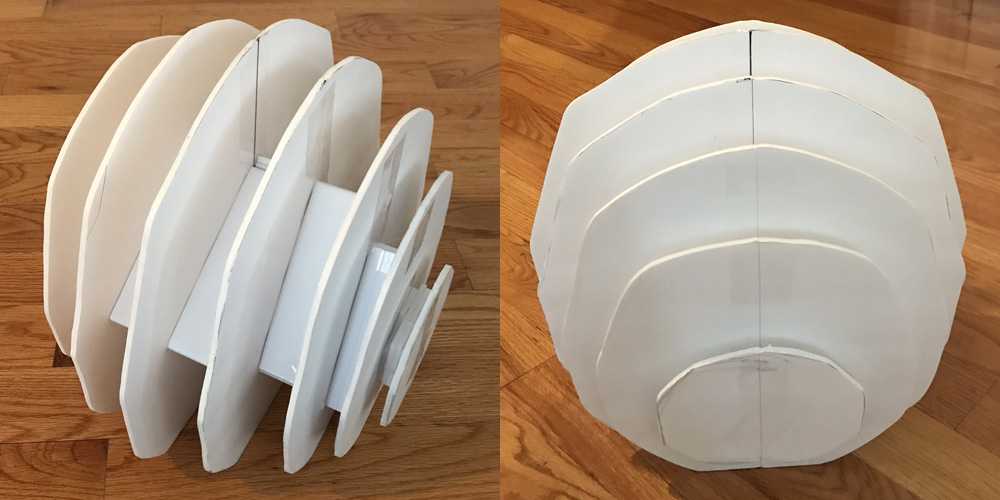
So the armature for the brain was similar to the way I did the spider skull; just five layers of foam board, spaced pretty far apart, with those little triangular supports hot-glued in between. I also mounted this armature on a disk of foam board, cut to be a little more narrow than the head tube, so the brain can slip into the head tube when I put everything together.
From here I did my usual tricks with taping lots of strips of construction paper over the armature to round it out a bit. I also used some pieces of craft foam to round out the hardest edges. Then I wrapped the entire thing in masking tape.
Before paper maché, I carefully wrapped the brain shape in aluminum foil, held in place with bits of tape. This will act as a release agent for the paper maché — meaning once the paper maché is dry I can easily separate all these inner pieces from the paper maché.
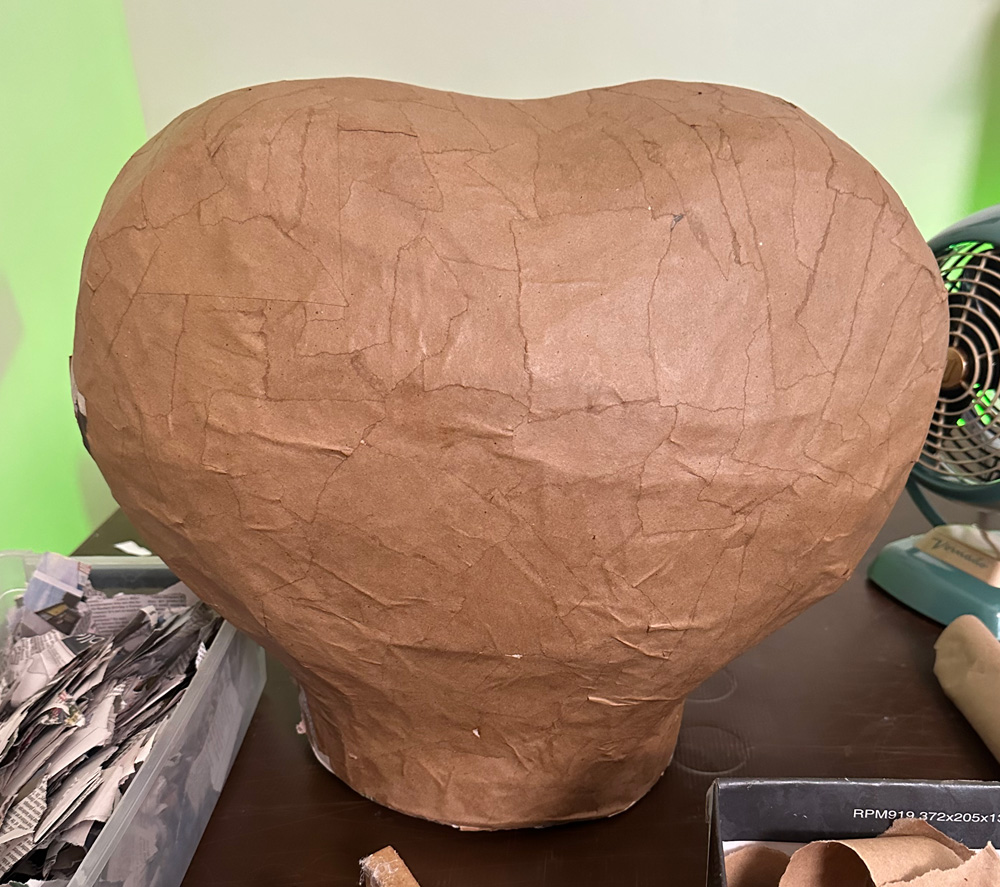
My approach to paper maché for this piece was a little different from what I usually do. Normally I want the outer layer of my sculpture to be many layers of paper maché, and then I wanna remove 100% of the materials inside. This time, I decided to do five layers of paper maché on this brain shape, then remove everything inside, and then add foam tubes to make the brain texture, and then cover the brain texture with just one layer of paper maché. I did it this way because applying paper maché on such an irregular surface is extremely time consuming, and the more layers you add, the more texture you lose. So just one layer of paper was fine to hold the whole thing together and give me a surface to paint on, and the five layers of paper maché under that are there to make the whole thing nice and solid. So, to be clear, for this mask, the foam tubes remain locked in between all the paper maché; there’s no way to get them out like I normally do for most of my masks.
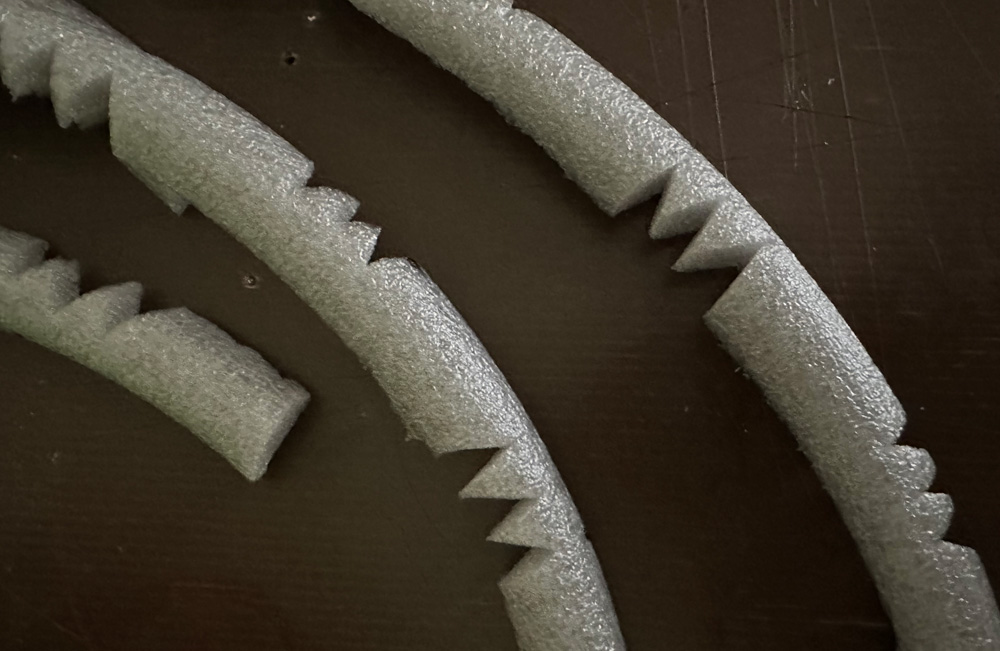
Okay, so for the brain texture I used this kind of solid foam tubing called backer rod, or caulk saver (paid link). I opted for 1″ wide, and 30 feet long.
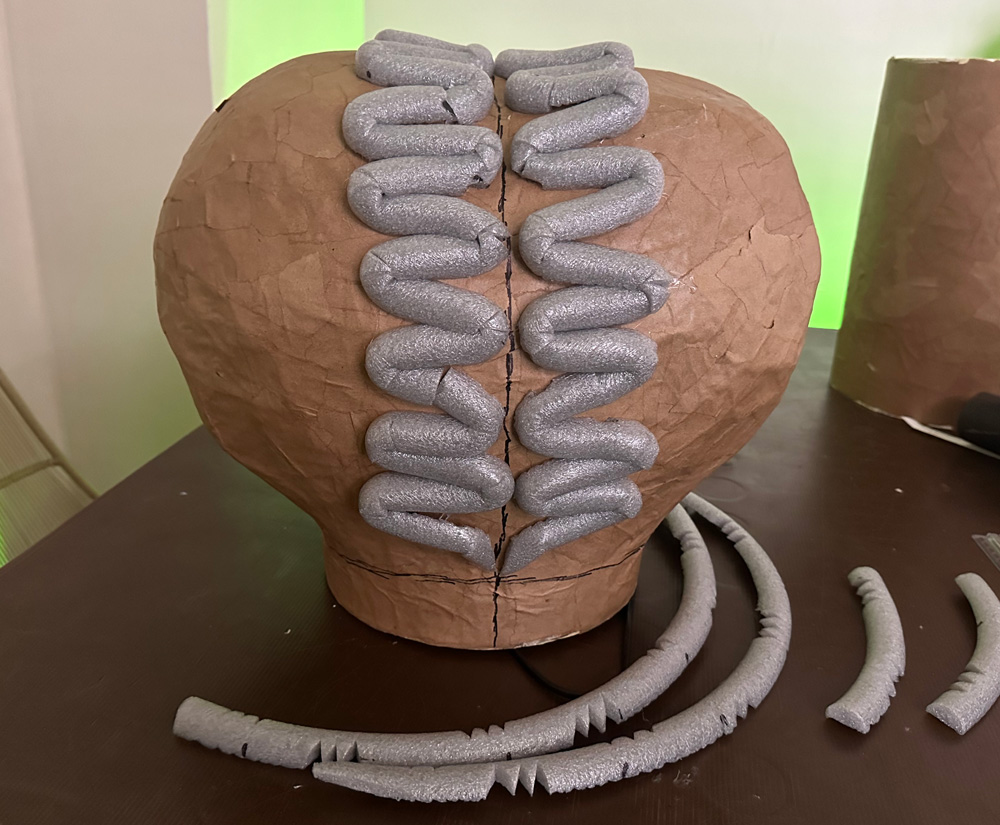
I cut a length of the foam tube and then sliced it down the middle with my X-acto knife. Using scissors, I snipped a bunch of little V shapes; these are to let the tube curve and bend as I glue it onto the brain. I also cut the ends of the pieces to be tapered. I hot-glued all this stuff in place on the brain.
I started with long pieces of tubing, glued on in a zigzag pattern, but I did some math and realized I would not have enough tubing to do the whole brain this way, so I switched to adding some smaller pieces sort of just floating in between the big zigzags. In the end I used about 28 of the 30 feet of tubing I’d bought.
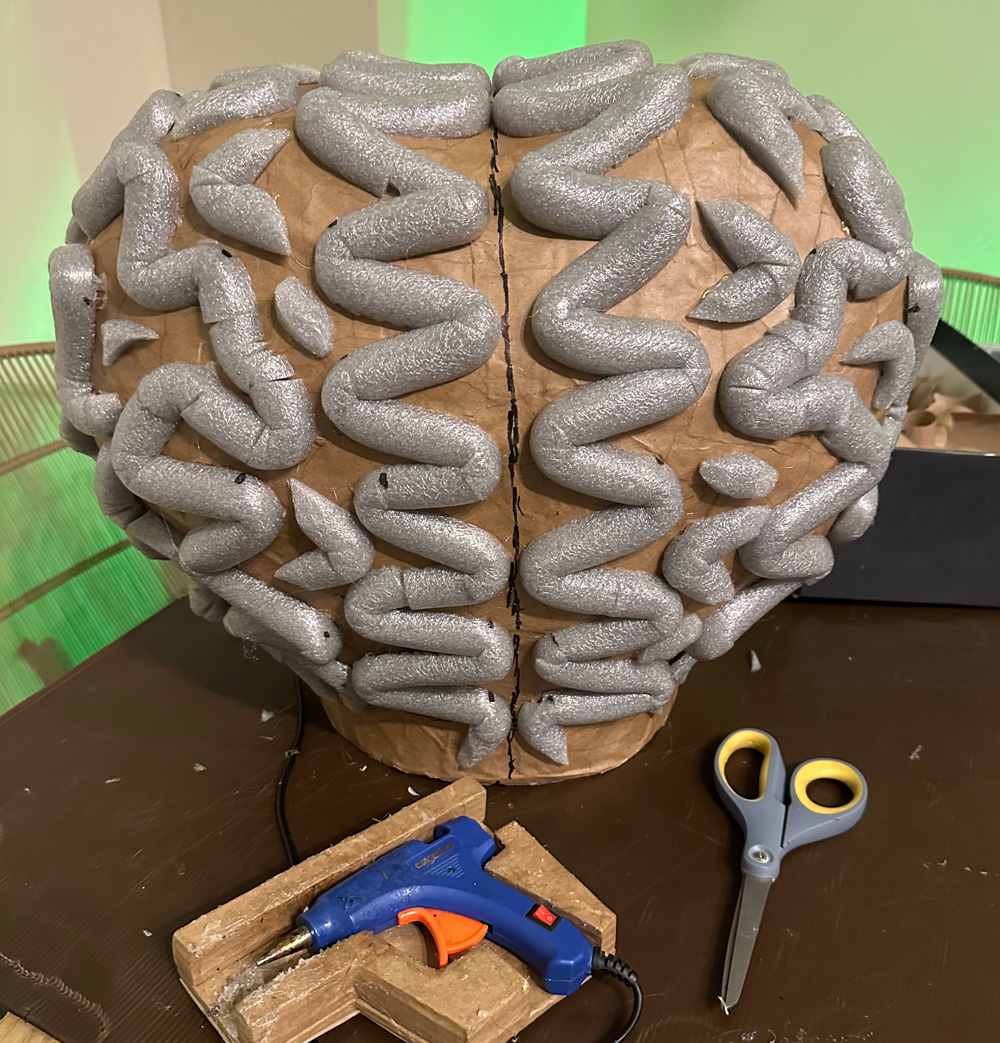
I was worried all this work with the foam tubing would take days and days, but I managed to get it done in one long session, probably 4-5 hours.
As mentioned above, once this was all the tubing was glued in place, I added one layer of paper maché on the entire brain. This was a lot harder than I would’ve liked for it to be! It’s difficult to get paper maché to sit nice and smooth on a shape that’s so irregular. The end result was a little sloppier looking than I’d hoped, but it’s fine! It’s just Halloween! And Mod Podge and paint will definitely help.
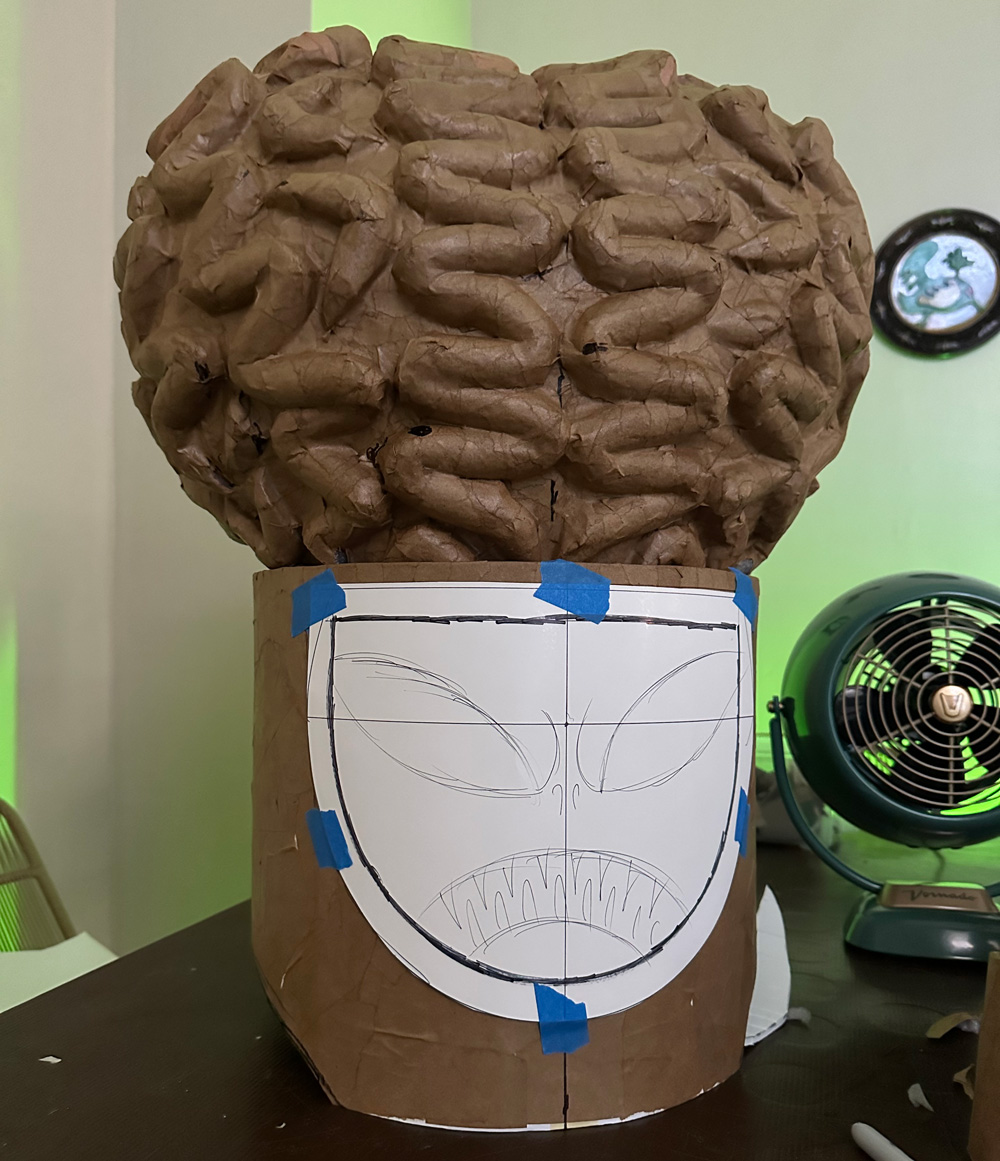
Making the face
I wanted to make the face a separate piece that I could easily take off and put back on. I built the face right on the tube shape for the head, so it would have the same curvature. First, I covered the front of the tube shape with a piece of wax paper, taped in place, and then a piece of brown paper, taped in place. This is so I can build the face and paper maché it while it’s on the tube, and then I can easily remove it. The face will stick to the brown paper and wax paper, but the wax paper protects the surface underneath.
I first drew the outer face shape onto a piece of paper, and then I drew the same shape slightly smaller inside. This outer edge will become the (fake) metal border around the face.
I traced this face border shape onto foam board and cut it out. I’ll attach this to the face later.
I traced the inner face shape onto the head tube, and sketched the alien face onto that.
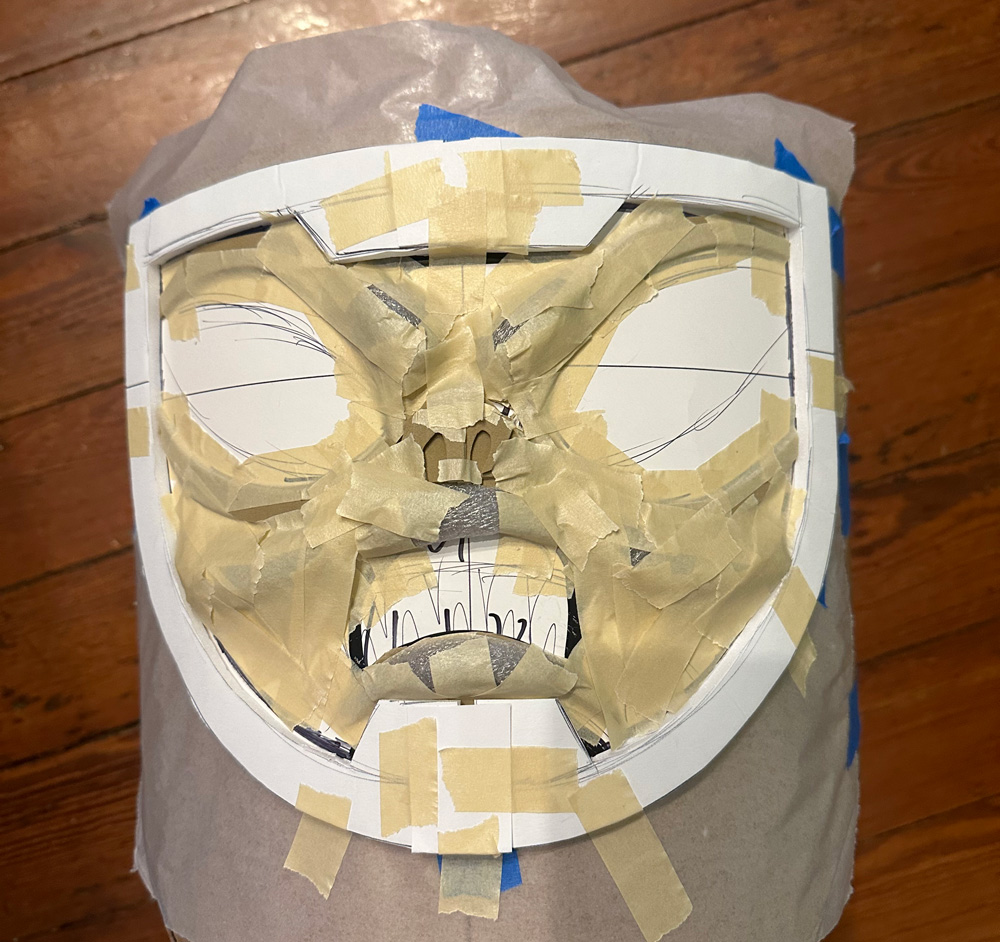
I then built up the 3D parts of the alien’s face with random pieces of foam; the eyebrow ridges, eyelids, nostrils, edges of the mouth, etc. I taped these in place. Then I put taped the border piece over that.
I covered the face with just one layer of paper maché. When that was dry, I carefully removed the face from the tube shape, and cut everything out using scissors and my X-acto knife. I reinforced all the cut edges with one layer of paper maché.
I cut two small holes in the back side of the face — one at the top, and one at the bottom — and placed a magnet in each. I covered this over with tape and one layer of paper maché.
Head tube thing, part two
I cut out the opening for my face, and then I cut small holes for magnets, just above and below the face hole, then I placed the magnets in them, and put a layer of tape over it to prevent it from ripping through the paper maché (coming up). Of course I placed the magnets carefully so they will line up with the magnets in the removable alien face. I reinforced the edges of the whole face opening with one layer of paper maché.
I trimmed the bottom edge of the mask to fit nicely onto the shoulder armor. This just took some trial and error.
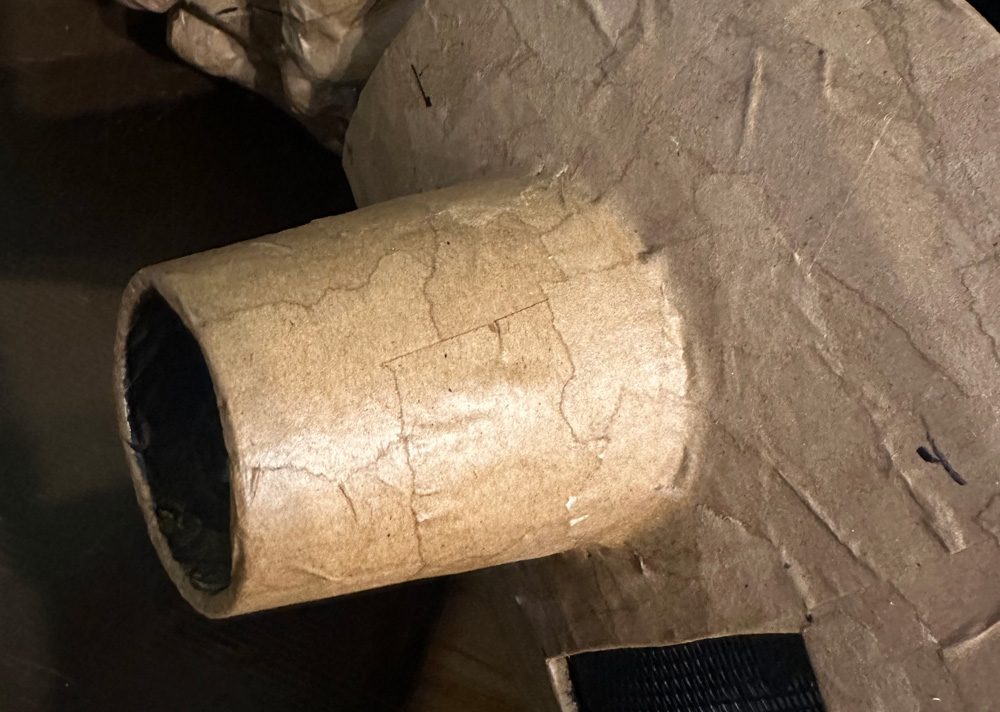
I used two styrofoam cups to make the ear things. I cut the bottom part of the cups off, then covered the cups with two layers of paper maché, and when they were dry, I trimmed the edges to fit nicely on the tube. I traced where the cups would go on the head tube thing, then I removed them and cut out two big holes in the tube shape. I hot-glued the cups in place, and then I covered the connection areas with a masking tape and then two layers of paper maché.
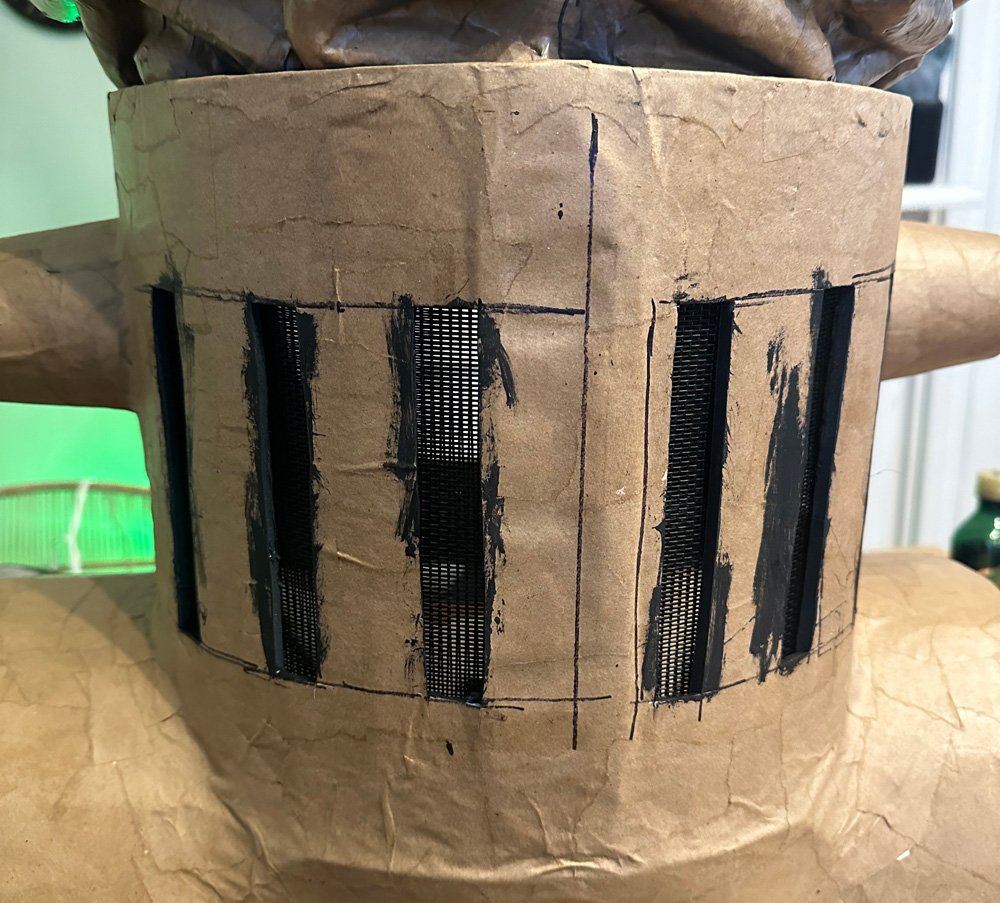
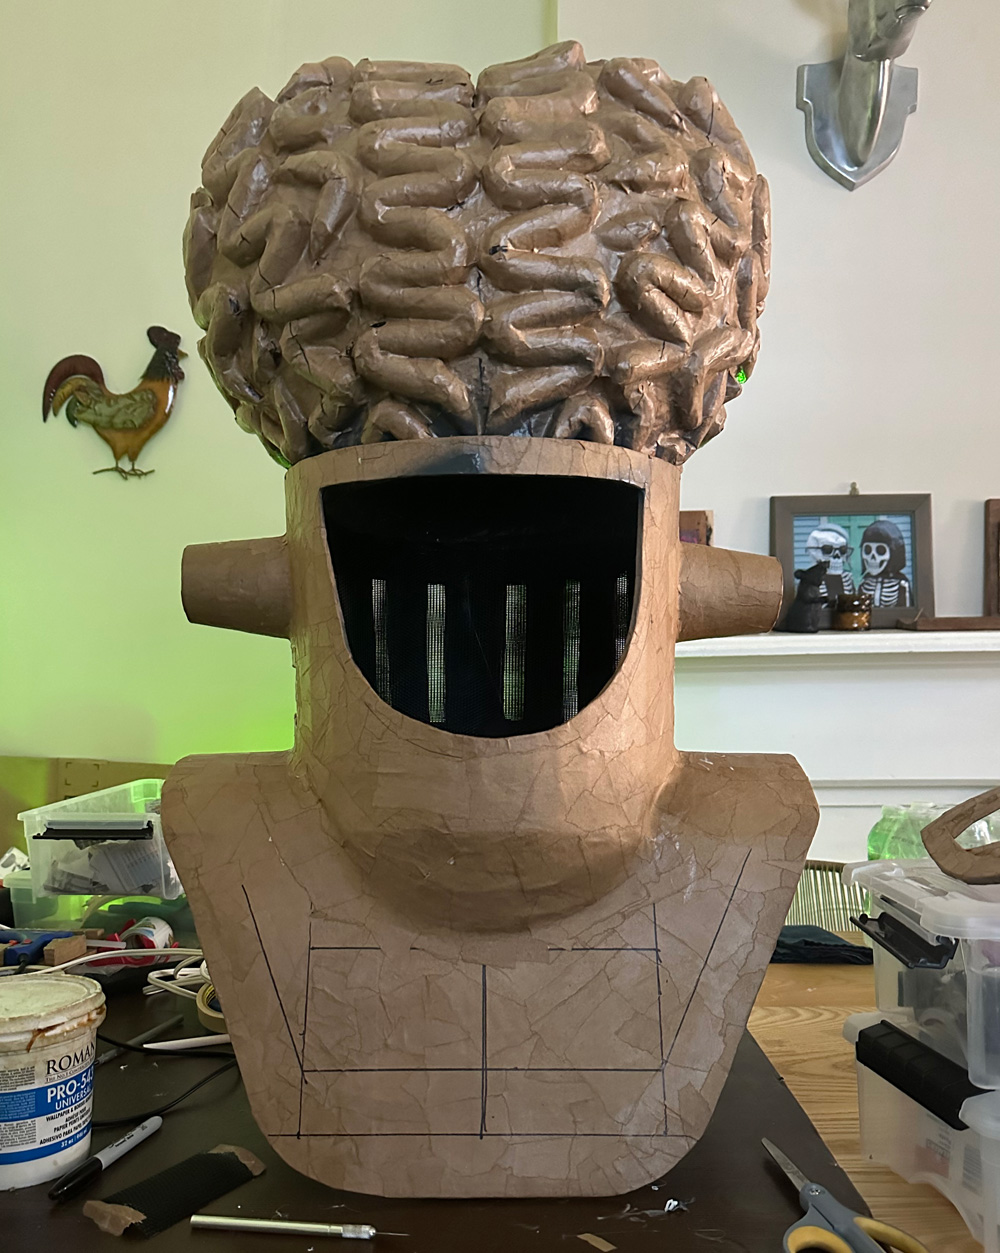
I also cut a bunch of vertical holes in the back of the tube shape. I like to add as many holes as possible in every big mask, to help with hearing and with hair flow. If you don’t have a lot of holes, you get a crazy echo in there and it’s very hard to hear. I reinforced these vertical holes with some wooden coffee stirrers, hot-glued inside the mask.
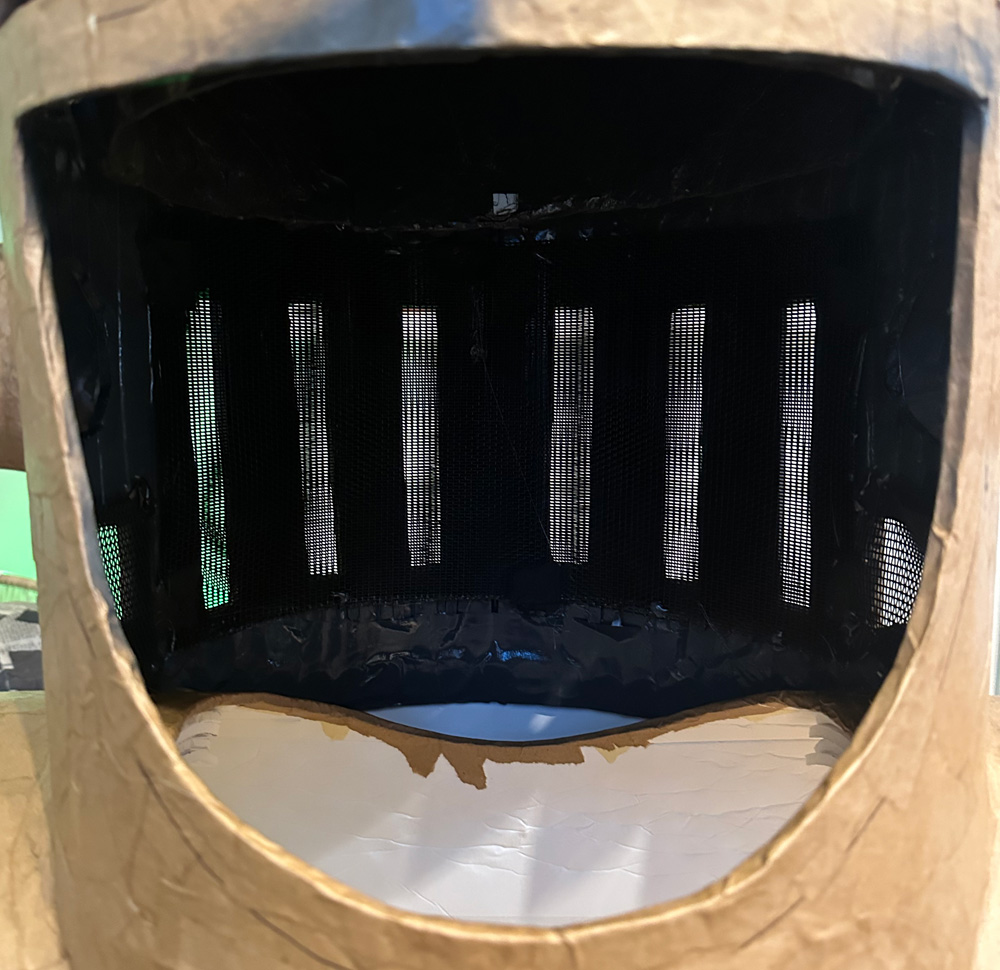
Things are a little out of order here; you can see I’ve already painted the interior black and added screen door material; this is because when I spray paint the thing silver later on, I wanted to have the screen in there already so it gets painted silver too. And in order to put the screen in there, I had to paint the interior first. Otherwise the screen would prevent me from reaching a lot of the interior surface.
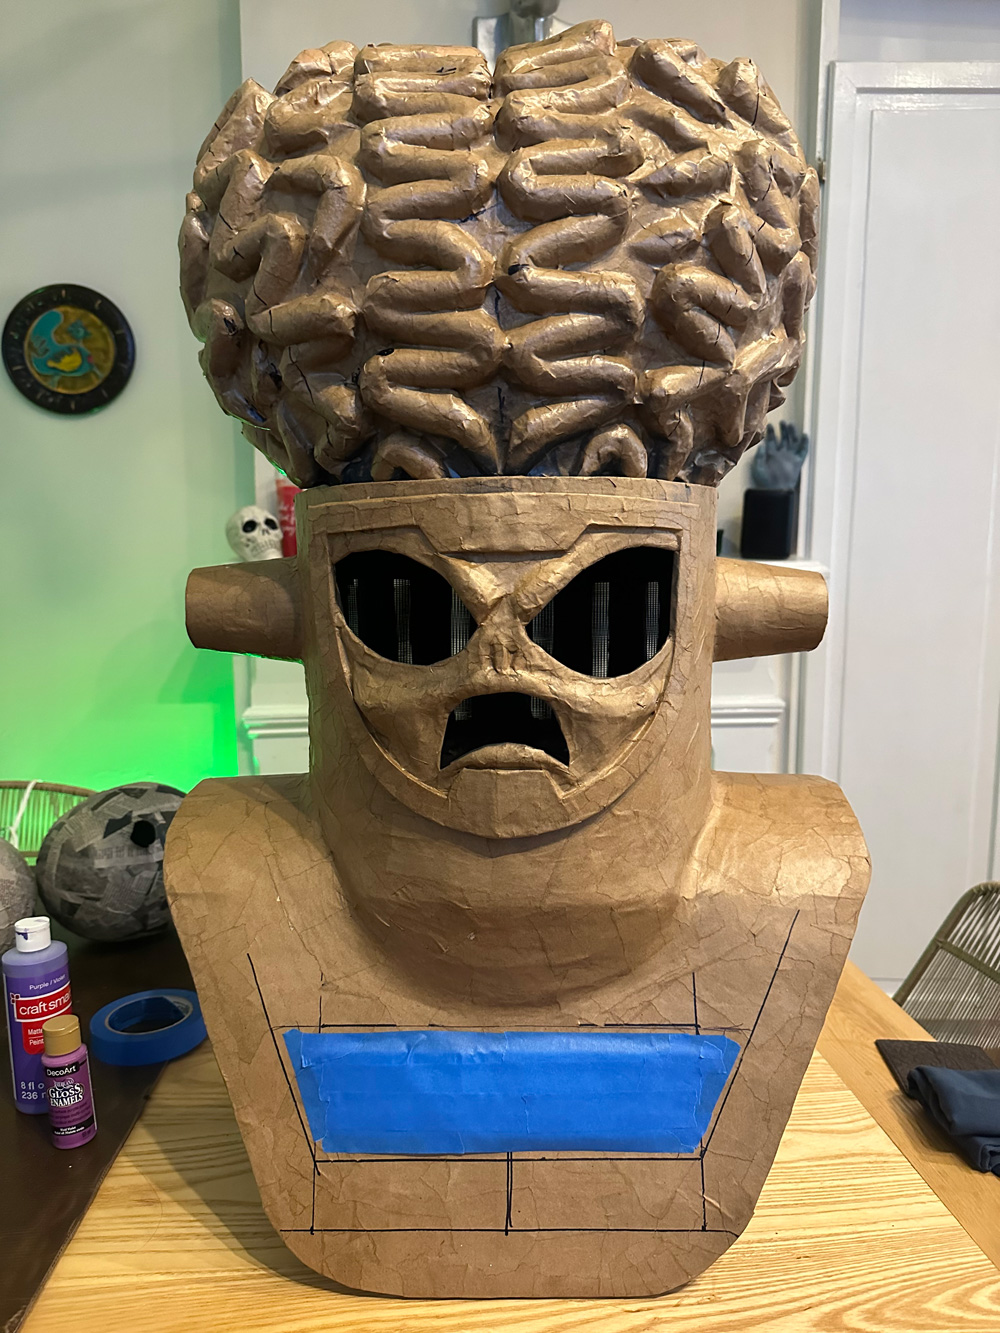
Assembling all the big parts
I set the brain in the tube and then carefully turned both upside down, and then I put hot glue on all the little places where the brain touched the inner edge of the head. I erred on the side of more hot glue; I don’t want the brain to fall off!
I spray painted the inside of the head dark gray. When that was dry, I hot glued pieces of screen door material in the head to cover the holes in the back.
I attached the head tube to the shoulder armor with a ton of hot glue.
The bottom edge of the tube didn’t quite touch the front and back of the shoulder armor, so I built up a curved wall using poster board and lots of masking tape. I covered all this with two layers of paper maché.
Making the piece more wearable
The mask was very top-heavy, so I added counterweight in two places. Inside the head tube, I hot-glued a bunch of pennies all the way around. Then, inside the shoulder armor, I placed some thin flat rocks from my back yard. I wrapped these in shipping tape and then attached them in the armor with shipping tape, one in the front, and one in the back. This made the whole mask feel much more balanced.
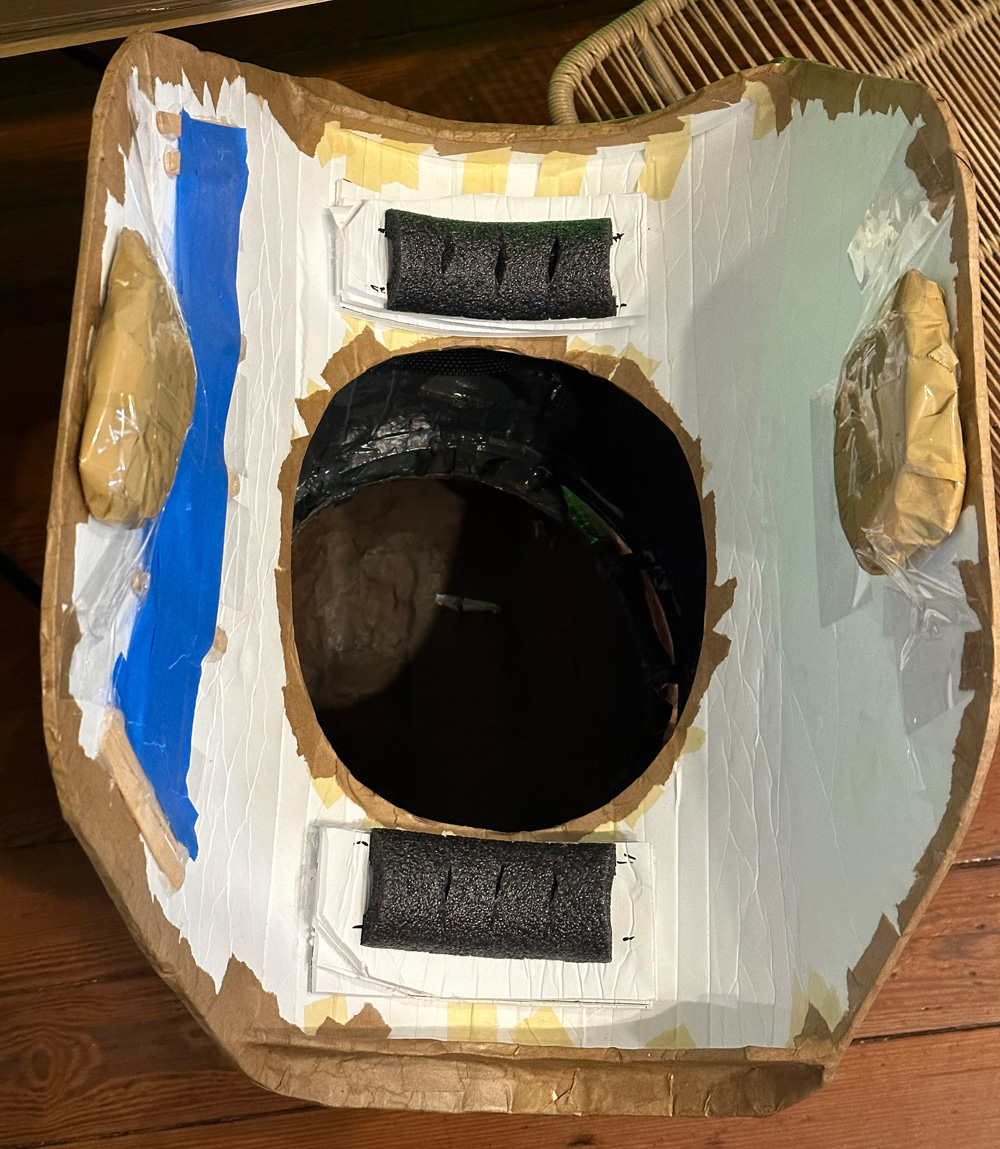
After some trial and error with wearing the whole big mask, I realized I needed to raise the whole thing up a bit. I hot-glued 4 pieces of foam board under each shoulder, and then I hot-glued a piece of foam insultation tubing (sliced in half) into each. This gave me the perfect height and made the shoulder armor more comfortable to wear.
I realized at this point I couldn’t hear in the mask as well as I’d like, as the “ears” (cups) are higher up than my own ears. So I cut two more holes, under the cups, and then I reinforced those edges with paper maché, and I hot-glued screen material in those as well.
Lights etc
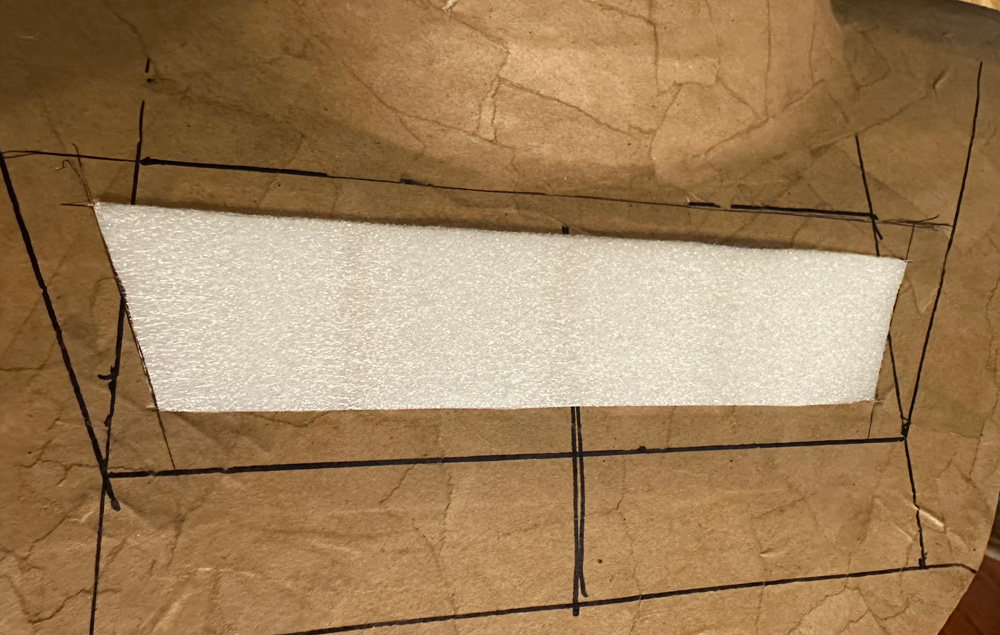
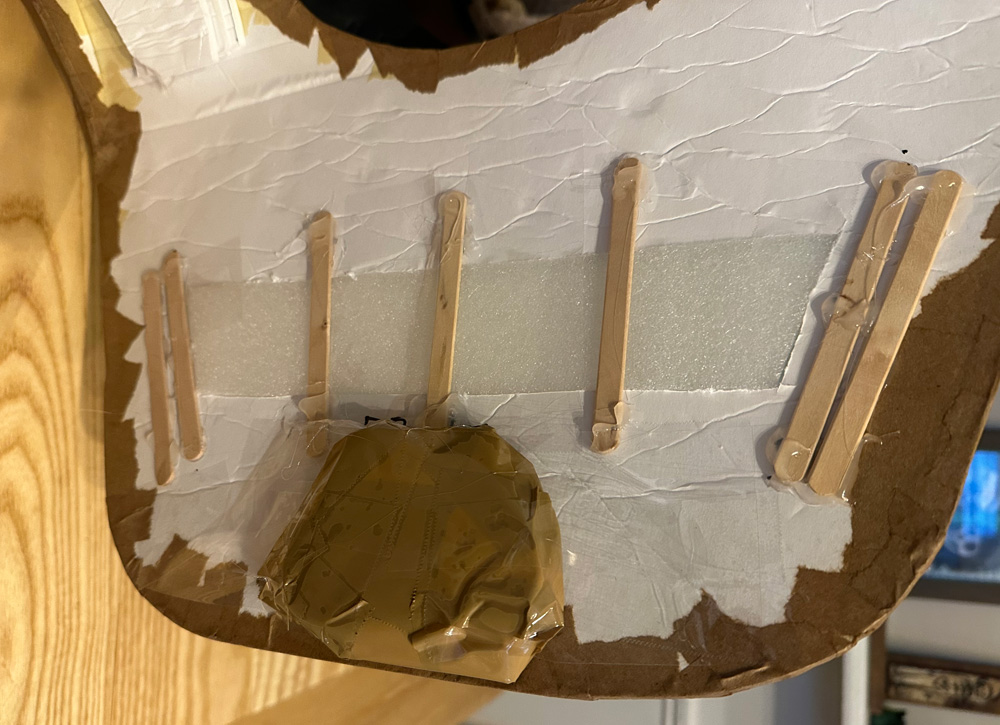
I cut a panel out of the front of the shoulder armor, and then I traced that to cut out a piece of this white rubbery foam that came in the packaging for… something. This foam will diffuse the lights I’m adding later. I hot-glued popsicle sticks inside the armor, behind the foam, to make this area stronger; without it; the whole front of the armor might bend and/or break, since the big hole I cut there makes it a lot less sturdy.

I cut the front panel out of a piece of craft foam. I cut out all the holes for the lights with my X-acto knife. I set this panel aside for painting separately. Craft foam doesn’t take spray paint well on its own, so I didn’t want to glue it on at this point.
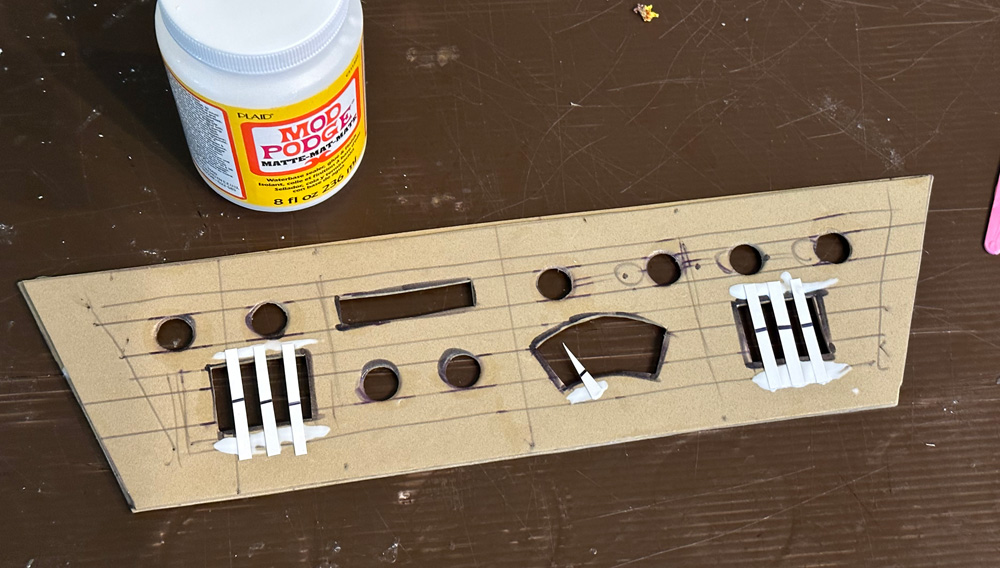
I cut out some little pieces of poster board and glued them into the panel, just to give it some more detail.
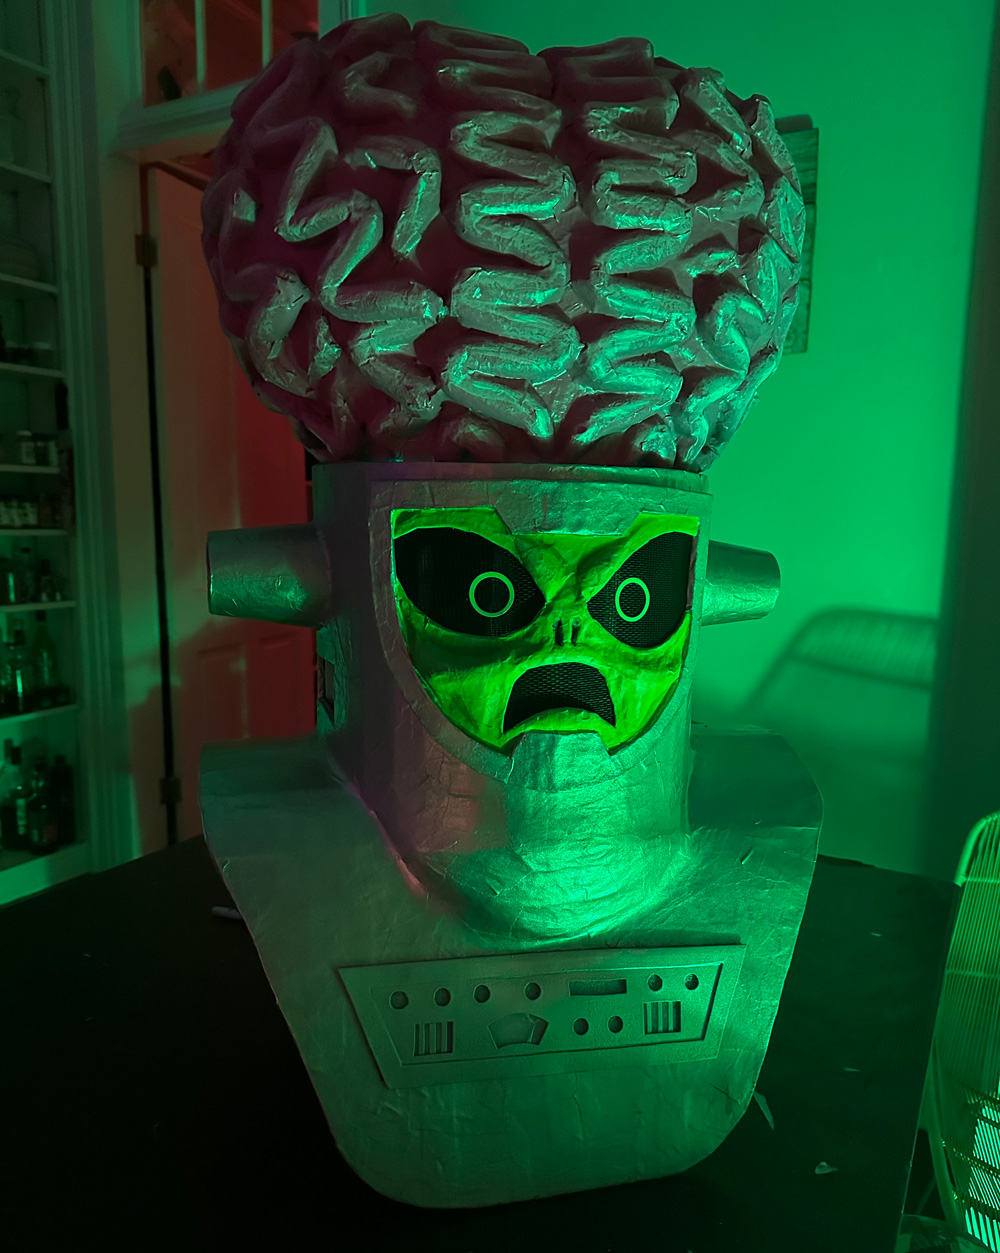
The lights I’m using for this mask are these little individual battery powered lights that you twist to turn on, and they last roughly 24 hours. I have a few different kinds from over the years. When the party was about to start I simply switched these on and taped them in place behind the panel in the armor.
Painting
I first painted the interior of the mask and armor with dark gray spray paint; I would’ve used black, but I was out. I also spray painted the back of the alien face with the same dark gray.
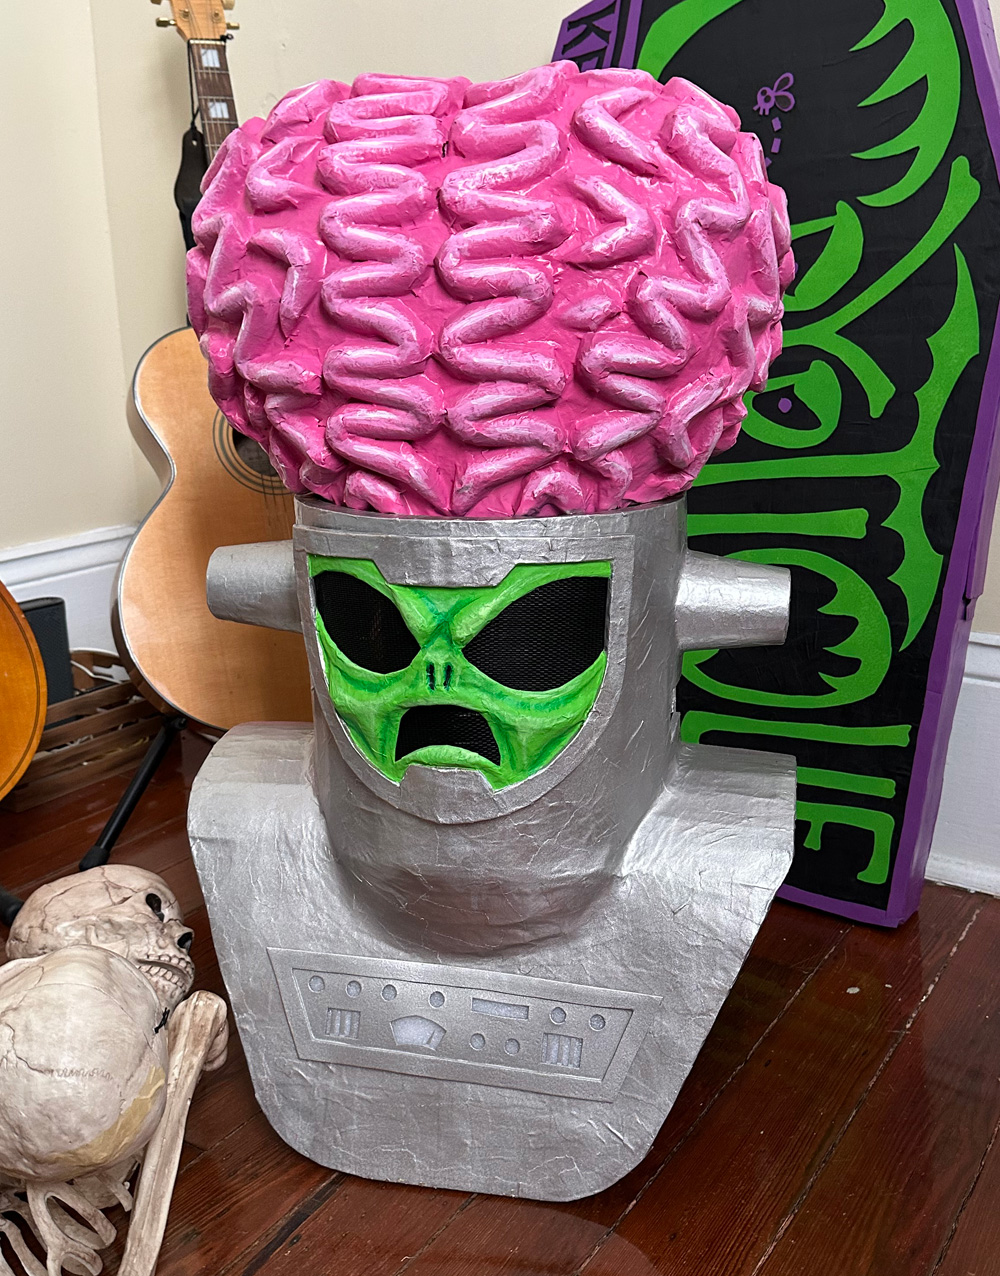
I painted a coating of Mod Podge onto the brain, to smooth out the rough texture a bit.
I masked out the panel for the lights with blue painter’s tape, and then I spray painted the whole mask, minus the brain, with silver spray paint. I sprayed the border of the alien face with the same.
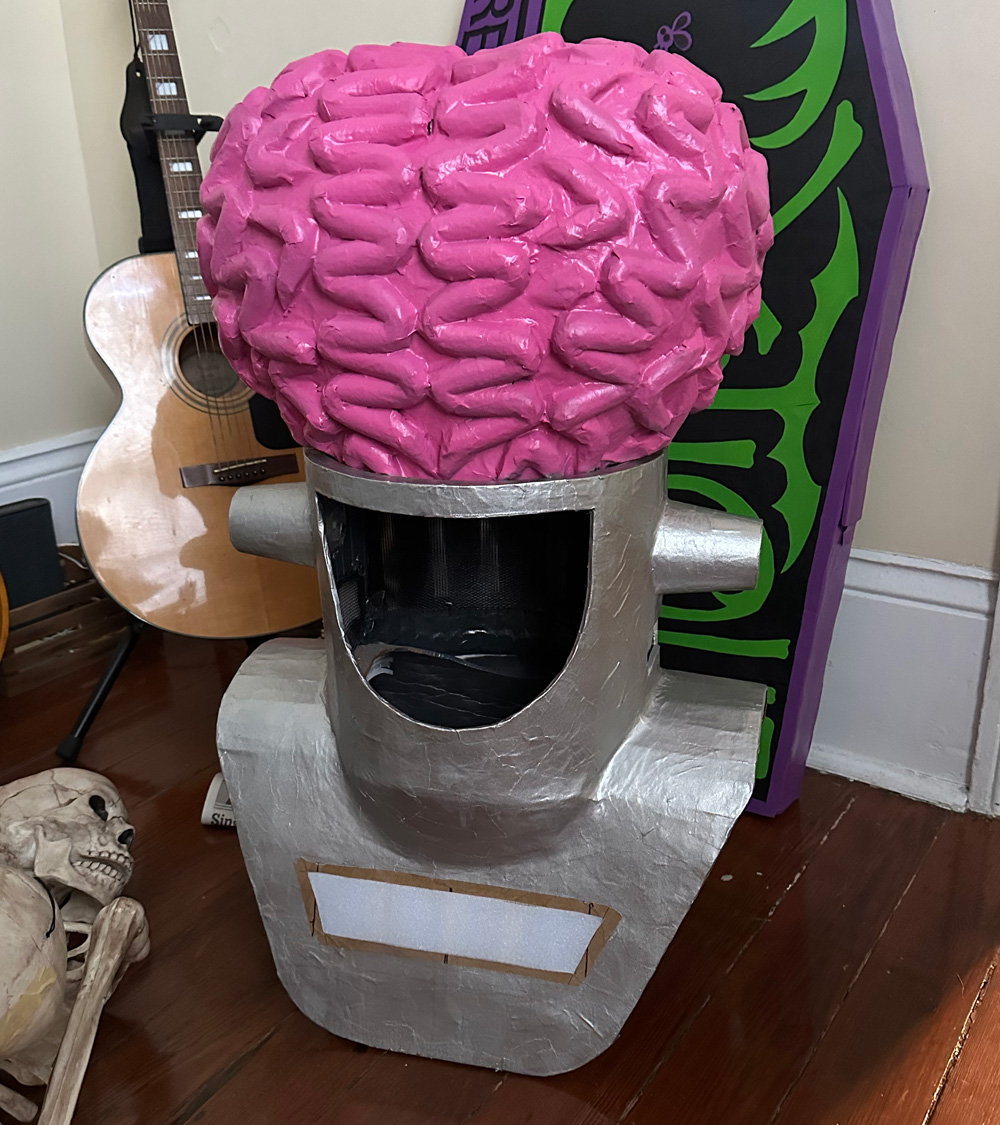
I let the silver paint dry and set for 24 hours, and then I masked out the top edge of the head tube with painter’s tape and newspaper, and then I spray painted the brain pink.
I painted the panel for the lights first with a coating of Mod Podge, and then when that was 100% dry I spray painted the panel silver. Craft foam doesn’t take spray paint well on its own, so the Mod Podge helps with that. When that was dry I hot-glued the panel onto the armour.
I painted two layers of highlights onto the brain; first some big blurry highlights with a lighter pink color, and then thinner, neater highlights with white. This is my attempt to create a sort of shiny, wet, organic look for the brain.
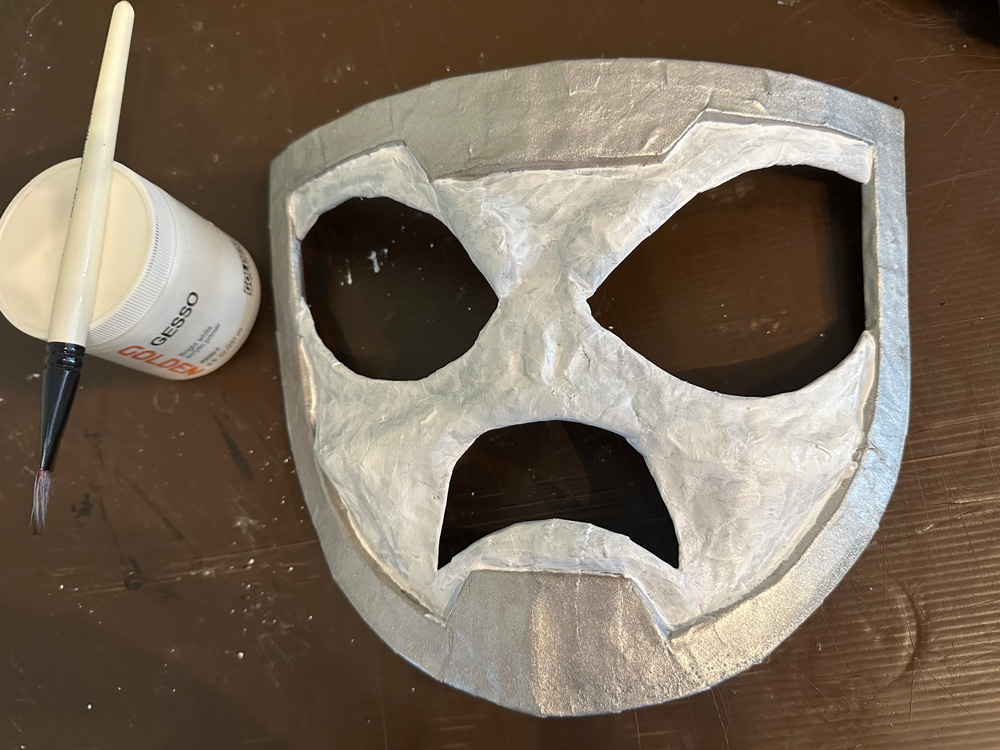
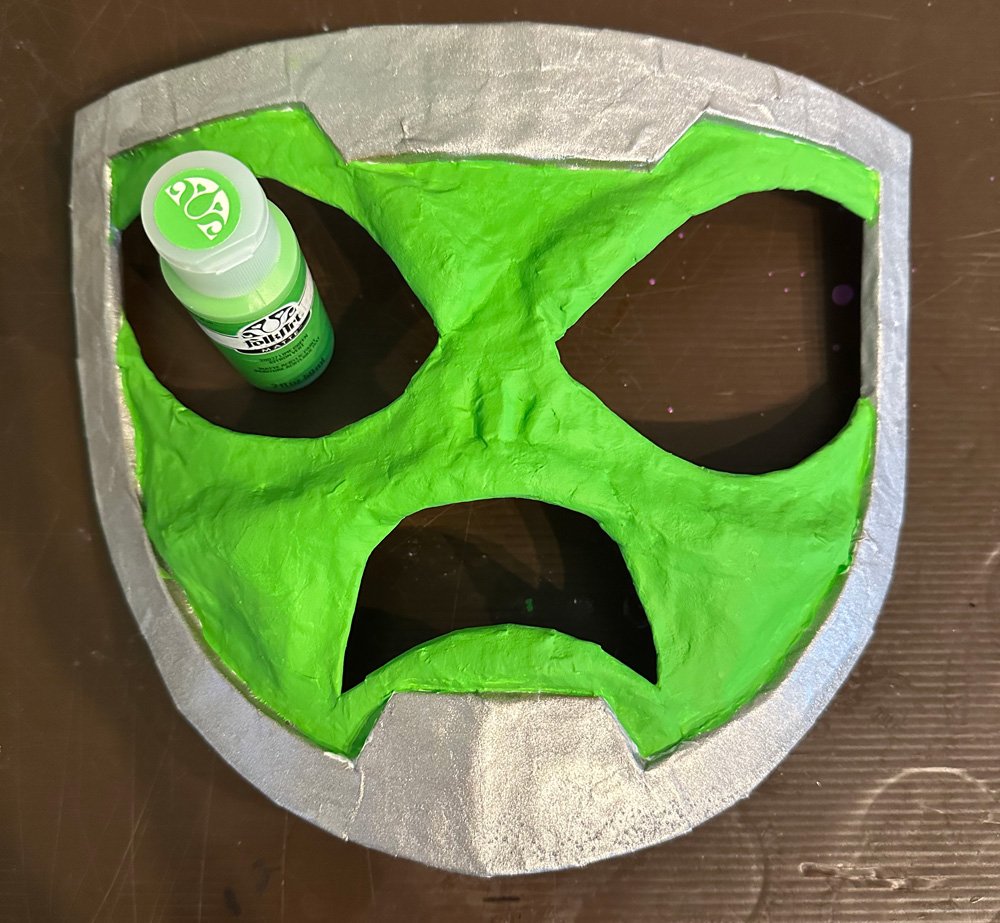
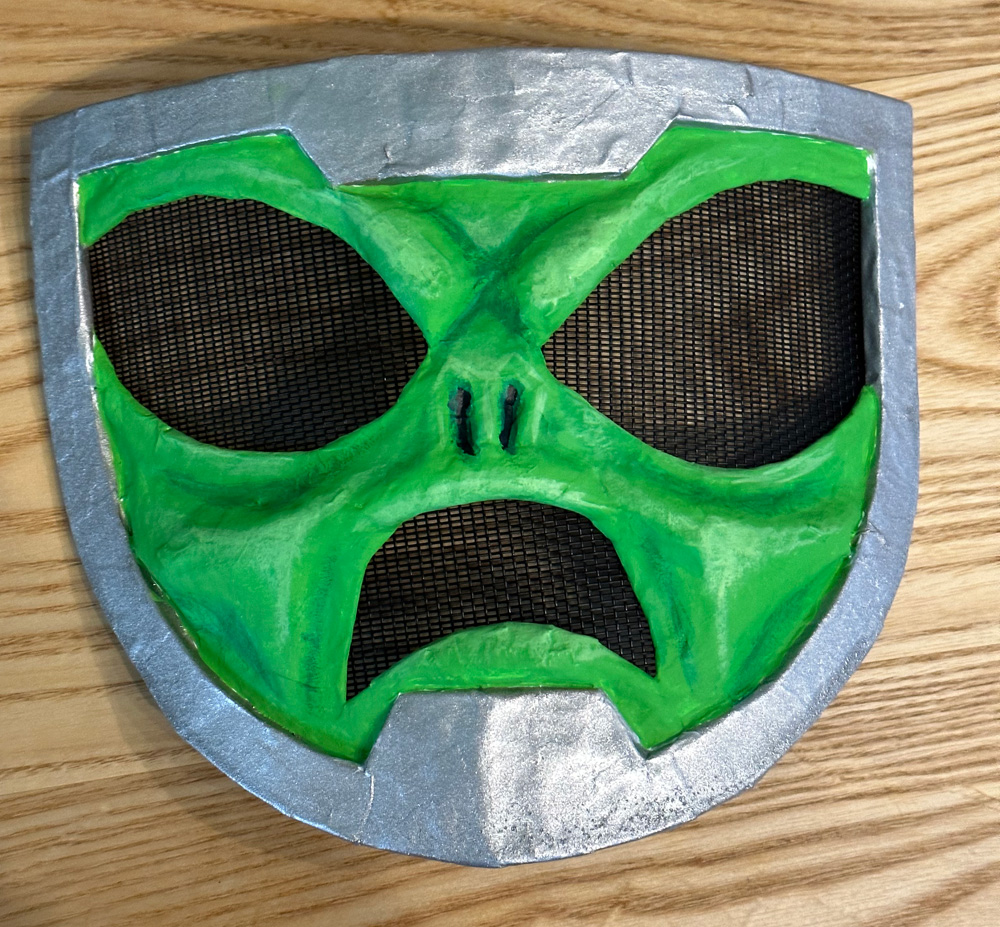
I painted the alien face with a coat of white gesso, and then when that was dry, I painted the face by hand with acrylic paint — a solid bright green for the whole face, then some darker green shadows and lighter green highlights.
Finishing touches
I hot-glued pieces of screen door material behind the mouth and eye holes.
I cut out little rings of light green paper to glue onto the eyes. To make these I used my 1″ hole punch and my 1.25″ hole punch. Easy!
Here are the little lights taped in place inside the armor on the night of the Halloween party.

This thing came out even cooler than I’d hoped, and it’s surprisingly comfortable and easy to wear! This is my favorite Halloween costume I’ve made in ages.
 About Manning Krull
 How to make a 4-foot paper maché alligator
 My violin skull mask, Mardi Gras 2015
 Three-headed paper maché dragon sculpture
October 31st, 2023 at 3:19 pm
All three posts today were so fun to read! Seeing your amazing creations every year is one of my favorite parts of the holiday. Happy Halloween!
October 31st, 2023 at 4:41 pm
Wow, thank you so much!!!!