
Easy DIY tombstone decorations for Halloween!
Published by Manning on November 9th, 2021
My wife and I made these tombstone decorations pretty last-minute for our back yard Halloween party; our first annual Halloween party that would be 100% outdoors. They were fun and quick to make!
First I’ll talk about making one tombstone, and then I’ll explain how I did these in a big batch to save time and a little money. I’ll also add a bit about waterproofing at the end.
So, for starters, I drew one tombstone shape onto a sheet of cheap foam board from the dollar store. I cut that out with my X-acto knife, and then spray painted it light gray.
For the details, I made a stencil out of another piece of foam board, and I used a darker gray spray paint to do a light dusting over the stencil. This is a really inexact method, as the foam board for the stencil will never lay perfectly flat, so you get a somewhat blurry effect for the details. Not to worry, the next step fixes that…
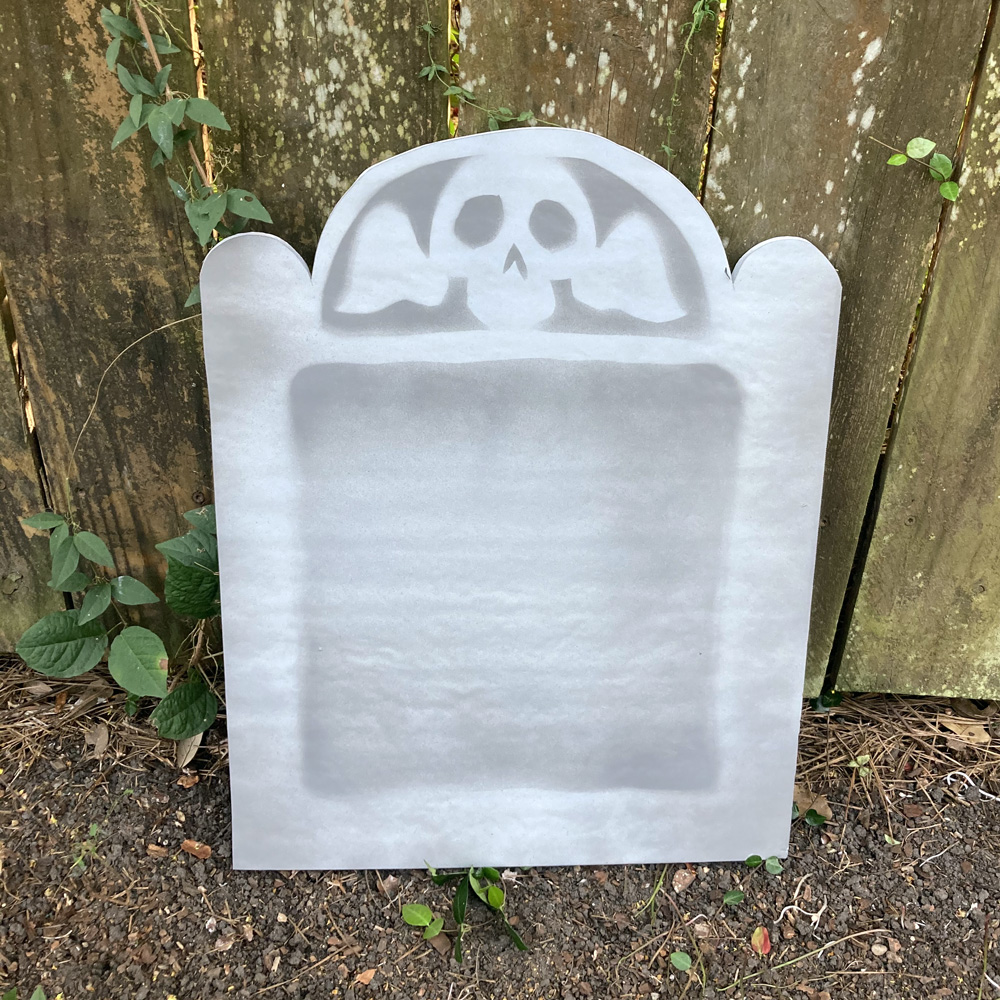
After the spray paint was completely dry, and I then used a plain ol’ black Crayola crayon to lightly accentuate the details from the stencil. Easy!
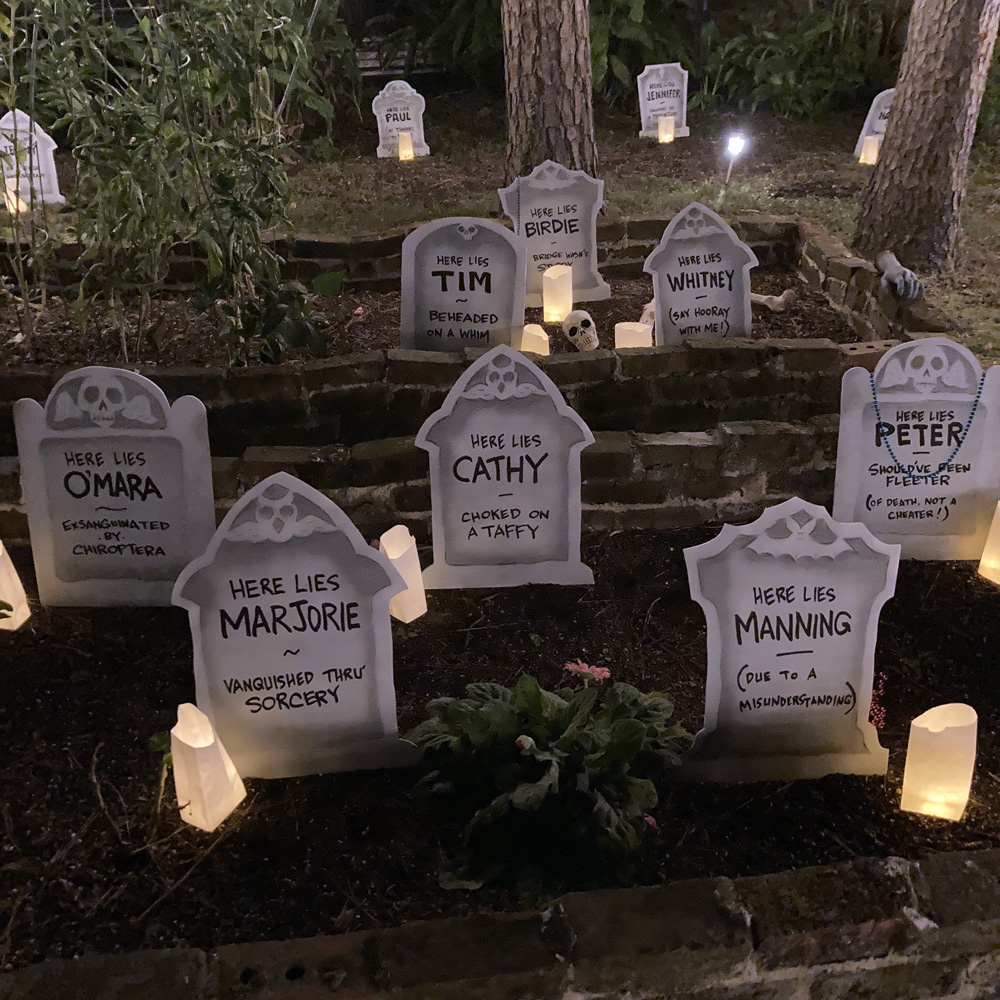
I wrote the “poem” (if you can call it that) on the tombstone with a big fat acrylic paint marker. I absolutely love these Posca broad chisel paint markers (pain link) for this kind of work! The paint is super dark and opaque, it flows really well, and the huge chisel tip lets you draw thick or thin lines depending on how you hold it. I bought three of these markers for 30 tombstones but ended up using just one for the first 25 or so, and by then the tip was becoming a bit smooshed so I cracked open the second one.
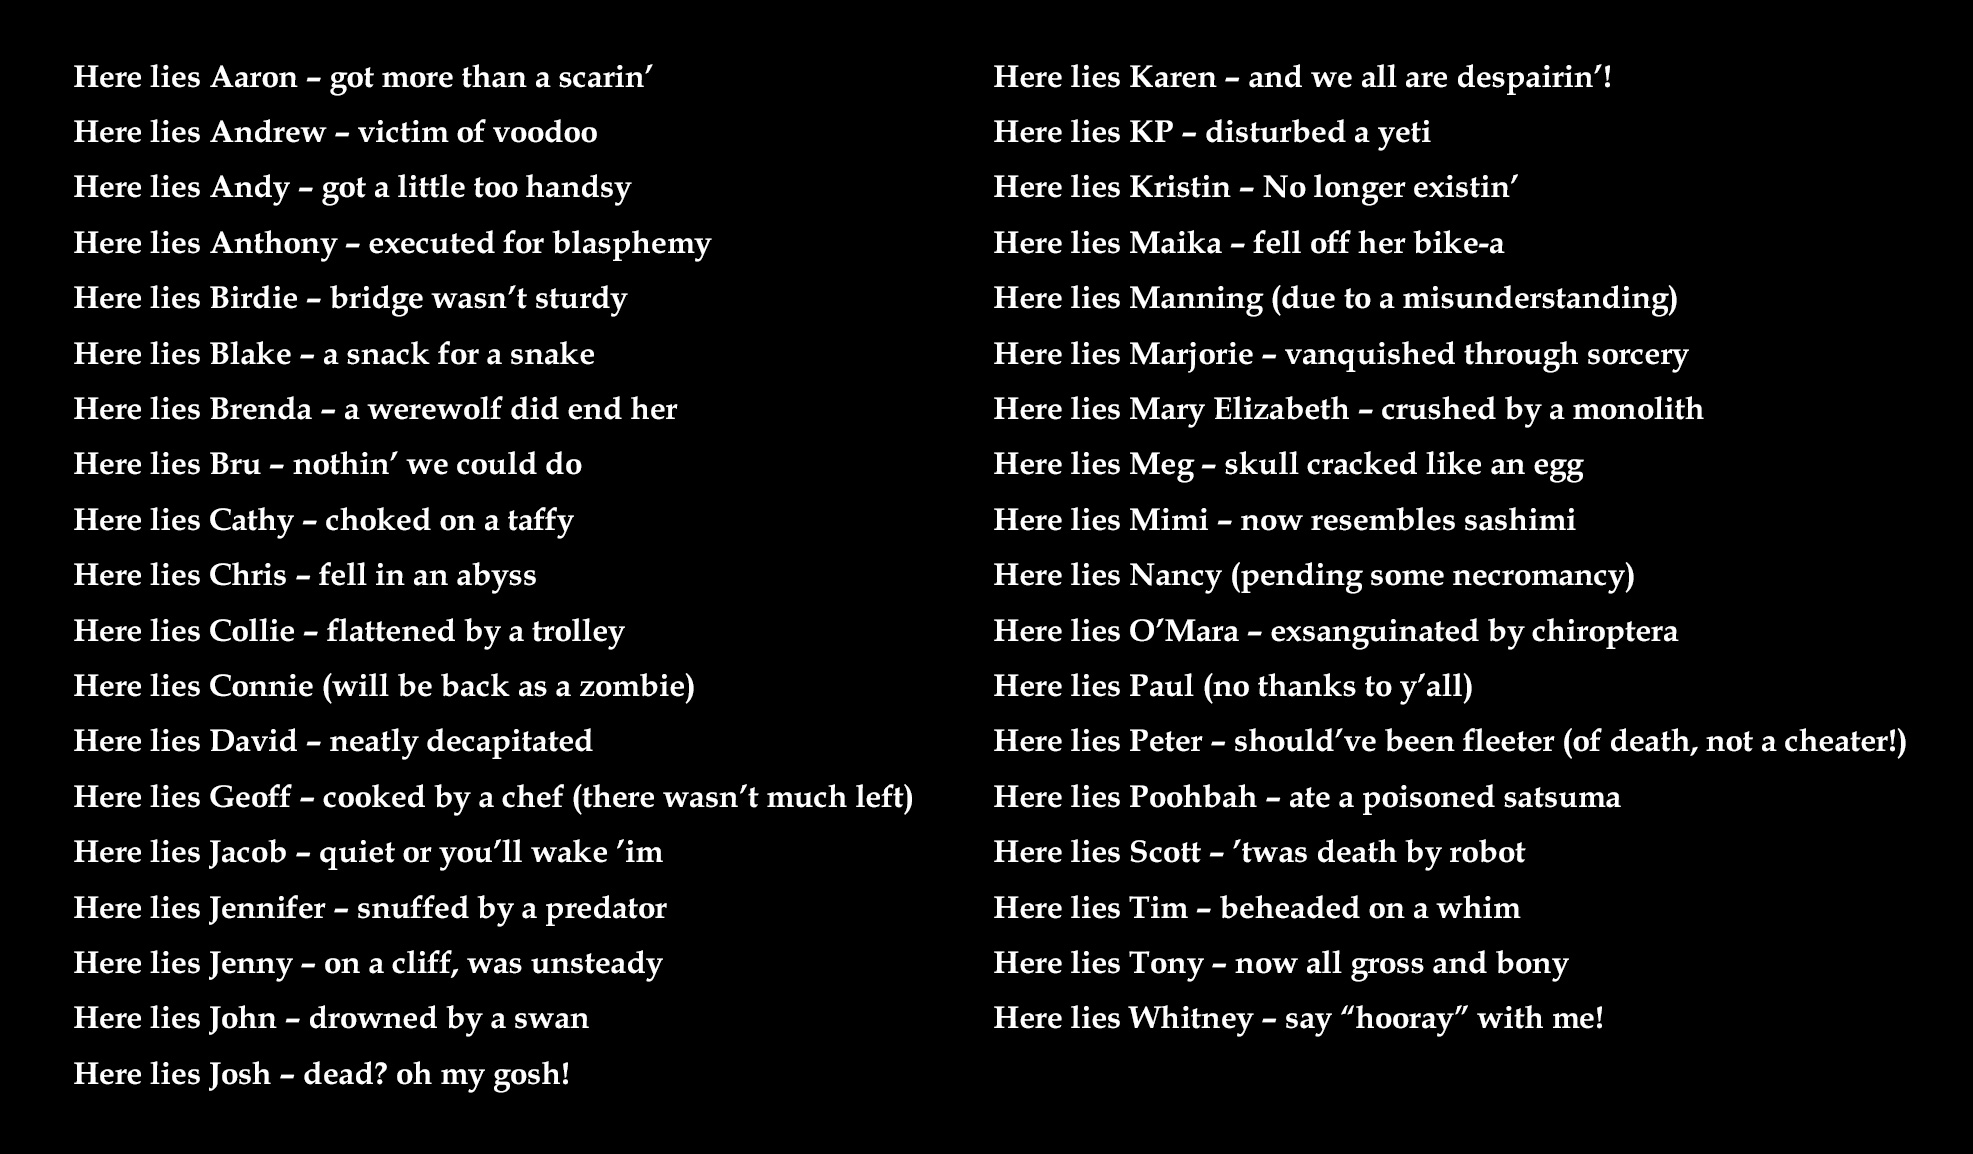
Anyway, writing all the rhymes for the tombstones ahead of time was a really fun endeavour; I’ll post all of the finished ones at the end.
To stand the tombstone in the yard, I bought a bunch of inexpensive metal tent spikes (paid link). Now, if I just taped a tent spike directly onto the back of the tombstone, it would be impossible to hit the spike with a hammer without smashing up the tombstone. So I made up this method: I cut out three strips of foam board, 1″ wide by 3″ long. I taped these together with shipping tape to make a sort of little brick shape, and then I taped the tent spike onto this brick with more shipping tape. I then hot-glued this whole thing onto the back of the tombstone, and added some more shipping tape to secure it. The purpose of the brick of foam board is to give some space between the tombstone and the tent spike, so I have room to hit the top of the spike with a hammer.
So, I hammered the spike into the ground, and this one was done!
Making a large quantity of tombstones
Okay, so that’s the story of one tombstone. In order to keep these quick and cheap, I made up a plan to create a large quantity of them all at once, assembly-style.
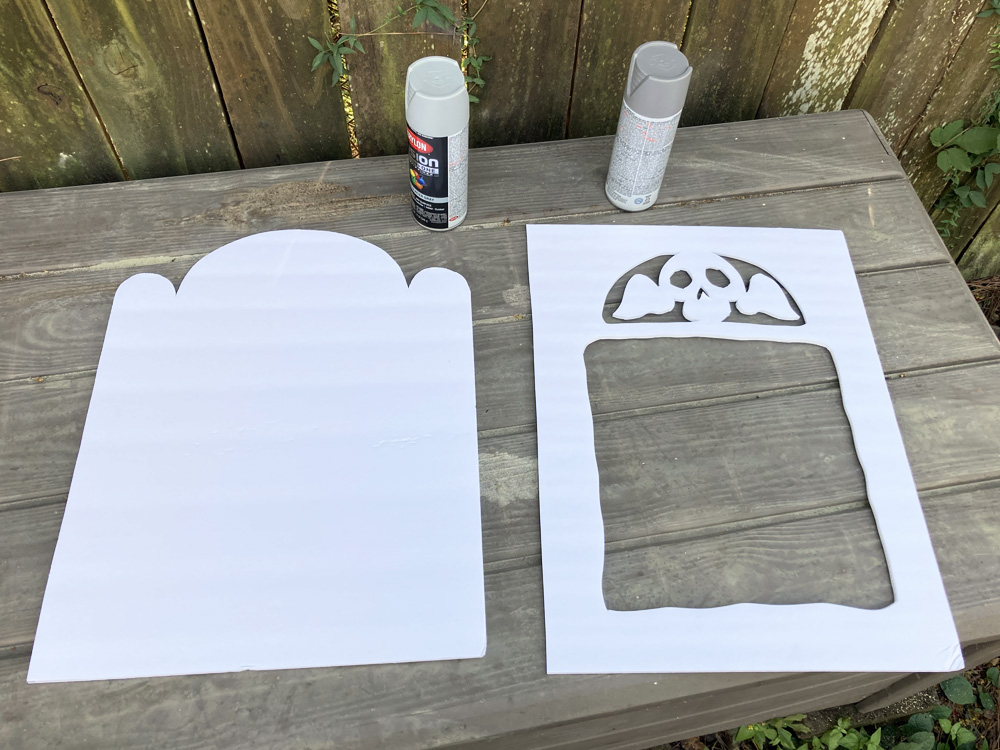
I started by buying about twenty 30″ x 20″ sheets of cheap foam board from the dollar store. Each tombstone would take up half of one sheet, so that’s 15″ x 20″ per tombstone.
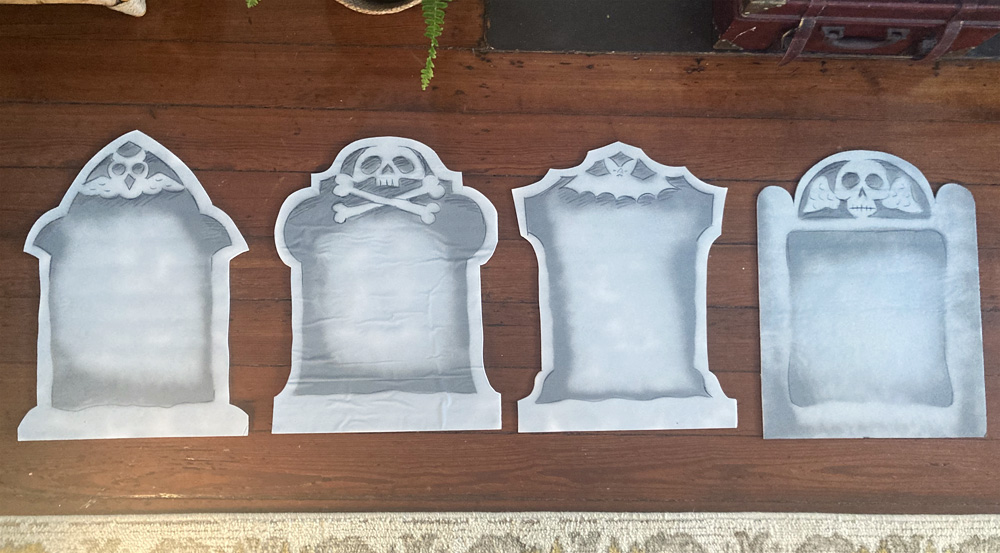
I measured and drew a line down the middle of a sheet of foam board and drew two different tombstone designs on the left and right. I then took two more sheets and drew four more tombstone designs. I cut out these six designs with an X-acto knife, and then traced each design four more times onto two more sheets of foam board — so that’s six designs, five copies each, for thirty tombstones total. Whew! Math.
I then made the stencils using three more sheets of foam board. I just traced my six tombstone designs onto those, and then drew my design for the stencil shapes inside the space of the main designs. I cut these out with my X-acto knife.
Then it was time to paint! Same deal as above; I painted them all light gray, let ’em dry, and then used the stencils for a dusting of darker gray. I used the cheapest spray paint I could find at Lowe’s for all this; about four bucks a can.
Then I did the details with a black crayon, and then the paint marker for the text. And of course the tent spikes in the back. All of this went really quickly; this is the easiest project I’ve done in ages!
Here are four of the six designs:
I don’t have photos of all the finished tombstones, but I do have all the rhymes I wrote for all of them; you can click/tap to enlarge:
Waterproofing
Like I mentioned, these tombstones were just meant for a one-night party in our back yard, so I didn’t have to worry about the weather. If I wanted these to last for a whole month, I’d waterproof the foam shapes before painting.
The quickest method for this would be Flex Seal (paid link); you’d just have to make sure to completely cover the front and the back and the edges. Once that’s dry you can paint over it; the Flex Seal seal website confirms you can paint over most (but not all) of their products. I’ve done this in the past and it works great.
A cheaper method would be shipping tape. You could cover both sides of the foam board with plastic shipping tape, making sure to wrap the tape around the edges, of course. Then paint over that. The downside with this method is that the lines from the tape would be visible on the tombstones when the light strikes them a certain way. Flex Seal would definitely look nicer and protect the tombstones better, but it’s more expensive (and faster!) than whatever cheap shipping tape you can find.
Happy Halloween!
 About Manning Krull
 How to make a 4-foot paper maché alligator
 My violin skull mask, Mardi Gras 2015
 Three-headed paper maché dragon sculpture
Leave a comment