
Paper maché pickaxe and shovel decorations
Published by Manning on October 30th, 2017
I made these here pickaxe and shovel decorations for the entryway into our Egyptian tomb Halloween party. They were super quick and easy! I didn’t need to make them sturdy at all, since they were just for display, and they only needed to last one night, so I was able to cut a lot of corners! I didn’t take any photos of my steps (I was in a huge hurry for all these latest Halloween projects!), but they’re pretty easy to follow; check it out…
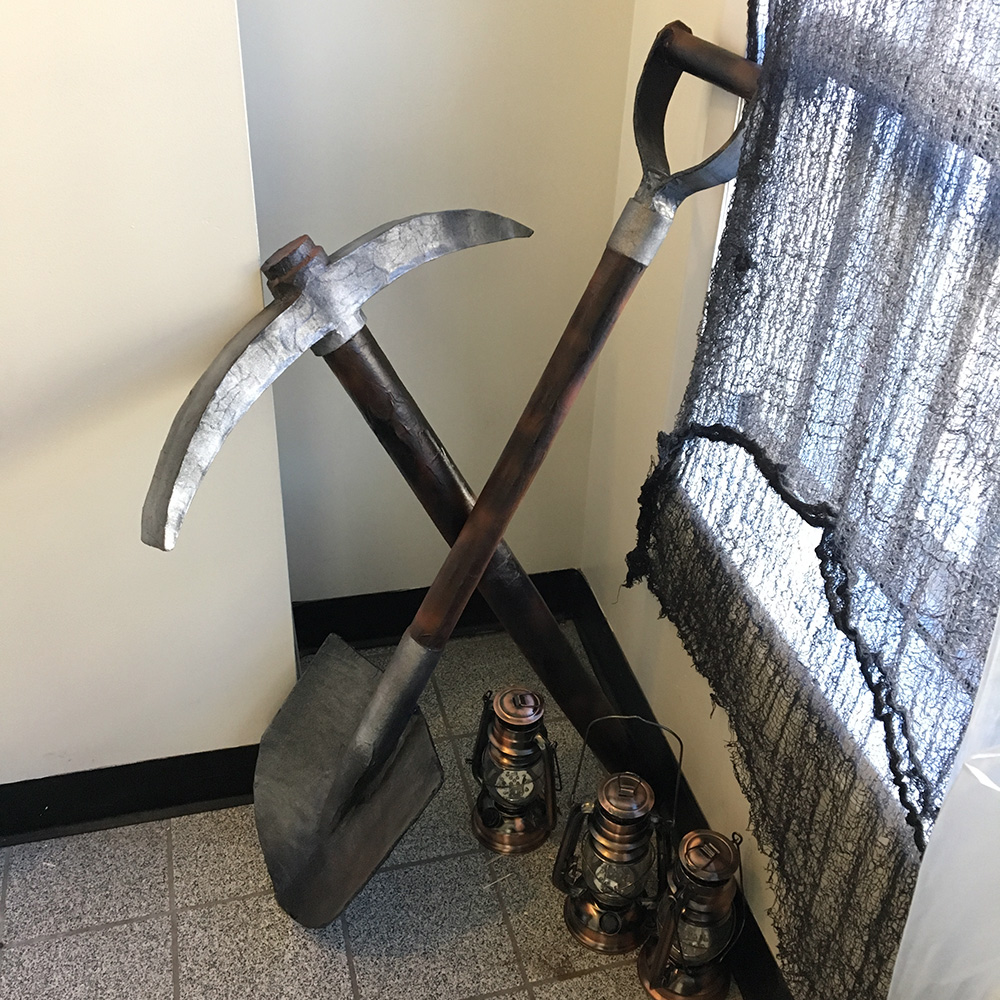
Pickaxe
I started with the wooden handle of the pickaxe; I made this out of a rolled up poster board. The poster board comes in sheets that are 28″ long, and I wanted the pickaxe handle to be about 36″ long, so I cut a second 8″ piece and added it with tape.
Real pickaxes have a handle that flares out a bit toward the blade, and I wanted to try to achieve something like that. I cheated, sort of! Rather than make a real flared tube I simply made a normal tube and flattened it a bit at one end to make it look flared from just the side. To hold this shape, I inserted an oval of foam board at that end, and a circle one at the other end, and taped them in place. This effect is totally fine for a decoration that people will barely see on their way into the party.
I then made the cylindrical sleeve that connects the handle to the blade(?) of the pickaxe. I made this out of a strip of foam board, employing my usual method of curving and bending foam board — I covered both sides in masking tape to prevent it from breaking, and then carefully rolled it up, first in one direction, then the other. I taped this shape in place on the handle.
I made the blade part of the pickaxe from some shapes I cut out from foam board; the sides, top, and bottom of the blade — four pieces for the pointy blade on one side and another four pieces for the flattened blade on the other. I taped all these together with masking tape, and then taped them into place on the handle.
Then I covered the entire pickaxe with one layer of paper maché. You can read all about my paper maché process and materials here. The short version is: I use Roman PRO-543 universal wallpaper adhesive (paid link), and I usually do alternating layers of newspaper and brown wrapping paper, but for this project one layer of paper was fine; it’s really just there to cover all the tape and create a nice consistent surface for painting.

When the paper maché was dry, I took the pickaxe outside and spray painted the whole thing black, and let that set for about an hour.
I protected the blade with newspaper and blue masking tape, and lightly spray painted the handle brown, waited a bit, and then did the same for the blade with silver. I later applied a coating of matte spray — not really to protect the paint job, but to protect my apartment from the paint; whenever you do a light dusting of spray paint, it can easily rub off on things if you don’t cover it with matte (or gloss) spray.
Shovel
I cut the shovel blade out of foam board and used my technique for making foam board curve-able: I covered both sides with masking tape, and then carefully curled up the blade into a nice curved shape.
I made the shovel’s wooden handle out of rolled up poster board, just like for the pickaxe. No flared shape this time.
I built the grip at the end of the handle out of a small piece of rolled up poster board and a few pieces of curved foam board. I taped this stuff in place on the handle, and then wrapped a piece of craft foam around the connection area. I covered this whole area with masking tape to smooth out all the connections.
I taped the blade in place on the handle with tons of tape, and then I added a sleeve of craft foam over and around the connection area.
I then covered the entire shovel with one layer of paper maché and let that dry.
To paint the shovel, I did the exact same steps as for the pickaxe above: black spray paint for the base coat, isolate the wood and metal parts with newspaper and tape, then a light dusting of brown and silver spray paint on the appropriate areas, and finish with matte spray.
The finished pickaxe and shovel looked pretty realistic and worked great as decorations. If you’re looking to make something like this and need it to be more sturdy, like for a prop you’re going to carry around, you can just do additional layers of paper maché; I’d recommend about seven or eight layers.
These props were great for our Egyptian tomb exploration scene, and they’d work for any kind of scene involving mining, or a shed or a barn, etc.
 About Manning Krull
 How to make a 4-foot paper maché alligator
 My violin skull mask, Mardi Gras 2015
 Three-headed paper maché dragon sculpture
Leave a comment