
Cleopatra headdress
Published by Manning on October 31st, 2017
I made this feathered Cleopatra headdress for my lovely fiancée for our ancient Egypt Halloween party in 2017. I neglected to take any pictures of this thing while it was in progress! I was so rushed in the last week leading up to Halloween I just didn’t have time to document my process. But I’ll explain how I made it.
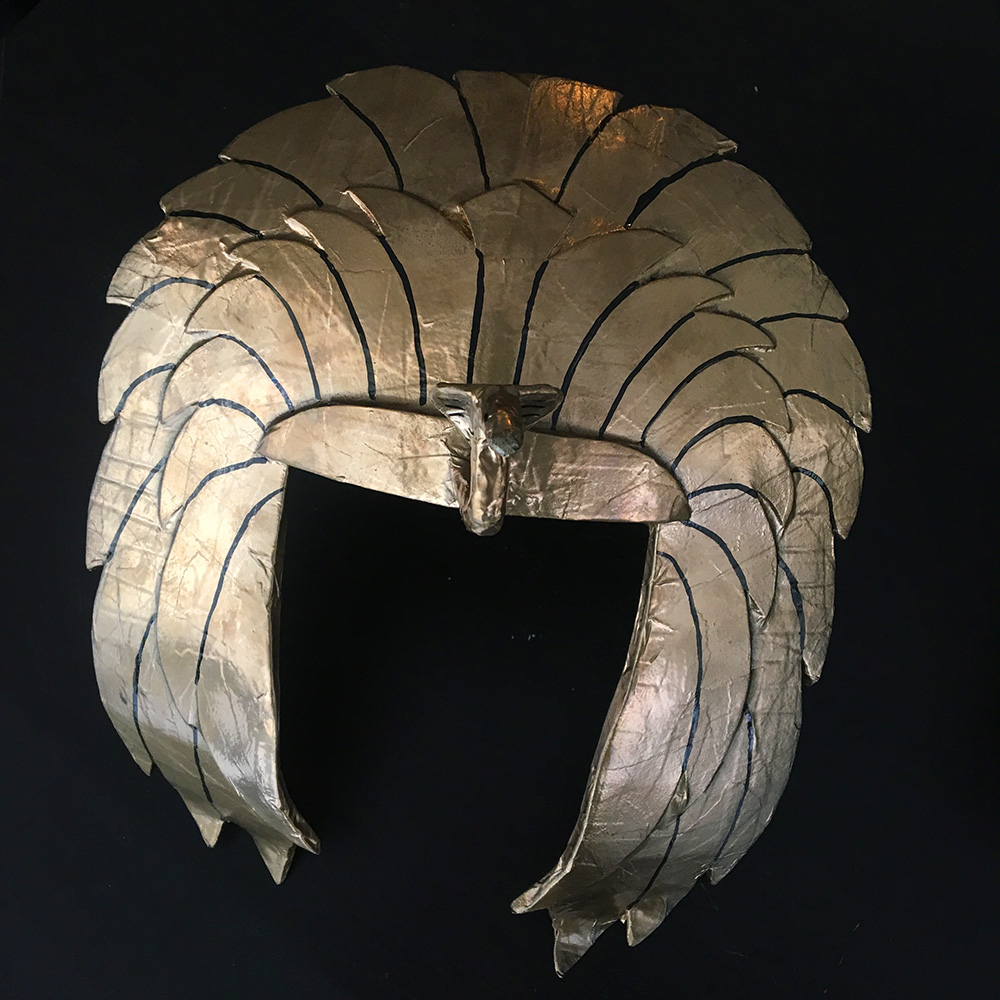
I started by making a sort of headband of foam board, about two inches wide. I measured my fiancée’s head and cut the foam board to be that size, knowing that she’d also be wearing a wig, which would add a little bit more width to her head. I curved the foam board using my usual trick; I covered both sides with masking tape and then rolled the thing up, inch by inch. The masking tape prevents the foam board from breaking or cracking.
I took a strip of strong elastic and taped it into the foam board band with lots and lots of masking tape, and then we checked the headband to make sure it fit; it did.
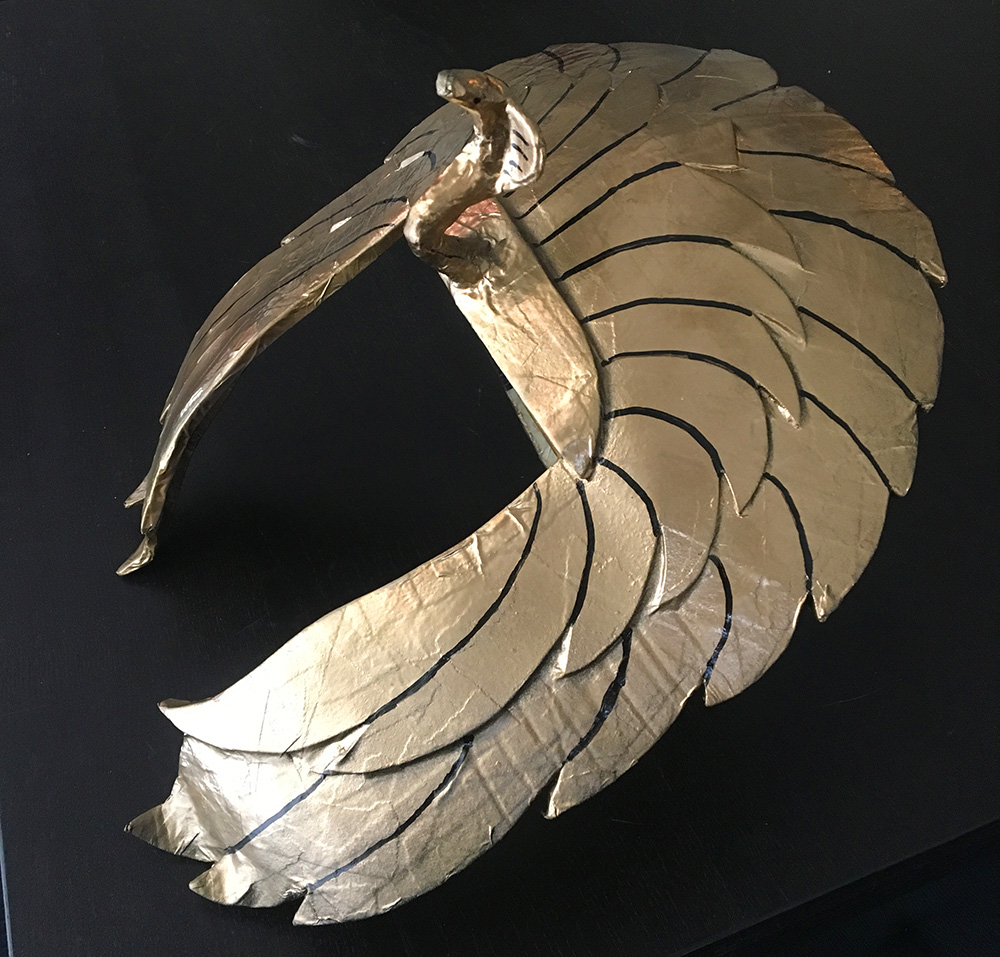
I sketched the feathered headdress shape onto poster board. I’m bad at drawing anything perfectly symmetrical, so I always do the full sketch to get the general proportions right, and then I cut out just half of it, trace that bit, then flip it and trace the other side. Way easier than trying to draw something that’s actually symmetrical!
So, I traced the completed shape onto foam board and cut that out with an X-acto knife. I covered the foam board with masking tape and then carefully curved and bent the shape to give it the contours I wanted. I sliced three thin wedges out of the top to allow that big flat top surface to curve inward and backward a bit, and then I taped the wedge-shaped cuts closed.
I added a second layer of feathers, cut out of craft foam and taped in place.
I added a little headband-like bar in the front, made from a piece of foam board. I cut a round hole in this with my X-acto knife; the hole is where the cobra will go, a few steps later.
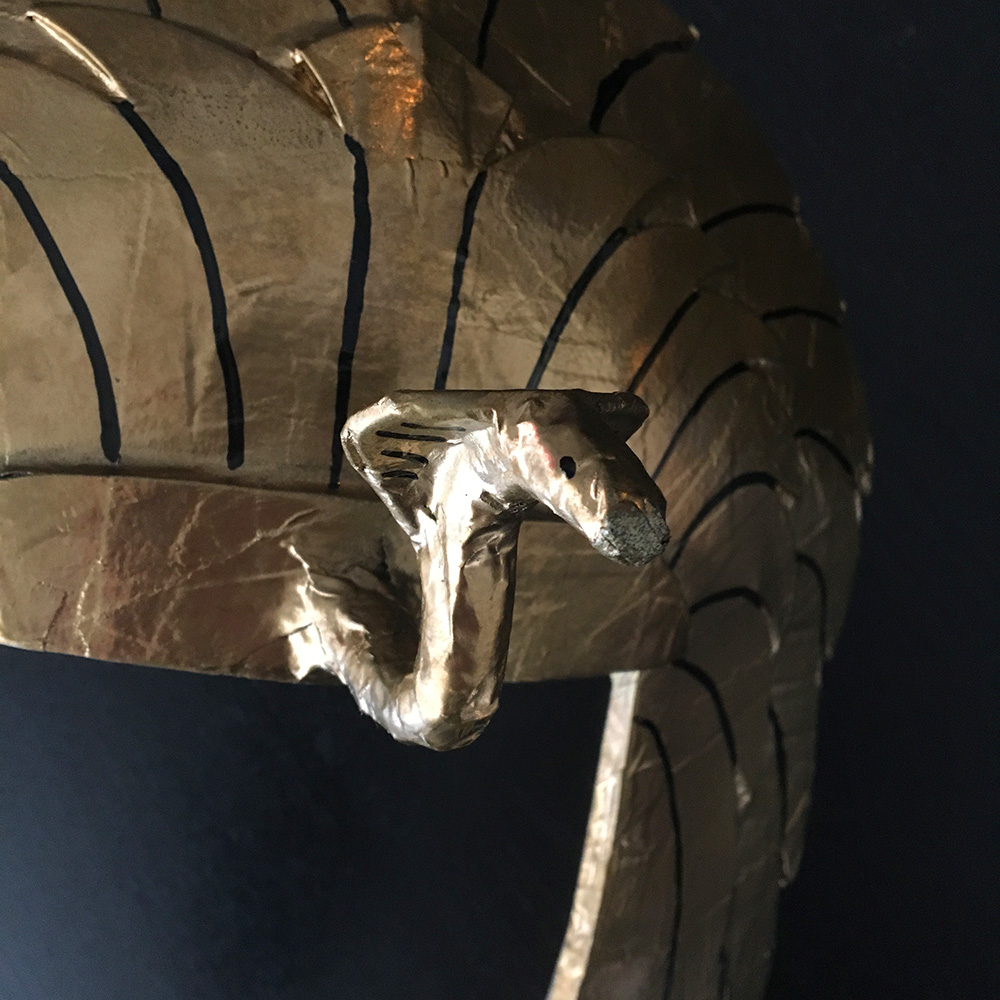
I made the cobra from a leftover piece of a dog leash that I bought at the dollar store when I was making a scythe for my friend’s Avatar of Woe costume (check out the helmet as well). I bent it into the position I wanted and wrapped it in a couple layers of masking tape to hold that shape. I made the cobra’s hood from a piece of poster board and taped it in place. I then cut two small craft foam shapes to tape into the hood to make it thicker. I covered all of that with more tape.
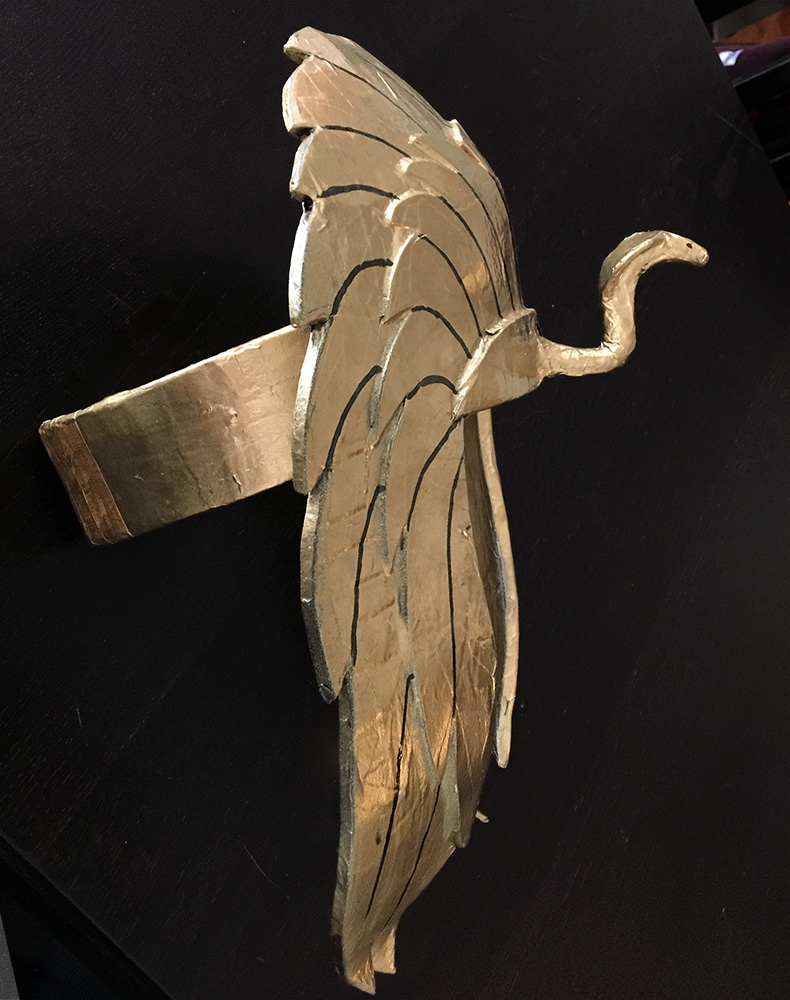
I covered the entire headdress with just one layer of paper maché — no time for more! (You can read about my paper maché process here.) I covered the cobra with a layer of paper maché, then inserted it into the hole in the headband, and then reinforced the connection there with tons of tiny strips of paper maché all around where the body connects to the hole.
Painting
When all the paper maché was dry, I spray painted the headdress black, let that dry, and then spray painted it gold. I then used a black paint marker to draw all the lines for the feathers.
If I’d had a lot more time I would’ve put a bit more work into this headdress: I would’ve done a couple more layers of paper maché to make the thing sturdier, and I would’ve used really tiny strips for the last layer to get the surface as smooth as possible. Also, before painting, I would’ve done a couple coats of gesso to smooth out the surface even more. And rather than using a paint marker to simply draw black lines between the feathers, I would’ve done a more careful paint job with a brush to create some nice shadow effects between the feathers. Anyway, this was all fine for a last-minute Halloween project that only needed to last one night!
Accessorizing
I also made a circular collar to go along with the Cleopatra headdress; I made this out of a few pieces of foam board, cut and taped and curved and covered in paper maché, and then painted. Getting the shape and size of this right took a lot of trial and error! The main pieces are basically two small rectangles that are curved over the shoulders, and then the two curved segments, one for the front and one for the back. The back is sliced down the middle so the whole collar can be opened up to put on. I embedded magnets in the back to close it.
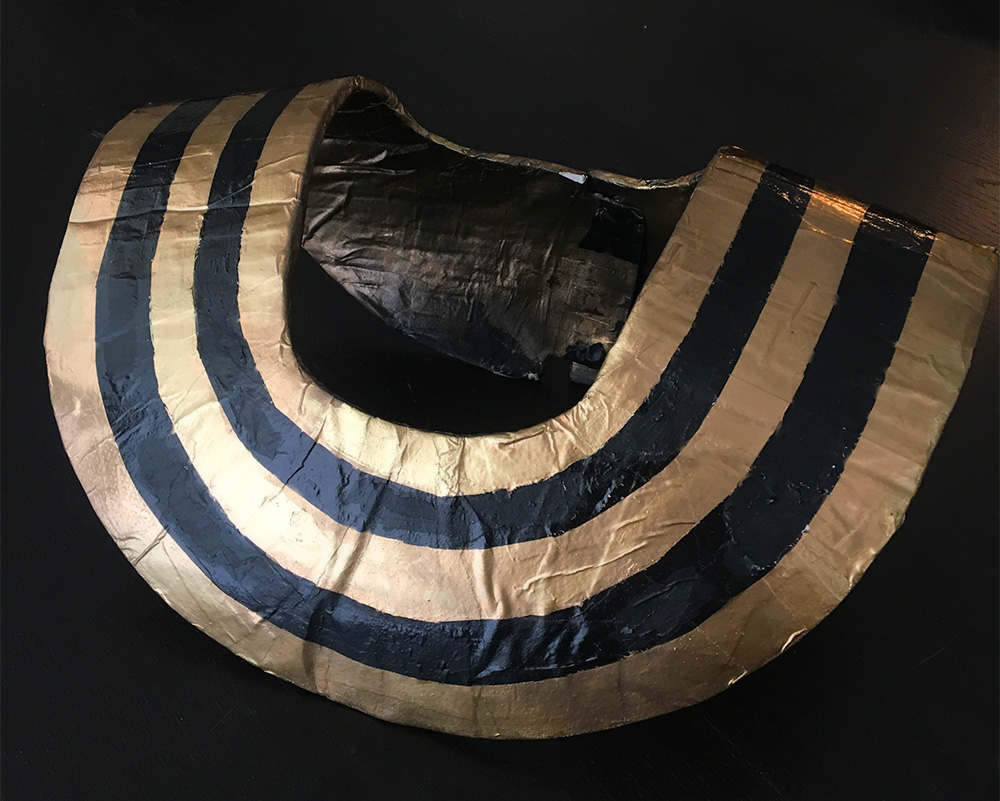
I learned an important lesson on this collar — I only did one layer of paper maché, basically just to cover all the ugly tape and create a consistent surface for painting. That’s enough paper maché to make this piece durable enough, and it’s fine for painting, but it turned out to be a disaster for using masking tape in order to paint the lines. A few days before painting this collar, I painted my big Anubis mask, and I used masking tape to paint the gold lines; I applied lots of tape and newspaper, spray painted it gold, let it dry, and removed the tape. Worked like a charm. But when I did the exact same thing for this collar, using the exact same tape and paint, the tape tore off tons of bits of paper! It was awful! I had to do a lot of repair work by hand with black and gold paint, but the damage is still very visible up close; tons of little areas are rough like torn paper rather than smooth like the nice spray-painted paper maché surface. If this were a commission piece, or something that would be viewed in daylight, I’d re-do the whole thing! There was no time to redo this for our Halloween party, and like I always say, for a piece that’s meant to be worn for only one night and viewed in low lighting, I’m not too worried about it. A coating of gloss spray helped a bit, too.
Anyway, I figured out why the tape and paint were fine on the Anubis mask but a catastrophe on this Cleopatra collar: For my Anubis mask, I used five layers of paper maché, because I needed that big hollow shape to be good and sturdy, and not sag/collapse. (And for a more permanent mask, I’d use at least seven layers.) Those five layers of paper maché bond together into something that’s basically like pasteboard; it’s thick and somewhat solid, and when I peeled the masking tape off, the top layer of paper stayed glued to the rest of the paper, rather than coming off with the masking tape. But for the Cleopatra collar with its one layer of paper maché, the paper only stuck to the foam board and tape a little bit; it didn’t really bond to it completely and it didn’t have enough thickness or strength to withstand the pull of the masking tape coming off, so a lot of the paper came with the tape instead of remaining on the base.
So now I know: one layer of paper maché is fine for a quick project like this if I’m only doing spray paint or hand-painting with a brush, but if I know I’m going to want to use masking tape for the paint job I’ll need at least four or five layers of paper maché to create a strong enough surface.
Along with this collar I also made a pair of simple gold bracers to go on my fiancée’s wrists (pics coming soon). I made these with foam board, cut to size and covered in masking tape and curled up. I taped them closed, essentially making a tapered tube, and covered them with one layer of paper maché. When the paper maché was dry I sliced open the seam where the ends of the foam board met, and the bracers retained their tube shape nicely thanks to the hardened paper maché. I used a tiny bit more paper maché to cover up those exposed edges. When dry, I simply spray painted the bracers gold.
The finished bracers don’t close in the back; they just stay curved onto the wrists, and they’re a little bit flexible so they’re easy to put on and take off.
I also made a gold belt in basically the same way: foam board, masking tape, curl it up, add paper maché, paint.
I need to track down some photos of my fiancée actually wearing all of this stuff! I’ll add those asap.
 About Manning Krull
 How to make a 4-foot paper maché alligator
 My violin skull mask, Mardi Gras 2015
 Three-headed paper maché dragon sculpture
November 7th, 2018 at 8:40 am
Do you have any pictures of someone wearing it? I’m malingering it for a school project and it looks a little difficult…
November 7th, 2018 at 8:41 am
Making*
November 7th, 2018 at 12:45 pm
Hi Jhalak! I don’t have any more pics, I’m afraid! I was in such a rush that Halloween I didn’t have time to take pictures of a lot of our projects. This was one wasn’t very difficult, and I think you could even skip the paper mache (which is the slowest/messiest part) and just carefully cover the whole thing in shiny tape before painting. Good luck!