
Experiment time: paper maché versus plaster cloth
Published by Manning on January 13th, 2019
I’ve always used paper maché for my big masks and sculptures, and although I really enjoy the paper maché process it can be very time-consuming. A friend of mine mentioned that she recently tried plaster cloth — aka plaster wrap, plaster of paris strips, craft wrap, etc — and she said it saved her a ton of time. She’d made a couple Halloween masks with the stuff and they definitely looked great; she said she was so happy with the results that she’d never go back to paper maché. Huh! I was skeptical, but intrigued.
I was curious if I’d enjoy working with plaster cloth, and what the results would be like in comparison to paper maché. I was mainly curious about: the amount of time I might save, what the resulting strength and weight would be, and what the texture would look and feel like. I decided to do an experiment with some small pieces before committing to doing a whole big mask with the stuff. The specific product I happened to buy for this experiment was Activa Rigid Wrap plaster cloth, 4″ x 180″ (paid link).

Here are the things I wanted to try for this test:
• Conduct a test involving multiple copies of a curved shape
• Compare various amounts of layers of paper maché and layers of plaster wrap
• Compare the strength of the finished pieces
• Compare the weight of the finished pieces
• Compare the look and texture of the finished pieces
• Consider the cost differences for a project made with one material or the other
Shape
I decided to use wine bottles as the base for the shapes I’d be creating for this experiment. I wanted something curved, because curved shapes are always stronger than flat shapes. Making multiple copies of something curved would mean I could try various stress tests on them and see how these materials would hold up in an actual mask or sculpture; more on that coming up.
I prepared the bottles by doing the following: First, I wrapped a piece of white paper onto each bottle, and taped it in place. I then used a marker to draw a large rectangle on each one; this would be my target area to cover, so all the finished pieces would be pretty much the same shape and size. I also labeled the bottles with “PM” for paper maché and “PoP” for plaster of paris, and I noted how many layers I would be doing for each.
I then covered the white paper completely in strips of clear shipping tape. My hope was that the test pieces would be fairly easy to lift off of the tape. I know from lots of previous projects that this kind of tape works well as a release agent for paper maché, but I didn’t know if it would work well for the plaster cloth.
Layers
Some background: For my paper maché masks, I usually do at least seven layers of paper, and on decorations with a shorter lifespan I often use about three to five layers. Each layer of paper maché on a big mask usually takes me between one and two hours. I often do two layers in a row and then let them dry for 12-24 hours (depending on the weather and humidity) before continuing.
I’d read that plaster cloth dries much faster, so that was an attractive idea, and I wondered if it would require fewer layers because it’s much thicker than paper. If I can use this stuff for future masks, I wondered: how much work time and drying time could I save?
So, for this experiment I decided on setting up six wine bottles — three for paper maché and three for the plaster wrap. For the paper maché I’d do tests with 4 layers, 7 layers, and 10 layers. For the plaster wrap I’d do tests with 1 layer, 2 layers, and 3 layers.

Applying the paper maché to the bottles was easy; I could do this stuff in my sleep! You can read about my paper maché process and materials here; he short version is: I use Roman PRO-543 universal wallpaper adhesive (paid link) and alternating layers of newspaper and brown wrapping paper.

I did all the layers in one session and let them dry for 24 hours; this is enough time in my hot dry apartment — it’s currently wintertime and my fiancée has the heat blasting — but that might not be enough drying time under different circumstances, especially if the weather is humid.
I set up a plastic bowl of warm water for the plaster cloth, and I cut the cloth into 6-inch strips; 6 of these for the three bottles. I laid a strip in the water for just a couple seconds, then wrapped it onto the bottle and smoothed it out with my hands. This was pretty easy; the strips got wrinkled/folded a few times as I was laying them in place, but it was pretty easy to pull at the corners and stretch out any bumps. Applying the plaster cloth is definitely much much faster than applying paper maché. It also dries much faster; everything felt dry to the touch just an hour or two after applying.
Mess and cleanup
I’m experienced enough working with paper maché that there’s little or no mess; the wallpaper adhesive I use is thick enough that I almost never drip any of it anywhere, so my work space usually stays pretty clean.
With the plaster strips, just taking the roll out of the packaging left plaster dust all over my counter, and then cutting the strips with scissors created a lot more dust. Applying the strips with the bowl of water caused lots of watery plaster to drip everywhere. And I read that you shouldn’t dump the bowl of water down the drain when you’re done, so I had to bottle it and throw it in the trash. So, I’d definitely say the plaster cloth is much messier and less convenient to work with than paper maché.
Cutting out the finished shapes
When all six bottles were 100% dry, I cut through the tape at the edges of the white paper with a box cutter, and carefully removed the paper maché and plaster wrap shapes. I carefully peeled the tape off of the back of the shapes, leaving just the paper maché and plaster cloth. Both the paper maché and the plaster cloth were easy to separate from the shipping tape.
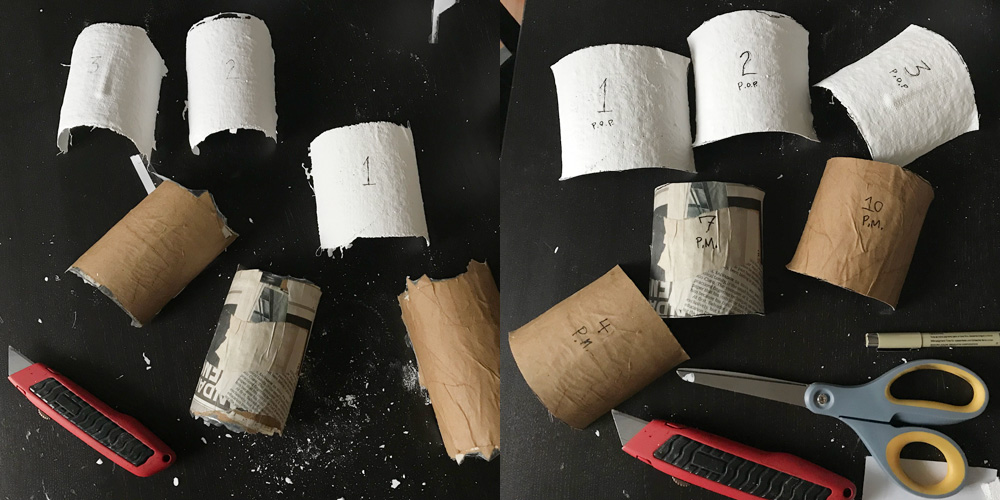
I cut out a rectangle of paper — a little smaller than the first rectangle I drew on all the bottles — and traced this onto all six curved shapes with a marker. Tracing this outline helped me cut out all the shapes at exactly the same size. I cut them all out with scissors. The thicker pieces of both the paper maché and plaster cloth were somewhat difficult to cut with scissors; the 3 layers of plaster cloth was about as hard to cut as the 7 layers of paper maché.
Comparing strength
I took each curved shape in my hands and gently pulled the edges outward, to get a sense of what kind of resistance there was. I also sat the shapes down, curved side up, and gently pressed down in the middle to see how much give they had. The shape that’s 7 layers of paper maché was my benchmark, as most of my masks are exactly that.
The 1-layer plaster piece was very delicate and crumbly; I could feel it wanting to break apart in my hands. The 2-layer plaster piece felt flexible but somewhat sturdy. The 3-layer piece felt a little less flexible and a little more sturdy.
The 4-layer paper maché piece was pretty flimsy, but not at all fragile-feeling. The 7-layer paper maché piece was a little bit flexible and felt pretty sturdy. And the 10-layer paper maché was very hard, almost like a thin piece of wood. 10 layers is definitely overkill for most projects!
Interestingly, the 3-layer plaster piece and the 4-layer paper maché pieces felt remarkably similar! So maybe 3 layers of plaster cloth could be a good substitute for 4 layers of paper maché. That would take so much less time to do! However…
Comparing weight
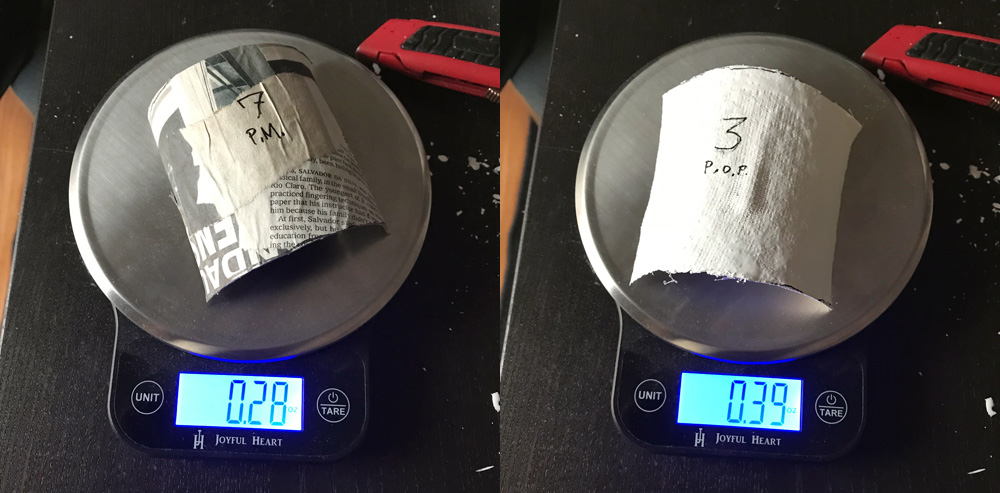
I weighed all the finished pieces on my little digital scale; here are the results:
Plaster cloth, 1 layer: 0.14 oz (4.0 g)
Plaster cloth, 2 layer: 0.28 oz (7.9 g)
Plaster cloth, 3 layer: 0.39 oz (11.1 g)
Paper maché, 4 layers: 0.18 oz (5.1 g)
Paper maché, 7 layers: 0.28 oz (7.9 g)
Paper maché, 10 layers: 0.42 oz (11.9 g)
The plaster cloth is much heavier than the paper maché. Remember I said the 3-layer plaster piece and the 4-layer paper maché piece felt about the same in terms of sturdiness? The plaster one is more than twice as heavy as the paper one!
Appearance and texture
The plaster cloth feels much more fragile than the paper maché; even at basically the same strength, if you apply a lot of pressure to the paper maché it just bends; it never feels like it’s going to break. But these thin plaster pieces area pretty easy to crack just by bending them a bit. Working on a dark-colored surface, I noticed the cut edges of the plaster cloth kept dropping plaster dust everywhere. The paper maché just feels stronger overall.
Thoughts about cost
I wanted to gauge the cost difference if I were to (theoretically) make the exact same mask twice, once with paper maché and once with plaster wrap. It’s hard to be very accurate in calculating how much of any material I use on a given project, but here are some estimates.
For paper maché, the paper itself is free or almost free; of course I use newspaper and paper bags, and sometimes cheap craft paper that’s just a dollar a roll — and a mask takes less than one roll. So I consider the cost of the paper to basically be negligible. However, the wallpaper adhesive I use costs about $20 a gallon, and I think I use about a quarter of a gallon on one medium sized mask, so that’s about $5 of paste for a completed mask. Not bad!
The roll of plaster cloth I bought was 4″ by 150″ and cost $6. I estimate that a roll this size would be enough for one layer on a medium-sized mask, meaning I’d need multiple $6 rolls — at least three — to do the required amount of layers to complete a mask. There are some cheaper options and bulk options for the plaster cloth, but I think it’s safe to say using plaster cloth for a mask would cost a good deal more than paper maché. Still, if it saves me a lot of hours/days, it could be worth it!
(Of course none of this includes all my other costs for a basic mask — the base materials, hard hat, screen material, paint, etc.)
Conclusion
After all of this, the only advantage I can see for using plaster cloth over paper maché is the speed of applying it. Other than that, it’s much more expensive, much heavier, much more fragile, and makes a way bigger mess. I’m not sure the time that I’d save could outweigh all of these drawbacks.
Idea: combining paper maché and plaster cloth
After this experiment, I’m thinking the optimal solution for quickly making a mask might be starting with 2 or 3 layers of paper maché — to create a sturdy interior texture that won’t be prone to crumbling — and then 3 or 4 quick layers of plaster cloth — to build up a lot of thickness and stability in one quick session — and then finishing with another 2 layers of paper maché for texture. The end result would weigh more and cost more than paper maché alone, but I think the time saved alone would be worth it! I’ll do a test of this soon and post my results!
Update!
I came back to this a few days later and did a test of a plaster cloth and paper maché combo. I took the 3-layer piece of plaster cloth that I’d made previously, and I applied two layers of paper maché over the whole thing, on both sides — so basically four layers of paper.
As I pretty much expected, the combination of three layers of plaster cloth and four layers of paper ended up feeling nice and thick and sturdy, somewhere between the strength of the 7-layer piece of paper maché and the 10-layer piece. Definitely thick enough and strong enough for a big mask, but with all the same drawbacks of plaster cloth that I outlined above — it weighs much more than the 10-layer piece of paper (0.60 oz! compared to 0.42 for the 10-layer paper piece), and of course the cost of working this way would be much higher than working with paper maché alone. However, once again, the main benefit here for a big project would be a huge amount of time saved.
One additional problem I hadn’t considered: Like I mentioned above, working with the plaster cloth created lots of plaster dust, and then lots of tiny crumbly bits when I cut it with scissors. The cut edges continued to crumble when I handled the piece to apply the paper maché, and that meant that as I worked on the thing with all this paste sliding around I could feel lots of sandy-feeling bits in the paste. These little grainy bits were spread around the surface of the paper maché as I worked on it. After finishing the first layer of paper maché , I tried to wipe off these grainy bits with my hands before continuing with the second layer, but as I worked on the second layer I could still feel some of them sliding around in the paste as I worked on it.
Now that the finished piece is dry, if you run your hands over the surface you can feel these grainy bits here and there. If I were to paint this piece I’m sure you’d see the grainy bits stand out in the paint job. This totally wouldn’t matter for some types of projects — like something that’s meant to have a rough texture anyway — but it might be really frustrating in other projects where you’re trying to achieve a smooth texture and want people to be able to look closely at fine details. For example, if it were a giant mummy mask, who cares! The more gritty texture the better. But, for example, for a smaller sculpture of a person with lots of painted details, any tiny bumps in the texture might be very visible and could end up being a big disappointment.
I still want to try a big mask project with a few layers of plaster cloth in between my layers of paper maché! I really want to see how strong the “walls” of a big mask feel when made of these materials together; I’m curious how a big shape like that would react to gentle pushing or pulling. I’ll post my results whenever I have a chance to try it…
 About Manning Krull
 How to make a 4-foot paper maché alligator
 My violin skull mask, Mardi Gras 2015
 Three-headed paper maché dragon sculpture
May 29th, 2022 at 9:10 pm
This was really helpful for me as I’m trying to figure out which material to use for an upcoming project. Thanks!
December 1st, 2022 at 9:06 pm
So I’m looking into doing a custom headlight cover, but I was thinking of using plaster cloth to make a basic cover, than using it to make a fiberglass version. Would this be strong enough to hold as a mold for fiberglass/composites?
December 3rd, 2022 at 2:48 pm
I think so, if you do a lot of layers of the plaster cloth, like at least six. Should take no time and dry nice and solid. Good luck!
March 23rd, 2024 at 9:18 pm
This is a fantastic post because I have exactly the same question. I make figures from paper cache and they take ages so was wondering about using plaster bandages. But after reading your post I’m sticking with paper mace. I use flour and water glue so they are practically free – using found newspapers on the buses. I also love the strength and lightness of the finished product plus it’s a fairly environmentally unharmful end product. In fact yesterday for the first time in stead of leaving to dry naturally, which really takes about 24 hrs in a warm room for it to be truly hard, I used a hairdryer and it was dry in one hour so even the time need not be a factor. Many thanks for your help with this.
March 27th, 2024 at 9:43 pm
Hi Susan! Yeah, after that experiment a few years ago I thought I might use the plaster cloth for certain projects, but I’ve actually never used it again, not even once! I’m sticking with paper mache for everything.