Experiment: using paper maché in place of a hard hat for big masks
Published by Manning on May 20th, 2019
I wrote way too many words about this! So I’ll start with a short version, and then you can read the rest for more details if you want:
The short version
I mount most of my big masks on a hard hat. Hard hats are almost perfect for this because they’re stable and comfortable, but they’re also somewhat heavy and very hard to cut. The suspension inside (that’s the rigging/straps/padding) is all I really need, but there’s no easy way to attach just the suspension into a mask without the big plastic shell of the hard hat. I came up with this method to make my own structure to attach the suspension to, using foam board and paper maché.
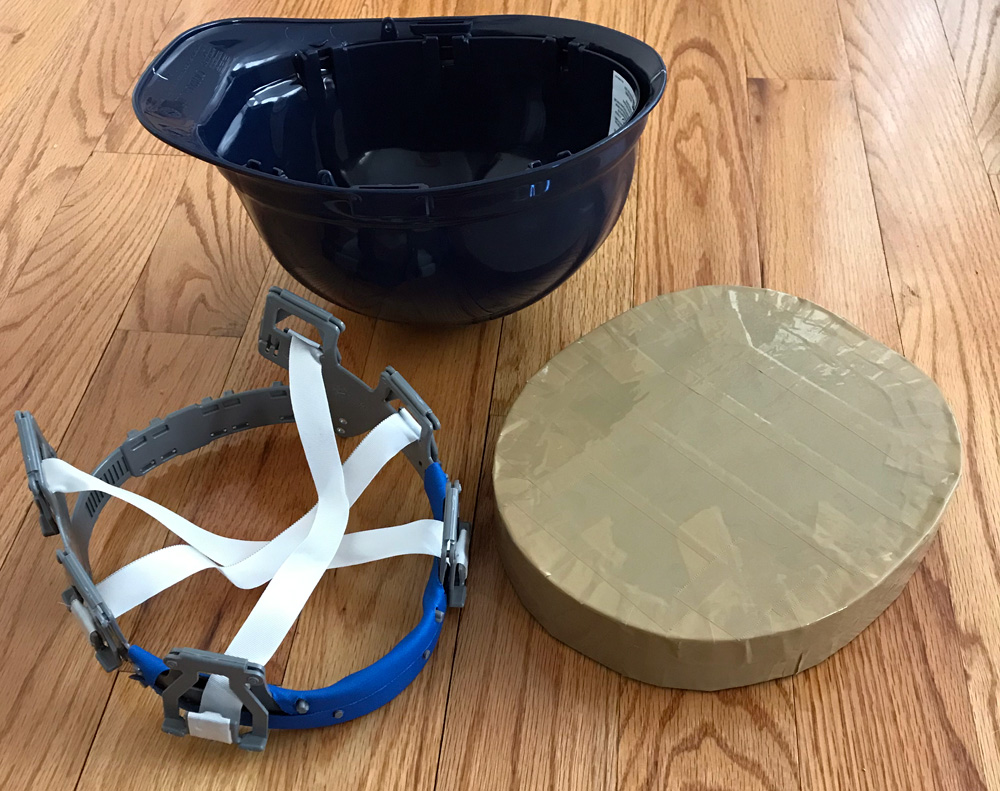
I bought a cheap hard hat just for the suspension, and then I built an oval-shaped box that’s the exact same size as the interior edge of a hard hat. I used this box as a sort of mold; I wrapped a strip of foam board around the box to make it take on the correct oval shape, and then I applied paper maché around the foam board strip, and when it was dry I removed the box and was left with a perfect, solid oval shape to attach the suspension to. I then glued and paper-mache’d the suspension into this band, and voilà: a sturdy and somewhat lighter alternative to working with a big plastic hard hat shell, and it’s also easier to attach inside a mask than a hard hat would be.
However, the results weren’t very dramatic; the finished piece was only a little lighter than a modified hard hat. So this was fun to try, but not something I’ll keep doing for all my masks in the future.
Okay, now then…
The long version!
Like I mentioned above, I’ve used hard hats in at least a dozen of my big paper maché masks, and they’re great because they offer perfect stability on the wearer’s head, they’re padded and very comfortable to wear, and they’re adjustable to fit different head sizes — this is particularly important when I’m making a custom mask to send to a client.
However, I’ve come to discover there are a few downsides in working with hard hats for masks:
• The biggest downside is that hard hats are bulky, and they usually need to be cut and modified in order to fit correctly in whatever mask I’m making. I find in almost all my masks the brim of the hard hat gets in the way, so I have to saw it off. Often, the hard hat is too tall — there are a few inches of empty space above your head inside the hard hat. So I end up cutting the top dome off of the hard hat a lot of the time as well. I use a dremel tool and a small hand saw for all this cutting and sawing, and it’s a lot of work. It’s time-consuming, it creates a ton of messy plastic particles, and it’s extremely noisy work — you might not care about this last bit, but I do; I live in an apartment with an outside terrace, and sawing a hard hat is so noisy that my neighbors across the street always come out onto their balconies to see where the noise is coming from. It’s a little embarrassing!
• Another minor downside is that the plastic that hard hats are made out of is heavy, so using a hard hat means adding a lot of unnecessary weight to your mask. Cutting away as much of the plastic as possible helps with this. But again, cutting this plastic is a drag, and it’s step that I’d love to be able to skip. Even leaving the minimum amount of plastic in place to attach the suspension to still makes for a significant amount of weight.
• Another minor downside is that the plastic that hard hats are made out of is so hard and non-porous, it’s difficult to get other materials to stick to it. All of the adhesives I work with — paper maché, hot glue, Gorilla Glue, etc — tend to not stick very well to this plastic, and I have to find different weird workarounds to lock the hard hat in place in the mask. Scoring the plastic with a knife can help a bit, or punching holes through the plastic and anchoring something in there. Anyway, even when I’m successful, I’ve seen the hard hat start to become disconnected after a year or two in some of my earlier masks where I just glued the hard hat in there with Gorilla Glue.
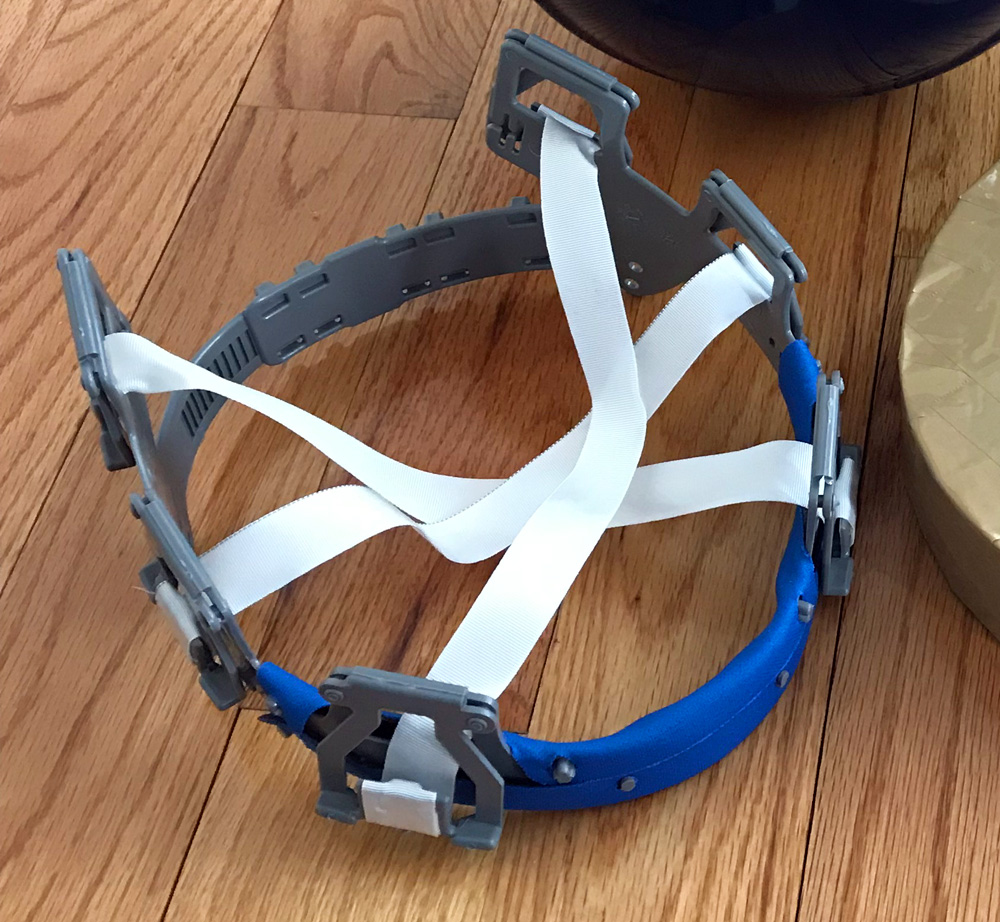
Anyway, what I’ve realized is that all the benefits of using a hard hat actually come from the suspension inside — i.e. the rigging; the padding and the adjustable straps — and not at all from the plastic shell of the hard hat. The outer shell is almost completely unnecessary to the mask. However, the suspension itself is not rigid, so it needs to be securely attached to something solid all the way around, and that’s why the shell of the hard hat is important; the shell has slots where the suspension is inserted, and this holds all the points of the suspension at the right positions so the whole thing is very stable. Without the shell of the hard hat, the suspension isn’t solid or stable at all, and there’s no easy way to attach it inside a mask.
So, I decided to try to come up with a reusable solution that would let me build a paper maché shape to replace the shell of the hard hat, just for the purpose of attaching the suspension the same way that the plastic shell does. This way I could continue using the suspension/padding/straps in all my masks, but I could skip the bulky, heavy plastic and all that sawing and mess and noise. My hope was that this solution would be smaller and more lightweight, although I was prepared to have to spend a bit more time on it.
Having worked with paper maché so much, I was confident I could build a sturdy paper maché band on a base of foam board that would perfectly mimic the interior of a hard hat shell, so I could attaching the suspension into this band and never need a hard hat again.
I did some research to see if I could buy a hard hat suspension by itself, without the plastic shell, but I learned that, for whatever reason, buying just the hard hat suspension is more expensive than buying a cheap hard hat that comes with a suspension. So for this experiment I just bought the cheapest hard hat I could find (about $6) and planned to discard the plastic shell later, or hopefully find another use for it in another project. So I’m fully aware of how dumb it is that this project with the goal of skipping the hard hat starts with… buying a hard hat.
Building a base for the band
In order to make a paper maché band that perfectly replaces the hard hat, I had to start by building a reusable solid shape to build that band around.
I used the hard hat shell as a guide to draw an oval shape that matched the interior edge — I wanted to draw a shape that would mirror the area where the six connection points for the suspension are.
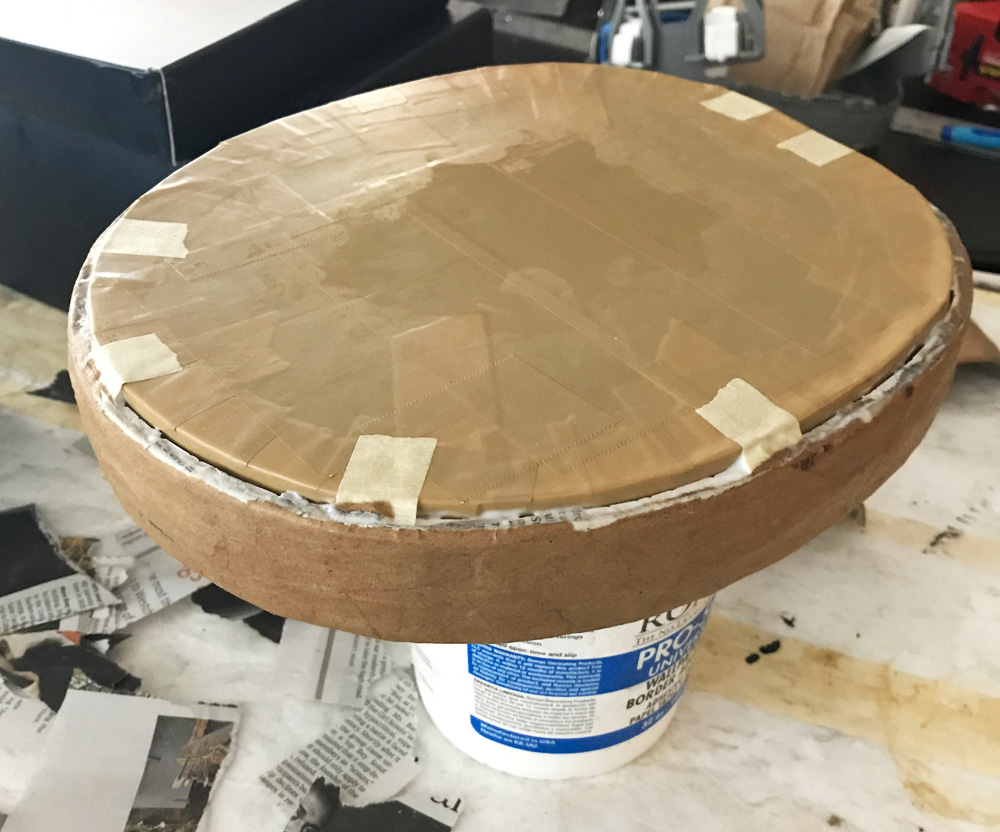
I drew this oval shape on scraps of cardboard through a few rounds of trial and error, and when I got the shape just about perfect I then traced it onto foam board, twice, and cut those shapes out with an X-acto knife. I used these two ovals to build a solid box-like shape by taping little foam board supports in between them. (See my article about my technique for making box shapes out of foam board.) I wrapped a strip of poster board around the edge of the base to create an outer wall, and I connected everything with masking tape. When this shape was done, I covered it completely in brown shipping tape. The shipping tape is there to act as a release agent for the paper maché I’ll be using; it’ll prevent the paper maché from sticking to it too much in the following steps.
My base for the band was done! Finally, I could use this base as a sort of mold to make the actual band that I’d use in a mask.
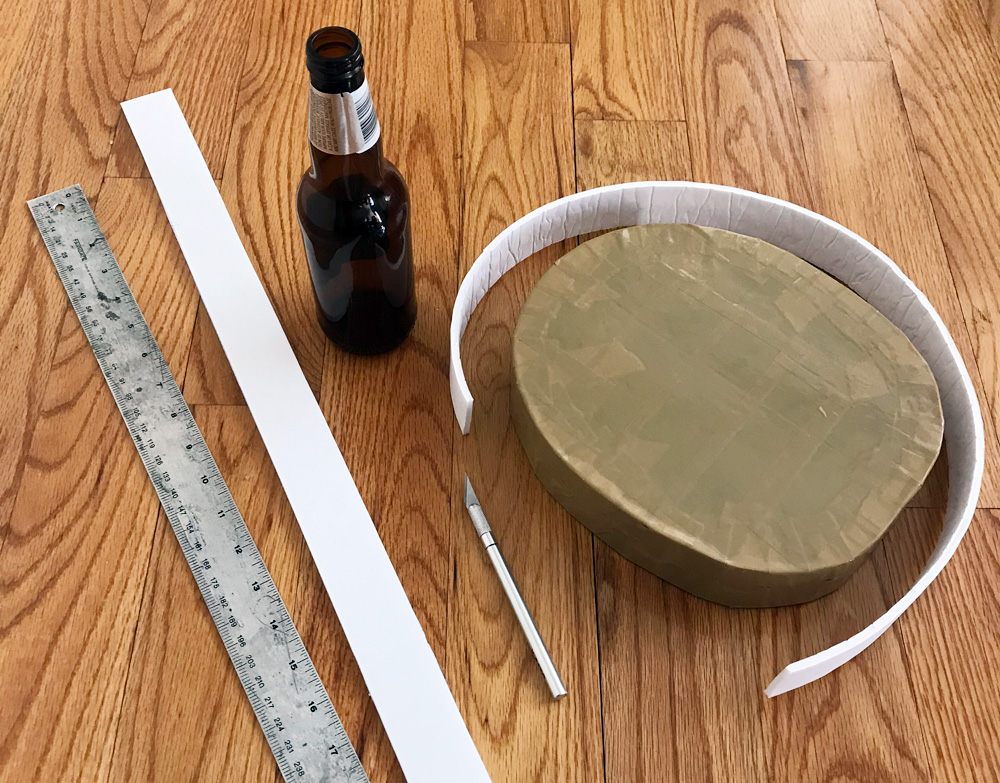
I cut a long strip of foam board, 1.5″ wide by 30″ long. I then did a few things to curl this strip; first I carefully wrapped it around a bottle to curl it up a bit, and then I removed it from the bottle and worked the whole thing through my fingers bit by bit, crunching up the foam and curling it up more.
When this strip was done, I wrapped it around my base and saw that it wasn’t quite long enough to reach all the way around, so I made a second curled strip and taped it to the first one with shipping tape. I trimmed this long strip to be the right length to go around the base.
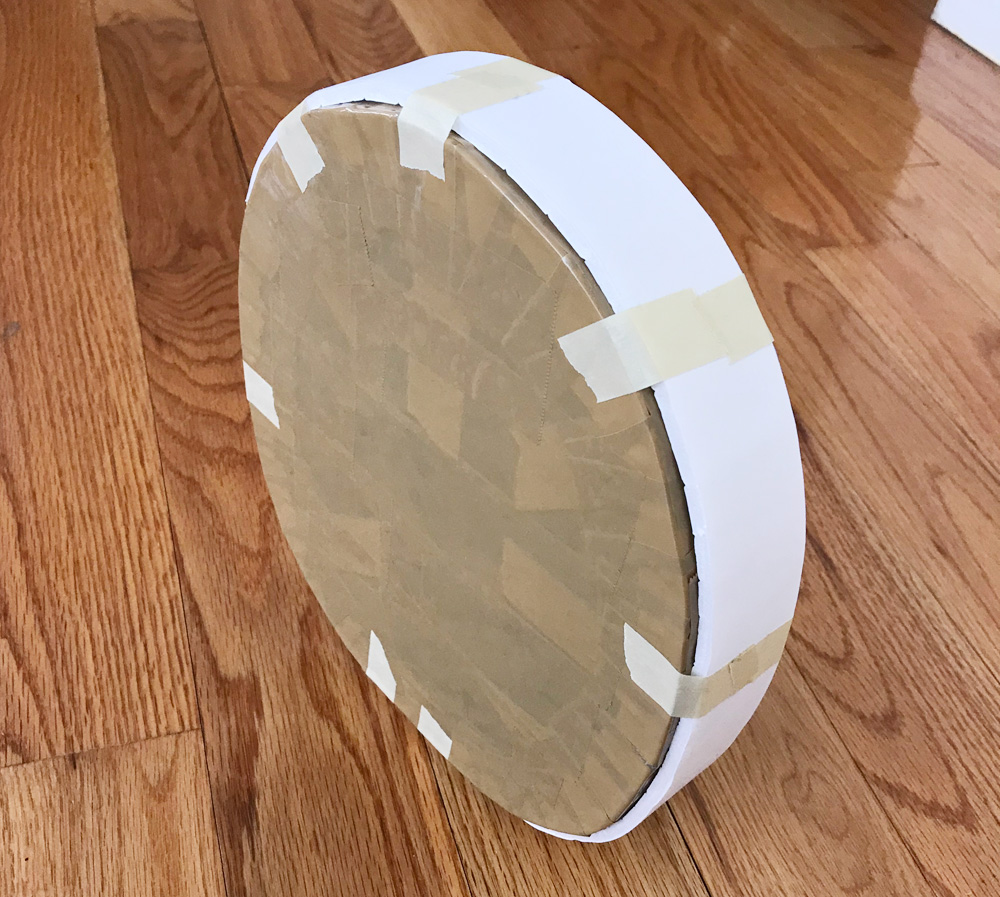
I took one end of this long foam strip and taped it to the base, and then I tightly wrapped it all the way around the base, connecting it every couple inches with masking tape. This tape will get snipped off later.
Paper maché
With my foam strip taped in place on the base, it was time for paper maché. For starters, I applied eight layers of paper maché all around this strip. You can read about my paper maché process and materials here. The short version is: I use Roman PRO-543 universal wallpaper adhesive (paid link) and alternating layers of newspaper and brown wrapping paper.
I only did the outer surface of the strip for now; I didn’t bother to wrap the paper maché onto the narrow edges of the foam board. These eight layers on the outer surface are there to create a strong, solid shape that perfectly mirrors the irregular oval shape of the base.
When these layers were dry, I carefully removed the band from the base. I snipped the pieces of masking tape with an X-acto knife, and then I wedged a butter knife in between the band and base and worked it all the way around, easily separating everything. The plastic shipping tape on the base made this easy, as the paper maché doesn’t want to stick to it too much. The band slipped right off the base as planned.
As I’d hoped, the band felt very solid and it perfectly retained the shape of the base. I then applied four layers of paper maché all over the band, so in the end the interior surface has four layers and the exterior surface has twelve.
I know from experience that once you’ve got more than eight or so layers of paper maché, the paper ends up with a texture, hardness, and rigidity similar to thin wood; it can be surprisingly strong. The finished band felt very solid and I knew it would be strong enough to use inside a mask.
Connecting the suspension
A hard hat’s suspension has six tabs that get inserted upward into six slots in the hard hat shell. For this project, I needed to find a good way to connect these six tabs into my paper maché band. I needed to connect everything in a way that was very solid and durable, so that the suspension won’t get detached even with all the wear and tear of putting on and taking off the mask many times, carrying it upside down by the straps, etc.
I knew from experience that simply gluing the tabs into the band probably wouldn’t do the trick. Gluing plastic to anything is very tricky since it’s non-porous, and even when glue seems to work, sometimes it’ll come apart days/weeks/months later. A trick I’ve learned is, if the shapes allow, you can wrap both shapes in several layers of paper maché, and then when they’re dry you can connect the one paper maché surface to the other paper maché surface. This works much better! If your paper maché is thick enough, it’s basically the same thing as gluing wood to wood. To make the connection even stronger, you can then cover the connection point with more layers of paper maché.
That’s basically what I did here. The tabs are an irregular shape, which is great because it means I could really work the paper maché in and around the complex shapes, and when it was dry the tabs were totally locked in there; no amount of pulling could make them slide out of the paper maché. I put about four or five layers of paper maché on these things.
When that was dry, I hot-glued the paper-maché-covered tabs into the paper maché band. I let the hot glue cool, and then I covered these connection points with another three or four layers of paper maché.
That all did the trick; the tabs were completely locked in there. There’s no way in hell these things are coming out.
Installing in a mask
One nice thing about working with this kind of paper maché band instead of a plastic hard hat is that it’s much easier to connect this thing into a big paper maché mask. I could easily build any kind of structure onto this band to fit whatever the interior of the mask is. For example, it would be easy to build a curved shape like a crest over the top of this band, using the same method with a foam board strip and lots of paper maché. That could give me a perfect surface for connecting all this into the top of the mask. I can also easily create connection points from the sides of the band, spanning outward to the inner sides of the mask. I could do this with hot glue and popsicle sticks, or strips of foam board and paper maché, etc. All of this is a lot easier than trying to work with the thick, hard, non-porous plastic of a hard hat.
(To be clear, I haven’t yet used this thing in a mask; I’ll probably be using it for my skull mask for Mardi Gras 2020! Or earlier if I get any good mask projects before then.)
I’m very pleased with the results of this experiment, and I might keep using this method for all masks going forward! The only real downside here is that this method takes much more time, especially with the drying time for the paper maché. So if I don’t have the luxury of time I might stick with the hard hat method for some projects.
Weight
I like weighing my projects (or parts of my projects) to compare the weights of different materials; I’m obsessed with keeping things as lightweight as possible! Here are some figures on this paper maché band method versus the plastic hard hat method:
• plastic hard hat shell, un-cut, plus the suspension: 14.04 oz (398.03 g)
• hard hat shell after I’ve trimmed off the parts I don’t need, plus the suspension: 8.04 oz (227.93 g)
• my paper maché band, plus the suspension: 6.32 oz (179.17 g)
So this new method ends up weighing, on average, about 1.27 oz less than my old method with the modified hard hat shell, or about 16% less. Not bad, but not a hugely significant reduction. Again, the only downside here is the extra time it takes to make the band and wait for all that paper maché to dry. Still, I like this a lot better than having to saw all that plastic!
To recap even further:
Pros of this method:
• A little more lightweight than a hard hat, even after I’ve removed as much of the shell as possible
• Less bulky than a hard hat, even after I’ve removed as much of the shell as possible; that means I can design a smaller mask with this method
• Easier to attach firmly in a mask; takes glue much better than a plastic hard hat
• Removes the need to saw and sand a hard hat, which, as I’ve mentioned, I find really annoying
Cons:
• Takes a lot more time, and I guess I could add as a con that the reduction in weight isn’t huge.
For a future experiment I’d like to try making something by hand that replaces the suspension entirely — making my own straps from some kind of thick ribbon, stapling them into a band made from foam board or something, and wrapping it in breathable fabric. I’d love to see if I could make something that’s just as comfortable as a hard hat suspension and weighs even less.


 About Manning Krull
 How to make a 4-foot paper maché alligator
 My violin skull mask, Mardi Gras 2015
 Three-headed paper maché dragon sculpture
Leave a comment