
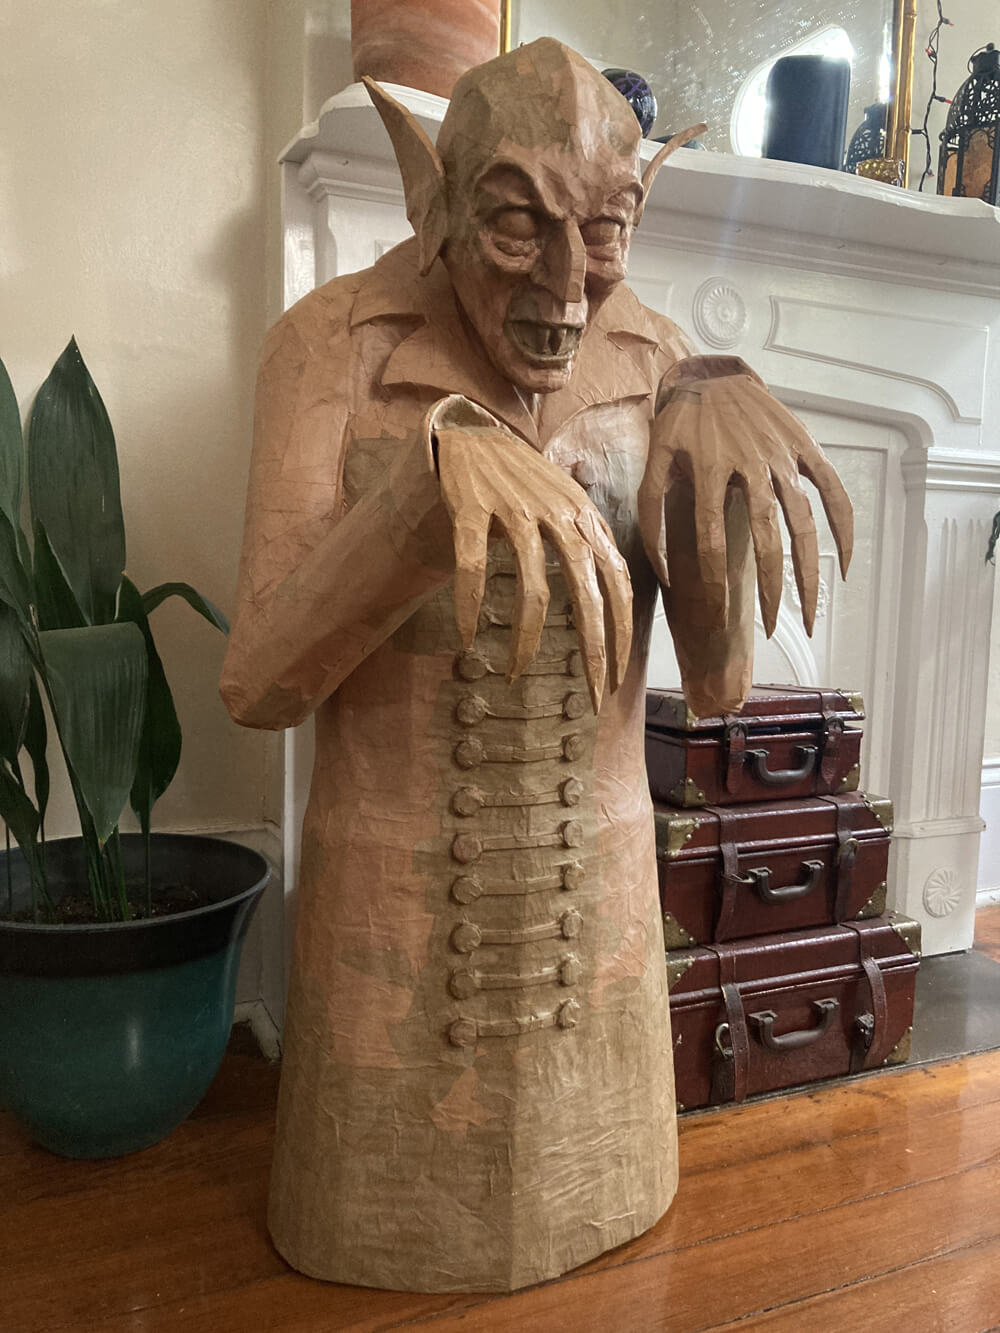
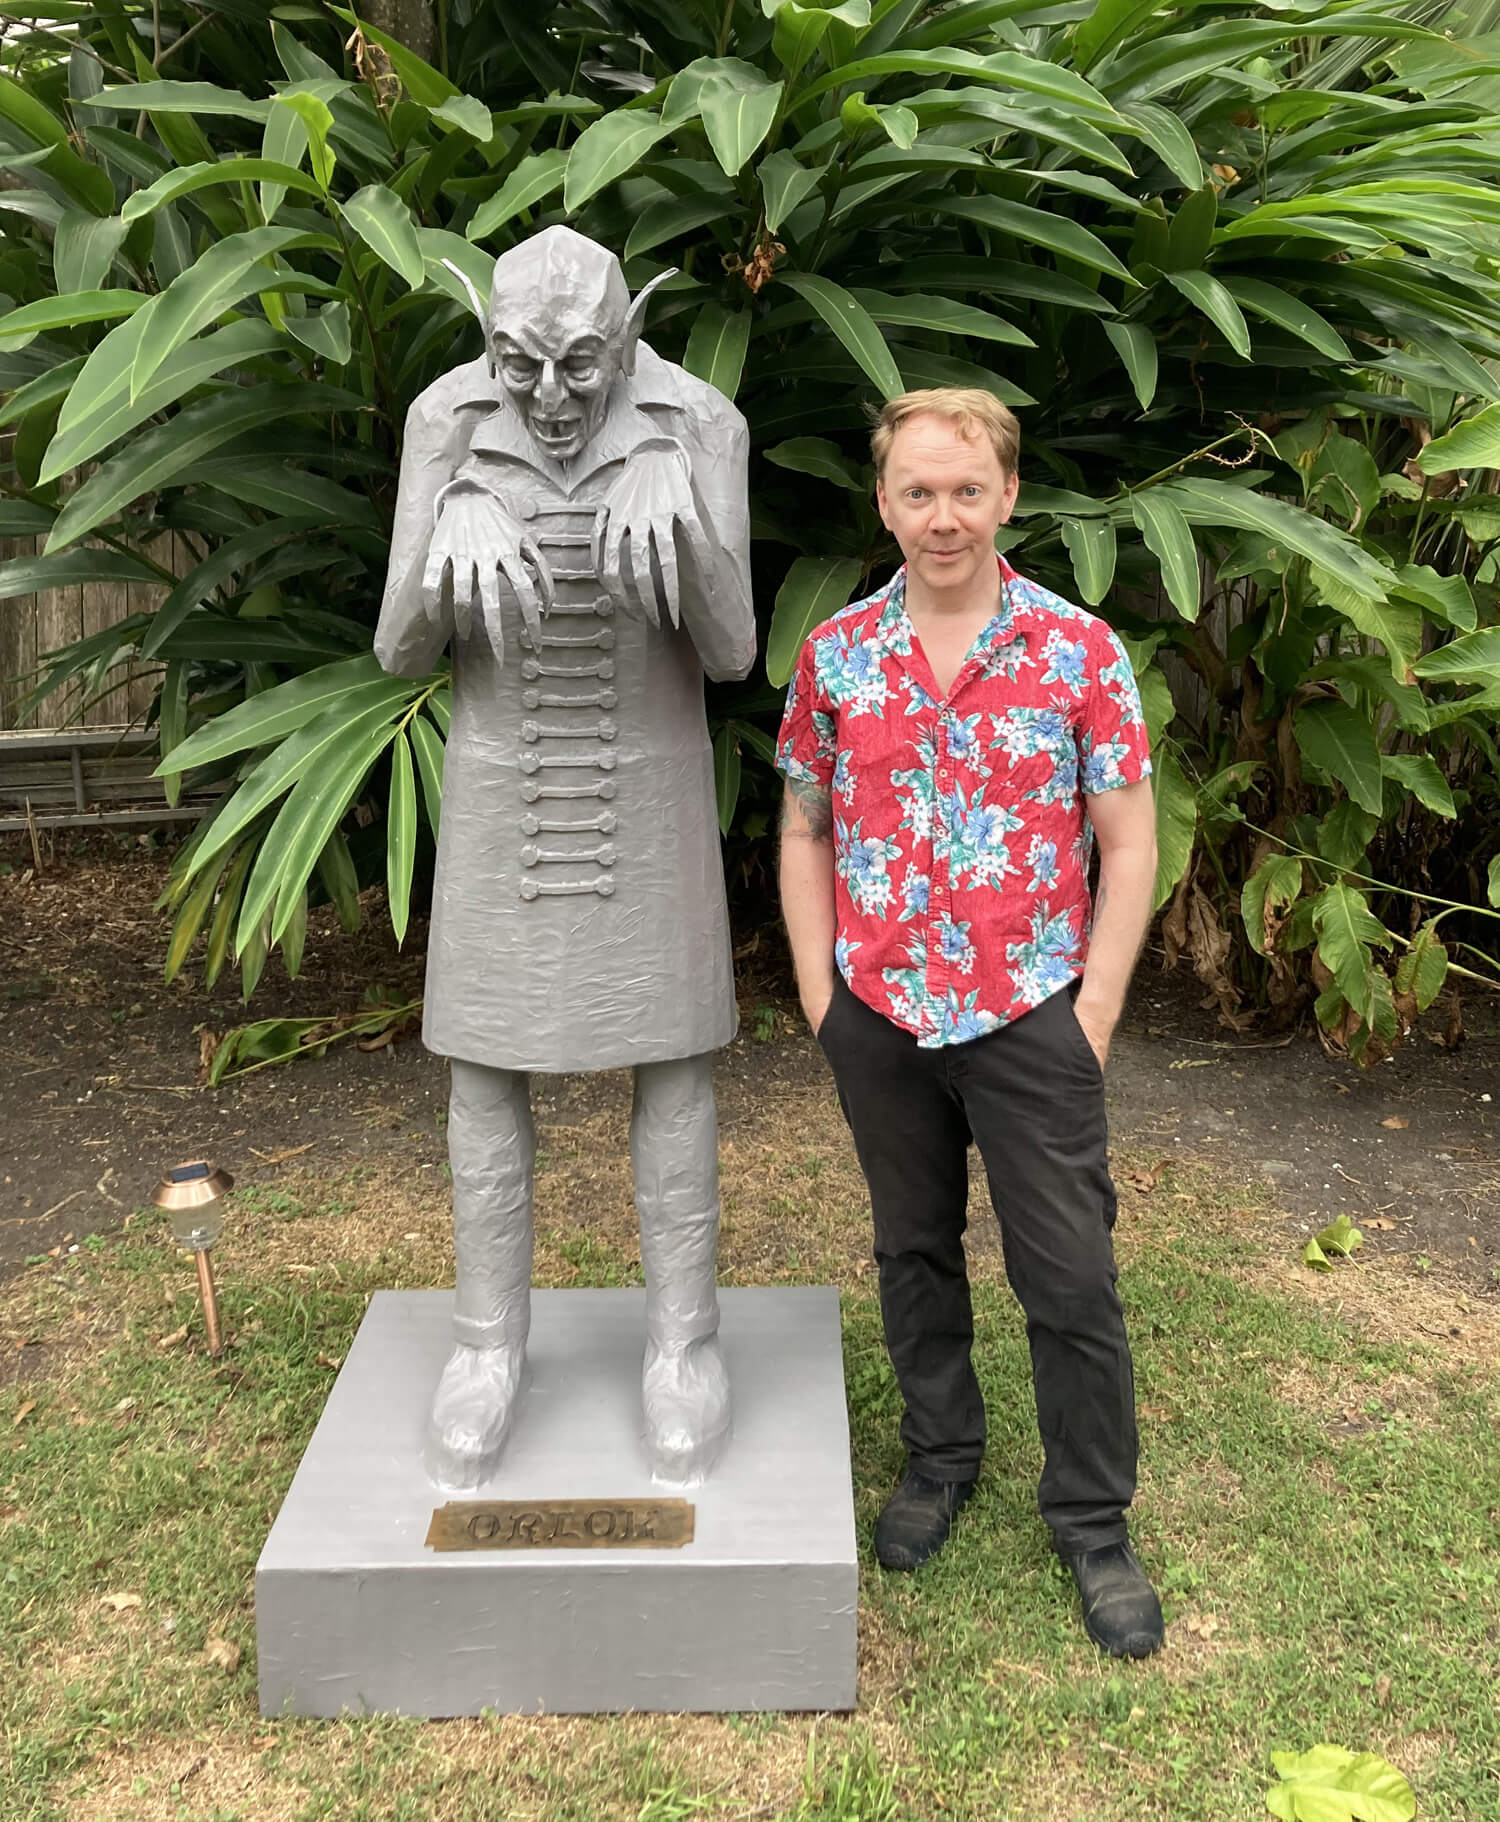
Lifesize paper maché Nosferatu statue!
Published by Manning on November 3rd, 2022
Check this thing out! For Halloween 2022 our party’s theme was the 100th anniversary of the film Nosferatu (well, the U.S. release) and I wanted to try making a lifesize paper maché statue of good ol’ Count Orlok, aka the guy that jabronis like you call Nosferatu.
Planning
I decided to use my tall skinny friend Kevin as a model for Orlok; I had him pose and hold a yard stick in his hand and I took photos from various angles. I also had him trace his hand so I could use that to make the hands, and I even borrowed a pair of his shoes to use as a base for the paper maché for Orlok’s feet.
Making the base for the head

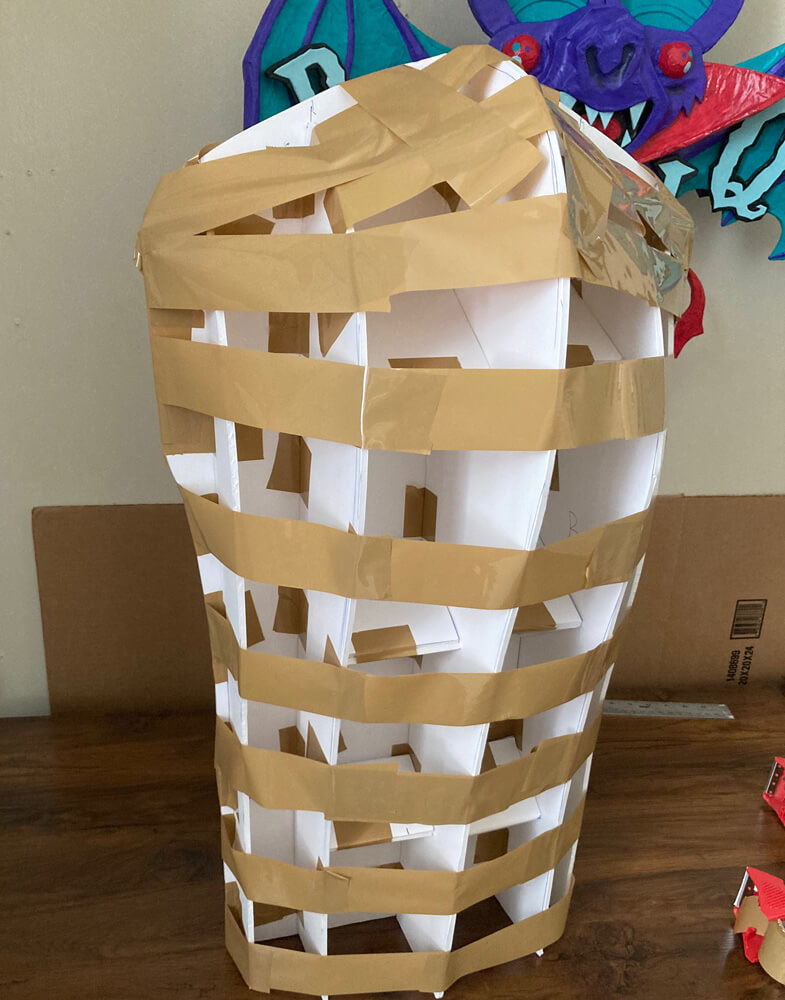
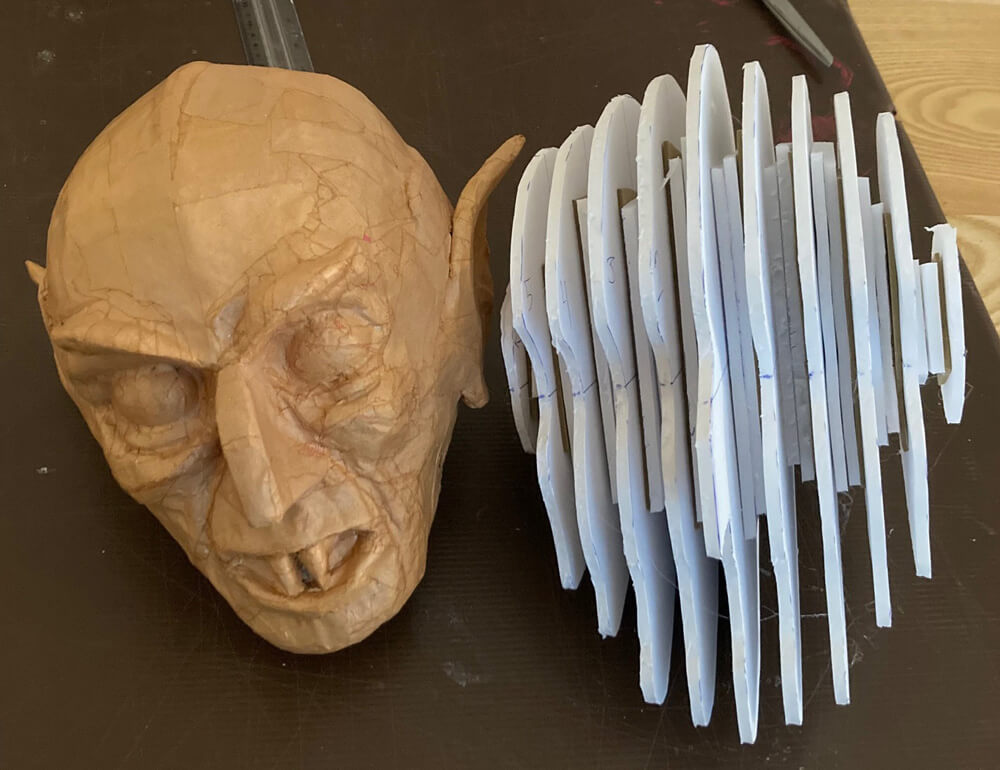
Orlok’s head was the first part of the statue that I tackled. To make the base, I used a modified version of a technique I’ve used several times: a sort of armature made of layers of foam board that are held apart at certain intervals.
I first did a lot of measuring and math and laying out in Photoshop; way too complicated to explain, as my brain can barely struggle through that part as it is.
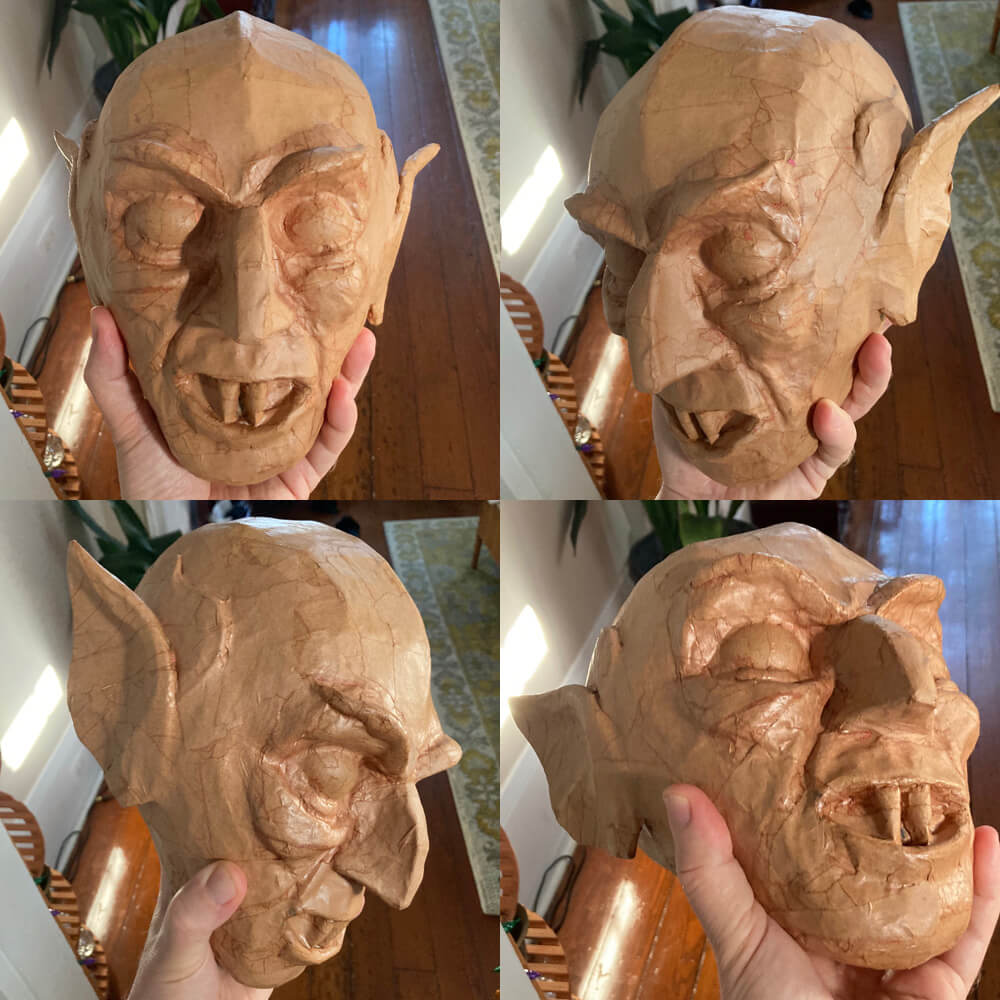
I started with the middle slice of the face, which is just a plain ‘ol profile shape of Count Orlok, traced right from a movie still from Nosfertau, and sized to match the dimensions of my friend Kevin’s head (or so I thought; plot twist coming in a few paragraphs). I then drew and cut out the outer slices I’d designed, layer by layer. Each layer is held apart by two layers of foam board; just random shapes to hold the designed pieces apart at the right intervals. I drew a cross-shape on each piece at the right position to help me line up the pieces when I assembled them. I hot-glued all this stuff together.
Once this was all assembled I trimmed some of the pieces with my X-acto knife just to get a better overall shape. I then wrapped the whole shape in masking tape in order to get a better idea of what this thing would look like with “skin” on it.
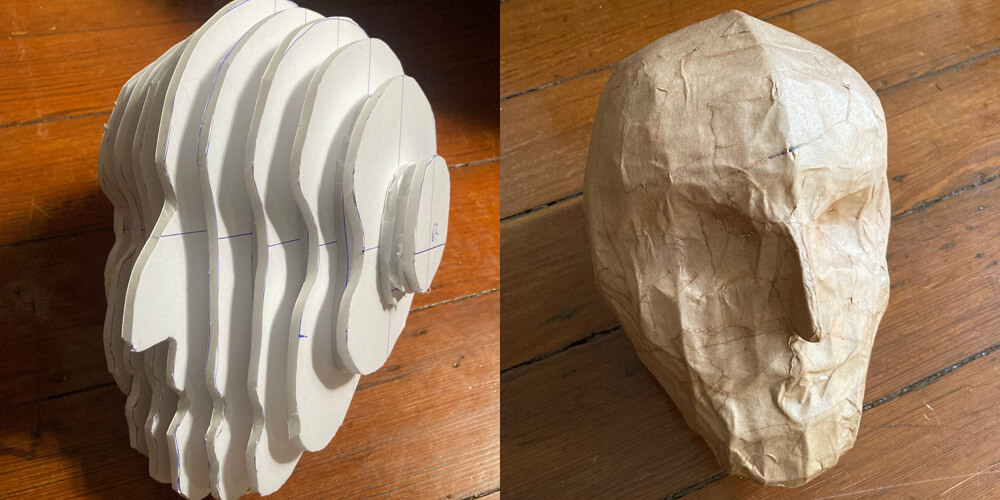
I knew I would be sculpting the face in clay, and I decided to first cover the head base with two layers of paper maché in order to make it easier to apply the clay; the paper maché made the shape more solid and gave me a more porous surface to stick the clay on.
Making the eyeballs
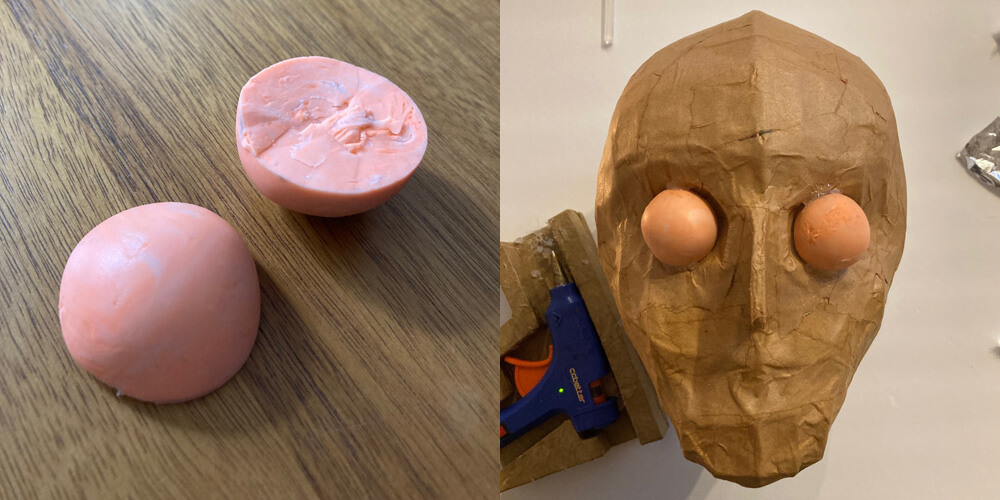
I thought about using a superball, cut in half, for the eyes, but I couldn’t find one that was the exact size I wanted, so I decided to do something fun and stupid. I had ordered some good-quality custom vampire fangs for myself from a wonderful guy on Etsy, and the kit he sends comes with a dental impression kit that uses two kinds of plastic that you mix together and then they quickly harden into a dense rubbery material. I had some of that stuff left over so I decided to use that to roll up a ball, let it harden, and then slice it in half with my X-acto knife.
I hot-glued the eyes onto the base of the head. It turns out hot glue does NOT stick to this kind of rubber, so I had to build up a little wall of hot glue around the edges of the eyes to lock them in place.
Not shown: I used the same material to sculpt the fangs. The nice thing about this dental impression stuff is that you can cut it very easily and very precisely with an X-acto knife — unlike air-dry clay. So for the fangs I just rolled a little tube shape with pointy ends, and when it hardened it was easy to cut the two fangs off of that.
Sculpting the face
I bought a package of DAS air-drying clay (paid link) to use for the face. I set the head base into this foam ring to help stabilize it, and then I sculpted the face right onto that.
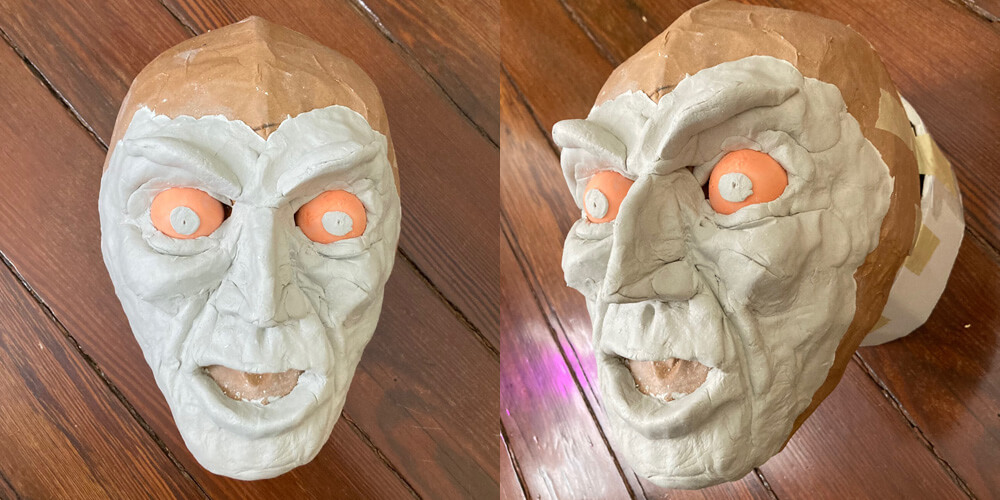
(The little clay irises/pupils were just for fun; I removed them as soon as the clay was dry.)
I let the clay dry, and then I hot-glued the fangs into the mouth, and then I covered the face with just one layer of paper maché.
Making the ears
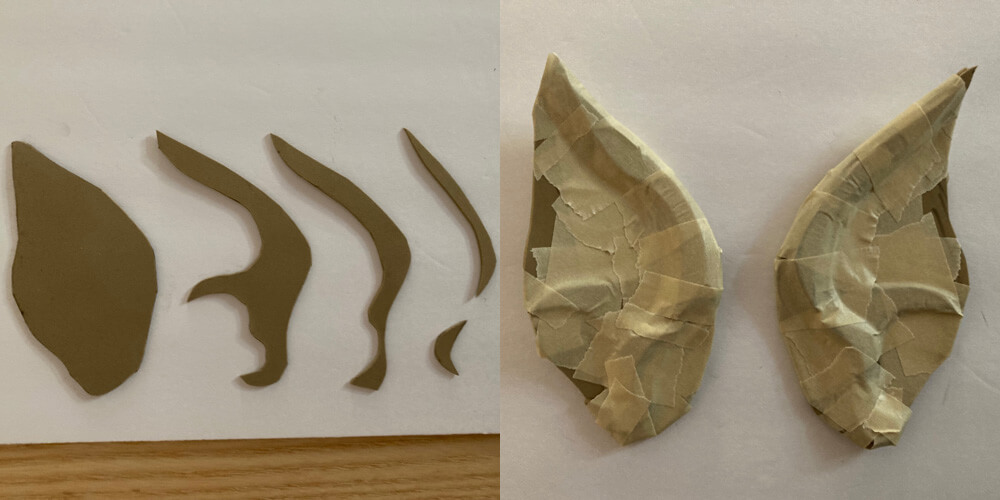
I made Orlok’s ears out of a bunch of pieces of craft foam, which I assembled with masking tape. The nice thing about working with craft foam and masking tape this way is that you can curve the foam in your hand and then apply masking tape to it and it’ll hold the curve. So I was able to make the ears somewhat curved and organic-looking.
I covered the ears with a layer of paper maché and let them dry. Then I hot-glued them in place on the head and covered over the connecting areas with more masking tape and paper maché.
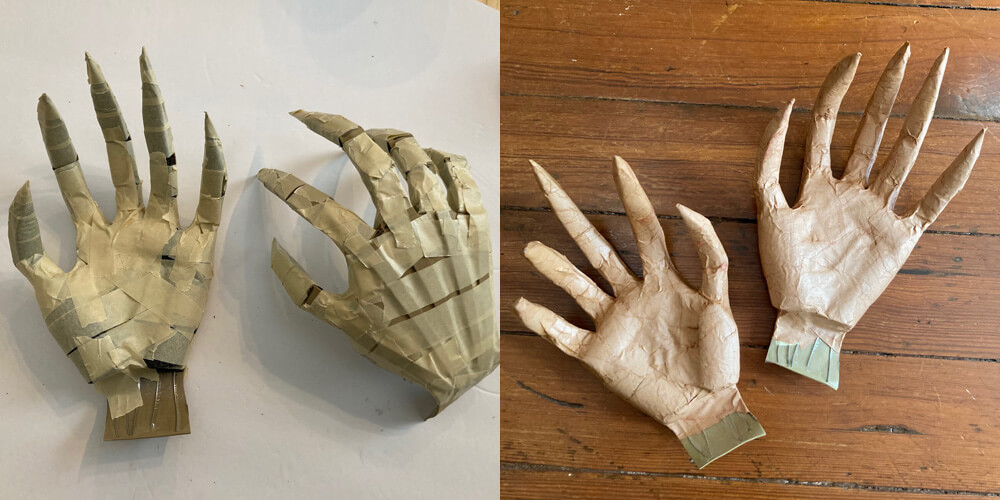
Making the hands

I made Orlok’s hands using a method I made up years ago, and I wrote a whole article about it: here’s my easy method for making spooky hands! These are at a bigger scale, of course, and one thing I didn’t love about the old hands I made that I wanted to correct here is that the palms weren’t thick enough, like, the fingers were fine, but I didn’t add enough padding to the palm. So this time around I added more layers of foam before covering everything with paper maché.
Orlok’s shoes
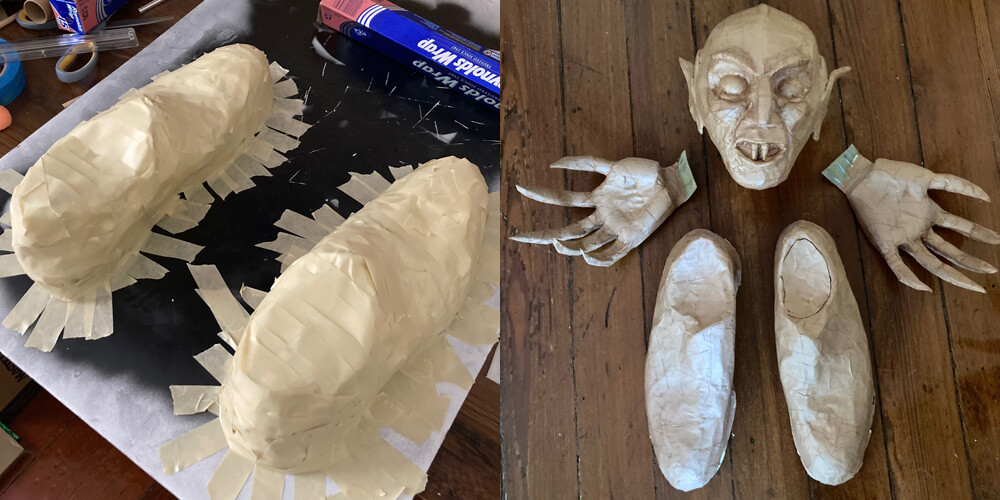
This part was easy; I borrowed a real pair of shoes from my friend who was the model for the statue, and simply covered them in aluminum foil and then blue painter’s tape and then covered them with several layers of paper maché. Once the paper maché was dry I cut open the bottom part and removed the shoes.
Pedestal
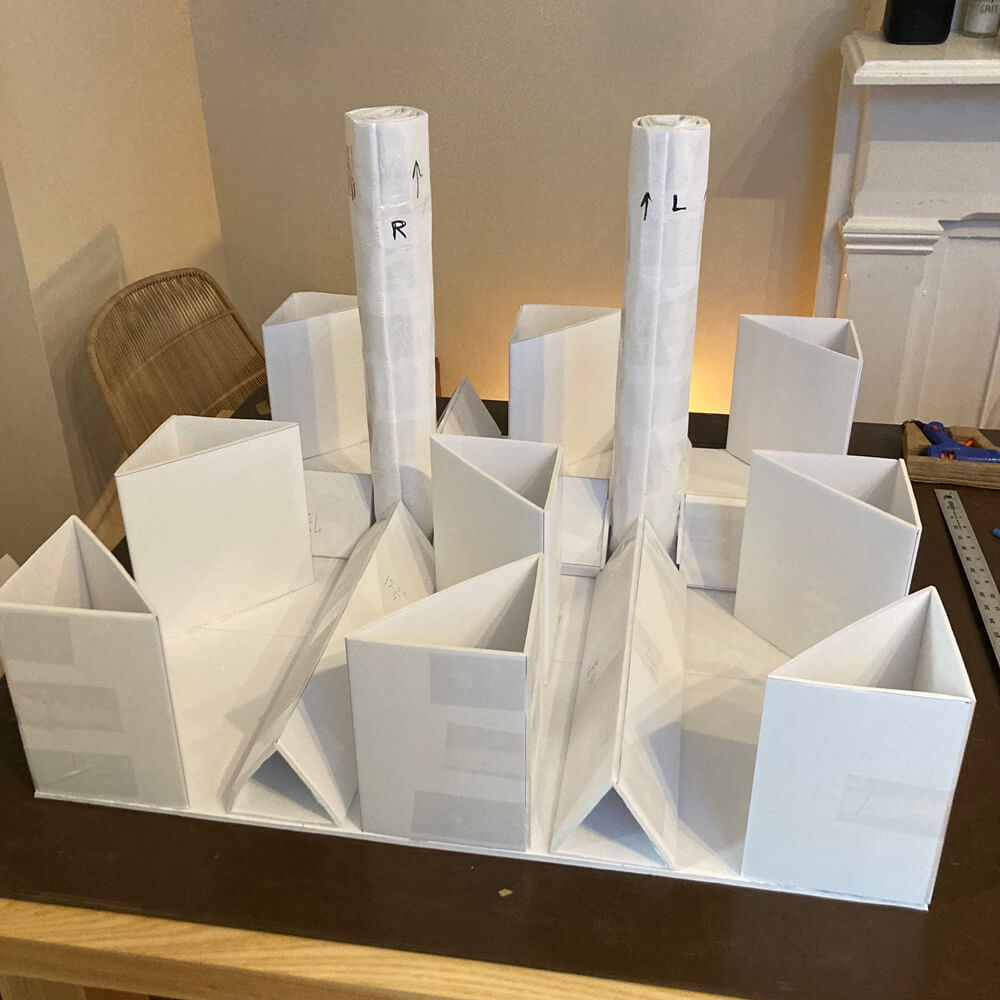
The pedestal’s just a simple box shape, right? Wrong! I maybe overdesigned it, but I wanted the pedestal to be built in such a way that the legs/ankles are locked inside, deep in the base, so there’s absolutely no way the weight of the statue could cause it to tip over or lean or sag or break. So, basically, rather than have a statue that just stands on a box, the legs extend through the feet and all the way to the floor of the pedestal.
I started by making the ankles out of two pieces of cheap foam board, carefully rolled up into very tight tube shapes. These shapes are very sturdy and can’t bend.
I made two big 30″x30″ sheets of foam board for the top and bottom panels of the pedestal, starting with two regular 30″x20″ sheets and cutting out two 30″x10″ panels and taping them together with heavy duty shipping tape.
I hot glued the ankle tubes standing in place on the bottom panel. Before doing this, I measured and cut out holes in the top panel so I could later slip the top in place over the ankles.
So, there are four types of structures in this pic. (This part may be really boring; just skip down to the rest of the body!) 1) There’s the 30″x30″ bottom panel. 2) There are the two ankle tubes. 3) There are nine large triangle shapes — four to create the corners and five more just for additional vertical support. 4) Then there are the smaller, longer triangle shapes that are laying down. These are there to lock the base of the ankles in place on four sides. So if you push against the ankles in any direction, you’re met with this resistance at the base.
Anyway, I assembled all those triangle pieces with shipping tape and hot glued them in place. When this was all done, I laid the top panel in place over the ankles and hot glued it down onto the edges of all the big triangles. I then slipped the feet in place over the ankles. Later (not shown) I cut out and added walls all the way around the pedestal.
When this was all done, I was really pleased with how lightweight and extremely sturdy the whole structure is. Now to build a statue onto this!
Legs, torso, arms

I built the legs up with more tubes of rolled up foam board and then I padded them out in various places with bubble wrap, craft foam, lots of tape, etc. I applied a ton of layers of paper maché around the weakest points in order to make the legs extremely strong. I connected them at the top with a scrap of foam board and put tons of paper maché on that too. The whole structure of the pedestal, feet, and legs is very sturdy and lightweight; I’m proud of how it all came out.
I made the torso out of bisecting pieces of foam board, all taped together, and then I quickly wrapped the whole shape with big strips of newspaper (no paste, yet) and masking tape. This first layer of newspaper is there to smooth out the angular shapes created by the foam board, and to give me a consistent surface to apply paper maché to.
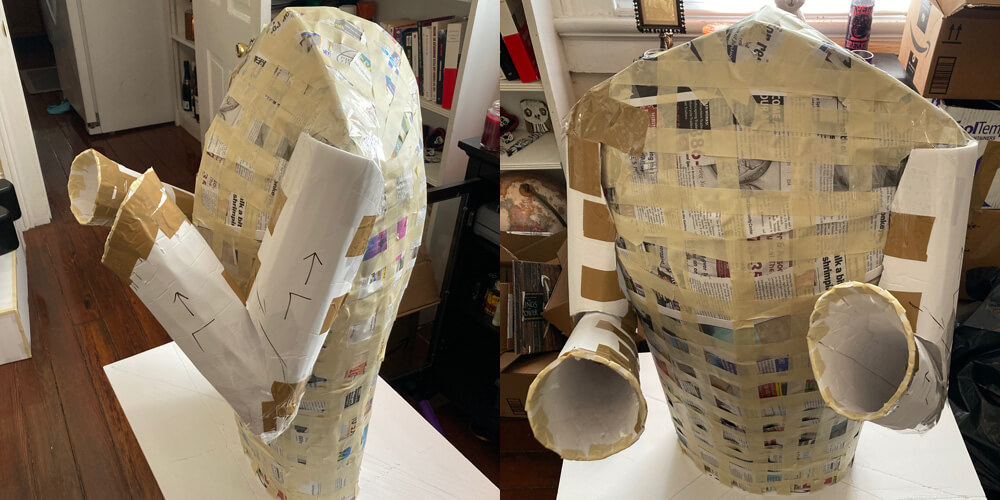
The arms are just curved and rolled pieces of foam board, all taped together. I later built up the shoulders a bit with some craft foam.
I covered the torso with two layers of paper maché, and the arms with just one layer, since they already felt pretty solid.
A calamity!
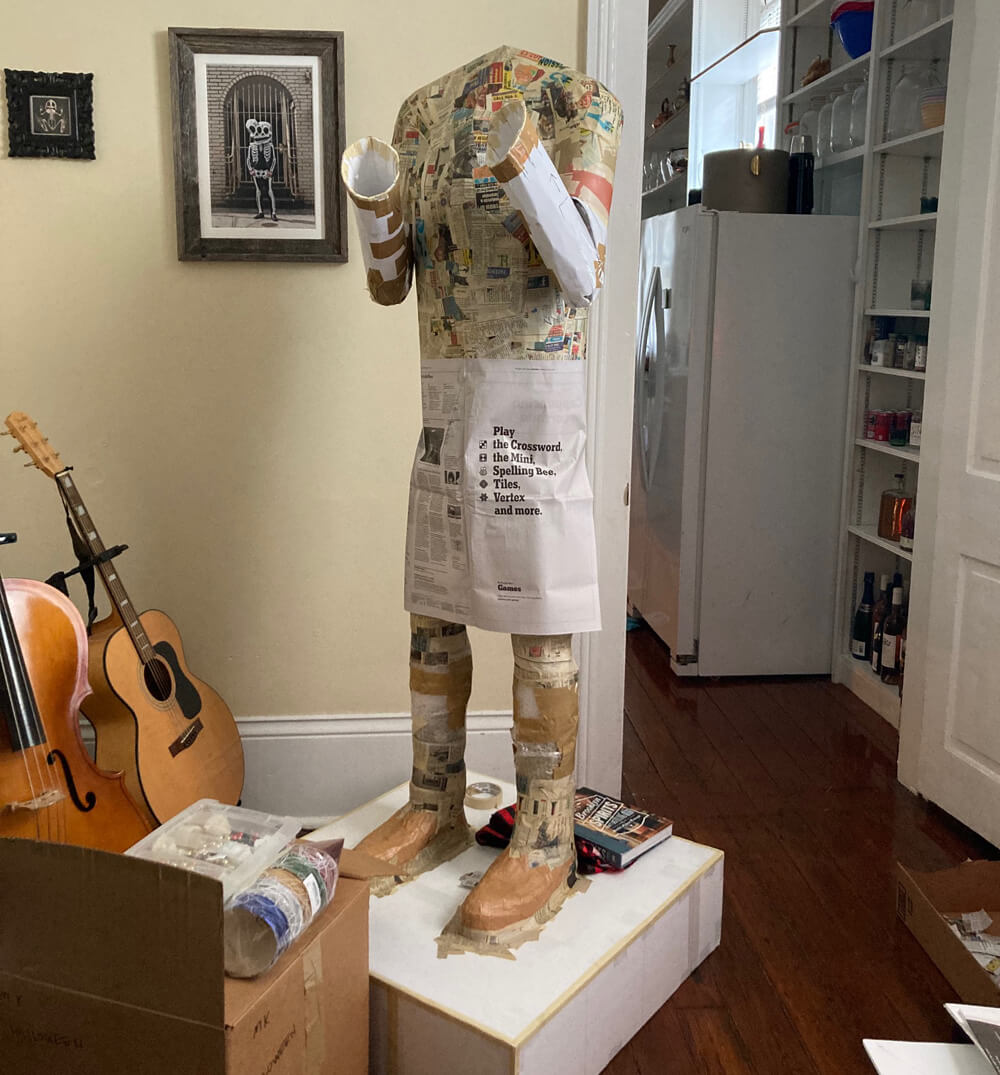
With the torso done, it was time to install the head — and guess what! The head I’d sculpted was way too small for some reason! I had no choice but to make a new one. I followed the same steps, but I didn’t have any more dental impression material to make the eyeballs, so I ended up finding cheap Christmas ornaments at the dollar store that were the perfect size. Oh yeah, and I used aluminum foil for the new fangs. The new head came out okay but I think I like the smaller one better.

Once the new head was finished, I hot-glued it in place, and then reinforced the connecting area with many layers of paper maché. This new head is really heavy! It has about a pound (half a kilo) of clay in it. In installing the head, it became clear to me that the whole torso was going to be extremely front-heavy, because of the weight of the face and the way it projects outward in front of the body — not to mention the arms and hands sticking out, too. The torso couldn’t stand up on its own; it wanted to fall forward. The solution here is a counterweight; I sliced open Orlok’s hunchback and stuck a brick in there! That balanced out the whole torso perfectly. The brick is wrapped in a plastic bag and shipping tape and attached to the foam board armature inside the back with lots more shipping tape, so it can’t move around.
Finishing the coat
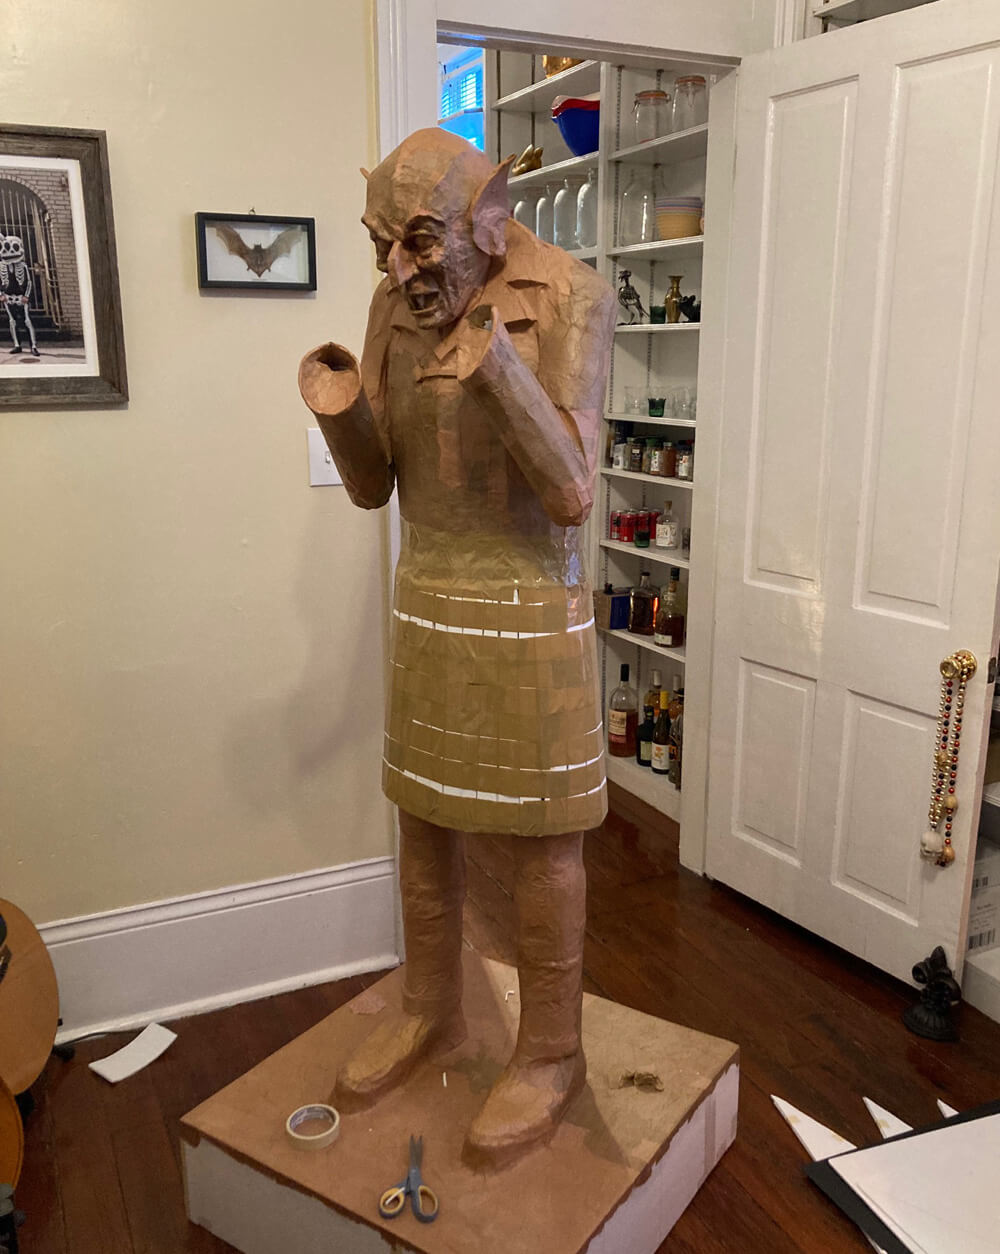
I propped the torso in place on top of the legs, and it was extemely shaky at first, because the torso is so top heavy all around, and the waist is so small. And I noticed a small problem: the torso was a bit too tall, so I ended up cutting about four inches off the bottom at this point.
I temporarily connected the torso to the legs with big strips of paper (no paste) wrapped all around, and secured with tape*. Before building the “skirt” part of the coat, I built a ring of foam board around Orlok’s thighs, right around where the bottom of the coat would be. I added some more layers of foam there to pad out this area a bit, so that the skirt area would taper outward a bit. Once that was done, I created the skirt itself with vertical strips of foam board taped in place. I then wrapped the whole area in tape to lock everything together; that’s what you’re seeing here.
Just like with the torso, I covered this skirt area with big strips of newspaper and tape (no paste yet) to smooth everything out, and then I applied four layers of paper maché over the whole area. As you can see, the skirt is strong enough that the whole torso can stand up on its own with no problem, and since it’s wider at the bottom than the waist is, it feels a lot more stable when it’s standing there like this.
*This is probably boring but I wanted to build the statue in two big parts that can be easily separated and reassembled, to make it easy to move this thing around and set it up in my yard or whatever. So the whole torso and skirt area are simply set in place over the legs; the waist and the top of the legs get inserted into the skirt, and the parts hold together pretty well on their own. I could Gorilla Glue the whole thing together at some point if need be.
Anyway, what else? The lapels are just foam board shapes taped in place and covered with paper maché. The buttons are… buttons! I ordered some large cheap buttons, and I cut out thin strips of foam board to be the threads or whatever in between the buttons. I hot-glued all these things in place and covered them with a layer of paper maché.
Painting
Easiest paint job ever; I ordered six cans of cheap gray spray paint, and painted the base/legs and torso separately. Ended up using about two and a half cans of spray paint. The gray paint was shinier than I wanted, so I used a can of cheap matte spray to make it less shiny.
Name plate
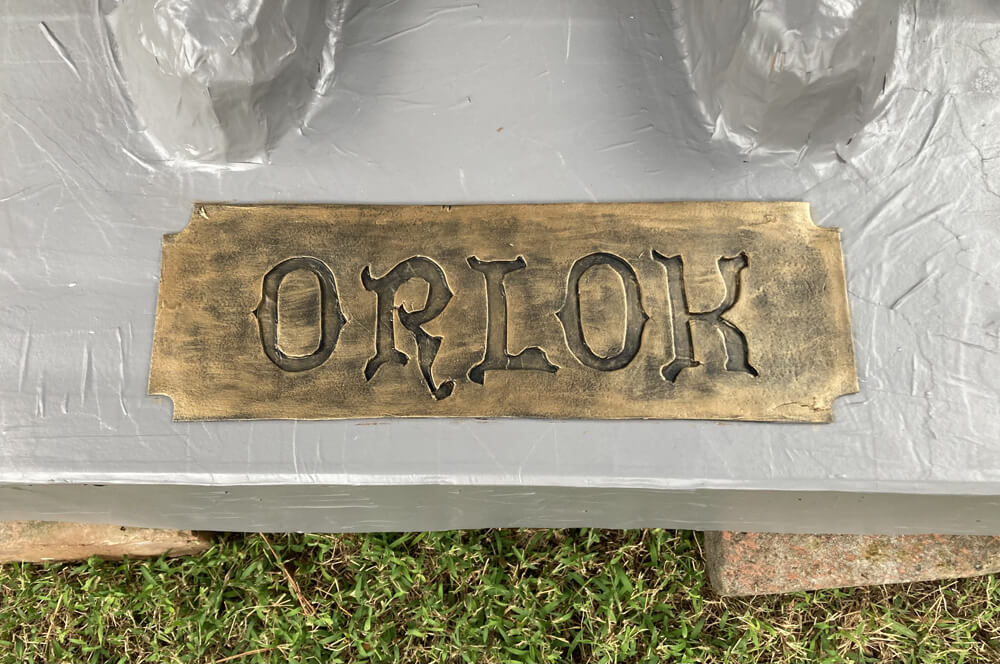
I made a plaque for the statue out of a piece of craft foam, and I cut the letters out with an X-acto knife. I painted the plate black, and then did a dry brush effect with a mixture of brown and a sort of metallic bronze color.
Finishing touches
I ordered some fake ivy and stapled a couple vines in place on the statue. I also ordered some party hats to use as decorations for the party, and for our guests to wear if they wanted, and I stuck one of those on Orlok’s head.
Done!
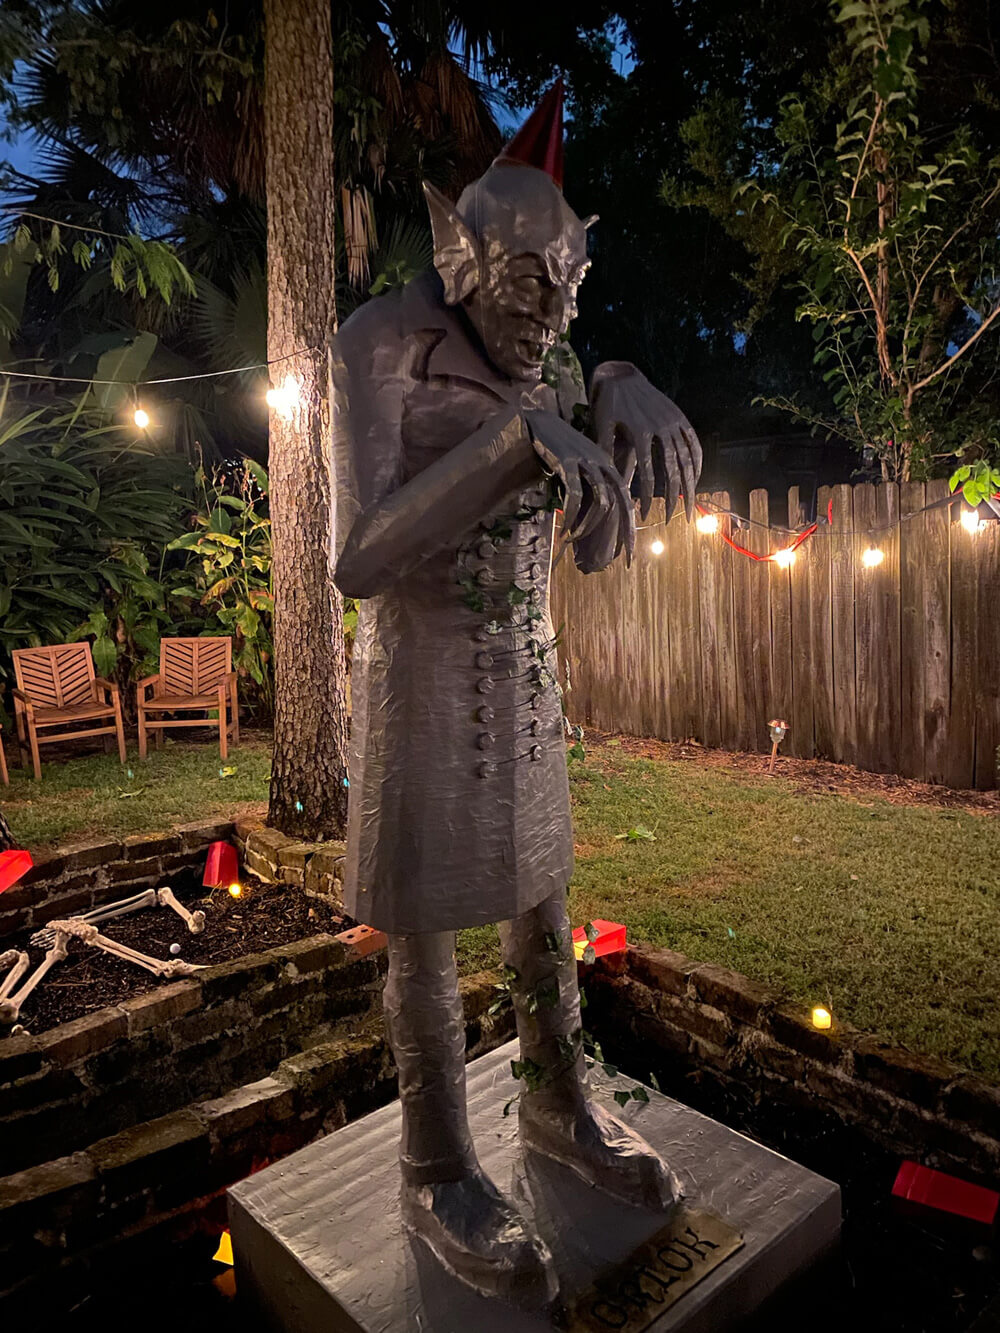
This was definitely one of the most challenging and interesting projects I’ve ever done! For fun I tried to add up all the materials in my head, and it came out to about eighty bucks — a big part of that is the spray paint and all that wallpaper adhesive; I probably went through about one full gallon of paste for this thing. Plus maybe 18 or so sheets of foam board, and so much tape. I’m really happy with how this thing came out!
 About Manning Krull
 How to make a 4-foot paper maché alligator
 My violin skull mask, Mardi Gras 2015
 Three-headed paper maché dragon sculpture
November 7th, 2022 at 2:41 pm
WOW! This is amazing. Well done, man!!