
Mardi Gras 2021 — I made a skull mask of my own damn head!
Published by Manning on February 16th, 2021
For Mardi Gras 2021, my wife and I made skull masks of ourselves! This was all her idea, and it was super fun to plan out how to do it and then watch it all come together.

Here’s how I made my skull!
Building the base
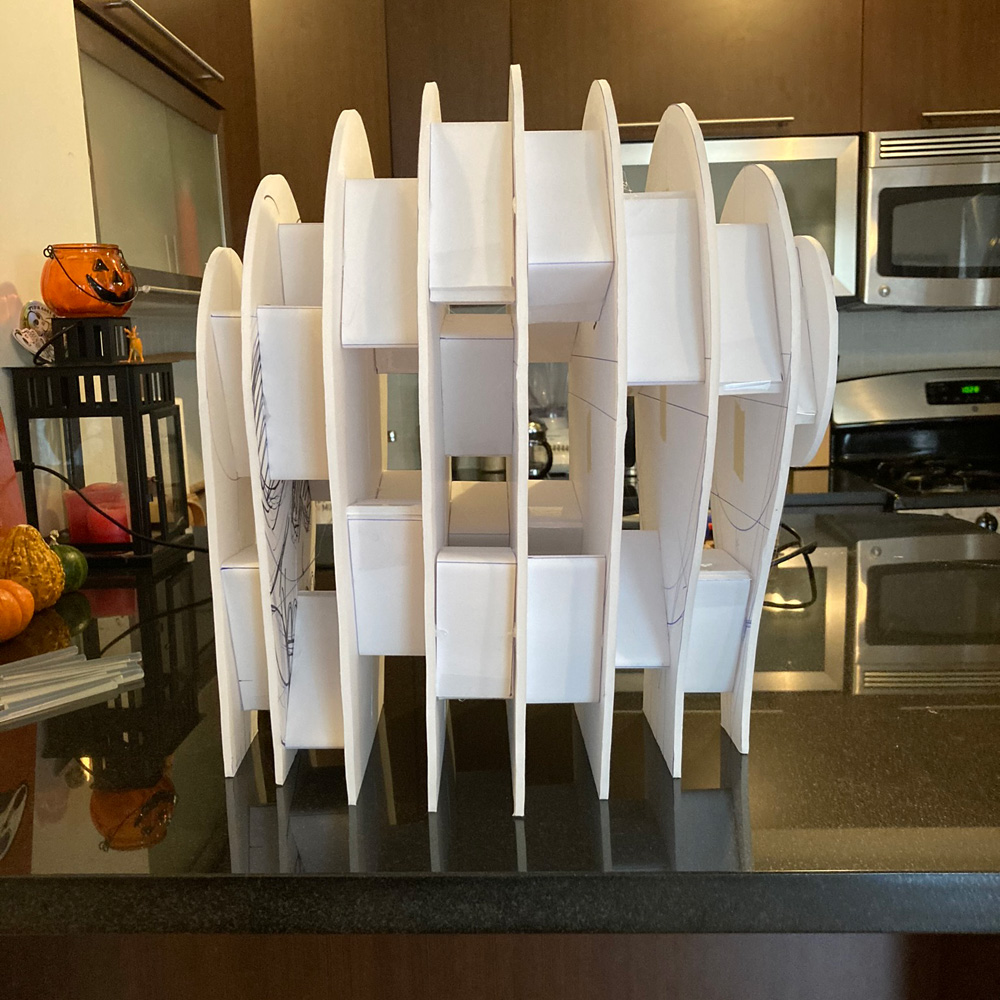
I started by sketching the skull mask to figure out its dimensions, and then I did a lot of math and a lot of Photoshop to figure out how to draw it as flat slices that I could assemble to build the basic 3d form. I’ve used this method for a lot of recent projects and I really like how much precision it lets me achieve!
I did something a little different this time — rather than cut out the foam board shapes and discard the square exterior, I cut out the shapes but taped them in place in their frames little by little as I went. Keeping them all in a square frame like this allowed me to easily line them up when it was time to glue them together.
One other thing I’ve never tried before: I sliced each of layer of foam board down the middle, not quite reaching the top and bottom edges. The idea here is that when it’s time to remove the base materials from the paper maché, I’ll be able to break these big pieces in half and pull them out more easily.

In the pic above, on the right side you can see where I cut everything; I marked the cut lines in red in Photoshop here. I cut each of the layers this way.
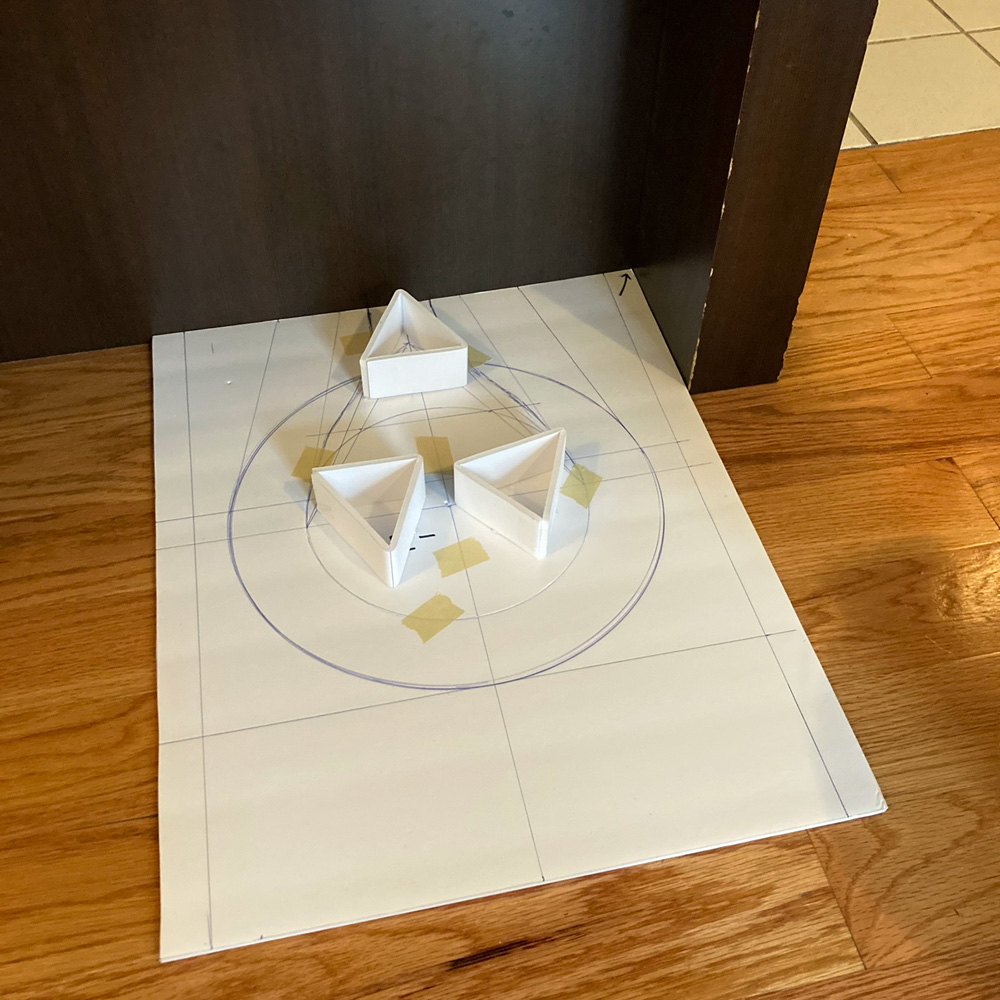
As usual, I cut out and taped together a bunch of strips of foam board to create little triangle shapes. These will be used as supports to separate the slices of foam board.
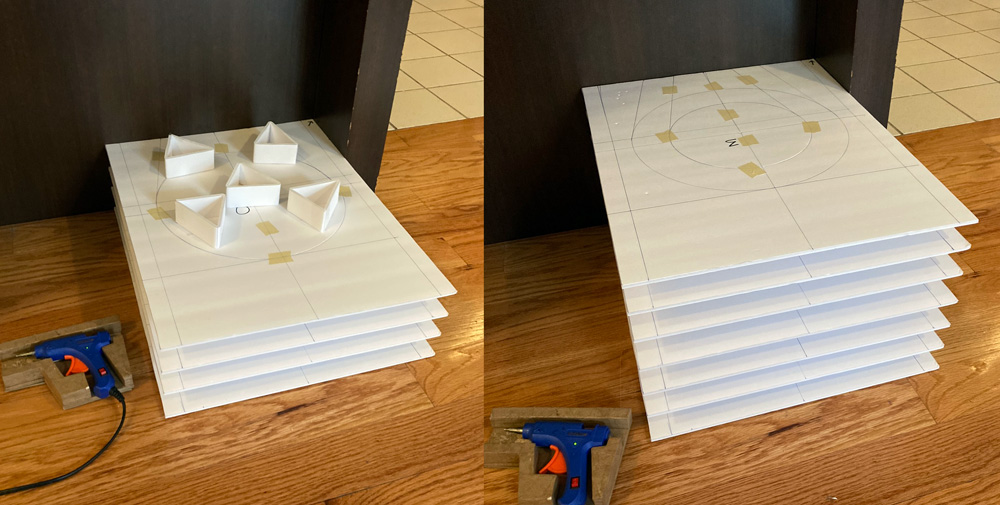
To assemble all the shapes, I first hot-glued a few of the triangles onto one of the foam board slices. I then put some hot glue on top of those triangles, and set the next slice in place. To line them up perfectly, I used this area in my apartment where the kitchen counter meets the floor and creates this perfect 90-degree angle in three directions; I use this space whenever I have to line up parts for any project. It beats the normal corners of the apartment because there’s no base board to get in the way.
I then glued some triangles onto the second slice, and then I glued the third slice in place on top of that — et cetera, until all the slices were assembled.
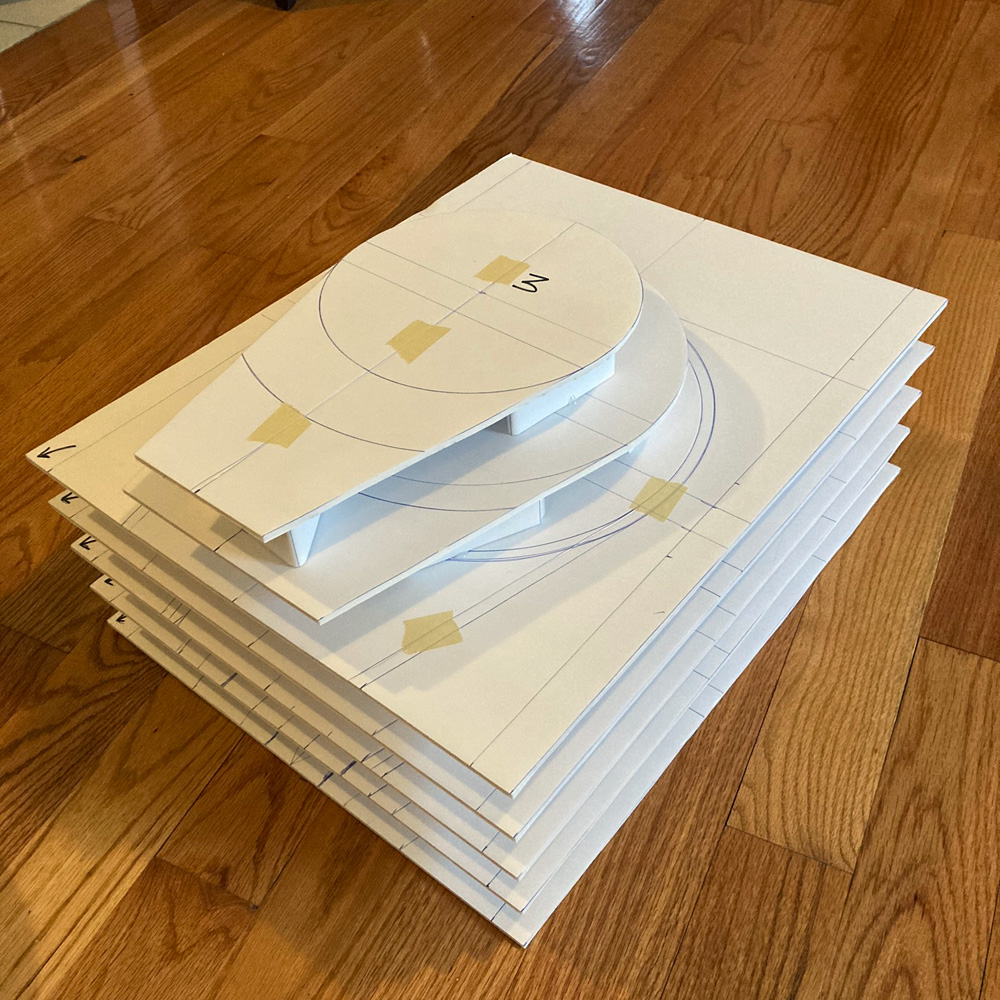
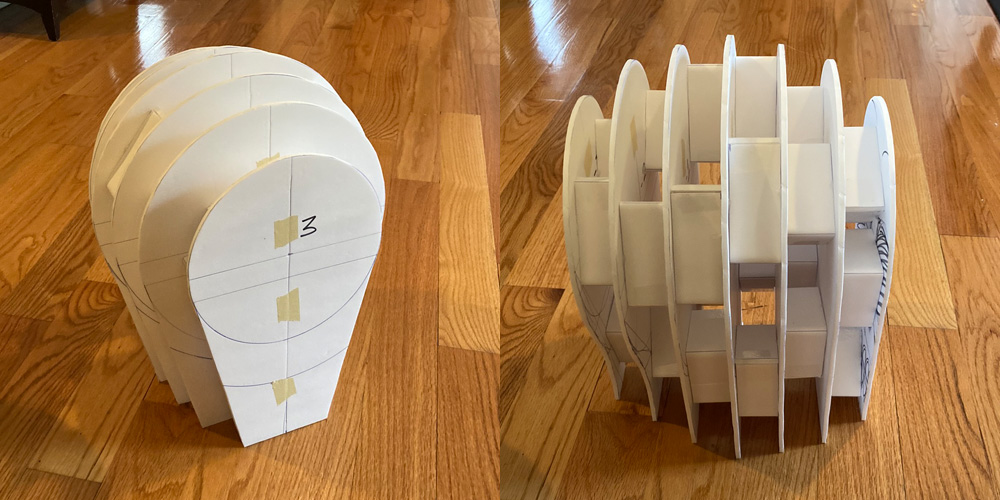
When that was done, I sliced through all the masking tape and removed all the outer parts of the foam board, and that left me with this nice 3d shape for the base.
I also added one smaller piece in the front and one in the back; these were small enough that I didn’t want to waste a big piece of foam board on them. You can see those smaller pieces in the next two pics.

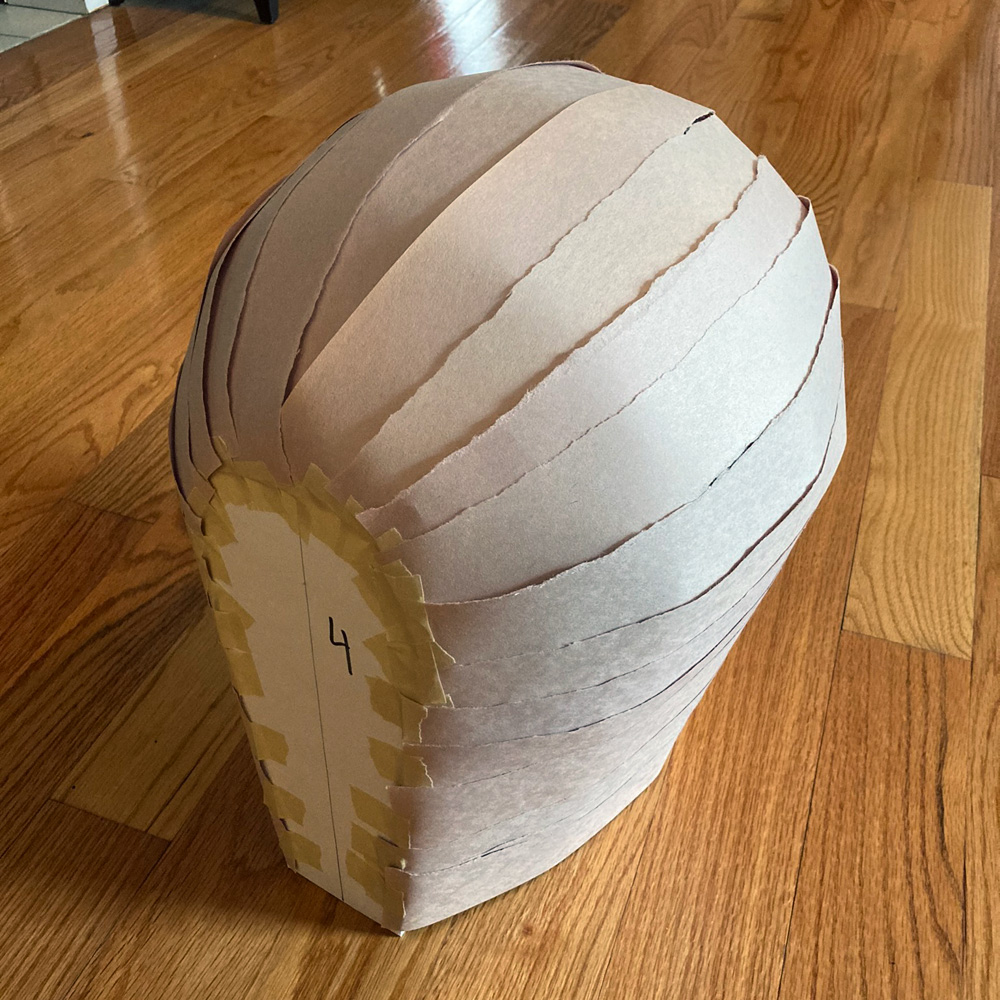
Next, a couple more techniques I’ve made up over the years to help me round out this primitive shape: I tore up strips of construction paper and taped them in place all over the base. I then cut long strips of bubble wrap (3″ wide, cut from a 12″ wide roll) and wound them around the base. These extra couple layers of material help smooth out the rough edges created by the boam board slices.
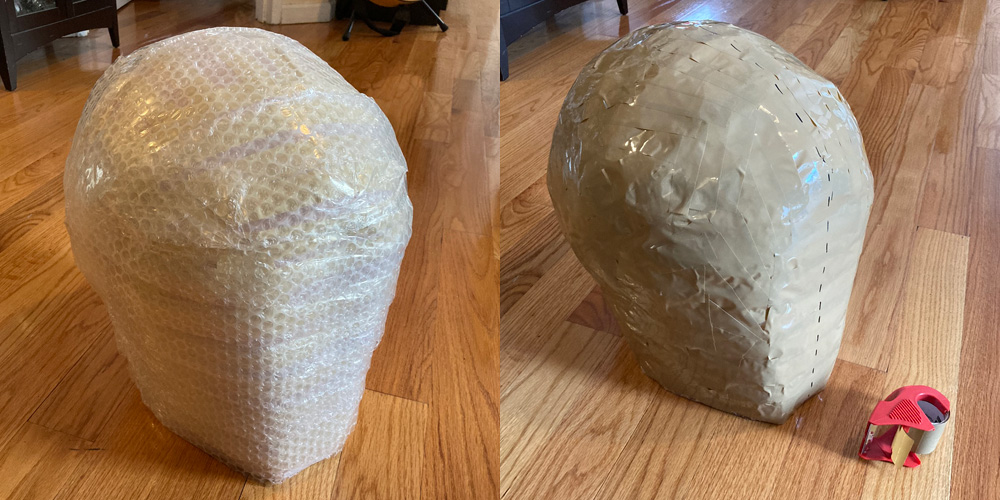
At this point the base always still feels a little wobbly, so I then covered it completely in shipping tape, to secure everything and make it a lot more solid and stable. The shipping tape will also serve as a release agent when it’s time to remove the base from the paper maché later on.
Now that you can see the whole shape, I should note: I’ll be cutting off a lot of the rear-lower part of this shape after the paper maché is done. Fow now I’ve built it out to be a shape that can stand up easily, but when it’s all done the front part of the mask will be a lot taller than the back.
Creating the face
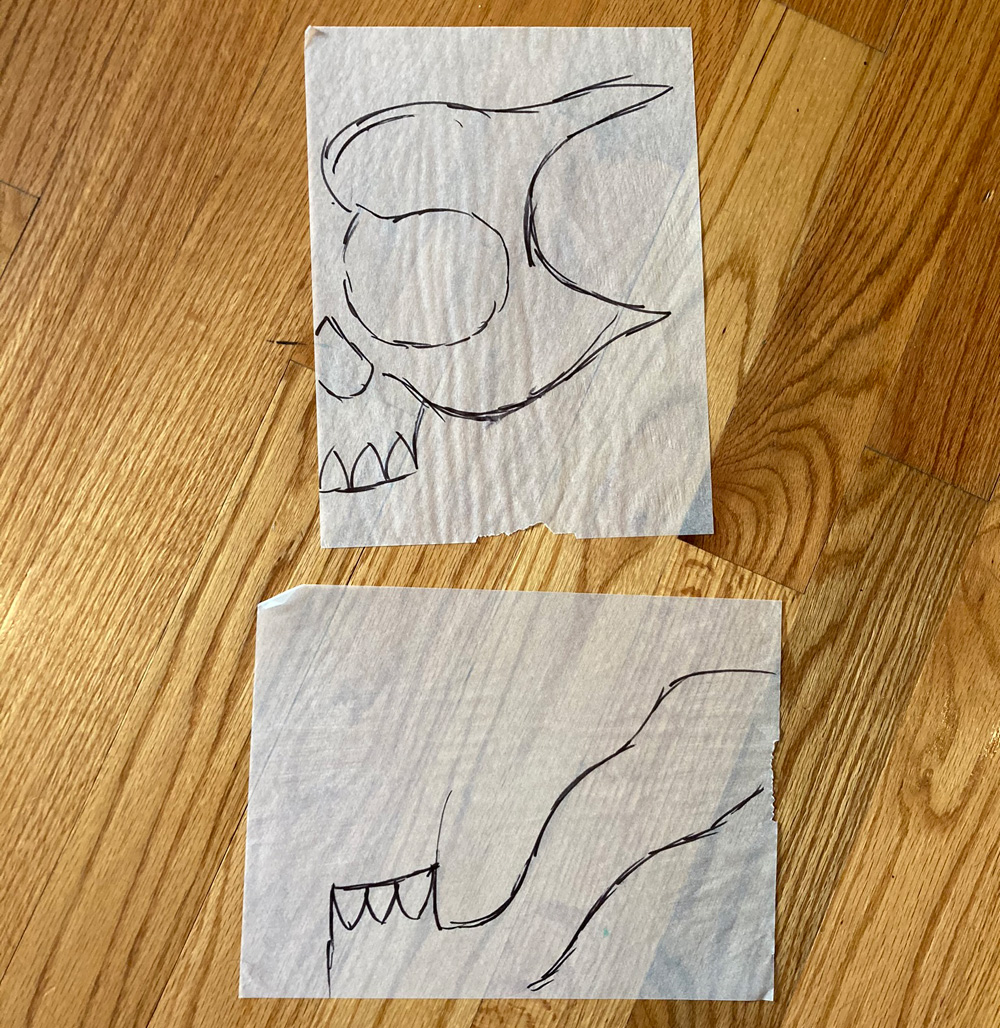
I sketched the face onto the skull base with a sharpie, and then I used tracing paper to draw some of the face parts as half-shapes so I could then cut ’em out, trace ’em onto foam board, then flip ’em to make the other sides.
I’m missing a lot of photos here because the next few hours entailed tons of trial and error to make the face work the way I wanted it to. So I’ll fast forward to this pic and explain a bit about what’s going on:
Like I mentioned, I started with the two foam board pieces for the eye sockets/cheeks/upper jaw, and the pieces for the lower jaw. I cut these out of the foam board with an X-acto knife. I curled and crunched these shapes in my hand to give them the correct curve to fit on the head. I taped these pieces in place on the head with clear shipping tape.
You can see I added some more foam board shapes to make more face parts — the bags under the eyes, an additional piece for the cheekbones to make those areas stand out more, and also a bridge for the nose. Again, these all took some trial and error but they weren’t too difficult.
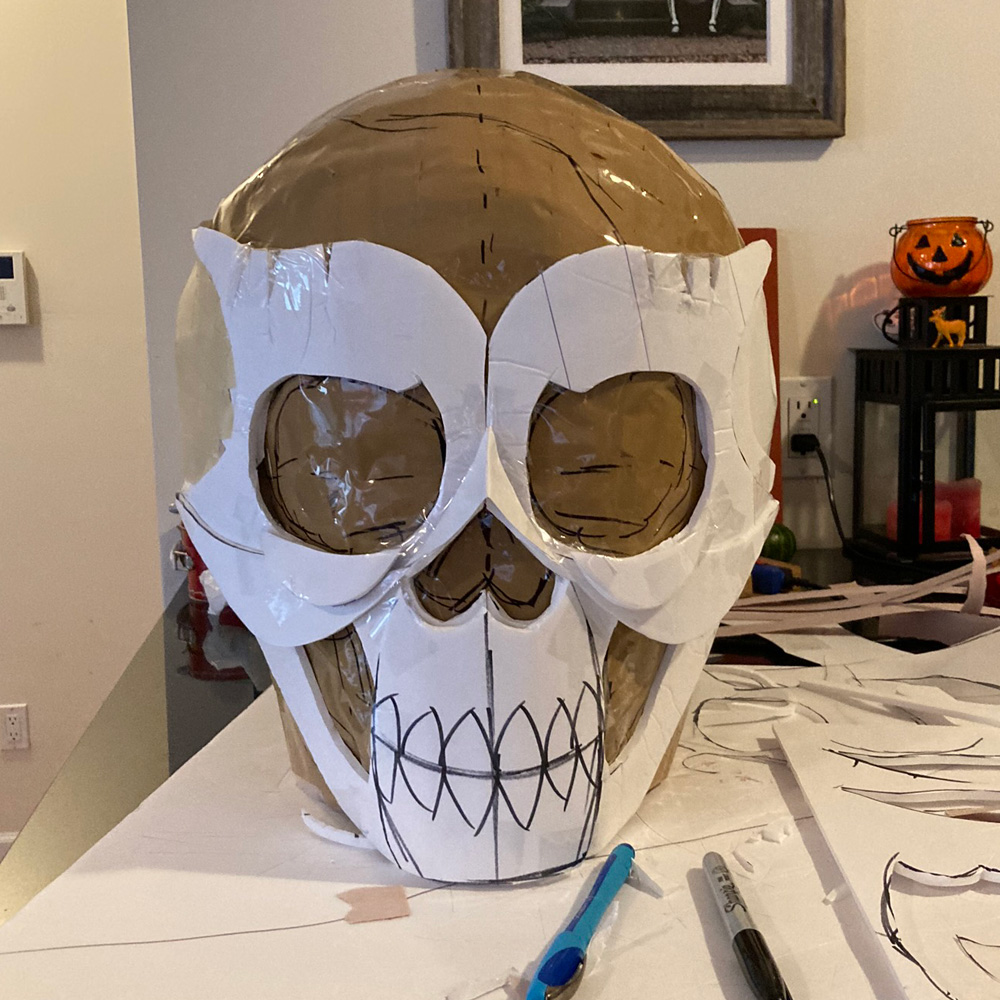
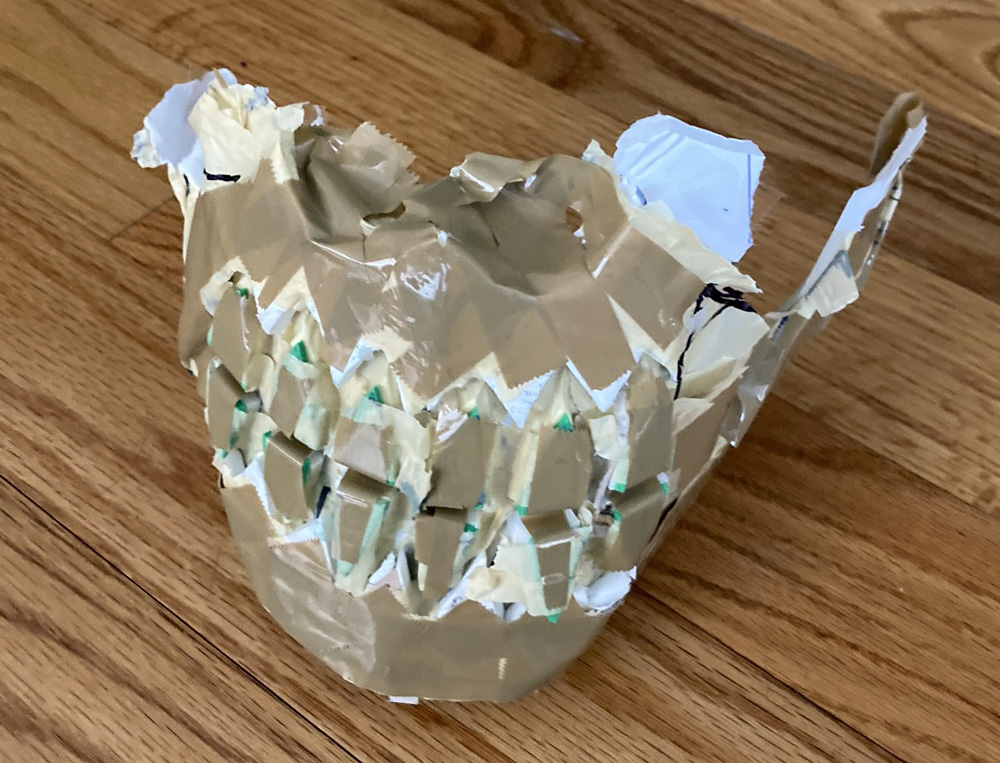
At this point I was unhappy with a few things so I made some adjustments. I decided the teeth should be a little higher (they’re only drawn on for now), and the eyes should be a little farther apart. You’ll see those changes in the next photo, along with some other stuff:

Okay, there’s a lot going on in the pic above. First I’ll mention the last step you’re seeing. Once all the face parts were done I covered as much as I could with brown shipping tape, sliced into very thin strips. The purpose of this layer of tape is to act as a release agent for the paper maché, coming up. I don’t cover 100% of the face because it’s very difficult to get this thick tape into some of the areas with corners and nooks and crannies. I’ve already got masking tape on those parts, and masking tape is a decent release agent itself — just not as good as shipping tape. So anyway, that explains all the irregular ugly tan parts.
Other changes you’re seeing here: like I mentioned, I made the eyes farther apart and I raised the teeth a bit. I didn’t actually move the eye sockets, I just modified them by slicing away some foam board at their outer edge, and taping it back into place on the inner edge. It’s all covered with tape here so you’d never I’d tweaked anything.
I made the teeth in a pretty convoluted way. The whole mouth is a new layer of foam board on top of the plain layer in the previous pic where the teeth are drawn on. I cut out the teeth and gumline as individual places and taped/glued them in place. I then added an extra layer of green craft foam (that soft rubbery stuff you can buy in craft stores) on the teeth to make them stand out a bit more.
I intentionally cut out the teeth and gumlines with a bit too much space between all the shapes; it looks way too dramatic here, but this will all get smoothed out during the paper maché process, leaving just an impression of these lines. I figured out this method on some previous skull masks.
I built up the bony areas of the cheeks and brow with pieces of craft foam to create some layered areas for the cheek bones, the gum line, etc. I tore up lots of construction paper into tiny strips and taped them in place over all these layers of craft foam and foam board, to turn the clean edges into nice smooth shapes. Then, like I said, I covered as much of this stuff with little strips of shipping tape as possible.
By the way, I left the left side of the head unfinished because that’ll get covered with my hair, coming up.
Making the hair
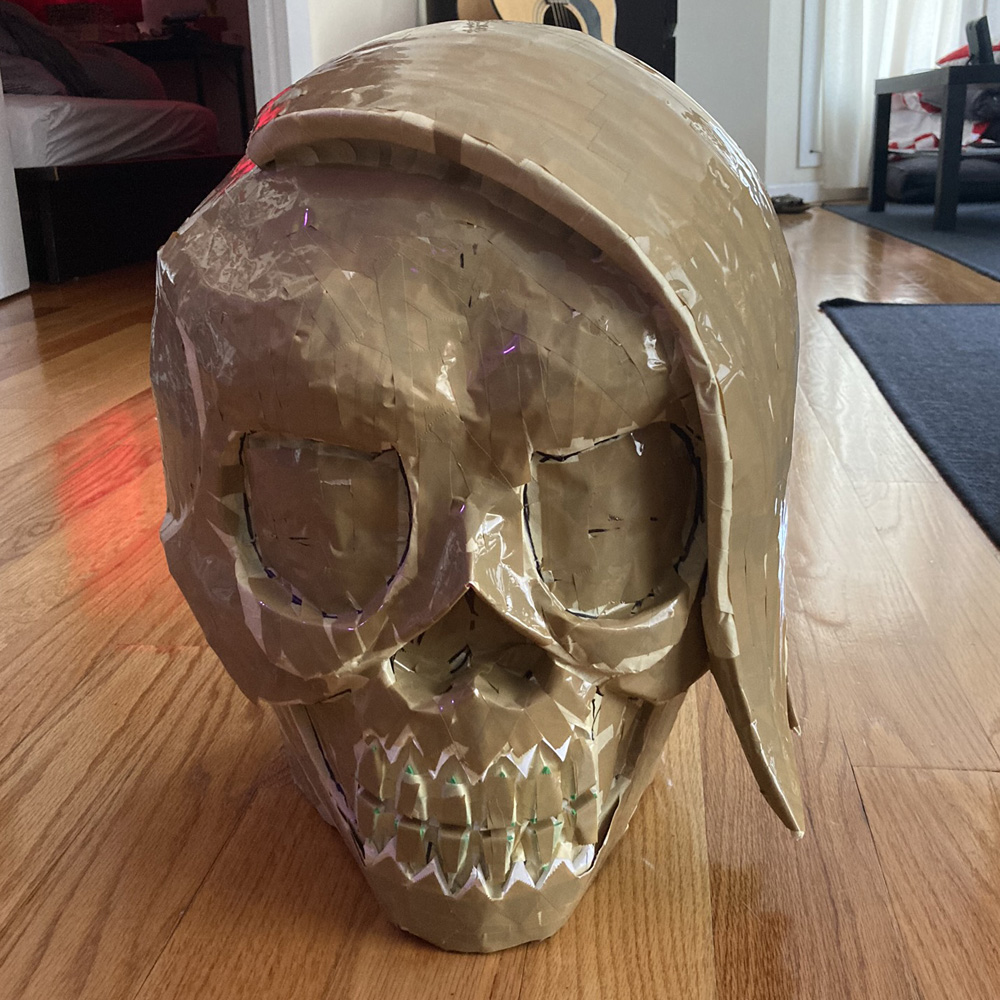
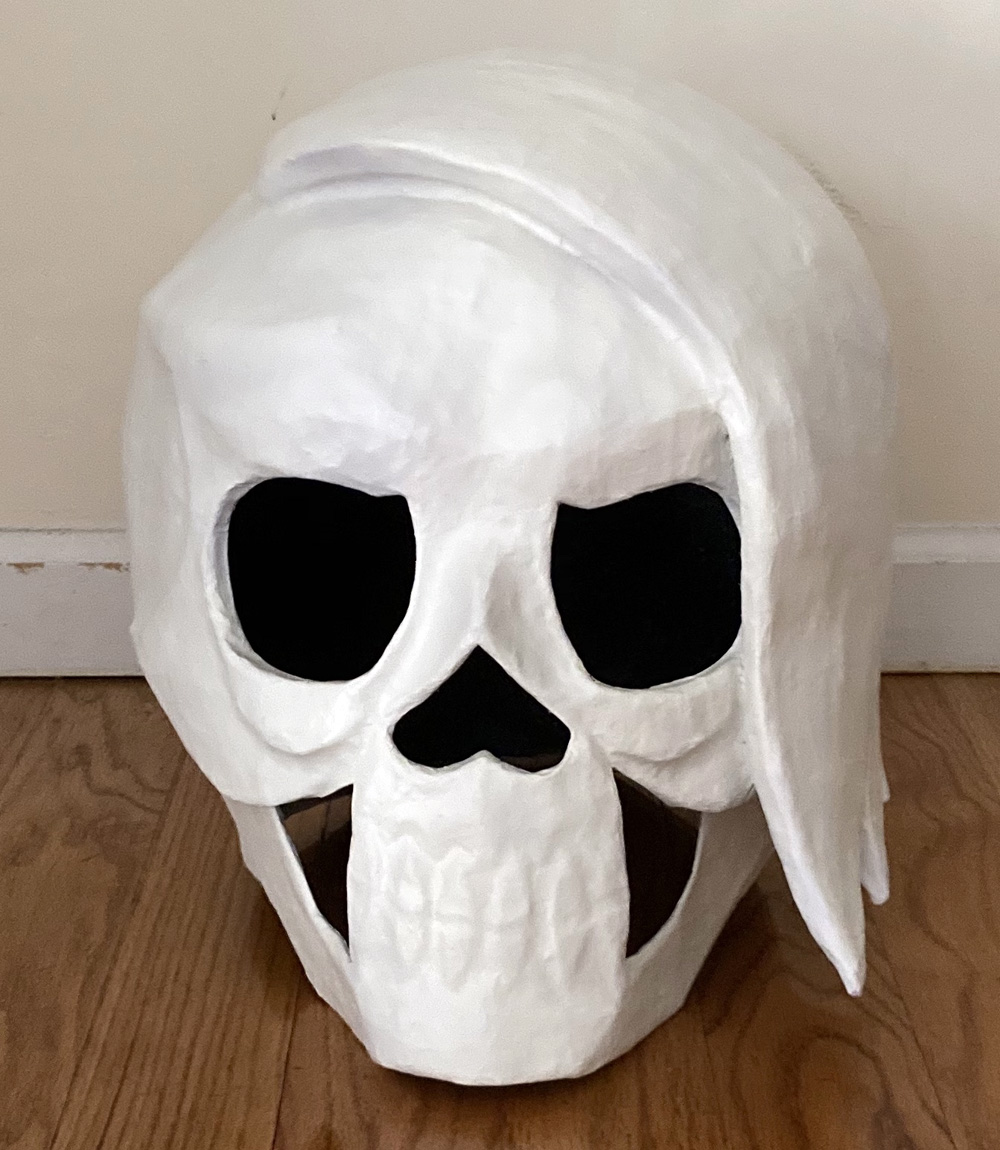
I cut some long 1″ strips of foam board and rolled them up by hand to make them nice and pliable. I taped these in place on the mask to build out the hair, snipping them with scissors in some places as I went. I did that same trick again with the construction paper and masking tape to smooth over the edges between the pieces, similar to what I did for the face. When that was done I covered everything with shipping tape, to serve as a release agent for the paper maché. I forgot take take pictures of a lot of my in-between steps here! Oops!
Paper maché

Finally, time for paper maché! I covered the whole mask sculpture with eight layers of paper maché over a few days; here’s some info about my paper maché process and materials. The short version is: I use Roman PRO-543 universal wallpaper adhesive (paid link) and alternating layers of newspaper and brown wrapping paper.

Cutting everything out
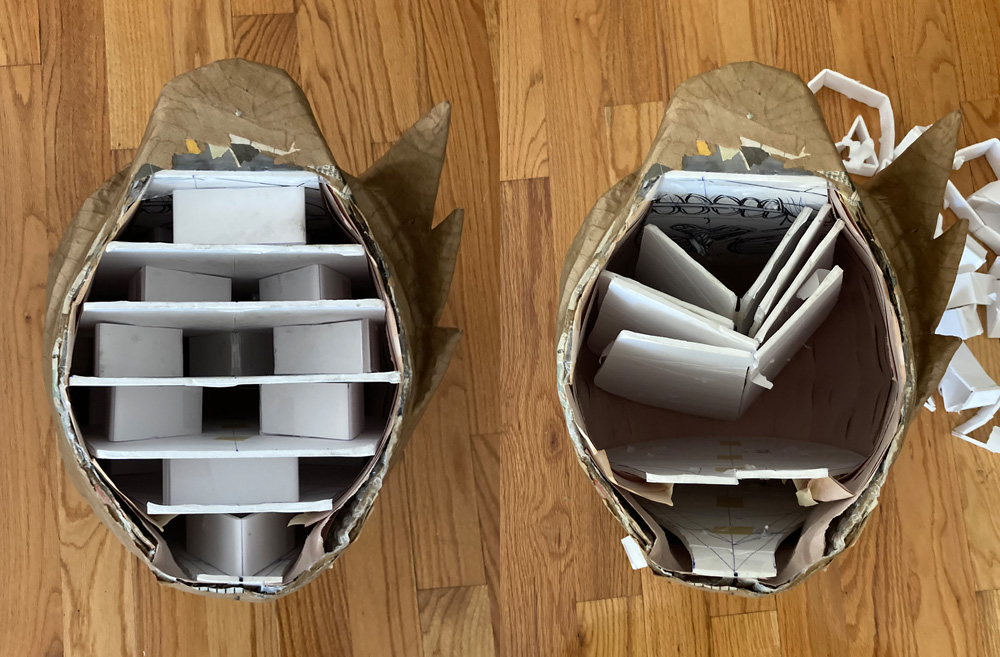
When the paper maché was one and 100% dry, I cut open the mask from the bottom and removed all the base materials. Having cut all the face slices down the middle beforehand really helped! It was easy to knock the triangle supports out of place and pull them out, then cut through the tape holding the face slices together, and gold those pieces up to pull them out through the hole.
All the shipping tape came out like a dream. It’s always so annoying covering the whole base with tape but it makes the removal process a million times easier. Even the teeth, which I was worried about because I could only partially cover them with tape — came right out with no problem.
The only thing I couldn’t get out of these was the tips of the hair — one came out but the others were really stuck in there. No big deal, as that amount of foam and tape really won’t add much weight to the mask.
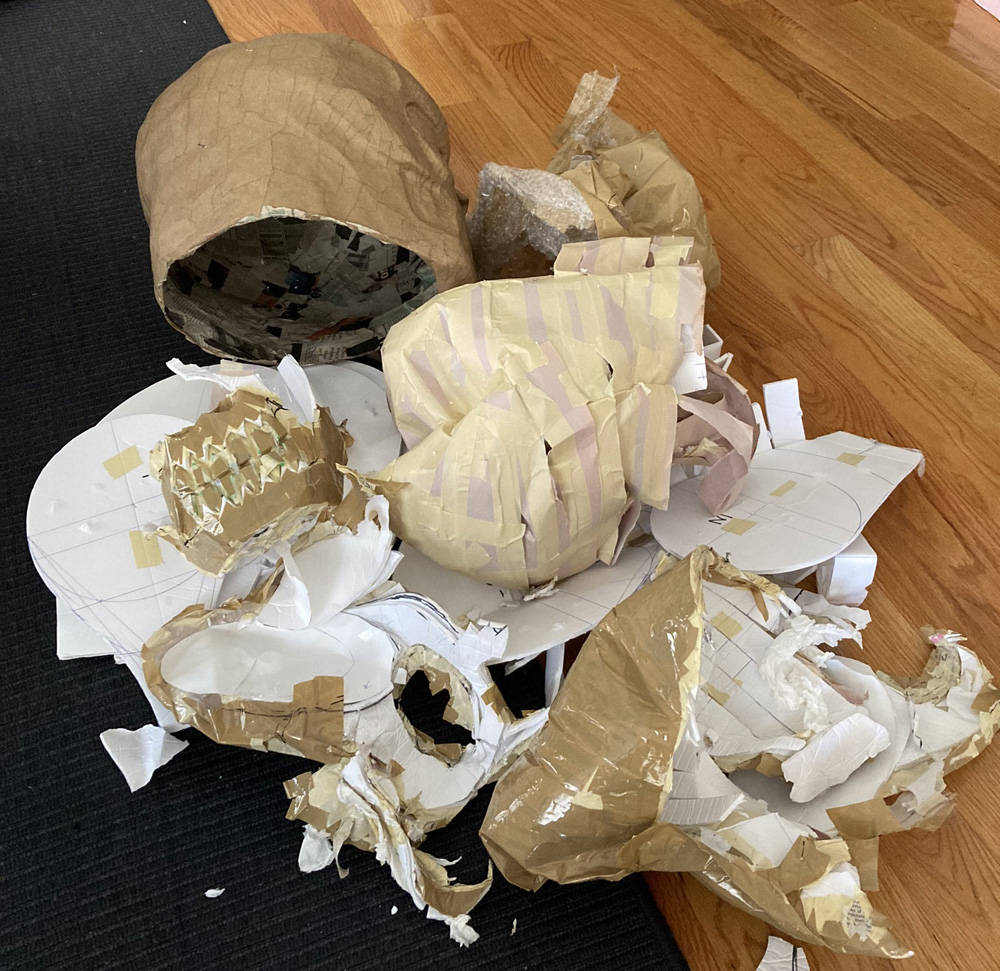
Even after doing a million projects like this it’s always surprising to see how much junk is in there!
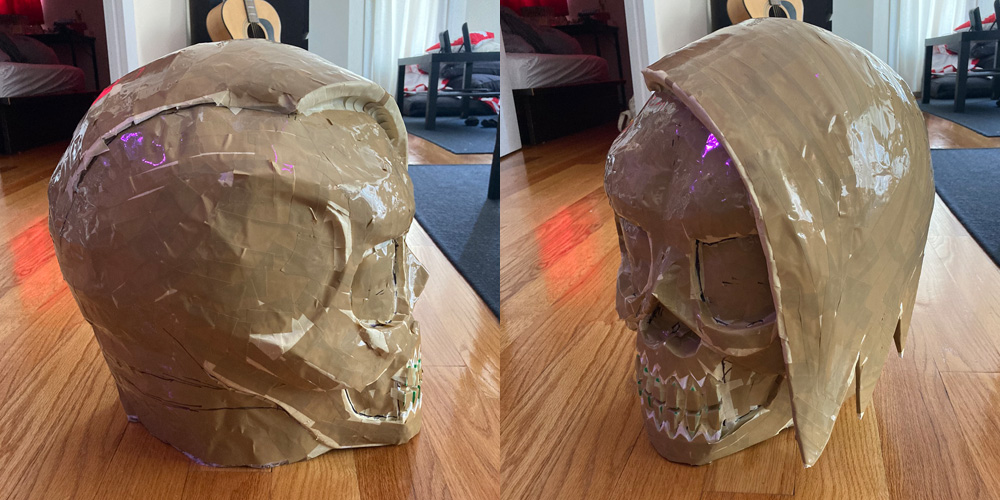
I cut out the eyes, mouth, and the areas at the sides of the mouth with my X-acto knife. I also cut out some extra holes at the sides, to help me hear better while wearing the mask — this makes a huge difference! I’ll conceal those holes as best I can, coming up.
I trimmed off a couple inches of height at the bottom edge of the mask toward the back, so now the chin descends much lower than the back of the skull. I trimmed off a little at a time, trying on the mask in the mirror a few times to help decide how the bottom edge should look. When that was done, I reinforced the inner bottom edge of the mask with plastic zip ties — I snipped off the square parts, taped the long parts in place, and covered them over with two layers of paper maché. This helps the big opening keep its shape and not warp.
I reinforced the edges of all the smaller holes with a layer of tiny strips of paper maché.
I noticed that the area at the sides of the nose was very small and might be prone to warping, so I added some support inside: I hot-glued two wooden coffee stirrers in there and then covered them over with paper maché.
Pennies for counterweight
Having a well-balanced mask is important so that it’s easy to wear and doesn’t pull and lean to one side. I grabbed a broom and set the mask on top to see how it would lean — as expected, it leaned to the left side, with the hair, because that side has more paper and glue than the other, and it also has a couple chunks of foam and tape that I wasn’t able to remove from the tips of the hair.
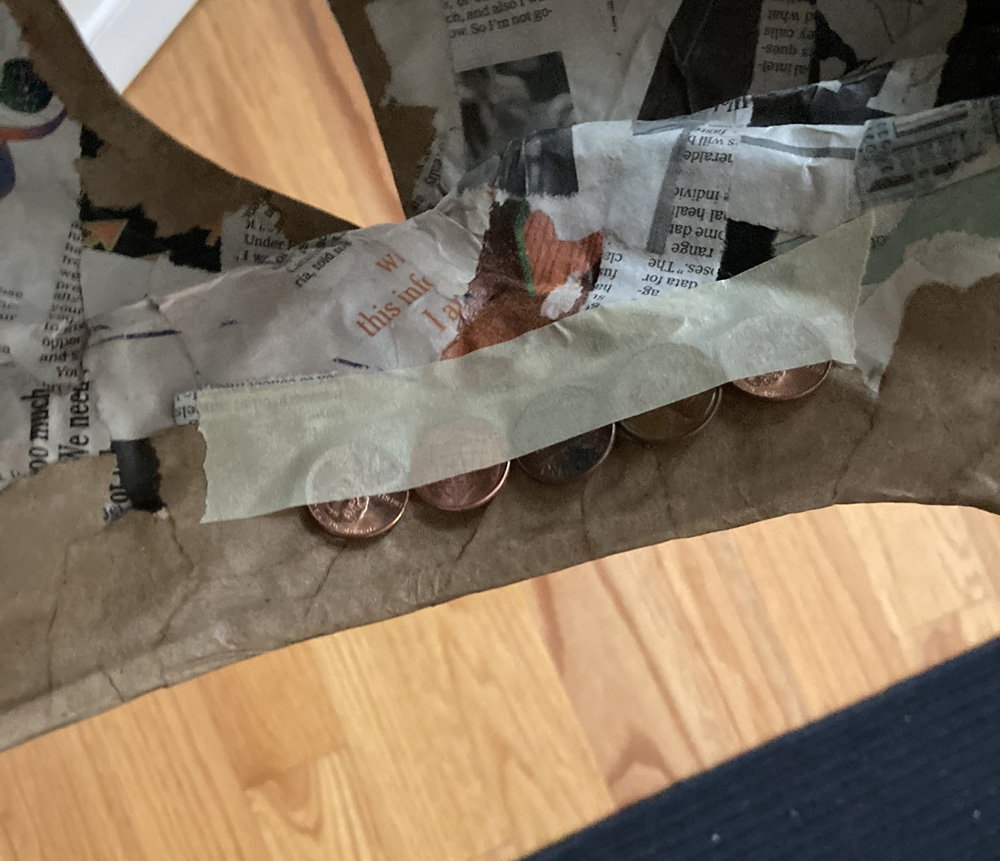
I taped some pennies in place on the inner-right side of the mask and then set it on the broom handle again; it sat pretty balanced this time. So I added two layers of paper maché over the pennies to lock them in place.
A few steps later I realized the mask was pulling forward a bit, so I added some more pennies in the back.
Glasses
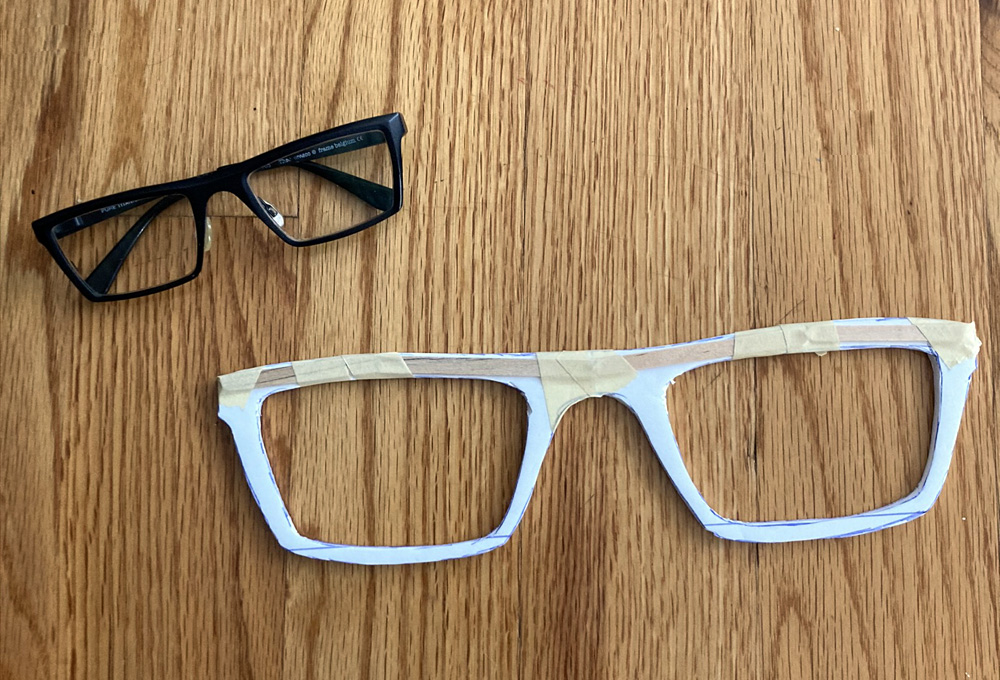
I drew my glasses onto foam board and cut them out with my X-acto knife. I taped some wooden coffee stirrers along the edges to make the foam board harder to bend or break. When this was done I covered the glasses with two layers of paper maché. The earpieces aren’t shown here but I made them the same way. When all three pieces were dry, I connected them with hot glue and then covered the connections with about five layers of paper maché.
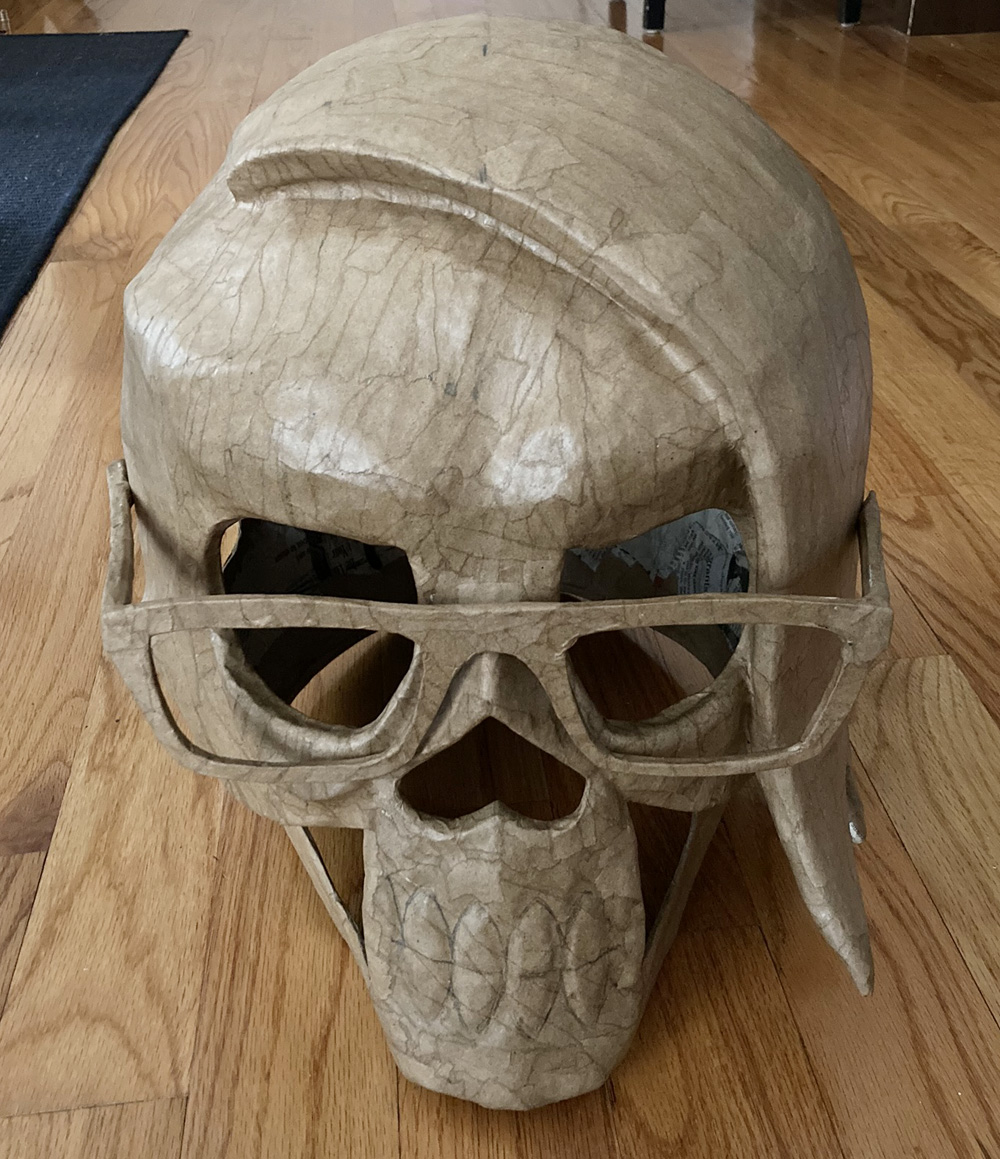
Magnets

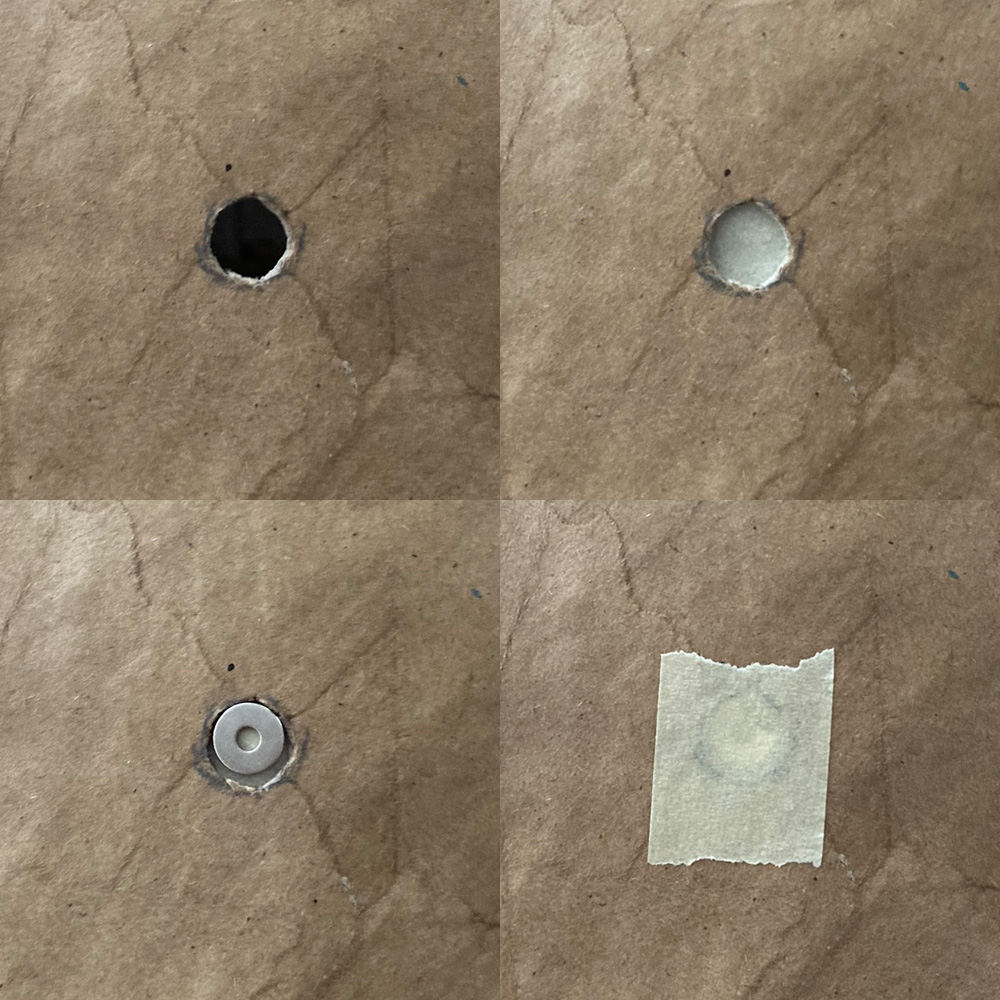
I installed a few magnets in the skull and in the glasses so that the glasses can be removable with no visible connection spot. For each magnet I just traced the shape onto the skull, sliced a hole with my X-acto knife, placed some masking tape on the inner side the hole, and stuck the magnet onto that. I then covered the magnet over with one layer of masking tape (to prevent them from tearing through the paper maché), and then I covered the masking tape with two layers of paper maché, both inside and outside the mask.
I always use rare earth magnets, which are super strong. Note: you can stack up additional magnets to make the connection stronger. So after the magnets were embedded in the mask and the glasses, I added a couple more inside the mask, behind the ones that were embedded in the paper maché.
Setting up the hard hat suspension
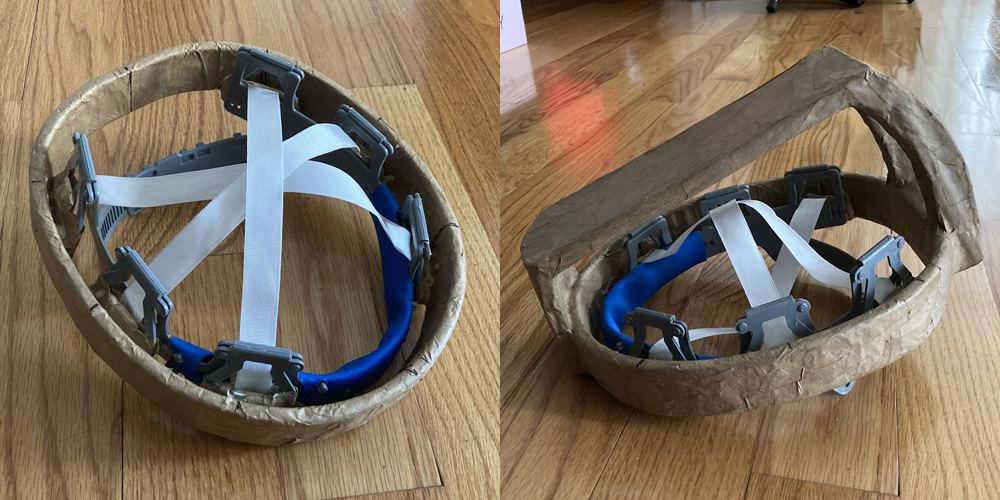
This is always such a huge step! And I did it a different way this time, just as an experiment. I normally use a modified hard hat in all my masks. A while back I had an idea about using a hard hat suspension (i.e. the straps and stuff) but not using the plastic shell of the hard hat. I made this paper maché band as a replacement for the hard hat shell, with the hope that it might reduce a lot of weight. In the end it only weighed a little bit less than if I’d kept the plastic shell, so this whole step was unnecessary. Anyway, I had this thing lying around and there was no sense in letting it go to waste, so I used it in this mask.
I built a sort of bridge onto the band, using foam board and wooden coffee stirrers. I covered this with about seven layers of paper maché; this part needs to be really strong. The skull mask will get attached on top of this.
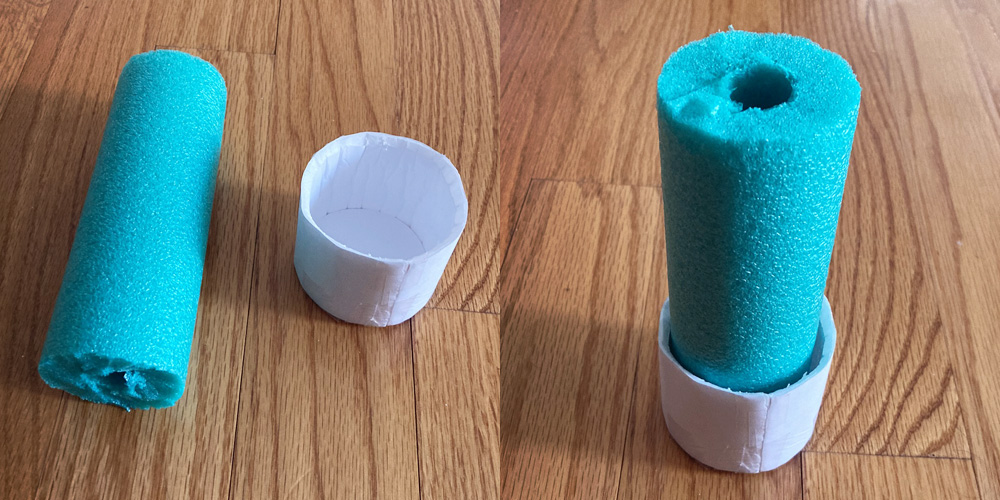
I cut a segment of a pool noodle to go on top of the bridge of the hard hat suspension. I also built a sort of cup shape out of a disk and ring of foam board, measured to loosely fit around the pool noodle.
In the pic above the cup shape is on the bottom but it actually goes on the top; it’ll be glued inside the top of the mask.
I covered this cup shape with five layers of paper maché (not shown).
When it was dry, I glued the cup shape inside the top of the skull using Gorilla Glue and then added a bunch of layers of paper maché all around the base of the cup shape to really lock it in place. Later on the pool noodle will get glued into that.
The idea with all this stuff is that I can put on the hard hat thing with the pool noodle taped on top of it, and then place the mask on top of that so that I can see if it’s the right height and position. Then I can take off the mask and adjust the length of the pool noodle with an X-acto knife, and/or change the position by moving it and re-taping it, and keep trying it on until it’s perfect.
Once the height and position were good, I paper maché’d the pool noodle in place on the hard hat suspension thing. Later on I’ll glue the pool noodle into the skull. All of this is a lot of work, but it’s worth it to get the position perfect!
Painting
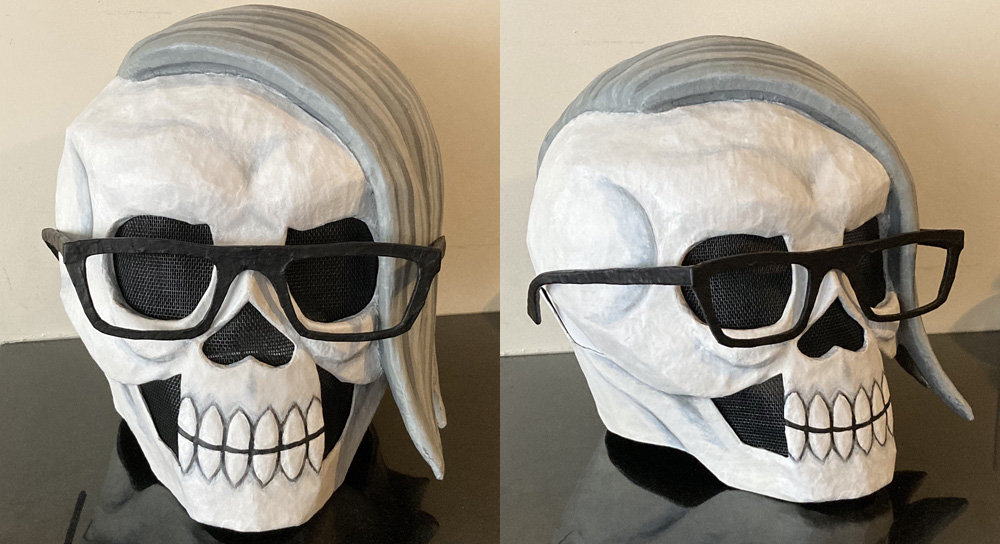
I followed all my usual steps for painting this skull mask, starting with a coat of gesso and then a coat of spray paint; you can read about my painting techniques here. I painted the skull and glasses separately and attached them afterward.
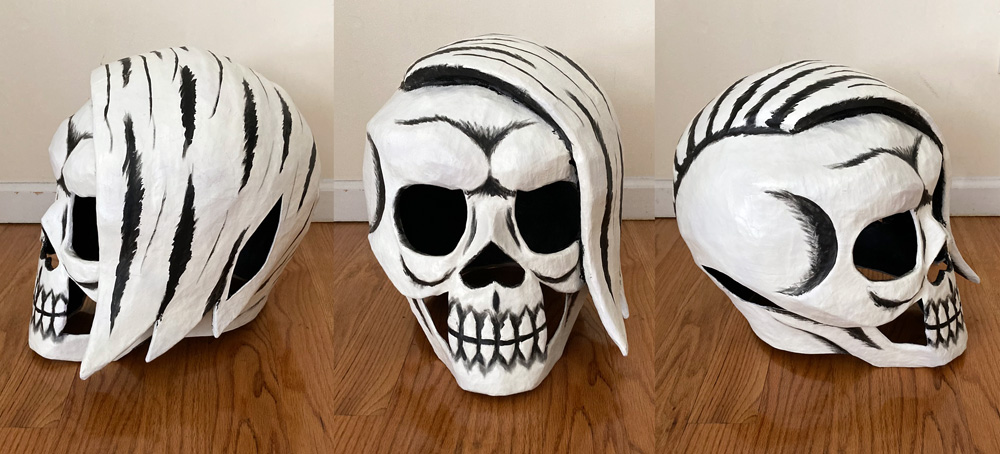
I did my usual technique where I painted heavy black shadows, way too dark, and then dial back the effect with a coat or two of white acrylic paint, rubbed on with a slightly damp sponge. (You can ignore the black shadows on the hair, those ended up getting covered over entirely.) For the teeth, I add some more black shadows and lines to enhance the contrast, and then I did one more coat of white on the teeth with a small brush, to make their edges nice and crisp.
Also, I’ve never painted anything with hair before! I had no idea what I was doing, but I’m happy with how it came out. I just started with a base gray color that I mixed up by using lots of white and a little black, and just a drop of blue to make the gray cooler rather than warm. I covered all the hair with that and let it dry a bit. Then I mixed slightly lighter and slightly darker grays and painted random lines all over the place to create highlights. It took a lot of trial and error but I like where it ended up.
(These pics show the screen material already installed in the eyes/nose/etc, but I actually did that step a bit later.)
Matte spray
I have the mask one quick coat of matte spray, to make the mask a little less shiny and to help protect the paint job. I put matte spray on the glasses as well — but just the inner surface. I’ve noticed that matte spray on anything painted black can cause a sort of cloudy/dusty look, and I wanted to avoid that. However, I wanted to put matte spray on the inner surface, where it’s less visible, to help protect the paint on the areas with the magnets. I’m a little worried that if the glasses stay in contact with the skull for a long time, the paint where the magnets are might get stuck together and rub off. So hopefully the matte spray will help. Also, when I’m transporting of storing this mask I’ll put little pieces of wax paper in between the magnets; that will hopefully help prevent damage to the paint as well.
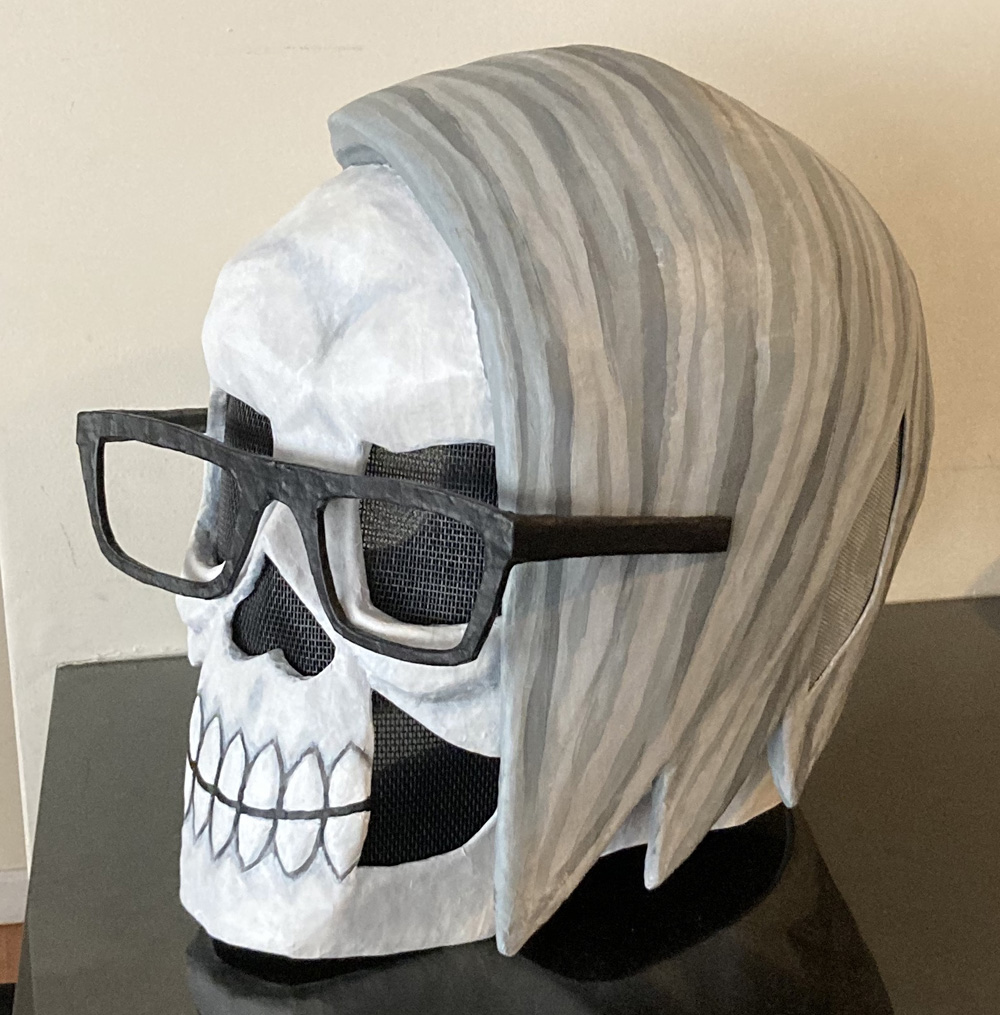
Installing screen for the eyes/nose/etc
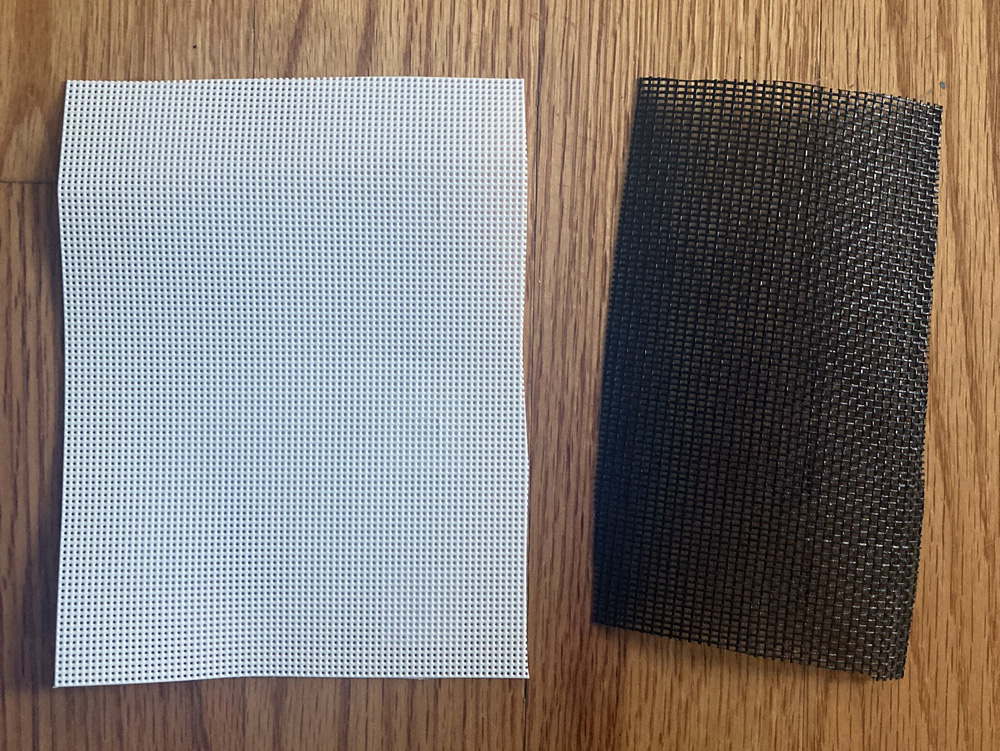
For the ears, nose, and the sides of the mouth, I cut out pieces of screen door material and hot-glued them in place inside the mask. For the ear holes I used a thicker type of screen that’s for craft projects; I’m not even sure what it’s called but it was in the arts and craft section of Amazon. For the side of the head with the hair, I painted the screen with acrylic paint before putting it in the mask. It didn’t take the paint too well but it’s fine.
Note: I’ve learned that a head lamp (paid link) is super useful accessory while working on something like this; it’s dark inside the mask and you need both hands free to work with the screen and the hot glue gun.
I sometimes use wooden coffee stirrers to hold the screen in place while the hot glue is cooling, and I even use magnets for this in some cases. This whole step of installing the screen used to be a real pain but after figuring out all these techniques over many masks it’s now a breeze.
Gluing the hard hat suspension in place
Last step! I set the mask upside-down, put some Gorilla Glue in the empty tube-shaped thing inside the top of the mask, and then set the pool noodle and hard hat suspension thing in place.
Note: Gorilla Glue expands a huge amount as it dries, so I always weigh down any pieces I’m gluing so they don’t shift out of place. A bag of pennies works great for this. Gorilla Glue can dry pretty quickly (like maybe an hour) when it’s smooshed in between two surfaces, but in the case of a project like this a lot of the glue oozes out, and that can take several hours to dry. I usually leave it overnight just in case.
Whoo, this skull is done! This was one of the less complicated skull masks I’ve made; really the hardest part was getting the face to look the way I wanted. I’m typing this all up before Mardi Gras day and I’m pretty optimistic this mask will be one of my more comfortable ones to walk around in — it’s fairly lightweight and the visibility seems pretty good. We’ll see!
Happy Mardi Gras everyone! Please be smart and stay safe! Even if Mardi Gras ends up being really small and really brief this year, I’ll be glad I did something to celebrate.
 About Manning Krull
 How to make a 4-foot paper maché alligator
 My violin skull mask, Mardi Gras 2015
 Three-headed paper maché dragon sculpture
February 19th, 2021 at 7:08 am
Amazing job!
I recently found your site a few weeks back and really enjoyed learning about your artistic process. When I realized Mardi Gras was coming up and a new mask reveal would be upon us, I knew I needed to check back in to see it! – and it was so worth it ;)
Keep on keeping on!
February 21st, 2021 at 6:22 pm
Aw, thank you Sarah! I’ve already got an idea for next year!
May 5th, 2021 at 2:28 am
Fantastic as usual and amazingly thorough and clear explanation/photos. Thank you for taking the time.
May 5th, 2021 at 6:25 pm
Hey Paul!!! Great to hear from you, and thank you so much!
October 16th, 2021 at 6:15 am
Love your work!
This has inspired me for a project I want to do.
Any chance you still have the patterns or at least the dimensions for the fiber board base from this mask?
October 18th, 2021 at 6:04 pm
Thanks Drew! And sorry, I don’t have any of that stuff anymore.
October 17th, 2021 at 3:46 pm
You guys are so cool! I’m going to try and spot you 2022 @mardi gras!
October 18th, 2021 at 6:09 pm
Thanks Angela, we’ll see you there! If you check this blog early on Mardi Gras morning you can see a photo of our new skulls so you can easily find us.
October 23rd, 2021 at 10:58 pm
Your paper mache skills are so inspiring! I am attempting one now, in a much simpler form. Your detailed description of the process and all the photos are really helpful. Mine will be used for a Dia de los muertos celebration. If I can’t keep it on my head, it will still be a cool decoration. Thank you for posting all this!
November 8th, 2021 at 4:10 am
Love these and the step by steps are so helpful! I’m a fellow New Orleanian working on my own paper mache costume project… Do you ever offer classes or live demos? I would really love to watch you work!
November 8th, 2021 at 11:49 pm
Hi Emily, thanks for your comment! I’ve never thought about doing classes or live demos, but the idea sounds fun! In the meantime feel free to reach out to me any time if you need advice; I’m happy to help another local!
November 20th, 2021 at 4:00 pm
Wow! Great job documenting the process. I keep meaning to do something like this. I’m about to start a new batch of work soon, this is really inspiring.
I just did some masks for Halloween and actually built them around the hard hat themselves. The suspension system really make them comfortable. I wore mine for hours.
April 5th, 2022 at 1:34 am
Hello my son wants to make a mask like this ? Can you provide us with the measurements you used on each foam poster board to build the base for the skull? ( where the pieces are graduated from small, large , small again any help appreciated! X
April 5th, 2022 at 9:11 pm
Apologies, Kelly, that stuff’s all long gone.
July 20th, 2023 at 10:33 pm
can you please email me at jlowpro@yahoo.com