
My painting method for my paper maché masks and sculptures
Published June 19, 2015. Last updated November 24, 2026.
I use basically the same few processes for painting all of my big paper maché masks and sculptures and other junk. Here are the main materials I use:
- Mod Podge
- Montana Golden acrylic spray paint (paid link)
- Acrylic paints (water-based paint you apply with a paintbrush)
- Acryic medium (for thinning paints)
- Lots of different sized paintbrushes, from huge to microscopic
- An old sponge (sometimes)
- Clear matte spray, or sometimes gloss spray
- Tiny plastic cups and wooden coffee stirrers for mixing paints
- Larger plastic cups for rinsing brushes
- Stuff to protect my indoor work area; cardboard or whatever
Mod Podge
These days I usually start with a coat of Mod Podge to smooth smooth out the texture of my paper maché a little bit and to conceal the torn paper edges. I used to use gesso for this, but in recent years I've decided I prefer Mod Podge; I believe it works better for this, and it's actually cheaper. I always mix a few drops of acrylic paint into the Mod Podge so that I can see where I've covered. Mod Podge by itself looks white-ish when it goes on, but it dries and turns clear pretty quickly, and on a large piece it's easy to lose track of where you've covered, so a little bit of paint mixed in really helps. I only use a couple drops of paint, so the completed coat of Mod Podge and paint looks kind of weird; not opaque at all. And that's fine.
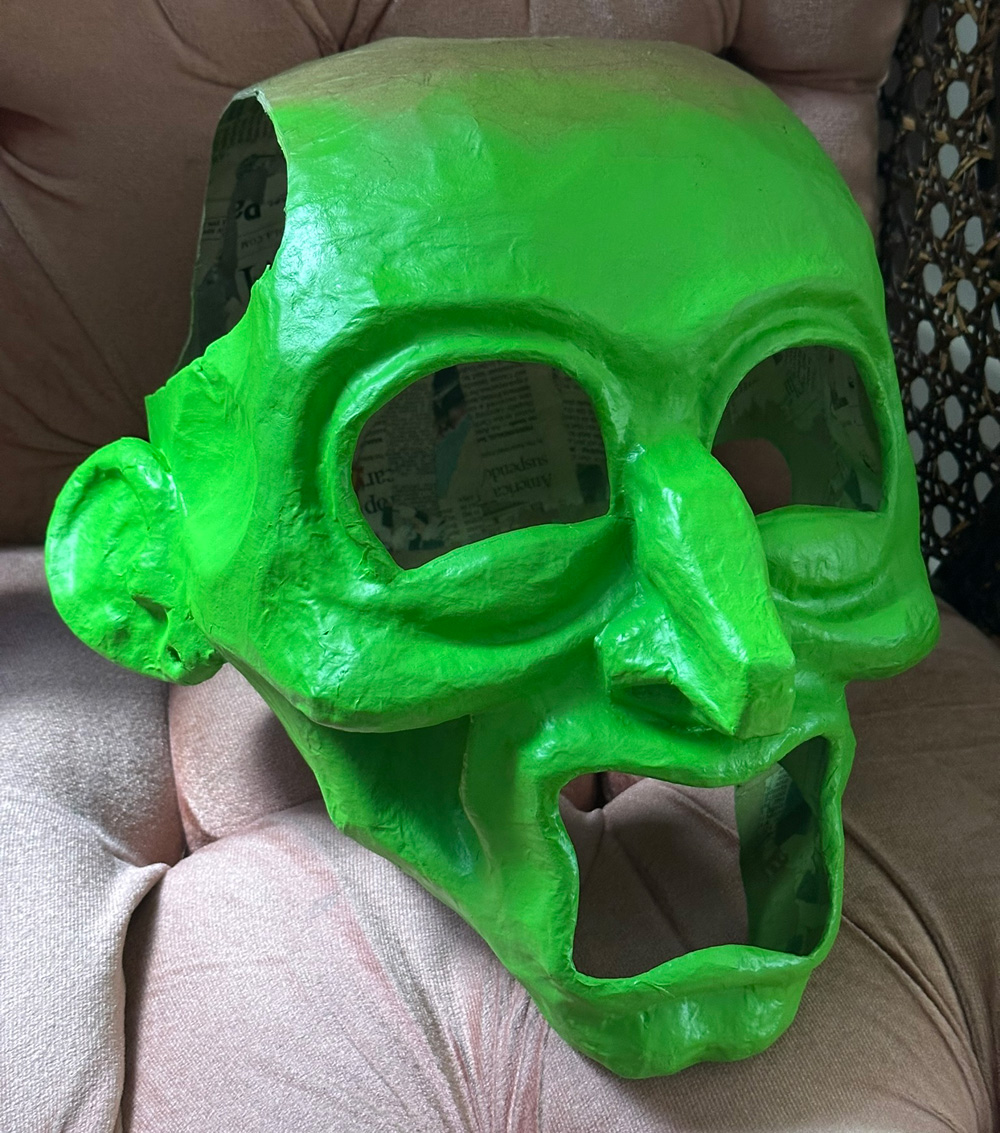
When mixing acrylic paint into Mod Podge, if my finished piece is going to be a bright color (let's say green), I use a few drops of that color and a few drops of white. This first coat of a light color going onto the sculpture will help the color of the spray paint (coming up next) pop.
Spray paint
My favorite spray paint is Montana Gold spray paint (paid link); it's the best quality spray paint I've worked with and it comes in a really wide range of colors. It's more expensive than the cheaper brands you can find at the hardware store, but it somehow seems to lasts longer and covers more; my guess is that it's maybe more opaque than cheaper brands so you get more square feet of coverage out of one can. I dunno!
I start with spray paint (well, after Mod Podge) on 99% of my masks and sculptures, just to get a really solid base coat before moving on to painting details. I let the coat of spray paint set for at least 24 hours before continuing.
I always do the spray paint outside, and I leave the piece outside to set. The Montana spray paints I use have a chemical odor that tends to last longer than the odor of the cheaper brands from the hardware store.
I sometimes use Rustoleum spray paint, like if I need a very basic color, and/or I need several cans to paint something huge. Whatever you do, do not buy the Lowe's brand of spray paint. It's terrible quality; the color can vary from one can to another, and several times I've had the cans become clogged/broken and unusable right away.
I always wear a KN95 mask when spray painting, and I always angle myself so the wind is taking the spray paint mist away from me. If I have to hold the piece while spraying it, I wear nitrile gloves.
Acrylic paint for details
After spray paint, I paint all of the rest of the details and shading and highlights with acrylic paint. My favorite brand is Liquitex Basics fluid paint (paid link) — the fluid stuff comes in bottles, so this is different from other Liquitex acrylics that come in tubes.
I used to thin acrylic paints with water, but I've upgraded to using acrylic medium (paid link) and it's really made a difference! If I'm going to be covering a large area with acrylic paint and I want the paint to go on thick, I don't use any medium to thin it out, but when I'm painting smaller details I mix in different amounts of medium depending on how much I want the paint to go on smoothly. Painting details with paint that hasn't been thinned is difficult because it's often too thick to let you paint precise lines and shapes. So adding some medium makes the paint thinner and lets you have a lot more control. Try a test and you'll see!
Shadows and highlights
Below, here's my Fortunato mask after spray painting, and then after I've painted all the shading and highlights and details:
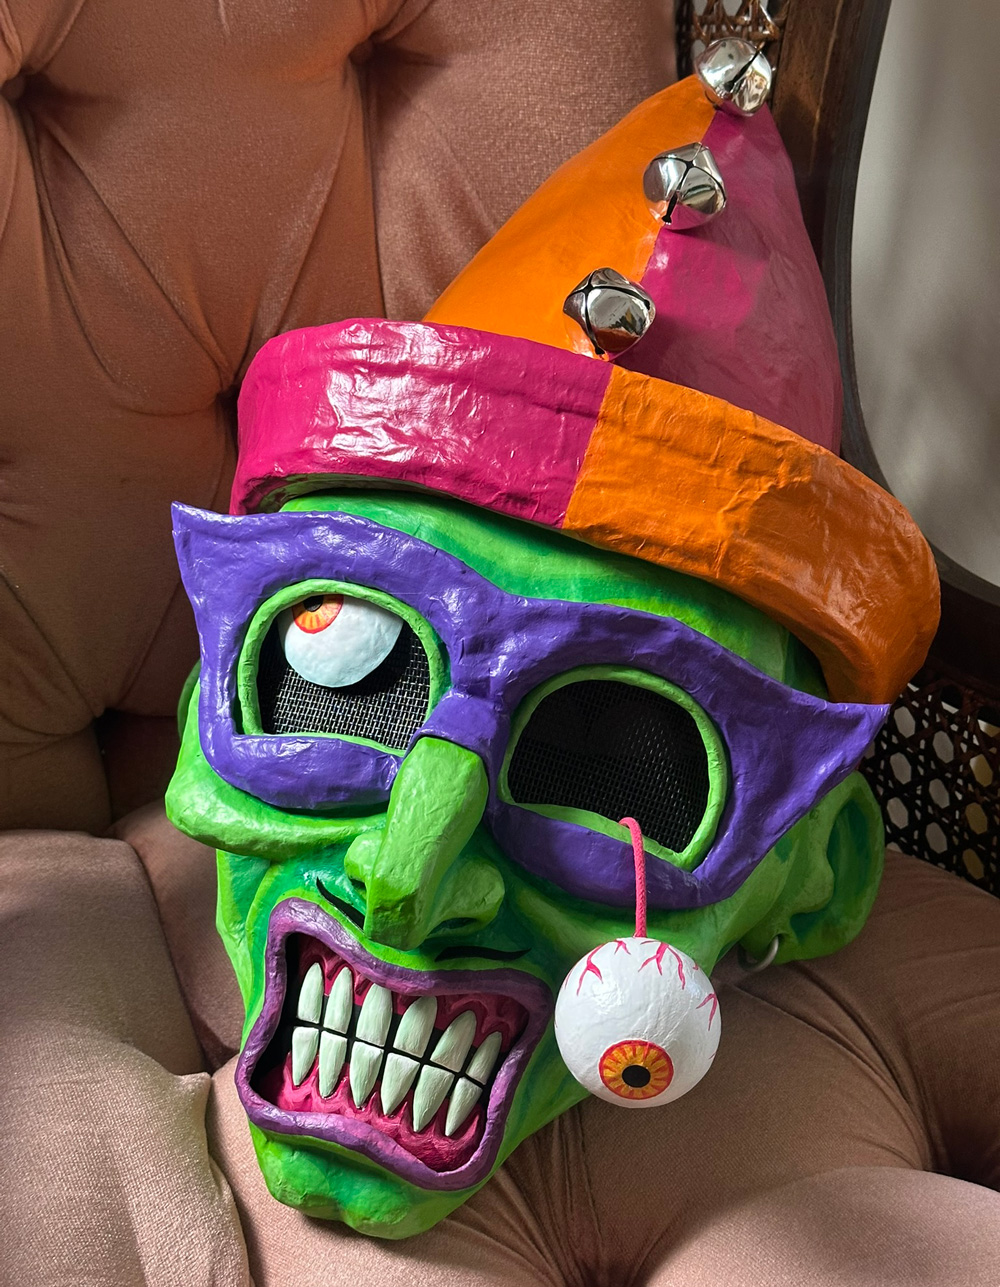
For most of my masks and sculptures, I mix up three colors of paint to start out. The first one is a shade where I try to match the spray paint base coat color as closely as possible. I make up a fairly large quantity of this one. Then I put a little bit of this base color into two more tiny plastic cups, and I mix one to be a darker version, for shadows, and another to be a lighter version, for highlights. I cover the plastic cups with a piece of poster board or plastic to keep them from drying out; they'll usually last a few days or even a week.
When mixing the color for shadows, you might think you just want to mix in some black, but you can get a more interesting effect by making your shadow color a bit cooler than the main color. To do this you can add some black and some blue, or even just some dark blue, or dark gray and blue, etc etc etc. Do some experimenting!
Same for highlights; you could just mix in white, but I find that you get a more exciting effect by making the highlight color a little warmer. To do this you can mix in a few drops of some white and yellow, or white and orange, or white and red, depending on what you're doing for. Just
That's my standard method, but you can also get crazy effects by using totally different colors for your darks and lights.
What's the reason the first color I mixed up; the base color? That's for when I mess up when I'm painting shadows/highlights/details and I need to cover my mistakes. :) It's also so I can dial back any shadows or highlights that are more intense than I want; more on that below.
Painting technique
I use a few basic methods for painting the highlights and shadows on my masks and sculptures.
One way to paint shadows and highlights is to simply take those shadow/highlight colors you've mixed, and paint them right onto your sculpture — you just put the shadow color into all the recessed areas, and the highlight color onto all the areas that stick out, like cheekbones, bridge of the nose, etc. You can try to blend the edges of the shadows and highlights so they're not too sharp — or maybe it'll look cool if you intentionally make them sharp!
Another way to paint shadows is to go with a much darker color, like a lot darker than you actually want the shadows to be. Then when that's dry, you can use a thinned version of your base color to paint over the shadows and dial back the intensity. The more layers of this thinned color you add, the more you're fading the shadows to be less intense.
And another interesting way to do highlight is with a dry-brush technique. Using a large and relatively stiff brush, you put a tiny amount of the highlight color on your brush, and then brush it onto a piece of cardboard or something to get most of the paint off. Then, you use this brush to quickly, lightly brush over the surface of your sculpture. The bristles with the paint will hit the areas that stick out the most, and they'll skip over the recessed areas. So only your outermost shapes get the highlight color, and you get a neat rough texture to the highlights. This technique takes some trial and error to figure out; it's fun!
I sometimes use damp sponge and a tiny amount of paint to create a faded, dirty sort of effect all over a sculpture. If I accidentally overdo this, then I can just go over the whole thing again with a thinned version of my base color to dial back the dirty effect.
I also sometimes do a wash — that's when I mix a couple drops of a darker paint color into lot of clear acrylic medium or water, like resulting in a mix that is very see-through, and then I paint this watery mix all over the surface of the sculpture with a big brush. The wash will go deep into all the recessed areas and not stick to the protruding areas very much. So this is a great way to get a dark color into all the nooks and crannies, like the spaces between teeth, or the wrinkles in eyelids, or the areas where eyelids meet eyeballs, etc etc. It's a neat way to create thin dark shadows.
I mix and match all of these techniques and just figure things out as I go. For all of these steps, it's important to let them dry completely before continuing. If you don't wait long enough, one step can ruin the previous step! An electric fan really speeds up drying.
When all the details are done and dry, I bring the mask back outside for a coat of Blair matte spray (paid link).
(Or sometimes gloss spray (paid link), if the job calls for it.)
That's it!
3D details to guide my painting
I don't have a very steady hand, and I am not good at painting straight lines, or smooth lines, or symmetrical lines, etc etc. It's a real problem! One way I work around this is that I try to build subtle 3D shapes into my sculptures to give me a guide for painting, so I don't have to really freestyle it and try to be precise. That might sound weird, so maybe this example will help: When I'm working on a piece that has eyeballs, I never want to have to paint the iris and pupil by hand. That would be a disaster. So I always use a little circle of construction paper for the iris, and then an even smaller one for the pupil. I That way I have a very subtle 3D shape with an edge, and I can use that as a guide me when I'm painting.
Boring stuff: cleaning your brushes
I try really hard to preserve my paintbrushes and make them last as long as possible, and the number one thing that helps with this is: paint quickly, and wash your brushes immediately/often.
If you paint with one brush for a long time, the paint that's higher up in the bristles will start to dry, and you'll never get it out of there, and the brush will lose most of its flexibility. I try to only paint with any one brush for no more than 10-15 minutes, and then I immediately either A) dunk the brush in a cup of water until I can clean it later, or better yet, B) take it to the sink and clean it right away.
My favorite method for making sure I've got all the paint out of the brush is to run the cold water directly onto the head of the brush as I swirl it into the palm of my hand. I do this until the water runs completely clear, and then I give the brush one last good squeeze under the running water. I then squeeze a paper towel around it and look to see if there's any color in the paper towel; there usually isn't, meaning this brush is 100% clean! If there's color on the paper towel then you've gotta keep rinsing.
Keeping my painting sessions short is the key to all this; as a result I've got lots of cheap brushes that have lasted many years.
I guess I should note, I only use paints that clean up with water — I don't use any paints that require paint thinner or anything.