
Paper maché bear trap prop
Published by Manning on October 29th, 2019
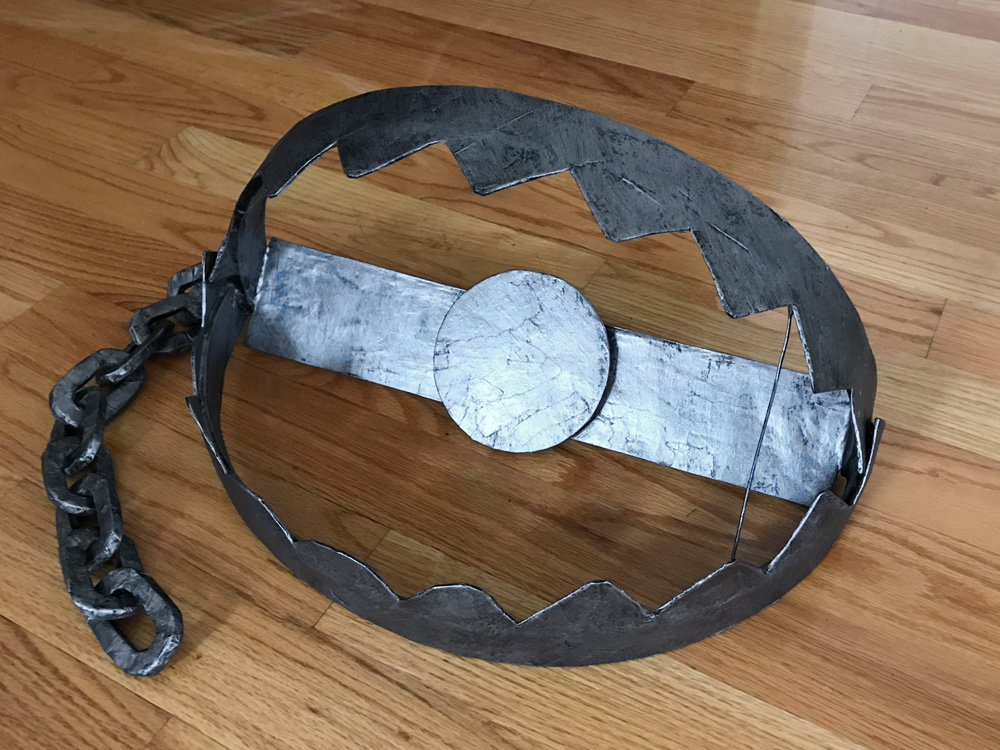
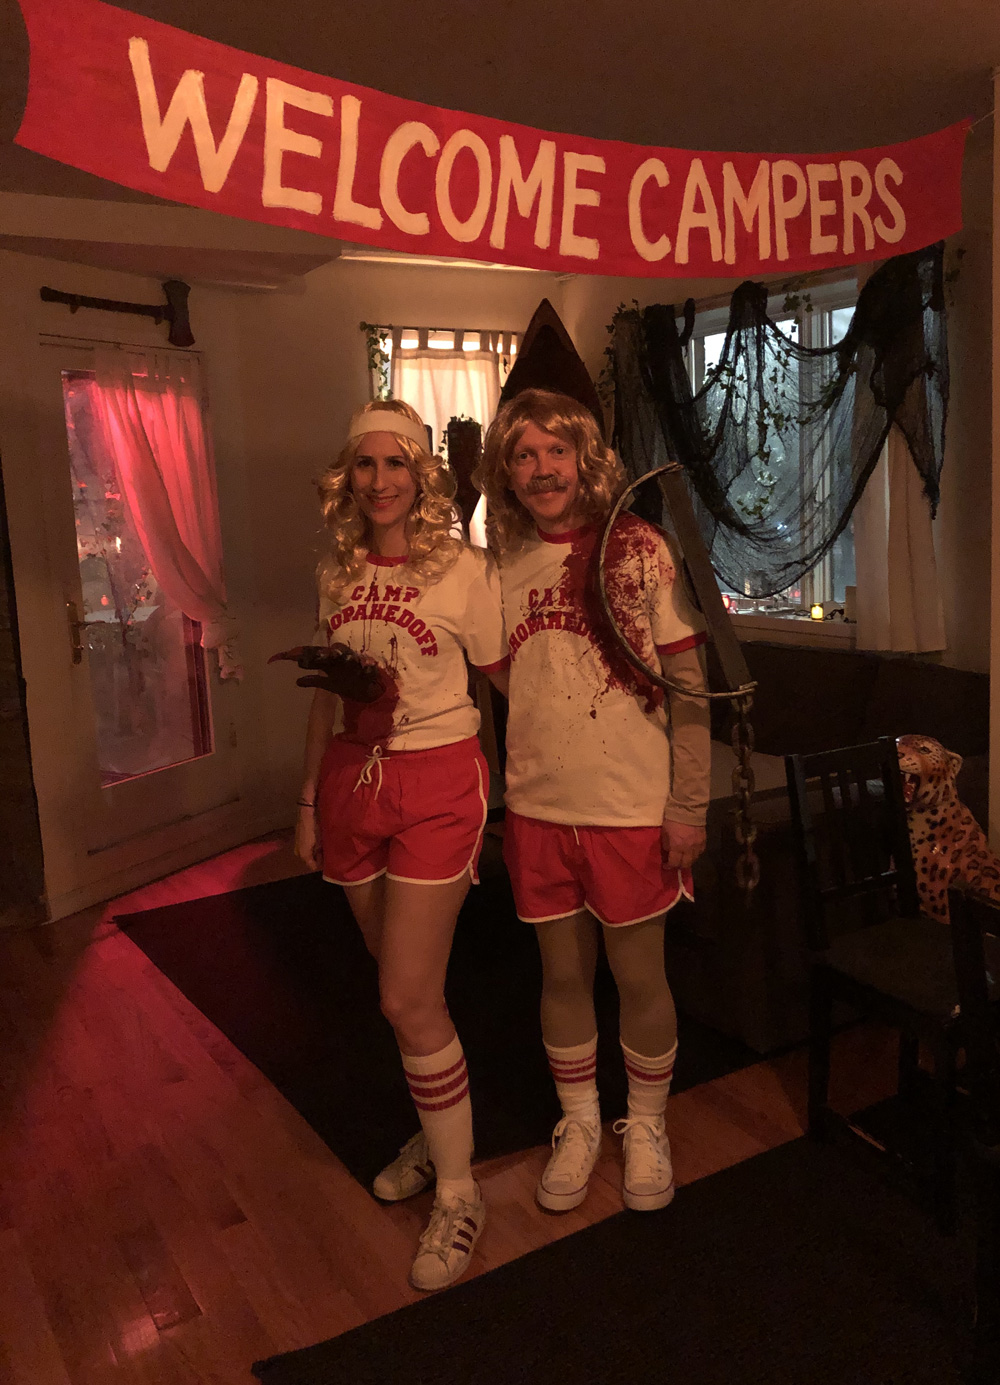
I made this paper maché bear trap prop as part of my Halloween costume for my Summer Camp Slasher party. It was pretty easy!
99% of my projects start with lots of foam board and tape and end with paper maché and paint, and this one was no different. I started out by building the “jaws” of the bear trap. I measured and cut out a few 1.5″ strips of foam board to serve as the jaws, minus the teeth; those will come later. I taped these strips end to end with heavy duty shipping tape to make one super long strip. Then I carefully rolled this strip around a wine bottle to give the strip a permanent curl.
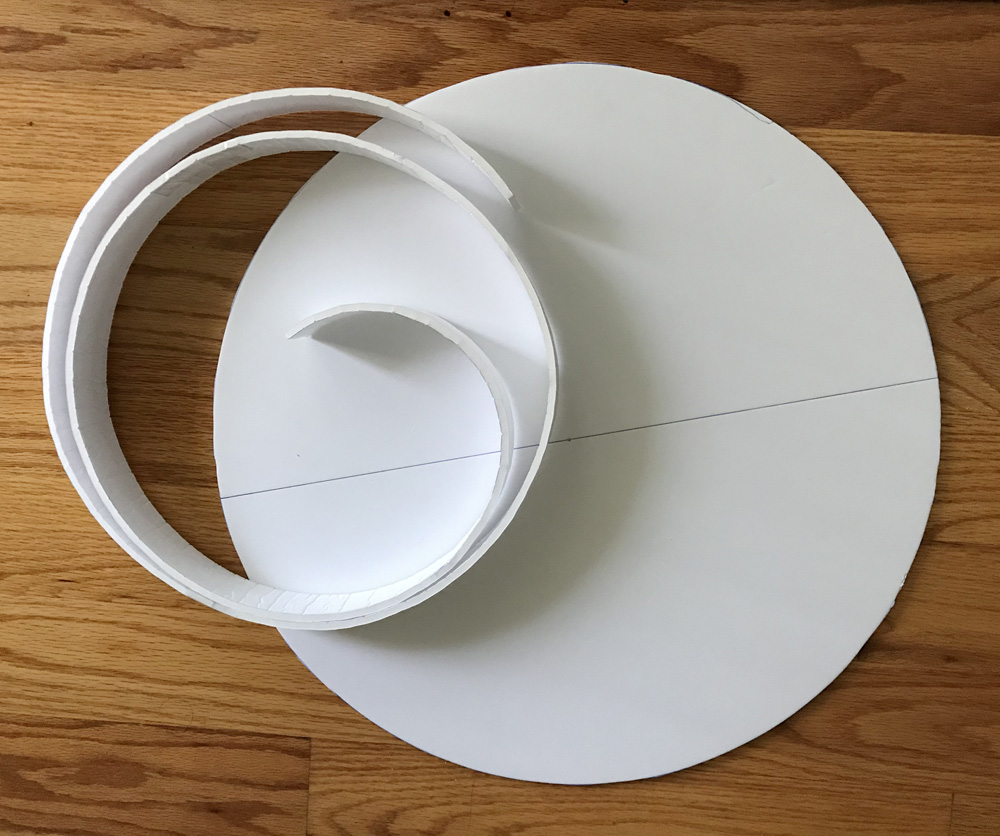
I measured and cut out a circle of foam board at 18″ in diameter. (See my article about drawing precise circles here.) I drew a line across the circle, bisecting it, using the hole in the middle as a guide. This will come in handy later.

I then carefully taped the long curled strip of foam board around the edge of the circle. The circle is just there to serve as a guide for the shapes; I’ll remove it later. The strip was longer than I needed it to be so I snipped it with scissors to make the ends meet as perfectly as I could.
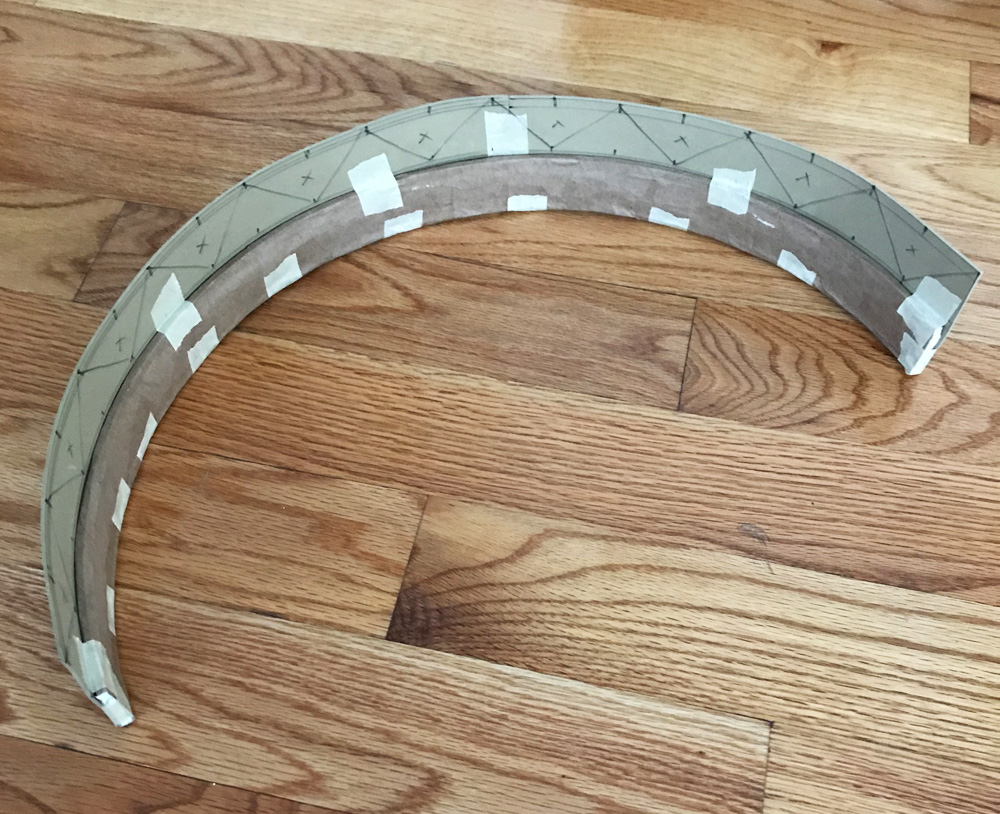
I then applied four layers of paper maché to the foam board strip to make it nice and solid; here’s some info about my paper maché process and materials. The short version is: I use Roman PRO-543 universal wallpaper adhesive (paid link) and alternating layers of newspaper and brown wrapping paper.

In applying the paper maché, I was careful to mostly avoid the edge of the foam board strip where it connects to the circle, so I could easily separate all this later.
Paper maché tends to warp as it dries, so when I was done applying the four layers, I weighed down the circle part with lots of books, to make sure it stays flat as it dries. I left it alone for 24 hours to try completely.
When it was dry, I sliced through all the tape that was connecting the strip to the circle. I removed the circle, and the curved strip kept its perfect circular shape thanks to all those layers of paper maché. I then applied one more layer of paper maché just to cover the exposed edge that I’d skipped over before because it was taped to guide shape. I shoved the circle guide back in place, near the other edge, while this dried.
When that layer was dry, I used the line I drew on the circle as a guide for cutting the jaws apart into two halves.
Making the teeth
I made the “teeth” of the jaws out of craft foam. I chose craft foam for this because it’s soft so it won’t hurt (much) when I’m wearing the thing! If this were just going to be a prop and not part of a costume, I’d have cut the teeth out of foam board as well.
I measured and cut out long strips of craft foam for the teeth. The foam strip for the jaws was 1.5″ wide, so I made the craft foam strips 3″ wide. I measured and drew the teeth on the strips, and then I taped the strips in place on the jaws.
I cut out the teeth shapes, and then I covered them with one layer of paper maché, just to give the teeth the same texture as the rest of the bear trap. They were still a little flexible after this, which is what I wanted; I wanted the teeth to have a little bit of give to them so they wouldn’t poke into my body too hard.
Making the chain and other parts
I cut out the long rectangular hinge shape and the round trigger shape (I found out this part is called the pan) out of foam board and covered them with paper maché; easy!
I did a little trial and error with holding the jaw parts on my shoulder to determine the size that the jaw opening would need to be, and when I figured that out I hot-glued the jaws in place onto the hinge. I covered over the connection area with some tape and paper maché to reinforce it. I then hot-glued the pan (the circle part) in place on the hinge part; I put a small circle of foam board in between so that the pan is raised up a little bit.
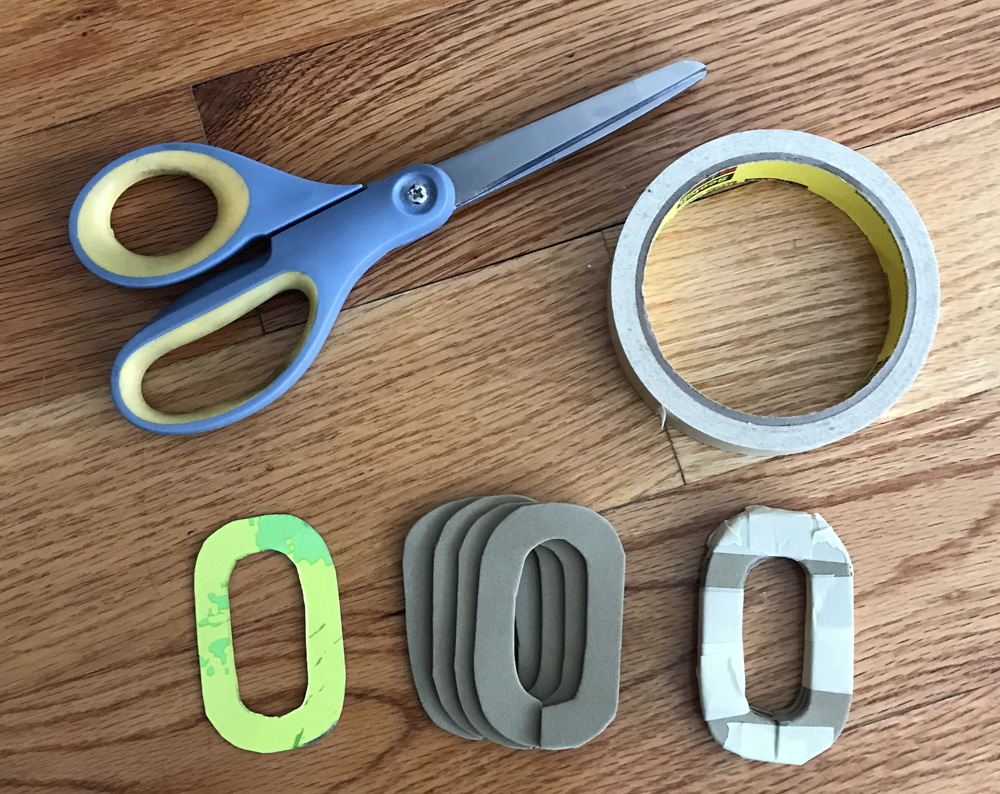
I made the chain mostly out of craft foam. I drew one chain link shape on poster board, cut it out, and used it to trace the outline onto craft foam; 40 copies for 10 chain links.
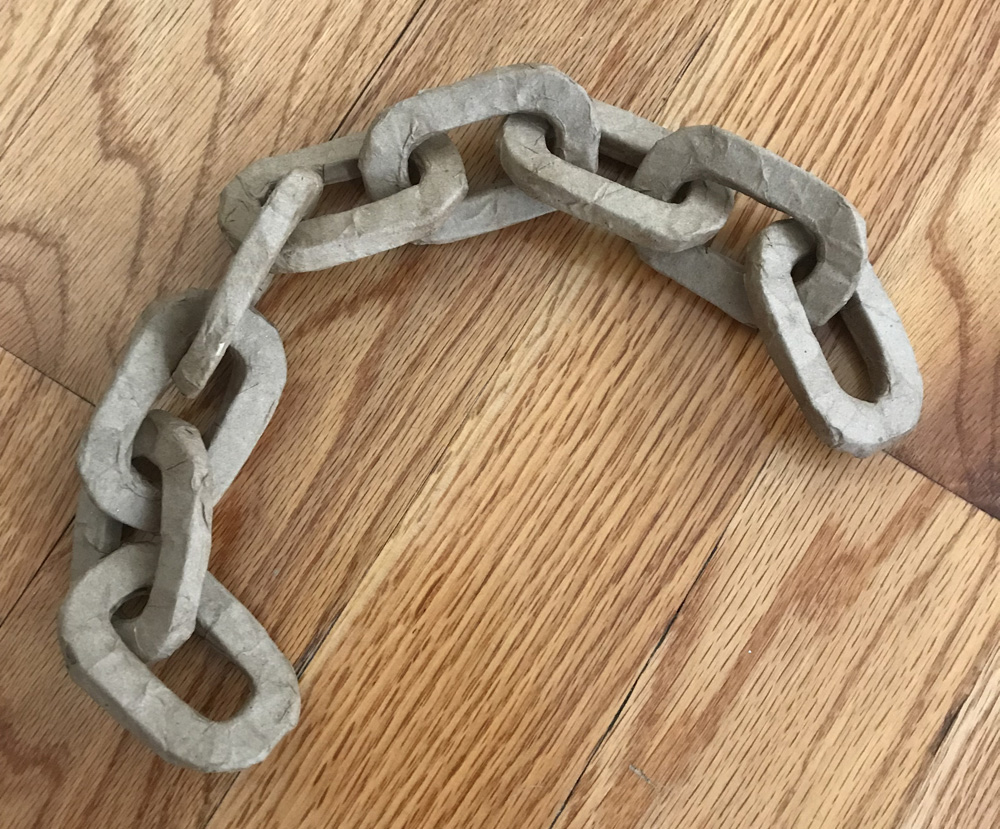
For each chain link I took four of the craft foam pieces and taped them together, then and covered them in a layer of paper maché. I let them dry, and then I cut each of them in half — one at a time, so I could keep track of which half goes with which — and then taped each one closed around the next link. I then covered over the taped connections with a layer of paper maché, just to hide the tape. I did all of this pretty quickly and sloppily but it’s totally fine for what will eventually be a rusty-lookin’ beat-up old chain.
I cut one chain link in half, looped the rest of the chain onto it, and hot-glued the half-link in place on the bear trap. I covered over the connection with some tiny strips of paper maché.
I’m thrilled with how the chain came out!
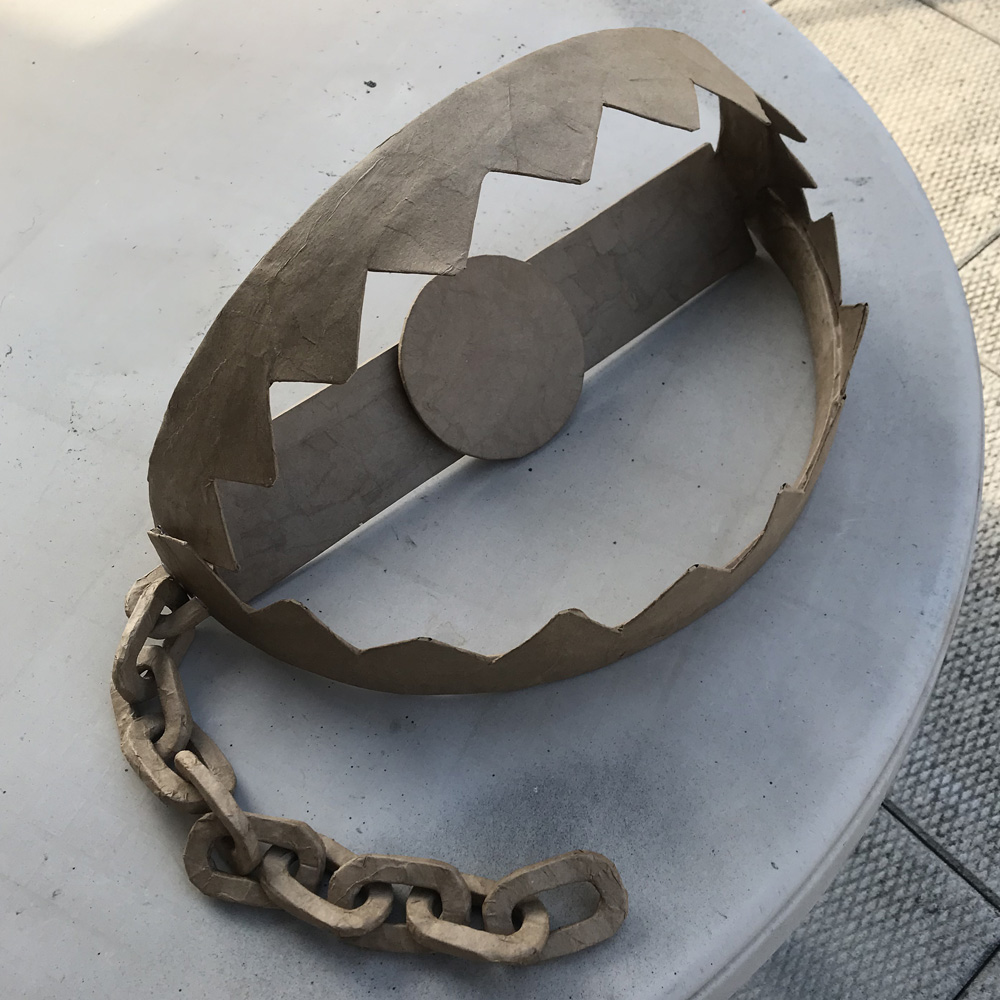
Here’s the bear trap prop with all the paper maché finished:
Painting
I spray painted the bear trap black, and when that was dry, I mixed up some silver and black acrylic paint and applied it sloppily by hand, using a dry-brush technique with a big rough brush, to give this prop a dirty old metallic look. Easy!
Making the bear trap wearable
Making this thing wearable was a challenge! I wanted something that would be nice and stable but could also be taken off and put back on pretty easily.
Once the whole bear trap was assembled and solid, I did some more trial and error with putting it over my shoulder, determining which teeth were stabbing me the most, and then trimming them with scissors so they’d be rounder and a bit shorter in some places. I removed one whole tooth in the back to give my arm more room there. I also snipped the very tip off of all the other teeth, just to make them less sharp all over. For all the big parts I cut off, I covered those areas with one last bit of paper maché.
I figured that the main thing I needed to do to attach this bear trap to my costume was to build a narrow horizontal bar inside the jaws of the bear trap that can easily connect to a hook on my shoulder — I wanted something really simple and secure, but easy to put on and take off.
I measured and cut a length of wire hanger to fit inside the jaws of the bear trap, leaving an extra inch at each end, which I bent into 90-degree angles. The little bent parts were there to help me anchor the wire in place inside the jaws of the bear trap. I taped these bent parts in place inside the jaws, and then I covered over these connection points with four or five layers of paper maché to really lock the wire in place.
Here, I’m posting this pic again (above); you can see the wire hanger on the right side there.
Now all I needed to do was build the hook onto my shoulder. I made a hook out a small piece of wire hanger, bent into four short segments: three small parts that will lay flat, and the hook part that’s slightly raised.
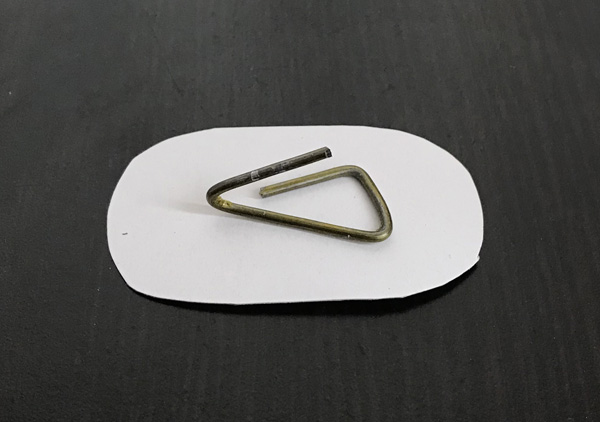
In the pic above, the piece at the top is the hook part, which is standing up away from the other pieces, and the triangular part at the bottom is flat on a piece of pasteboard. This is right before I glued it in place. I hot-glued the triangular base part onto the pasteboard, and then I covered over that connection with masking tape.
I knew I’d be wearing a white t-shirt with the summer camp name over top of a flesh-colored long-sleeved t-shirt, so I wanted to attach the hook part into those. I put on the two shirts, put the bear trap onto my shoulder, and I marked a dot on my shoulder with a marker right where that length of wire hanger ran across. I then took off the bear trap and used an awl to carefully poke a big hole through both shirts where I marked the dot — uhh, I hope this is obvious but I lifted the shirts up off of my shoulder before stabbing the awl through! Ha.
With the shirts still on, I took the little hook thing and put it under the shirts and worked the hook part up through the two holes so it was sticking out. Before attaching it permanently in the shirts, I did a quick test with the bear trap prop and it worked perfectly! Even without attaching the hook in the shirts, the whole prop felt very stable on my shoulder.
I carefully removed the shirts with the hook thing still in place. I turned the collar area inside out and then I hot-glued the pasteboard in place in the shirts, using tons of glue to really make sure it’s locked in there.
I decided to also hot-glue a slightly-larger piece of craft foam over the paste board so the craft foam would be against my skin rather than the paste board and tape; my hope was that this would make the piece a little more comfortable to wear. This strip of craft foam will also help distribute the weight of the bear trap a bit more, hopefully so it doesn’t pull really hard at the area of the hook itself. My hope was that all of this wouldn’t make the shirts visibly sag and stretch too much. This worked out fine!
Blood!
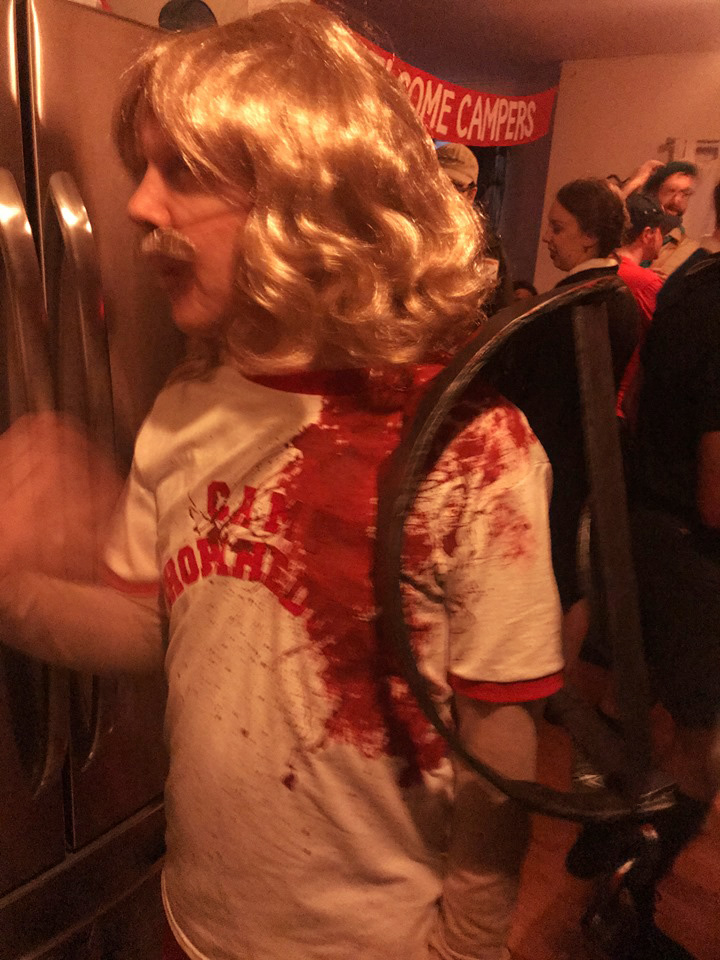
I mixed up some red and black acrylic paint and used it to bloody up my t-shirt. Before applying the blood, I put on the shirt and popped the bear trap in place (I’m thrilled with how easy it is to put it on and take it off!) and I marked some dots with a Sharpie right where the teeth jabbed into the t-shirt. These would serve as a guide for where to concentrate most of the blood.
I laid the t-shirt on a plastic shower curtain outside and flicked the paint at it with a big paintbrush. I also painted some long drips and big splotches by hand. Oh yeah, and I put some blood on the shoulder and the hook itself to conceal that whole contraption a bit better.
I also added some of this blood effect on the bear trap itself. Pro tip: acrylic paint is way better than store-bought fake blood! (Uh, for clothes and stuff anyway, not for your skin.)
This bear trap worked out beautifully, and I was really glad I thought to make it removable, so when I went outside in the cold I could quickly take it off and put a hoodie on.
On to the next project!
 About Manning Krull
 How to make a 4-foot paper maché alligator
 My violin skull mask, Mardi Gras 2015
 Three-headed paper maché dragon sculpture
May 30th, 2022 at 10:27 pm
Hello,
I was wondering how much you would charge to make and ship your paper maché bear trap prop? Also, is the mouth of the trap able to be opened and closed or is it set in one position?
Please let me know.
Thanks!