
Paper maché wolf mask
Published by Manning on November 2nd, 2018
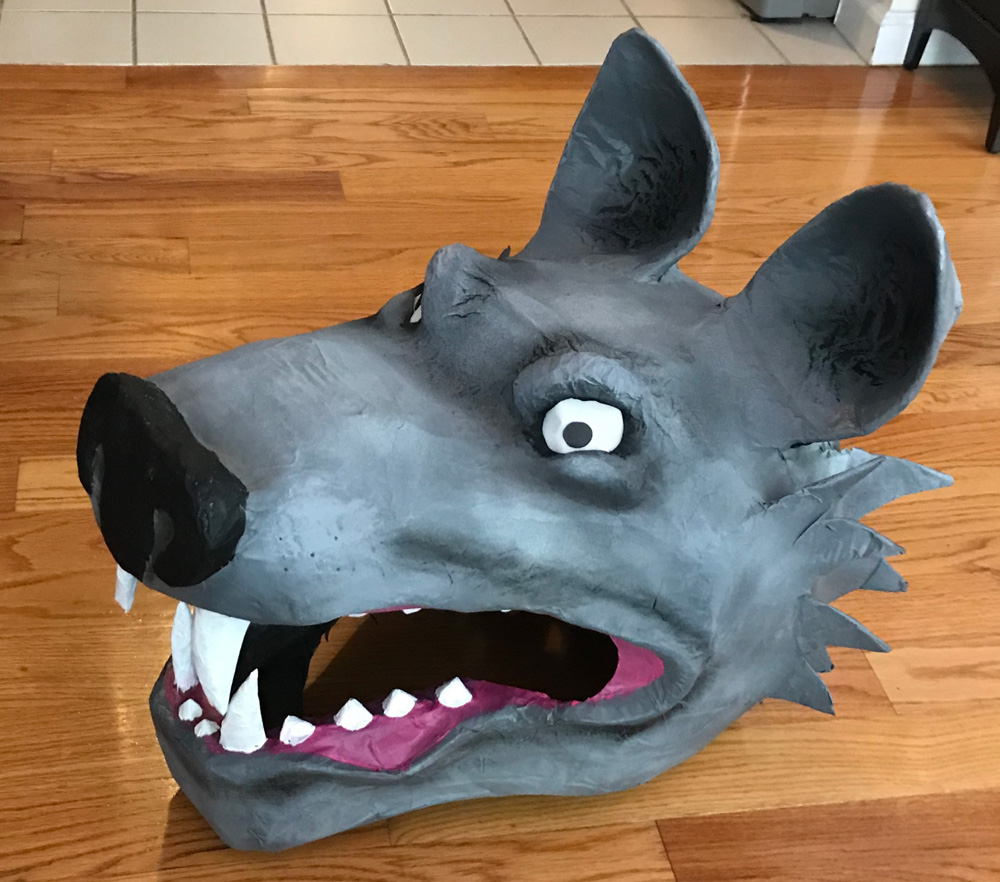
I made this oversized paper maché wolf mask for Halloween 2018! It was a rush project without a lot of planning, and I took a lot of shortcuts, but it still came out pretty cool (but, uh, way bigger than I was thinking)! Here’s how I made the thing…
I started by doing some tiny sketches of the wolf mask in profile, and then I drew it at real size (I thought) on a big piece of foam board, to use as a guide. I based the sketch on measurements of my head wearing a hard hat — I mount all my big masks on a hard hat, so it’s important to make sure the hard hat will have room to fit in the mask.
Building the base for the wolf mask
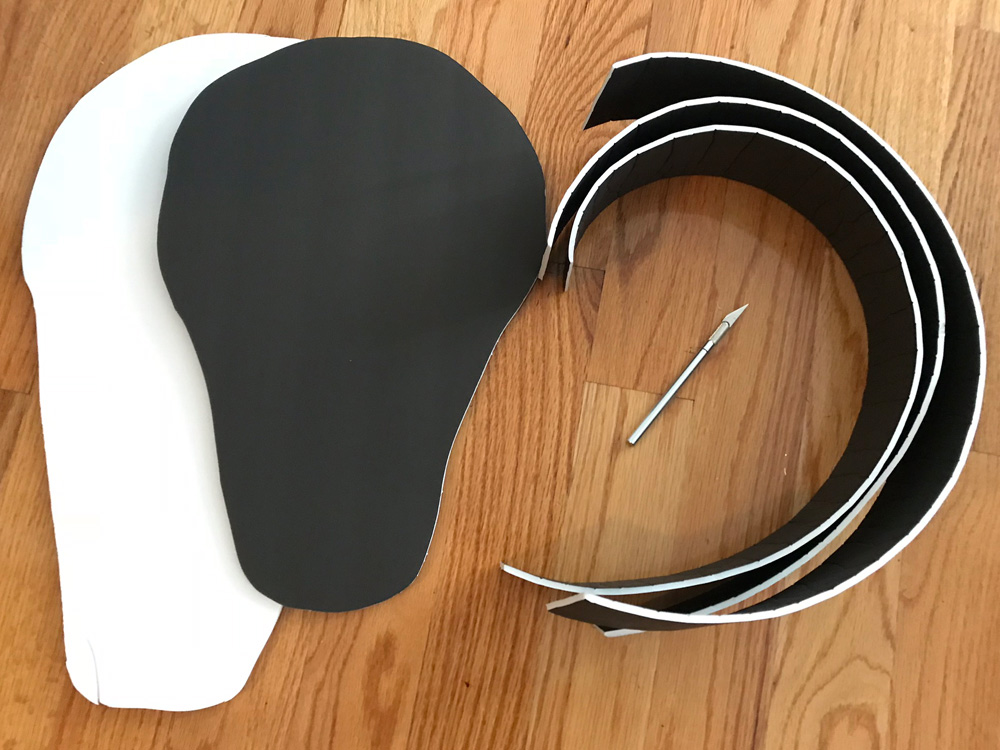
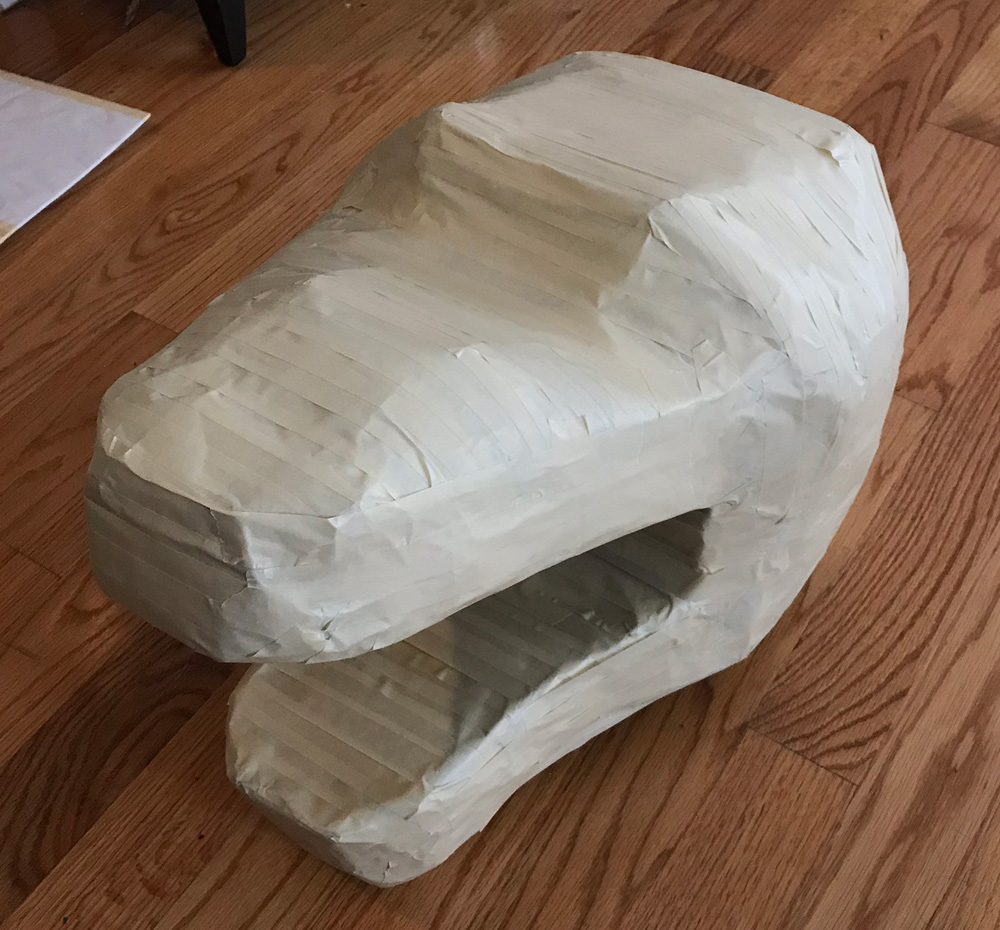
I cut out two big shapes of foam board, one to be the base of the jaw and another to be the base for the top part of the wolf head. The upper one is a little larger than the bottom one. (No reason they’re different colors; that’s just the kinds of foam board I had lying around.)
I cut some long strips of foam board and curled them up by hand in order to make them flexible, and then I taped them in place along the flat jaw pieces, basically like walls.
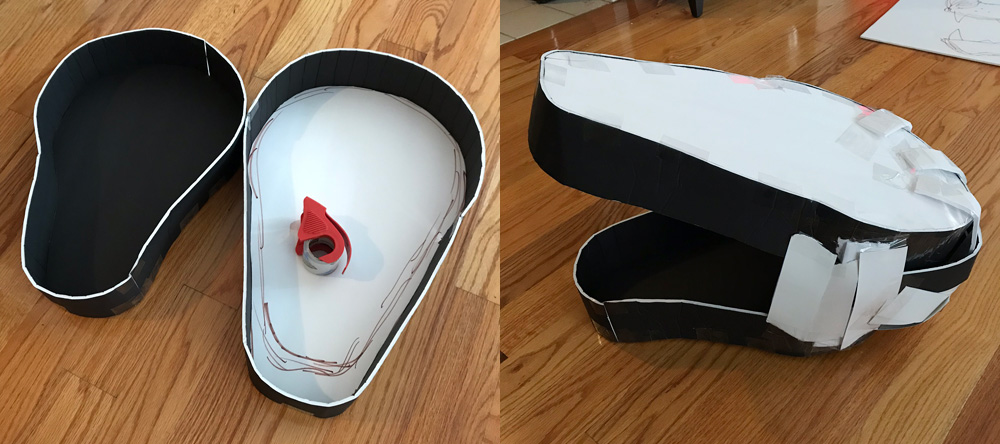
I taped these two big pieces together with some scraps of foam board to hold them in the position I wanted. Every couple steps, I held my base up to my drawing of the wolf head to make sure it was lining up pretty well.
I then did a ton of steps to add dimension and form to this wolf head base. I started by taping some strips of poster board along the sides to build up walls there.
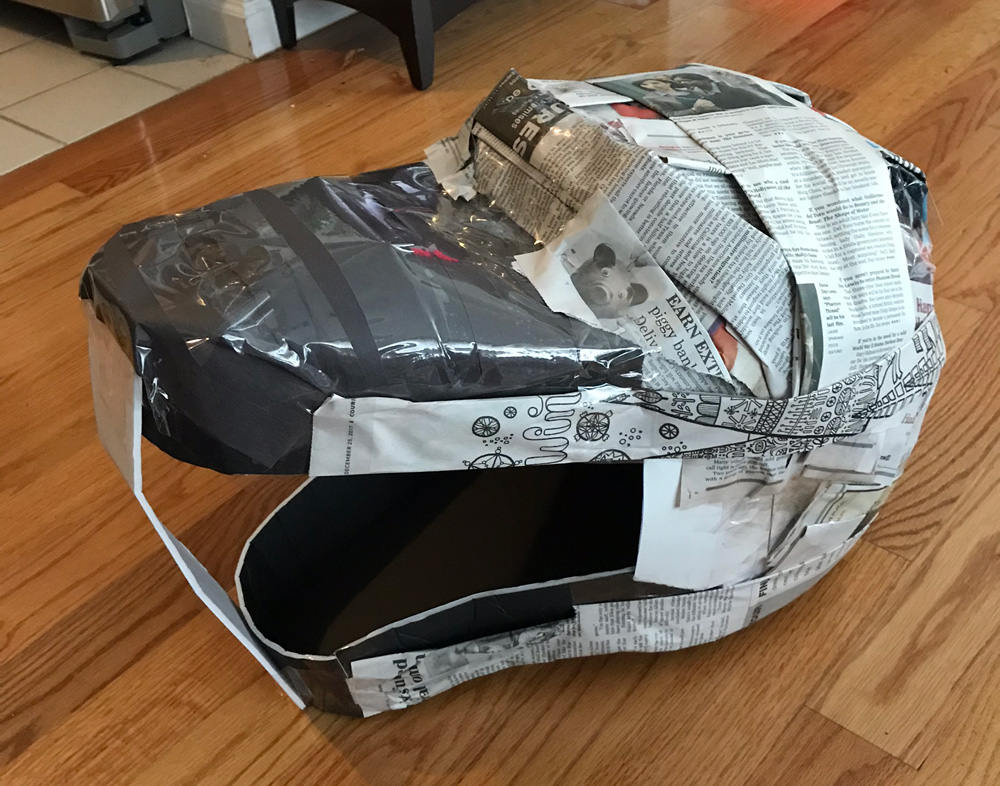
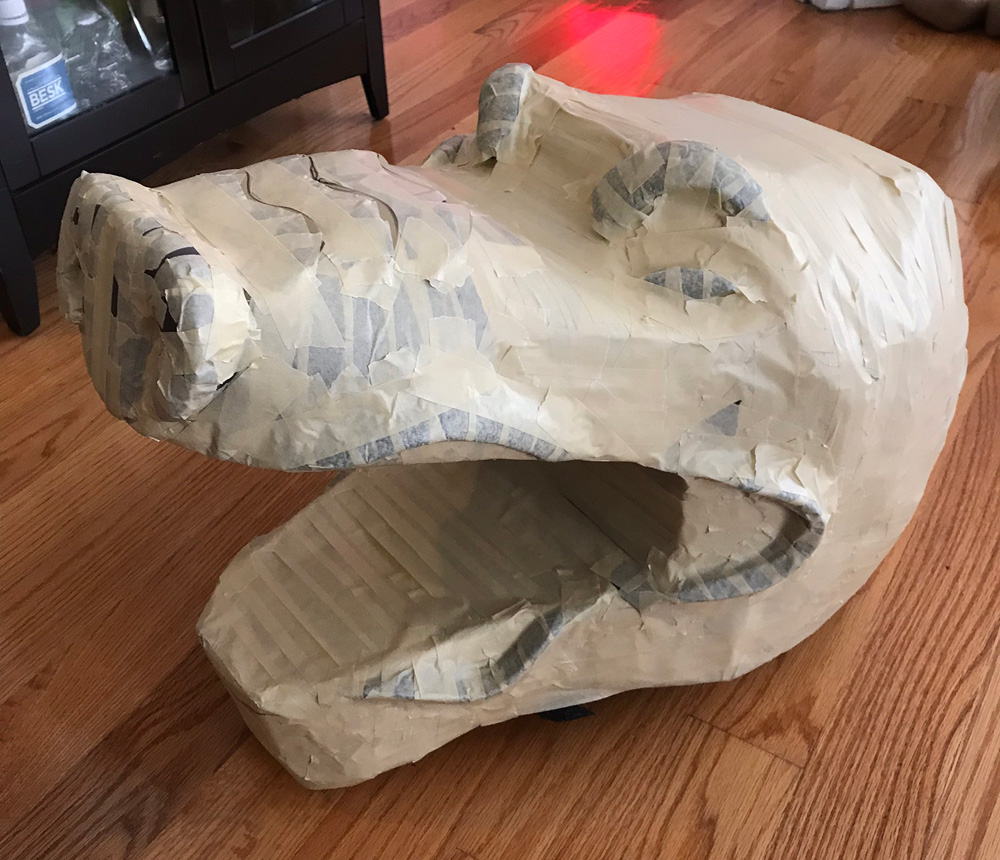
I took big sheets of newspaper and folded/rolled them into loose rolls and taped them in place to pad out the wolf head. Not shown: before this step, I built up some little walls of foam board on top to give a curve to the snout and to create the structure for the top of the head where the eyes will go. The black paper over the top of the snout is some scraps of construction paper I had left over from another project.
You can also see I taped a piece of foam board in the mouth to hold it open at the right position; I’ll remove that later.
I also stretched a bunch of tape across the open spaces in the upper and lower jaws, to create the roof of the mouth and the, uh, floor of the mouth? You can see the space in the mouth is open in the above pic and taped over in the next pic.
When my basic wolf head shape was done, I covered the whole thing completely in masking tape. The tape helps stabilize this whole wobbly/squishy shape, and it’s also helpful in that it gives you a look at the finished shape without all the different contrasty textures and patterns of the newspaper and other materials; it’s way easier to imagine the finished wolf head when you see it in one nice solid color like this. It, uh, kind of looks like Barney the dinosaur for the moment. Ears and teeth will help with that!
I then started adding lots of raised details to the wolf head, mostly using foam pipe insulation tubing; I buy this stuff at Home Depot and use it for all sorts of projects. I love working with this kind of foam because it’s cheap, flexible, lightweight, easy to cut, and it’s firm enough that you can build pretty solid shapes with it. In the above pic you can see a lot of details I made out of the pipe insulation: the eyebrow ridges, the lower eyelids, the nose, and the flared lips. I taped these all firmly in place.
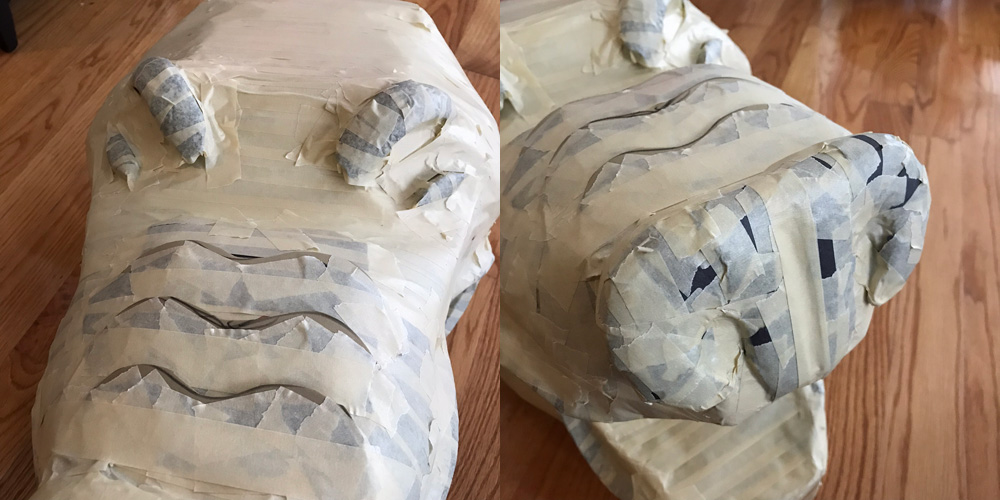
The only detail in the above pics that’s not made with the pipe insulation foam is the subtle wrinkles on the top of the nose; I cut these out of a sheet of craft foam and taped them in place, and while I wanted to keep them subtle they ended up basically disappearing after I added paper maché. I should have made them a little more raised. No big deal!

I made the four big wolf fangs out of the same foam pipe insulation material, and I covered them in masking tape. I don’t have a pic of the smaller teeth in progress, but I cut them out of foam pipe insulation as well; basically just a ton of little fat triangles. I taped the smaller teeth in place in the mouth, but I left the four big fangs separate; I’ll attach them later on, after all the paper maché is done.
I made the wolf’s big ol’ ears (the better to hear you with) out of sheets of craft foam, which I curled up and taped closed, and then I taped them in place on the head with a ton of tape. I forgot to take a pic of that step! But you’ll see them in the pics coming up. The ears were easy; they took two minutes.
Another thing I forgot to take a picture of — this always happens when I’m rushing(/panicking)! — I made big jagged pieces of fur for the back of the wolf’s head out of sheets of craft foam that I simply cut out and taped in place. Each big piece of fur is two layers of craft foam; I doubled them up to make them a little more sturdy/rigid. To hide the raised seam between the thick craft foam and the smooth wolf head base, I laid some little pieces of construction paper over the seam and covered them with masking tape. I also wrapped some masking tape around the points of the fur to help them be a little more rigid.
Paper maché

Time for paper maché! I covered the entire wolf head in several layers of paper maché over a couple days. You can read about my paper maché process and materials here. The short version is: I use Roman PRO-543 universal wallpaper adhesive (paid link) and alternating layers of newspaper and brown wrapping paper.

I didn’t take any pics along the way, but the above pic is after the paper maché was finished, dry, and cut out.
Because this wolf mask was such a rushed job, and it only needed to survive one night, I took a ton of shortcuts with the paper maché (more on shortcuts at the end of this article), and I was honestly worried the whole thing would fall apart when it was done! If I were making this mask for a client, or if I were making it for myself for parades or something, I’d cover the entire thing with at least six, maybe eight layers of paper maché.
So, for this very rushed project I did just three layers on most of the whole head, and I added a partial fourth and fifth layer in a few places strategically to give the mask more support in the most load-bearing parts. I added a sixth layer in just a couple places; all around the bottom edge that will be the opening for my head, and all across the big wide back surface of the head — the larger and flatter the surface the weaker it tends to be, so this is important.
The ears, teeth, inner mouth, and a few other places are just three layers of paper; yikes! I hoped no one would breathe on this thing. The big pointy pieces of fur in the back have just one layer of paper, but they’re the least of my worries; they don’t need to be structurally sound at all.
I also covered the four big fangs with one layer of paper maché and set them aside; they won’t get attached to the jaw for a few more steps.
I let all of this stuff dry for a couple days before continuing…
Removing the base
I’ve never been more nervous about opening up a mask and removing the inner materials! With so few layers of paper in some places, I had to be extremely careful with this step. I sliced open the bottom of the mask with an X-acto knife, and slowly, gently, carefully began cutting and pulling out the materials inside. The biggest risk here is that if you pull too hard, you can pull part of the paper maché inside-out! This happens from time to time and it’s not a huge deal if you notice and stop right away; you can push it back out the right way and it’s usually fine, although you can end up with some permanent wrinkles in the outer surface.
I removed all the base materials I could get out of the wolf head — this included all the foam board and newspaper, and most but not all of the masking tape. In some places the tape didn’t want to come out, and I didn’t want to force it; hey, let it stay if it’s happy in there. Again, if I’d done a proper number of layers I could’ve pulled everything out and not worried about tearing/warping the mask, but in this case I had to be super careful.
I never planned on removing the materials in the ears; they’re locked in there permanently. I also figured the small foam teeth would stay stuck inside, but they actually all came out.
The finished hollowed-out paper maché wolf head was super lightweight, and not exactly sturdy, but it wasn’t flimsy either; it stood up under its own weight and didn’t wobble too much. However, I knew from experience not to let the hollow paper maché head sit on a floor or table for too long; the weight of the wolf’s snout could make the whole thing start to sag and make the big mouth opening start to close. I’ve had some masks warp this way! Preventing this is easy: I built a stand out of some wine bottles taped together — three for the base, and one upside-down one taped in the middle — and set the wolf head on that, so that all the weight would be pulling down from the top of the head, so the lower jaw is hanging rather than being slowly crushed. It’s fine to set the whole head down on a flat surface to work on it, but whenever I wasn’t doing anything with it I set it back on the wine bottles.
At this point I also cut out the hole in the mouth for where my face will be, and I cut out holes for the wolf’s eyes — not to see out of; I’m gonna put lights in there!
I cut out a couple other hidden holes in the back of the wolf head, behind the pointy fur pieces, to help with hearing and air circulation. I had to be careful with this, because I didn’t want to weaken the structure of the head too much; it was already weak enough! But if you don’t have any holes in the sides/back of a big mask like this, it can be really echo-y in there, and that can make it very hard to hear while wearing it at a noisy Halloween party.
Normally I’d reinforce all the cut-out holes with more paper maché, to make them a little stronger and look a little nicer, but I didn’t have time for that with this mask. More on shortcuts at the end of this article.
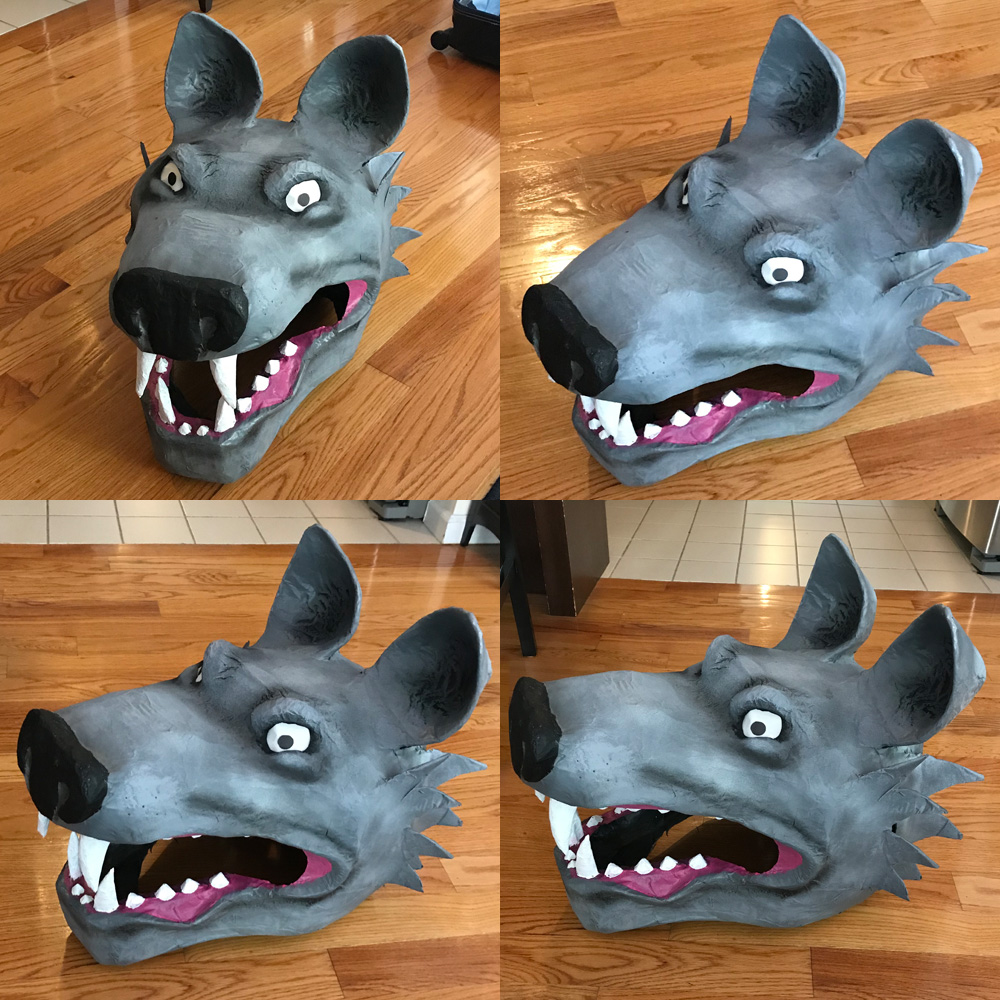
I attached the four big fangs inside the mouth with a hot glue gun, and then I covered the connection points with one layer of tiny pieces of paper maché. That catches us up to the finished paper maché pic above; base removed, holes cut, teeth attached. Here, I’ll post it again:
Painting
I took the wolf mask outside and spray painted the interior black, not being too precise, as this is just to darken up the inside and hide any visible tape and newsprint. I then spray painted the exterior a dark gray color.
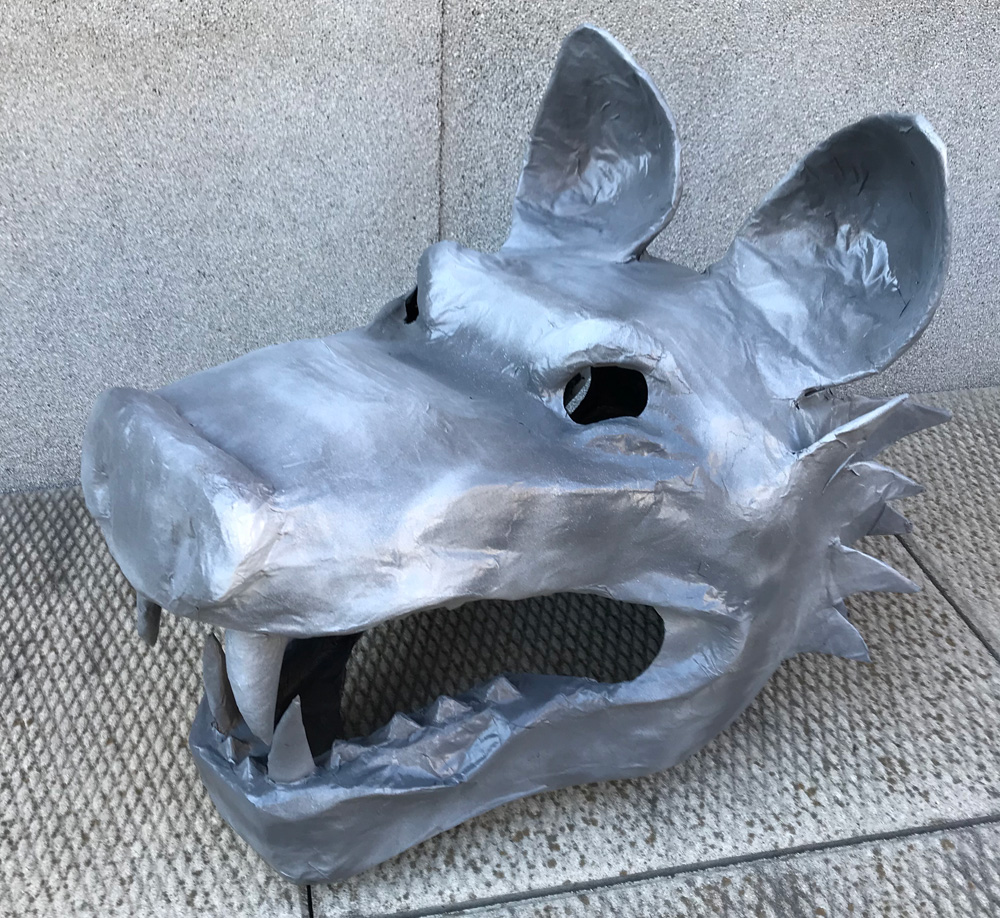
Then I did a light dusting of light gray spray paint all over, and after that, I used the dark gray again to hit the recessed areas, to accentuate the shadows there. I then faded some of that back a bit with another light dusting of light gray again. All this took maybe fifteen minutes! The shading is nowhere near as precise as I’d normally go for, but for this quick project it’s fine, and the finished effect is much more interesting than just solid gray.
I did the rest of the details of the wolf head with acrylic paint and various paintbrushes. I painted the gums with a couple coats of a mixture of a dark pink and white acrylic paint, and I painted the teeth white.
I mixed up a light gray color with black and white acrylic paint and did a dry-brush effect over a lot of the raised areas of the mask, and then I dry-brushed the tiniest amount of black acrylic into a bunch of the recessed areas — around the mouth, under the eyes, etc. All of this helps emphasize the curves and shadows a bit more.
When all the painting was done, I took the wolf head back outside and sprayed the whole thing with a coating of matte spray.
Light-up eyes
I used a sheet of tracing paper to fill up the eye holes and to diffuse the lights I’d put in them later; I just folded up a sheet of tracing paper into a thin strip and taped it in place inside the mask. I cut out little circles of black construction paper to make the pupils, and I taped them in place with tiny loops of masking tape.
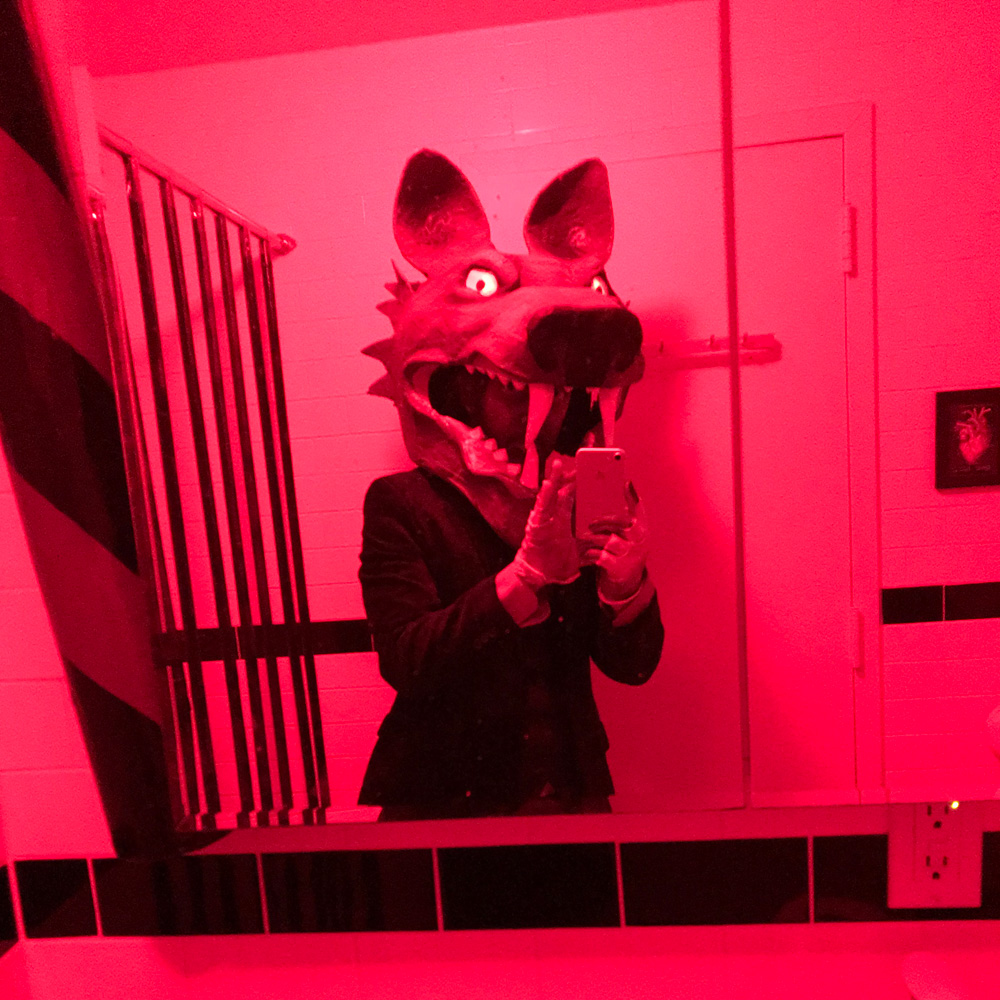
I wanted the lights to be set back a short distance from the paper; if they were right up against the paper you’d see a solid little glowing point there. So I built a little structure out of scraps of poster board to hold the lights about an inch behind the eyes, to help spread the light out.
I bought a bunch of tiny individual battery-powered lights off of Amazon; you just twist them to turn them on and they stay lit for a good 12 hours, sometimes a lot longer. A little while before the party, I would turn on two of these lights and attach them behind the eyes.
Installing the hard hat
Like I mentioned, I install a hard hat in almost all of my big masks. For this mask, I trimmed the top portion off of a hard hat with a dremel tool and a hand saw, and I sanded the edges to smooth them out. Normally the top dome of a hard hat sits high above your head, but for this mask I needed to have the hard hat be as, uh, not-tall as possible, so I measured and figured out how much I could cut off. After sawing and sanding the hard hat, I taped a piece of foam board across the top to create a flat roof.
Then through some trial and error I figured out how to attach the wolf head to the hard hat at the right height and position — I put on the hard hat and put the wolf head on over it, and by looking in the mirror and holding the wolf head at the position I wanted, I could guess how much foam I’d need to attach in between. I took off the wolf head and hard hat, temporarily taped some foam in place on the “roof” of the hard hat, and put the head back on. It took a few steps of trying different amounts of foam to find the right amount. When I finally did figured out the right amount, I taped the foam firmly in place on the hard hat with tons of tape.
I then realized I had a dilemma: If I glued the hard hat permanently in the wolf head now, I wouldn’t be able to get my fingers inside to place the lights behind the eyes before the party. You have to twist the lights to turn them on, and it takes a bit of effort. It wouldn’t be possible to install the lights ahead of time, glue the hard hat in, and then turns on the lights afterward — no way to twist them on.
So I came up with an idea using magnets; I don’t know why, but I love using magnets in my projects and coming up with weird uses for them. Here’s the basic idea: Tape magnets in the back of the eye sockets, where the lights will go. Then glue the hard hat in and let it set. Then, tape magnets firmly to the little lights. On the night of the party, twist the lights on, and use a tiny loop of masking tape to connect the lights to a narrow wooden stick, and stick it into the mask. This totally worked; when the light got near the magnet, it jumped in place! Perfect!
A couple things I had to think about: First of all, it’s important to check the position of the magnets and make sure you’re attaching the correct pole to the correct pole, you know? I had to plan that out carefully when attaching the magnets inside the mask and onto the lights. I marked these with a marker to be sure.
I was also worried I might go to insert the lights/magnets on the night of the party and they’d jump into place, but somehow in the wrong position. Then I’d be screwed; there would be no way for me to get my fingers in there to pull the lights out and try again. So I decided to attach a long string to each magnet before inserting the lights. That way if I messed up, I could pull the string to pull the magnet and light back out and try again. Luckily it worked out fine on the first try, so I just taped the strings out of the way and I was good to go. (I could’ve cut the strings, but I decided to keep them in there in case, like, maybe one of the lights died really quickly or something. Better safe than sorry.)

On rushing, and stuff I learned
I can’t emphasize enough how rushed this project was; the whole thing seriously took about four days. Here’s a recap of some of the shortcuts I took, and some of the things I learned with this project:
Doing way fewer layers of paper maché than usual: As I mentioned above, I usually do at least six layers, often eight, all over on any big mask, but for this one I strategically put fewer layers in a lot of places on most of this mask to save time. A lot of places are just three layers! I was pleasantly surprised that, although the mask is a lot flimsier than what I’m used to, it’s totally fine. I’m used to my finished masks feeling really solid and rigid and not wobbling or having much give — like a nice new cardboard box. This mask definitely sags and bends a bit as you move it, but it never feels like it’s going to fall apart or anything. Like I always say, good enough for Halloween!
Applying the paper maché really sloppily: I rushed through these layers so much! A lot of the surfaces are really wrinkled, and around some of the more intricate details, like the point tufts of fur and the teeth, the edges of the paper are a real mess, even a little bit twisted or raised in some places. And you know what? It’s fine! When looking at the finished mask from even a couple feet away you don’t even see these imperfections. Still, I’m a perfectionist, and I totally plan on being way more careful with my layers of paper on all my upcoming projects, just because I like to keep everything as smooth and neat as possible.
Using big strips of paper towels as a shortcut: For some places where I needed the full six layers for support, I used big strips of paper towels — like ripping a whole paper towel into just three or four strips — and laid them in place in strategic areas between my normal layers of newspaper and brown wrapping paper. I find paper towels to be very hard to deal with for normal paper maché work — it gets too soggy and smooshy and is very hard to control — but when you’re just laying a big strip in place and covering it over with a normal layer, it totally works fine, and it helped me build up those stronger areas super quickly. This is the one rushed technique I made up here that I may keep for more serious projects!
Not reinforcing the edges: Normally in all my big masks I reinforce all the cut edges — the eye holes and other holes, as well as the big opening where you stick your head in. This usually means tiny bits of masking tape around the edges of the smaller holes, covered with tiny bits of paper maché, and for the big opening, I usually tape plastic zip ties around the interior edge and cover them with masking tape and paper maché. This makes the whole mask feel a lot sturdier, and it also hides the ugly exposed edges of the cut paper maché, which often look a little shredded and you can see the cross section of all those layers of paper. Anyway, no time for that with this mask! And it’s totally fine; you don’t notice the ugly cut edges nearly as much as I’d expect. But I would never let this slide on a more serious project.
Rushed paint job: This is the first time I’ve done all the shading on a big mask with just spray paint, applied very loosely and quickly. Normally I’d do a whole bunch of steps with sponges and various degrees of watered-down acrylic paint to carefully put shadows and highlights where I want ’em.
I also took a lot of shortcuts for the details that I hand-panted with acrylic paint. If I’d had more time I would’ve liked to have done a lot more layering of the pink color in the gums, to give those areas some depth and contrast. I also would’ve layered colors on the teeth; instead of just painting them white, I’d start with a yellow/tan color and create a gradiant effect so the base of teeth would be a little darker. Overall I also just did a really sloppy job with the paint, because I was completely running out of time. I wish I had time to be more precise with the details. No big deal!
Not installing screen in the holes: Normally I install screen door material in all the holes in my masks — eyes, mouth, ventilation holes, etc. I never planned on putting screen in the mouth or eyes of this mask, as the mouth hole is huge and would look weird with screen, and I knew I’d be putting lights and paper in the eyes. I did plan on putting screen in the ventilation holes in the back of the head, behind the pointy tufts of fur. I ended up skipping this, mostly ’cause I was running out of time, but also the holes there are pretty discreet and can only be seen from the back, and I decided I didn’t care! This is another thing I would not skip with a more serious project.
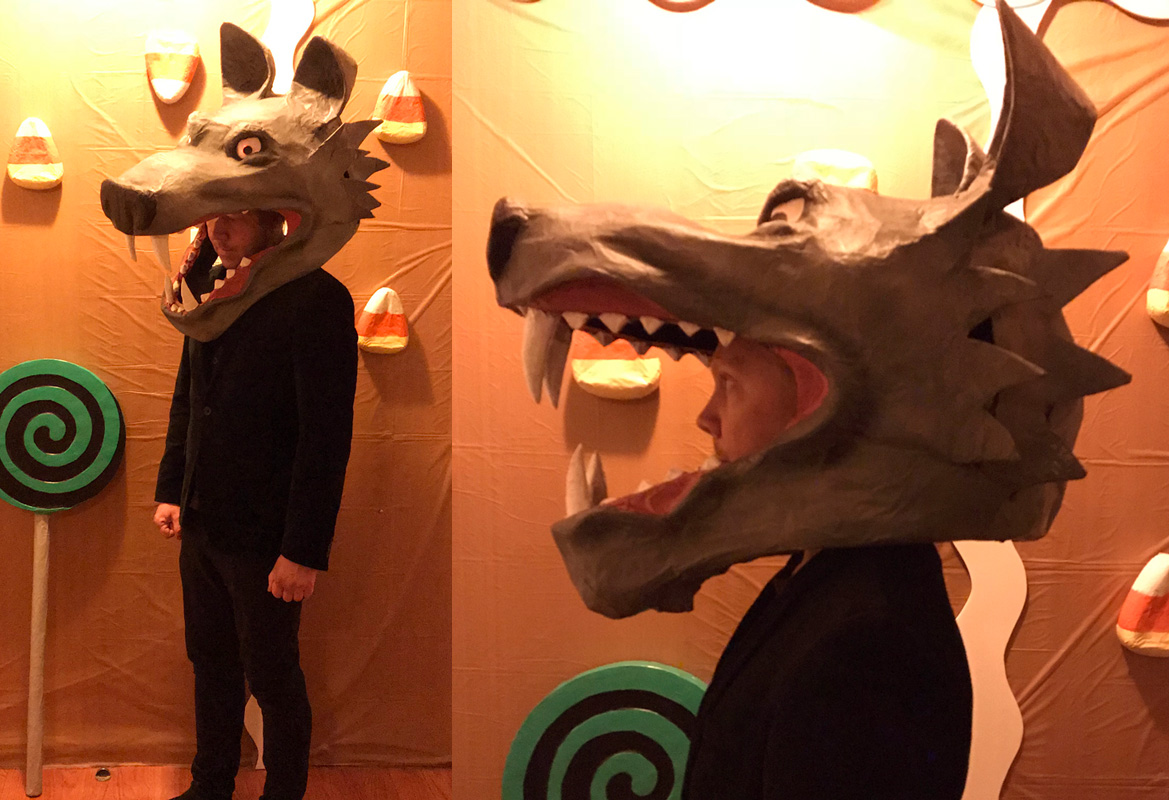
One of the best lessons I learned from all this was just that it is possible to make a huge mask like this in less than a week. I normally give myself a month! That’s mostly working weekends, but still. This one was about four days from start to finish. Basically — Day one: Build the whole base, apply half the paper maché. Day two: The rest of the paper maché. (Then skip a whole day here for drying.) Day three: remove base, attach teeth, spray paint. Day four: paint details, apply matte spray, set up lights for the eyes, install hard hat. Whew!! Obviously I couldn’t do all of this inside one week while working my normal nine-to-six(-plus) job, but it’s awesome to know it’s do-able.
Whew! This was an intense project, but I’m happy with the results!
 About Manning Krull
 How to make a 4-foot paper maché alligator
 My violin skull mask, Mardi Gras 2015
 Three-headed paper maché dragon sculpture
Leave a comment