
Posts tagged "animals":
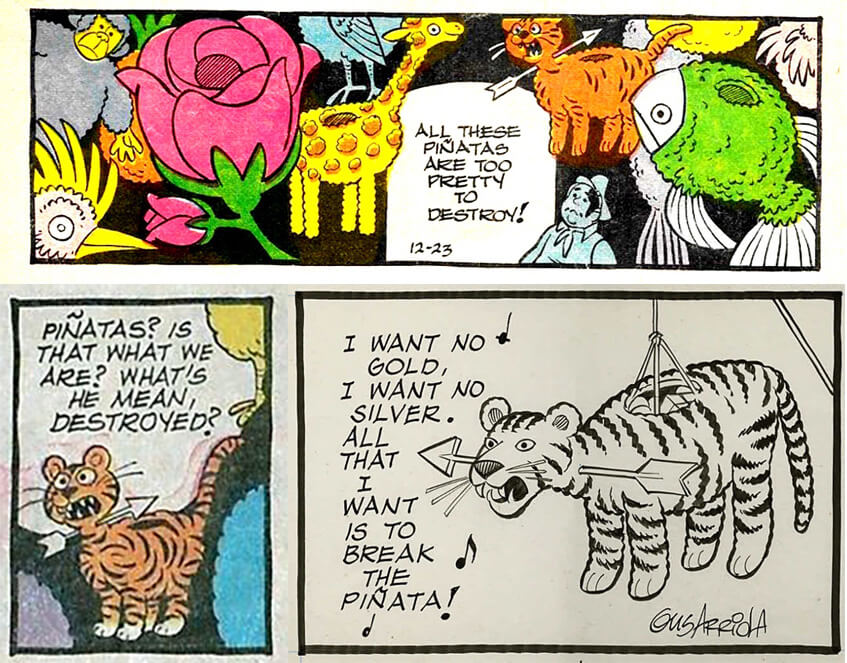
Tiger piñata sculpture!
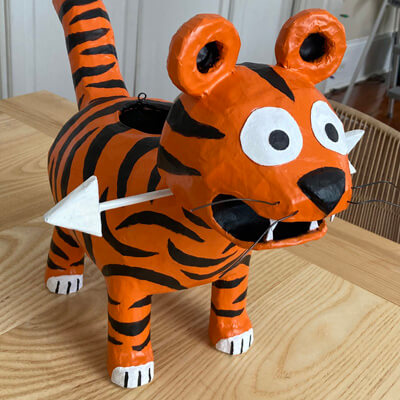
I made this lil’ tiger piñata for one of my favorite people in the world, writer and illustrator Jon Morris; it’s for his Gordo book project, which you can read about in this thread! The tiger sculpture I made isn’t a real piñata, in that it’s not (completely) hollow and it’s not intended to be destroyed. It’s just a prop that’s meant to look like a piñata. Here’s how I made the thing!
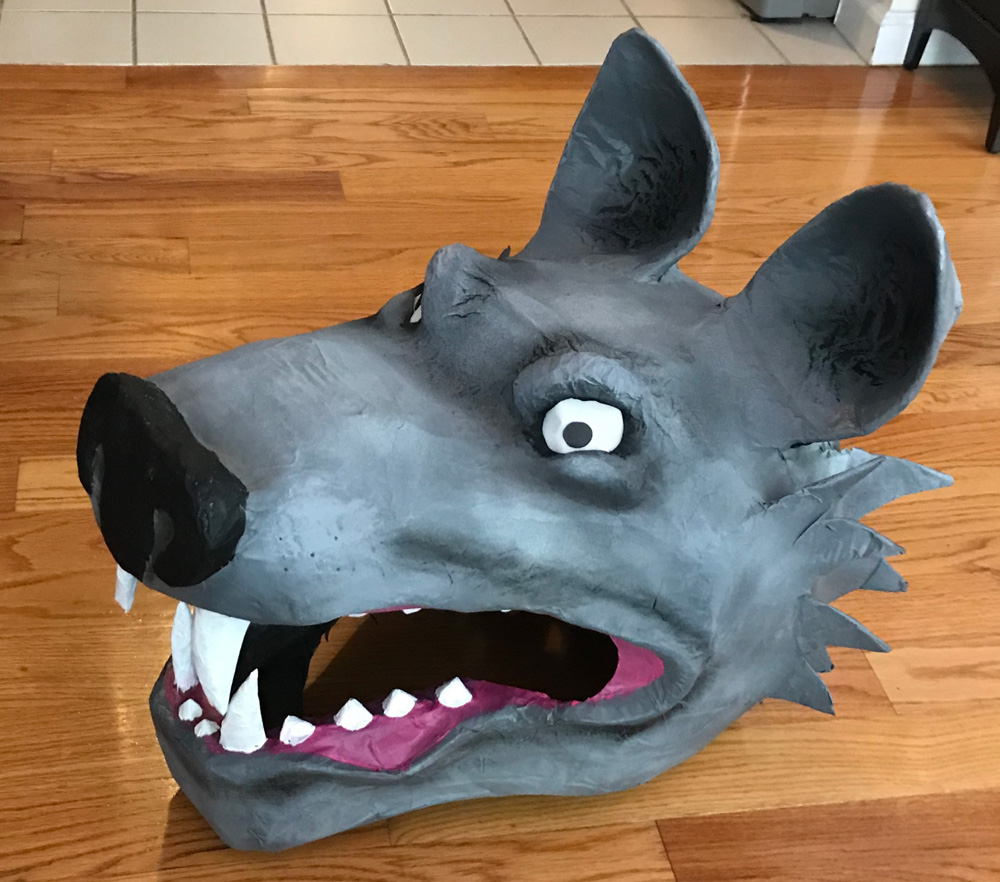
Paper maché wolf mask
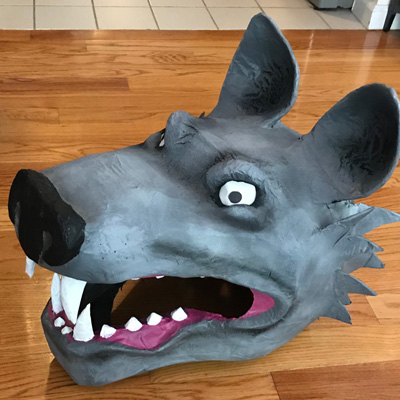
I made this oversized paper maché wolf mask for Halloween 2018! It was a rush project without a lot of planning, and I took a lot of shortcuts, but it still came out pretty cool (but, uh, way bigger than I was thinking)! Here’s how I made the thing…
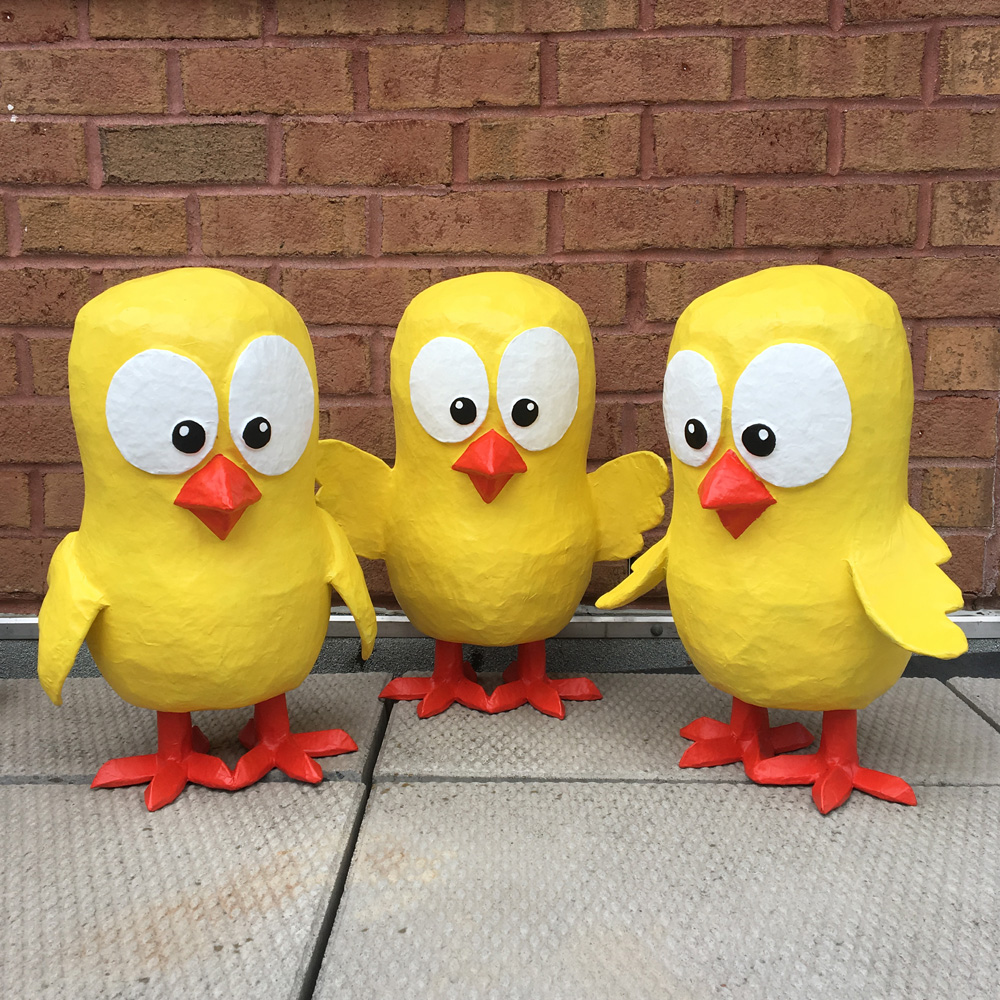
Paper maché baby chicks! — part 2
This is part two of two of my paper maché baby chicks project; see part one here.
Making the chicks’ legs and feet
This was a fun challenge: I wanted the legs and feet to be hollow and removable, so when my client received them she could add a lot of coins in the legs/feet for weight and then insert them back into the body, so the chicks would have a nice solid heavy base. Without this weight, the chicks would probably fall over, and if I added the weight permanently while making the sculptures, the shipping cost for the chicks would go way up. Read more…
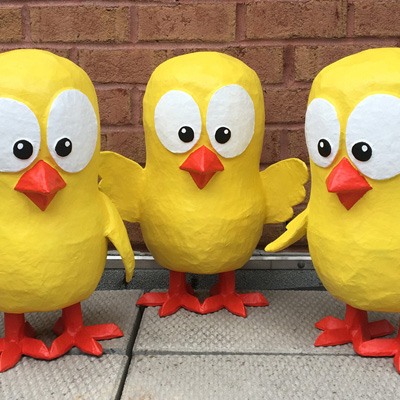
Paper maché baby chicks! — part 1
Another fun commission project: three big paper maché baby chicks!
I was contacted by a wonderful new client at Canadian Crane who commissioned three sculptures of these cartoon baby chicks that their company has in some of their marketing materials. They sent me a pic and I started planning…
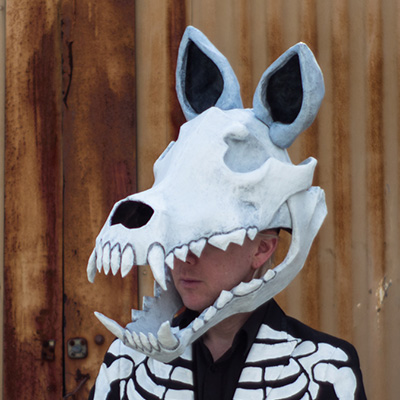
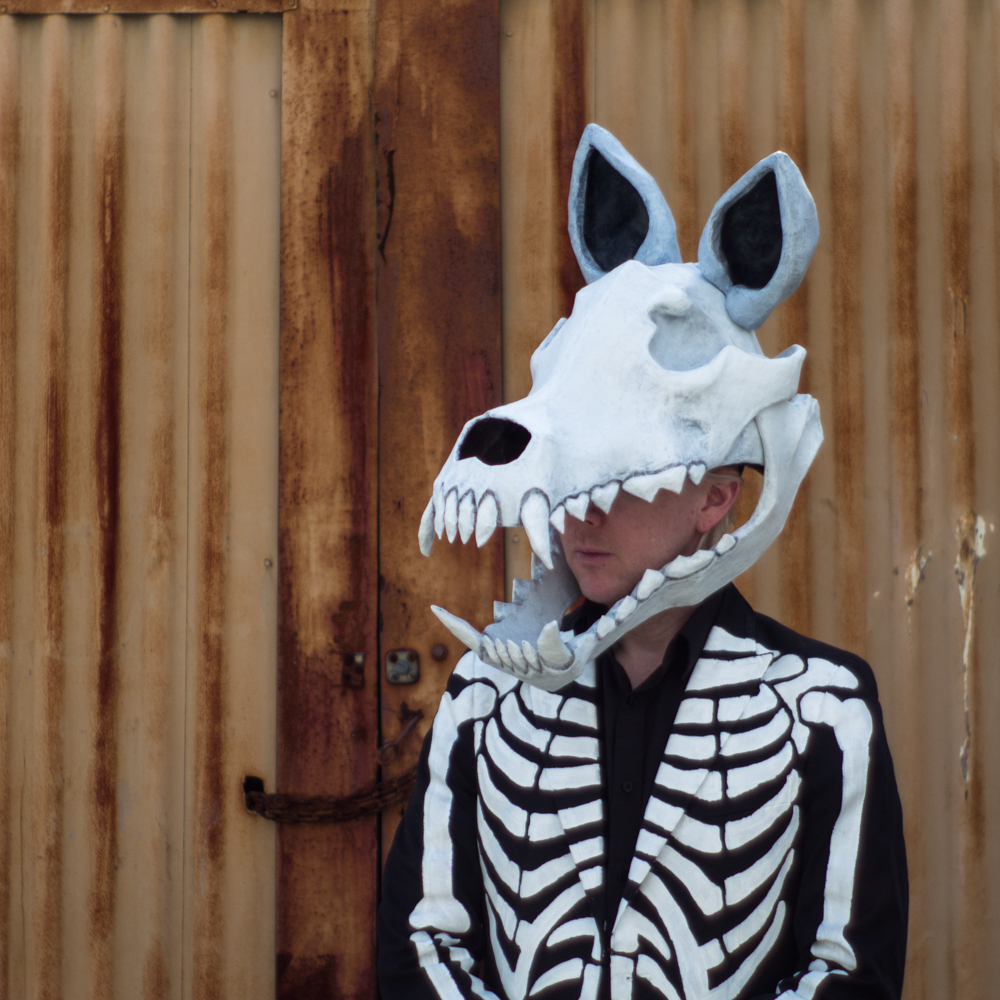
Wolf skull mask — part 4; making the ears
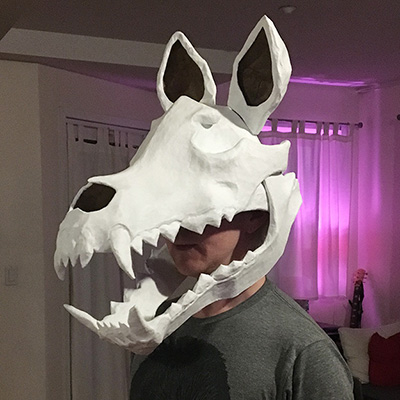
This is part 4 of my paper maché wolf skull mask; see part 1 here.
I wanted to give my wolf skull some ears; I had this idea because in researching wolf skulls I realized that basically all carnivorous mammals’ skulls look almost indistinguishable, and the main different from one mammal head to another is the ears. So my hope is that adding ears will help people recognize my skull as a wolf (or at least a dog! I’ll settle for a dog!). Read more…
Wolf skull mask — part 3; painting, etc.
Painting the wolf skull
Before painting the wolf skull mask, I applied a coat of gesso over the whole thing. Gesso is a thick white paint-like substance that can help smooth out any imperfections in your paper maché surface. In this case it really helped smooth out the teeth in particular.
Paper maché wolf skull mask — part 2
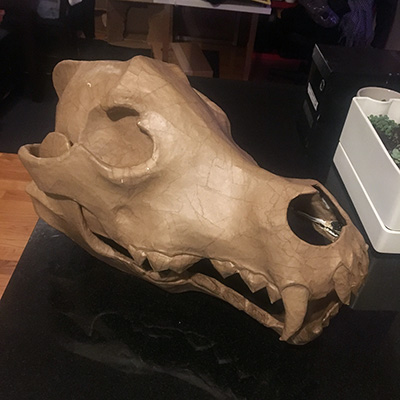
What big teeth you have!
Hooboy, the teeth were one of the hardest and most time consuming parts of this whole mask project! Like I mentioned in part 1, the four big fangs were made out of foam insulation tubing and masking tape; those were pretty easy. I tried a few different methods for the other teeth; I’ll spare you my failures and just show you where I ended up…
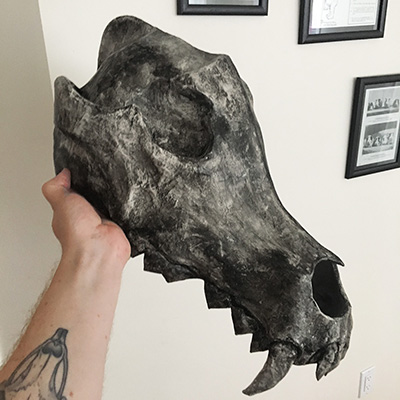
Paper maché wolf skull mask — part 1
I made this here paper maché wolf skull mask for Mardi Gras 2017! It’s got detachable ears, a movable jaw, and it’s one of my most lightweight and comfortable skull masks yet. It was a lot of fun to make; here’s how I did it!
Making the bird skeleton for my cuckoo clock mask
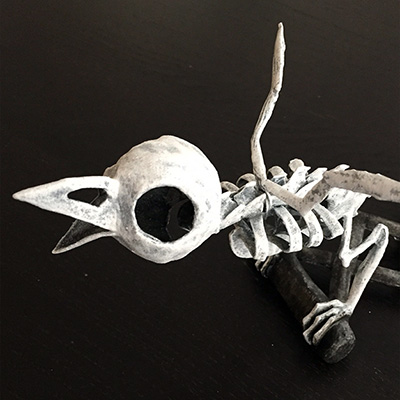
I made this bird skeleton for my cuckoo clock skull mask for Mardi Gras 2016. Making this skeleton was extremely challenging, and I basically made up all the steps as I went along. I had no idea what I was doing, but I learned a lot and I’m very happy with the end result. I didn’t take as many pictures as I should’ve along the way, so I’ve done some sketches to explain certain steps.
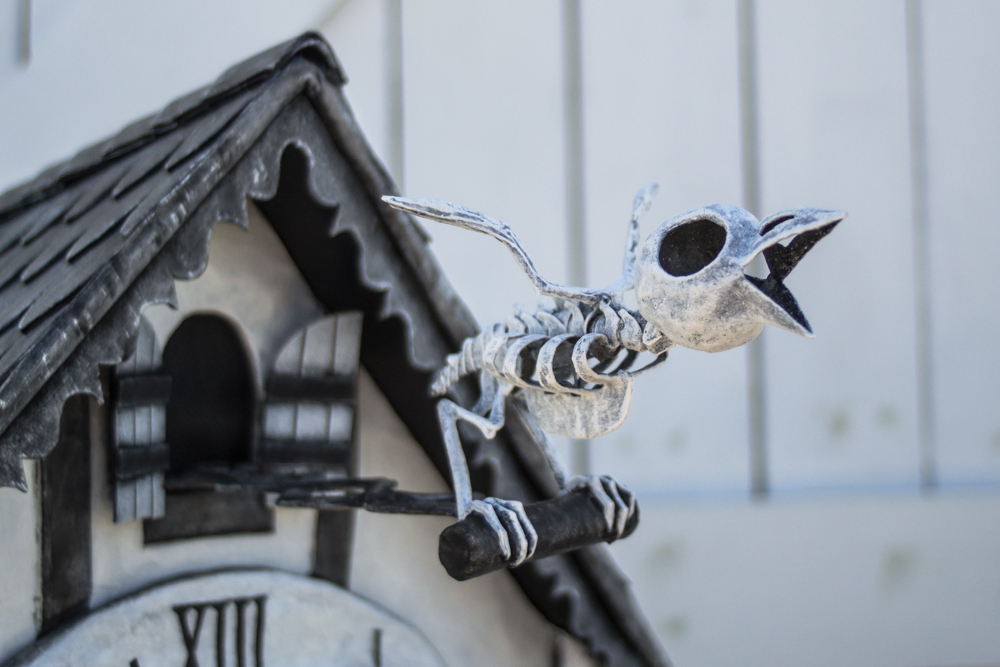
The main materials in the bird skeleton are:
Making foam board antlers
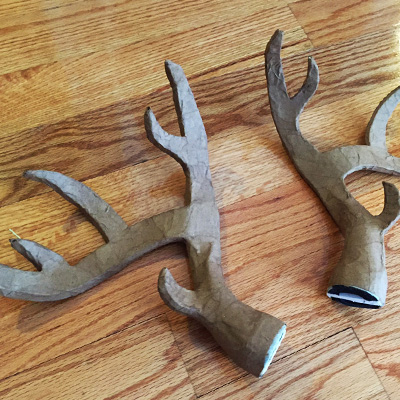
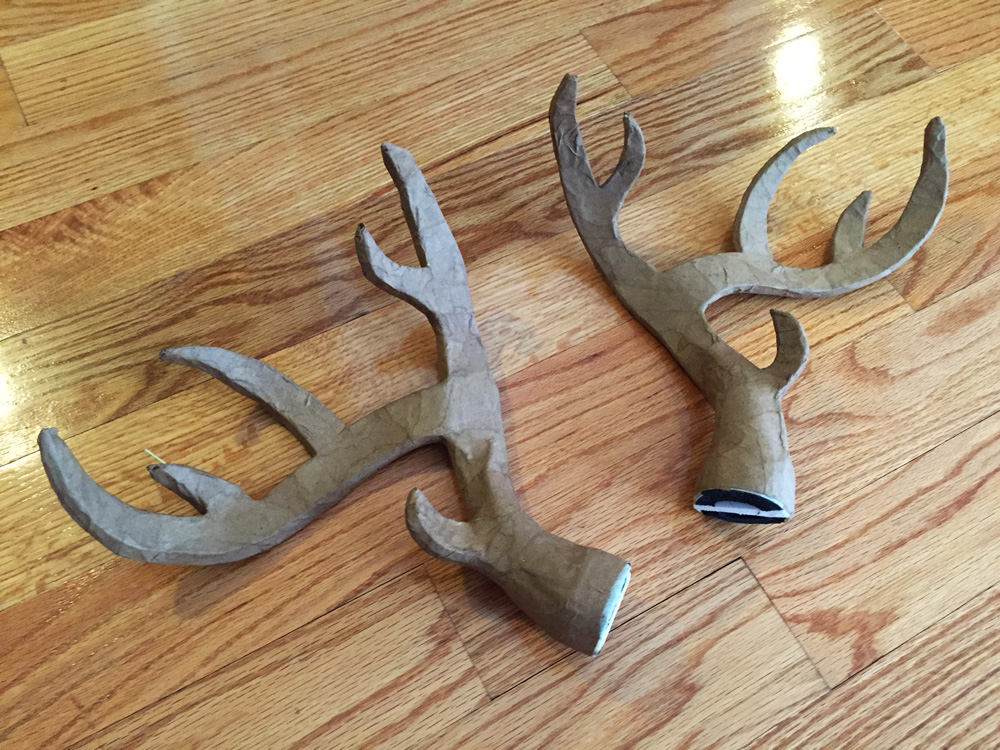
My fiancée needed antlers for her Halloween costume — swamp goddess; it’s a long story — and I made up this method that worked great!

First I drew an antler shape on drawing paper and got the lady’s approval. I kept the shape a little bit on the thick side; I thought this would be important in order to keep the antlers from being too fragile, but it turned out to be unnecessary. If I were doing this again I’d draw the antlers a little thinner.
9-foot paper maché snake prop!
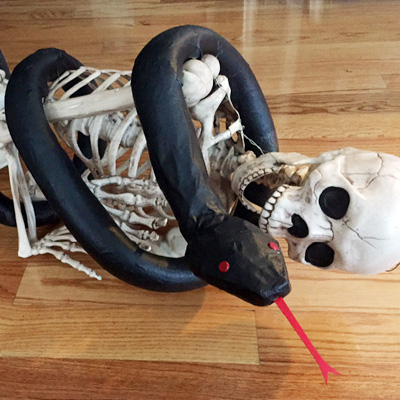
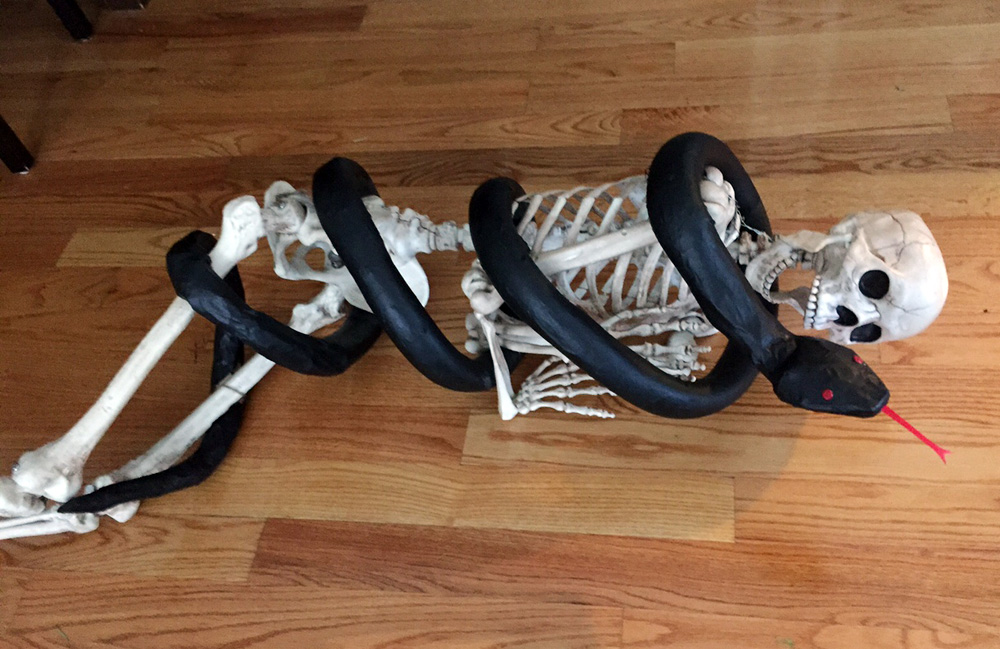
My latest project for my Voodoo Bayou Halloween party: I made this big ol’ snake! He’s made of foam tubing, wire hangers, tape, paper maché, paint, and a few other odds and ends.
I started with a package of black pipe insulation from Home Depot; four one-meter foam tubes for just $3! This stuff is fantastic to work with; extremely lightweight, sturdy, flexible, easy to cut, etc. It’s so great for creating organic-looking shapes that I ended up using a bunch of it on two projects before I tackled the snake: my six-foot bat decoration and a pair of horns for a devil mask I’m working on (pics coming soon). When it was time to start on the snake, I only had two and a half of the one-meter tubes left, so that’s about seven and a half feet for the snake. (I later added a tail made of bubble wrap for a total of about nine feet; more on that below.)
Giant paper maché bat — part 3
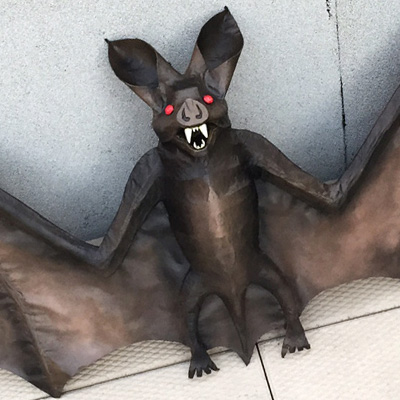
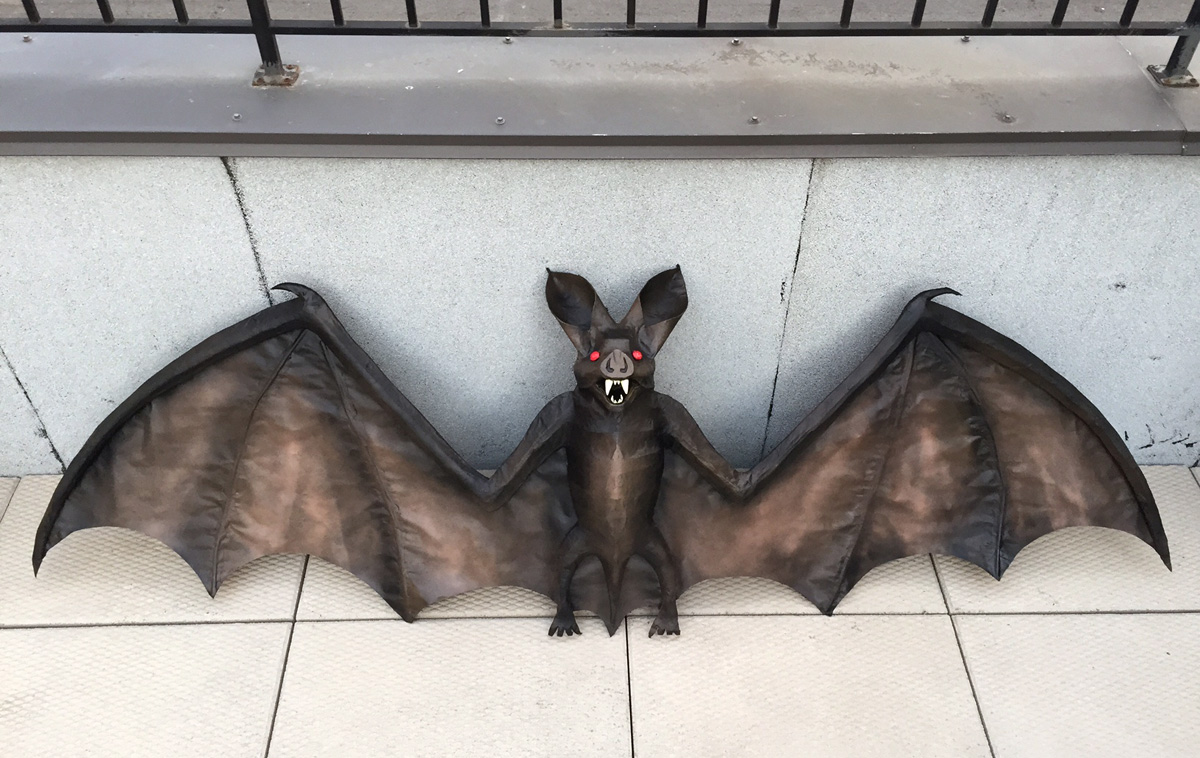
See part one and part two of my giant paper maché project. When we left off we were here:
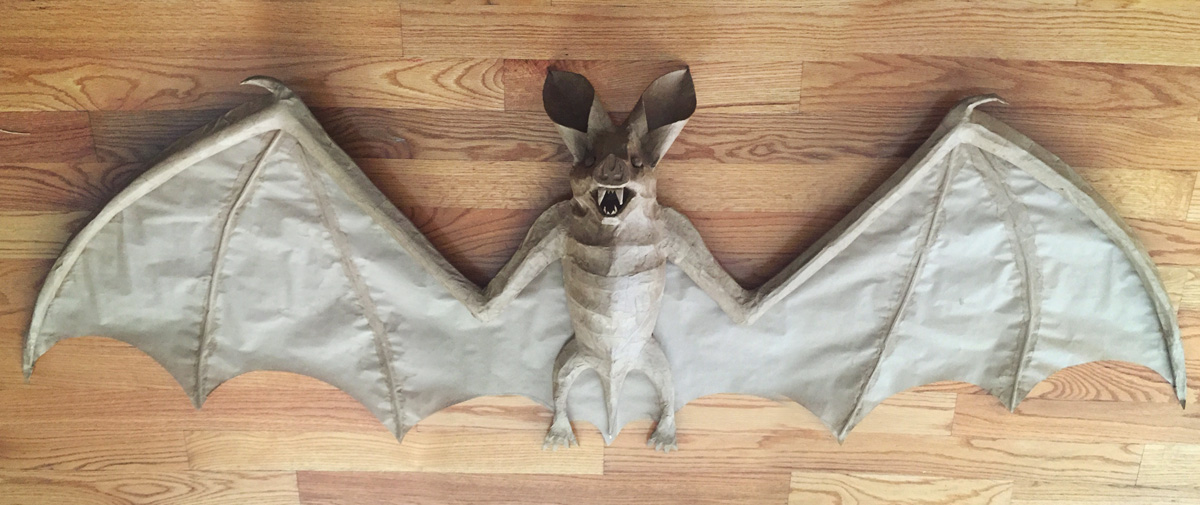
Now then, it’s time to paint!

I started my paint job on the bat by bringing him outside and protecting my work area with a cheap shower liner from the dollar store.
First, I simply applied a coat of black spray paint all over the whole bat.
Making a giant paper maché bat decoration — part 2
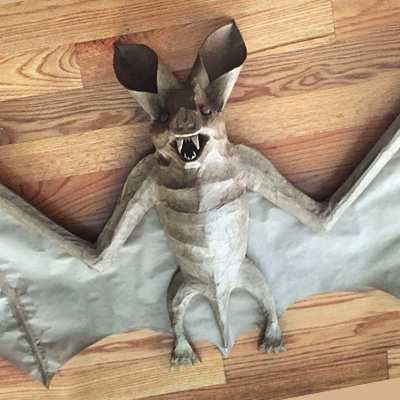
See part one of this paper maché bat project here. Now, where were we? When we left off, I’d just added the wing membranes, and the head was nearly finished but not yet attached to the body.
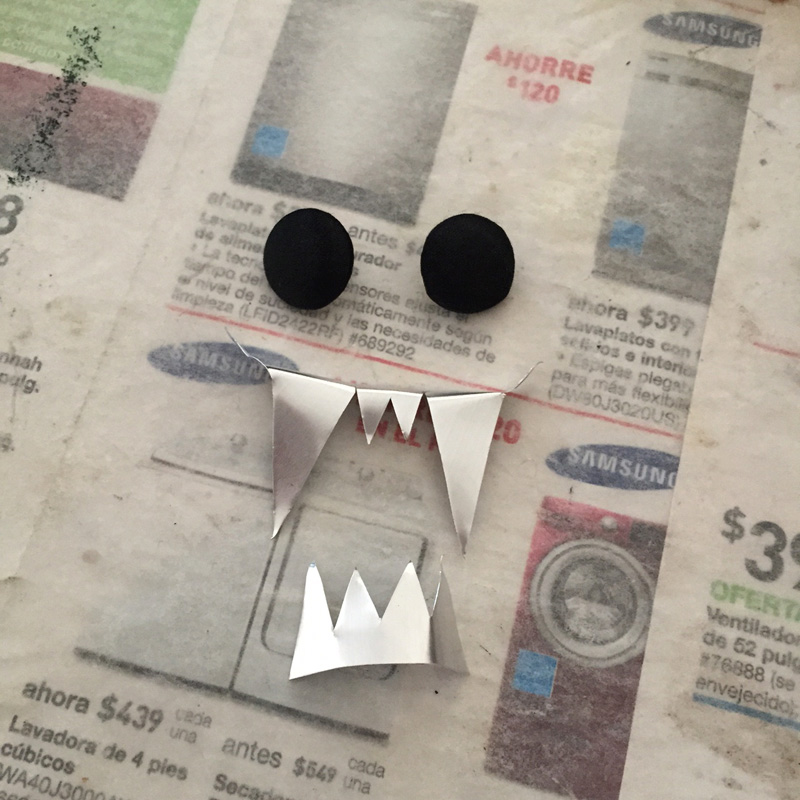
I cut the teeth out of an aluminum cookie sheet, and I put a layer of paper maché on them; this was very difficult and annoying because the shape was so small and intricate. For the eyes, I decided to stick with the buttons I’d been messing around with earlier, and cover them with paper maché so I can more easily paint them.
Six-foot Paper maché giant bat — part 1
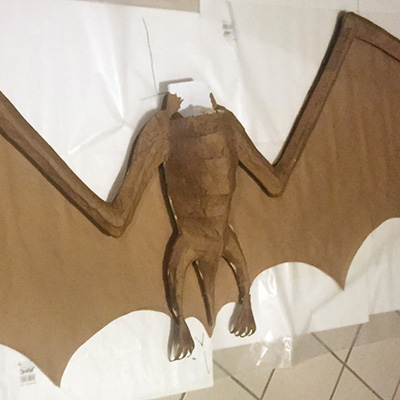
For our Voodoo Bayou Halloween party, my fiancée told me she wanted a giant bat decoration. Okay!
I started with a rough pencil sketch of a bat to figure out the proportions, and then I transferred that to two sheets of foam board. I started with just the wing bones and body; no head. I cut out those pieces with an X-acto knife.
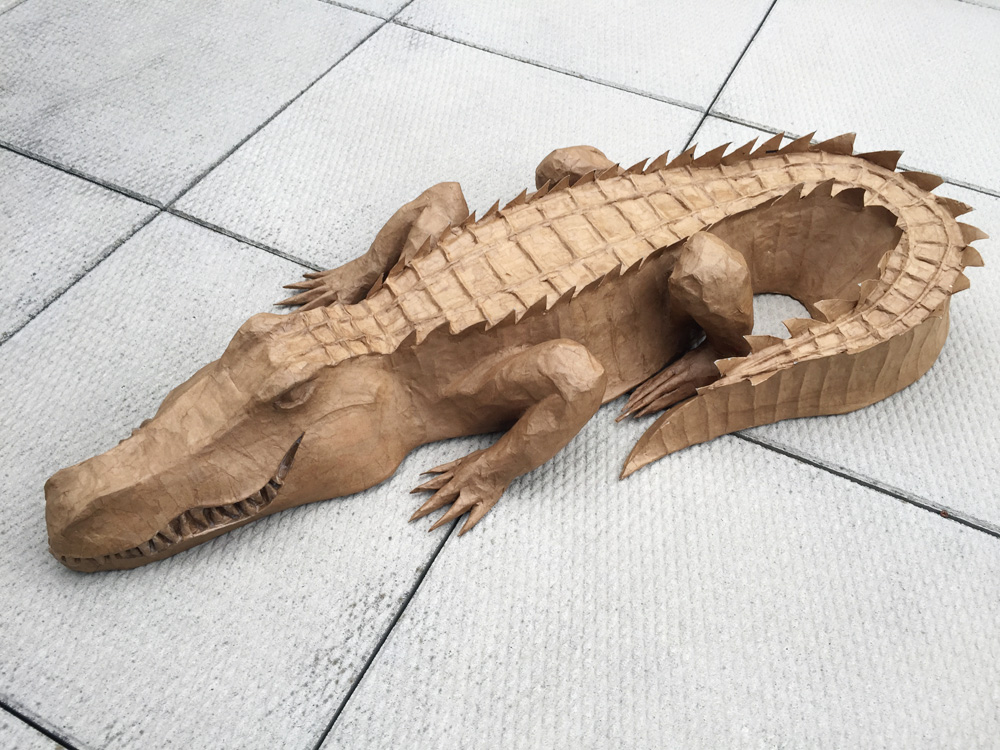
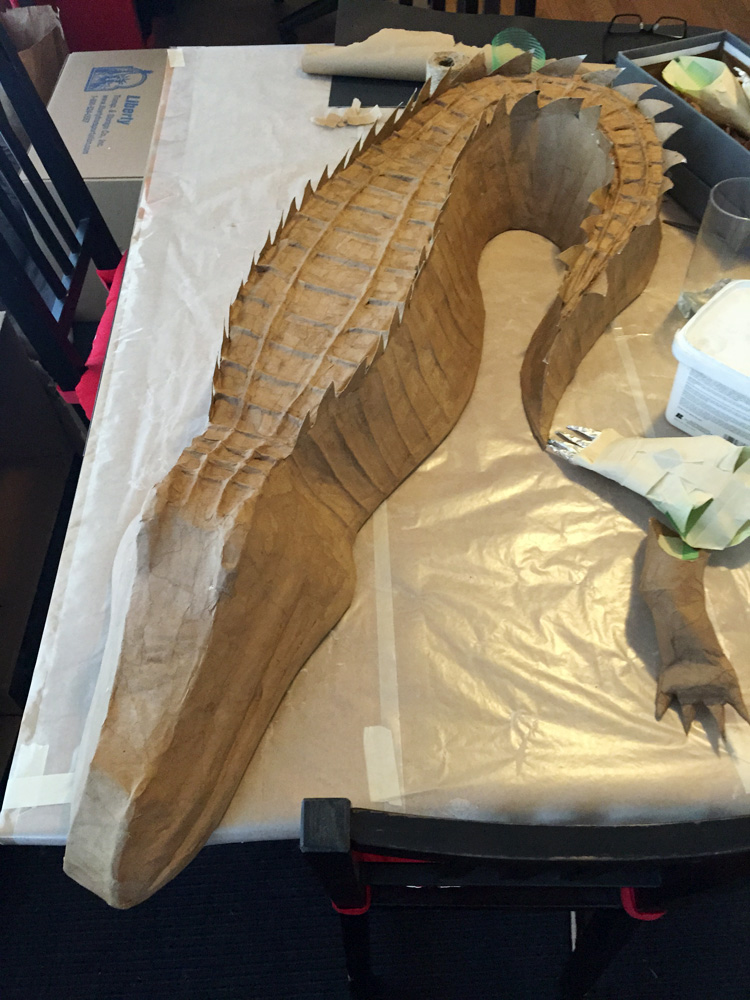
Paper maché alligator — waterproofing and painting

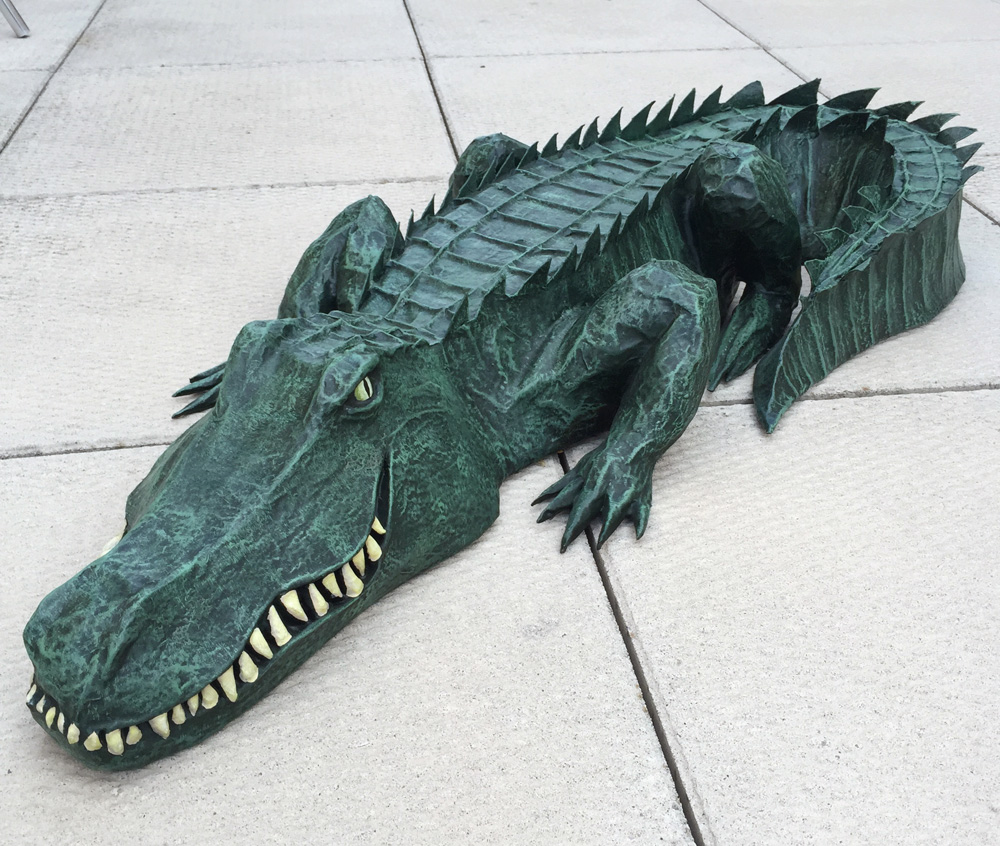
It’s finally done! This is part three of my paper maché alligator project. See part one and part two.
With all the paper maché done, it was time to waterproof and paint the alligator. Originally this guy was just meant to go in the bathtub during my Halloween party and then get thrown out, but as I made the thing I got pretty attached to it, so now I’m hoping to be able to waterproof it well enough so that it might not be in too bad shape after being submerged in water during the party, and maybe I can keep it and use it as an all-year-round decoration in my apartment, maybe on top of my bookshelf, or hanging on a wall. So I’m trying to approach decorating this thing like it needs to look good not just in the tub but anywhere.
Read more…
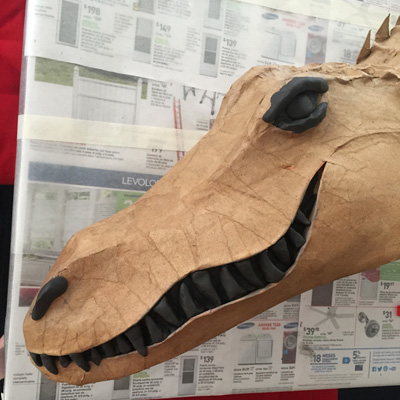
Paper maché alligator, part 2
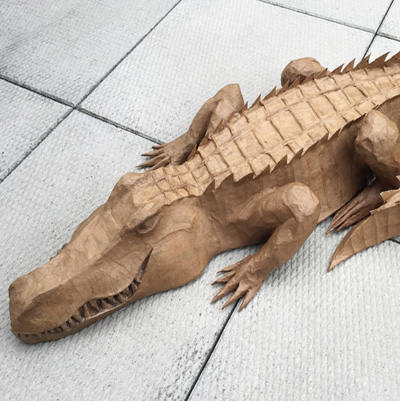
This is part two of my paper maché alligator project for Halloween. Part one can be found here. When I last left off, I had just applied Activa Plus clay to the alligator’s head in order to create the teeth, eyes and eyebrow ridges, and nostrils. So my next step was to paper maché over those bits; easy. See my article about my paper maché method here. The short version is: I use Roman PRO-543 universal wallpaper adhesive (paid link) and alternating layers of newspaper and brown wrapping paper. Read more…
Paper maché alligator — work in progress
I’m currently working on a 4-foot paper maché alligator to go in my bathtub for this year’s voodoo swamp-themed Halloween party. I’m excited about the progress I’m making on it, so here are some work in progress pics!
Read more…
Simple paper maché animal masks
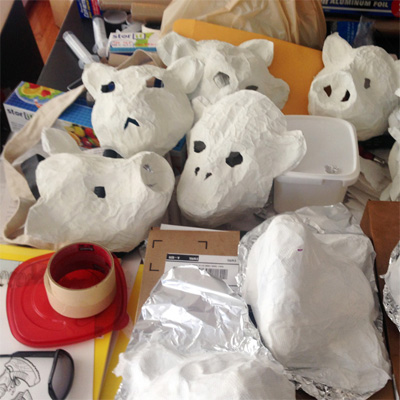
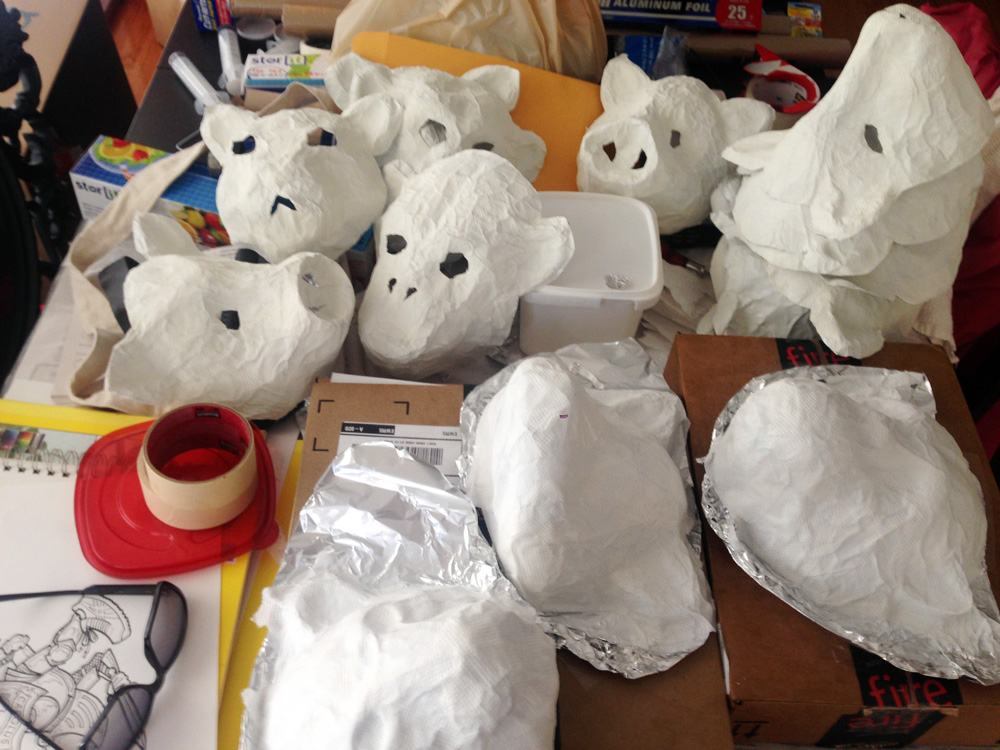
For one of my Halloween parties I had the idea of creating tons of simple, spooky paper maché animal masks and hanging them up all over the walls. So my challenge was: how to make lots of masks quickly and cheaply? I came up with a plan that worked out great. Here are the materials I used:
Read more…
Paper maché skeleton lion prop
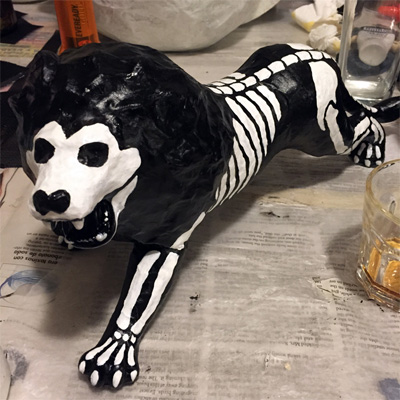
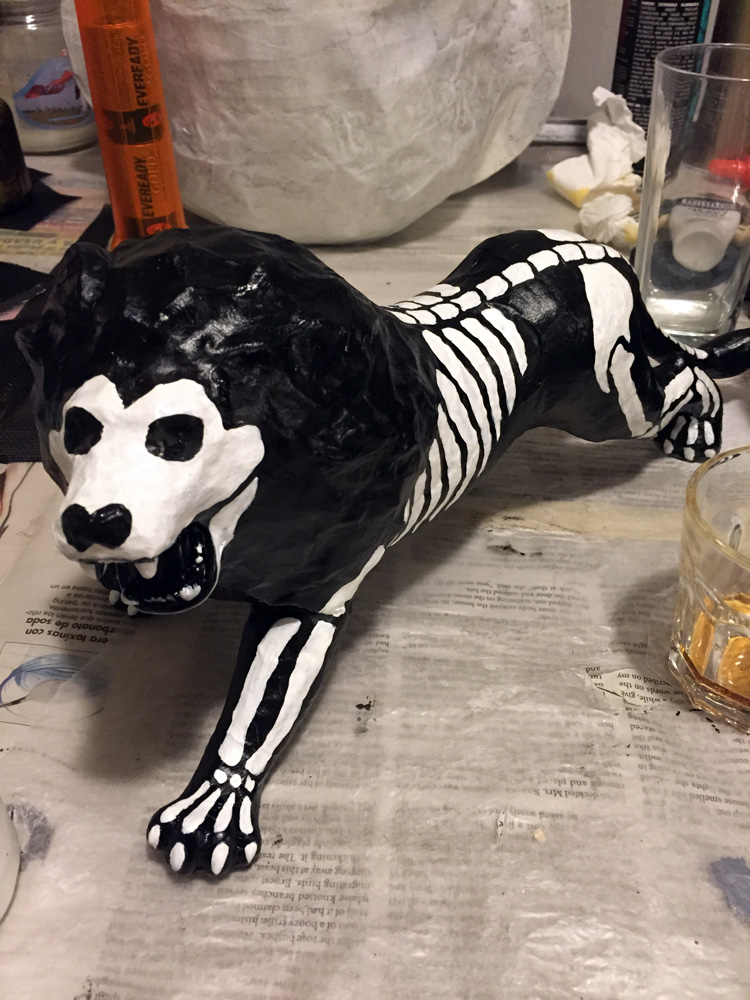
I made (or modified, really) this little paper maché skeleton lion prop for my fiancée’s skeleton lion tamer costume. She mentioned there was this weird soft rubber lion model at her work that they didn’t need and I told her I could paint bones on it for her so she could use it as a prop for her costume. But when she brought it home I saw it had these deep grooves all over it to imply a fur texture, and I knew it would be basically impossible to paint nice clean lines over it for the bones. So I did a couple layers of paper maché over the whole thing, and then painted it; easy! See my post about my paper maché process here. Because the scale is much smaller here than for my usualy big skull masks and other projects, I did the paper maché a little different; I started with my usual alternating layers of newspaper and brown wrapping paper (just one layer each), and then I added a final layer of tissue paper to get the surface as smooth as possible. Then I spray painted it black and painted the bones on with white acrylic and a brush. Fun!
Read more…
 About Manning Krull
 My violin skull mask, Mardi Gras 2015
 Three-headed paper maché dragon sculpture