
Spiked ceiling for my ancient Egypt Halloween party
Published by Manning on October 30th, 2017
I made this spiked ceiling for the entranceway into my ancient Egypt Halloween party. We have a small private hallway that you have to go through before entering our actual apartment, and we wanted to turn this space into the entrance to the tomb, like with hidden traps to foil would-be thieves or explorers. I didn’t take a ton of work-in-progress pictures of this project because there’s not a whole lot to show; this was a pretty easy one!

I started by measuring the hallway, and I decided I’d use the top edge of the doorways as a sort of shelf to hold those edges of the spiked ceiling.
I decided to make the spiked ceiling in two big sections, to make it easier to work with and easier to install. I planned out the dimensions of the spiked ceiling in Photoshop so I could calculate exactly how many spikes I’d need to make (132!) and exactly how to space them out in nice even rows.
I measured, cut, and taped together sheets of 30″ x 20″ foam board to make the big panels that the spikes would go on. I used heavy duty packing tape to connect the foam board pieces on both sides; packing tape is the best kind of tape to get very strong connections that won’t stretch or bend.
To make these panels less likely to curve or sag under their own weight once they’re up, I built up a 2″ wall of foam board all along the hidden side, i.e. the side that won’t have spikes on it. Building a wall like this with 90-degree angles and strong connections at the corners will help make the whole shape a lot more sturdy and less bendable.
Next up was the spikes. I bought a styrofoam cone to use as a base for all of my spikes; I got this from the crafts section of the dollar store. The cone didn’t come to a complete point (probably for safety reasons; screw that!) so I built up the point with a few layers of paper wrapped around it, and covered the whole thing with a lot of packing tape. With this base completed, it was time to make those 132 spikes.
I made the spikes from construction paper; I used the stuff leftover from creating the pages of my paper maché Necronomicon sculpture. I made the spikes by just curling the paper onto the styrofoam cone and attaching the edges with a few pieces of tape, slide the base out, and repeat.
I trimmed the spikes with scissors down to about 9″ long. I then made about ten 1-inch incisions all around the edge, to create thin tabs that I could bend inward. I creased these tabs inwards with my fingers and pressed on them all the way around a few times in order to keep them as permanently bent as possible.
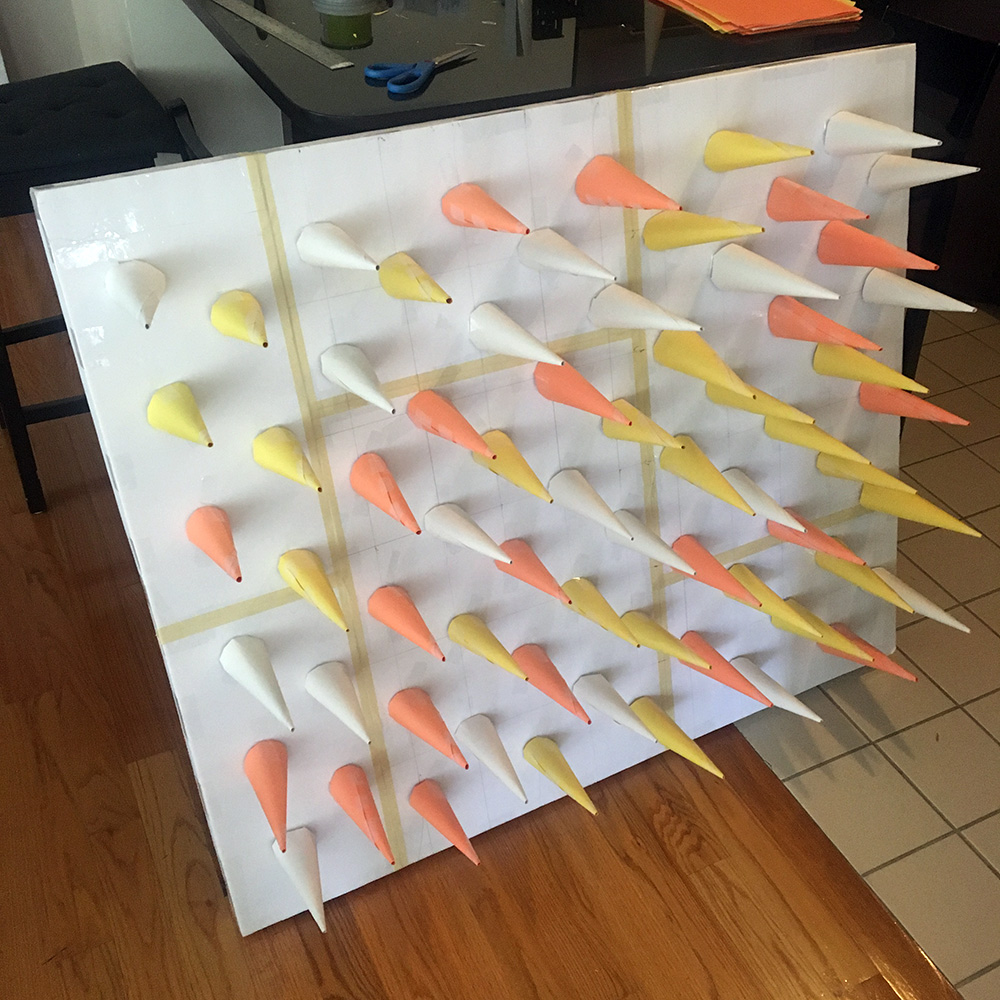
I carefully measured and marked off spots on my ceiling panels to create the grid of where the spikes should go; this is part of what I planned out in Photoshop at the very beginning. I attached the spikes to the ceiling panels with heavy duty packing tape; two thin strips for each spike. In the end the connections aren’t very strong, and that’s fine. This piece will be displayed in low lighting and in an area that people will pass through in just a few seconds; it doesn’t need to be perfect and no one’s going to spend a lot of time looking at it. And I honestly don’t really mind if a few spikes get knocked off! If I were trying to make this a more permanent installation I’d cover the spikes with paper maché, but that would take a tremendous amount of time and effort; probably a few days’ work.
I spray painted the finished spiked ceiling panels a light gray color — it was actually a super cheap light gray primer that I got on sale; I didn’t care too much about making these spikes look perfect, since they’d be displayed in very low lighting. You can see in the finished pics I didn’t even completely cover the yellow and orange paper in some places; this all looked fine in the lighting of the party!
I hung the spiked ceiling panels in the hallway using a few tiny shelf brackets attached to the walls with just thumbtacks, and like I mentioned above, two of the edges of the panels rested on the top edges of the two doors in our hallway. The spiked panels were very lightweight and held up fine during the party; amazingly, no spikes even got knocked off!
To complete the look of an archeological dig that’s uncovered the entrance to an ancient Egyptian tomb, I added bricks on the walls made from sheets of tan craft foam and taped some little plastic scorpions on them, I added a paper maché shovel and pickaxe in the corner, and I set out a couple old battery-powered lanterns that I’d bought for our Voodoo Bayou party a few years back. I added broken foam bricks along the edges of the door and put a big cracked ankh made from foam board on the door itself — I was kind of going for a feeling of, oops, the explorers cracked the symbol of eternal life on the way into the cursed tomb, that’s probably not good. Anyway, that’s it for this hallway! I hope it got people good and nervous on their way into the party…
 About Manning Krull
 How to make a 4-foot paper maché alligator
 My violin skull mask, Mardi Gras 2015
 Three-headed paper maché dragon sculpture
Leave a comment