
8-foot foam board rowboat prop
Published by Manning on October 22nd, 2019
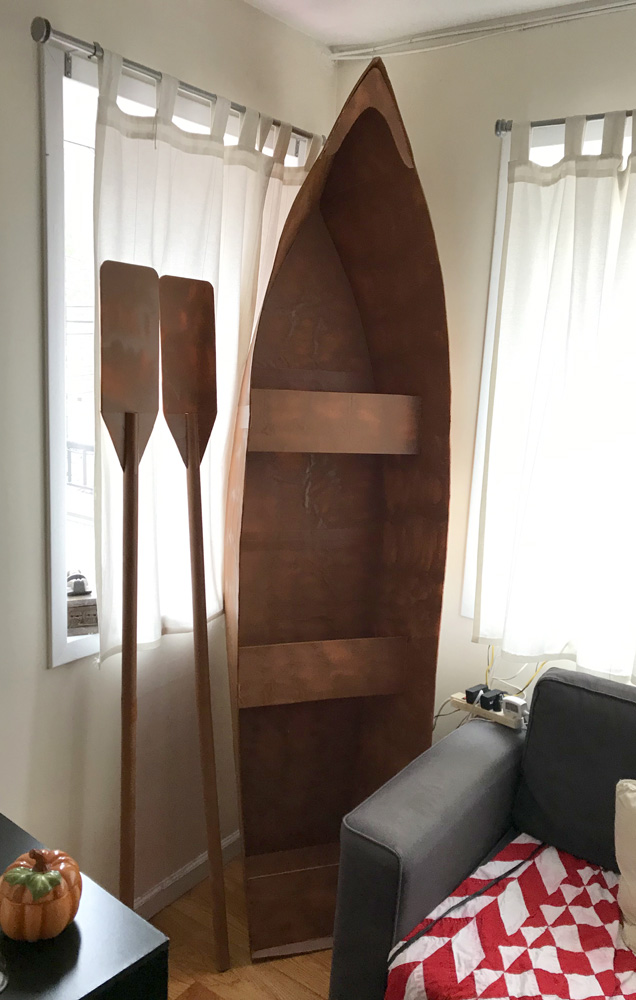
I made this big rowboat prop for my 2019 Halloween party — Summer Camp Slasher! It was a somewhat complicated project but I tried to simplify everywhere I possibly could and take every shortcut I could find. I made this whole thing in one afternoon!
Here’s my weird idea I came up with for creating this slightly complex boat shape: I started with two giant foam board panels — one to be the bottom surface of the boat, and one to span across what would be the open upper surface; this one would be removed when the shape was done. My plan was to build the walls of the boat around all this, and then remove the top surface, leaving the shape open on top — like… a boat (duh).
So, I designed and calculated and worked out these two big shapes with some work in Photoshop. I printed out a small guide for myself that I could use to draw the full-size shapes onto pieces of foam board.

I attached several sheets of foam board together with heavy duty shipping tape, and I drew the two big shapes on those. I cut these out with an X-acto knife.
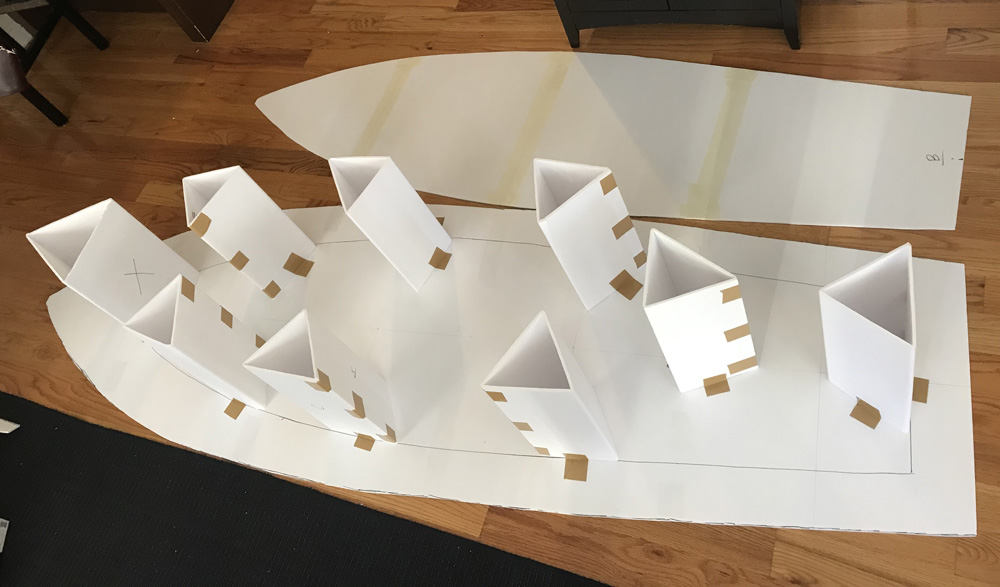
I measured, cut, and assembled several triangular tower shapes to hold the two big panels apart at the right distance; this whole thing is similar to my method for making box shapes out of foam board. I taped these supports in place. (You’ll see I’m working on the boat upside-down here; the larger panel is on the bottom for now.)
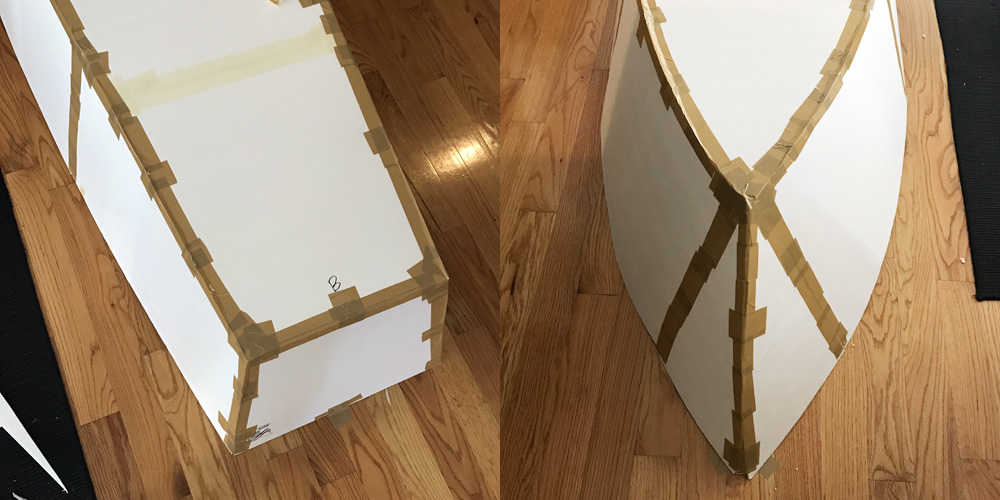
I made the walls of the boat one segment at a time. I’d take a sheet of foam board, lean it against the boat structure, and trace the line for where I’d need to cut. Then I cut out the shape with an X-acto knife and taped it in place — with tons of shipping tape for the permanent connection to the bottom of the boat, and just a small piece of masking tape for the top part of the boat that will be removed later. I repeated this all the way around the boat.
Some of the segments needed to be slightly curved, so I curved and bent the foam board sheets before drawing and cutting. To do this I simply laid the sheet on the floor and pushed one side down while gently but firmly pulling the other side up. This crunches up the foam inside the sheet and gives the whole piece of slight curve. I repeated this all over the sheet, curving it up piece by piece. Once you get the hang of this it’s easy. Using really cheap foam board from the dollar store helps! The good stuff doesn’t want to cooperate much.
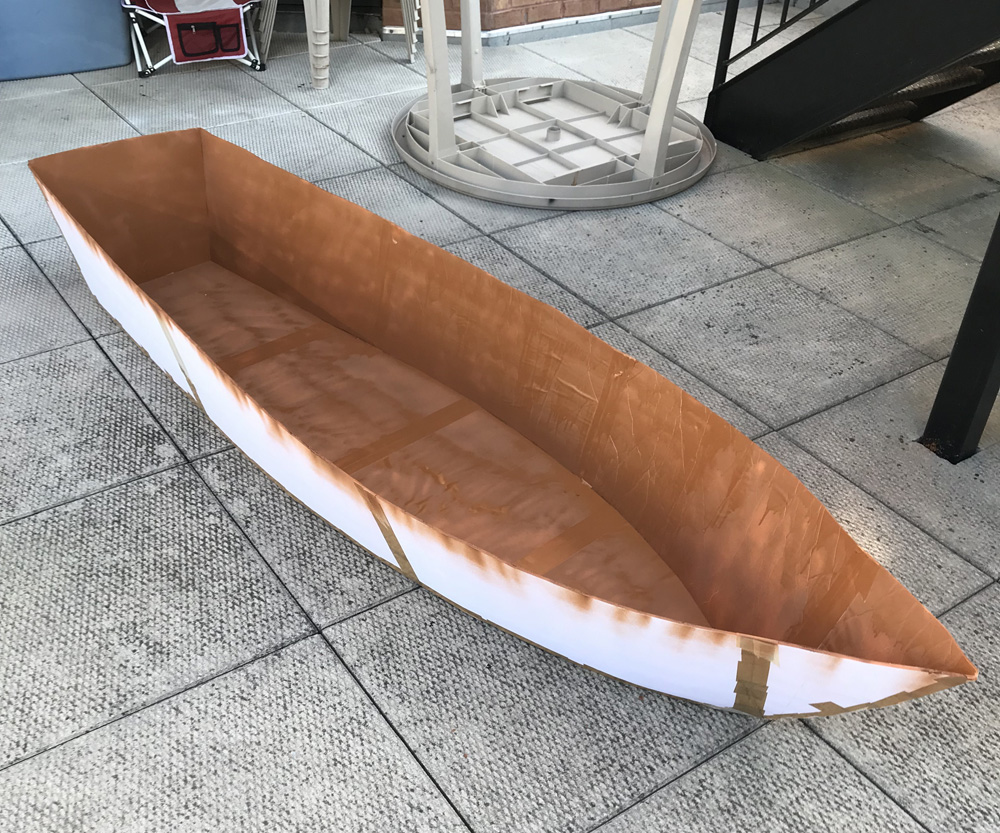
I drew long curved lines for where I wanted to trim the walls of the boat. I cut through these with my X-acto knife, and then I lifted the whole boat off of the top guide surface. The boat held together pretty well! Like, better than I expected. It’s not super sturdy but it doesn’t have to be.
I still had to add the benches and stuff, but I decided to paint the main boat shape first.
Painting
I took an unusual step to prep the boat for painting: I covered over all the visible areas of shipping tape with masking tape. I do this for some projects because shipping tape looks really shiny and ugly when you spray paint it, whereas masking tape blends into the matte surface of the foam board a lot better.
You might ask why I didn’t just use masking tape for this prop right from the beginning — the problem is, shipping tape is much stronger for assembling shapes like this, so I needed to start with shipping tape and then finish with the masking tape.
Anyway, another consideration before painting the boat prop was this: I first wanted to figure out how and where the boat would be displayed during my Halloween party, so I could work out which surfaces would be visible and which wouldn’t — that way I could skip painting some of the surfaces and save a lot of paint!
With the boat standing in the corner of the apartment, that meant I could skip the right side (uhh… starboard?), and the back end, which would be on the floor. The bottom surface faces the wall and window, so I skipped painting that too.
I spray painted the boat with the cheapest tan spray paint I could find at Home Depot; this took about two and a half cans.
Almost done!
Benches and other details
I measured and cut out more pieces of foam board to create the bench pieces and other little details, like the big flat surface at the back and the little pointy thing at the front. It wasn’t easy to accurately plan out the measurements for the benches, so I had to do some trial and error with holding them in place and seeing how much I needed to trim off. No big deal.
I glued all these pieces in place with a heavy duty hot glue gun and tons of hot glue. I was a little worried because the flimsy boat structure wants to sag and open outward a bit, and I wanted to try to make the benches pull the walls inward a bit. So I overdid it with the glue gun, but it totally worked. I’d glue one side of the bench in place, let that completely cool, and then pull the walls together with one hand and glue the other side of the bench in place with the other. I squished the boat with my arms while the glue cooled, and when I let go it was fine.
And with that, this thing was done! But then I realized, oh yeah, I need oars!
Making fake oars
Like the boat prop, I wanted to keep these oars as simple and quick as possible; the details aren’t super important. I started with rolls of brown wrapping paper; the same stuff I use for paper maché. My plan was to use these rolls of paper for the oars and later on break them down and rescue as much of the paper as possible to use for future projects.
I used two rolls of paper for each oar. To keep the rolls tightly closed, I pulled just a little bit of the plastic wrapping off, and then taped the exposed part of the roll closed. Then I pulled the wrapping down a little more, and put more tape on the exposed paper. Repeat all the way down. When I was done I had an unwrapped roll perfectly closed with tape on one side.
I did this for all four rolls, and then I taped two rolls together for one oar and the other two for the other oar. I taped the rolls together with shipping tape because it’s really strong, but then I covered over the shipping tape with masking tape because it’ll look better when it’s painted. (Just like I did for the boat itself.)
I cut the paddle parts of the oars out of foam board and taped them in place with masking tape.
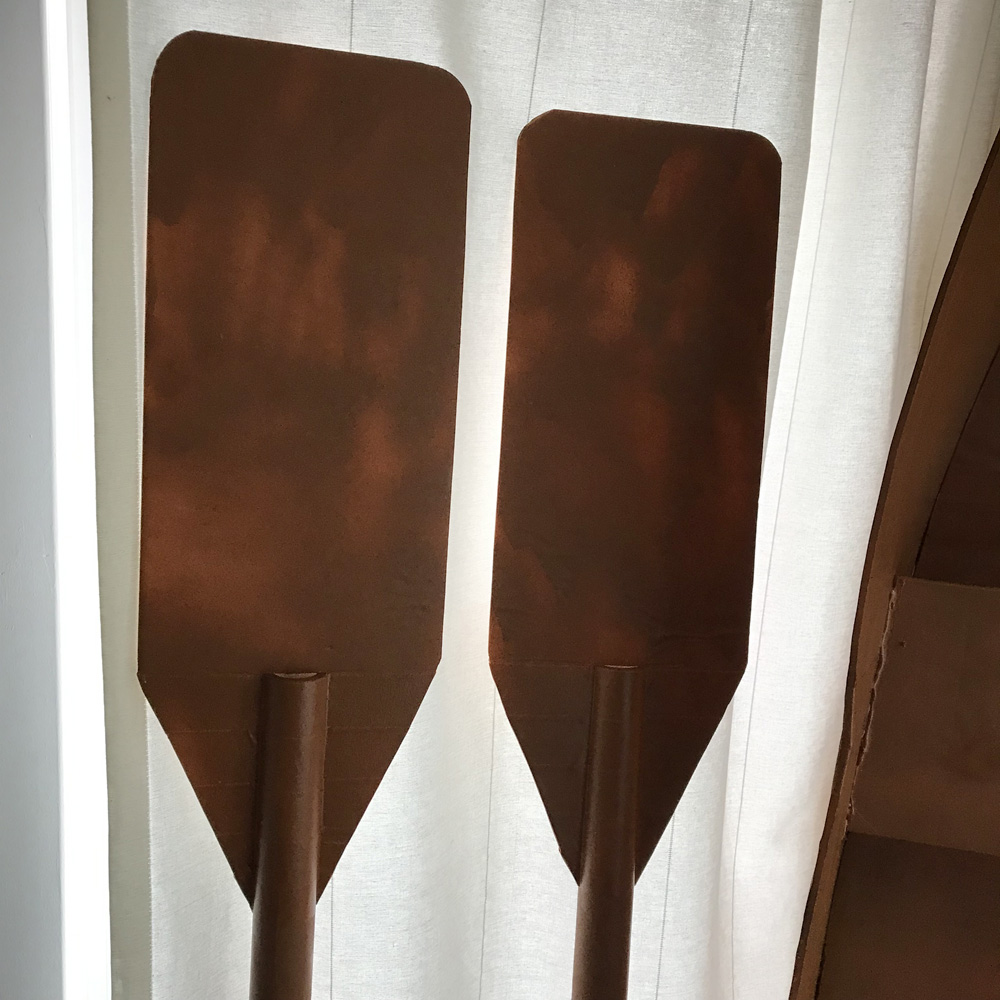
That’s it! Then I spray painted the oars to match the boat.
I managed to keep all of these steps really simple, and I took as many shortcuts as possible and skipped any kind of fine detail work. It all paid off; as a decoration that’s not viewed too closely this all totally worked.
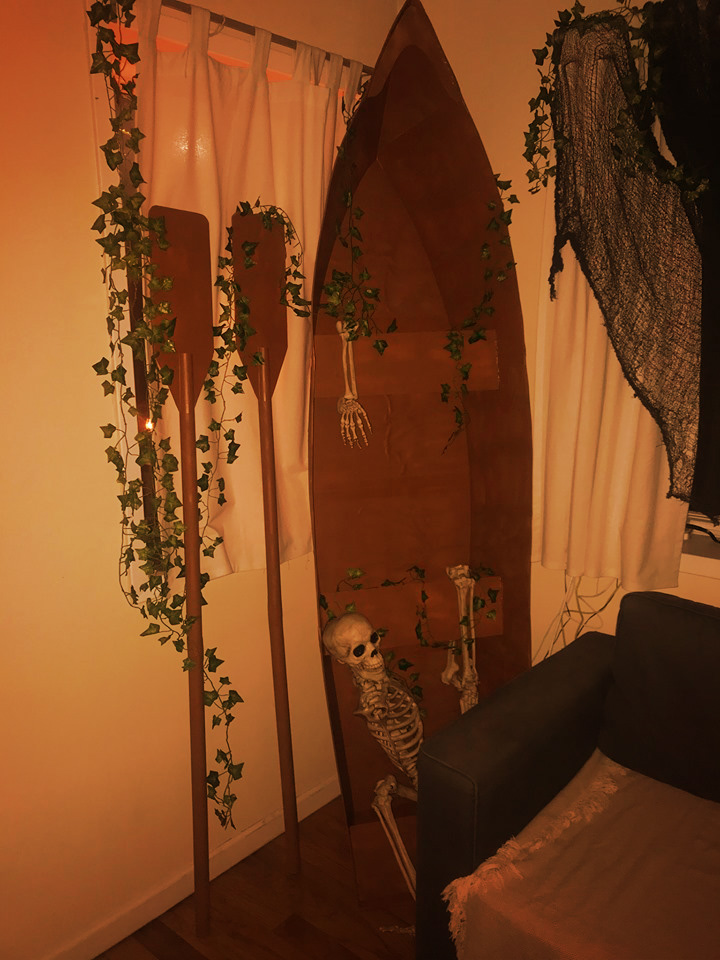
Here’s a pic of the rowboat on display during our party; we threw some skeleton parts in there and hung a bunch of fake vines on and around it.
Whew! On to the next project!
 About Manning Krull
 How to make a 4-foot paper maché alligator
 My violin skull mask, Mardi Gras 2015
 Three-headed paper maché dragon sculpture
September 12th, 2020 at 10:31 pm
This looks fantastic and doable! I was looking for an easy build for a rowboat for our front yard this year, so I could reuse the Kraken tentacles and this gives me a great starting point. Thanks for posting!
September 14th, 2020 at 9:25 am
Thanks Cynthia! I’d love to see your Kraken tentacles if you’ve got any pics!
April 14th, 2023 at 11:08 pm
Hello,
Your boat turned out great! I’ve been looking for a pattern for a small rowboat (6ft) to use as a flower bed. Do you think if we doubled the foamboard it would be sturdy enough to hold dirt outdoors?
Thanks! Cinda
April 14th, 2023 at 11:56 pm
Hi Cinda! I don’t think so, I’m afraid! This foam is very thin and flimsy. I think you’d need to use wood, but I realize that’s a much bigger project. Good luck!
September 2nd, 2023 at 11:48 am
Hi,
I want to build a row boat similar to the one you built for an art installation. Is this something you could undertake as a gig ? Thank you
September 11th, 2023 at 5:09 am
Hello I was wondering where you got your phone boards from the boat looks awesome by the way