
Giant candy cane decorations!
Published by Manning on August 30th, 2018
I made these giant 4-foot paper maché candy cane decorations as part of a set of giant candy decorations for my Halloween party — that’s why they’re orange and black rather than red and white! Our theme was basically “haunted gingerbread house” so I made lots of different kinds of giant spooky candies. I did these in Halloween colors but of course you could do them in more traditional colors for Christmas!

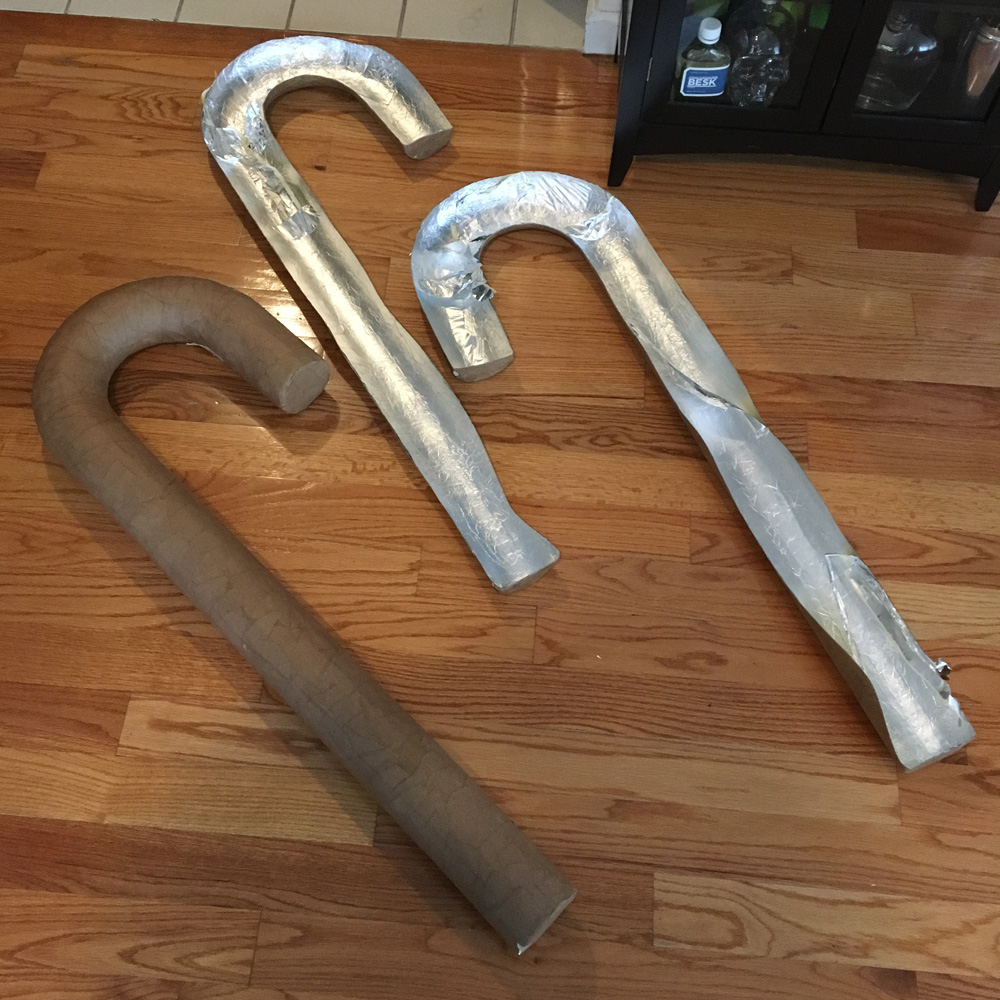
I started by buying a ton of styrofoam cups from the dollar store — I originally thought about using cardboard mailing tubes, but they’re way more expensive! The cups worked fine. The cups I bought were 20 for a dollar, and I ended up using about three and a half packs for one candy cane base.
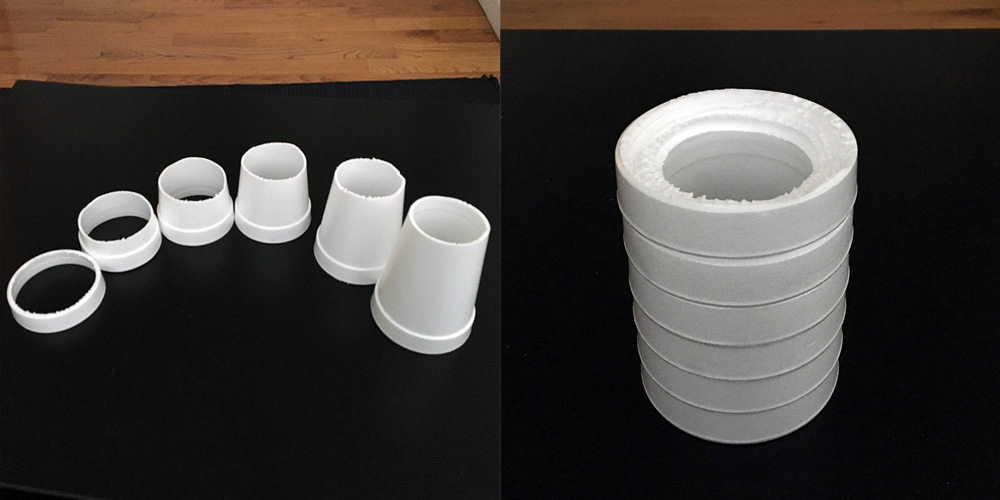
I trimmed a bunch of the cups with an X-acto knife in order to make the flat ends of the candy cane. That way when the cups are stacked, the cylinder shape is nice and flat on both the top and bottom.
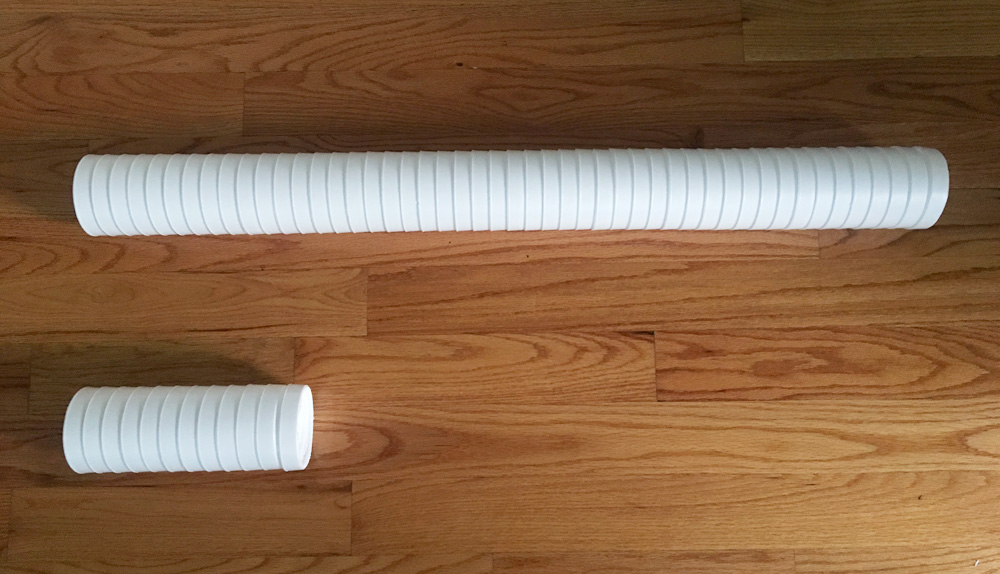
I laid out the cups in two stacks to figure out how big to make the candy cane; the curved part will go in between on the left there. You can see both ends of the stacks are flat, because of the way I trimmed them in the previous step. After I took this pic I ended up removing a few cups from both pieces; the short straight piece ended up being 8 cups long, and the long straight piece was 44 cups.

I designed the curved part of the candy cane on foam board. The tapered shapes at the bottom are based on the measurements of the interior of the cups, so those pieces can sit inside the stacks of cups for the long and short parts of the candy cane. (How did I draw those perfectly-sized circles? Read my article about drawing precise circles.)
To round out the curved part of the candy cane, I trimmed the top ridges off of a dozen cups, leaving about 3/4″ of the cup below the ridge. I assembled all these parts along the curved foam board shape I cut out, and I used a bunch of masking tape to lock everything together.
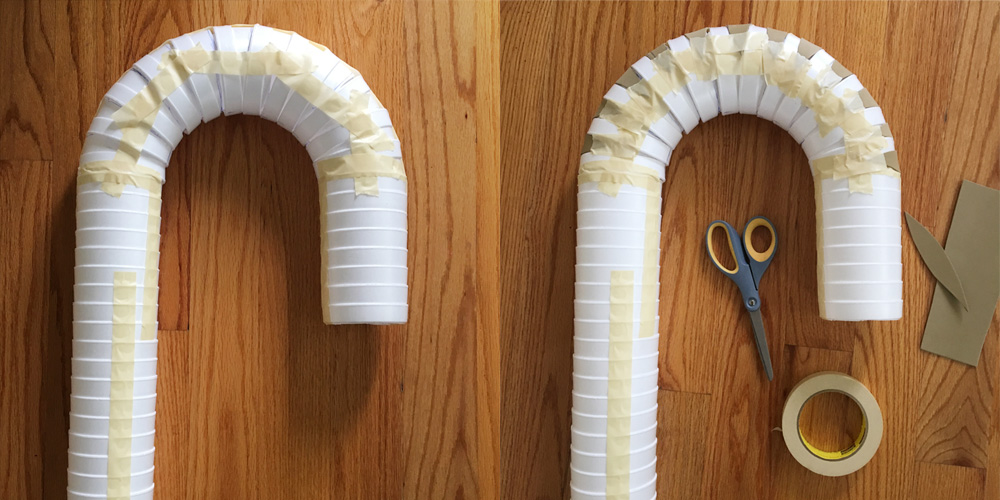
I filled in the gaps in the curved part of the candy cane with little wedges of craft foam that I cut out and taped in place. Doing this helps to smooth out the surface and avoid getting a bumpy, ridged look in the finished piece.

I also wrapped the straight parts of the candy canes with a bunch of construction paper I had left over from another project; this also helps conceal the ridges of the cups.
I wrapped the curved part of the candy cane with a layer of shipping tape and then a layer of masking tape, to further smooth that part out.
You’ll see I use a layer of shipping tape and then masking tape in a ton of my projects. The shipping tape doesn’t want to lay very flat so it does a great job of hiding the pattern of (in this example) the ridges of the cups, but it leaves an irregular, bumpy surface. The masking tape does a good but imperfect job of smoothing out the bumpy shipping tape. Masking tape stretches and molds to shapes, so if you were to apply the masking tape right on the ridges of the cups, it would take on the shape of the ridges and let them show through. So in the end with these two steps you’re left with some bumps, but I believe it’s much nicer than having a visible pattern show through.
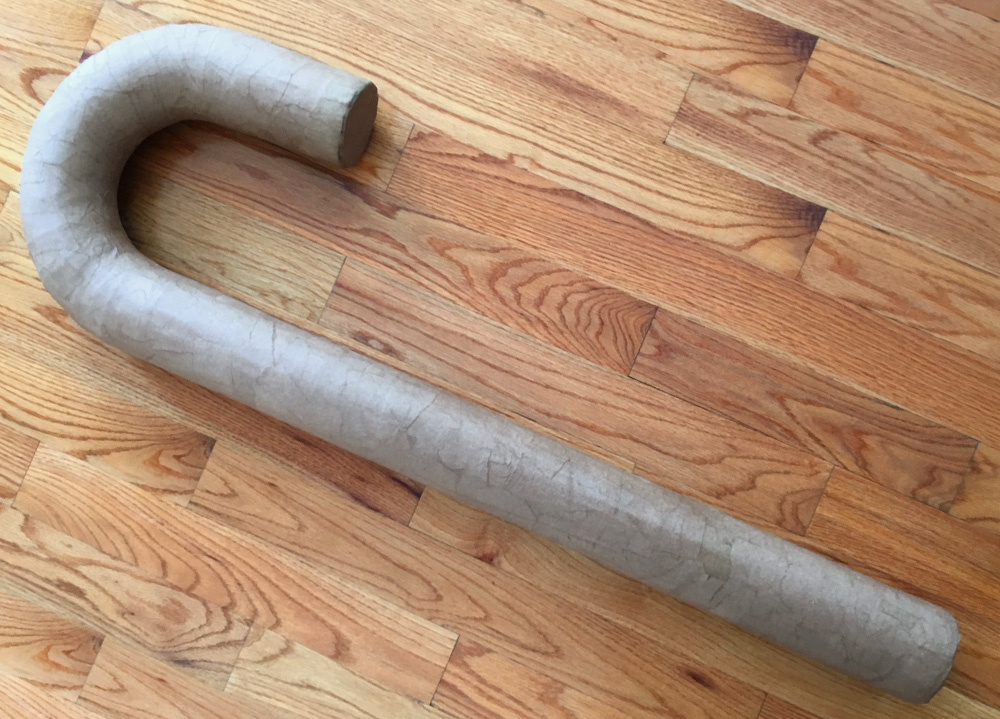
After building this base, I decided to scrap my plan of building several of these and instead use this one candy cane as a re-usable base for multiple paper maché copies. Before proceeding with that, I covered this base with two layers of paper maché, just to make it a lot more solid and stable. You can read about my paper maché process and materials here. The short version is: I use Roman PRO-543 universal wallpaper adhesive (paid link) and alternating layers of newspaper and brown wrapping paper.

When the paper maché was dry, it was time to make my first copy. I first covered the base with aluminum foil, held in place with tape, and I applied four layers of paper maché over the course of a couple days.
When this was dry, I sliced the candy cane open with an X-acto knife and carefully removed it from the base, leaving the aluminum foil inside the paper maché copy. Above you can see the base at left and the two halves of the first copy at right. I taped the two halves of the copy back together and covered the taped parts with two layers of paper maché. The first copy was done!
I then repaired the base with some masking tape where I’d sliced it up a bit with the X-acto knife. Then I was ready to make a second copy; I applied another layer of aluminum foil and repeated the steps above. In the end I made three copies of the candy cane. When you’re working this way and you’ve made enough copies, of course you can also use the base as one more copy; I just repaired the cuts again with some paper maché. The only real difference is that this last copy is a lot heavier than the others, because it still contains all the base materials.
Painting perfect candy cane stripes
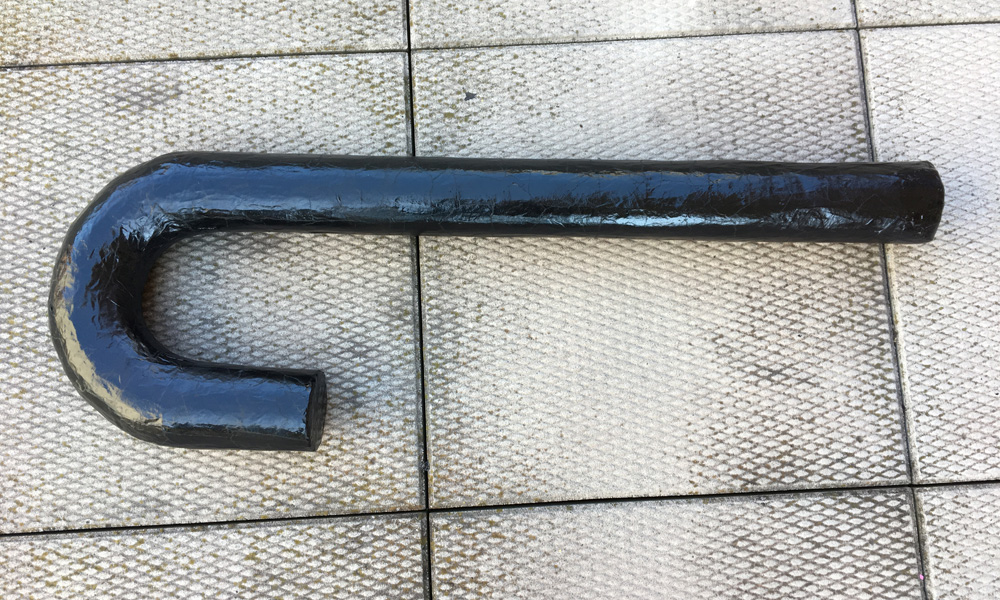
I took the candy canes outside and spray-painted them black. It’s important to let the spray paint set for at least 24 (or even 48) hours for the next steps using masking tape; if you do that stuff too early the masking tape will peel the paint off in a lot of places.
This might sounds nuts, but the hardest part of these candy canes was figuring out how to paint the stripes! I thought that would be easy but it ended up pretty complicated, for the first one at least.
I measured the diameter of the end of the candy cane and it was 4″, and I assumed the math for the stripes would somehow be based on 4″. I measured and marked off dots at 4″ intervals with a China marker, and then I started wrapping some masking tape around and hitting those dots and it was totally wrong!
It turned out that the correct intervals to get stripes at a 45-degree angle was 6″ intervals. I also wondered if the little dots and lines needed to be staggered on the “front” and “back” sides of the candy cane — like 6″, 12″, 18″ on the front, and 3″, 9″, 15″ on the back. Turns out, no, it’s 6″, 12″, 18″ on both sides. Anyway, I bet someone who knows a lot about math could’ve figured this all out really easily. I basically got there through a few rounds of trial and error.
So, once I figured things out for real, here’s how I painted the stripes.
First, I used a ruler to mark off those dots — like I was saying, at 6″, 12″, 18″, etc, on both sides. Then I used a big plastic triangle drawing tool (what the heck is that called??) to mark off short 45-degree lines at each of my dots; these will guide the string and tape that I’m going to wrap around.
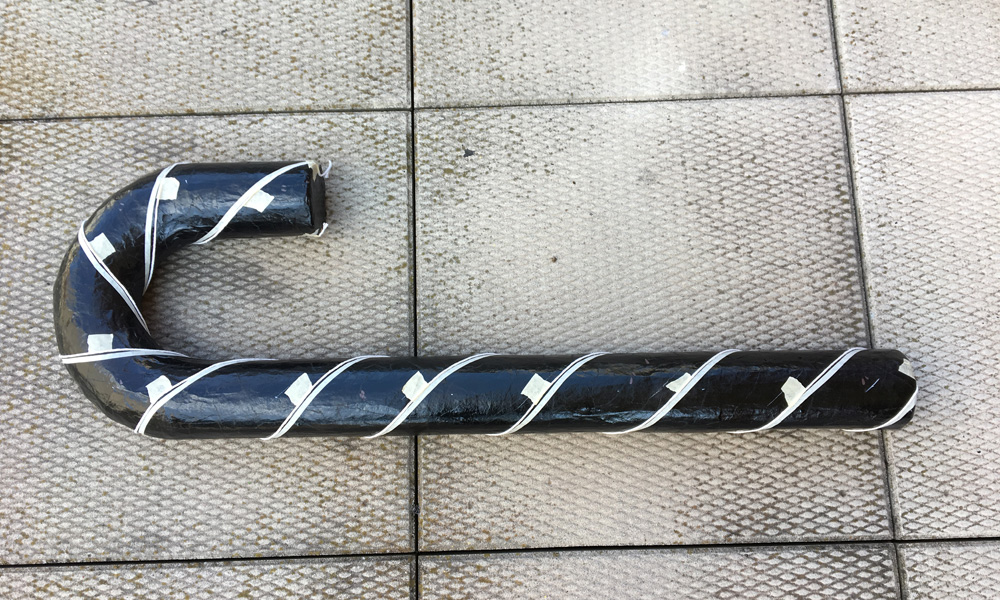
Then I taped a piece of string to the bottom end of the candy cane and tightly wound it around, trying to hit those marks along the way. The nice thing about this method is you end up slightly missing some of the marks, but once you’ve taped the other end in place, you can drag and pull the string a bit here and there to get it right onto the marks. That part is actually pretty easy.
Another surprise: turns out you need two strings! It takes two lines to draw the stripes. Maybe that should’ve been obvious? This is why I didn’t go into math!
The pic above shows both the string step, and the next step with thin masking tape.
(Ugh, I don’t even know how to write about tackling the curvy part at the top of the candy cane; that really did require some good ol’ trial and error.)
One the strings were attached at both ends, I added little square-ish bits of masking tape to hold it in place, trying to keep the tape to one side of the string, so it won’t interfere with the real line of tape I’d be adding right after.
Then I used a roll of very thin (1/4″?) masking tape to follow along those strings.
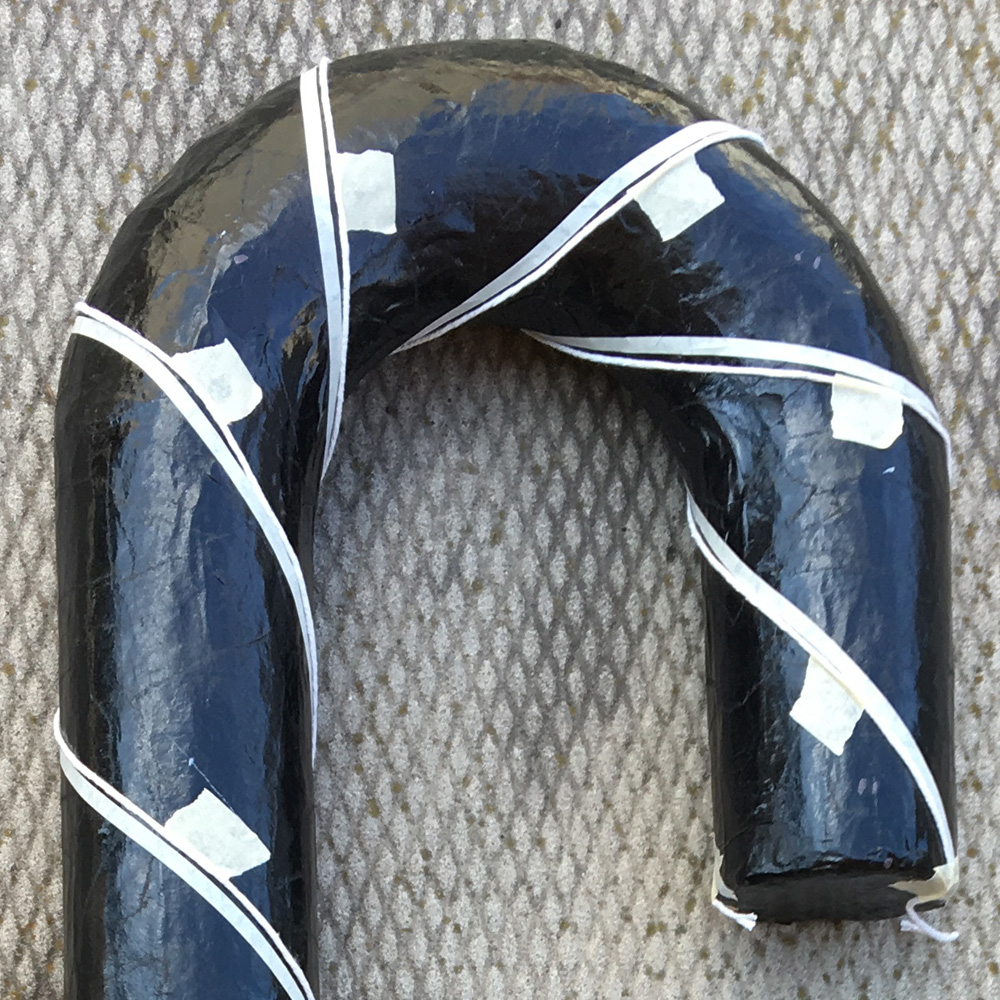
So in the closeup above pic you’re seeing all those steps: string, large bits of tape, and thin tape.
Next, I carefully removed the strings and bigger tape. I then smoothed the thin tape down as much as possible to get the neatest line possible.
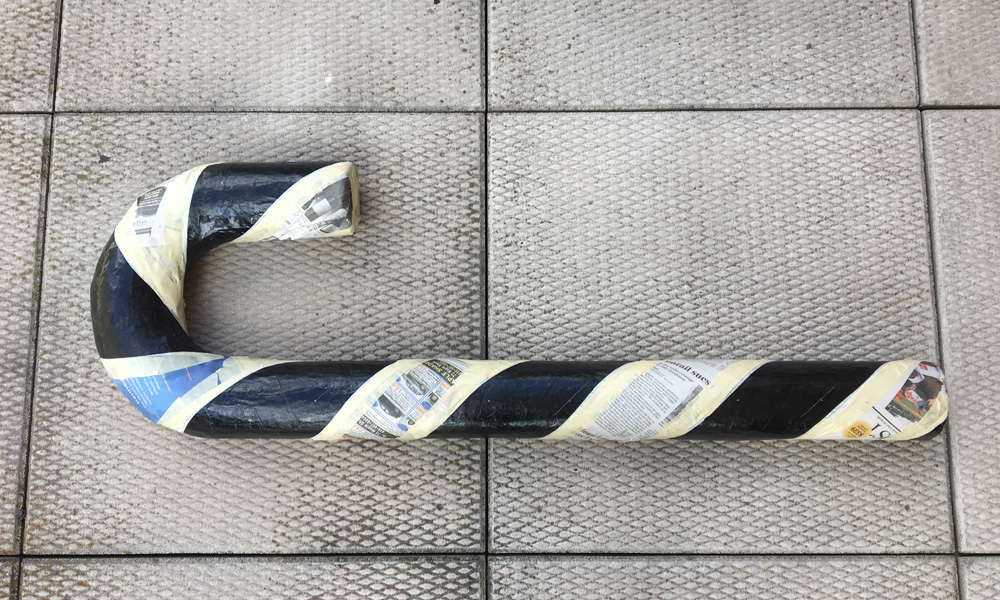
Once the strings were off, I then added a second line of normal 1″ painter’s tape, and I overlapped this onto the thin tape as much as possible.
Then I filled in the space with strips of newspaper, held in place with normal 1″ masking tape. It took longer than I would have liked to get all of this really precise!
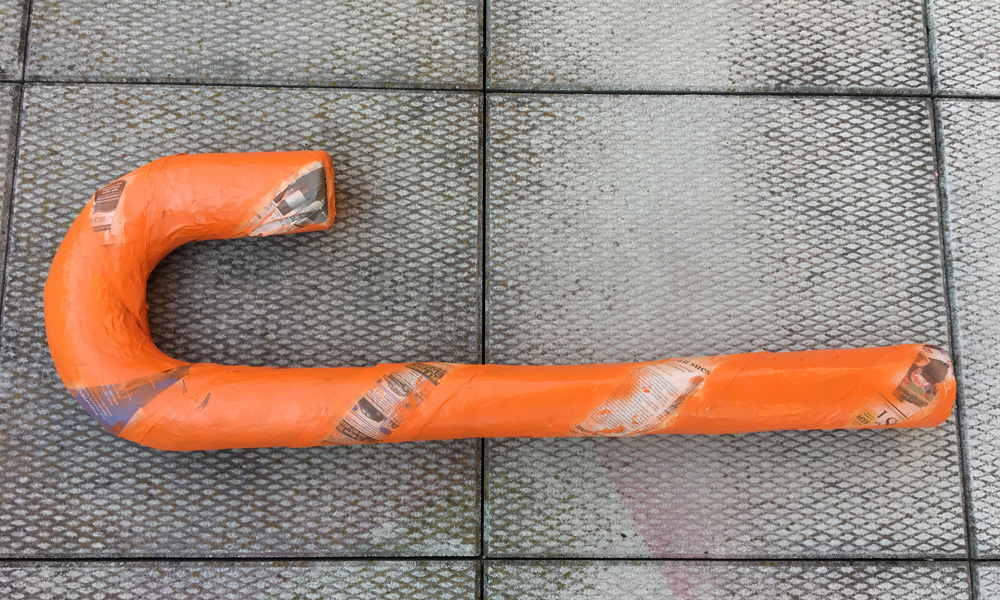
Whew! Finally ready for painting! I painted the exposed parts with orange spray paint.
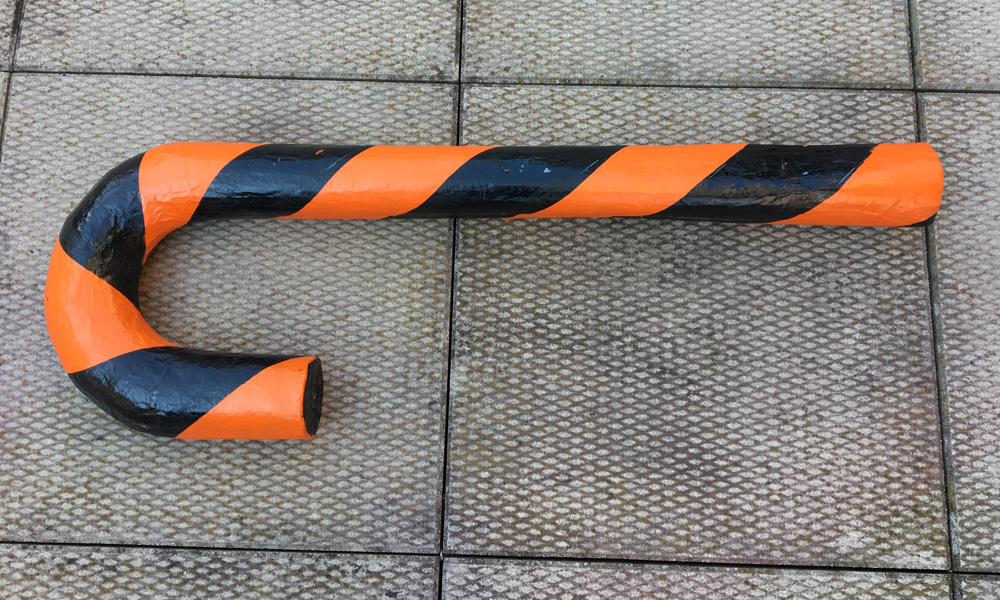
I let that sit for about an hour and then very slowly and carefully removed all the newspaper and tape. And voila! A couple small (but expected) problems occurred: The tape tore up one tiny area of the paper mache, luckily in just one place. And some of the white China marker lines were more visible than I’d like in the black areas (but they were perfectly covered in the orange areas). Both of these problems were easy to repair using a piece of card stock held in place like a shield and very carefully spraying some tight bursts of black and orange paint in the appropriate areas to conceal the problems. When all this was done, the whole effect was great! But like I mentioned many paragraphs ago, really this whole stripe-painting process was a lot more hassle than I expected!
For the second, third, (et cetera) candy canes I was able to mark off the stripes a lot more easily, because I could lay this first one down right next to them for reference and mark the little white lines just like that. Still, applying all that string/tape/newspaper as precisely as possible just takes a lot of time.
Wow, that was a lot of work, but I’m really happy with how these things turned out. Happy Halloween and/or Merry Christmas!
 About Manning Krull
 How to make a 4-foot paper maché alligator
 My violin skull mask, Mardi Gras 2015
 Three-headed paper maché dragon sculpture
Leave a comment