
Making a foam board coffin
Published by Manning on October 15th, 2015
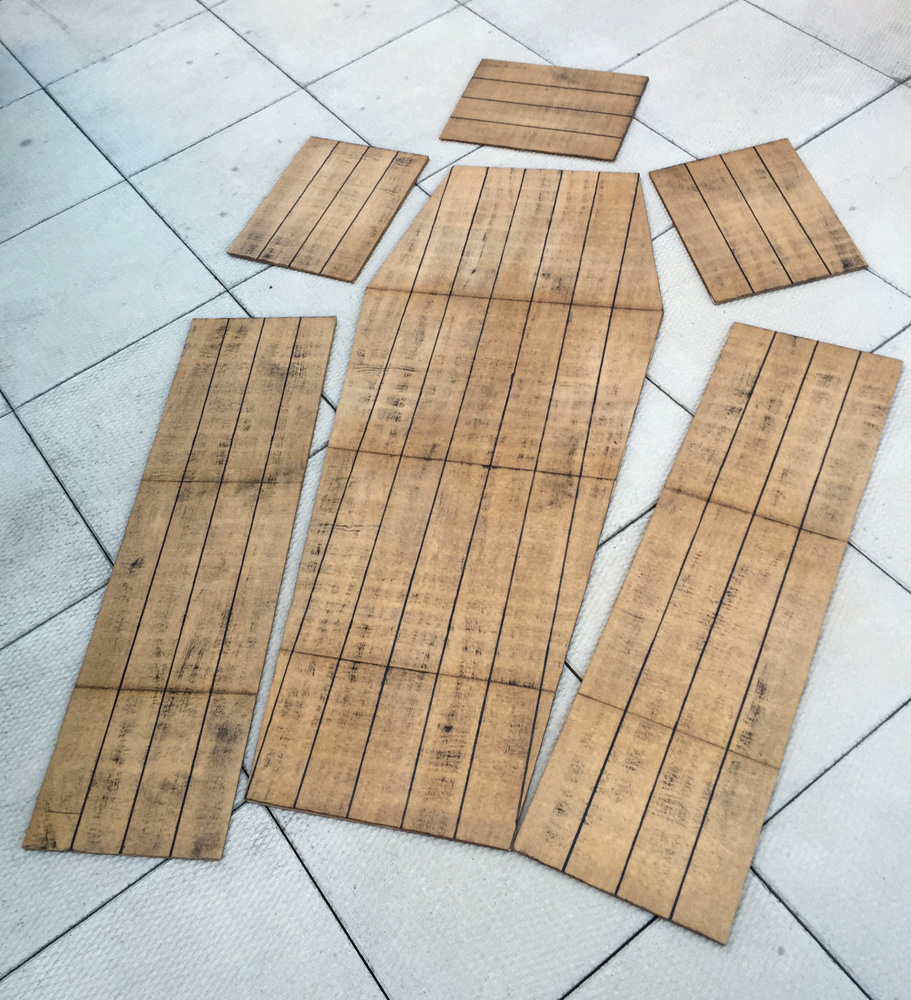
One of my main decorations for my Voodoo Bayou party was this fake wooden coffin; I wanted to have it standing in the corner of the living room so people could pose for pictures in it. The main material in the coffin is foam board — 17 sheets total. I designed the coffin in Photoshop based on how large each sheet of foam board is: 20″x30″. Here’s my basic design:
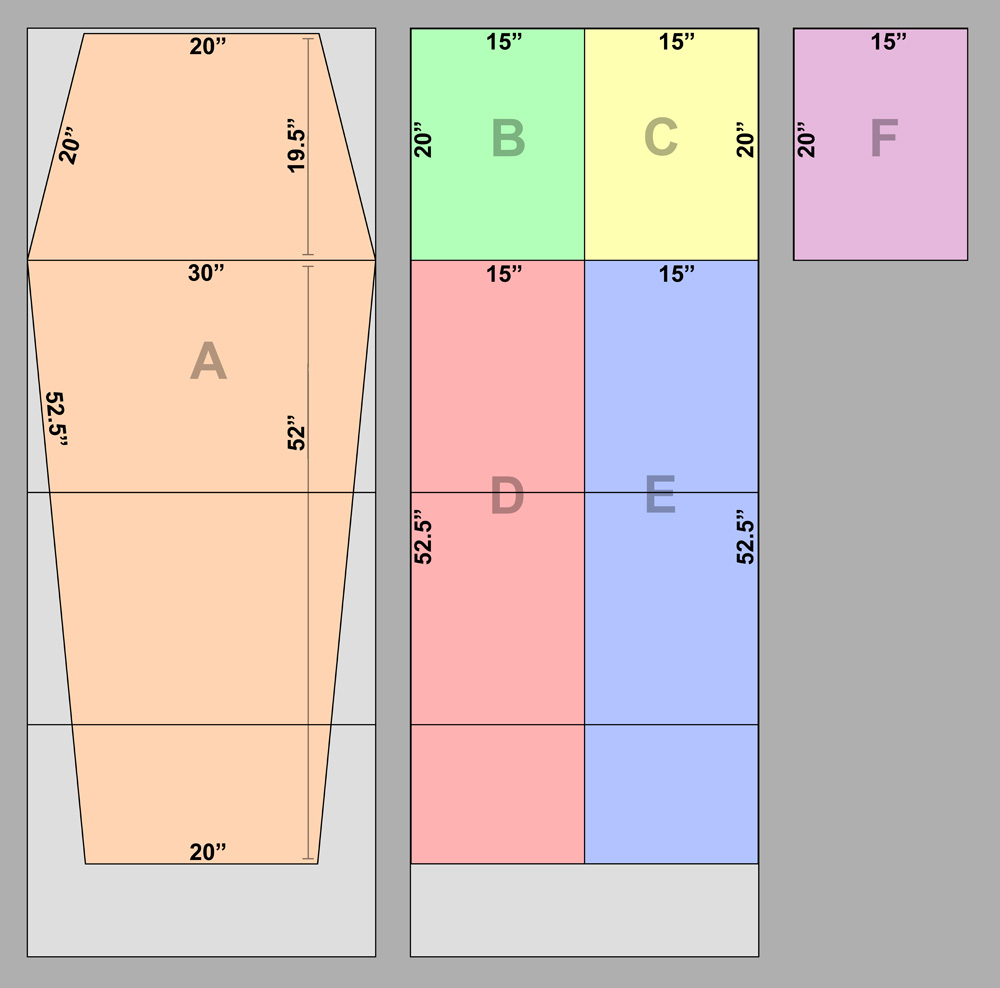
Note: I wanted the coffin to be two sheets of foam board thick, so I actually had to cut out two of each of the pieces pictured in the diagram. You’ll see the diagram above calls for 8 1/2 sheets of foam board, so double that and you get 17.
Another note: These measurements aren’t 100% precise, if you really do the math! I rounded everything to the nearest half inch. I’m specifically talking about those pesky diagonal lines. The thing is, you’re never going to really be able to cut these pieces 100% accurately even with a ruler and an X-acto knife. These rough measurements are more than accurate enough for throwing this project together. Working with foam board is definitely an inexact science!
Remember, the coffin will be standing up. So, “A” is the coffin back, “B” and “C” are the walls that go on either side of where the person’s head would be, “D” and “E” are the long walls at the bottom, and “F” is the wall that goes above the head. (B, C, and F are identical pieces.)
My coffin doesn’t have a lid, because I’m lazy, and it doesn’t have a bottom panel (at the feet), because it’s meant to be standing up, and it wouldn’t work well to have people standing on part of the foam board; it would get destroyed very quickly. So the bottom panel of the coffin is just open. With these six main panels of the coffin, and two layers for each panel, that’s twelve pieces total that had to be cut out.
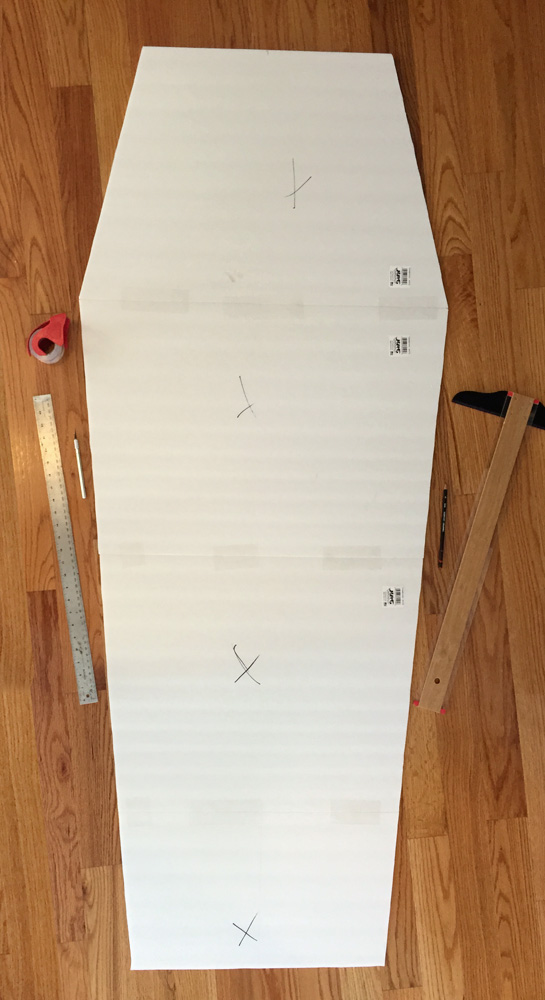
I first taped the pieces of foam board together using Scotch heavy duty packing tape — four sheets for the back, three sheets each for the long panels, etc. I only put tape on one side of the foam board, because I didn’t want the tape to be visible on the finished coffin; the shininess of the tape would ruin the fake wooden look. Since each panel of the coffin will ultimately be two layers of foam board glued together, I could keep the taped parts on the inside, so no one will see them.
I carefully drew all the panel shapes with a ruler and pencil, then cut out the shapes with an X-acto knife. Once I cut out all the shapes, I drew long black lines on them with a wide Sharpie marker, to make each panel look like several long wooden boards. I plotted these out with a ruler and pencil.
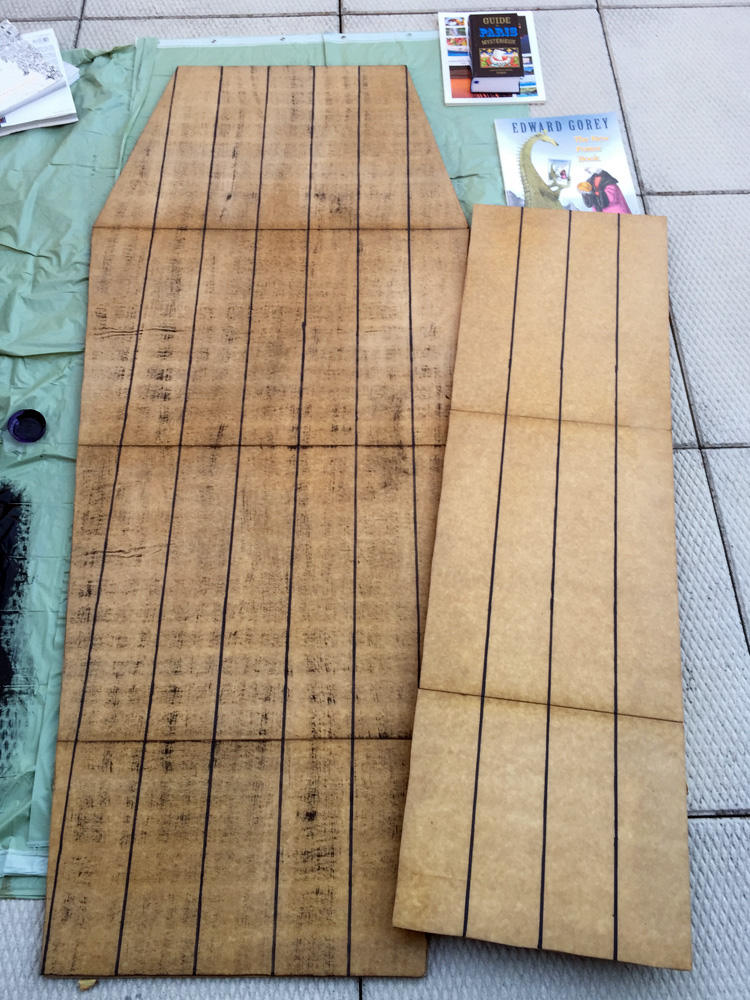
After adding the black lines, I brought the foam board pieces outside to stain with wood stain. I wanted the coffin to look like it was made of cheap, light-colored boards, like a pine box coffin an old Western. I bought a can of Minwax wood stain, a light color called Golden Oak. I protected my work area with two cheap plastic shower curtains from the dollar store.
I tried to use a wood grainer tool to create a cool wood texture effect, but it didn’t work on this project. I’ve had good success with this technique on painted foam board (see my Voodoo Bayou fake wooden signs), but this time I was applying the wood stain directly to the white paper surface of the foam board, and the stain immediately spread out and soaked in, so it wasn’t possible to create any kind of lined pattern. No big deal, and the solid color of the stain looked great on its own.
Since I couldn’t use the wood grainer tool, I had to create a wood texture some other way. I ended up using black tempera paint and a very rough paintbrush (actually an old paintbrush ruined by dried paint!), and did a drybrushing technique all over the fake wood panels. You’ve got to use the smallest amount of paint possible for this; load up the brush with paint and then brush most of the paint away on another surface — in my case, the plastic shower liner I was using to protect my work area. When there’s almost no paint left on the brush at all, you can attempt the drybrushing. Less is more! You can always add more later. In the end, I was pretty happy with the wood effect I achieved.
In the pic above you can see two panels of the coffin; one with just the Sharpie lines and wood stain, and the other with Sharpie, wood stain, and black drybrushing with tempera paint.
Weighting and waiting
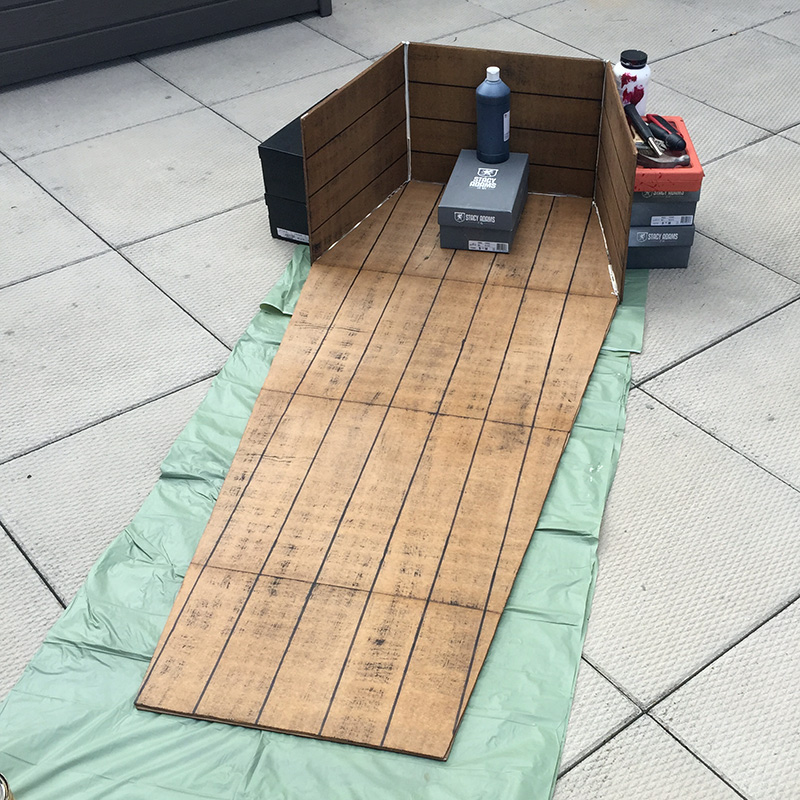
An important note about working with foam board! Foam board warps very easily, especially when you’re doing anything involving liquid like paint or glue. If I’d stained/glued all these pieces, let them dry, and immediately assembled the coffin, the whole thing would be very warped, and the parts might not even fit together very well. It’s very important to flatten out the finished foam board pieces for a day or two before assembling everything. So after your paint/stain and glue are dry, lay the pieces on a flat surface and weigh them down with a ton of books and other stuff; I use books, paint cans, computers, etc!
In a day or two the pieces will be flat enough to assemble. Here are all my pieces, pre-assembly.
At this stage I started gluing the panels together. I used a ton of Elmer’s wood glue and held the panels in place with heavy boxes and other stuff.
I let the glue dry outside for a full 24 hours before attempting to pick the coffin up and bring it inside. You’ll know the glue is dry when it turns almost transparent. The coffin is fairly sturdy and very well balanced; it stands up just fine without any other support. I’d originally considered adding some kind of foam board base around the bottom edge, but this turned out to be totally unnecessary. I also thought the connections with the wood glue might not be strong enough and might require a thin strip of paper maché all along the seams, but this turned out to be unnecessary.
Since this prop is so lightweight and my party guests will definitely be interacting with it, I have to expect it to get damaged or even destroyed during the party, and I’m fine with that. It was pretty easy to make. If I had it all to do over again, I’d use light brown acrylic paint instead of the wood stain; acrylic paint would be easier to work with, dry much faster, and not have any odor so I could’ve done this whole project in the apartment. With the amount of wood stain I used this coffin had a very strong chemical odor and I had to leave it out on our terrace for several days; not ideal since it’s (for some reason) always very windy on our terrace and there are all kinds of leaves and dust and stuff blowing around and sticking to my projects!
Another way to go would be to use spray paint and then use wood stain with the wood grainer tool, like I did with my fake wooden signs. That would create a much cooler and more realistic wood grain effect but overall would be much more expensive and time consuming, given the size of this coffin. We’re talking at least three or four cans of spray paint to cover all these surfaces, then the time consuming process of applying the wood stain and implementing the wood grainer.
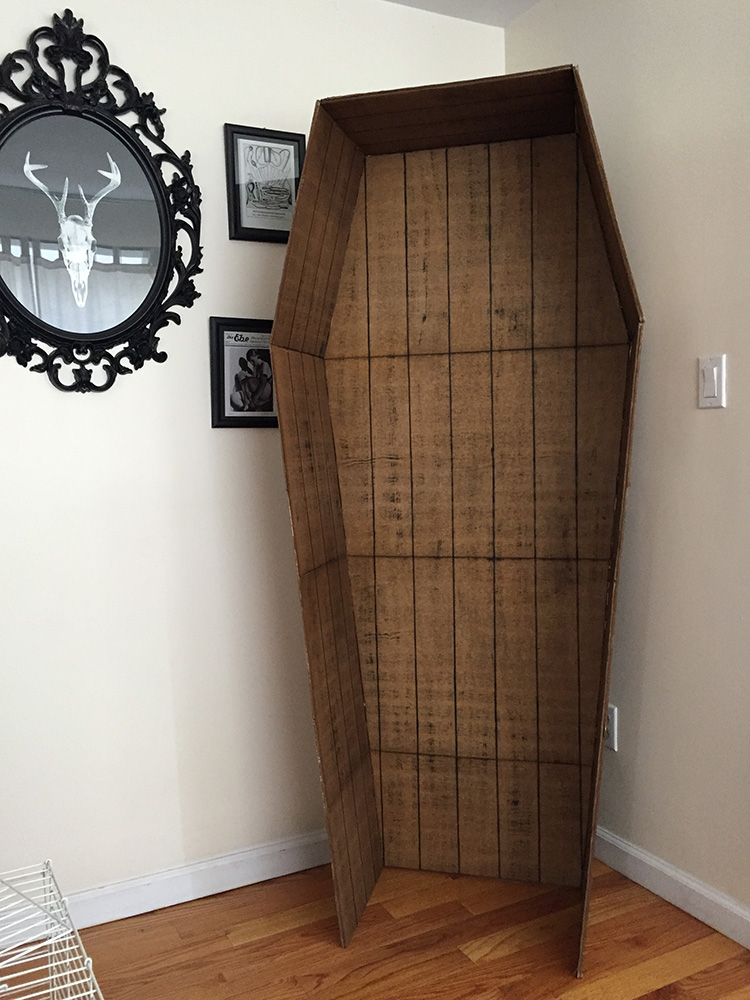
My finished coffin is actually a bit oversized; I designed my specs based on the size of the foam board sheets I was using (30″x20″) rather than actually researching real coffin dimensions. The finished coffin definitely feels a bit larger than life, but one nice benefit of that is that two people can cram into it together for pictures.
Related: See my post about buying cheap foam board in bulk.
 About Manning Krull
 How to make a 4-foot paper maché alligator
 My violin skull mask, Mardi Gras 2015
 Three-headed paper maché dragon sculpture
May 23rd, 2021 at 5:41 pm
[…] Or follow this tutorial for how to build a Halloween Coffin using foam. | Manning Krull […]
September 20th, 2022 at 3:27 pm
[…] via […]
September 20th, 2022 at 11:34 pm
[…] via […]
February 22nd, 2023 at 5:25 pm
Hi! Can you give me an estimate of the cost of this project?
Thanks!
Teri
October 4th, 2023 at 12:58 am
[…] Foam Board Coffin – learn how to make one from Manning Makes Stuff […]