
Posts tagged "tutorial":
Skull mask with dancing skeletons, part 4

This is part four of my skull mask project with rotating gears and marching skeletons. See parts one, two, and three.
Installing the hard hat
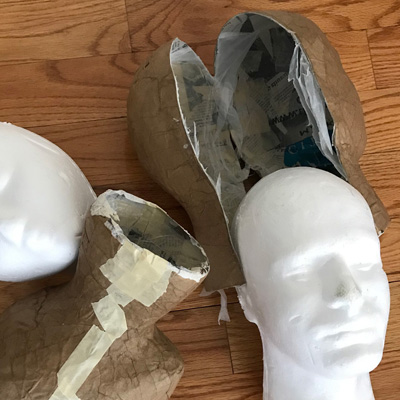
Almost all of my big paper maché masks are mounted on a hard hat. Hard hats are great because they’re cheap and they provide a lot of comfort and stability in a big mask. I usually saw off some parts of the hard hat for each mask depending on its shape, in order to reduce weight and to help the hard hat fit in the mask as well as possible. Read more…
Skull mask with dancing skeletons, part 3
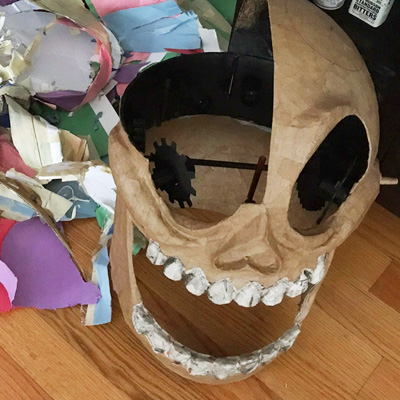
This is part three of my skull mask project with rotating gears and marching skeletons. See parts one and two.
Building the skull shape
In part one I built the whole mechanism with the gears inside of a big circular wall; this would become the outer wall of the skull mask at around ear-level (not my ears, the skull’s ears — uh, wait a minute…). Read more…
Paper maché skull mask with dancing skeletons, part 2
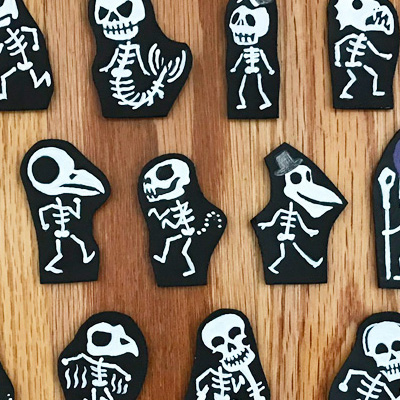
This is part two of my skull mask project with rotating gears and marching skeletons. See part one here.
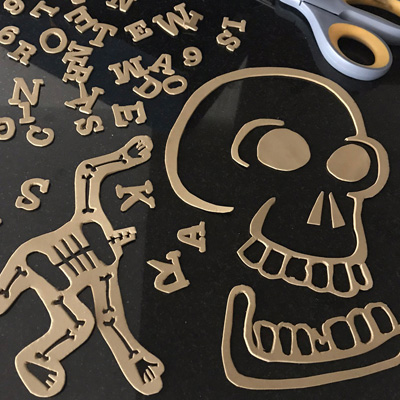
Dancing skeletons
I drew all 29 of the dancing skeletons at a larger size (about 6″ tall) on sketchbook paper, keeping the designs as simple as possible since I’d be re-painting them by hand at a much smaller size. I scanned ’em and cleaned ’em up in Photoshop, reduced them to about 2″ tall, and printed them out. Read more…
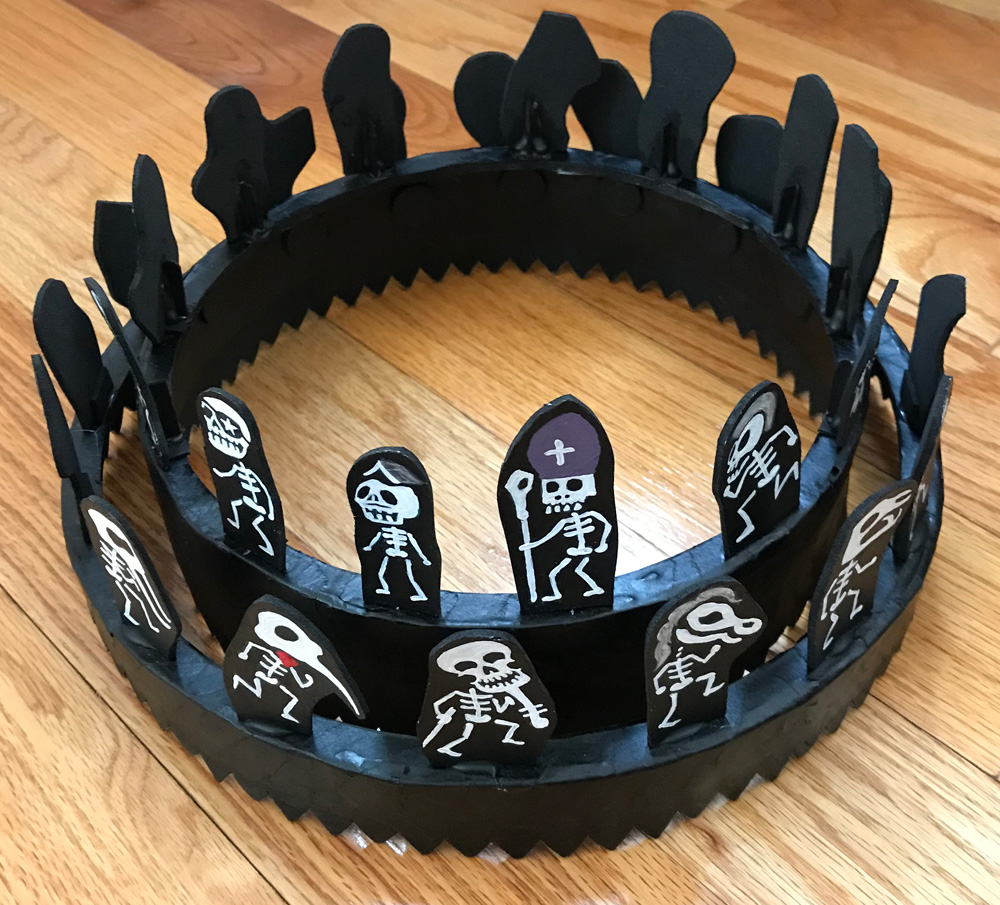
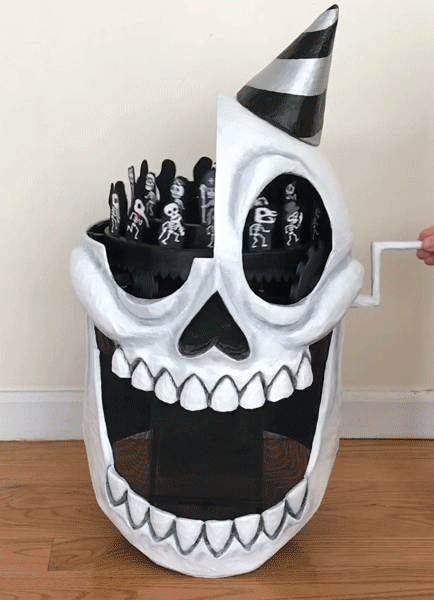
Skull mask with dancing skeletons, part 1
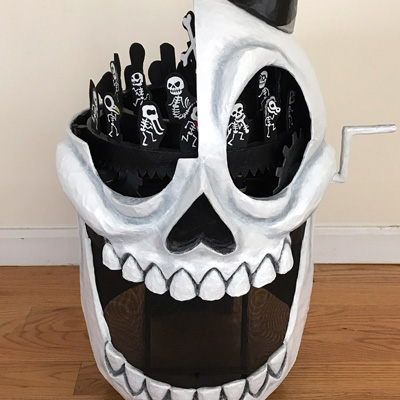
Welcome to the newest installment in my ongoing quest to kill myself with overly complicated art projects! For the 20th anniversary of my skeleton group I decided to make a paper maché skull mask with moving parts! Yikes! The mask has a crank and gears and 29 little skeleton figurines representing my fellow skeletons; a sort of best-of selection of our skull masks and skeleton outfits over the last two decades. Here’s how I made the thing!
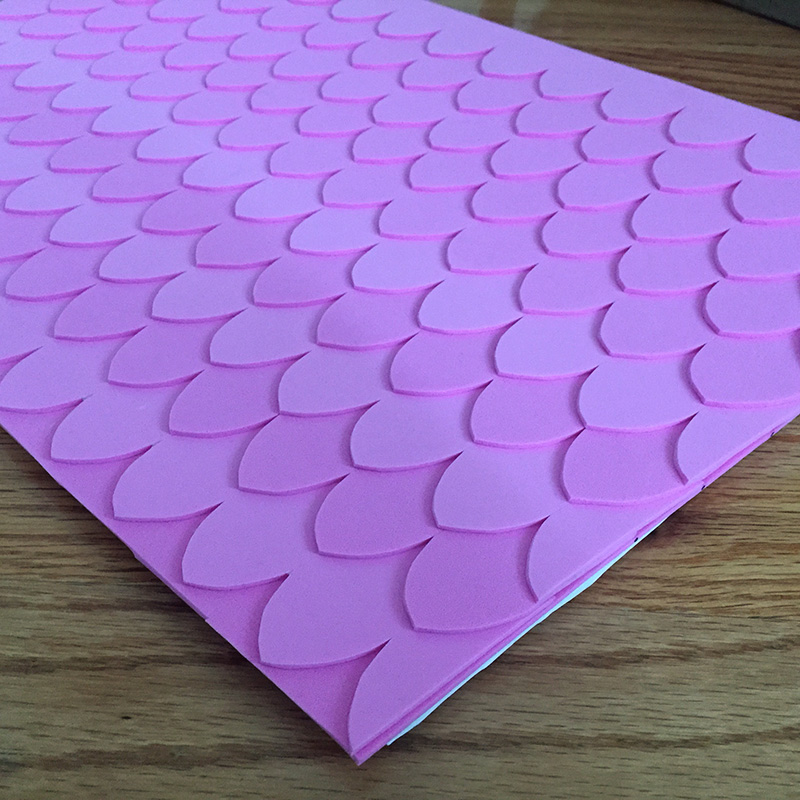
Creating 3d relief shapes with craft foam
A few years ago I made up this method for cutting out precise shapes with craft foam, to create 3d relief shapes on a lot of my various sculpture projects.
Craft foam, aka wonder foam, is a soft rubbery material that I often describe as being similar to a yoga mat, but much thinner. You can buy it in any arts and crafts store, and it comes in tons of colors. Read more…
Making an oversized medieval key prop
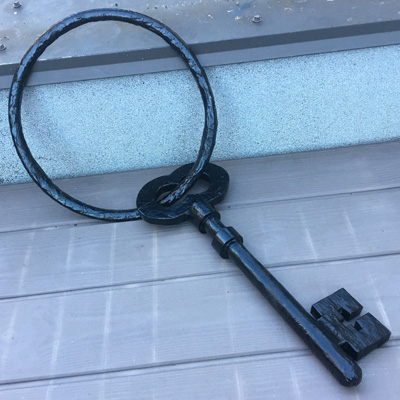
Check out my giant medieval key! I made this for our spooky gingerbread house themed Halloween party, to hang on our bathroom wall across from the bathtub-converted-into-a-cage-full-of-bones. This thing was so easy to make, and it only took one day (besides painting).
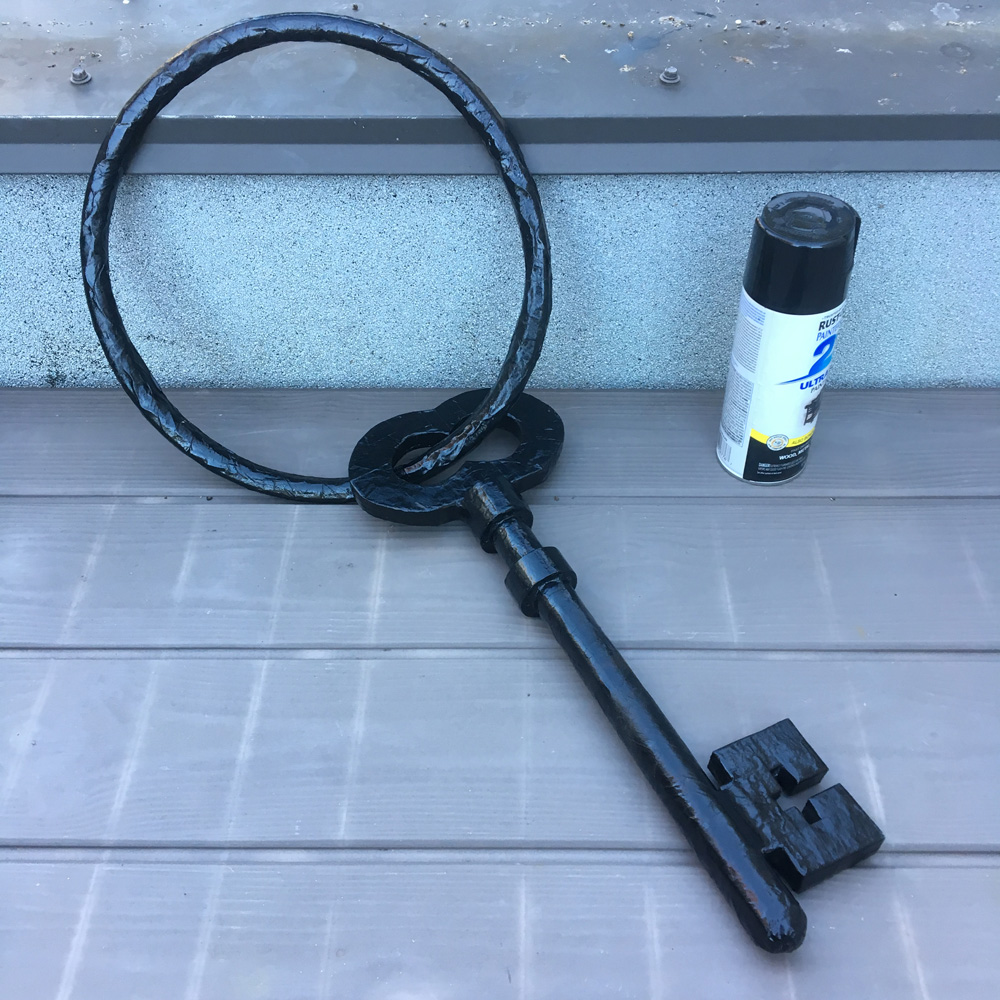
I started out by doing a Google image search for medieval keys. There are so many cool styles to choose from; I sort of mixed and matched some elements from a few keys, with the goal of keeping the design simple and iconic. Read more…
Making paper maché shapes with a reusable base
This is my method for creating multiple paper maché copies of a shape using a reusable base. I’ve tried different variations on these steps over the last few years and have settled on this process as my favorite.
Start with a base
First, you wanna build a base for your sculpture, so that you can cover it in paper maché and make copies of it. Read more…
Attaching a hard hat in a paper maché mask
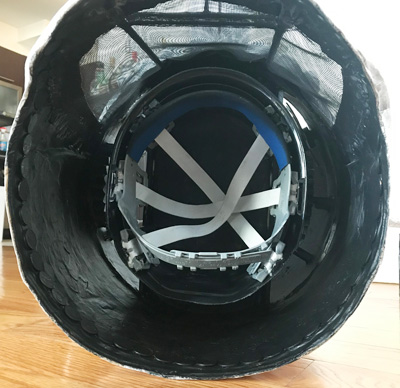
Hello! I’m just putting this long boring article here so I can link to it from other posts rather than explain the same thing every time. I mount almost all of my big paper maché masks on a hard hat. Obviously all my masks are very different shapes and sizes, so a lot of this can vary, but this is my basic method that I’ve settled on…
Paper maché technique: multiple layers and even coverage
I use this method for some of my paper maché pieces when I need multiple layers but I don’t have a ton of time, and especially if the weather is good for drying quickly outdoors — hot, sunny, and not too humid.
The whole point of this method is saving time by doing multiple layers of paper maché in one session but keeping the coverage nice and even. Backing up a bit… usually it’s not possible to cover your base entirely in a layer of paper maché all in one session because you’ll end up gluing it to your working surface. Read more…
Making a foam board Egyptian sarcophagus
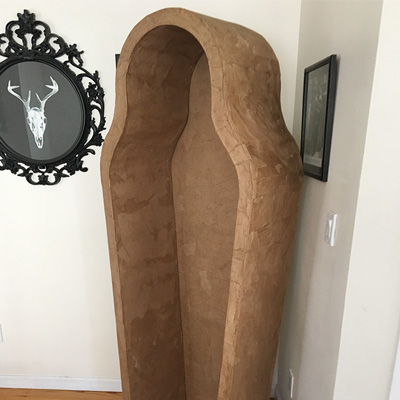
I made this standing sarcophagus for Halloween 2017 — basically a big selfie booth! Here’s how I did it…
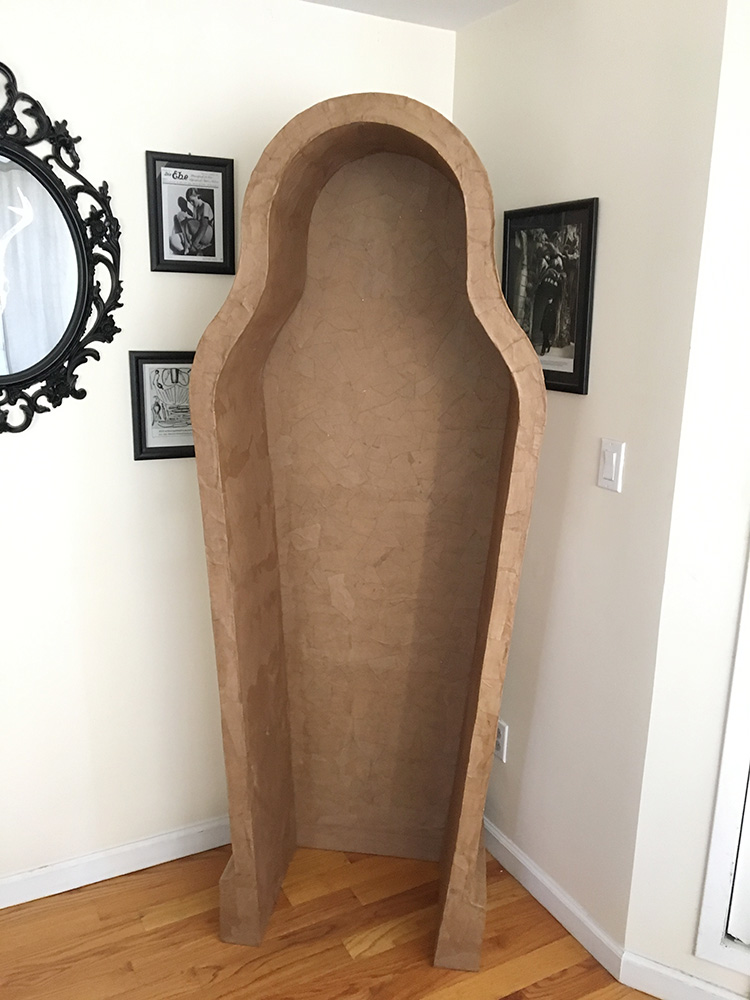
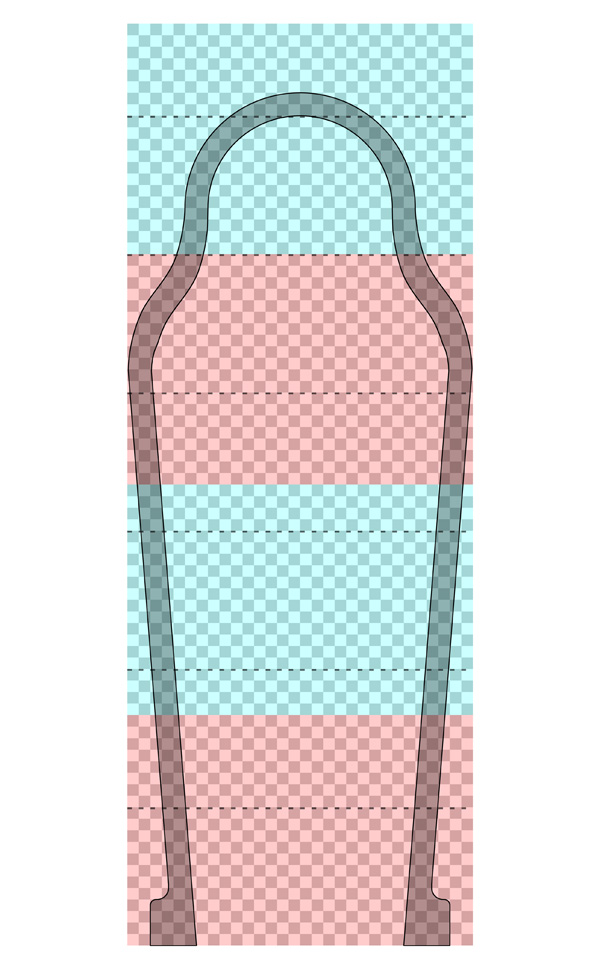
I started by planning out the dimensions of the sarcophagus in Photoshop. The red and cyan boxes represent 30″ x 20″ sheets of foam board, and the grid is square inches, with dotted lines to denote feet. I don’t have a Photoshop template for this stuff; I just wing it and lay out and measure whatever parts I think are going to be important. You can see that my design was 6’2″. I built the sarcophagus at this size and later decided to add three more inches at the bottom, for a total of 6’5″. Read more…
Twin paper maché skull masks
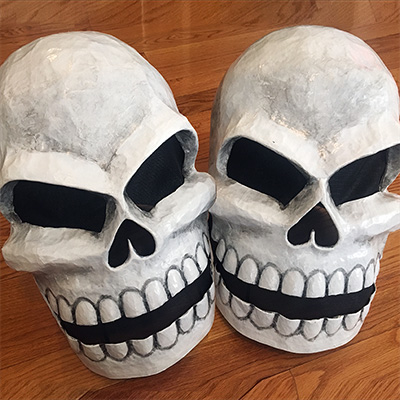
A new project, a new experiment! I received a custom order for a pair of twin paper maché skull masks; the request was to base them on the design of my first Mardi Gras skull mask and keep them more or less identical, and there was a very short timeline to get them both done. So, I decided to try a reusable base! This was a first for me.
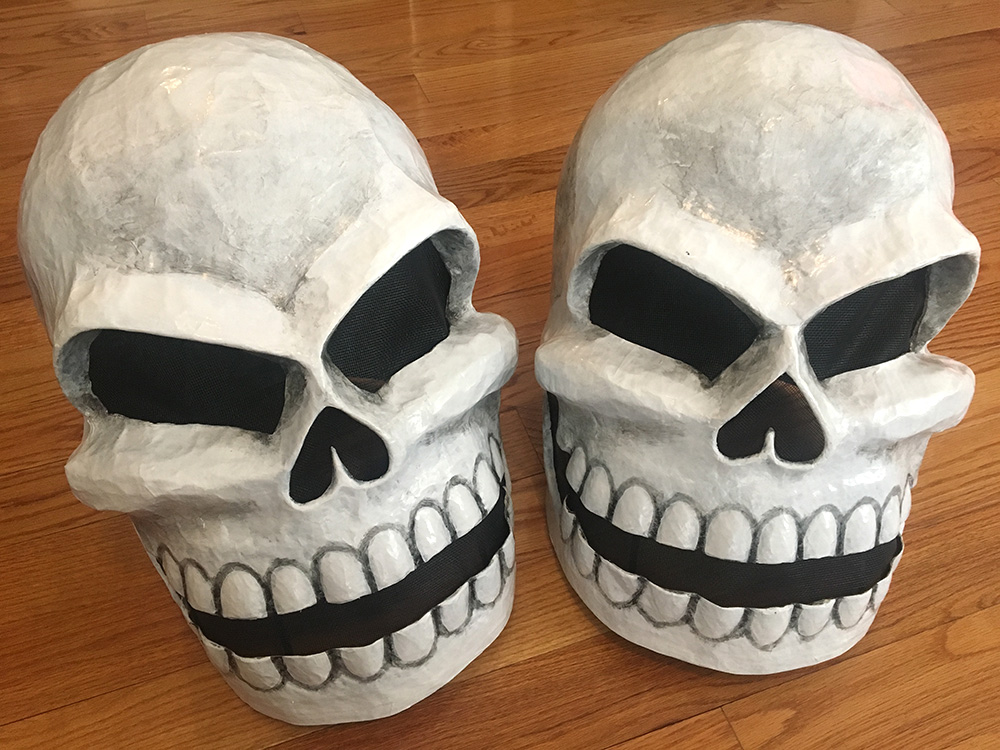
Luckily I have that article about how I made that first Mardi Gras skull five years ago; otherwise I probably wouldn’t remember how I did it! Of course it would be impossible to get these new ones exactly the same as that one, but I’d do my best to get them close. Read more…
Strangler ghost costume!
Hooboy, this costume was a big undertaking! The basic concept for this costume is a lightweight ghost sculpture, made with wires inside to make it somewhat adjustable, and it’s attached to a harness worn under one’s clothes. There were so many different parts to build and so many problems to solve, and I basically made up the whole thing as I went along, jumping around from part to part in a weird order. So, I’ve put together as much info as I can about how I made this thing here…
Cheap and easy DIY knife props
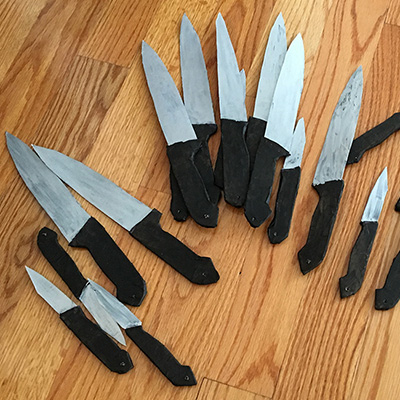
These are so easy! For my séance Halloween party, I wanted a quick and easy method to make dozens of knives and have them floating in our kitchen, held aloft by murderous ghostly hands (i.e. hanging on fishing line). The knives needed to be lightweight, cheap, and relatively quick so I could make a ton of them. (I also wanted them to not actually be dangerous if one of them were to fall on someone; the lightweight part is key there.) I came up with this method that’s really fun and easy and the knives look great. Read more…
Crystal ball decoration for my séance Halloween party
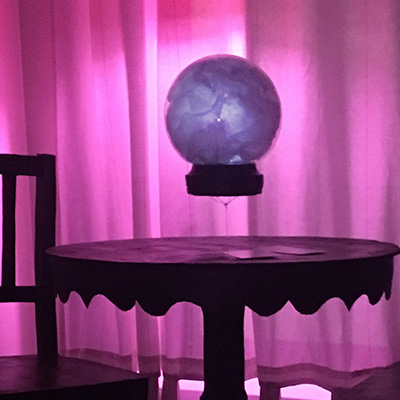
This homemade crystal ball decoration was for my séance Halloween party. The main decorations for the party were lots of pieces of lightweight paper maché furniture hung upside down on the ceiling. This crystal ball was the centerpiece for all of that, hanging upside down from the little paper maché table I made. It was fun and easy to make!
I considered a lot of options for the clear ball part itself; my main criteria were that it had to be lightweight, transparent, and preferably cheap. I ended up buying an 8″ acrylic globe off of Amazon; these are meant to go over a light, like on a light post in front of your house or whatever. They come in a lot of sizes, with options for clear or frosted, and mine ended up being about $11. You can find these at Home Depot too.
Teeth-making tips for big paper maché masks
In all of the large paper maché masks and heads I’ve made, the teeth are always, always the most labor-intensive and challenging (and sometimes frustrating!) part. I’m always amazed at what a large proportion of my time and effort go into such a small part of the head! I’ve tried a few different methods for making teeth over the years, with varied success. Here are the methods I’ve used, and some pros and Cons:
Making big paper maché masks — advanced tips
In making all my big paper maché masks I’ve learned a lot of important things along the way — things I could only figure out through trial and error, but now that I know about them they’re a huge help in every subsequent mask I make. I’m by no means an expert! I’ve only made four big skull masks so far, and I have two more in the works (one skull and one non-skull) but with each one I can see them getting easier and easier to make and to wear, thanks to these tricks I’ve worked out over the years. Here are some of them…

Tips for working with gesso
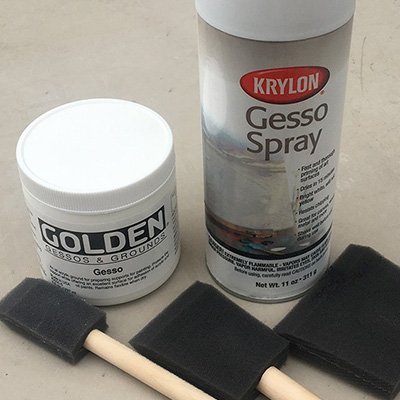
If you’ve ever created any paper maché projects and then painted them, you’ll surely have noticed that the edges of your paper are often still visible, sometimes even after several layers of paint. I hate seeing those paper edges in my stuff, and I’ve learned I can reduce this with a few techniques, like being really precise with my last layer of paper, and doing a final layer of just paste smoothed over the whole shape with my hands. Still, even when I do that stuff I end up still seeing those paper edges through the paint sometimes. It drives my crazy.
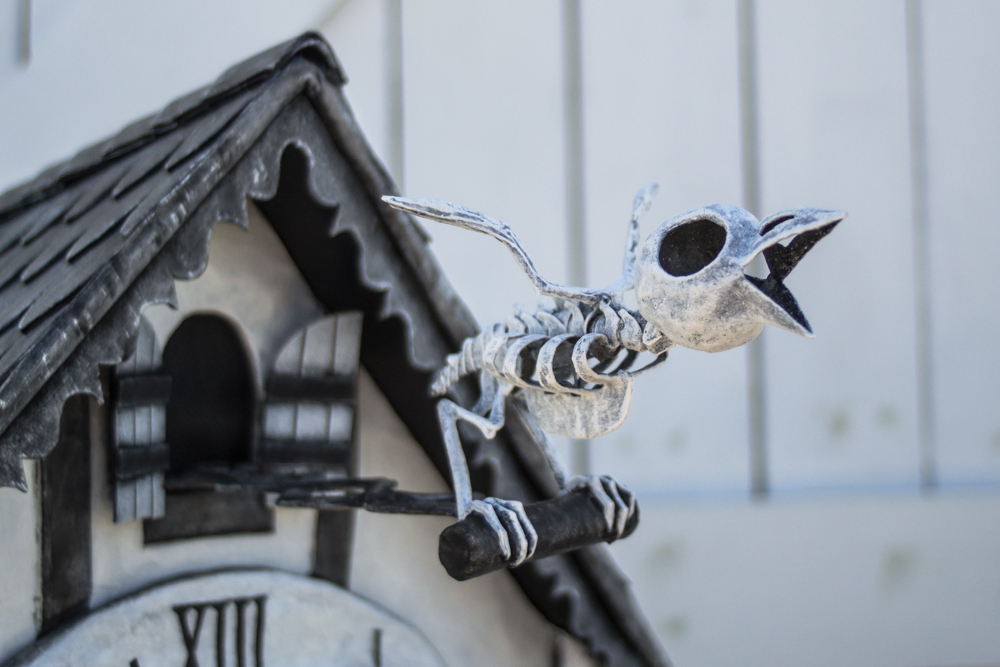
Making the bird skeleton for my cuckoo clock mask
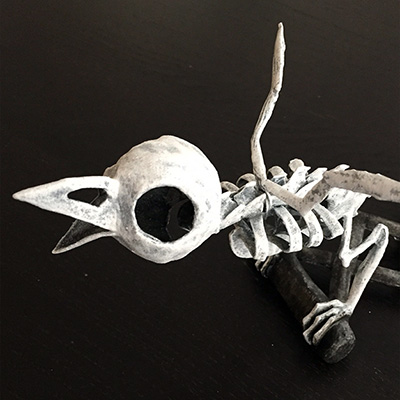
I made this bird skeleton for my cuckoo clock skull mask for Mardi Gras 2016. Making this skeleton was extremely challenging, and I basically made up all the steps as I went along. I had no idea what I was doing, but I learned a lot and I’m very happy with the end result. I didn’t take as many pictures as I should’ve along the way, so I’ve done some sketches to explain certain steps.
The main materials in the bird skeleton are:
Cuckoo clock skull mask — part 3
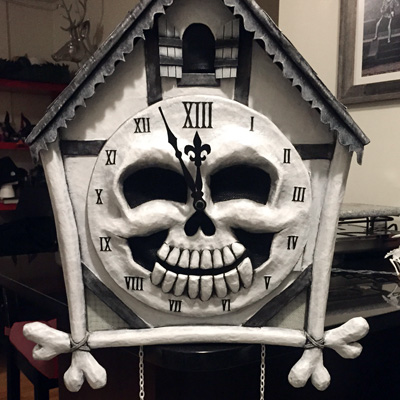
This is part three of my cuckoo clock skull mask project. See part one and part two.
Where were we? Oh yeah, it’s time to paint!
Painting the mask
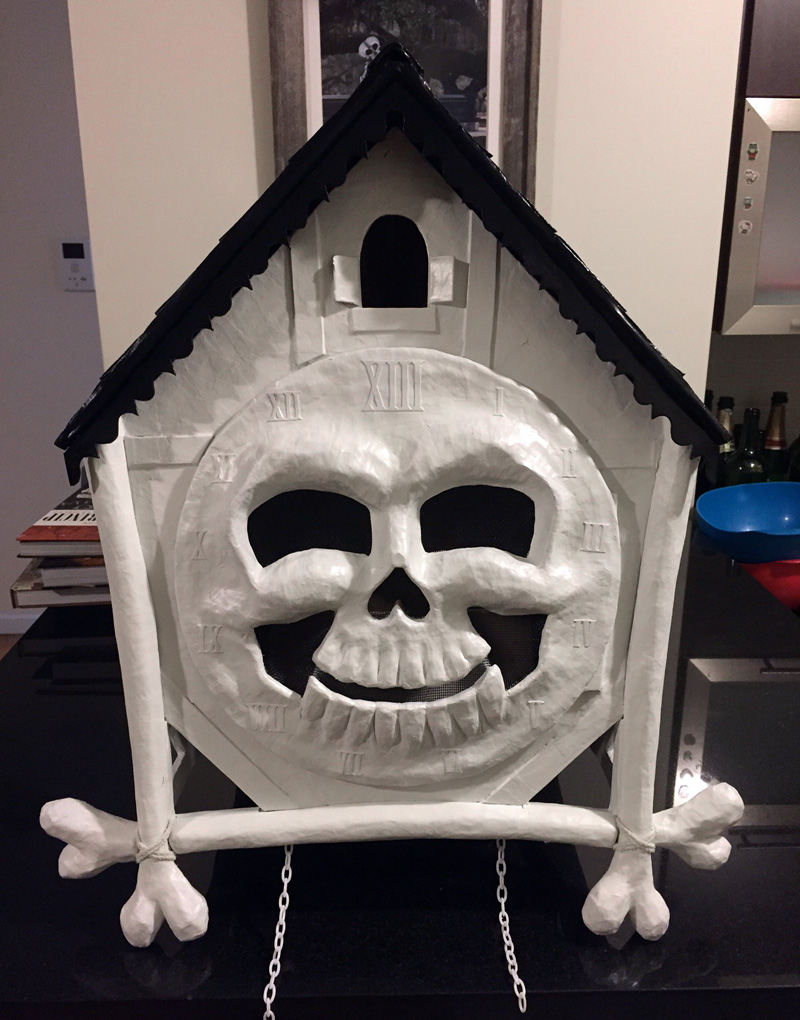
I painted the clock body and the roof separately for the most part before joining them together. I first protected the screen in the eyes/nose/mouth with blue masking tape (the kind that’s really easy to remove), and then I spray painted the entire exterior of the clock white. I separately spray painted the roof black. I let these pieces air out for about three days outside.
Cuckoo clock skull mask — part 2
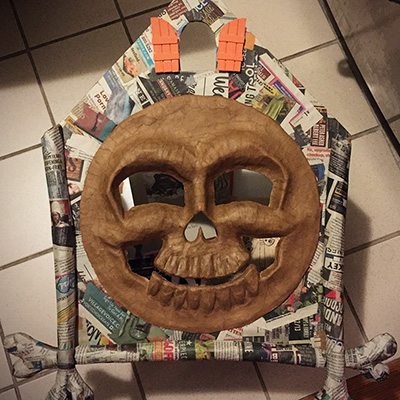
This is part two of my cuckoo clock skull mask project. See part one and part three.
Scale-pattern shingles on the roof
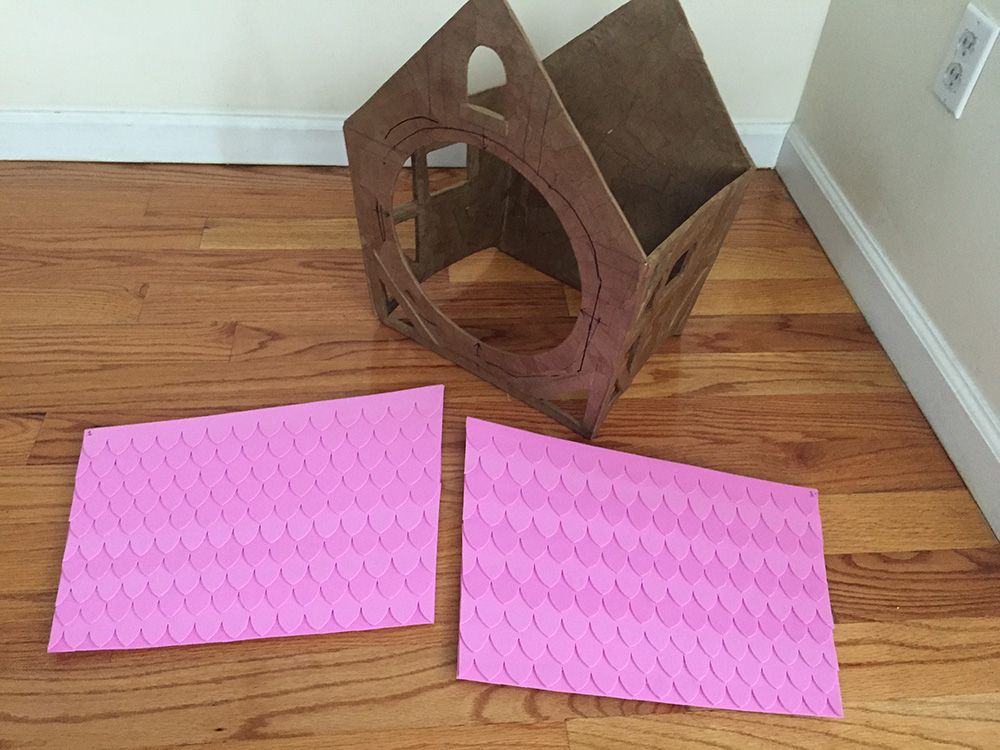
I started the roof with two foam board panels. My process for creating the scale-shaped shingles was kind of convoluted…
The pattern on the roof is made with a few layers of craft foam (aka Wonderfoam). I made this way harder for myself than it needed to be! Since all my wall and roof panels were irregular shapes — there isn’t a single 90-degree angle on this whole mask — I needed the scale-shaped roof tiles to start out larger near the top of the roof and get smaller toward the bottom. I ended up designing the whole roof surface in Photoshop, starting with a nice regular scale pattern on a rectangular shape (figure 1). Read more…
 About Manning Krull
 How to make a 4-foot paper maché alligator
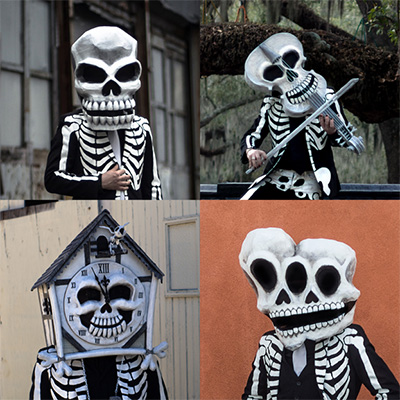
 My violin skull mask, Mardi Gras 2015
 Three-headed paper maché dragon sculpture