
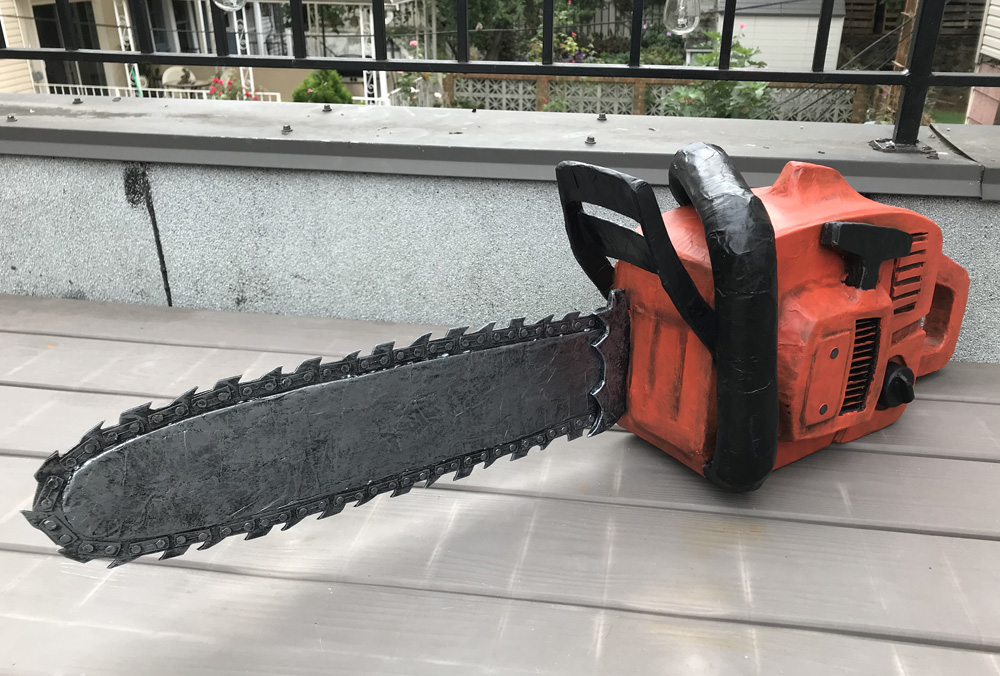
Paper maché chainsaw prop
Published by Manning on October 1st, 2019
This thing was fun! And relatively easy, really! I made this paper maché chainsaw prop as a decoration for my 2019 Halloween party. There are so many different little shapes to this thing, and I was really winging it along the way, so there’s no way I can accurately write about every single step or this article would be twenty pages long. But I’ll show you some of the broad strokes…
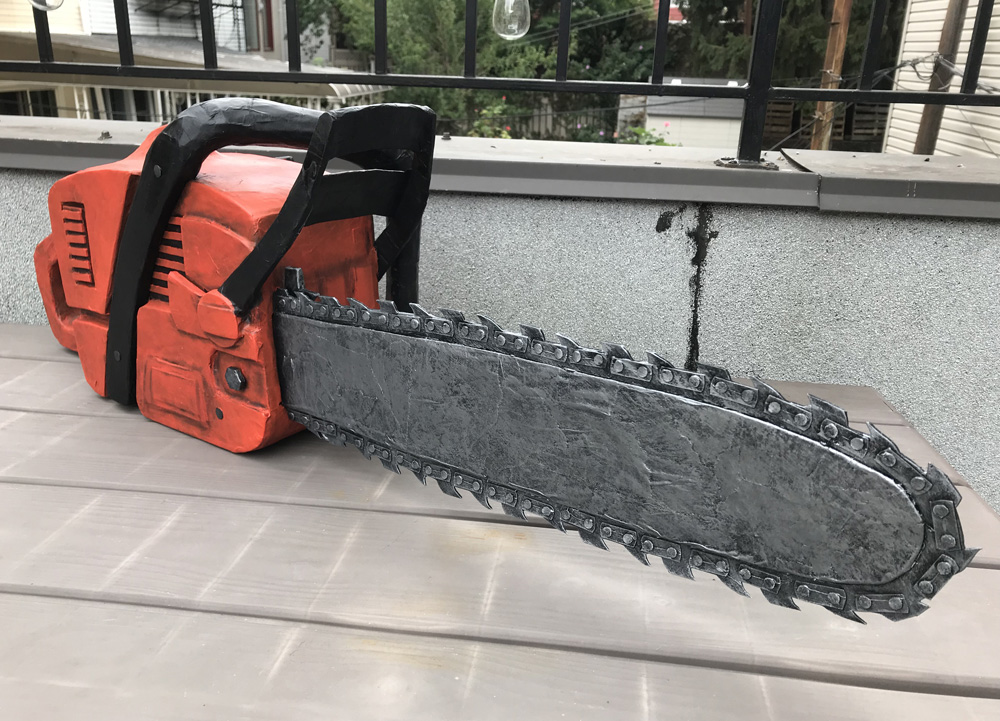
Note: I’ve never used or even held a chainsaw in real life, so I just made this thing from photos I found online, and I filled in the blanks for anything I couldn’t see clearly in the photos. I took a lot of shortcuts and simplified or removed a lot of shapes. I was going for the impression of a realistic chainsaw, not trying to make an actual realistic chainsaw. I’m sure some of the details on this thing would seem nonsensical to someone who actually understands all the parts of a chainsaw.
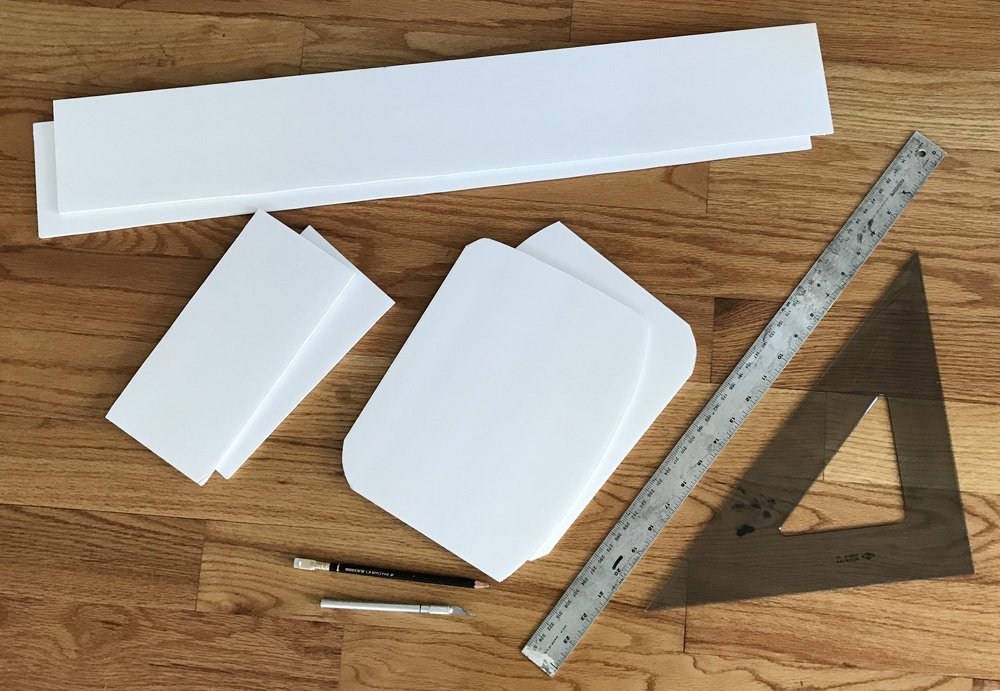
So like I said, I found some photos online of a fairly typical chainsaw as seen from multiple views. I didn’t do any specific measuring for this project; I just sort of eyeballed things and worked that way. I started by making the blade…
Making the chainsaw blade
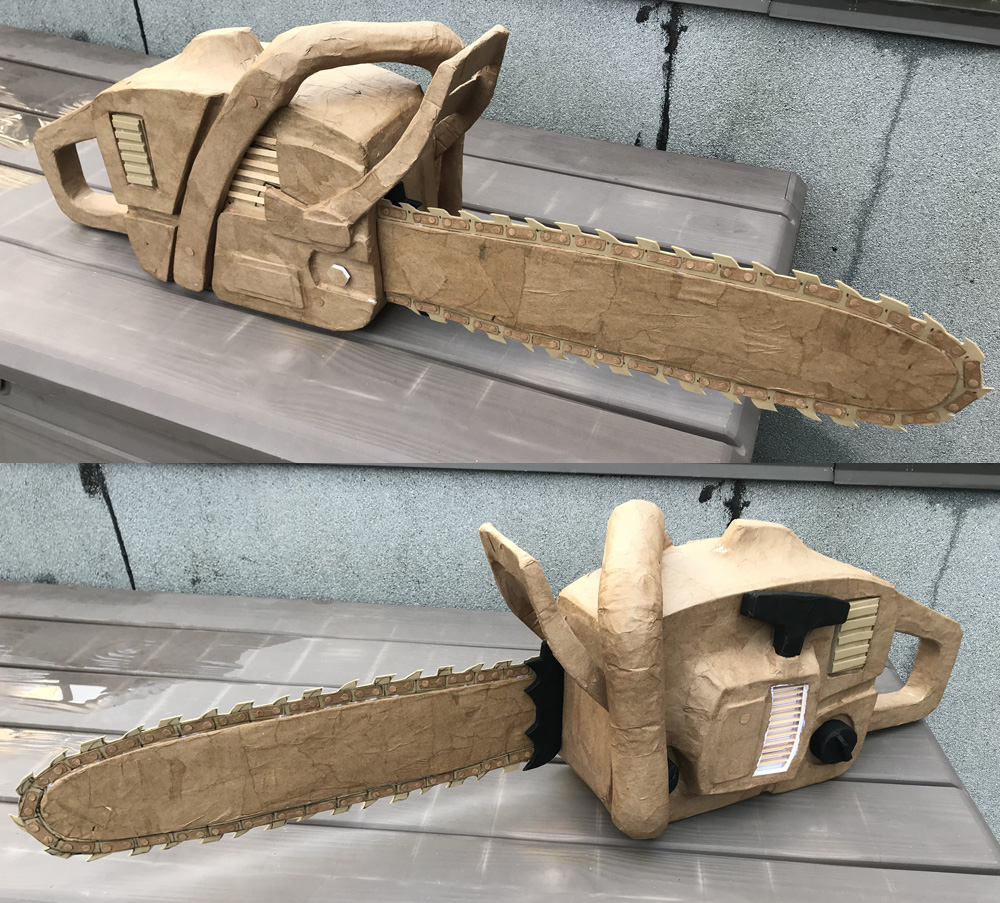
I neglected to take pics of my steps for the blade, so here’s the finished thing (before painting), and I’ll tell you my basic steps below…
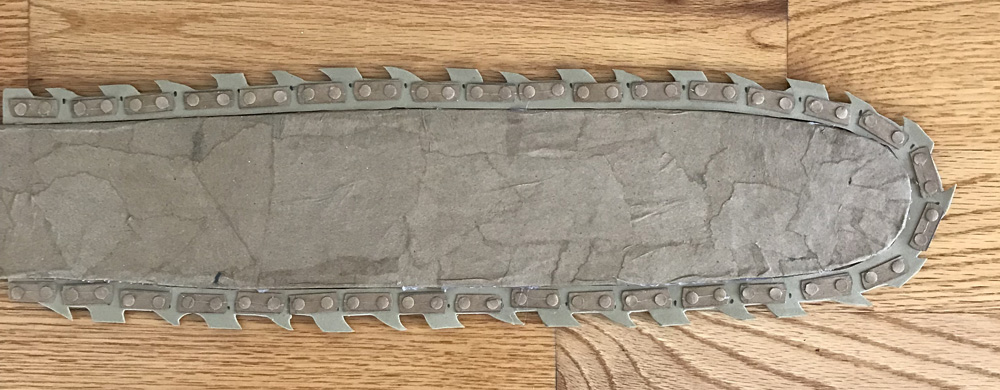
I drew the basic shape for the blade (minus the chain and jagged bits) on a piece of foam board and added some extra length at the back; later I’ll use this back part to help anchor the blade into the body of the chainsaw. I cut out this shape with an X-acto knife, covered it in shipping tape, and then covered it with three layers of paper maché; here’s some info about my paper maché process and materials. The short version is: I use Roman PRO-543 universal wallpaper adhesive (paid link) and alternating layers of newspaper and brown wrapping paper.

I often put plastic shipping tape on foam board before applying paper maché because it can help prevent the shape from warping as it dries; this is a trick I learned through lots of trial and error over the years.
I was pleasantly surprised that the blade shape didn’t warp at all here; if it had I would have laid a ton of heavy books on it and left them there for a few days. That always helps.
To make the fake chain for the blade, I traced the blade shape onto a piece of 18″ x 12″ craft foam, and then I drew the jagged outer edge of the chain by hand right on the craft foam. I cut out the exterior outline of this shape with scissors. At this point I left the inner part — the big oval blade shape — intact in the craft foam. I’d cut that part out later.
I cut a ton of little shapes out of pasteboard — a LaCroix box, to be precise — to make the details of the chain. First I cut out a ton of little rectangle shapes to represent the links, and then I used a hole punch to make a ton of little circles for the rivets or whatever the hell those are. I glued all this stuff in place along the craft foam chain shape, let it dry, and then flipped it over and did the other side.
When that was dry, I cut out the inner part of the craft foam; leaving me with just the narrow chain part. I then used a hot glue gun to carefully glue this chain shape onto the edge of the paper maché’d blade with really tiny dots of hot glue.
Here’s a closeup of the finished chainsaw blade before painting; it’s weird that all these materials are pretty much the same color; that wasn’t intentional.
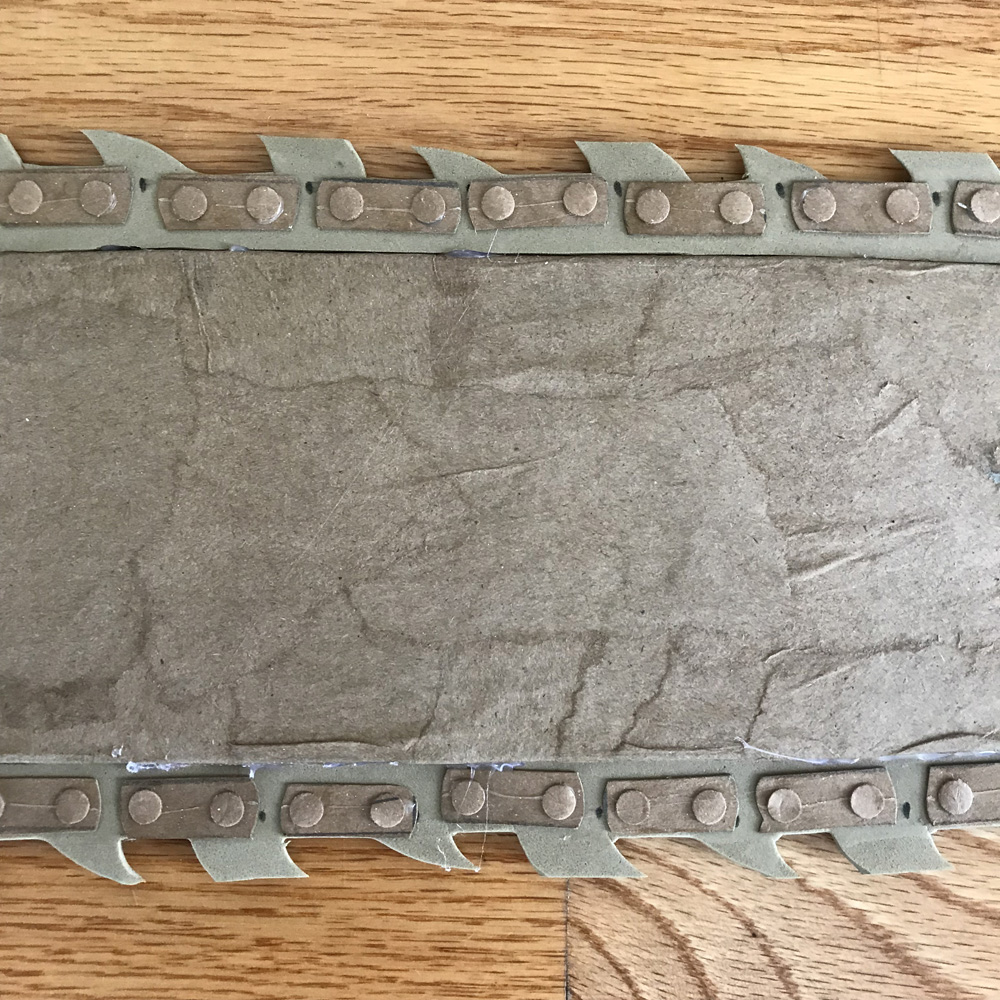
Here you can see the brown paper maché surface on the foam board blade shape in the middle, then the tan craft foam that makes the jagged blade shape around that, and then the little rectangles and circles of pasteboard for the chain links. I did all of this really quickly so everything’s a little sloppy and imprecise, but it’s fine for this quick Halloween project! No one’s supposed to be looking at it this closely!
Making the chainsaw body
The bulky body section of the chainsaw is basically a simple box shape I made and then I kept adding more and more elements to it.
I made the basic box shape out of foam board — I just drew the shape, cut it out, and then traced it and cut out a second copy. I built a couple little triangle structures to hold these two sides apart at the right distance, and then I added walls all the way around made out of foam board. See my article about making simple box shapes out of foam board for more info.
To help the foam board walls be able to bend around the corners of the shape, I used this technique I made up: I cut out the long strip that would serve as the walls, and then I carefully rolled it up around a wine bottle. Then I flipped the strip around and rolled it up around the bottle the other way. This helps to crunch up and weaken the foam inside the foam board, so you can curve it and bend it any way you need.
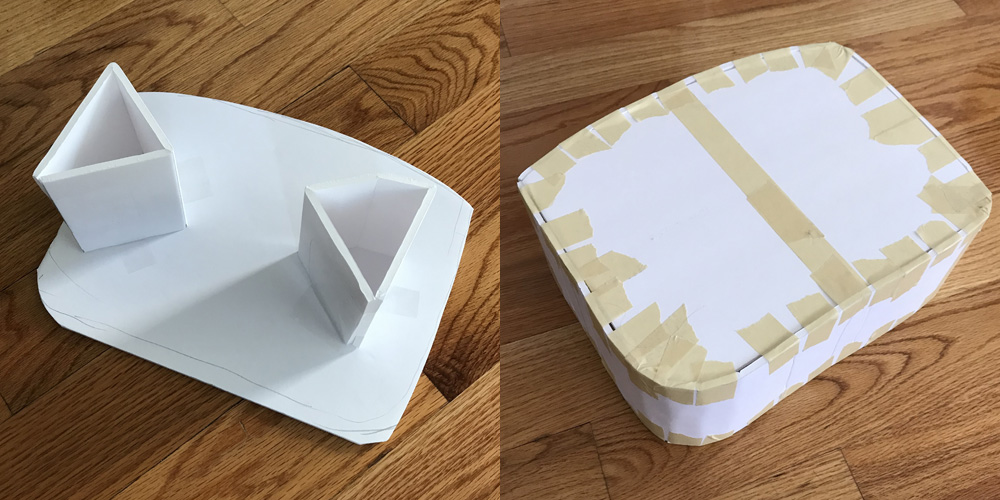
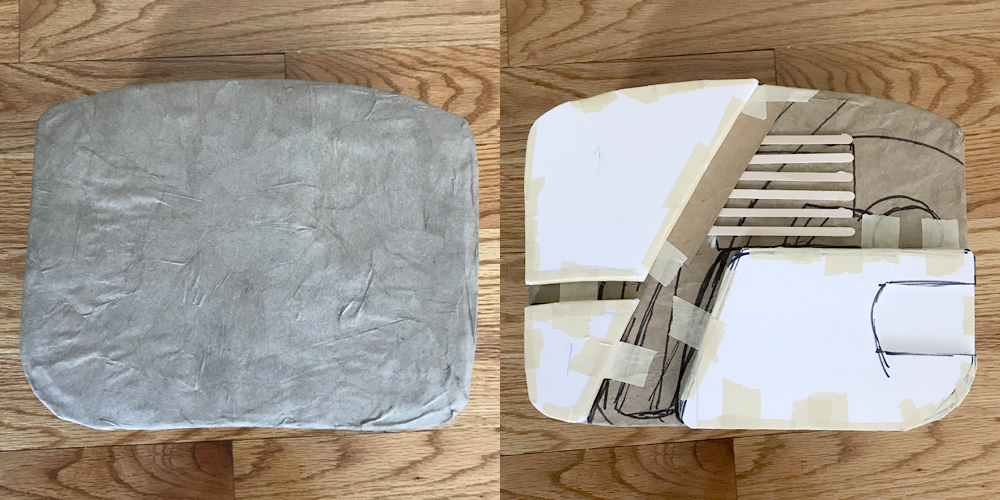
I taped this strip around the box shape and secured everything with tons more tape, making this irregular box, which was really flimsy and wobbly at first. I then covered this box shape with two quick layers of paper maché, just to stabilize the whole thing. When it was dry it felt much stronger and more solid; ready to add all this other junk.
Adding details
I added a million different little shapes all over the chainsaw body, based on different things I saw in different photos of chainsaws. Most of these I cut out of foam board and/or craft foam, and some were one layer thick while others are two or three.
I made some vent things on both sides out of some wooden coffee stirrers, hot-glued in place.
I made the handle at the back by drawing the shape onto foam board and cutting it out, and then I traced it to make four more copies. I wrapped them all together with masking tape.
I made the curved handle across the top of out a long pieces of foam insulation tubing; I cut a tube into quarters, and used one quarter for the handle. I wrapped it in tons of tape to make it a little more firm before adding paper maché.
I made the narrow guard thing at the front out of a few pieces of foam board taped together.
I made the gas tank cap and another little cap (what the heck is the second one for?) out of some wide plastic bottle caps, with a piece of foam board for the ridge across the top.
I made the little jagged guard thing next to the blade out of a piece of foam board, covered in tape and then paper maché.
Etc etc etc. I just kept looking at the photos and building more little shapes onto this thing.
For some of these pieces I taped them right onto the body and then covered them in paper maché, and for others I covered them in paper maché and let them dry before attaching them to the body. For most of these pieces I used just one layer of paper maché. However, I did three or four layers on the handles, to make them a lot stronger.
The main reason I usually cover decorations like this with paper maché is just to hide all the ugly tape and glue and foam edges so I have a nice uniform paper texture all over. It also gives me a great porous surface for painting.
Back to the subject of layers: most of the parts of this chainsaw prop have very few layers of paper maché because it’s just a quick decoration that’s meant to last one night. If it were, say, a costume prop that was meant to be handled for a long time, I’d do way more layers of paper on the whole thing, like six or eight. Not worth it for this thing!
Attaching the blade
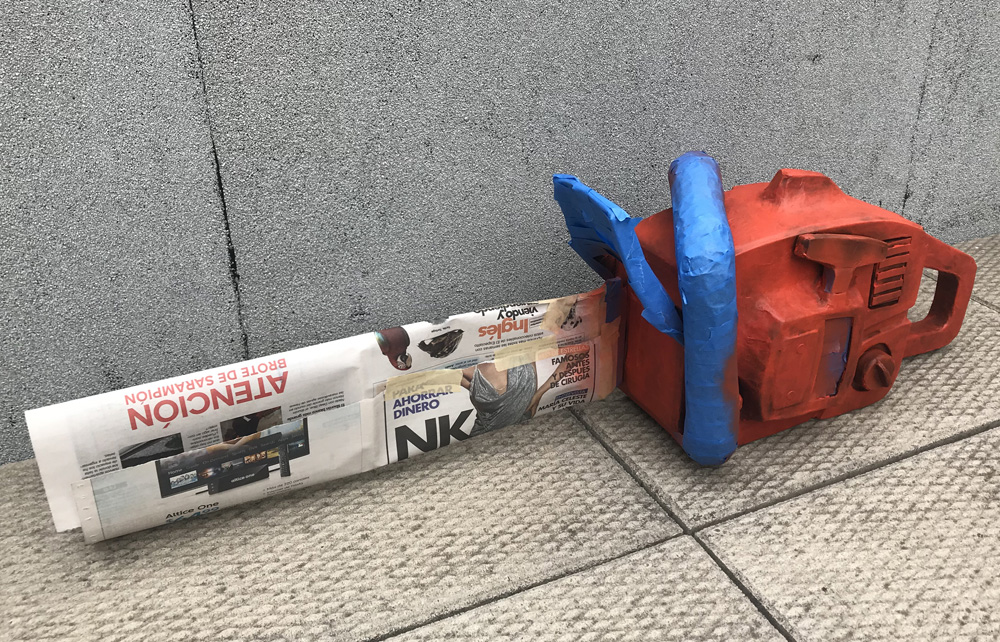
I designed the blade to have a lot of extra length at the back so that I insert that part into the body and glue it in place, and I designed the body shape so that when the blade is inserted, this extra piece rests right against the inner wall of the body. So, I cut out a big panel from the front of the body, squirted some Gorilla Glue in there on that inner wall, and then slid the blade in place. Gorilla Glue takes a long time to dry, so I propped the chainsaw on its side with a small jar of coins sitting on the blade to hold it in place for a couple hours. When the glue was dry, the blade was very firmly attached inside. I reattached the front panel I’d cut out with some tape and then more paper maché.
Painting
I spray painted the whole chainsaw prop black, and when that was 100% dry I protected the blade and handle with tape and newspaper and did a light dusting of orange spray paint all over the body. I did the rest of the painting by hand with acrylic paint and various brushes and sponges.
I mixed up some some silver and black paint and roughly painted the blade, letting some of the black show through here and there.
I dirtied up the whole body of the chainsaw with a big rough brush; I put the absolute minimum of black acrylic paint on the brush, brushed it onto paper to get even more paint off of it, and then rubbed it into the corners and crevices to create shadows and smudges.
It was really nice to work on a project like this where I didn’t need to be a perfectionist and the more messed-up looking the finished product was, the better! I’m really happy with how this thing came out! On to the next project!
 About Manning Krull
 How to make a 4-foot paper maché alligator
 My violin skull mask, Mardi Gras 2015
 Three-headed paper maché dragon sculpture
November 25th, 2020 at 6:20 am
Hello,
My name is Hugh Brown and I’ve been doing a coffee table book called “Saw – The Chainsaw In Popular Culture” for way more years than I care to admit. It’s nearly finished and is in two volumes in a slipcase with almost 800 pages. I’d love to include your paper maché saw in the folk art section. If you’re interested my email is sawmeister@earthlink.net. I’ll send you a few sample pages. The book’s going to be printed by a fine art publisher and they require 400 dpi files. More details if you’re interested. Love your work!
Hugh
I was the creative director of Rhino Records and have done tons of music packaging.
November 26th, 2020 at 1:30 pm
Hi Hugh! I’ll email you in a sec…
February 23rd, 2023 at 10:22 am
Hi manning ! i’d like to base myself on this blog entry to make a chainsaw prop for a Texas Chainsaw Massacre cosplay. I know it’s been a few years since you’ve made it, but could you perhaps give me some indications for the dimensions of the pieces needed ? thank you in advance ! & apologies for my wonky wording, english isn’t my main language :)
February 23rd, 2023 at 7:31 pm
Salut Eugene! Je t’envoie un email! :)
November 3rd, 2023 at 1:26 am
Hello Manning,
I’ve been looking everywhere for a chainsaw prop template for my halloween costume, and I think your design is exactly what I’m looking for! It looks amazing, and I was wondering if it was at all possible for you to give me the template and dimensions so I can properly measure and cut it out for my costume? I really appreciate it!
Many Thanks,
Melody B