
Paper-maché severed head props!
Published by Manning on October 28th, 2019
I made these severed head decorations for Halloween 2019, using paper maché and clay and a bunch of other stuff. They were fun! Here’s how I made ’em…
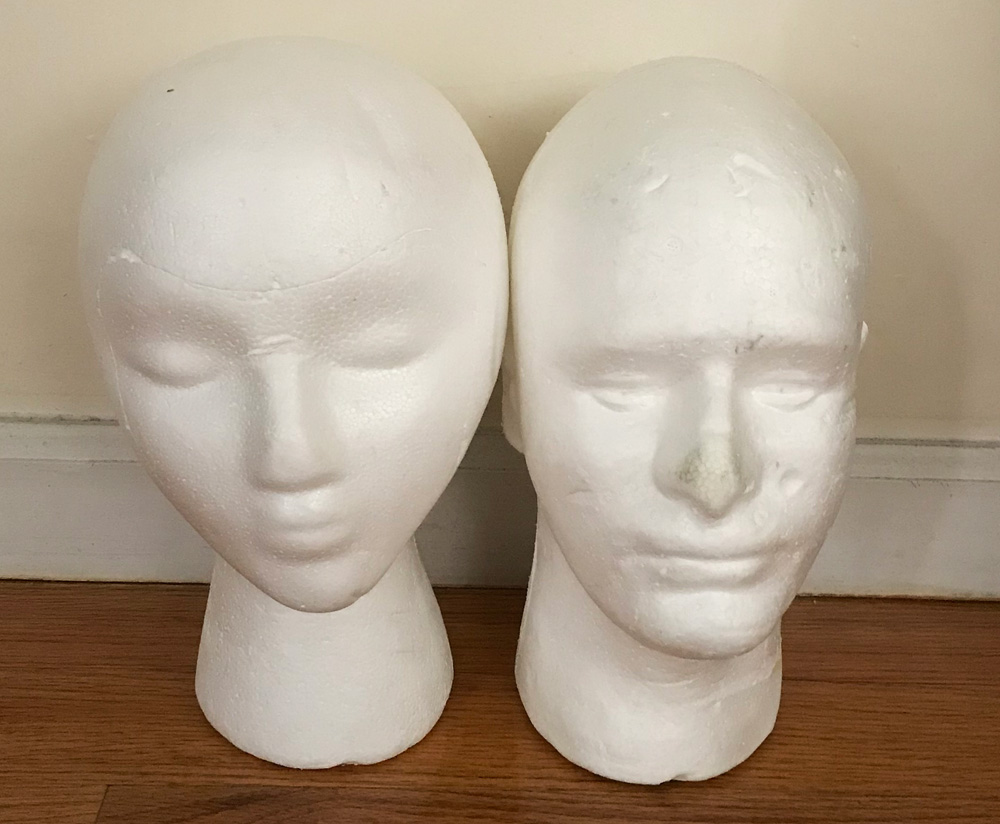
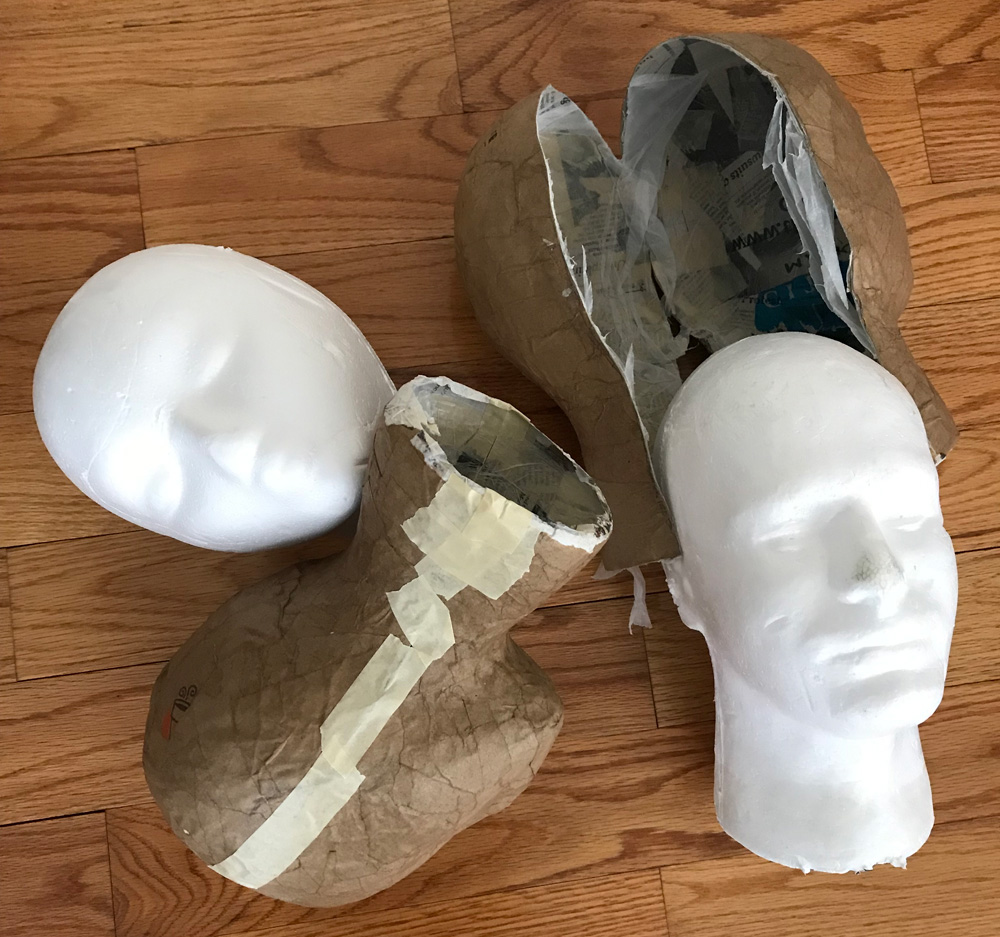
I started with a couple of styrofoam heads I already had laying around; one dude and one lady. I’d bought these ages ago for some project or other; I don’t even remember what it was specifically because I’ve ended up using them for a million different things — as a stand for masks I was working on, as a base for other Halloween head props I’ve made, etc. The heads were already a little beat up from other projects and stained with paint here and there, but that didn’t matter for this project.
I decided to make a dozen severed heads, for starters. My plan was to use each styrofoam head as a reusable base, to make several paper maché copies of each one.
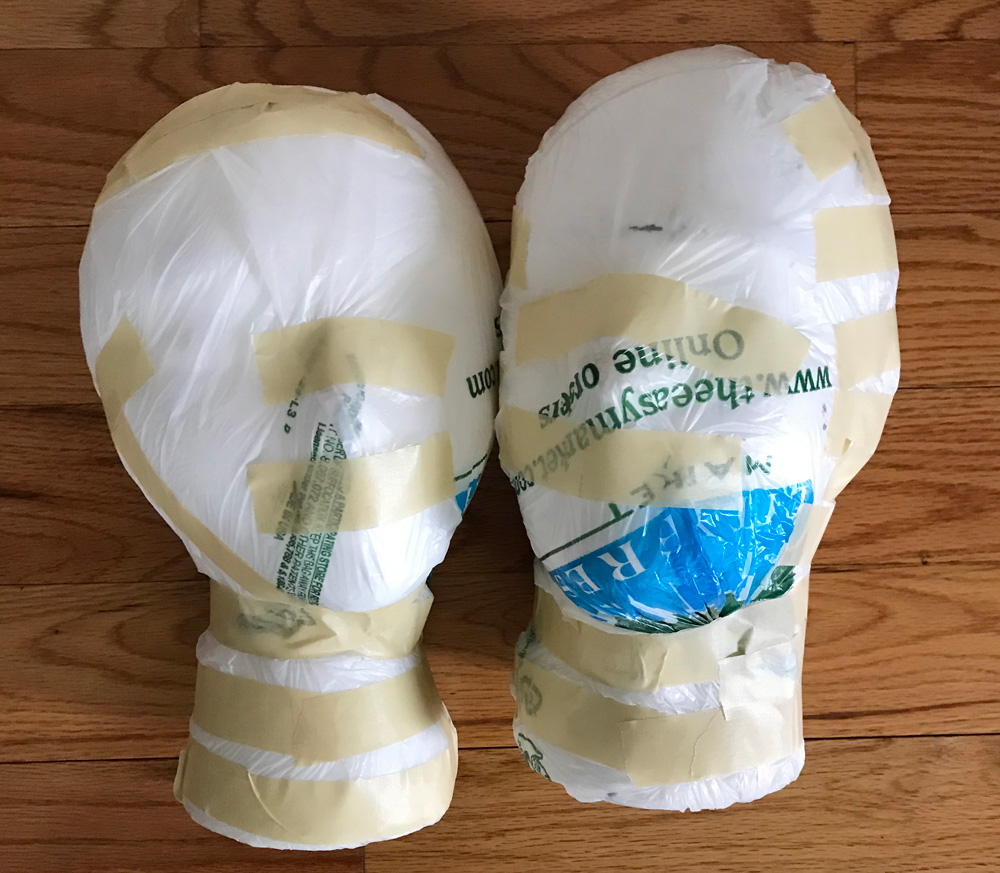
To prepare the styrofoam heads, I wrapped a plastic shopping bag around each of them and then used masking tape here and there to pull the bags tight, so they can’t slide around at all. The plastic will act as a release agent for the paper maché; the paper maché will stick to the bags but the bags won’t stick to the heads, so when each head is done I can cut ’em open and easily remove the paper maché shell from the styrofoam head.
Yikes, this looks like a photo from a serial killer’s blog. Well, it’s only going to get worse from here…
After doing a couple of these I realized it helps to make sure the corners of the bag are at the sides of the head, rather than at the front and back. With the corners at the sides, you can pull them straight back and tape them down. If one of the corners happens to be on the forehead it can create an unfortunate bump there.
Paper maché
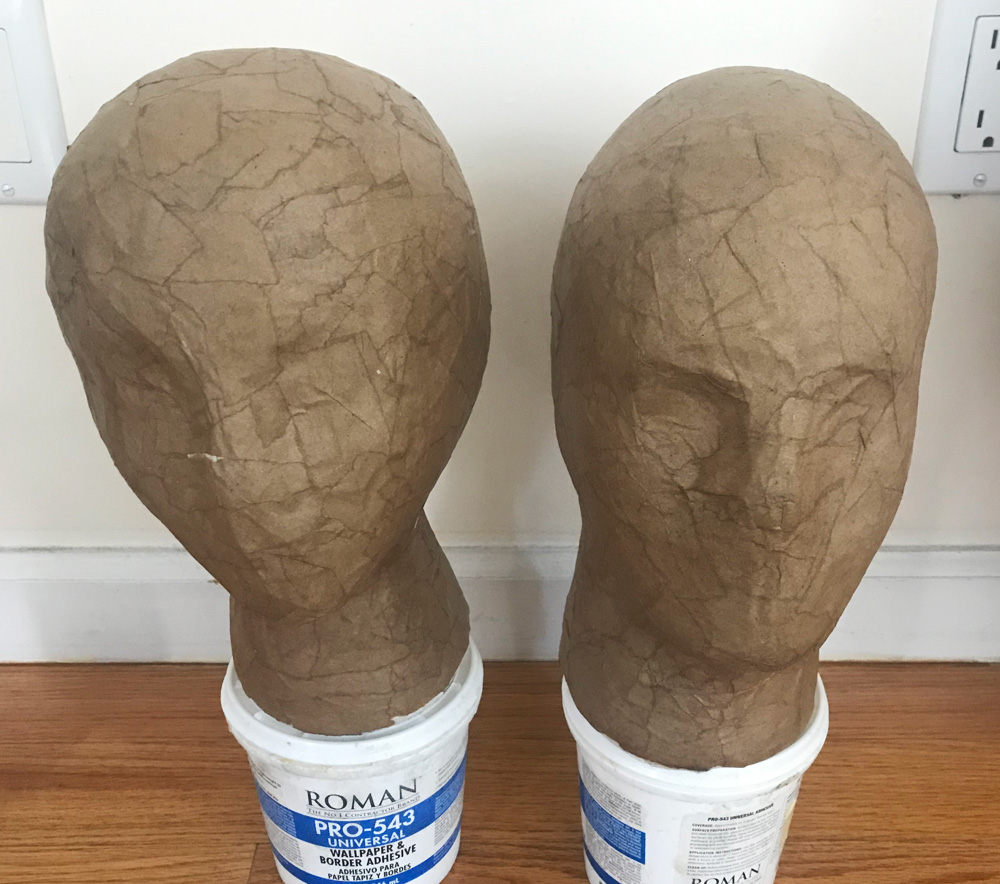
I applied five layers of paper maché really quickly and sloppily to each of the heads. You can read about my paper maché process and materials here. The short version is: I use Roman PRO-543 universal wallpaper adhesive (paid link) and alternating layers of newspaper and brown wrapping paper.

Normally I’m pretty careful when applying paper maché, because I want to create a nice smooth texture and avoid wrinkles and visible edges, but in this case I was happy to throw the paper on there really haphazardly, for a few reasons: 1. Since these are decorations for my Halloween party, I knew they’d be displayed in low light and no one would be looking closely at them. 2. I knew I’d be covering the front of the heads with more detailed work for the faces, and the back of the heads will be covered with fake hair. 3. They’re meant to be all rotten and banged up anyway!
I usually do alternating layers of newspaper and brown wrapping paper, but for these heads I also cheated by using cheap C-fold paper towels, torn into two or three huge strips each. For each head, I did one layer of newspaper, then three layers of the C-fold paper towels, and then one layer of brown paper to finish. The paper towel layers took just seconds to apply — I wish I could work this fast for all my projects! But really you can only get away with shortcuts like this when you’re not going for a nice smooth surface. The paper towels went on really wrinkly and bumpy in some random places, and there’s no way to avoid that if you’re working really fast with huge strips. For this project it didn’t matter at all, which was great!
I used one of these heads to conduct an experiment using wood filler to take the place of several layers of paper maché; it worked pretty well! You can read about that here.
I also did an experiment with Elmer’s art paste for the last four heads; you can read about that here. These heads ended up being less sturdy, so I added an extra layer of paper on each of them.
For each of the heads, I didn’t bother to cover the bottom surface of the neck, as I’d be working on this area to create a kind of severed neck effect later.
For each pair of heads, I’d do my paper maché in the morning and then let the heads dry outside in direct sunlight all day. I’d turn the heads every couple hours to make sure the sun hit them everywhere. With direct sunlight and dry weather, the heads would be finished drying after about 24 hours. If we got a cloudy day I’d still put the heads outside; they still dry faster this way than inside. But in that case I’d give ’em two days to dry completely.
When everything was 100% dry, I carefully sliced the heads open with an X-acto knife and removed the foam heads. You could remove the plastic bags at this stage, but I opted to leave them in; it might sound silly but that layer of thin plastic lends a tiny bit more sturdiness to the heads. I reconnected the paper maché halves with masking tape and applied another layer of paper maché over the tape.
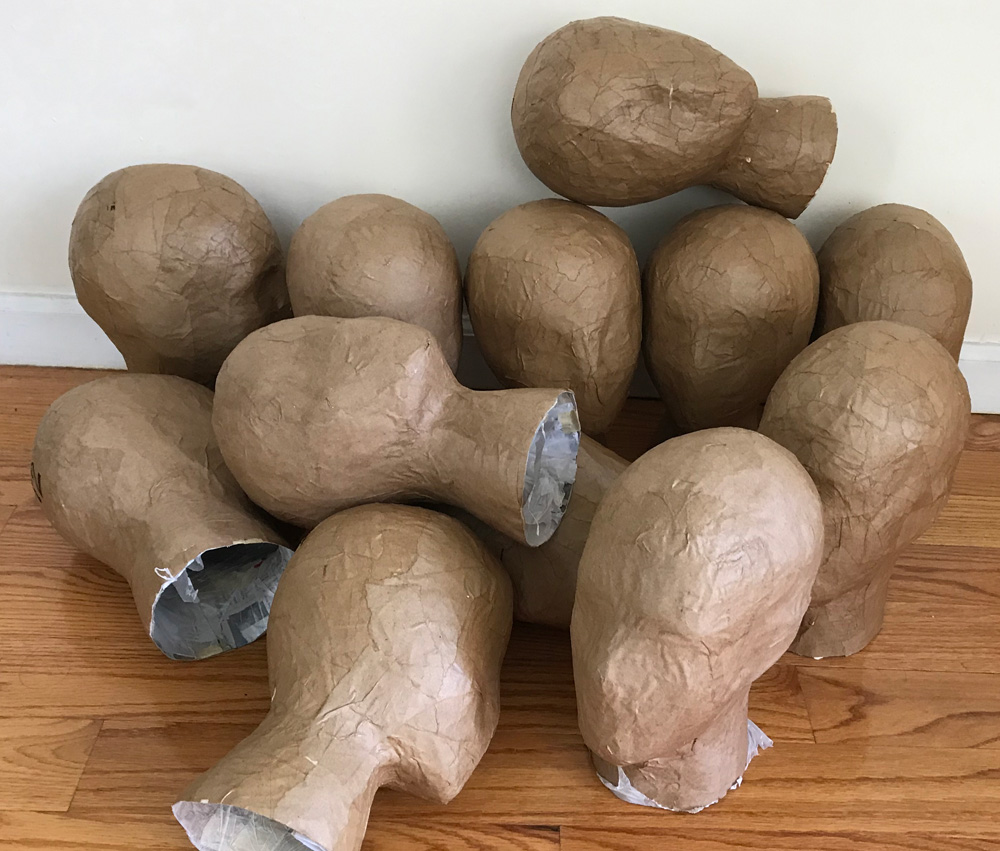
In the end, I had a half a dozen male heads and half a dozen female heads that were more or less identical; ready to start adding all the gory details…
Making the severed neck
I stuffed lots of crumpled-up newspaper into the heads in order to make them a little more stable for the remaining steps. Note: for some of the heads I had to do some of the steps in a different order; for example, for the heads where I wanted to insert eyeballs, I had to stuff the heads and close the necks later.

I trimmed the neck a bit with scissors to create a jagged line in a few places, like torn flesh. I trimmed all the necks a bit differently; some longer than others, and a few with a very lop-sided/diagonal cut.
I cut out a disk of foam board to place inside the neck. I wanted this to go inside the neck about 3/4″ deep, so I could leave part of the outer “skin” of the neck sticking out a bit further than this neck stump thing. I made sure there was enough crumpled-up newspaper in the heads to hold this disk in place (so it wouldn’t fall inside), and then I taped the disk in there masking tape.
I made a slice of exposed vertebra out of a scrap of foam board and taped it in place.
I then added two layers of paper maché over all this stuff; the edges of the neck, the interior of the neck, etc. While doing this, I added some squished-up pieces of paper and paste to create random little bumps on the flat disk area, just to make it look a little more like chewed-up flesh and less like a nice clean flat disk.
Making the face
Let’s start with the ears. Are ears part of the face? That’s a philosophical debate for smarter people than I.
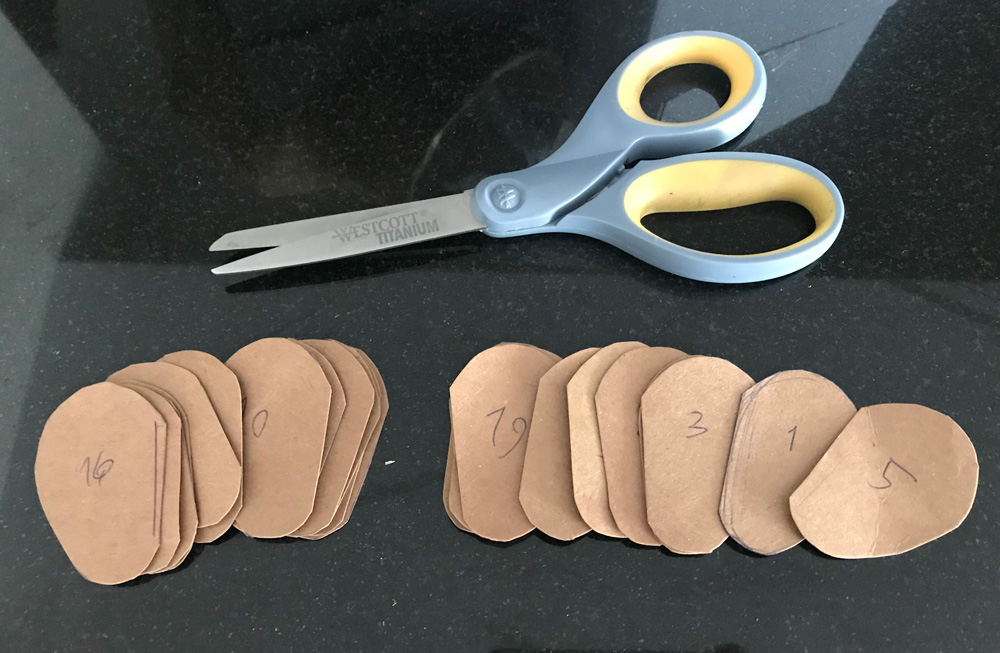
To make the ears, I started by tracing 24 ear shapes onto paste board (a salvaged saltines box) and cut ’em out. I number things whenever I’m making a lot of something to help me keep track of them; in this case I did odd numbers for the left ears and even for the right.
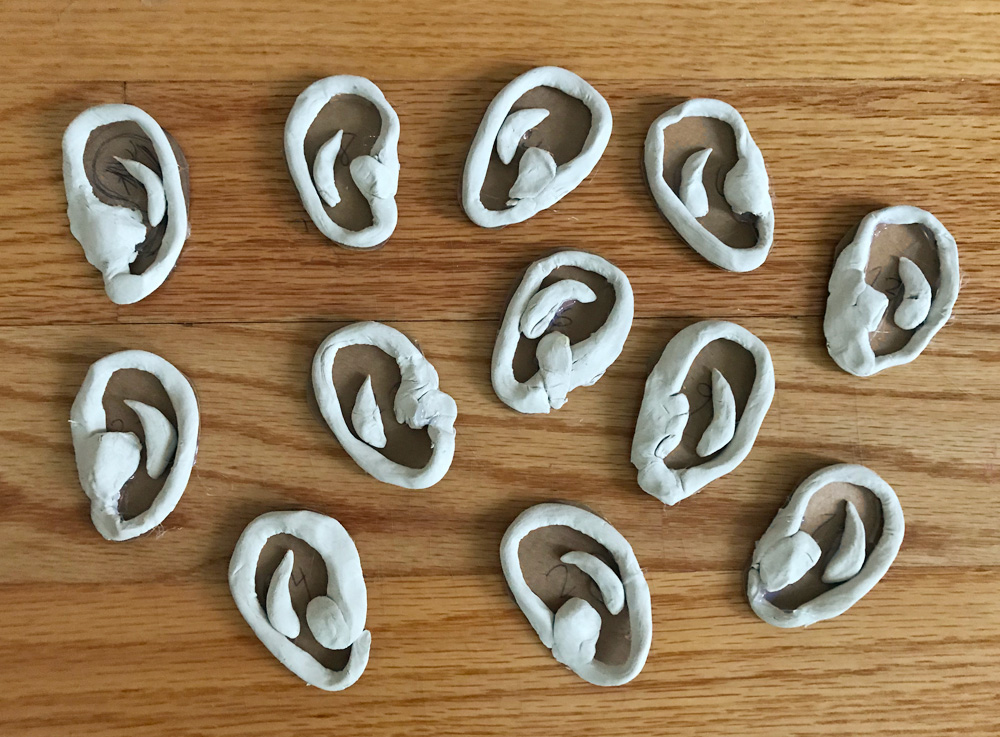
Then I sculpted very simple ear shapes onto them using paper clay — this was my first time using paper clay, and it was interesting! I’m used to using modeling clay like Activa Plus air dry clay, and this paper clay was a bit different. The paper clay was a little harder to work with, and it’s weirdly not very sticky, so it didn’t wanna stick to my pasteboard shapes. Not a big deal! I let the clay dry overnight, and in the morning it had shrunk quite a bit — this happens with most types of clay — and the pieces had become completely unstuck from the pasteboard. No problem, I quickly glued them all back on with my hot glue gun.
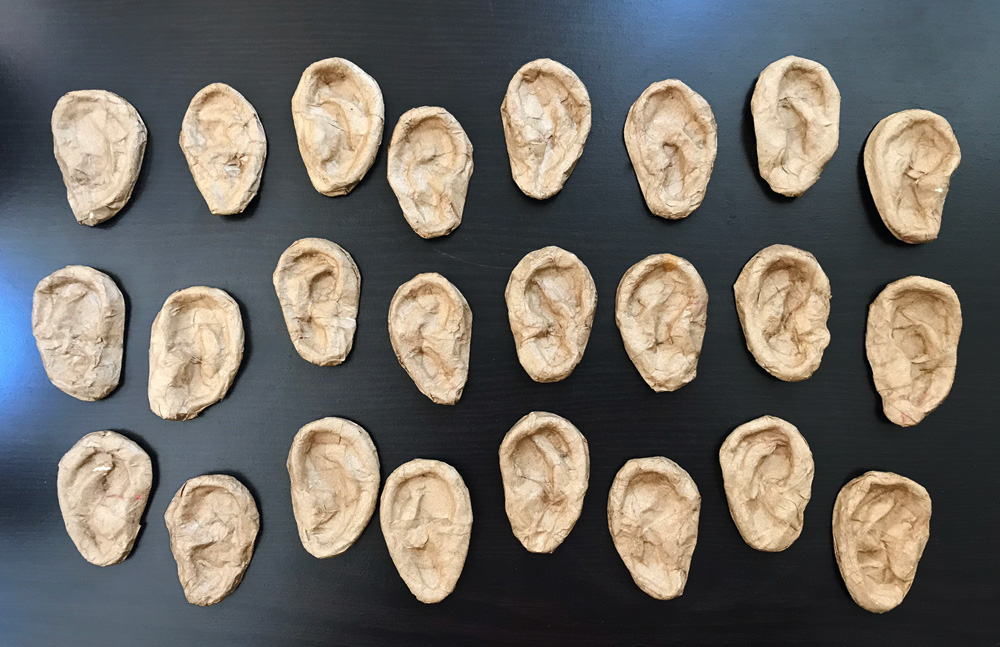
Then I covered all of the ears with just one layer of paper maché. They look pretty good for being so simple! This is just half of them; I made ’em a dozen at a time.
I hot-glued the ears in place on the heads, and then I added some paper maché to smooth out the connection at the front of each ear; I added some little squished up pieces of paper and paste in front of the ears to fill the sort of corner-shaped void there, and then I covered over this area with a few layers of paper.
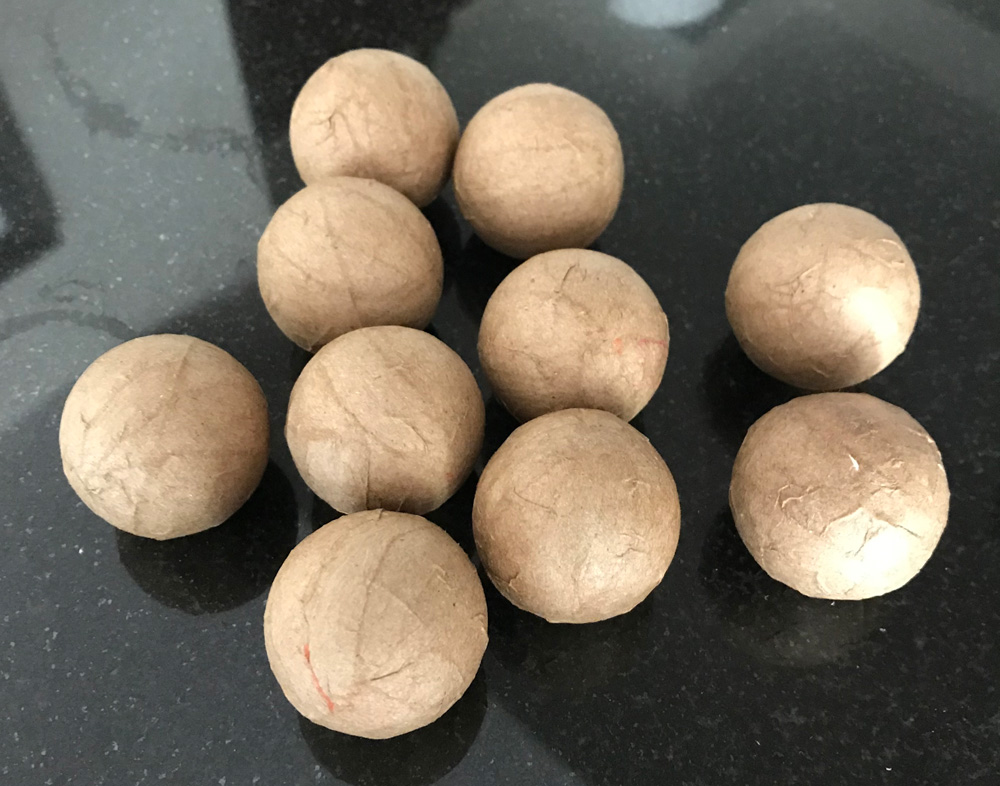
I added eyeballs inside several of the heads; I just covered some ping pong balls in one layer of paper maché (to make them easier to paint) and let ’em dry.
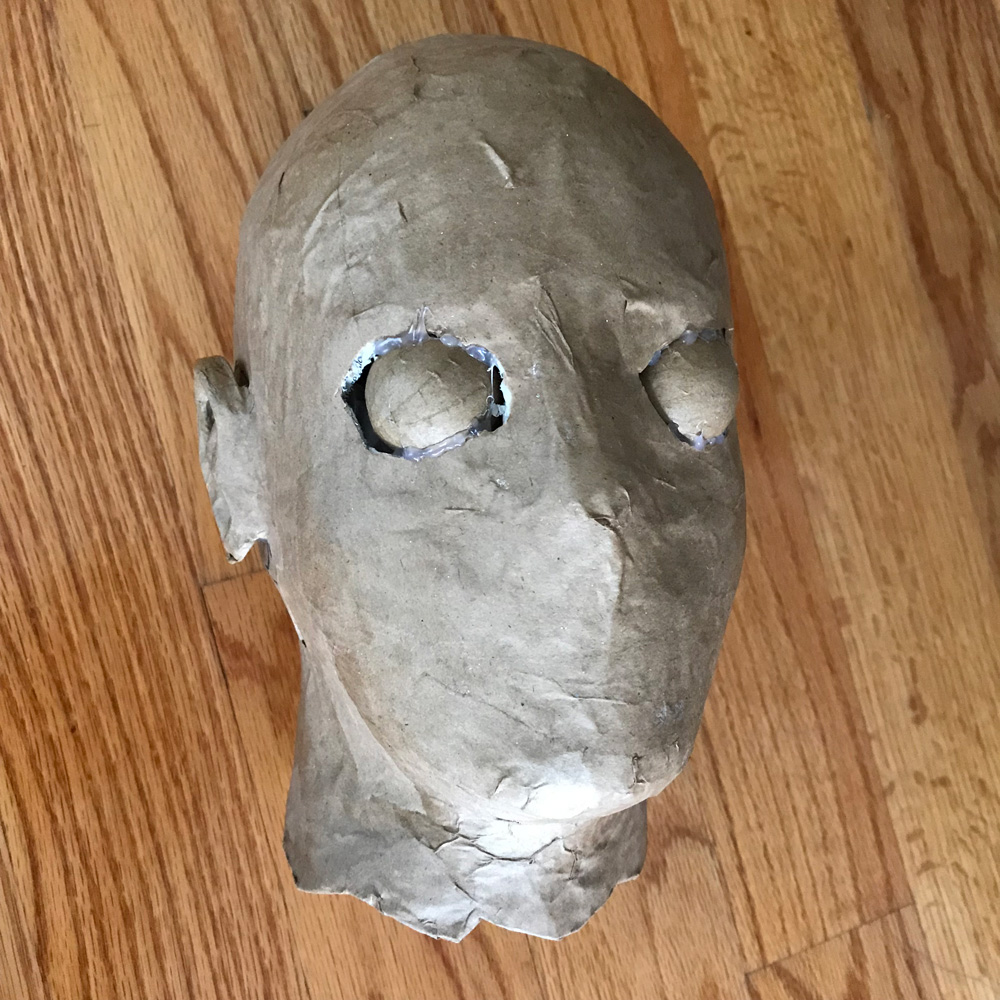
I cut holes for the eyes in the paper maché head shapes (obviously I did this before the neck holes were closed up), stuck the eyeballs inside through the neck and positioned them behind the eye holes, and hot-glued them in place.
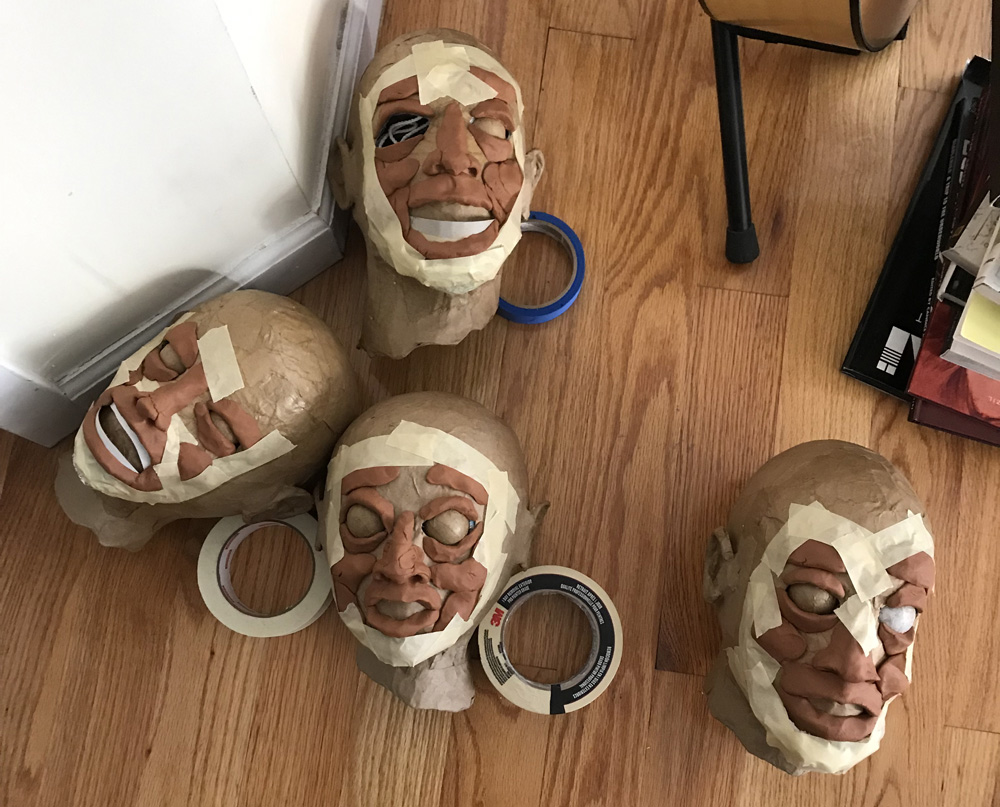
I sculpted the eyelids/nose/lips/etc right onto the heads with Activa Plus air dry clay and a few other types of clay I had lying around. I used a bunch of masking tape around the clay parts, for two reasons: one, to help smooth out the connections between the clay and paper base, and two, to help keep the clay parts from falling off as they dry.
When all the clay stuff was dry, I covered the faces over with a layer of paper maché.
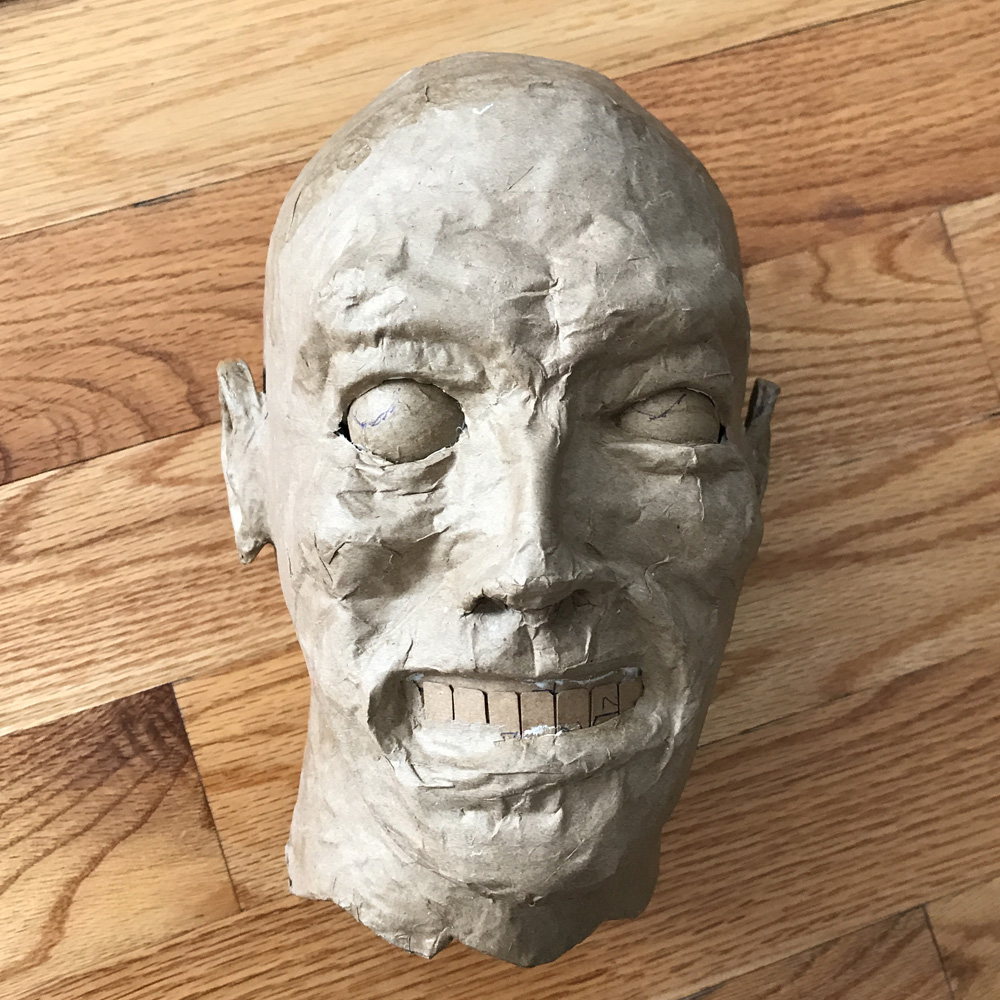
Oh yeah, I made teeth for a few of the heads; I just cut out the basic teeth shapes out of pasteboard as one long strip and then taped it onto the face — before adding the clay lips and stuff, obviously.
Painting
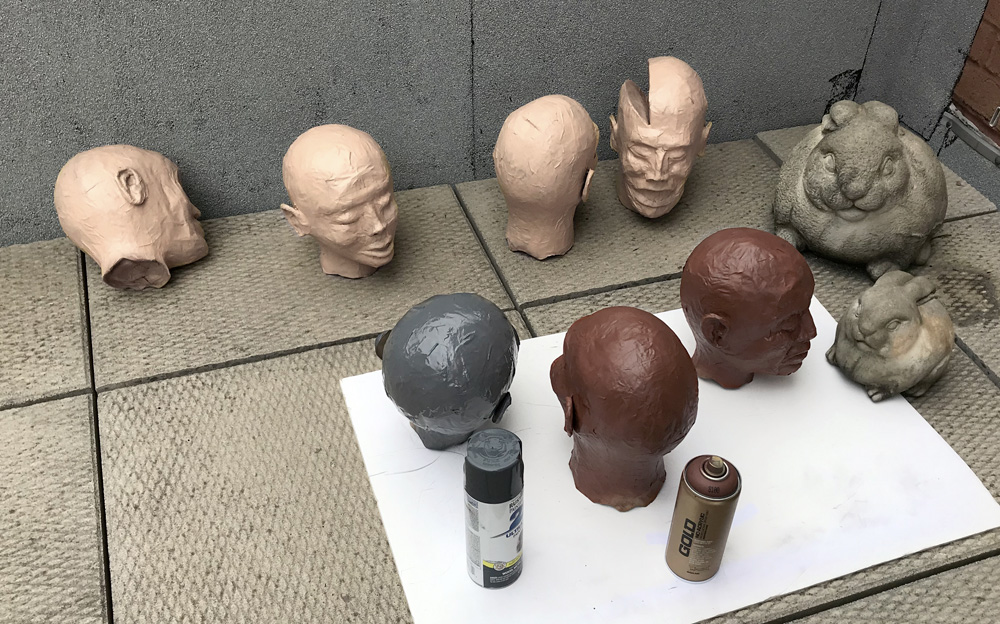
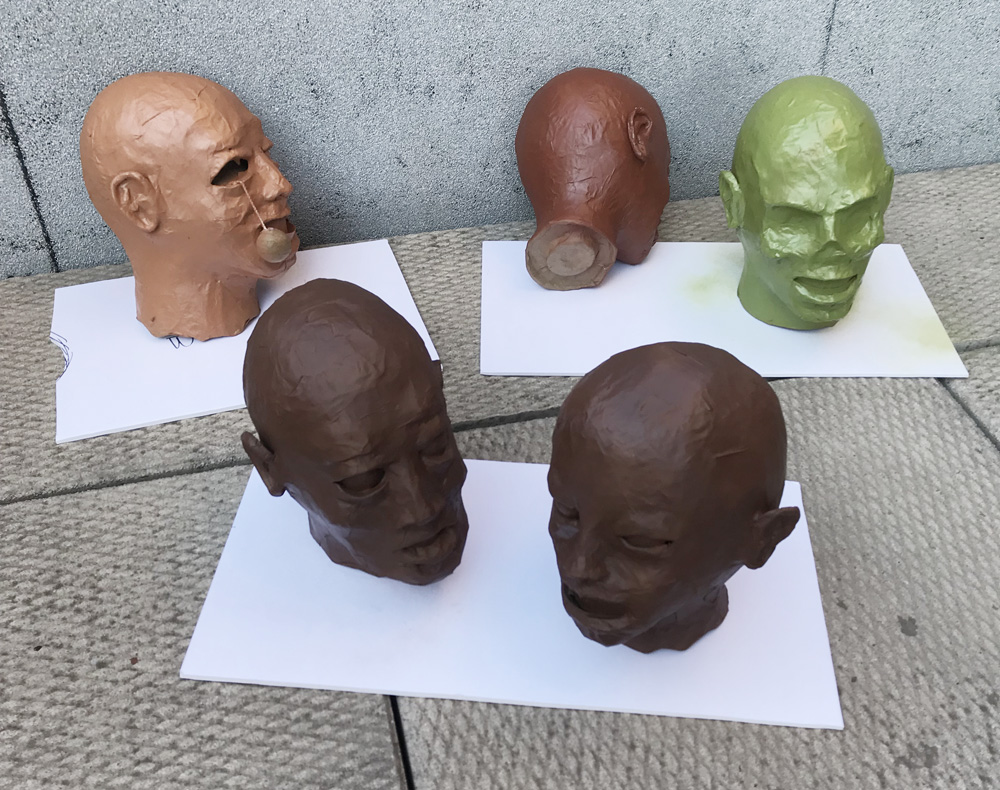
I spray painted the heads with some random leftover colors, and then I painted all the details with acrylic paints and various brushes — again, I had the luxury of being able to do this really quickly and sloppily for the most part; the more messed up looking the better!
I was a little more careful in painting the eyes of the few heads who have eyes. I used smaller brushes and acrylic paint for these.
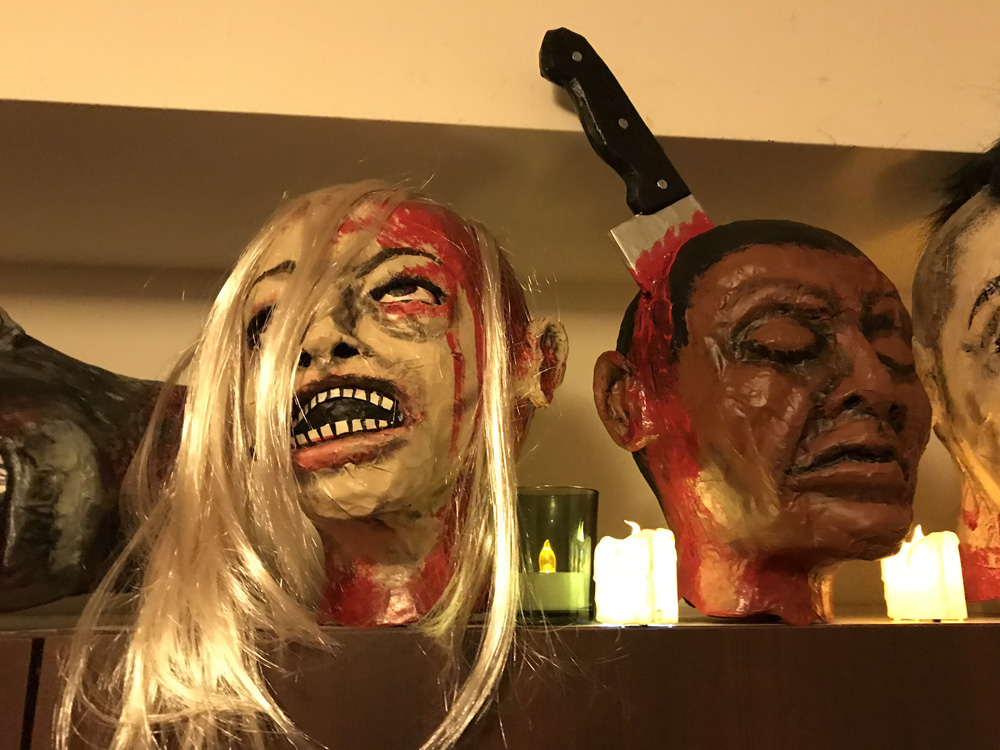
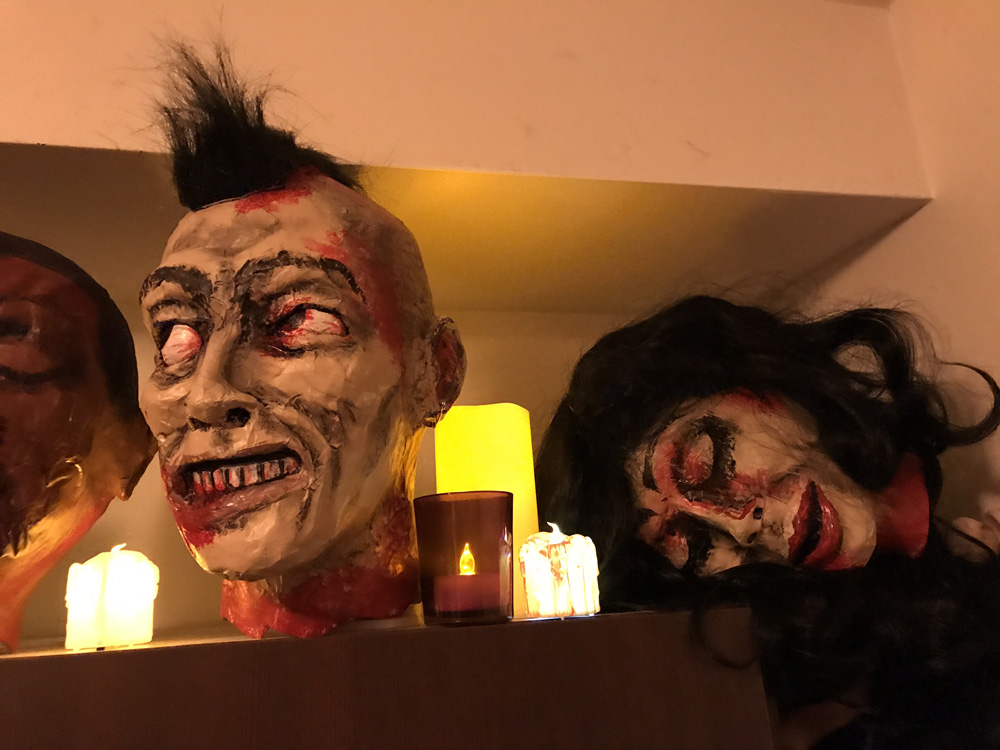
And of course I used lots of red acrylic paint for blood (a few different shades), inside and around the neck.
Some variations and gore effects
I tried a few different effects and objects to give the heads some variety…
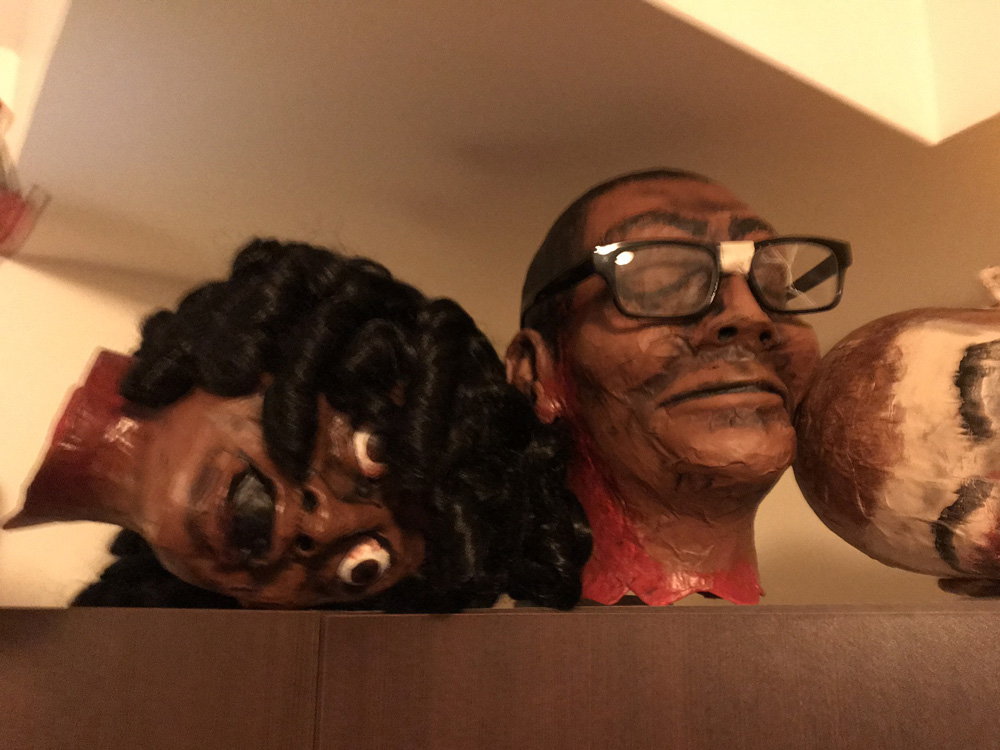
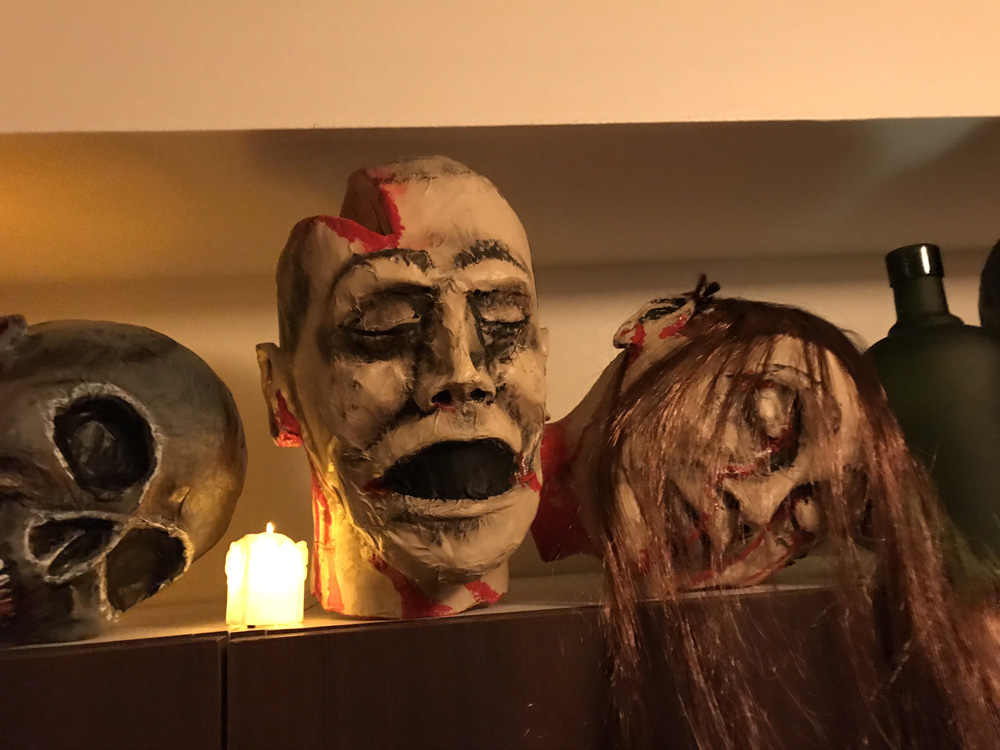
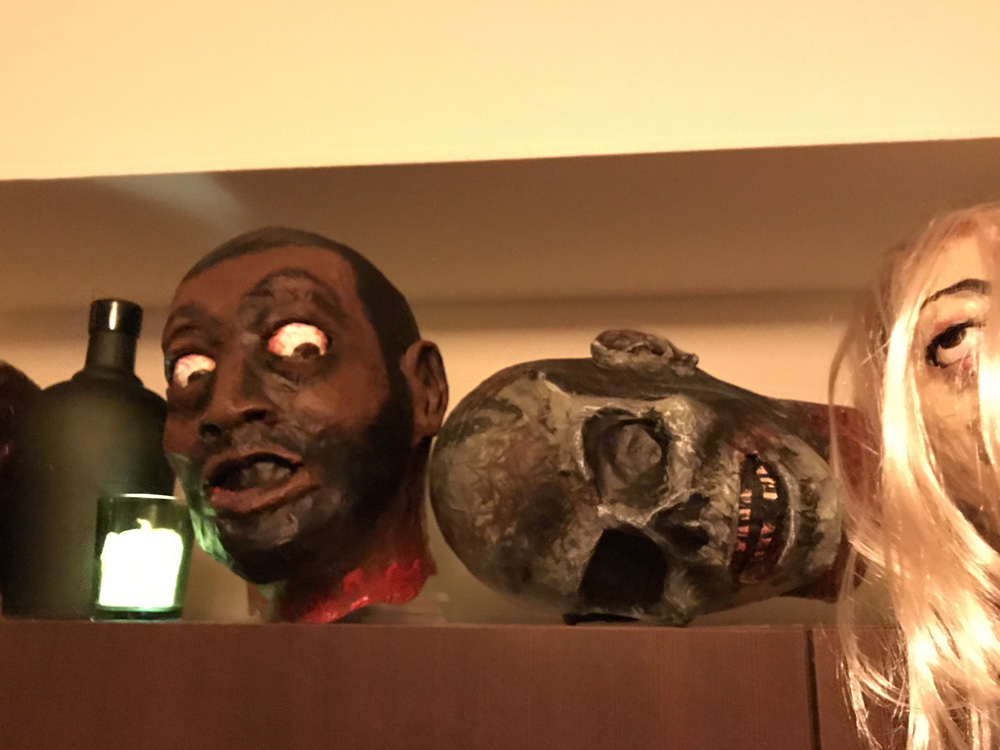
Hair — I bought a few very cheap wigs off of Amazon and used them for the hair on some of the head props.
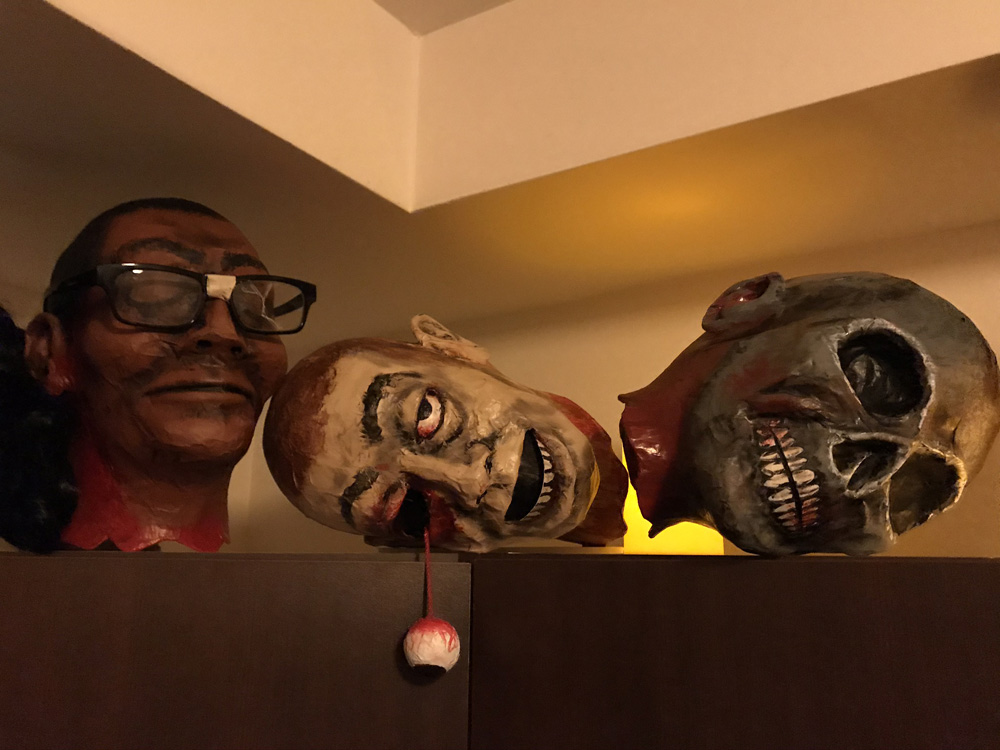
Dangling eyeball — I gave one of the heads an eyeball dangling from its socket.
To give the eye a deep dark space to hang out of, I took a piece of scrap pasteboard and bent it into a curved shape, basically a big curve for the deep recess, with two bent tabs to glue above and below the eye hole inside the head. I painted this thing black, then attached the string to it with tape and hot glue, and hot glued the whole thing into the head. For now I left the string longer than it needed to be and I simply stuffed it all into the eye hole to keep it out of the way while I was sculpting the rest of the face.
Once the face was sculpted and paper maché’d and dried, I pulled the long string back out of the eye hole. Then I worked on the eyeball itself.
I took one of my paper-maché’d eyeballs and popped a hole in it with an awl. I wanted to make this eye a bit heavier so it wouldn’t bounce around too much while hanging on the face, so I filled it with some cheap plastic beads I had, and then I poured glue into it to let it seep through the beads and harden.
When that was dry, I trimmed the string to the length I wanted, dumped a bunch of hot glue into the hole in the eyeball, and stuck the string to that. Done!
Chopped head — Haha, this one was fun! I created this axe wound effect on one of the heads right before the step where I’d stuff it with newspaper. I drew the wedge-shaped wound on the head shape with a marker and then cut it out with an X-acto knife. Then I took a big folded up piece of construction paper and stuck it into the opening so I could trace a line around the shape of the chopped-open piece.
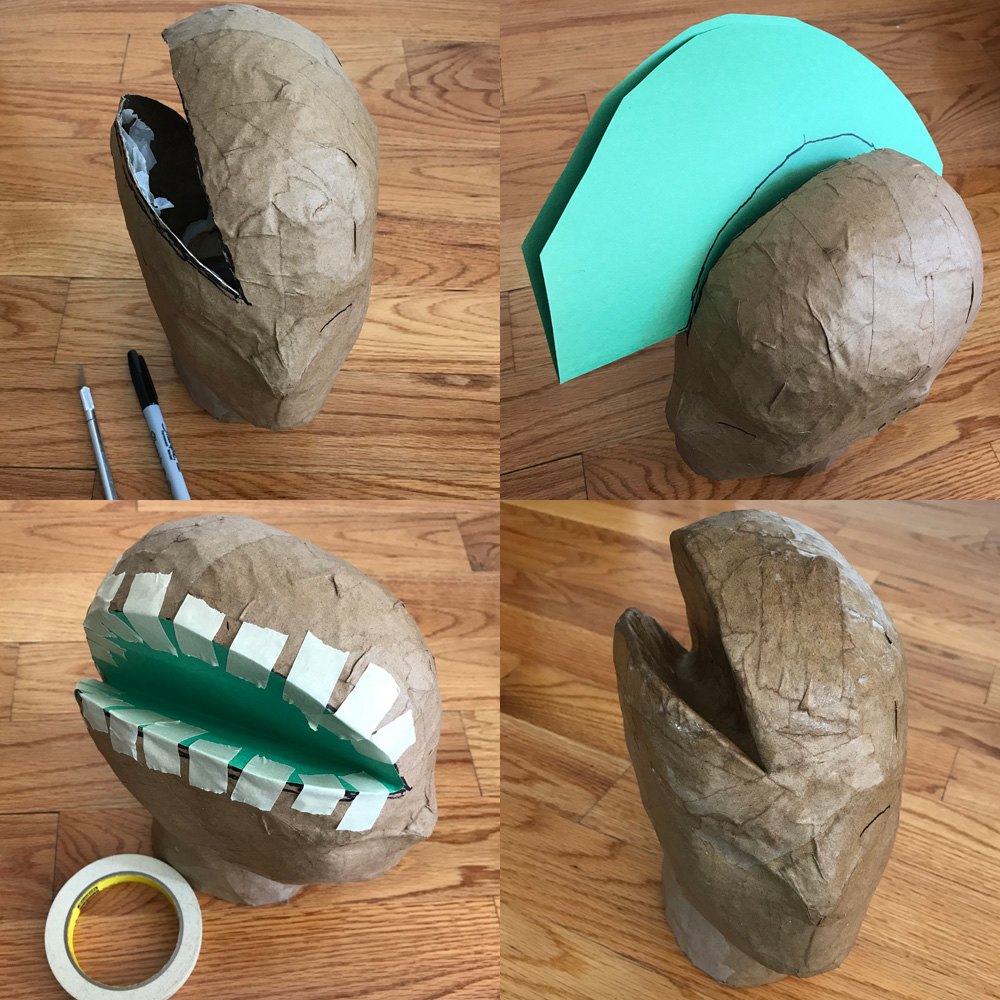
I cut out this construction paper piece and taped it into the wound. I then covered the tape and construction paper with three layers of paper maché. When that was dry, I then completed the rest of the head as normal.
Knife in head — See my article about making a realistic paper maché knife! I made up this project for a previous Halloween; I no longer have that knife but it was easy to use the same techniques to make a new, partial knife that I could glue onto one of the heads and make it look like it was stabbing into it.
You can see my paper maché knife project to see how I made the thing. When it was done I simply hot-glued it in place on the head, and of course I added a lot of red paint for blood. If anyone was going to be looking closely at the thing I may have built up the edges of the wound with some clay and paper maché, but I didn’t bother with that for this simple decoration.
Glasses — I bought a cheap pair of reading glasses at the dollar store; look, I don’t have to sculpt EVERYTHING, all right?!
Displaying the heads
I wanted to position the heads at various angles across the top of my cabinets, and since they’re irregular shapes and not very balanced, they didn’t want to sit in these positions on their own. I ended up building some little supports out of foam board and taping the heads to them with masking tape in order to prop them up the way I wanted.
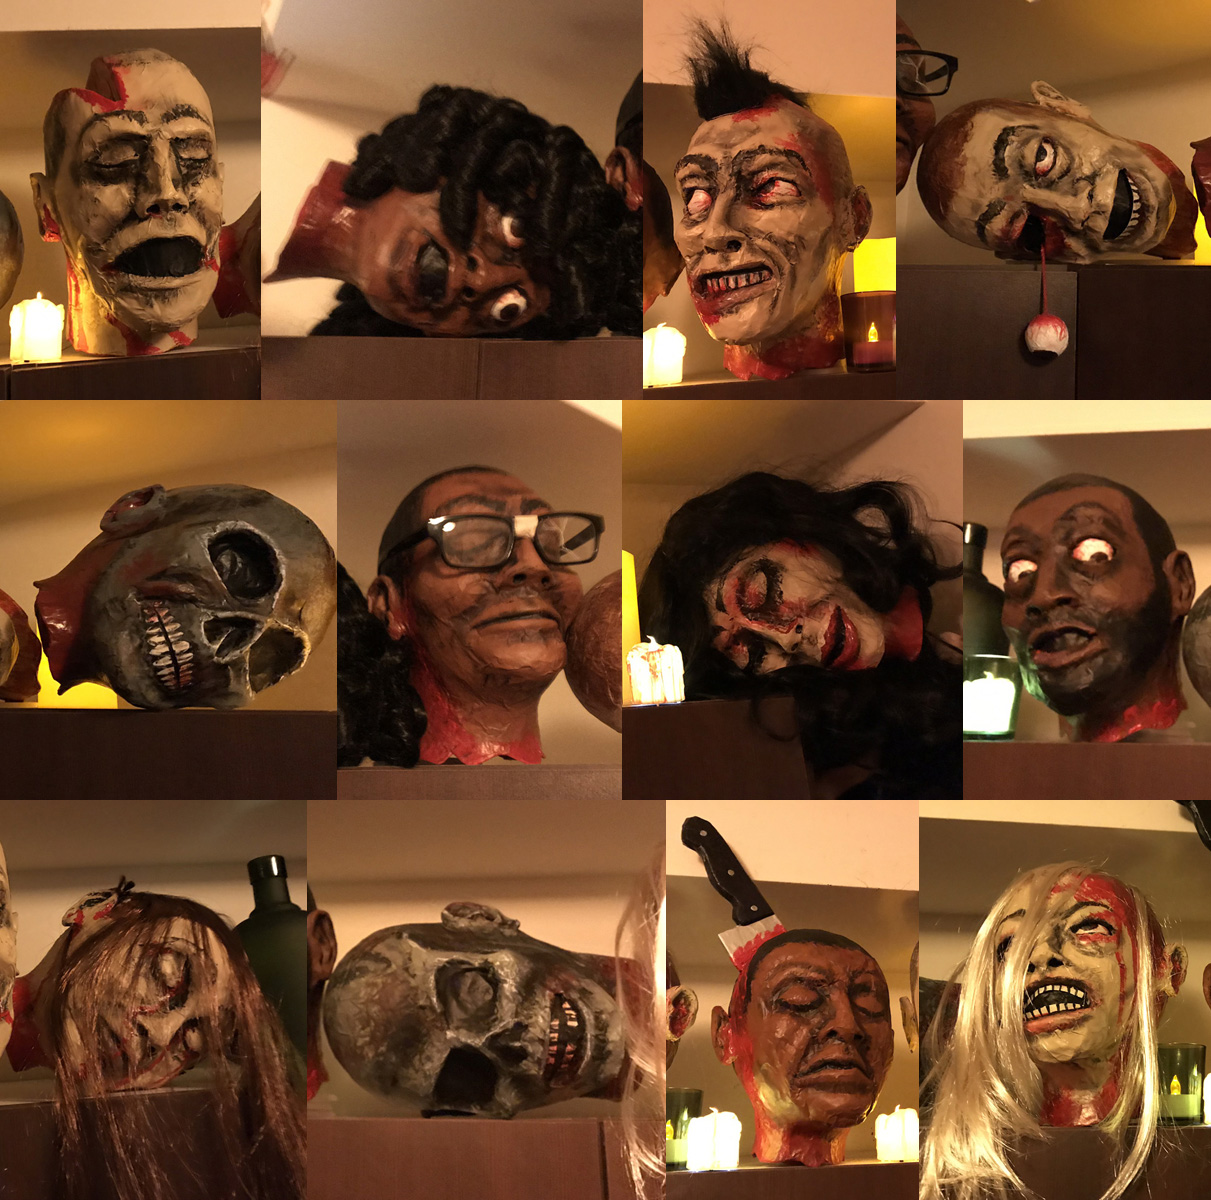
Here are a bunch of pics of the finished heads, and a video of all of them together in our kitchen!
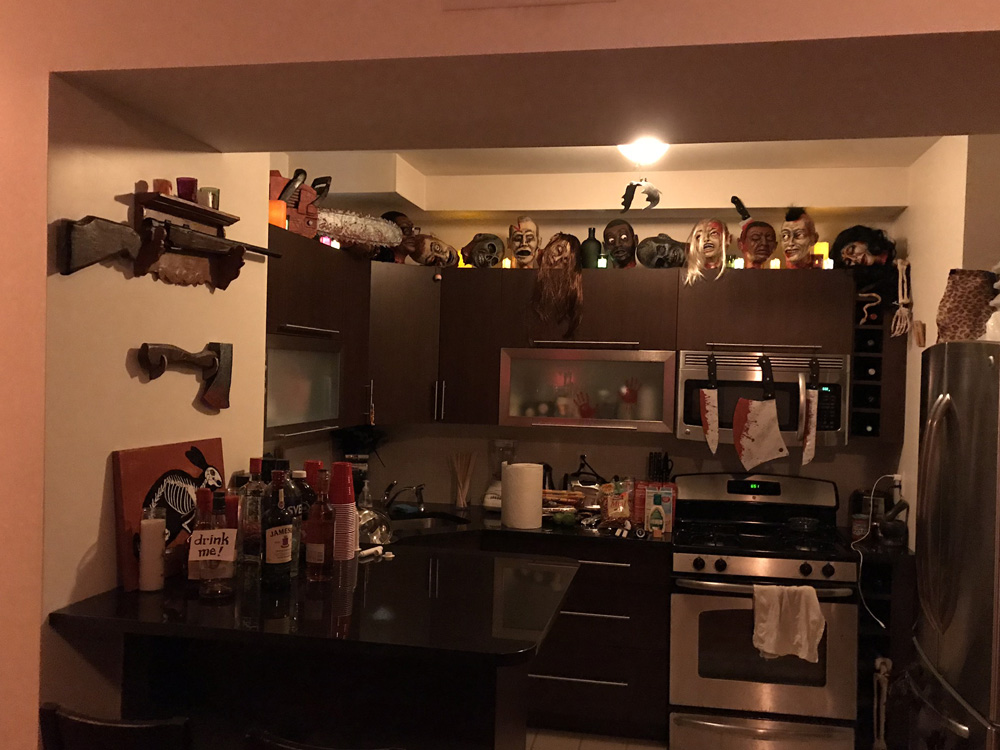

Here’s a video of the finished heads right before the party!
Paper maché severed heads from manningkrull on Vimeo.
 About Manning Krull
 How to make a 4-foot paper maché alligator
 My violin skull mask, Mardi Gras 2015
 Three-headed paper maché dragon sculpture
June 23rd, 2022 at 5:08 pm
You did a great job. Cant wait to try this.
August 23rd, 2022 at 12:33 pm
Do you happen to live in New Jersey and rent out your severed heads?
August 23rd, 2022 at 10:29 pm
Hi Robert! Sorry, I moved from NYC to New Orleans last year, and most of those heads went home with people the night of the party. :)
July 10th, 2023 at 6:24 pm
Nice job. Do you spray the head with top coat or some kind of glossy or matte finish?