Paper maché technique: multiple layers and even coverage
Published by Manning on November 30th, 2017
I use this method for some of my paper maché pieces when I need multiple layers but I don’t have a ton of time, and especially if the weather is good for drying quickly outdoors — hot, sunny, and not too humid.
The whole point of this method is saving time by doing multiple layers of paper maché in one session but keeping the coverage nice and even. Backing up a bit… usually it’s not possible to cover your base entirely in a layer of paper maché all in one session because you’ll end up gluing it to your working surface. So it makes sense to cover part of the base, let that part dry, then flip it over and do the other part. Doing many layers this way can take forever! The method I’m going to talk about here lets us fast-forward and do multiple layers this way with only one waiting period total instead of one waiting period per layer.
You might think, well, I could just do (let’s say) four layers on the top half, let it dry, and then flip it over and do the four layers on the other half. That’s true, but if you do four layers on exactly half of the base and then four layers on the other half, there’s a risk of creating an ugly ridge where the halves meet and overlap, kind of like a seam all the way around. You get this because you’re overlapping four layers of paper onto edge that’s four layers thick; all those layers add up and become visible as a ridge. So, the point of this method is to help spread the layers out evenly to avoid that kind of problem.

For this tutorial let’s assume you’ve already got your base shape built and all your paper and paste ready to go. See my article about my paper maché process for info on the materials I use. If you want your base to be removable, keep in mind you’ll want to use something as a release agent between the base and the paper maché; I’ve used things like shipping tape, aluminum foil, etc, depending on what I’m trying to do.
You’re going to alternate what kind of paper you’re working with for each layer of paper maché so you can easily see what parts you’ve covered. I usually use alternating layers of newspaper and brown wrapping paper. So, first figure out how many layers total you want to do, and work out which type of paper you’re going to need to start with; I usually want my last layer to be brown wrapping paper, so let’s say I’m going to do four layers — that means I’ll start with newspaper so that my fourth and final layer will be brown paper.
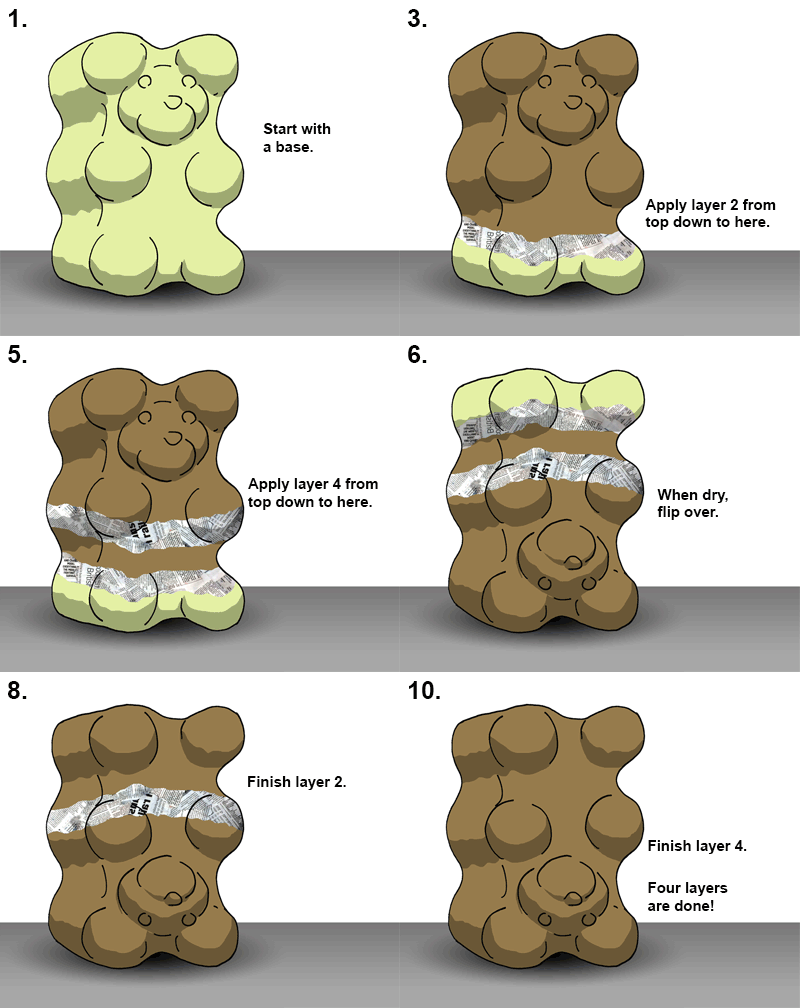
Set your base shape in whatever position you want to start with, and then you can apply your first layer of paper maché, starting from the top and going almost all the way down to your working surface.
Then you can immediately apply a second layer, starting at the top again and stopping an inch or two before you reach the edge of your first layer.
Same for the third layer; switch what kind of paper you’re using, start at the top and work your way down, stopping a bit before the edge of the second layer.
Et cetera, et cetera. I often do four layers at a time this way. The most I’ve ever done with this method was six, and it worked out great. The larger your shape, the more you can space out where the edges of your layers end up.
As soon as this first full set of layers is done, if the weather allows you can bring the piece outside and set it up in the sunlight, and turn it once an hour or so. If you’re stuck keeping the piece inside, an electric fan can really help speed up drying as well. Again, just turn the piece once an hour or so so the fan can hit all sides more or less evenly.
Depending on the humidity and other factors, a piece with four layers of paper maché applied at the same time could take anywhere from half a day (especially in direct sunlight) to several days to dry completely.
When the first set of layers is dry, you can apply the second set. Set the piece upside down on your working area. You’re now going to apply the first layer of paper maché just until you reach and cover the edge of your first layer from before. Once that edge is met and covered, switch papers and repeat with the second layer, working until you’ve just covered the edge of the second layer from the first set. And so on!
Here’s that animation of the steps again:

The result is four (or however many) layers that are all perfectly even, with no bump or ridge or seam where the layers overlap, since they all overlap in separate areas with just one layer of paper at each of the overlap points.
Good luck!

 About Manning Krull
 How to make a 4-foot paper maché alligator
 My violin skull mask, Mardi Gras 2015
 Three-headed paper maché dragon sculpture
February 12th, 2022 at 3:07 pm
Thank you for the great info, especially about the two different types of paper. Your pieces look fantastic
February 13th, 2022 at 11:44 pm
Thank you, Tor, happy to help!