
Pumpkin Night custom paper maché mask!
Published by Manning on February 28th, 2021
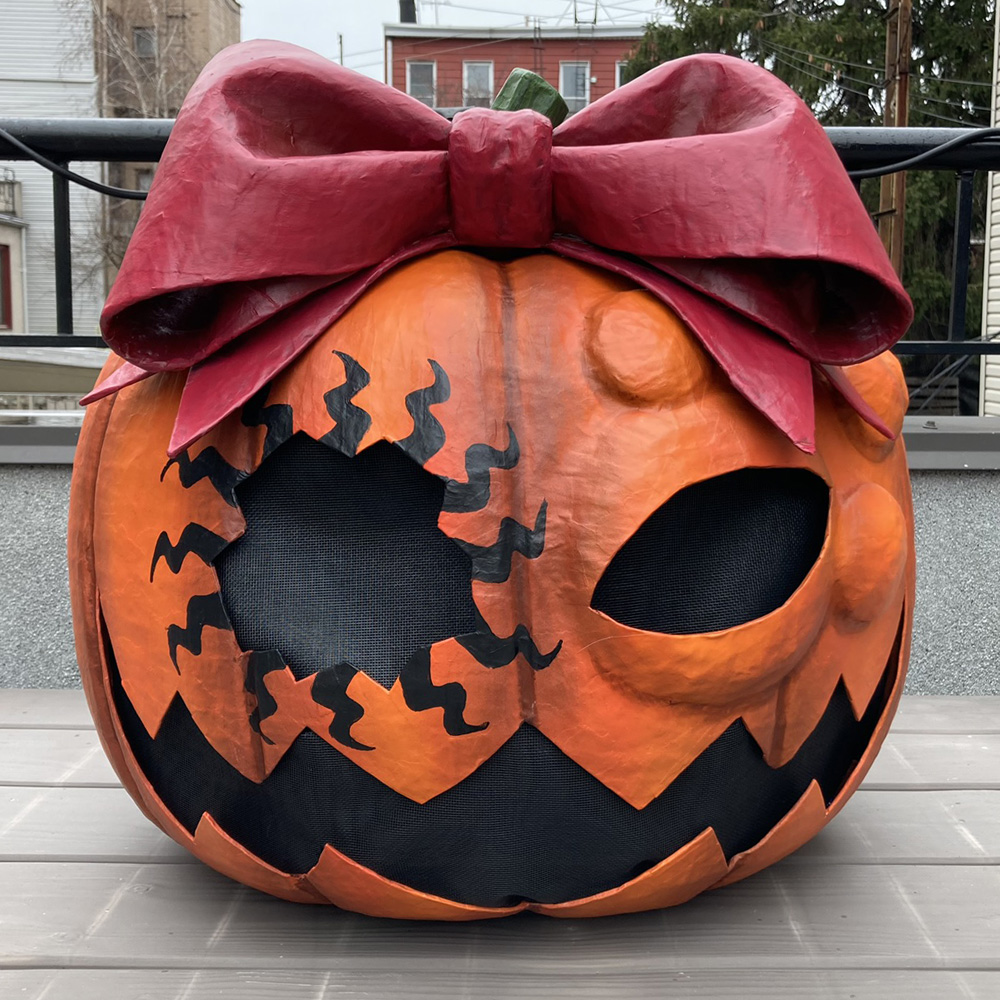
I made this custom Pumpkin Night paper maché mask for a wonderful client! Here’s how I made it! (And check out my page about custom work!)
I wasn’t aware of the Pumpkin Night manga so of course I started with lots of Google image search results. What a cool design! I’d never done anything like this before!
Making a pumpkin base in the style of the Pumpkin Night manga
Okay, so there are a million tutorials online about making a paper maché pumpkin using a trash bag, wadded-up newspaper inside, and string — however, I decided to not do that! Ha!
The trash bag and string method is an easy and fun way to make paper maché pumpkins and jack o’lanterns, and they can end up looking really cool, even somewhat organic and realistic. However, this method doesn’t give you a lot of precision — you end up with some lumps here and there, and the wedges of the pumpkin are all somewhat irregular in their shapes and sizes.
For this Pumpkin Night mask, I wanted something much more even and precise, to match the look of the mask in the manga. So, as usual, I made up an overly-complicated method to get the look I wanted!
I did a lot of sketching and calculating, using the manga images as reference, and I came up with a way to make twelve identical wedges that could be assembled into a base for my pumpkin shape. Here’s how I made each of the Pumpkin Night mask’s twelve wedges:
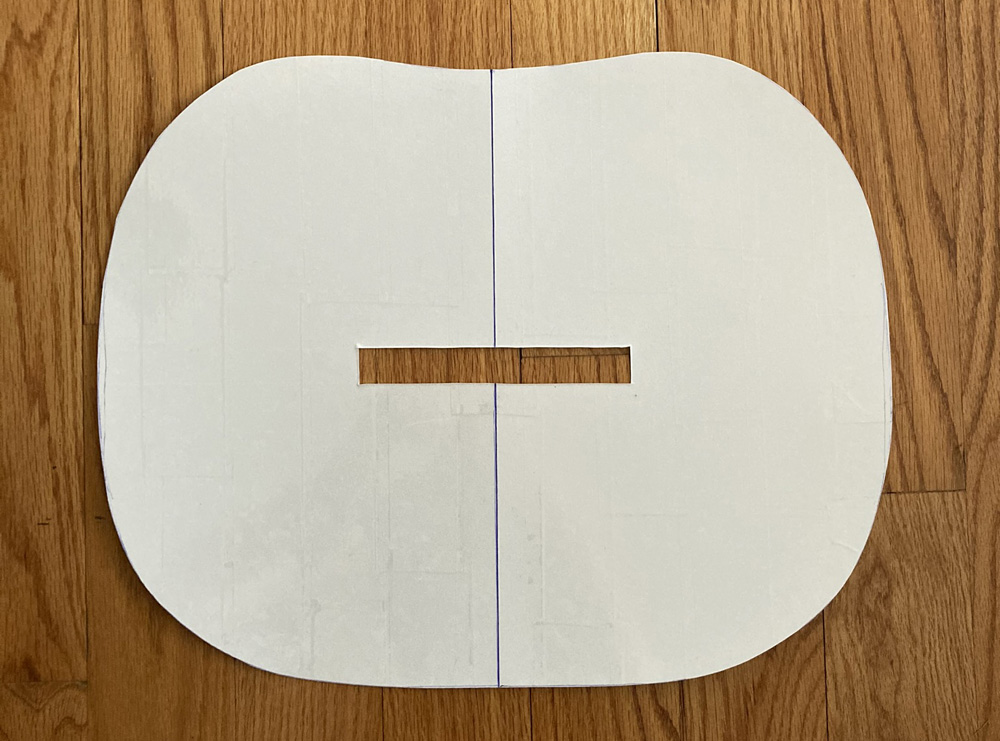
I started by deciding on a size for the pumpkin — about 18″ x 14″ — and then drawing half of the pumpkin onto construction paper (minus about half an inch of width; I’ll explain why later.). I cut this out, traced it onto poster board, and then flipped it and traced it again, so I had a drawing of the two identical halves, with a line down the middle.
I drew a big rectangular notch in the middle of the shape — what’s this for? You’ll see coming up.
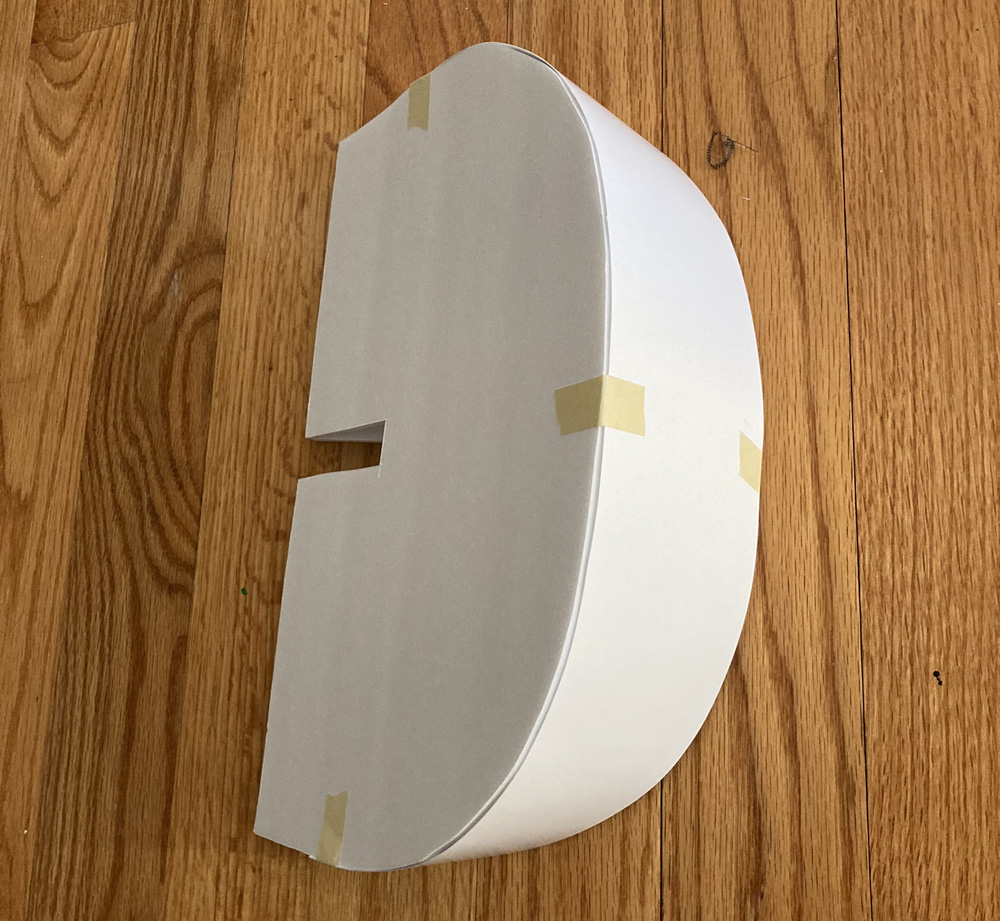
I needed to trace this shape onto foam board many times, so I did a trick to make the first shape sturdier: I covered the poster board with shipping tape. I then cut out the pumpkin shape and it felt nice and strong; good enough to survive being traced a bunch of times without having the edges get all messed up.
I traced this poster board pumpkin shape onto foam board twelve times — tracing not only the outline, but marking the line down the middle as well.
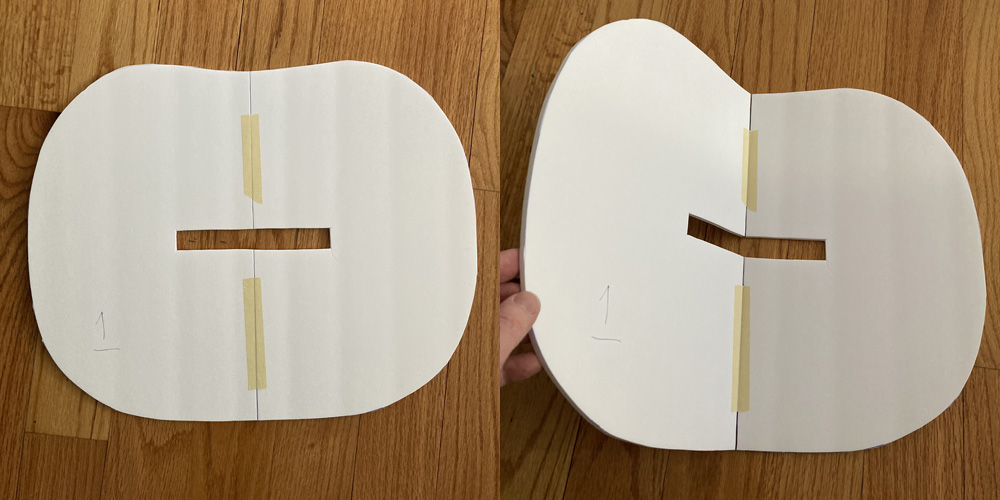
I cut out each pumpkin shape from the foam board with an X-acto knife. I then cut the line down the middle, but not all the way! I left about an inch at the top and bottom of the line uncut. Then, I put a strip of masking tape over the middle cut, and then I finished the cut at the top and the bottom. So this left me with the cut-out pumpkin shapes, sliced down the middle, but taped together.
The reason for the cut down the middle, and the tape, is so that I can easily fold this pumpkin shape perfectly in half in order to build each of the pumpkin wedges.
Okay, here’s another needlessly complicated thing! I love this stuff! Since there would be twelve pumpkin wedges, I knew they would each need to have an angle of 30 degrees in order to make them all fit together perfectly — 360 degrees divided by 12 is 30. But how to build the wedges with that exact angle?
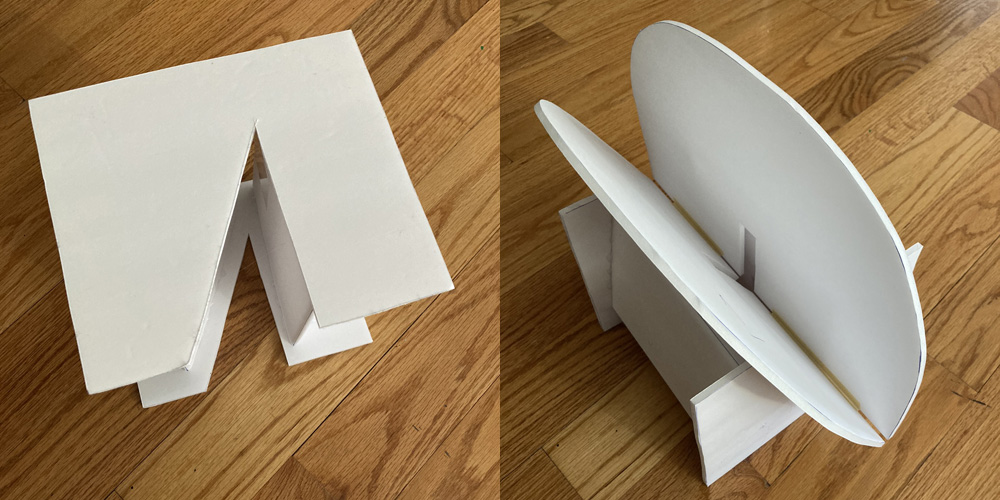
I made a triangle in Photoshop with an angle of exactly 29 degrees. (Why 29 and not 30? Because I knew that when I added tape and stuff later, the wedges would probably be a little thicker — this turned out to be correct!)
I printed that triangle and cut it out. I traced this shape onto foam board twice, and used those pieces to assemble a sort of box shape with this wedge-shaped chunk cut out. Is this making any sense? It barely makes sense to me! But anyway, check this out: I could then use this box shape as a guide when assembling each pumpkin wedge. I just took each foam board pumpkin shape, folded it in half along the taped line, and inserted it into the cut-out space in the box shape. I then used a hot glue gun to dump a bunch of glue into the inner edge of the fold, so that when it cools it solidifies the wedge at that precise 29-degree angle. Whew!!!
I also cut out 24 small foam board triangles, each with an angle of 29 degrees at their pointiest point, and hot-glued these inside each of the pumpkin wedges, two per wedge. These helped the wedges become a lot more solid and less wobbly-feeling.
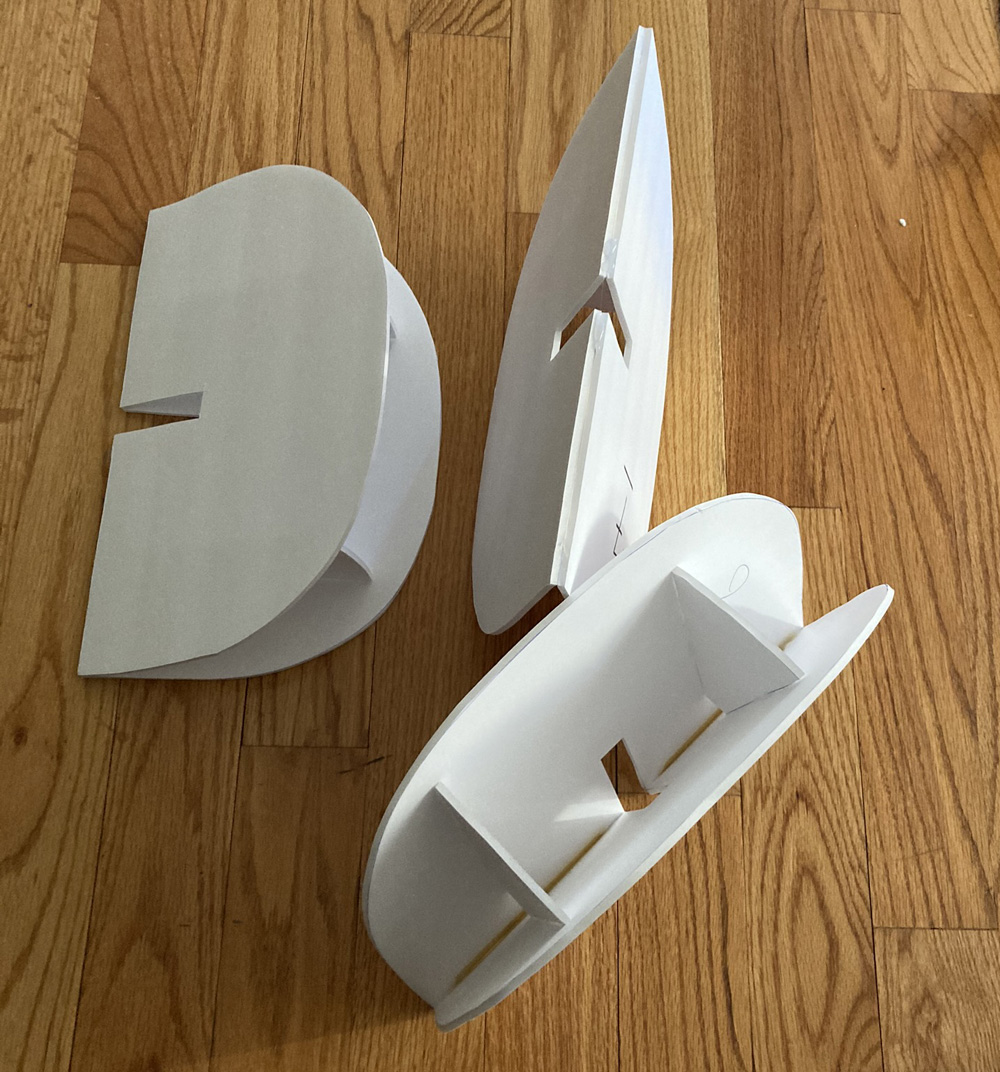
All this went pretty quickly; I soon had all twelve pumpkin wedges built, each with two of their three “walls” completed.
Okay, going back to something I mentioned a few paragraphs up, when I measured and drew the half-pumpkin shape, I made it about half an inch less wide than the real size, and the reason is that I knew when I folded the foam board to insert into this 29-degree guide, it wouldn’t be able to go all the way in, because the foam board is so thick. So I calculated how much width I should remove so that the finished wedges would still be the correct width; turns out I had to remove about half an inch of width from the half-pumpkin shape in order to get the wedges to be the width I wanted. Whew!
Okay, so the side walls of the wedges were done, but I still need to add the curved edge that makes up the outer surface of the pumpkin.
To work out this shape, I first traced one of the wedges onto a piece of poster board by carefully rolling it along and tracing the shape onto the poster board as I went. I then cut out this shape and traced it onto poster board eleven more times and cut those out. I taped these poster board shapes onto the pumpkin wedges. Easy!
Now, if I were to assemble my twelve wedges at this stage, I’d end up with a pumpkin with completely flat sides. So I needed to round out the outer surfaces, to give them the bulging shape of real pumpkin wedges. I did this by adding three more layers of two different materials onto each one.
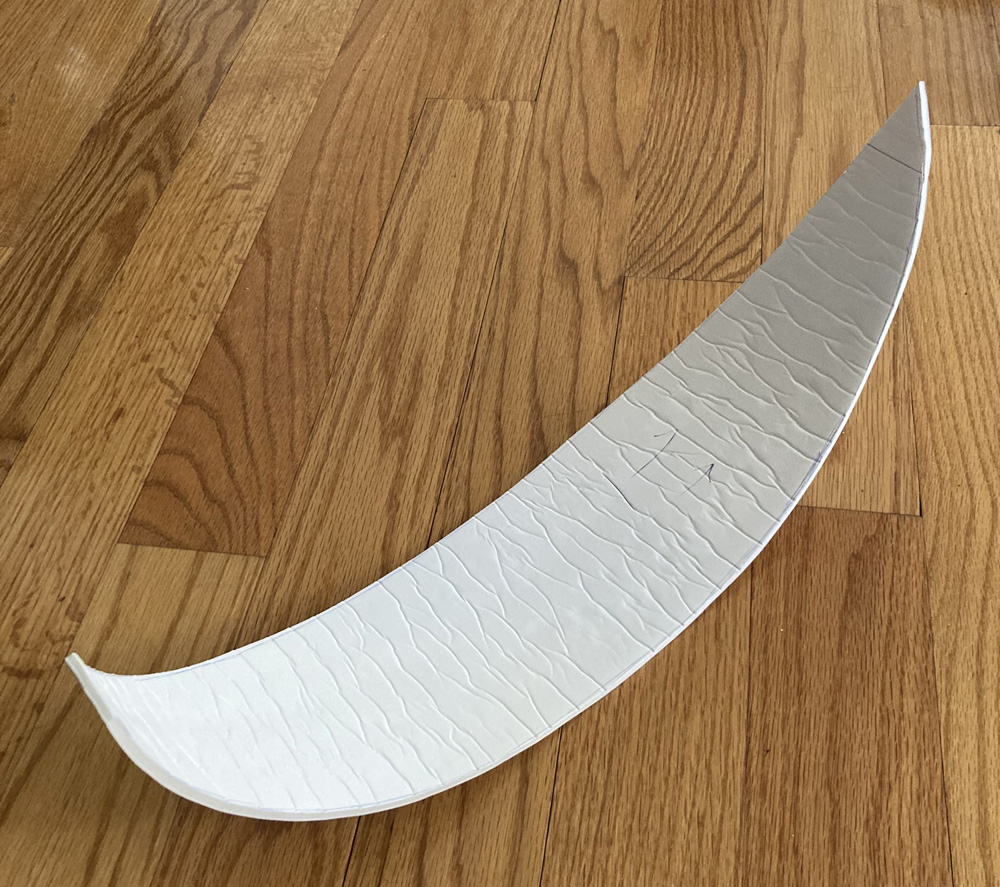
I made the first additional layer out of foam board, by tracing the wedge shape and then drawing an inner line that’s a bit narrower. I cut out and curled up these foam board pieces, one by one, by sort of rolling and crunching them in my hands. As I’ve mentioned in a lot of my articles, this works great with the cheap dollar store foam board I use, but it may not work as well with the good-quality stuff you’d get at an art store. It also works with cardboard, fyi! Anyway, I hot-glued these curved foam board pieces in place on each pumpkin wedge.
I then added two additional layers of craft foam — you know, it’s this kind of thin rubbery foam you can buy in all different colors in arts and crafts stores. I happen to have tons of tan craft foam left over from another huge project, years ago. Again, I cut these pieces to be a little narrower than the previous layer, so when they’re all layered togther they create the kind of bulging shape I wanted.

I then covered over the outer surfaces of the wedges with torn-up strips of construction paper, secured with tape — this smoothes out the stair pattern of the layered materials.
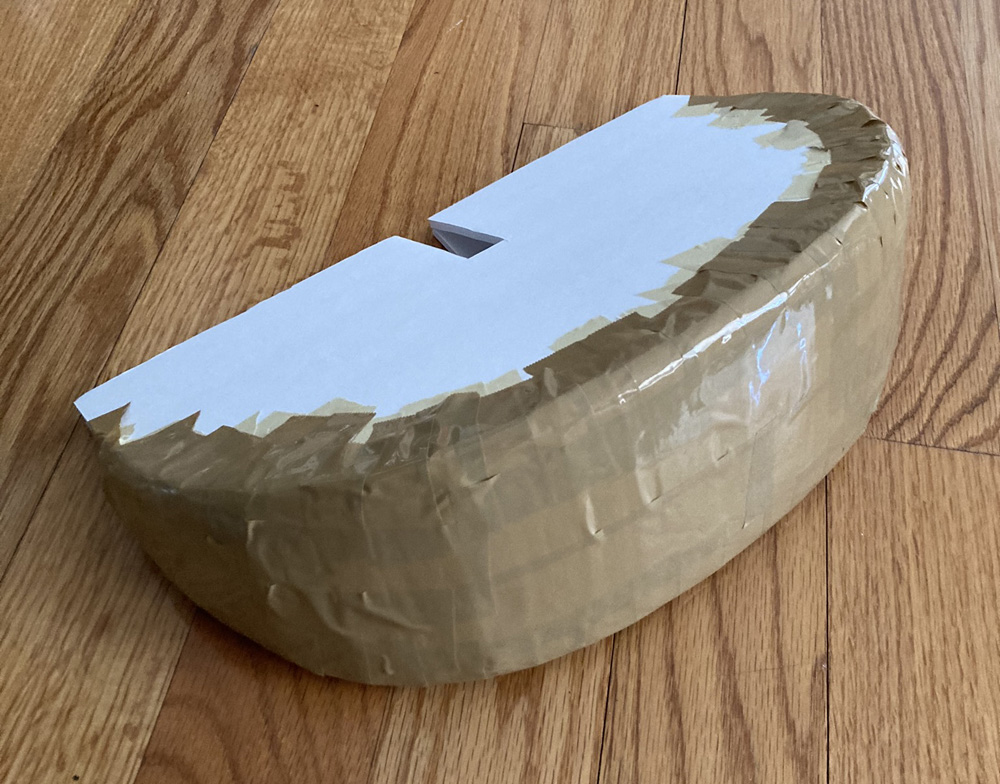
When that was done, I covered the construction paper with a layer of masking tape, and then a layer of shipping tape. The tape makes the shapes even smoother and more stable. The final layer of shipping tape is there to act as a release agent for the paper maché, so that when the paper maché is done it will easily separate from the tape so I can pull all the base materials out of the mask.
Note: after doing a couple of these things I wondered if the masking tape step was unnecessary, so I tried one with just shipping tape, and it looked fine, so for the rest I skipped the masking tape. Boom, saved a couple bucks.
Okay, all the weges are done! Time to assemble them!

You remember that rectangular notch shape I drew and cut out from each of the pumpkin wedges? Here’s what that’s for. I cut out a few foam board circles and taped them together to make a thick disk. I’d measured all this beforehand so that this disk will fit snugly in the notches of the pumpkin wedges. This gave me a guide to help in assembling the wedges and keeping them positioned all perfectly evenly. I thought this step might be overkill but it turned out to be really helpful; it was difficult to wrangle all twelve pieces at the same time and hold them together, and the disk helped a lot by keeping them all vertically aligned.
Remember how I made the wedges with a 29-degree angle rather than 30? I assumed that all the tape and stuff would probably make them thicker, and this was correct. When I went to push all the wedges toward each other, they didn’t fit perfectly; they were a little too fat so they didn’t meet in the center perfectly like I wanted. Totally not a problem, but I’m glad I did 29 degrees and not 30. I probably should have done 28! Anyway, the result of the pieces not meeting in the middle is that the finished pumpkin is wider than I intended; about 19″ wide rather than 18″. Not a big deal!
To connect all the wedges I basically hugged them all together with one arm while I dumped a ton of hot glue over the top corners, like near the middle where they all came together — I basically made a big ring of hot glue that touched all twelve wedges so that when it cooled it held them all in place. I let the glue cool for a good five minutes — with a large quantity of hot glue it can take a surprisingly long time to cool all the way through — and then the whole thing felt pretty solid. I flipped the pumpkin over and did the same thing with the hot glue on the bottom. Then I covered all the glue with shipping tape, to really lock everything together.
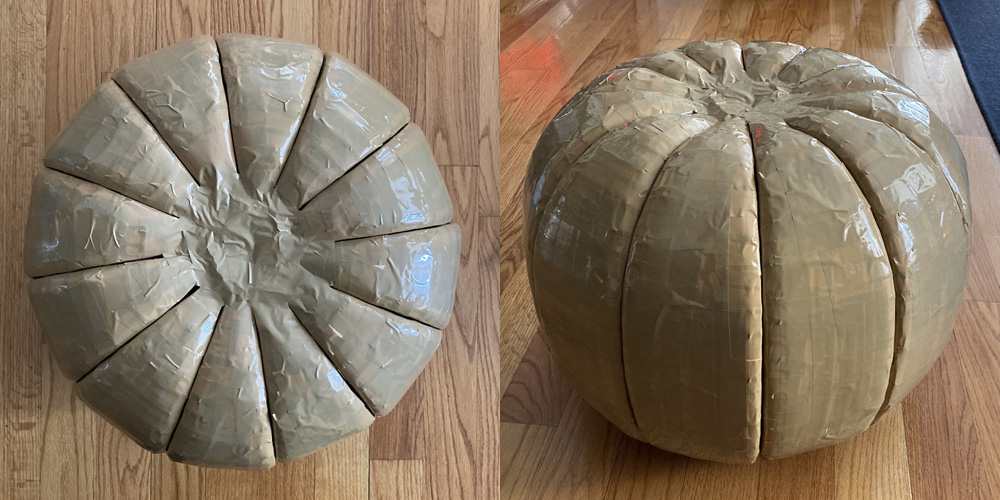
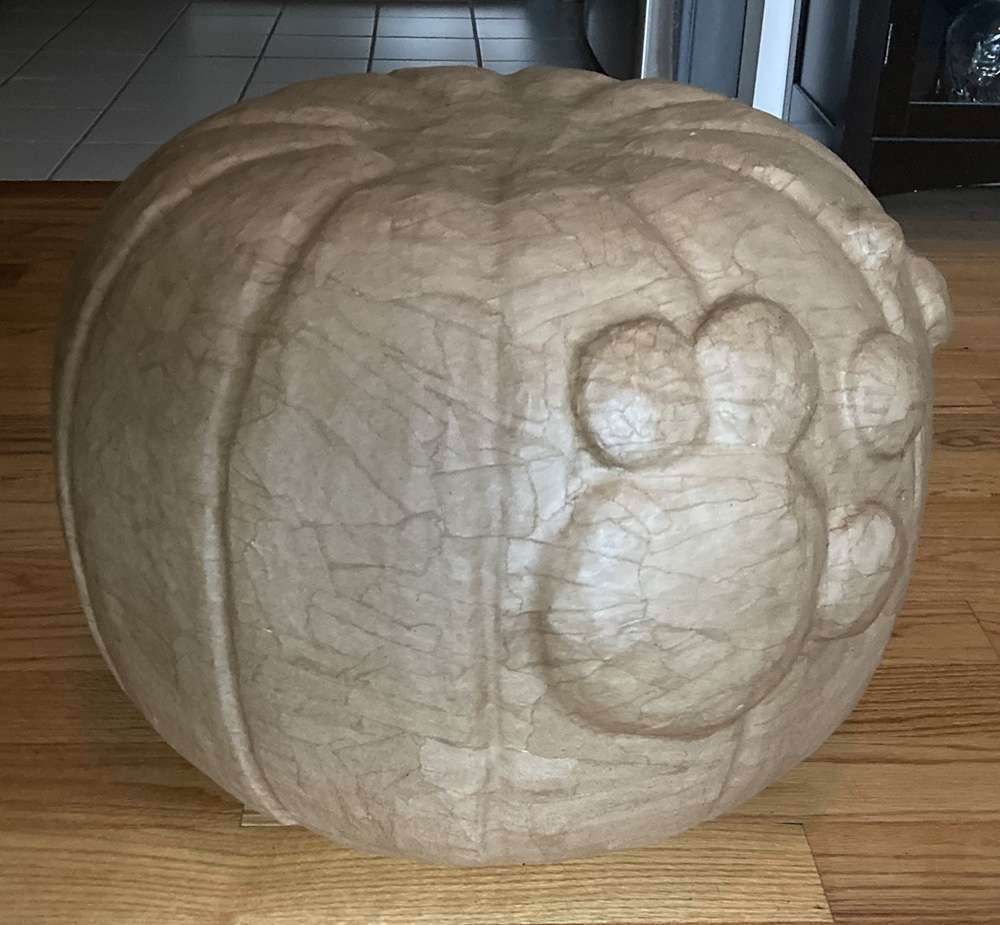
With all the wedges assembled, finally this thing really looked likes a pumpkin! And the whole shape felt extremely solid and stable; there was no wobbly-ness to it when I picked it up and moved it around. To my relief, the assembled pumpkin matched the shape I was going for in the images I found from the Pumpkin Night manga. I’m always fairly confident that my all my obsessive planning will pay off, but you never know!
Planning out the face
The Pumpkin Night mask’s right eye (our left) and mouth won’t have any 3D features so they really won’t become part of the mask until it’s time to cut those shapes out as holes. The left eye of course is on a big round bump, and there are other bumps or warts on the left side of the face. Anyway, I wanted to draw all these parts onto the pumpkin first to help plan everything out. I’ll have to draw them again after the paper maché is done, but this first pass at least lets me know I’m on the right track!
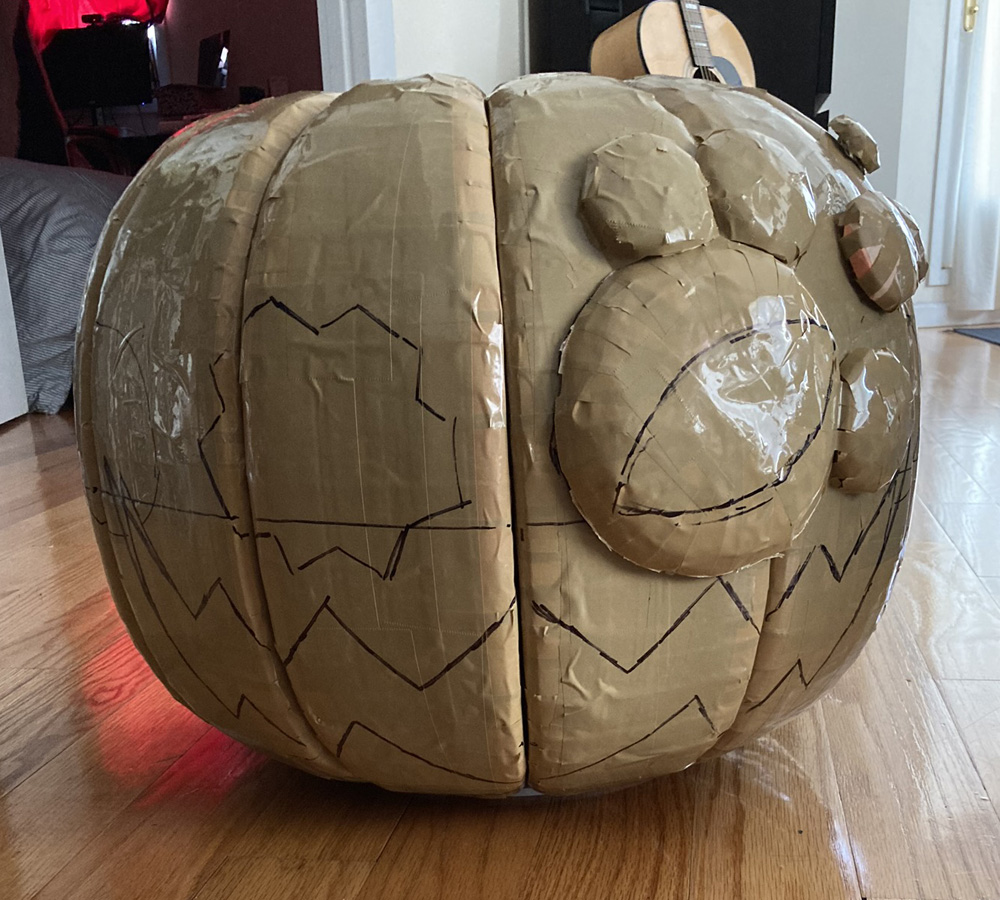
I made the big bump for the left eye out of about eight layers of craft foam; I just measured and cut out smaller and smaller circles and stacked them up. I covered them with strips of construction paper and masking tape, and then a final layer of shipping tape to act as a release agent for the paper maché.
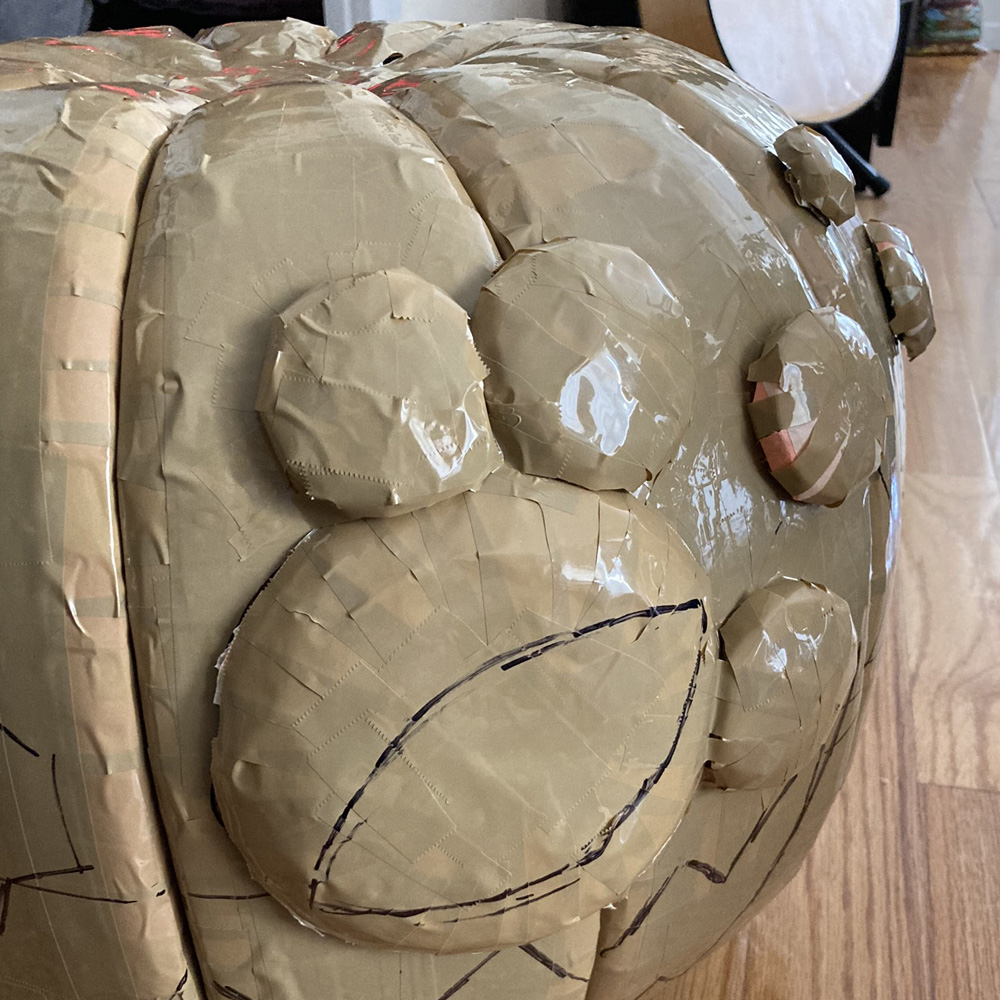
I made the smaller bumps the same way, each with a few layers of concentric circles of craft foam, and then lots of tape.
Making the stem
I made the stem separately, with the plan to attach it to the pumpkin later. In all the images I looked at from the Pumpkin Night manga, the stem is drawn pretty differently by different artists, so I just went with the shape I liked the most. Normally I’d have built the stem right onto the pumpkin so I could paper maché the whole thing together, but I realized it would be smarter to make it separately, so that when I’m paper maché-ing the pumpkin I can set it upside down to work on the bottom.
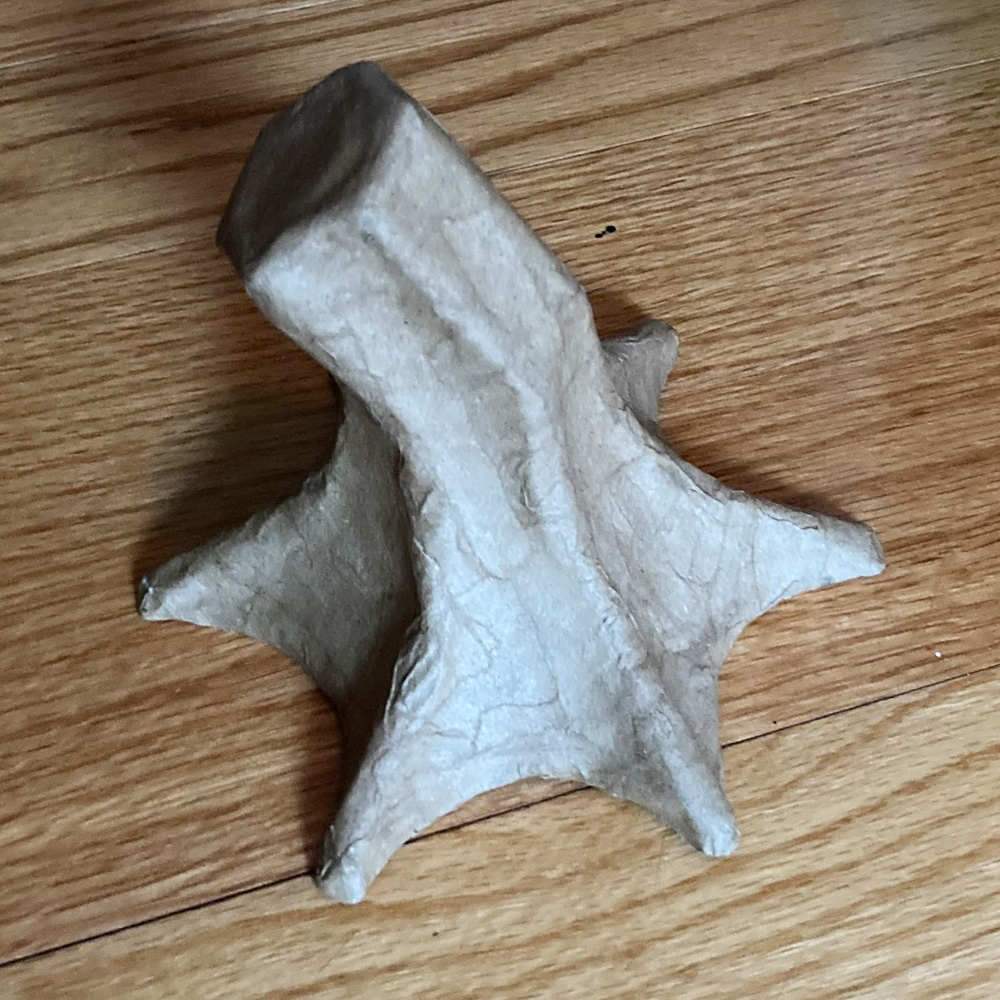
I made the stem out of foam board, which I covered in masking tape and shipping tape to get it ready for paper maché. I forgot to take pics of these steps; oops!
Paper maché!
Finally, time for paper maché! I covered the whole mask with eight layers of paper maché over a few days; here’s some info about my paper maché process and materials. The short version is: I use Roman PRO-543 universal wallpaper adhesive (paid link) and alternating layers of newspaper and brown wrapping paper.

Like I mentioned, I did the stem separately; I put eight layers of paper maché on the stem and set it aside for later.
As I worked on the layers of paper maché on the pumpkin, I noticed the round bumps weren’t coming out as perfectly round and smooth as I’d like — this was due to the shipping tape I put on them, which tends to create some little wrinkles and pointy corners here and there. On a bigger shape it’s not very noticeable, but I didn’t like how it looked on these bumps, so I fixed ’em! After my fourth layer of paper was dry, I attacked the little uneven shapes with some sandpaper, and then a metal rasp, and then some sandpaper again. This helped an incredible amount! I then wiped off the shapes with a damp sponge to get all the paper dust off of ’em, and continued with the rest of the layers of paper maché. When it was finished they looked much, much better! Sanding paper maché is a pretty common technique but I almost never do it. It was really helpful in this case.
Removing the base materials
When the paper maché was 100% dry, I cut out a big circle on the bottom of the pumpkin and removed all the base materials. The shipping tape makes this easy! The wallpaper adhesive barely sticks to it at all; everything comes right out.
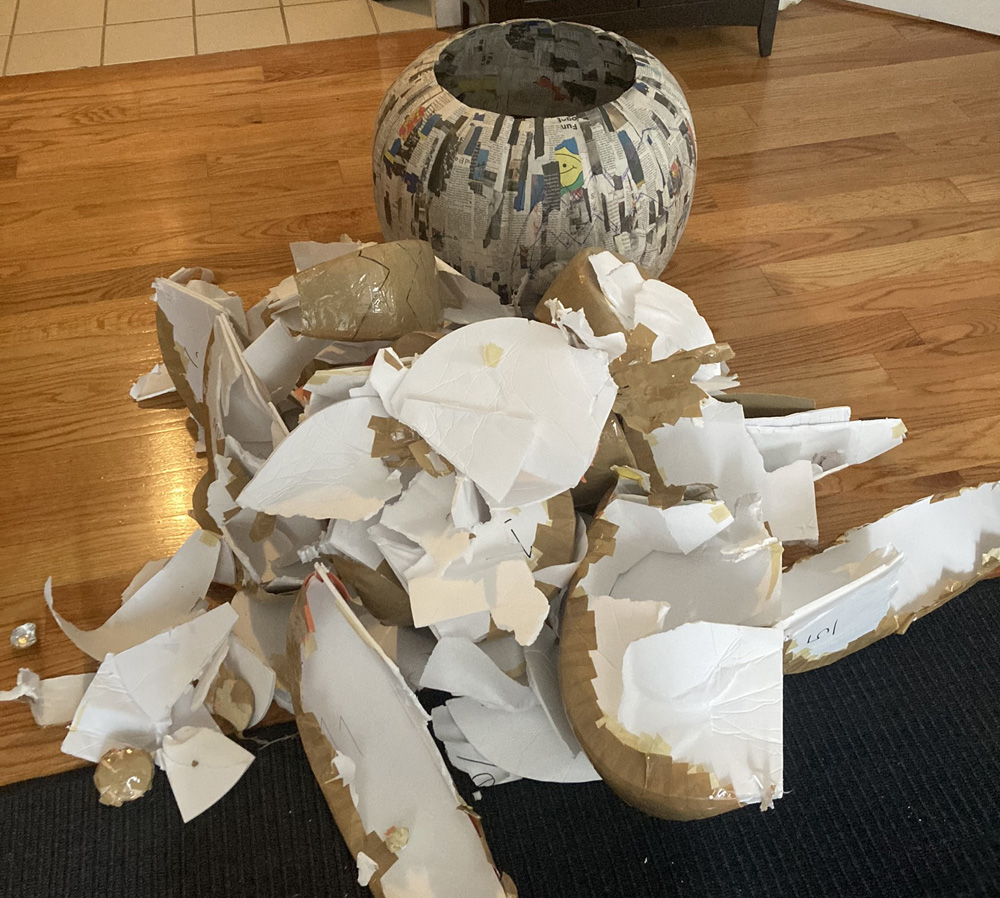
Look at all that junk!
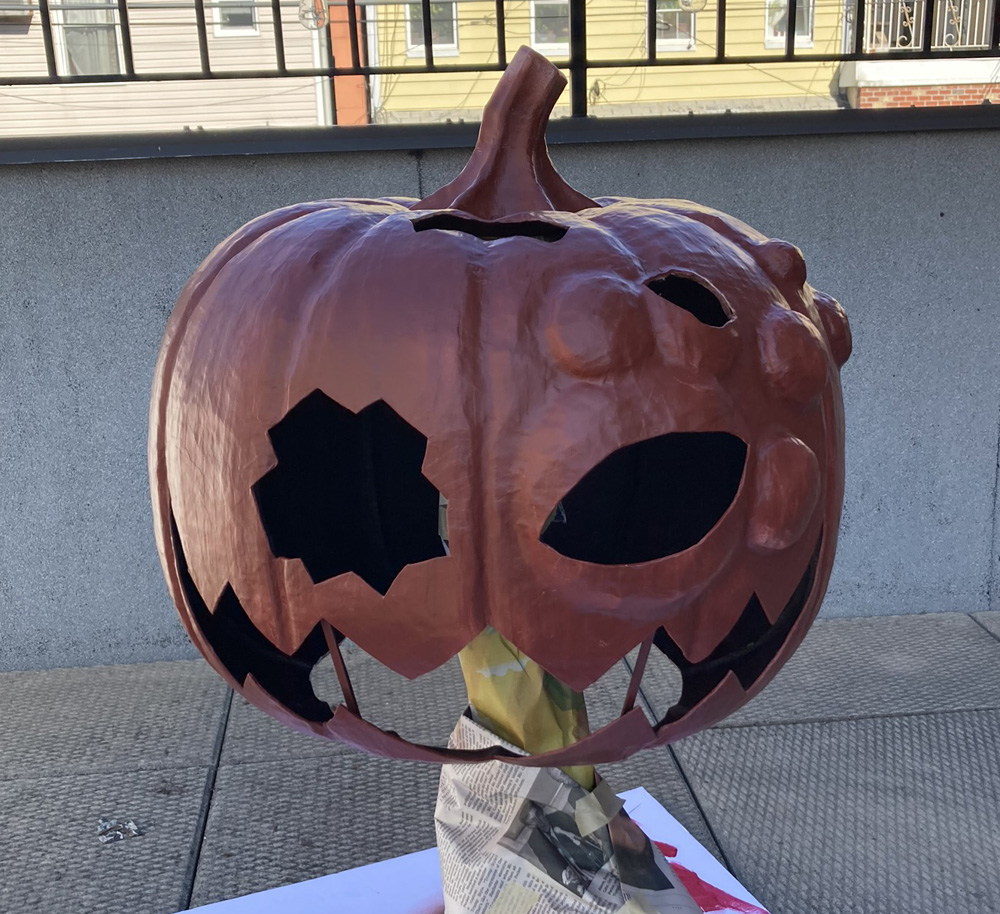
Cutting out the face
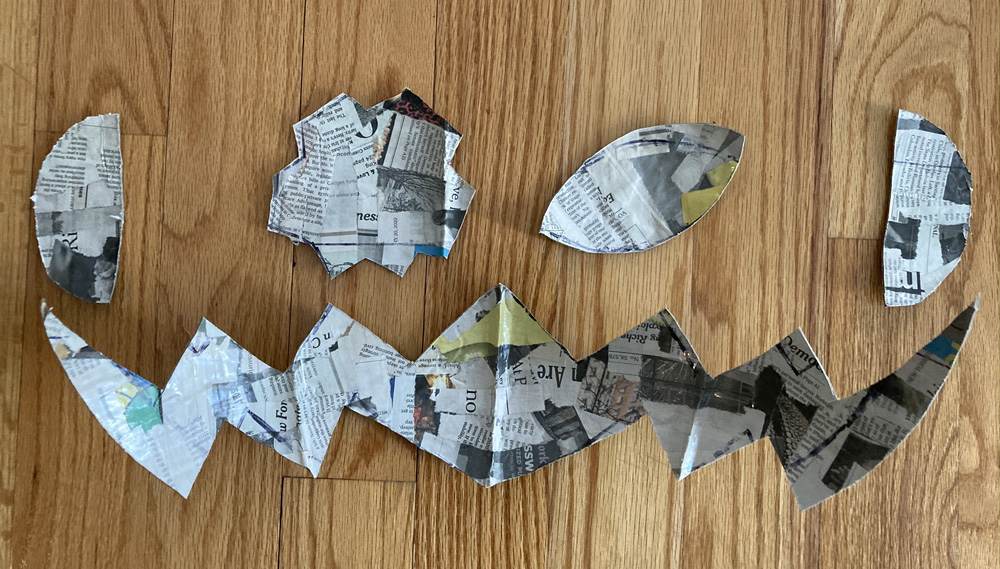
Again using the images from the Pumpkin Night manga as reference, I drew the shapes for the eyes and mouth onto the pumpkin and then I used my X-acto knife to cut them out. I also cut out a few discreet holes on the sides of the pumpkin, to help the wearer hear better. Without holes on the sides of a big mask like this, it’s very echo-y inside!
I reinforced all the holes in the mask with a layer of tiny pieces of paper maché.
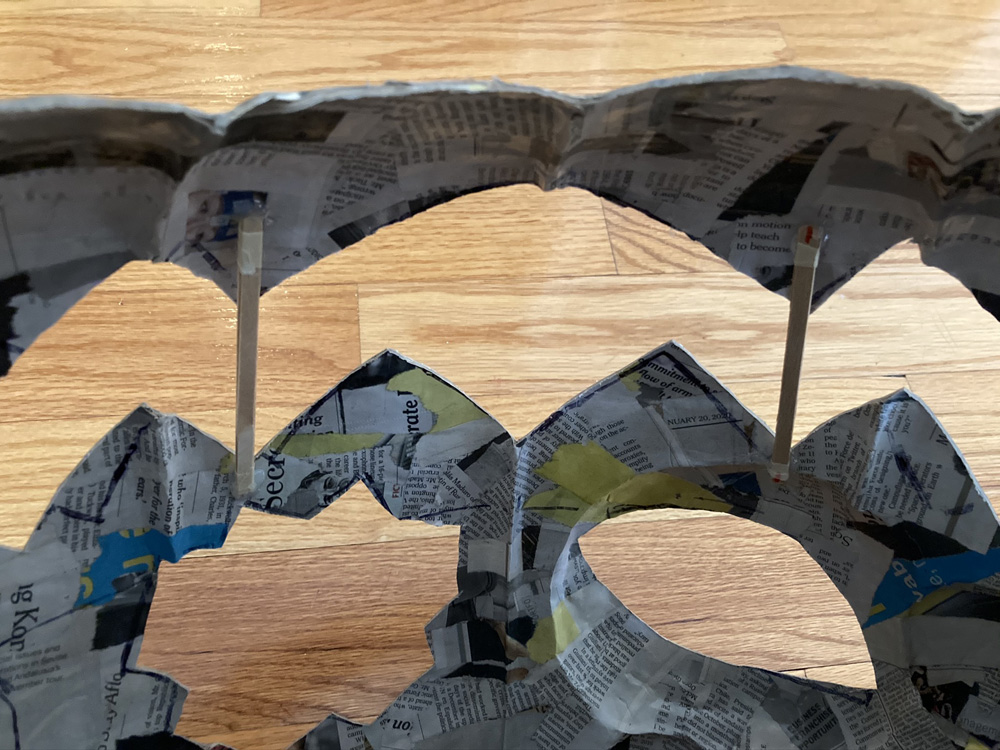
With a wide mouth like this, there’s a risk that the weight of the top half of the mask can cause the mouth to sag over time, so I added two wooden coffee stirrers inside the mask to keep the mouth propped open. I hot-glued these in place and then covered over the hot glue areas with two layers of paper maché.

I taped the stem in place on the pumpkin and then covered over the connecting areas with five layers of paper maché.
Making the bow
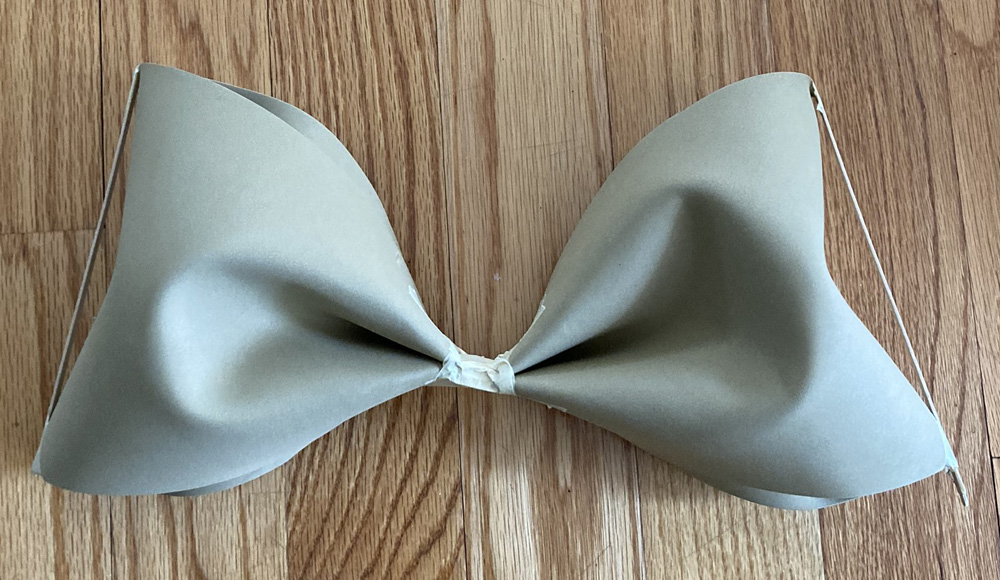
I made the bow — like the bow part of the bow — out of two sheets of craft foam; check it out, each side is one piece of foam, curled and bent into these shapes, which I taped closed in the middle. I was a little bit lost on how to do this, but looking at the Pumpkin Night comic helped. You can see I taped wooden coffee stirrers in place on the sides to cinch the foam a bit, giving it a little bit of a concave curve on the left and right sides. After I covered the bow in paper maché, I removed the coffee stirrers and the curves remained.
I covered this part of the bow with four layers of paper maché. I then made the little knot thing out of strips of craft foam, rolled around the bow and taped in place. I covered this with six layers of paper maché.
Pretty much the same process for the two pieces of ribbon that hang down: I cut them out of craft foam and covered ’em in four layers of paper maché.
I then built a kind of blocky structure on the back of the bow, using foam board and paper maché. This will get inserted into the pumpkin later to lock it in place.
Pennies for counterweight
The front of the mask has a lot of 3D details and the back has none, so that means the mask will be front-heavy. I propped the mask up on a broom handle to see how it leans. It leaned forward quite a bit, so I taped some pennies inside the lower-back edge, and tried it again on the broom handle until it sat pretty evenly. I then covered the pennies with three layers of paper maché to lock them in there.
Prepping the hard hat
I do a different version of these steps for every big mask, depending on the shape and size. Here’s a pic; I’ll explain the steps below.
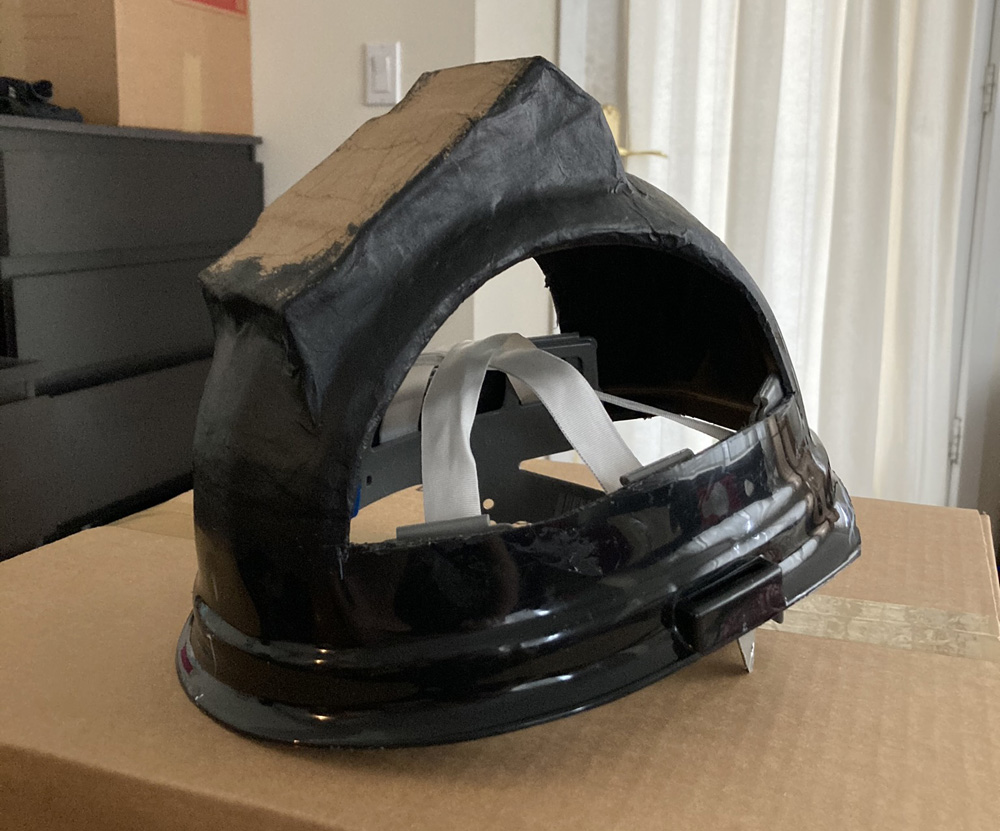
I first took the suspension (that’s the straps and padding and stuff) out of the hard hat, and then I used a dremel tool and a small hand saw to cut off the sides of the hard hat, as well as the brim, leaving just the crest shape in the center.
(Boring note, you should skip this! I always install the hard hat backwards in each mask. I cut off the front brim, and then that front edge becomes the back. This is probably pointless, but I’d rather have the rough/ugly edge in the back. You can install the suspension in either direction, so there’s no difference for the wearer. I design a lot of my masks to be able to open in the front, and I’d rather have the nice clean edge of the back of the hard hat be visible in the front.)
I built up a weird diagonal surface on top of the crest using foam board, hot glue, and tape. This took some trial and error with putting on the hard hat and putting on the mask over that to determine the height and angle that I’d need for this shape.
Once I got the shape correct, I covered it with six layers of paper maché. The paper maché goes all the way under the crest shape of the hard hat, so it’s really locked in place.
When all that is done, I put the suspension in place in the hard hat, and I put a drop of Gorilla glue in each of the six connection points, so it’s permanently stuck in there.
Here’s the same pic again just for reference. At this point I’d already painted all of the paper maché black, expect for the top surface where the glue will go (later). The hard hat itself was already black.
I also taped a rectangle of foam board inside the roof of the mask and covered it with six layers of paper maché. This will give me a flat surface to glue the hard hat onto later. No pic of this step; use your imagination!
Painting
I first painted the interior of the mask with black acrylic paint — everywhere but the surface where I’ll be gluing the hard hat in later.
I applied a light coating of gesso, hand-painted this time rather than the spray kind, as a base coat. I let that set for a day, and then spray painted the entire pumpkin with a dark brownish-red color. I let that coat set for a day as well.
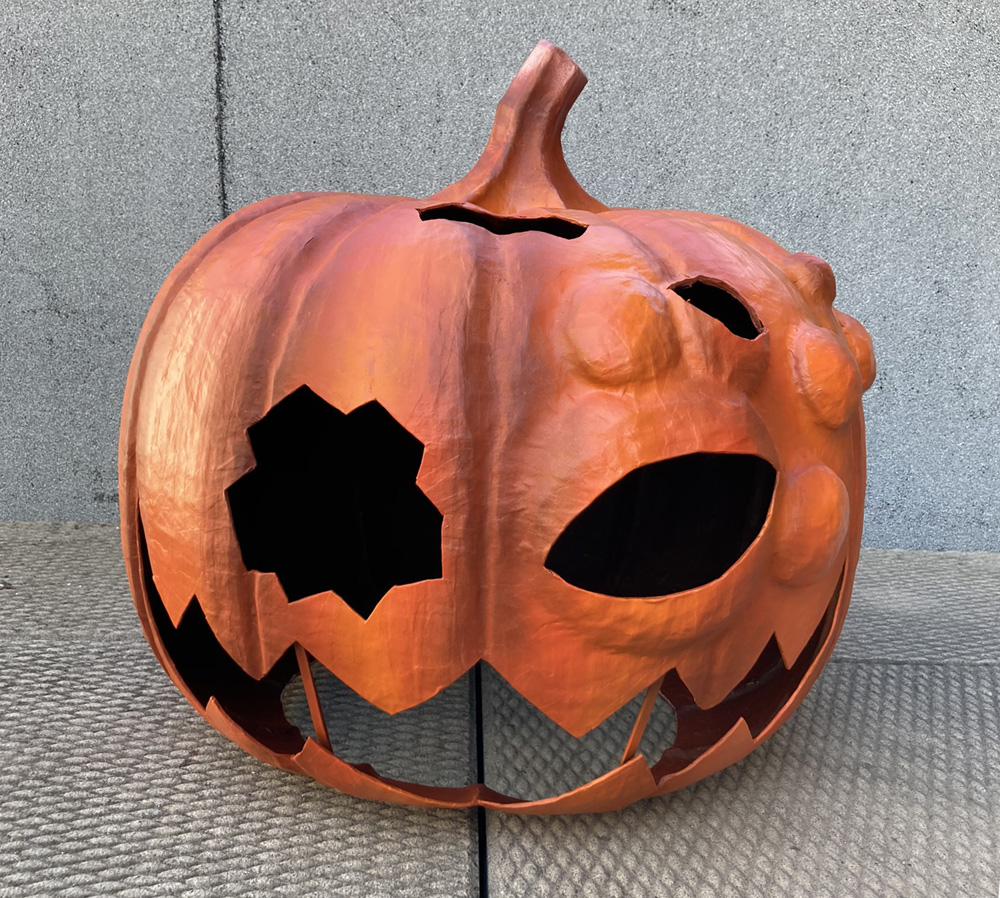
I took a look at some of the color images from the Pumpkin Night manga and planned out my next steps. I grabbed two cans of bright orange spray paint, one darker and one lighter. I started with the darker one and basically applied a couple light dustings of vertical lines on the outer most edges of the pumpkin wedges, avoiding the grooves between the wedges as best I could. After that, I immediately used the lighter orange to do the same thing, but concentrating more in the middle of each wedge. So, with the brown-ish base coat, and then the wide blurry darker orange streaks, and then the lighter orange blurry streaks in the middle, the result is that each wedge is darker toward the outer edges and lighter toward the middle; sort of a soft gradient to enhance the roundness of the wedges. Whew! Hard to explain, but easy to do. These steps with the two orange colors took ten minutes tops.
Anyway, I let all that spray paint set for a day before continuing. I then used some brown acrylic paint and a stiff brush to enhance the shadows between the wedges. To do this, I dipped the brush in the paint just a little, then wiped almost all of it off on some paper before applying it to the pumpkin. When creating shadows like this I like to have as little paint on the brush as possible, and roughly work it onto the shape. It’s less like painting and more like dirtying up the surface!
I used this same shading effect on the lower edges of all the bumps and warts, to emphasize them a bit.
I then used a little orange acrylic paint to do a tiny bit of dry-brushing all over the most pronounced shapes of the pumpkin, to add bit of highlighting, but that ended up being not very visible.
For the black shapes around the right eye, I first plotted them out with a pencil as lightly as possible, and then I painted them with a narrow brush and black acrylic paint.
I painted the stem with a few coats of green acrylic paint, starting dark and going lighter coat by coat. For the last coat I did a bunch of narrow vertical lines with a slightly brighter green.
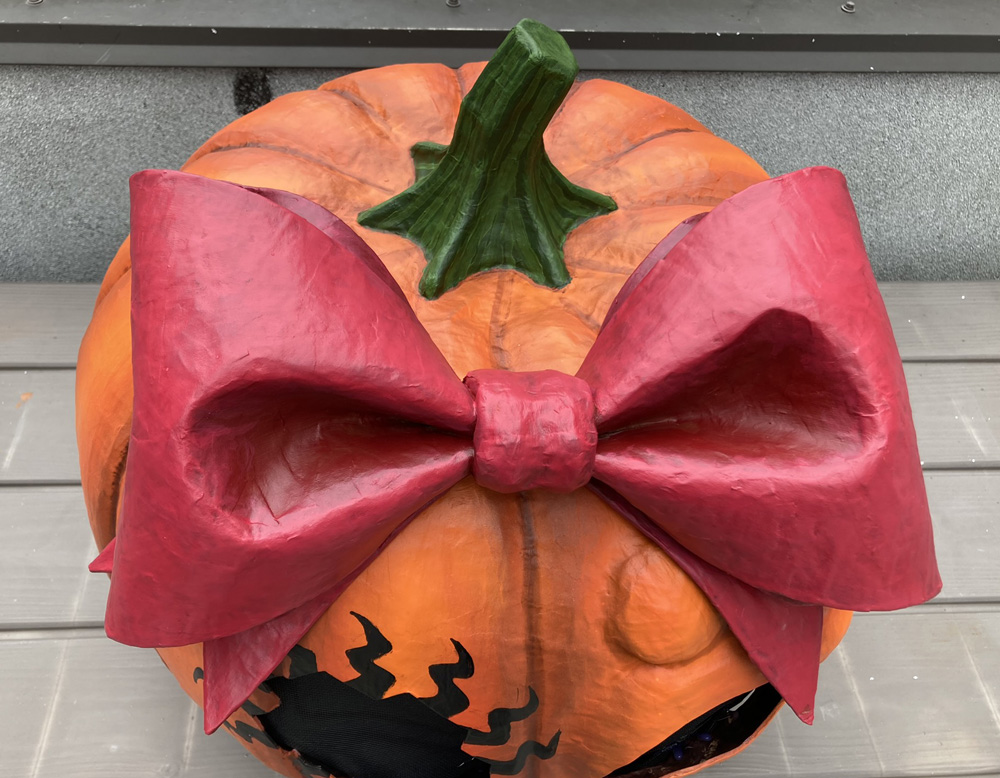
I painted the bow separately. I spray painted it the same dark orange-brown color as the pumpkin, let that set, and then did a few coats of red acrylic paint with a little brown and pink mixed in. I mixed the colors a little lighter as I went, to create some subtle highlights on the parts of the bow that stand out the most.
When all the painting was done, I let everything set for a day and then I finished it with a coating of matte spray. This pic is from a little later, after I’d attached the bow:
I rarely work in bright colors like these — I rarely work in color at all, actually! This was all really fun and I learned a lot about blending and combining colors. I’m fairly confident in my sculpting/paper maché abilities, but not so much when it comes to painting. With sculpting and paper maché I can usually get the exact result I’m expecting, but with painting I’m surprised with the finished product every time! Usually happily surprised, but you never know. This time I was thrilled with the results.
Installing screen in the eyes/nose/mouth
I cut out and hot-glued pieces of screen door material inside all the holes in the mask. This is always very tricky work! A headlamp really helps, as it’s dark in the mask, and you need both hands!

Note: For the side holes, I painted those pieces of screen orange before installing.
Adding the bow
I inserted the blocky shape on the back of the bow into the hole I’d cut in the pumpkin, and I hot glued it in place from the inside. I really overdid it with the hot glue to make sure the connection is nice and strong.
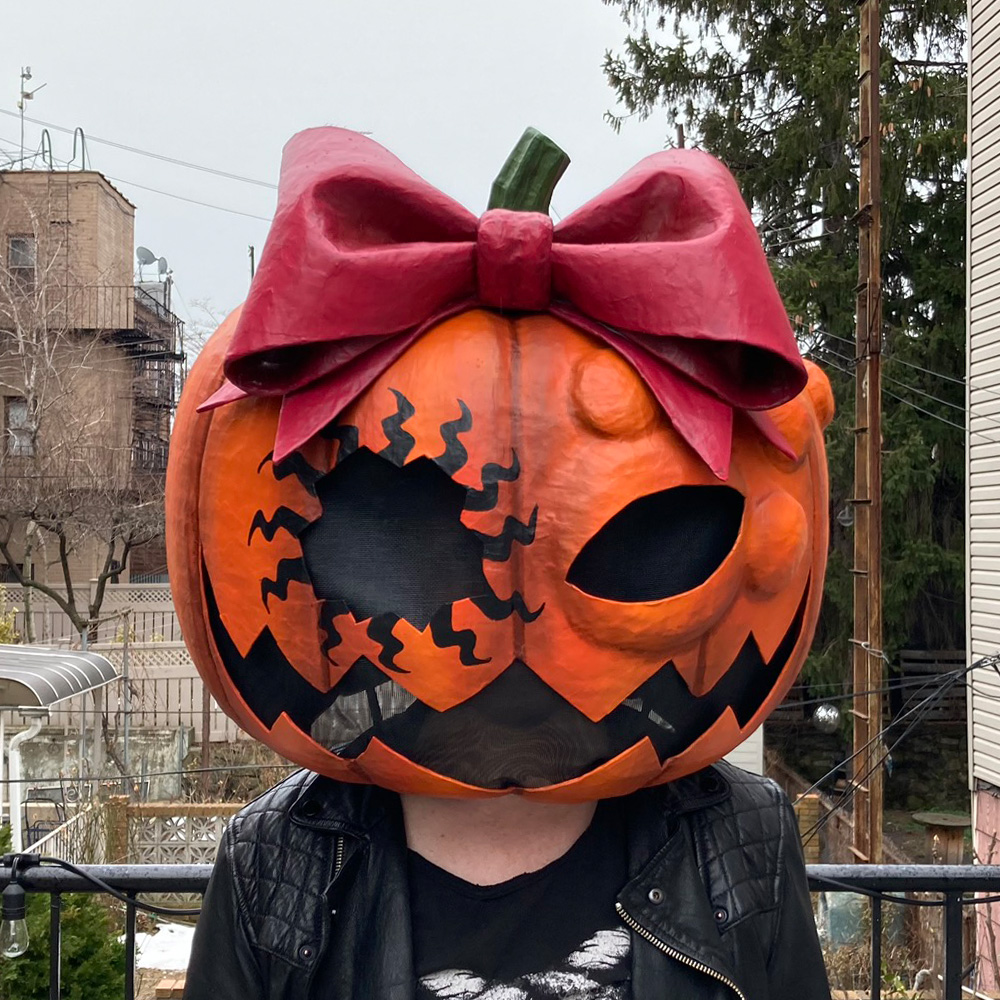
In this pic you can get a good look at the bow and the stem:
Installing the hard hat
Last step!
I set the mask upside down, dumped a bunch of Gorilla Glue onto the rectangle shape on top of the hard hat, and set the hard hat it place. Gorilla Glue expands a huge amount as it dries, so it’s important to set something heavy in the hard hat while the glue sets. I use a bag of pennies for this. I also placed big pieces of foam around the hard hat so it can’t slide out of place while drying.
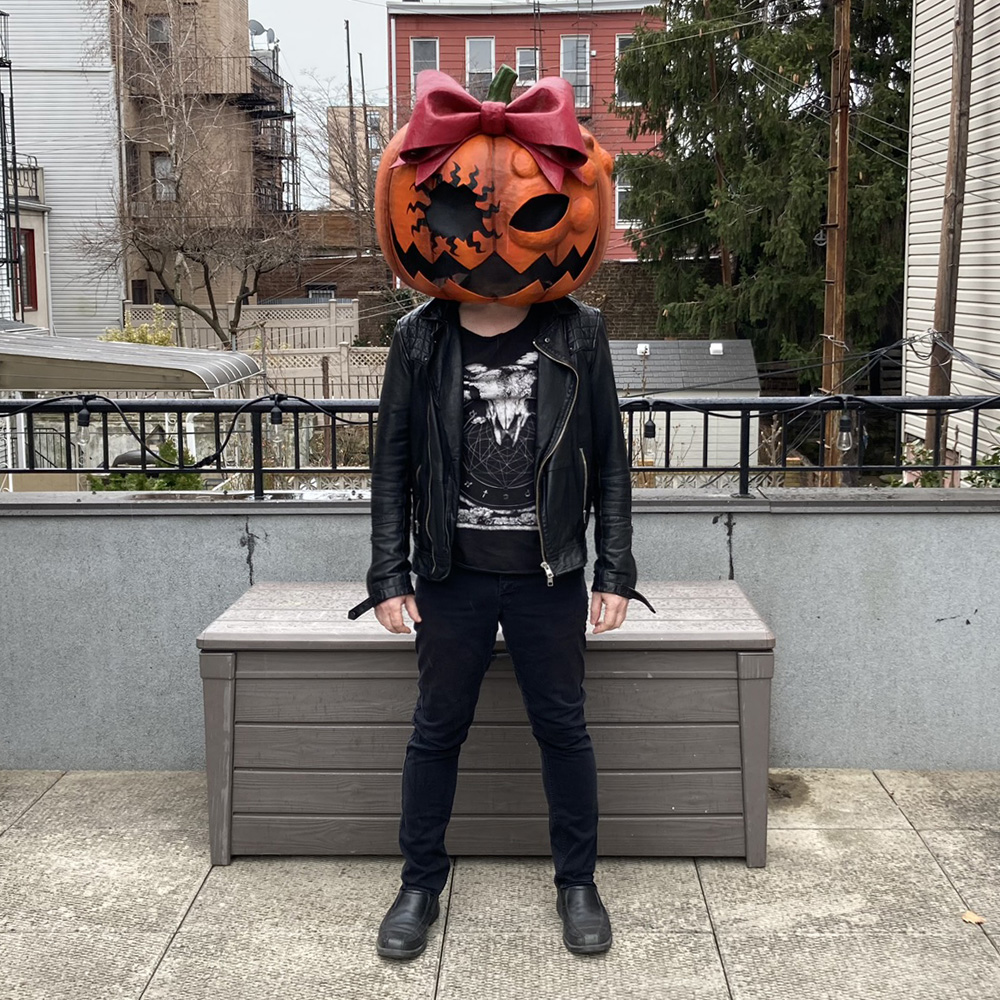
I let the glue set overnight, and boom, this mask was done! I’m really excited about how it came out!
Interested in having a custom paper maché mask like this? Check out my page about custom work! Let’s talk!
Pumpkin Night mask — additional pics
 About Manning Krull
 How to make a 4-foot paper maché alligator
 My violin skull mask, Mardi Gras 2015
 Three-headed paper maché dragon sculpture
September 16th, 2021 at 3:31 am
FINALLY! ive been looking so hard to find a good tutuorial on this.
September 16th, 2021 at 6:41 pm
Coool!!! If you end up going for it I’d love to see your results! Good luck!
October 28th, 2021 at 5:23 pm
Would it be possible to use a real pumpkin by hollowing it out and taping around it as a shape for the paper mache ? Or will that be too difficult to remove ?
Trying to make one for my daughter. What are the measurements? If I could I would order from you but I’m not able to do so financially.
October 28th, 2021 at 10:44 pm
Hi Karoline! That is a great idea, and it never occurred to me! You could absolutely put tape around a real pumpkin, then apply paper mache over that, and when it’s dry you’ll have to cut the paper mache open (maybe even cut the whole pumpkin in half) in order to remove the paper mache. Then, you can repair the paper mache by putting it back together with masking tape, and just apply a few more layers of paper mache over the taped area. I did something similar for these baby chicks; you’ll see pics of how I cut the whole thing open and then put it back together. Good luck! My finished Pumpkin Night mask was about 18″ wide, but it probably could have been smaller, like 14″-15″ wide.
January 5th, 2022 at 11:35 pm
Excuse me friend, just a question, you left the chopsticks on purpose to support the mask and not leave it limp? Or to not be swaying too much? It gets something harder
January 5th, 2022 at 11:38 pm
Just a question friend, what types of tapes did you use?
January 5th, 2022 at 11:41 pm
Excuse me friend, is it mandatory or is it optional to use foam? Could it be just cardboard?
can you use magazines instead of newspapers? Or are newspapers better? And Why?
January 5th, 2022 at 11:45 pm
Friend, excuse me, but where do I find a Disc like this And if possible how do I make one?
January 6th, 2022 at 3:35 pm
Hi Jack! I’ll reply to all your questions here:
1. “you left the chopsticks on purpose to support the mask and not leave it limp?”
Yes, without the sticks, the weight of the head would make the mouth start to close over time.
2. “what types of tapes did you use?”
Scotch heavy duty shipping tape, and Scotch masking tape
3. “is it optional to use foam? Could it be just cardboard?”
Cardboard would work as well! I like foam because it’s easier to cut. They’re both fine.
4. “can you use magazines instead of newspapers?”
Magazines don’t work well, because the paper doesn’t absorb the paste very well. Newspaper is much more absorbent.
5. “but where do I find a Disc like this And if possible how do I make one?”
If you mean the disk in this pic, I made it out of foam board — it’s three layers of foam taped together. Cardboard would work for this too!
January 7th, 2022 at 1:56 pm
Just a question, instead of using cardboard to cover the pumpkin walls, can you use the tape to cover it?
January 7th, 2022 at 1:58 pm
18×16, still fit for the size of the pumpkin?
January 8th, 2022 at 10:15 pm
Is it possible to replace the newspaper with another type of paper?
May 31st, 2022 at 11:24 pm
hello I wanna make this so bad, i have a question about the hard hat? you say u use the back of the hard hat and cut it out to see
so is the paper mache thats facing towards the ground for the back of the pumpkin head? im alittle confused on what way to glue it inside the head.
June 1st, 2022 at 10:40 pm
Hi MonsterGirl30! It really doesn’t matter too much; you can glue the hard hat in facing either way. I always saw off the brim of the hard hat, which leaves a rough edge that looks a little ugly, so I put that part facing backwards. For this mask it didn’t matter at all, because there’s no way anyone can see into the mask. Some of my other masks can open in the front so the viewer can see the wearer’s face and the hard hat, so for those masks I like to have the nice-looking part in the front. But for this pumpkin mask it’s really not important.
September 1st, 2022 at 11:08 pm
Hi! I’d really love to make this for a costume! Do you have any idea or estimate on how much of each materials you used to make this? It would be a shame to have to go back out to the store midway through to pick up more supplies or to have way too much stuff left over.
September 19th, 2022 at 6:09 pm
Do you NEED the hard hat?
September 20th, 2022 at 11:29 am
There are definitely other options but I think a hard hat is the easiest, most comfortable, and most stable. Some people just use a ring of wire with some foam wrapped around it. I’ve seen people use a hat, like a straw hat or whatever, and just attach that in the mask.
September 24th, 2022 at 11:54 pm
What are the measurements for the disk and the rectangular notch?
October 25th, 2022 at 12:21 pm
Hermoso trabajo, felicidades me encantó !!!
March 16th, 2023 at 6:08 am
I’ve been slowly working on this mask over the span of a couple months for a convention I’m going to. The amount of times I’ve come back to this tutorial is insane. All I can say is… that Roman pro is a miracle product lol. I’m currently working on cutting out the face, I hope my end result looks even a bit like yours. Thank you so much for the tutorial, you are a life saver. I can’t imagine what i would’ve come up with if I had been left to my own devices lol.
March 18th, 2023 at 3:32 pm
Cooool! I’m happy my site has been helpful to you! Good luck and I’d love to see a pic when it’s done!
August 25th, 2023 at 7:28 am
im not too crafty myself, i was wondering if you sold these?
September 14th, 2023 at 1:09 am
Question, what measurements were used for the rectangular notch?
October 13th, 2023 at 10:33 pm
Hello friend, can you tell me what the measurements of the nightclub are?
October 13th, 2023 at 10:50 pm
Could you scan each piece and tell me its size?
October 21st, 2023 at 9:53 pm
I’m making this right now! Thank you so much for the tutorial!!
I wanted to ask – I’m at the cutting stage and I’m terrified. What did you use to cut the bottom out? I’m scared it’s all going to fall apart!
October 23rd, 2023 at 11:21 am
Hi Alex! I usually use an X-acto knife when cutting through multiple layers of paper mache. If you did at least 6 layers it should be pretty solid! Good luck!!! I’d love to see a pic!
October 25th, 2023 at 8:10 am
Hello! ive been looking for tutorial like this, thank you! btw may i know what fabric do you use for the eye cover and the side hole (the orange one)? i want to buy that kind of fabric that can cover the hole but still can see from the inside
October 26th, 2023 at 9:19 pm
Hi! That’s screen door material, which I spray painted. I bought a big roll of it at the hardware store and I use it for all my masks.
October 25th, 2023 at 8:14 am
Do you think paper mache with cornice + flour works well? im kinda scared if the paper mache didn’t strong enough and will break if i move too much
October 26th, 2023 at 9:22 pm
If you use enough layers of paper mache (8 or more), it will be very strong, almost like very thin wood.
July 6th, 2024 at 4:35 am
Returning about a year and a half later to say I used your tutorial to make my own and it was so helpful. I got so many compliments! Thank you so so much for the tutorial, it gave me so much confidence and I learned a lot from the process.