
Posts tagged "painting":
Pumpkin Night custom paper maché mask!
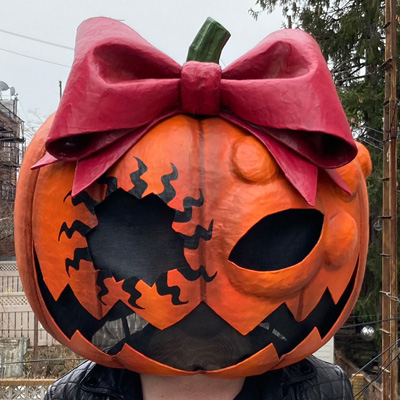
I made this custom Pumpkin Night paper maché mask for a wonderful client! Here’s how I made it! (And check out my page about custom work!)
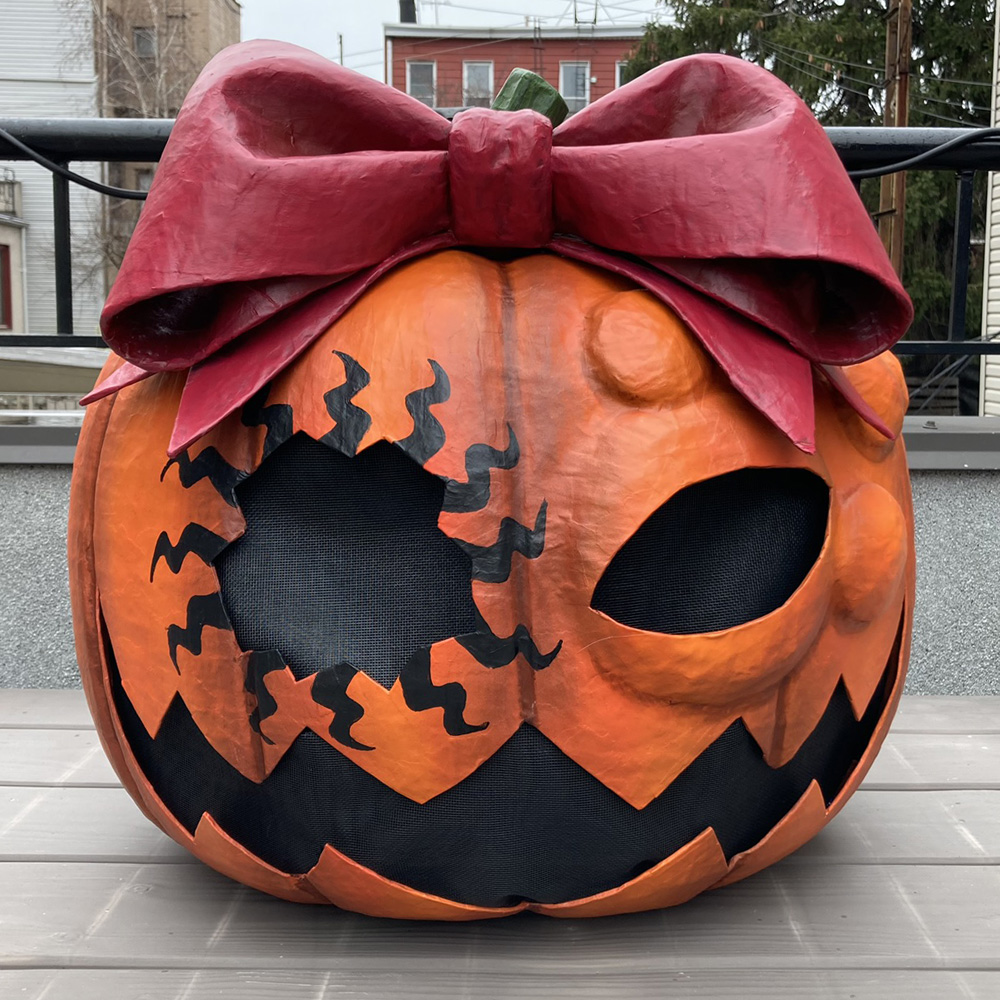
I wasn’t aware of the Pumpkin Night manga so of course I started with lots of Google image search results. What a cool design! I’d never done anything like this before!
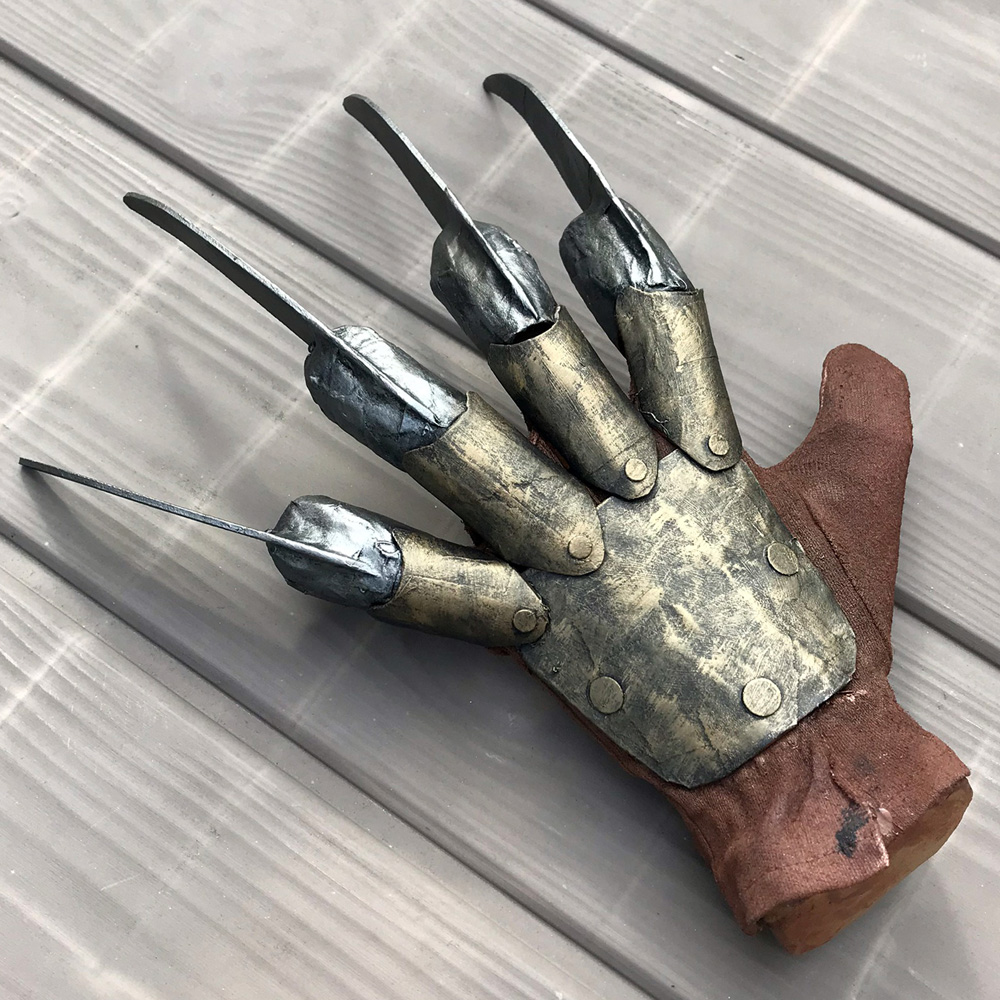
Freddy Krueger hand prop accessory!
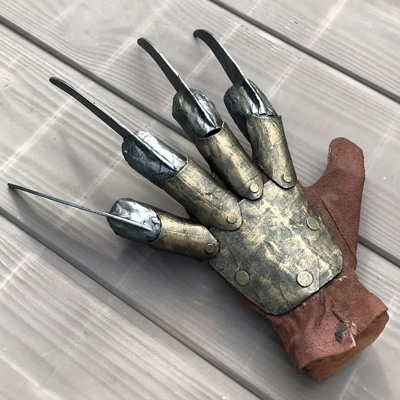
I made this Freddy Krueger hand prop as part of my wife’s 2019 Halloween costume; soon it’ll be a wearable prop that’s bursting out of her chest! For now, here’s how I made the hand itself…
Sculpting the hand
I definitely went overboard with building the hand; I totally could’ve just stuffed a glove with wadded-up paper towels or something. But that would leave me with a really lifeless, fake-looking hand, and I wanted something more realistic, with more tension in the way it’s posed. I’m always up for overkill on these things!
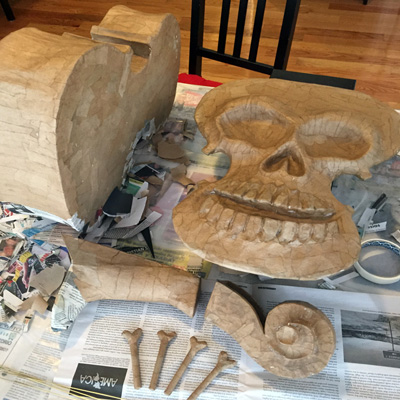
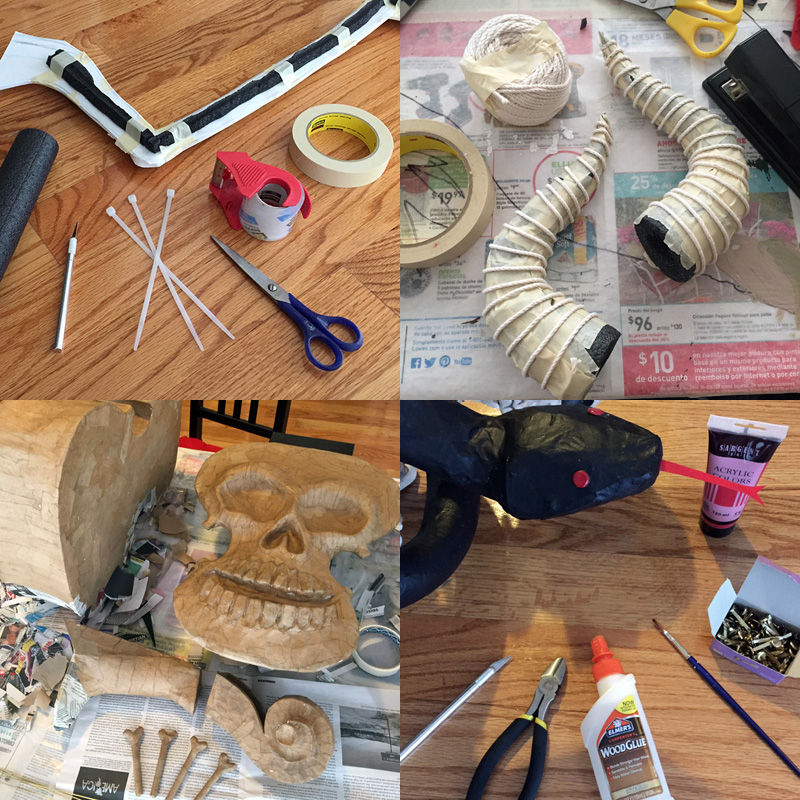
Skull mask with dancing skeletons, part 4

This is part four of my skull mask project with rotating gears and marching skeletons. See parts one, two, and three.
Installing the hard hat
Almost all of my big paper maché masks are mounted on a hard hat. Hard hats are great because they’re cheap and they provide a lot of comfort and stability in a big mask. I usually saw off some parts of the hard hat for each mask depending on its shape, in order to reduce weight and to help the hard hat fit in the mask as well as possible. Read more…
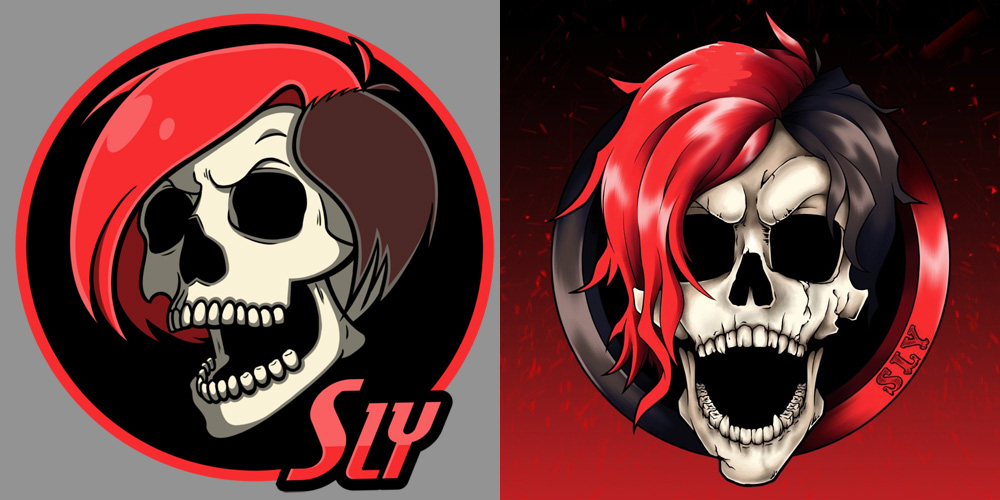
Custom SLY skull trophy sculpture
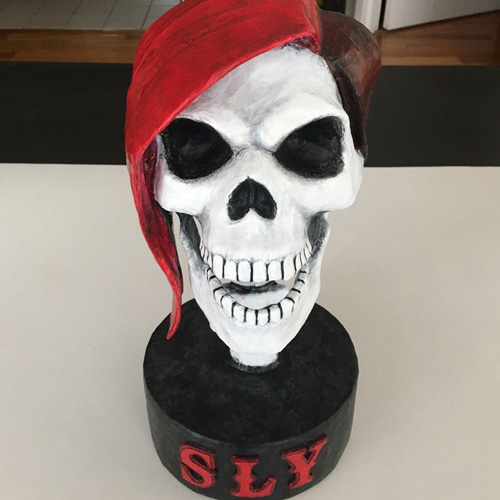
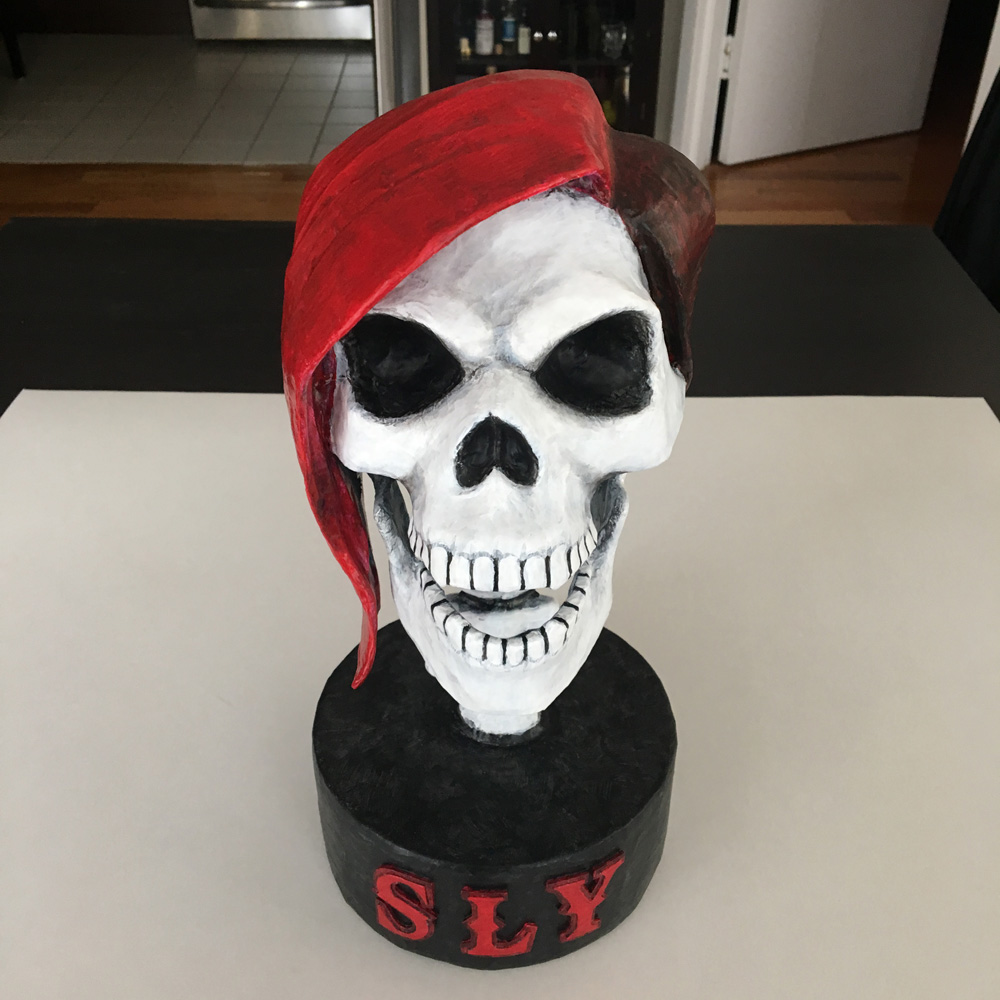
I made this skull sculpture (skullpture??) for my good friend, Twitch superstar Slyvinlisha, aka Sly. I made the sculpture based on two different versions of her logo illustration, pictured below.
I started with a nice plastic skull from one of my Halloween skeleton decorations that broke in half due to a spooky Halloween mishap! I broke the neck off at the base and put the rest of the bones away to use for other Halloween decorating purposes. Read more…
Painting a skeleton shirt with fabric paint
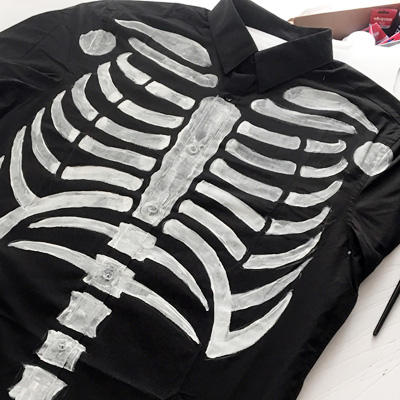
I’ve already posted two articles about painting skeleton clothes — my first skeleton suit, and a new pair of skeleton pants — and I learn something new every time I paint up some new clothes.
I’ve been wearing my skeleton suit every Mardi Gras for years now, usually with a black dress shirt, sometimes with a tie and/or vest, but last Mardi Gras (2017) was so warm it made me realize I also need an option that doesn’t involve layers. So I decided to paint this skeleton dress shirt. Read more…
Paper maché Necronomicon sculpture — part 2

This is part two of two of my paper maché demonic book project. See part one here.
Making the 3d “BOO!” logo
To create the “BOO!” logo in the mouth, I started out by printing several copies of the logo (designed by my friend Jon Morris) at the actual size; I’d planned out my sketch for the face along with the logo in Photoshop so I’d be able to plan all of these parts to fit together the way I wanted.
Three-headed paper maché dragon sculpture! — part 2

This is part two of two of Isabella the dragon! See the first part here.
The sea serpent’s bodies and heads and fins and other various parts were done, but I had to do some other steps before assembling them. It made sense to switch gears here and work on the pedestal and tray area, to figure out how they’ll fit with the dragons.
Repainting a miniature Halloween gazebo
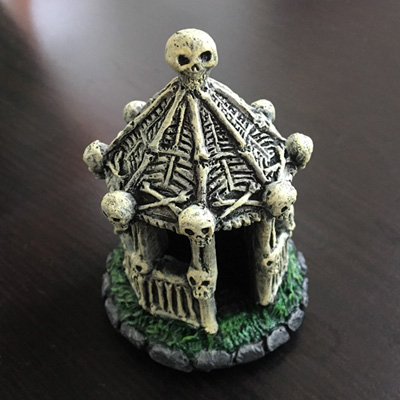
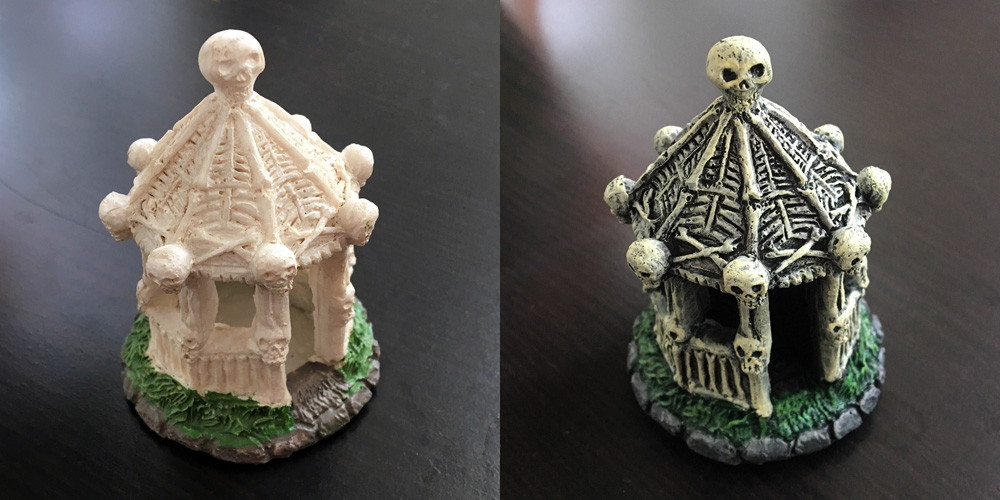
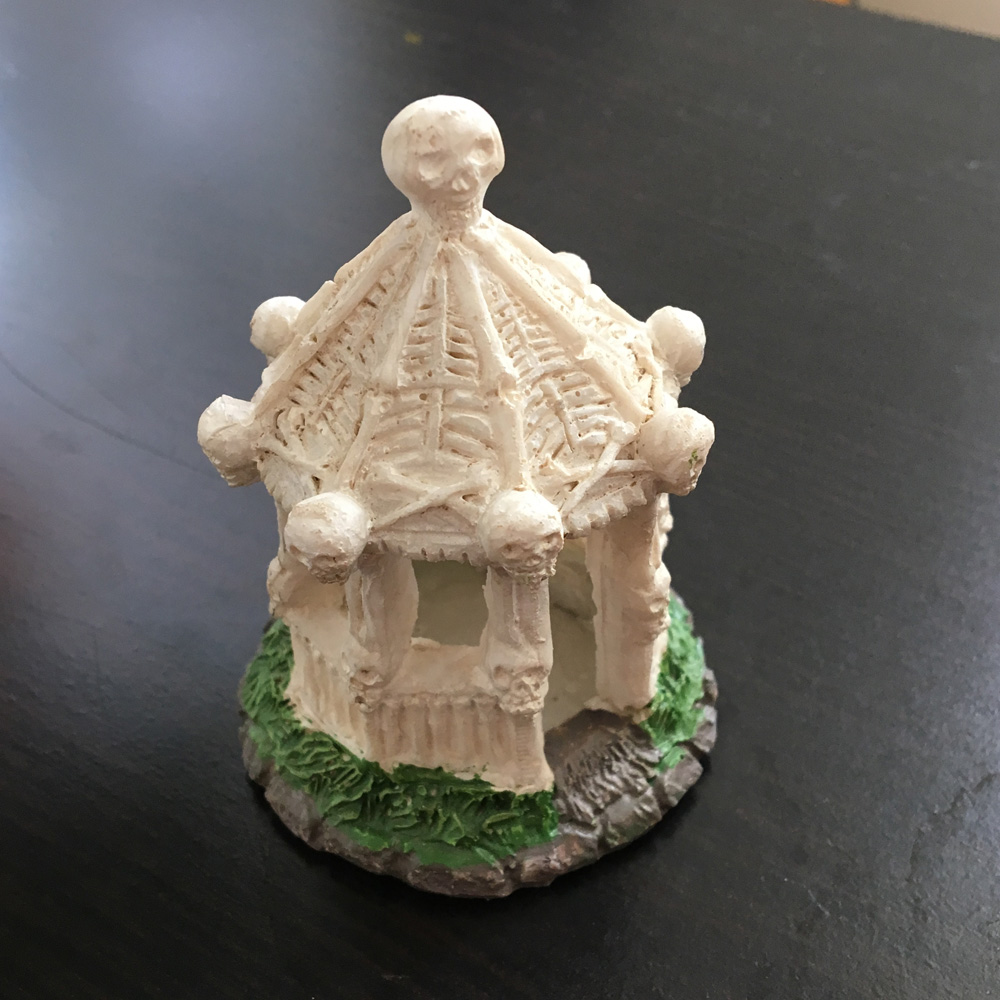
I was at the dollar store looking at Halloween decorations with a friend of mine when she noticed an item I would normally skip over — a 3″ miniature gazebo molded out of plaster or something, like the kind of thing you’d put in a little Halloween village set-up in your living room. Not the kind of Halloween decorating I normally do! My eyes usually skip right over this kind of thing. However, she thought it was cute, and upon closer inspection I agreed; the sculpture itself was really neat, with lots of detail in the skulls and bones, but the whole thing was kind of ruined by a bad factory paint job; hey, whaddaya want for a buck? So I decided to buy it and repaint it and send it to her as a gift.
Repainting a dollar store bird skeleton
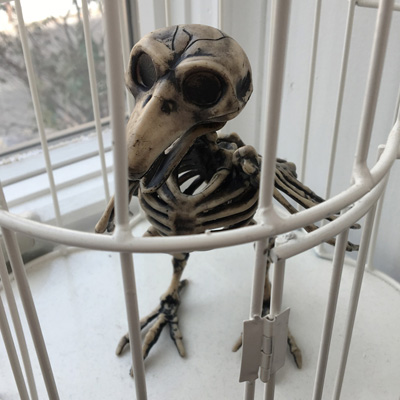
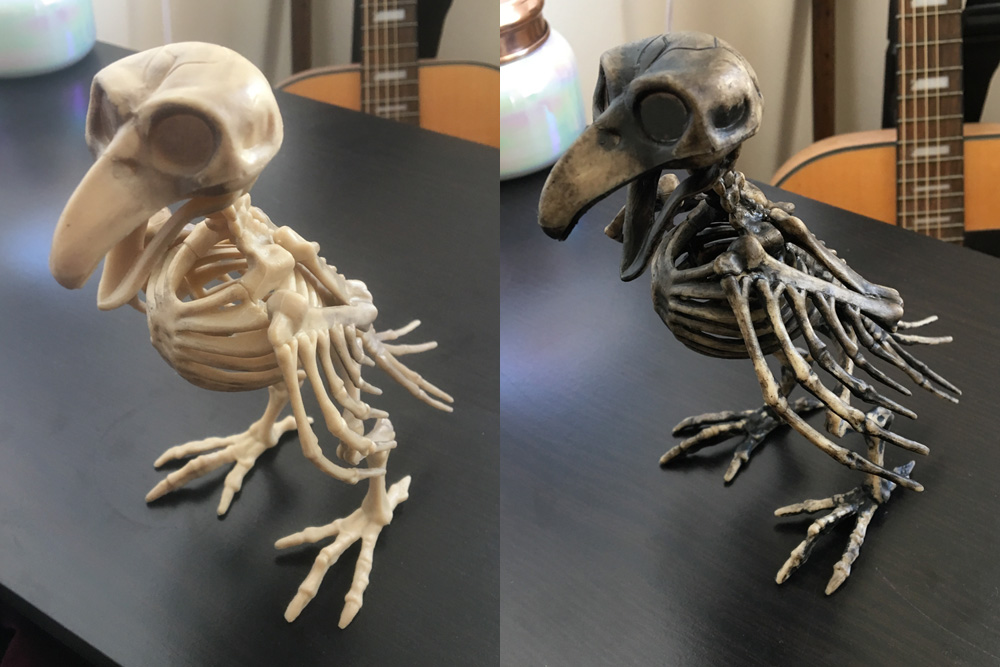
I’m sure it goes without saying that I vastly prefer hand-made Halloween decorations to store-bought ones, but when I saw this really cool spooky bird skeleton for just a buck I couldn’t resist! A few years ago I actually made a tiny bird skeleton for my cuckoo clock skull mask, and it was an insane amount of work for such a simple little skeleton! I’d never use a store-bought piece for one of my Mardi Gras skull masks, for I’m okay with it when I’m decorating for a big Halloween party; the more shortcuts I can take the better! Anyway, I knew this little plastic bird skeleton would look great in this old birdcage we have lying around, so I snatched him up.
Paper maché baby chicks! — part 2
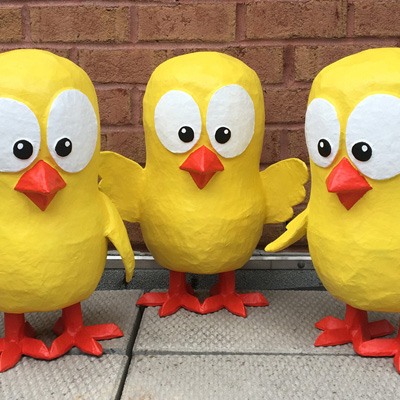
This is part two of two of my paper maché baby chicks project; see part one here.
Making the chicks’ legs and feet
This was a fun challenge: I wanted the legs and feet to be hollow and removable, so when my client received them she could add a lot of coins in the legs/feet for weight and then insert them back into the body, so the chicks would have a nice solid heavy base. Without this weight, the chicks would probably fall over, and if I added the weight permanently while making the sculptures, the shipping cost for the chicks would go way up. Read more…
Wolf skull mask — part 3; painting, etc.
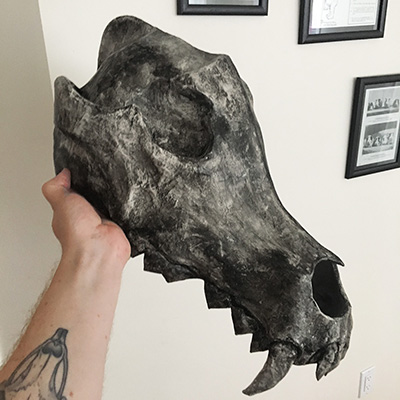
Painting the wolf skull
Before painting the wolf skull mask, I applied a coat of gesso over the whole thing. Gesso is a thick white paint-like substance that can help smooth out any imperfections in your paper maché surface. In this case it really helped smooth out the teeth in particular.
Painting new skeleton pants
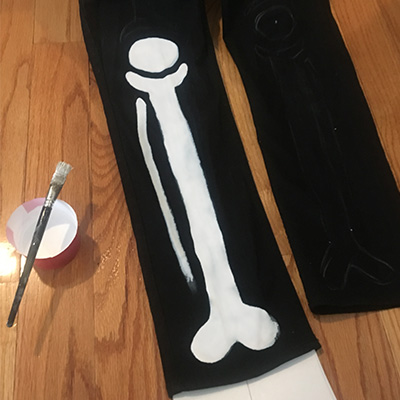
I’ve been wearing my hand-painted skeleton suit for five Mardi Gras in a row now, with a few Halloweens thrown in there as well, and for some reason the pants seem to be harder to squeeze into every year! Huh! I wonder how that could be; they must keep shrinking in the wash a little more every single year! Yeah, that’s gotta be it. So anyway, it’s reached a point where I absolutely needed to make new ones for this Mardi Gras; last year I seriously thought they might split open on me during a parade! I learned a lot from how I made these last time, and luckily this was a much more successful project my second time around…
Tips for working with gesso
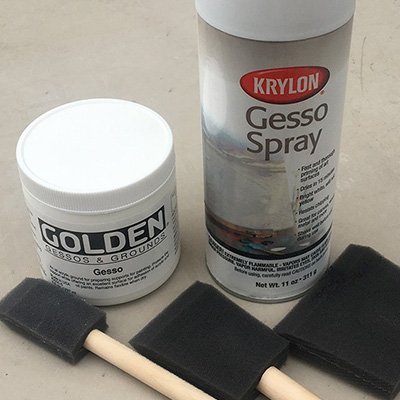
If you’ve ever created any paper maché projects and then painted them, you’ll surely have noticed that the edges of your paper are often still visible, sometimes even after several layers of paint. I hate seeing those paper edges in my stuff, and I’ve learned I can reduce this with a few techniques, like being really precise with my last layer of paper, and doing a final layer of just paste smoothed over the whole shape with my hands. Still, even when I do that stuff I end up still seeing those paper edges through the paint sometimes. It drives my crazy.
Making the bird skeleton for my cuckoo clock mask
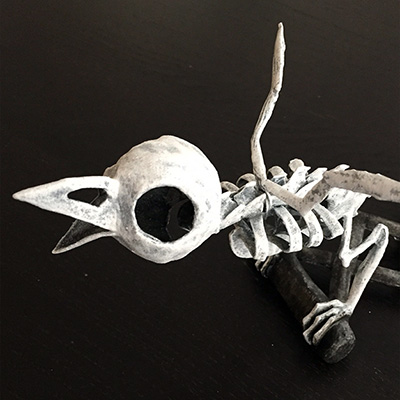
I made this bird skeleton for my cuckoo clock skull mask for Mardi Gras 2016. Making this skeleton was extremely challenging, and I basically made up all the steps as I went along. I had no idea what I was doing, but I learned a lot and I’m very happy with the end result. I didn’t take as many pictures as I should’ve along the way, so I’ve done some sketches to explain certain steps.
The main materials in the bird skeleton are:
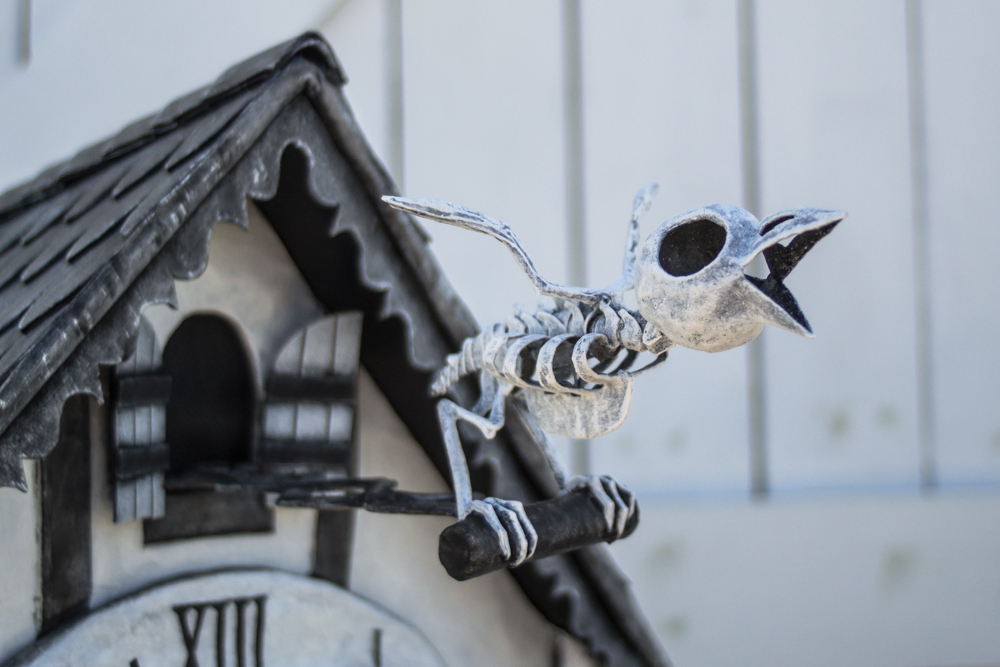
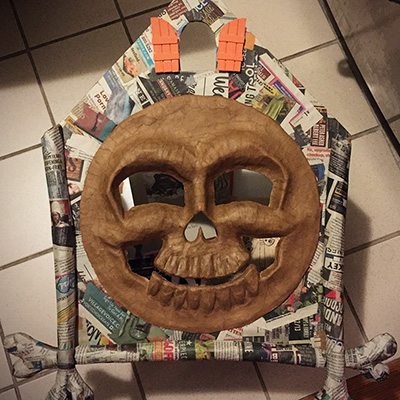
Cuckoo clock skull mask — part 3
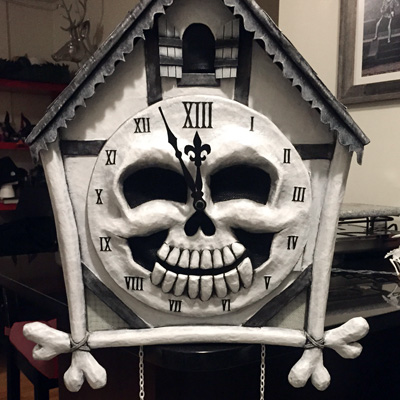
This is part three of my cuckoo clock skull mask project. See part one and part two.
Where were we? Oh yeah, it’s time to paint!
Painting the mask
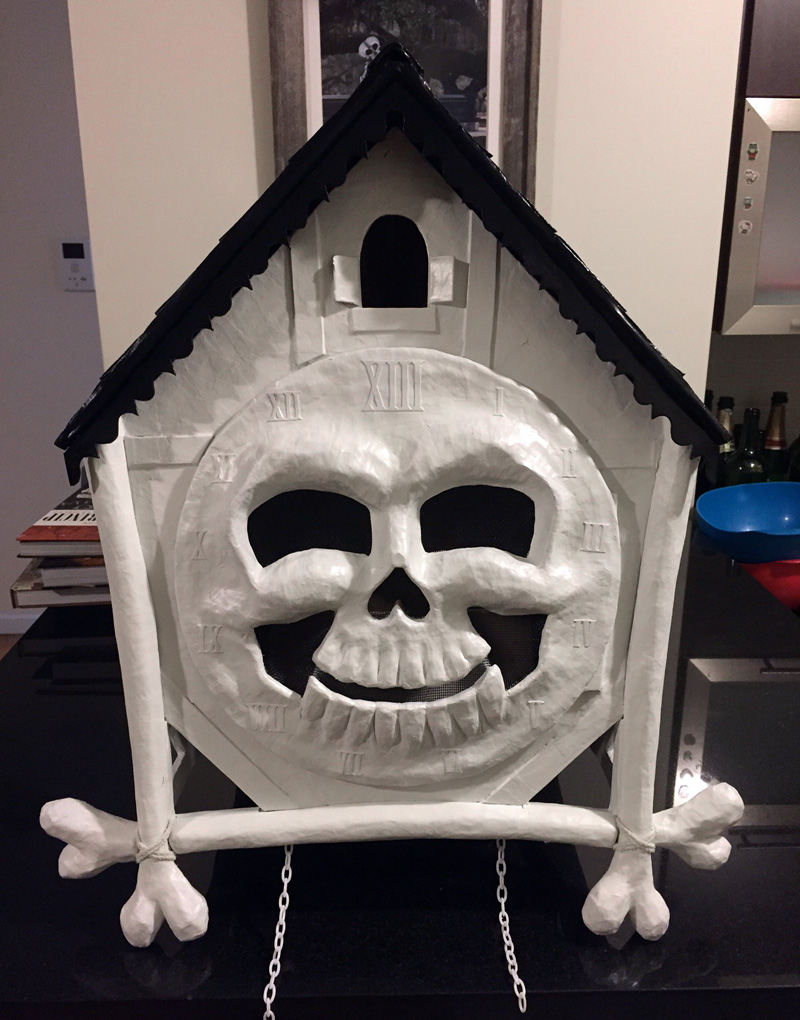
I painted the clock body and the roof separately for the most part before joining them together. I first protected the screen in the eyes/nose/mouth with blue masking tape (the kind that’s really easy to remove), and then I spray painted the entire exterior of the clock white. I separately spray painted the roof black. I let these pieces air out for about three days outside.
Cuckoo clock skull mask — part 2
This is part two of my cuckoo clock skull mask project. See part one and part three.
Scale-pattern shingles on the roof
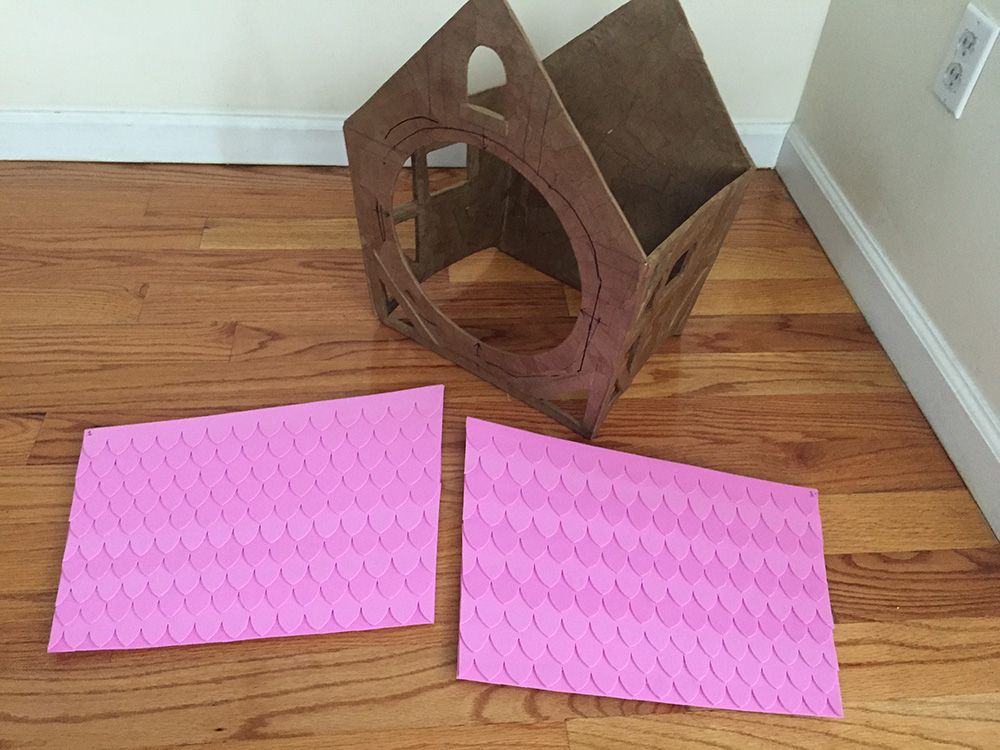
I started the roof with two foam board panels. My process for creating the scale-shaped shingles was kind of convoluted…
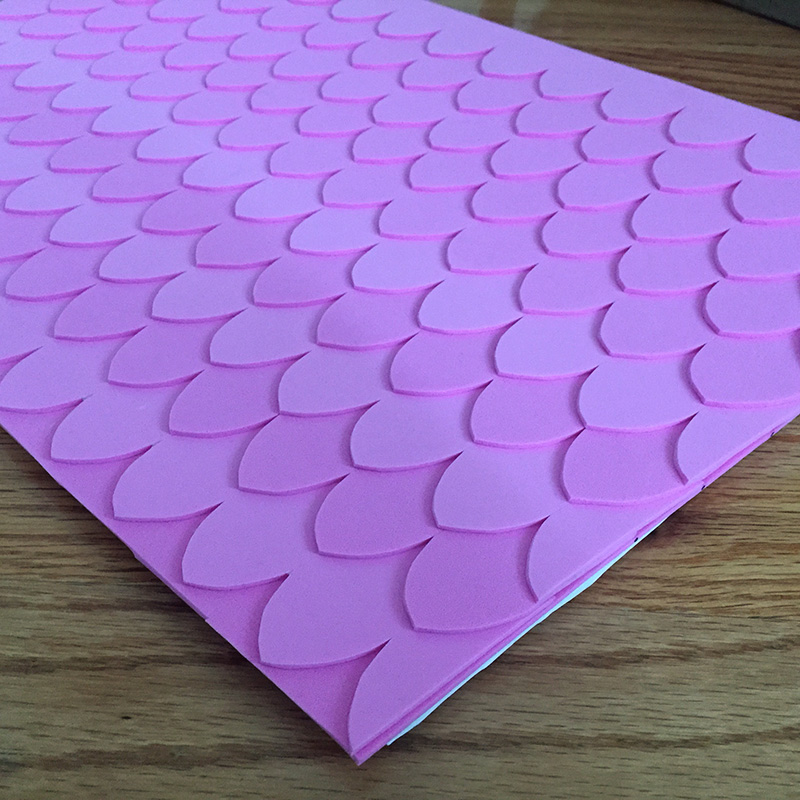
The pattern on the roof is made with a few layers of craft foam (aka Wonderfoam). I made this way harder for myself than it needed to be! Since all my wall and roof panels were irregular shapes — there isn’t a single 90-degree angle on this whole mask — I needed the scale-shaped roof tiles to start out larger near the top of the roof and get smaller toward the bottom. I ended up designing the whole roof surface in Photoshop, starting with a nice regular scale pattern on a rectangular shape (figure 1). Read more…
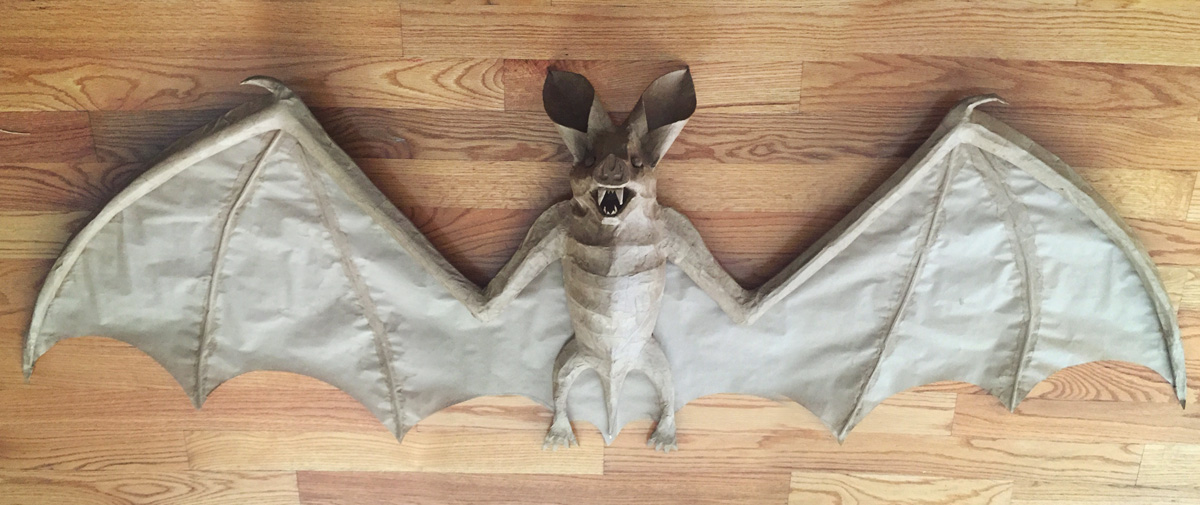
Giant paper maché bat — part 3
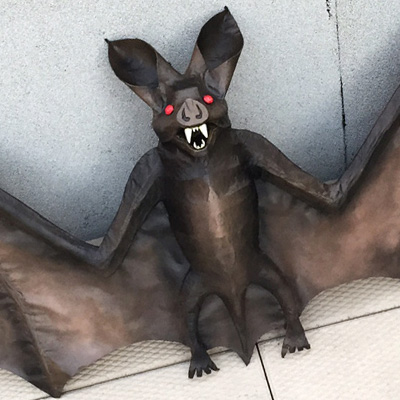
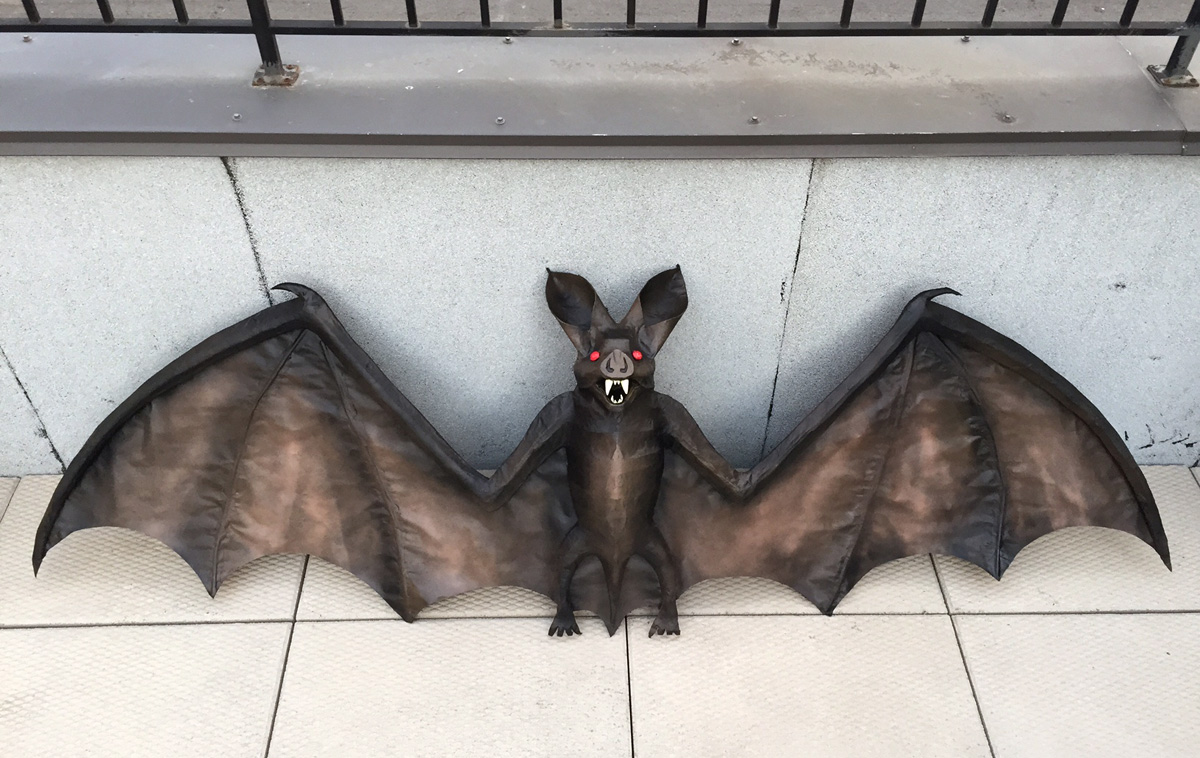
See part one and part two of my giant paper maché project. When we left off we were here:
Now then, it’s time to paint!

I started my paint job on the bat by bringing him outside and protecting my work area with a cheap shower liner from the dollar store.
First, I simply applied a coat of black spray paint all over the whole bat.
How to make a fake wood grain texture for signs and other projects
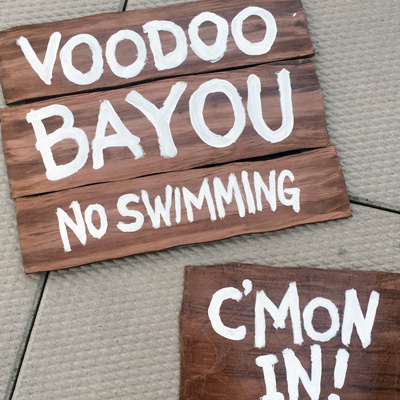
Believe it or not, these signs are just foam board! Plus a little spray paint and wood stain. I experimented with a few techniques, and here’s what I came up with…
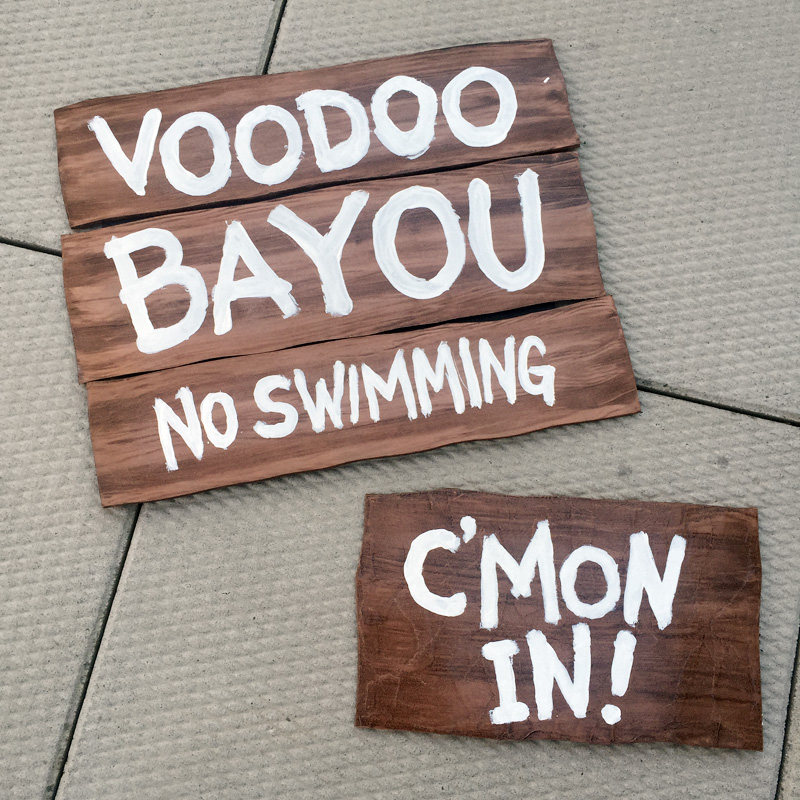
For the big Voodoo Bayou sign, I started by cutting out my foam board shapes and spray painting them with a light tan color. You can see that color on the white foam board at left, below:
Working with foam board for art projects; cutting, painting, etc
I use foam board (aka foam core) in almost all my big projects — masks, Halloween decorations, etc — and I’ve learned a lot of techniques that help make working with it a lot easier.
First, check out my article about buying cheap foam board in bulk. I’ve found that the cheap stuff is much easier to work with, and it’s less than half the price of the good stuff you’d buy in an art store!
Craft materials — choosing the right brands and saving some money

I use a few basic craft materials in all my big masks and decorations, and I’ve experimented with a lot of brands over the years. While I try to be cost efficient with all my projects, I’ve come to realize that for certain materials you can definitely use cheap stuff with great (or even superior) results, while for other materials you’re much, much better off buying high quality stuff. Here’s a rundown of the stuff I use and what I’ve learned about the various qualities that are out there.
 About Manning Krull
 How to make a 4-foot paper maché alligator
 My violin skull mask, Mardi Gras 2015