
Skull mask with dancing skeletons, part 1
Published by Manning on March 5th, 2019
Welcome to the newest installment in my ongoing quest to kill myself with overly complicated art projects! For the 20th anniversary of my skeleton group I decided to make a paper maché skull mask with moving parts! Yikes! The mask has a crank and gears and 29 little skeleton figurines representing my fellow skeletons; a sort of best-of selection of our skull masks and skeleton outfits over the last two decades. Here’s how I made the thing!
Having never made anything with gears or moving parts before, I decided to try building the actual mechanical parts first, completely independent of a skull mask. Once I got that working, I’d build the skull mask around it. As usual, I did tons of sketching and measuring and calculating on paper and in Photoshop for weeks before I actually started building anything. I did a little bit of research about designing gears and figured out what materials I could use. Of course, the best material for gears like this would be metal or wood (or 3d printed plastic!) but I decided to stick to the materials I’m most familiar with, so my gears are mostly made of craft foam and foam board — not ideal, but it works! I’m totally not set up to work with sturdier materials like wood or metal, and besides, using foam would help me keep the mask much lighter so I don’t break my neck — after all, I’d have to wear this skull mask for a leisurely five-mile parade on Mardi Gras morning.
Making working gears with craft foam
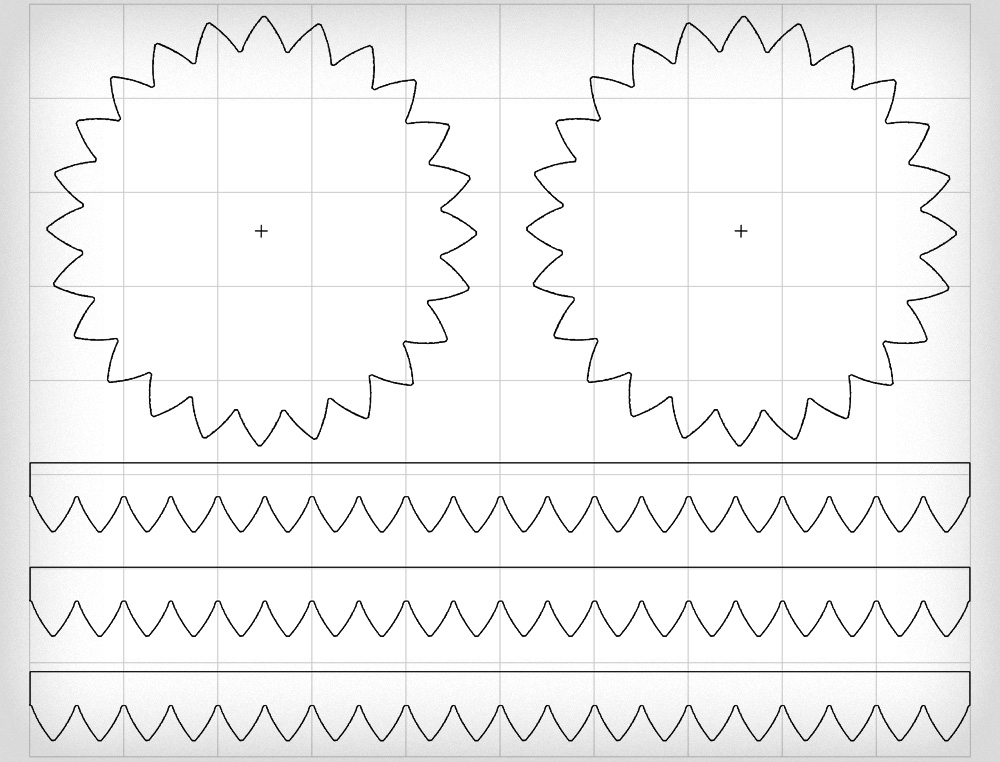
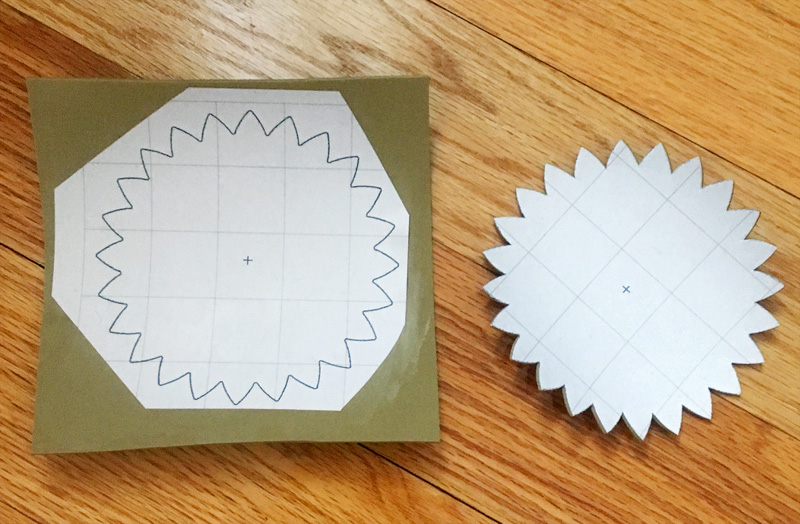
I wanted my skull mask to have two exposed rotating rings of marching skeletons, moving in opposite directions. For this, I’d need two large rings with teeth on the bottom, and two round gears to turn them. After lots of careful planning in Photoshop, I printed out a dozen or so copies of my designs (above) for the round gears and the long strips of teeth that would make up the two moving rings.
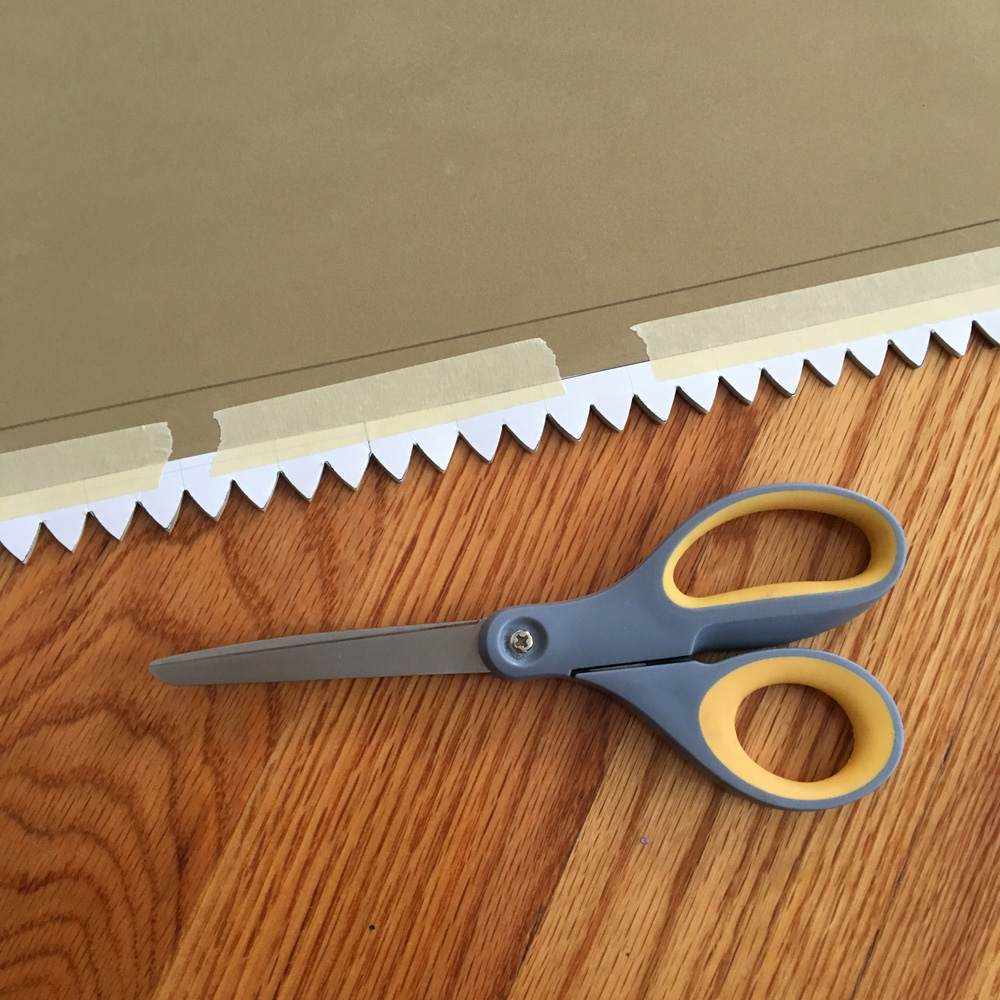
I started with the long strips for the rotating rings of teeth. I cut out my printed shapes as long rectangular strips and taped them onto strips of craft foam — this soft, rubbery foam you can buy at any arts and crafts store. I cut the teeth out with scissors, and then removed the tape and paper. This craft foam is very flexible, even a bit flimsy, but it’s also very durable has a lot of friction against itself, and I was optimistic it would work great for these moving parts, even if it’s not very rigid.
I figured out the exact size circles I needed for the two big rotating rings, and drew them onto foam board. (See my article about drawing precise circles.) Each circle has another circle inside that’s 3/8″ smaller, so I could remove the inner circle to create an empty ring. I cut out all these circles with an X-acto knife.
Rather than remove the inner circle right away, I left it in place and put some tape on it so it wouldn’t fall out. I wanted to leave this inner circle in place to keep the whole ring nice and rigid while working on it. Later on, when the rings of teeth were firmly connected (coming up), I’d snip the tape and remove the inner circle. I have a diagram of this coming up.
Back to the craft foam teeth. Before wrapping the teeth onto these circles, I first wrapped a thin wall of poster board around the circles, to give the strips of teeth a little extra stability. Then I wrapped the craft foam teeth around the poster board strips. I taped all of this in place with masking tape.
Then I applied a layer of paper maché over the edges of the strips and the flat circles, to firmly connect them. Paper maché is a great way to lock different pieces together so they’re nice and rigid and strong. (See my article about my paper maché process and materials here.) Paper maché tends to warp as it dries, so keeping that inner circle of foam board taped in place during drying was key here.
When the paper maché was dry, I snipped the tape holding the inner circle in place, and removed it. It worked! The rings remained perfectly circular and flat, and they were nice and strong for being so thin and lightweight. I know from experience that if I hadn’t left the inner circle in there during the paper maché steps, the finished rings would’ve come out really warped.
Here’s a diagram of all those steps:
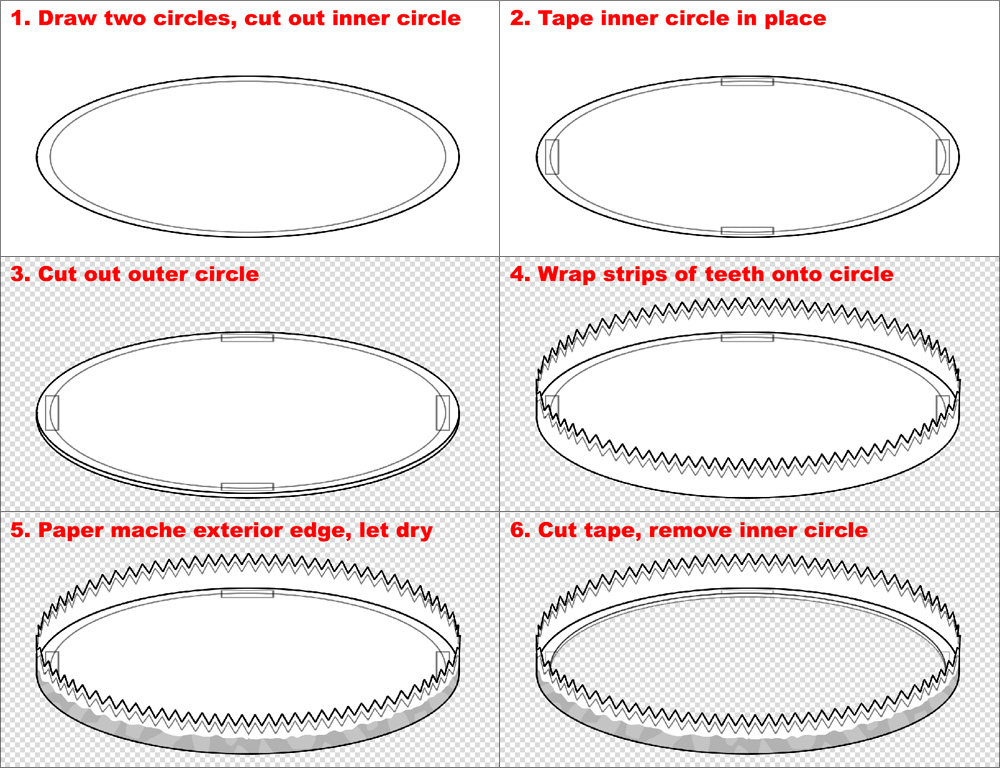
Note: the teeth are pointing up here but in the actual mechanism they point downward. Of course the skeletons would come later!
And here are the rings, pretty much finished other than cutting and removing the inner circles:
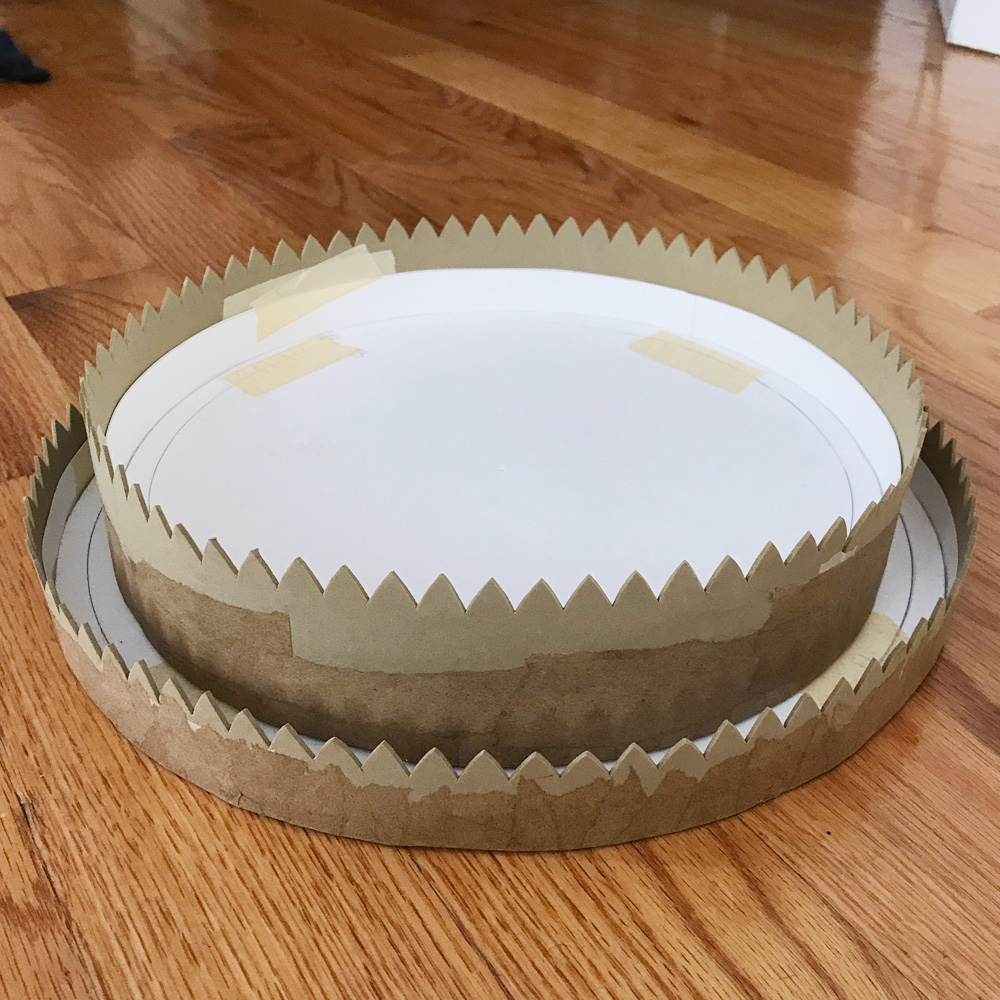
You can see the light brown craft foam for the teeth, the brown paper maché, the white strip of poster board, the white foam board, and of course some masking tape. That’s all for the rings!
Making the smaller gears with craft foam
For the smaller round gears, I first tried cutting these out of foam board (aka foam core), but it didn’t work out for a bunch of reasons, so I ended up making them out of many layers of craft foam. I’ll explain…
Since the big rotating rings with the teeth are made out of craft foam, which is very thin, I knew I’d need my smaller gears to be much thicker than that, since I’m not able to engineer this whole thing with any great precision; there’s no way I could get the gears and the rings to line up 100% perfectly. So the small gears would have to be thick enough that the teeth of the rotating rings would sit correctly on them even if the rings get nudged to one side or the other by a few millimeters. If the gears were too thin, the rings could slip off of them and fall downward into the mask.
So, my first plan was to cut the small gears out of 3/16″ foam board, and make them two or three layers thick; wide enough to support the rotating rings even if they slip to either side a bit. However, it’s hard to cut foam board with 100% accuracy, even with a brand new X-acto blade, so while each individual gear I cut out looked fine, when I stacked them up to glue together, they wouldn’t line up perfectly; they were much too imprecise. Some teeth would stick out a tiny bit farther than others, and the edges weren’t perfect 90-degree angles, they were ever so slightly diagonal all over the place. I just couldn’t cut the foam board with enough precision.
So I decided to try craft foam. It’s much thinner than foam board and it’s soft enough that you can cut it very accurately with scissors. Because it’s so much thinner than the foam board, I knew I’d need many layers to make each gear. I started with six layers of craft foam per gear, and after some trial and error increased them to nine layers each.
To draw and cut the precise shapes for the gears, I took many copies of my printouts and pasted them directly onto the craft foam, using the same wallpaper adhesive I use for paper maché. I smoothed a lot of paste onto the craft foam with my hands, then laid the printouts in place, and then smoothed more paste over them. I’ve used this method for a lot of projects. As the paste dries, the craft foam may curl up a lot; this is no problem, and it’ll uncurl by itself when you remove the paper later on.
When this was 100% dry, I cut out the shapes very carefully with a pair of nice sharp brand-new scissors. After all the shapes were cut out, I soaked them in water, paper-side-down, for about 20 minutes, and this let me easily peel the paper right off. (As soon as the paper is off, the craft foam turns perfectly flat again.) I then ran the craft foam gear shapes under running water for a few minutes to get all the rest of the paste off. I pressed them into a paper towel to squeeze any remaining water out of them, and then let them finish drying for an hour or two.
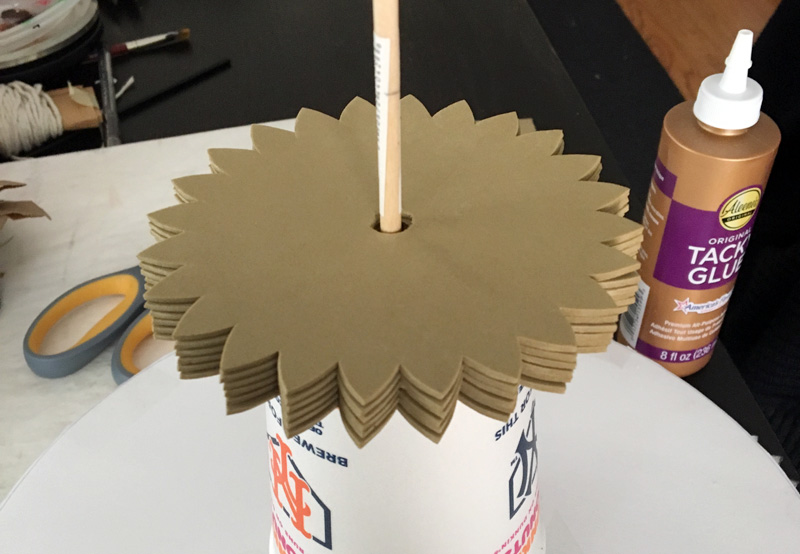
I glued the layers of the craft foam gears together with Tacky Glue and let them dry for 24 hours; the foam isn’t very porous and the glue can stay moist in there for a very long time, so you have to give it a lot of time to try. As you can see in the pic above, I rigged up a system with a paintbrush mounted vertically in a styrofoam cup to keep all the layers of the gears perfectly aligned while drying.
As I’d hoped, the craft foam gear shapes were much more precise than my first attempt with the foam board. They lined up almost perfectly with each other so that when they were glued together they formed a solid shape with a uniform edge. And while one layer of craft foam is pretty flimsy, my finished gears (nine layers thick) feel very solid and sturdy, like one solid block of dense foam.
Building the outer wall for the gears mechanism
This whole setup that I designed to work out the mechanics for the gears was essentially based around three concentric rings — the smaller rotating ring, the larger rotating ring, and the outer wall that contains all this and would become part of the skull mask. I decided to use a plastic trash can as the outer container piece.
I measured and cut the trash can with my dremel tool — don’t forget to wear eye protection and a dust mask for this! I also wear work gloves and long sleeves because I’m a coward.
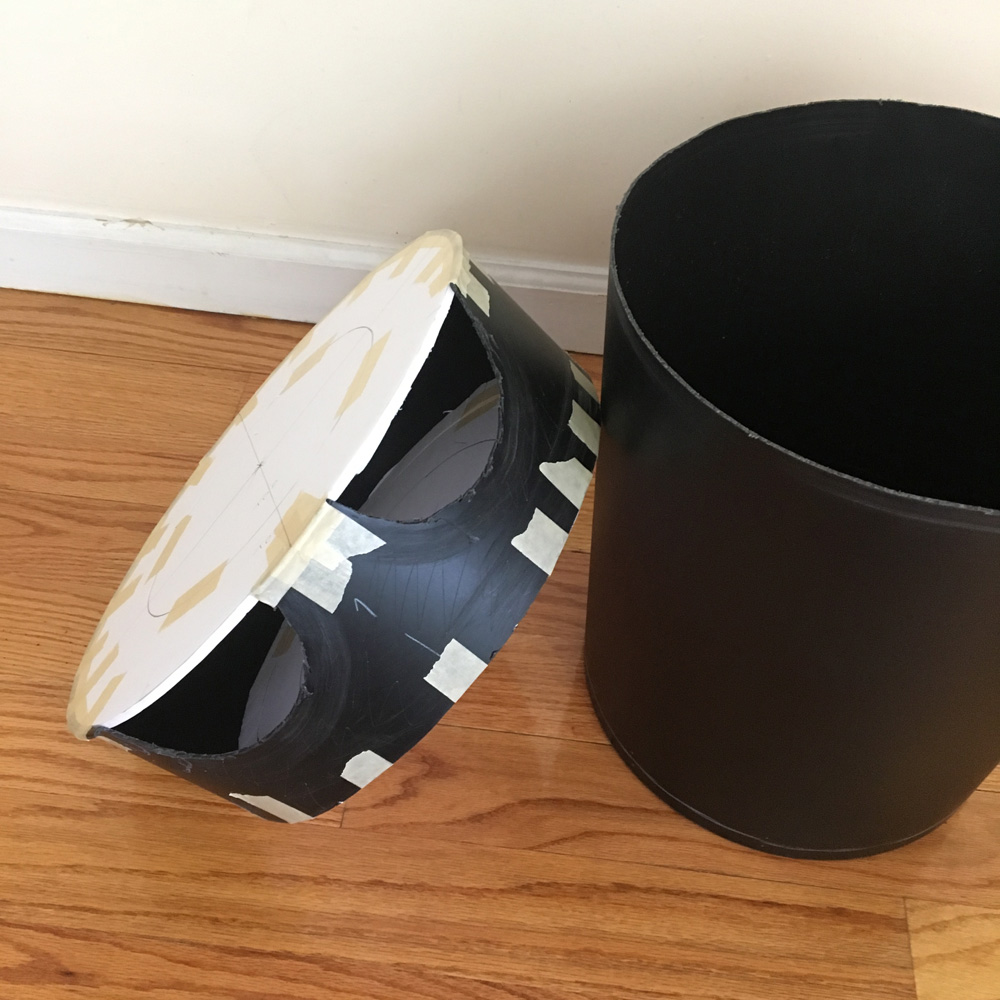
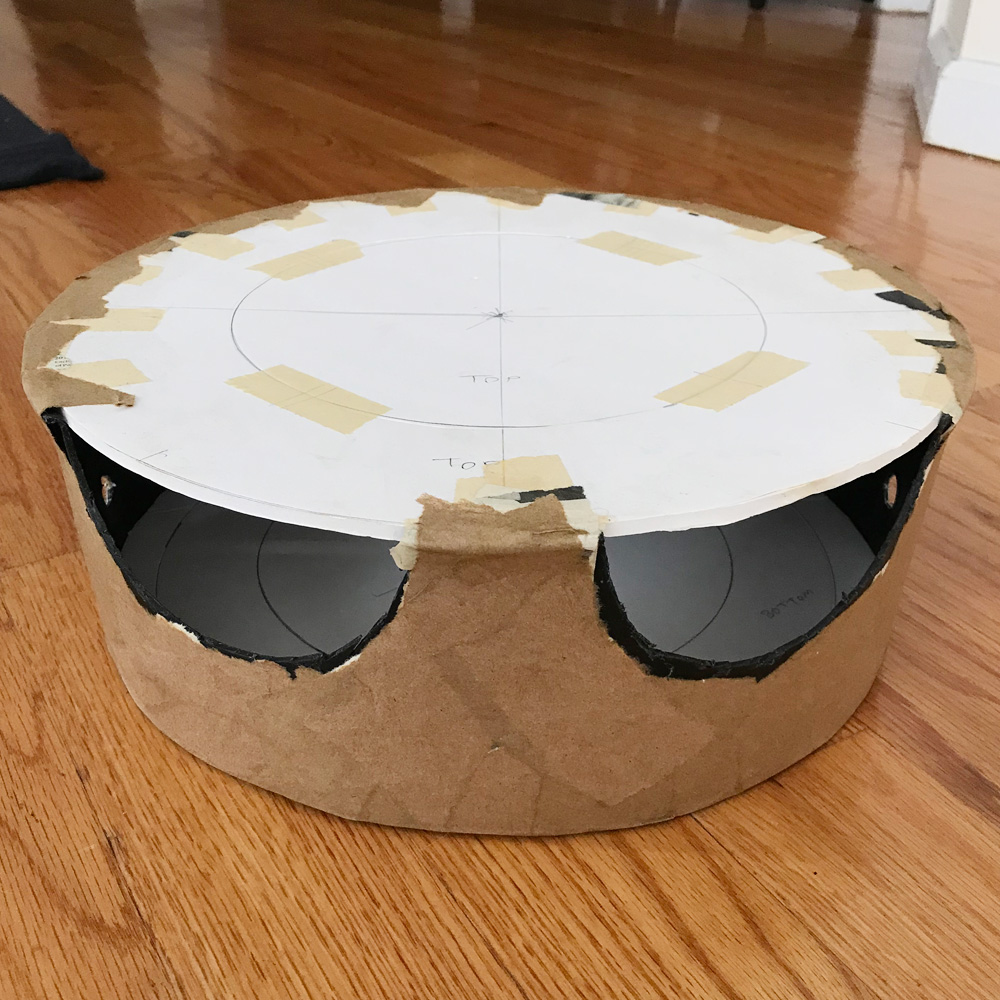
I cut a wide ring off the top of the trash can; this would be the container for the gears and stuff, and it would become a permanent part of the skull mask. I also cut out two holes that will eventually be the bottom of the skull’s eye holes. Oh yeah, and I drilled two small holes in the sides for where the rod will go through later. Although I don’t mention this for every step, I carefully plan and measure each step before cutting/drilling/etc; I need as much precision as possible for all these pieces.
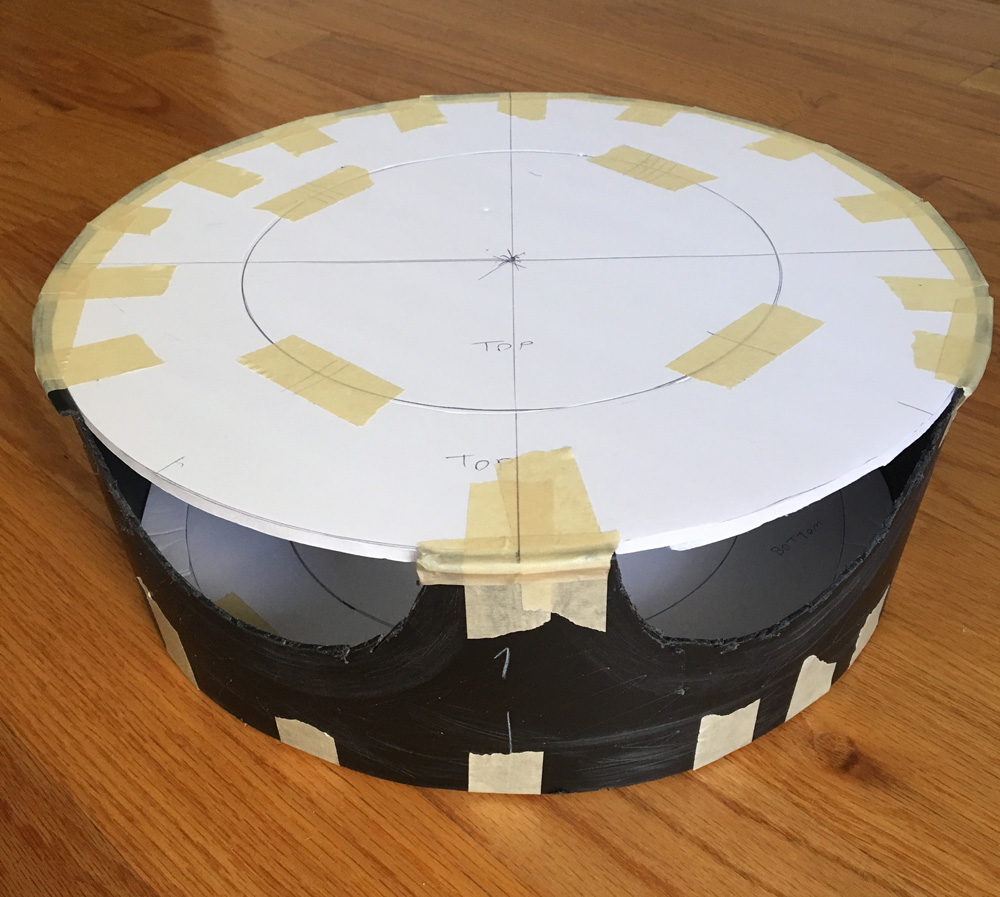
I measured and cut circles of foam board to fit the top and bottom of this plastic ring, and taped them in place. These circles are there to help hold the shape of the ring when I apply a bunch of paper maché, which tends to warp. I applied four layers of paper maché on the outside of the wall and let it dry. I then removed the foam circles, applied two layers of paper maché inside the walls, and immediately put the foam circles back in there so they could hold the shape while the paper maché dried.
Figuring out the gears
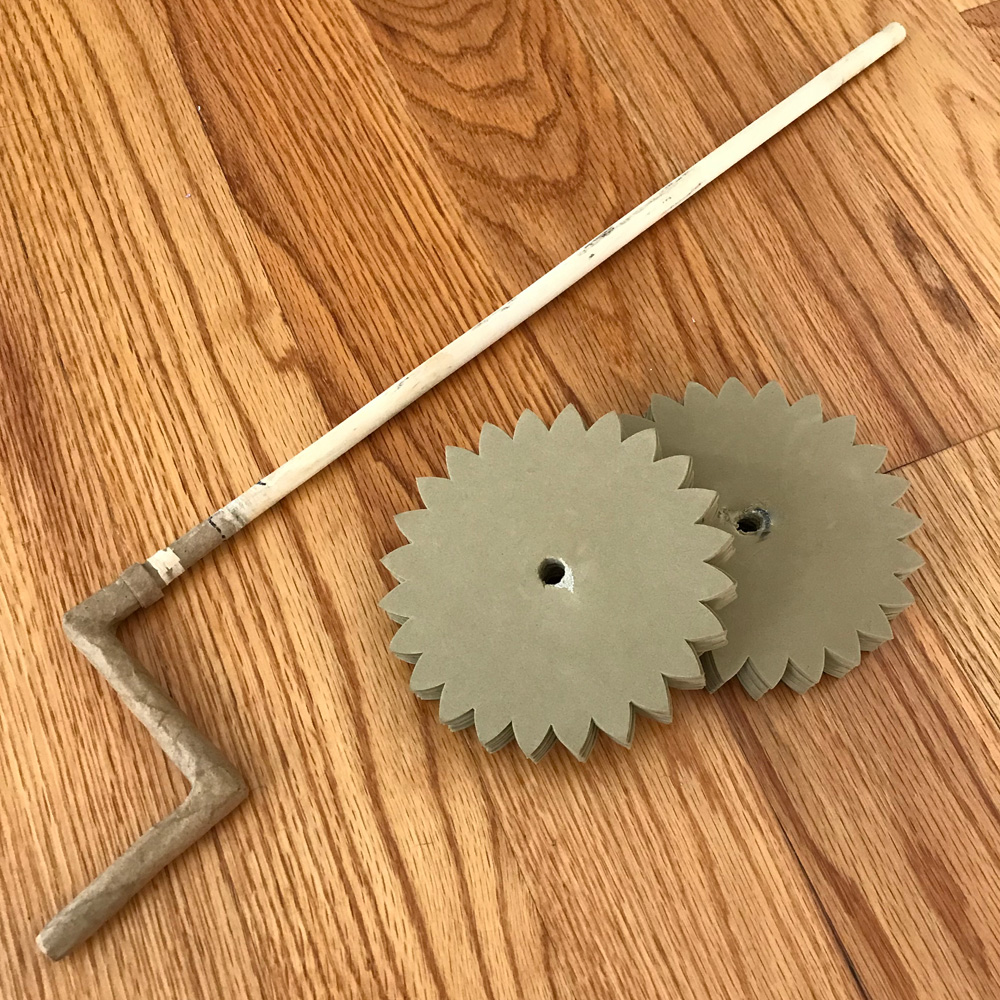
I used a wooden dowel for the long rod that turns the smaller gears. (Fun fact that’s probably only fun for me: I bought this dowel years ago to make the tuning pegs on my violin skull mask! This part was left over; I love finding a new use for old junk like this!)
I made the handle to turn the rod out of a couple smaller lengths that I cut off of the same wooden dowel. I hot glued these in place at 90-degree angles and then covered the connecting points with about five layers of paper maché, to make them nice and solid.
I poked this rod through the holes I’d cut in the sides of the outer skull wall, and stuck the rod through the foam gears. Later I would glue the gears in place permanently on the rod, but I had to get the positioning right first.
I locked the central rod in place by adding two little rings made out of long strips of paper on either side of the mask walls, rolled up and glued in place; this prevents the rod from sliding from side to side. I soaked the paper in the same wallpaper adhesive I use for paper maché, and carefully wound them around the wooden rod at the correct points. I let them dry for 24 hours.
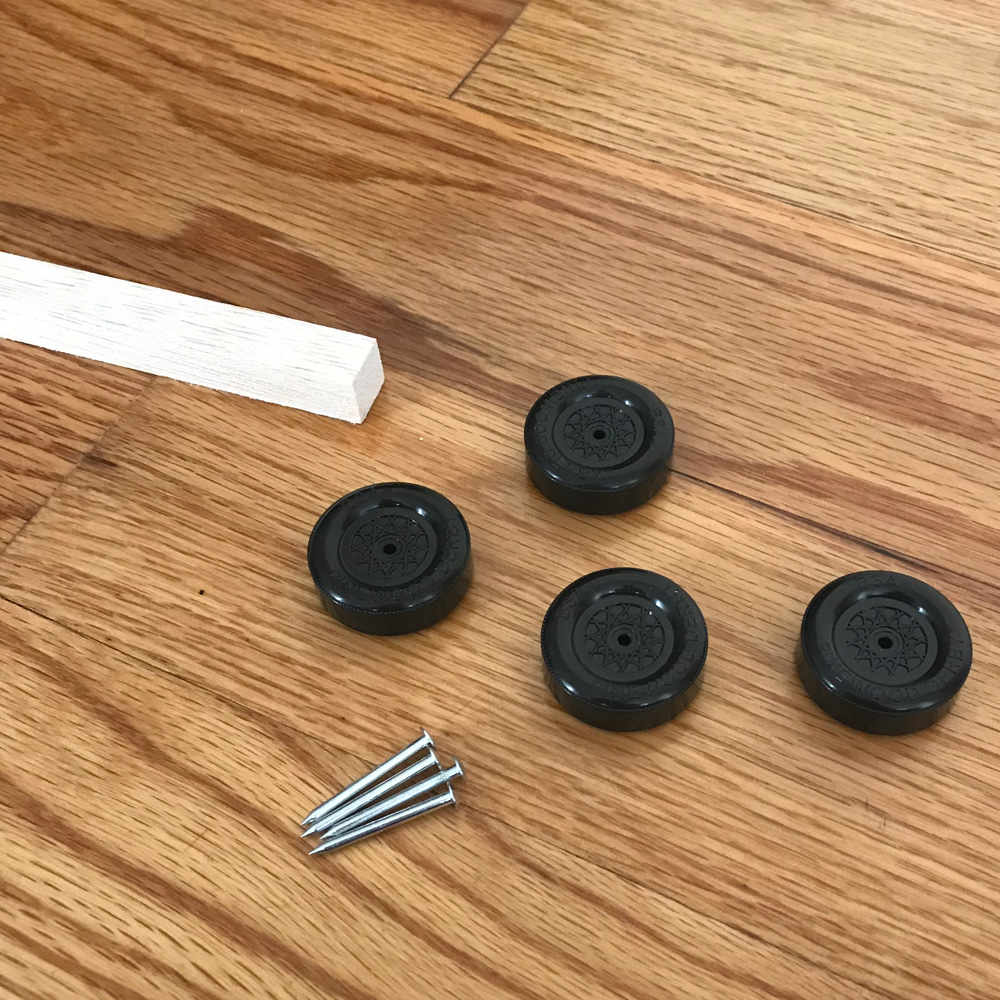
The rotating rings needed something to rest on, and rather than build a bunch more gears for this I decided to let the gears rest on plastic wheels from a DIY toy car kit; there’s no need for interlocking teeth here, just something that can support the rings and turn along with them. I measured and cut four little wooden posts off of a piece of balsa wood, nailed the wheels into them, and hot glued the posts into the mask wall at the correct height (pic coming up). So much measuring here! I added a wide ring of construction paper around each wheel, to give the rotating rings plenty of surface to sit on, even if they shift around a little bit.
So, each big rotating ring rests on three points: the foam gear that turns it, and the two little wheels that support it.
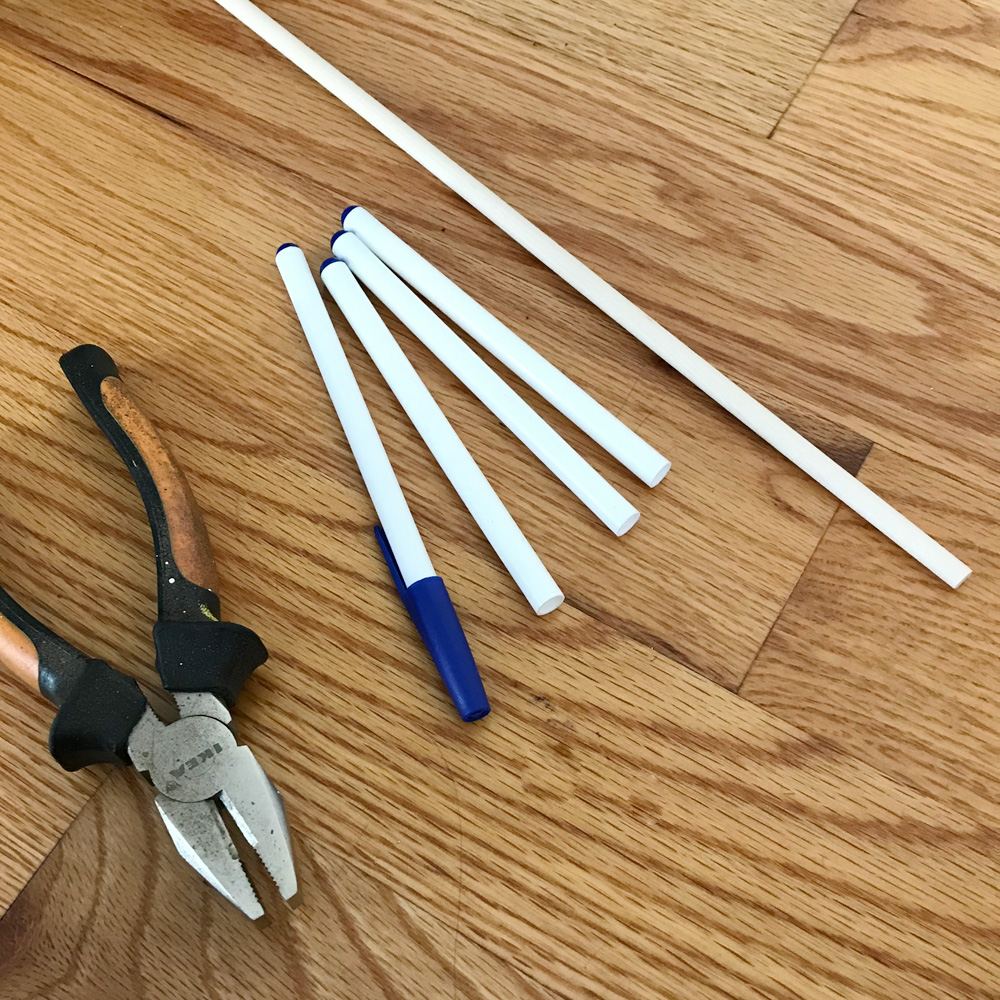
I also attached little spinning vertical “bumpers” made from plastic pens to go in between the rotating rings and keep them from from slipping out of place. To make these, I bought some cheap plastic pens, ripped the insides out with pliers, sawed the hollow tubes to the right lengths, and sanded the edges to make them nice and smooth.
These plastic tubes sit on pieces of a thin wooden dowel that I cut and sanded. I mounted the wooden dowels on little chunks of balsa wood, just like the plastic wheels. I hot glued these in place on the inner walls of the mask. The pens aren’t permanently attached; they’re just held on by gravity.
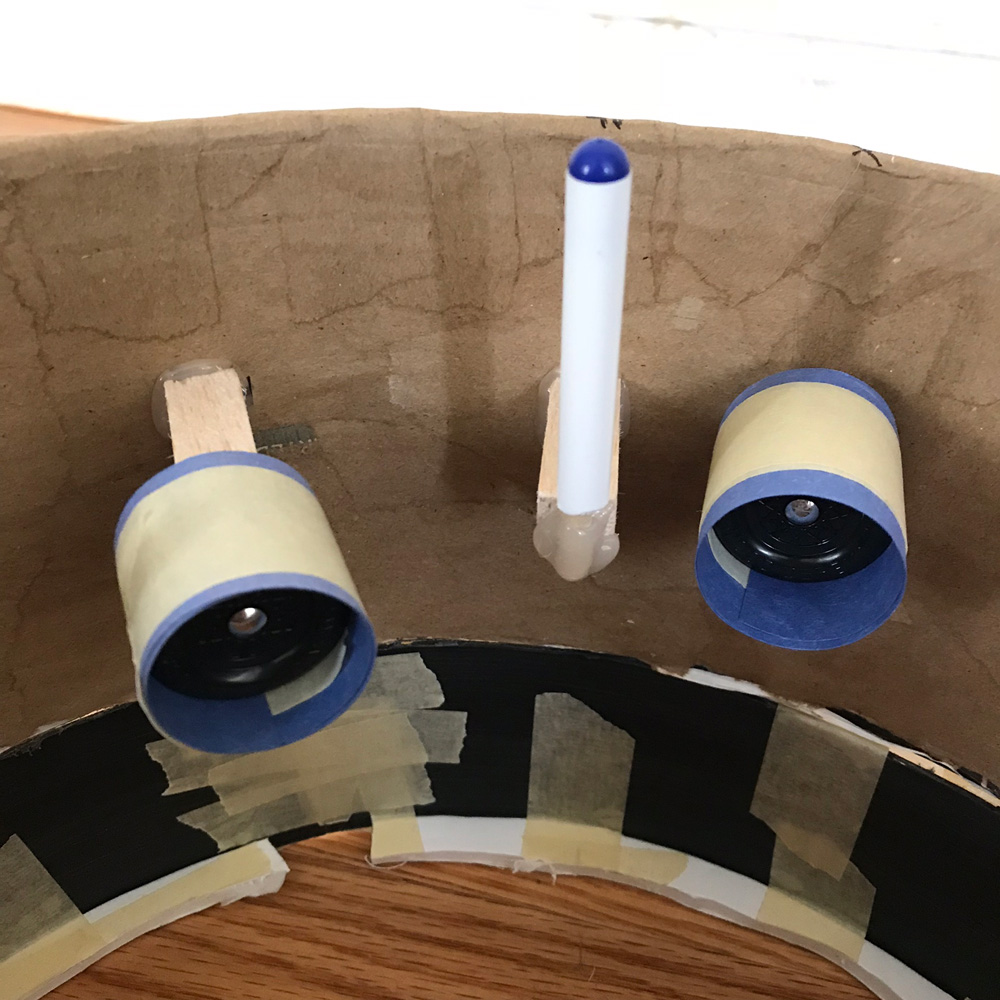
Here’s a pic of a few of the supports after being installed in the mask:
All of this stuff is to keep everything in the right position with as little friction as possible on all points of contact. Here’s an animated diagram of all of this! I actually made this beforehand, to help plan the whole thing out; the finished product is slightly different…
The above animation is an overhead view of the whole mechanism. The three big concentric rings are: the outer wall of the mask, the larger rotating ring, and the smaller rotating ring. You can also see the two big foam gears (which look like rectangles from overhead) at the left and right, and the four plastic car wheels that support the rotating rings — notice the two wheels at the left are “deeper” toward the center of the mask so they can support the inner ring. The tiny rotating circles are the plastic pens that are positioned vertically to serve as bumpers; they’re being turned by the friction of the big rings as they rotate in opposite directions.
In working on the real thing, I realized I wouldn’t need eight little spinning pens like in the above animation — just the inner four would be fine, as they would hold the smaller ring perfectly in place, and also hold the larger ring close enough to the center that it wouldn’t bump into the outer walls. (However, I ended up adding a fifth; more on that in a bit)
At this stage I was able to test the gears and rotating rings for the first time! It actually worked! That’s always a relief. I adjusted the positioning of the foam gears a little bit and glued them in place on the rod with tiny drops of Gorilla Glue; I marked the positions of the gears with a pen, slid the gears away, applied the glue on the rod where the gears should sit, and then slid the gears back into their correct positions over the glue. Gorilla Glue expands a lot as it dries, so it was able to creep up into the tiny spaces between the layers of foam and really lock the gears in place.
I took a couple videos of the finished gears mechanism and converted them to looping gifs. Here’s a gif of the gears turning, without the rotating rings in place:
Of the two big tan gears, you can see how the one on the right is right up against the inner wall, while the left one is a couple inches deeper toward the center of the mask. This is because the one on the right supports the larger rotating ring, and the one on the left supports the inner rotating ring.
The four big horizontal cylinders are the toy car wheels with construction paper and masking tape on them. You can see the two on the right are mounted on longer pieces of wood — that’s because they help support the inner rotating ring, which is deeper toward the center of the mask.
You can also see the five vertical plastic pens that server as bumpers to keep the two rotating rings in position. Like I mentioned above, I thought four would do the trick, but I had to add that extra one on the far left to help keep the outer rotating ring from sliding off of its gear.
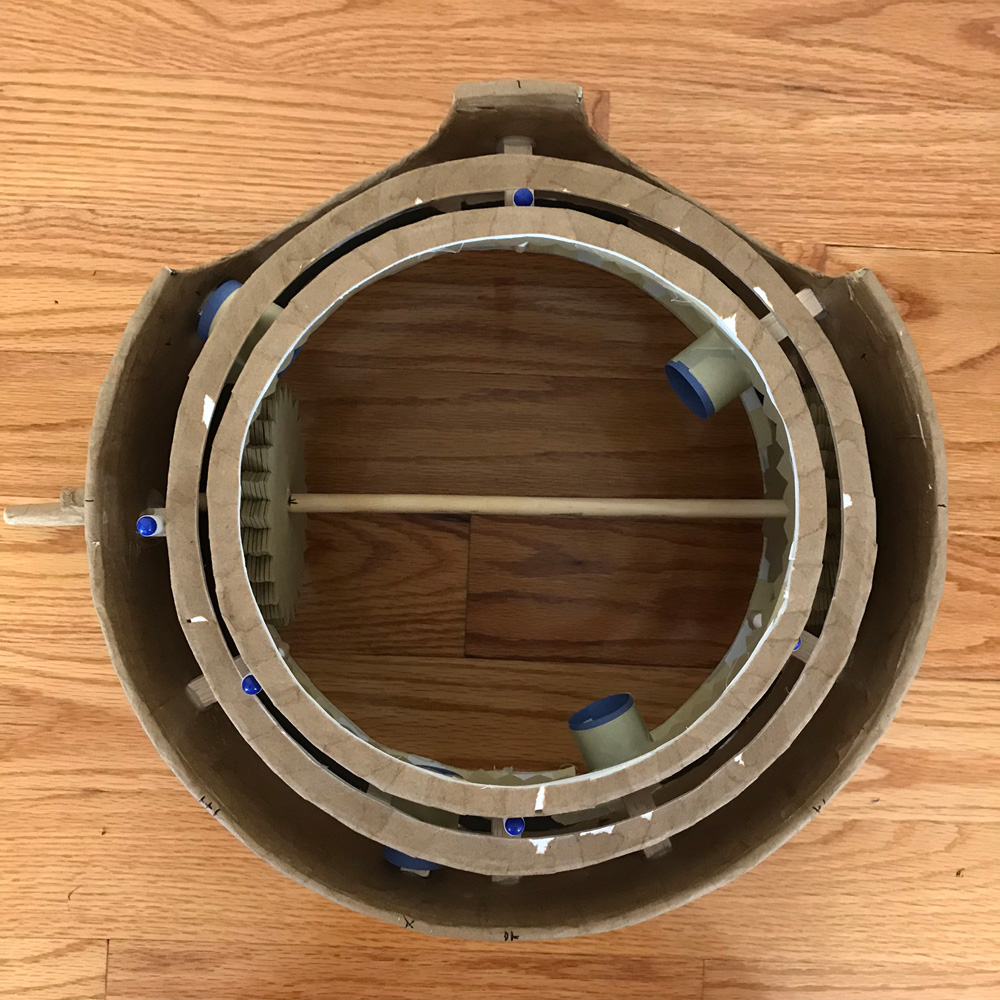
Here’s another gif with the rotating rings in place:
In these gifs, you might notice that the outer wall has a top segment that’s brown (covered in paper maché) and a bottom segment that’s black. The bottom part is a second ring I cut off of the same trash can to use as a temporary support to go underneath the top ring while I’m working on all this whole mechanism with the gears. I simply taped this second piece in place with masking tape &mdash somewhat loosely, so I can easily remove it later. Many steps later, after I’ve built up the paper maché walls of the skull mask and the whole thing is nice and solid, I’ll remove and discard this lower plastic ring in order to reduce the weight of the mask. Like I mentioned, the upper ring of plastic will stay in the mask permanently, to help keep the outer wall perfectly circular; I can’t afford to let this part warp or the whole gears set-up might stop working.
Here are a couple still pics of the same things; this first one is without the rotating rings in place, to show you the moving parts underneath:
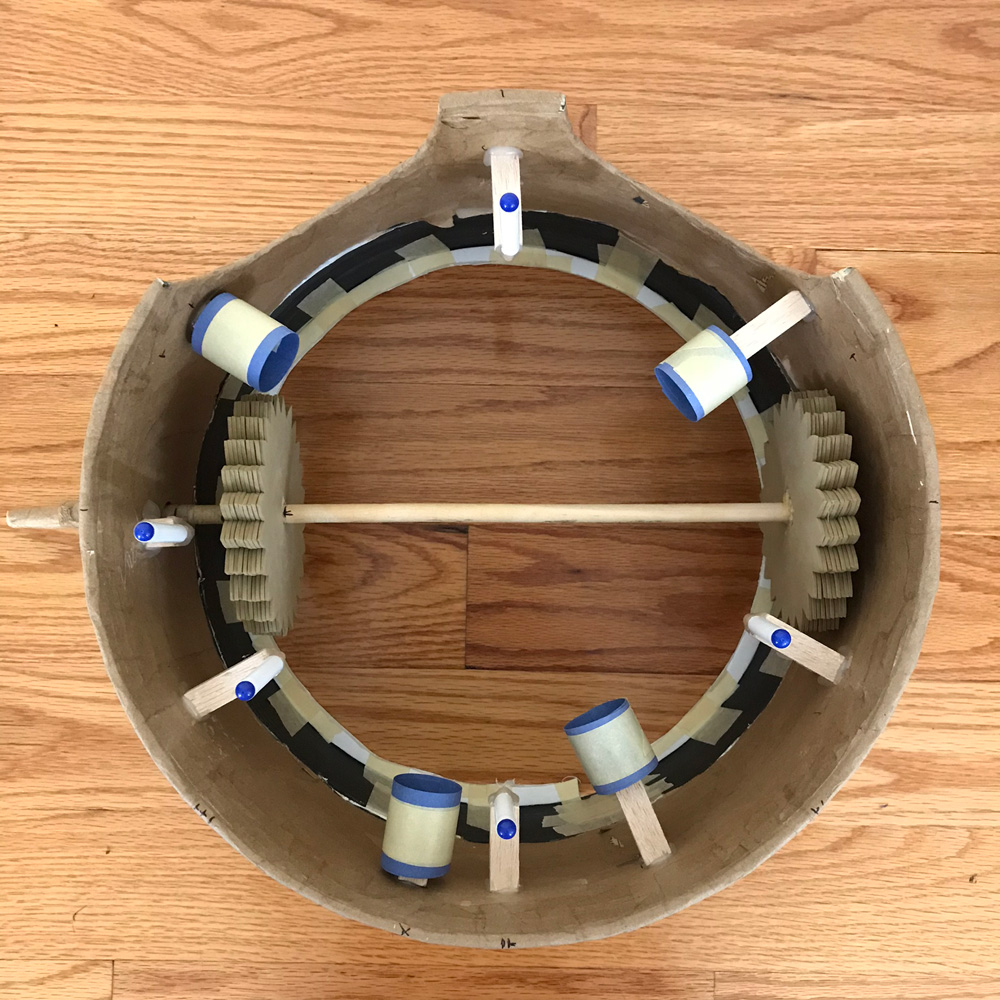
And here’s the same thing with the rings in place:
The next thing I did was take all out of this stuff outside and carefully spray paint all the interior parts black; as lightly as possible, to avoid any unnecessary drips or thick buildup of paint. First I removed the rotating rings and the plastic pens and spray painted them all individually and set them aside. Then I spray painted the inner walls and all the moving parts, making sure to turn the gears to get them from all sides.
After this was all dry, I touched up the paint job here and there with a paint brush and slightly watered-down acrylic paint.
This whole set-up is so delicate I was honestly a little worried that painting everything might mess up the way all the parts move together, but after letting the paint set for a day I put it all back together and everything worked fine.
(Boring note: I ended up changing the pens to a different kind that are a little skinnier; all the moving parts were feeling a little tight so I bought myself a couple millimeters with thinner pens.)
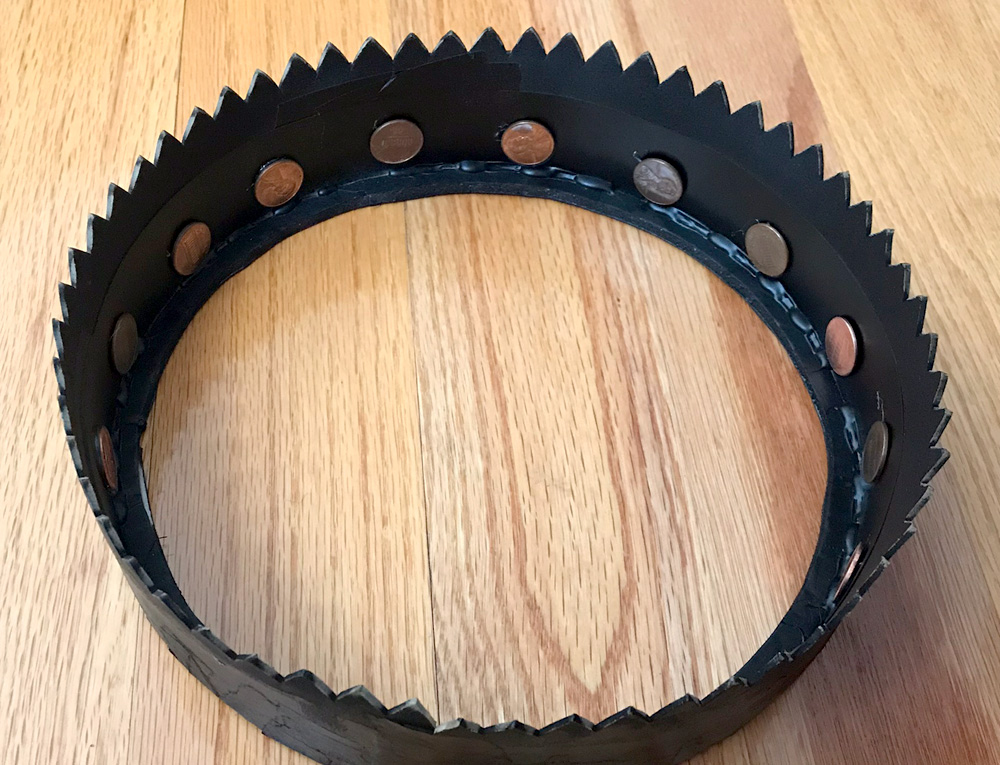
One problem I could foresee was that the rotating rings are so lightweight that they kind of want to jump up off of the gears as the whole thing rattles around. I knew adding the skeletons later would help weigh them down a little, but I figured I’d have to add some additional weight as well. So, I hot glued a bunch of pennies at regular intervals along the inner edge of the rings, and then painted them black. This immediately made a difference; the rings are a lot more stable as they rotate, and you can actually feel the difference in the weight when you turn the handle; it’s not difficult at all but there’s a nice feeling of resistance now.
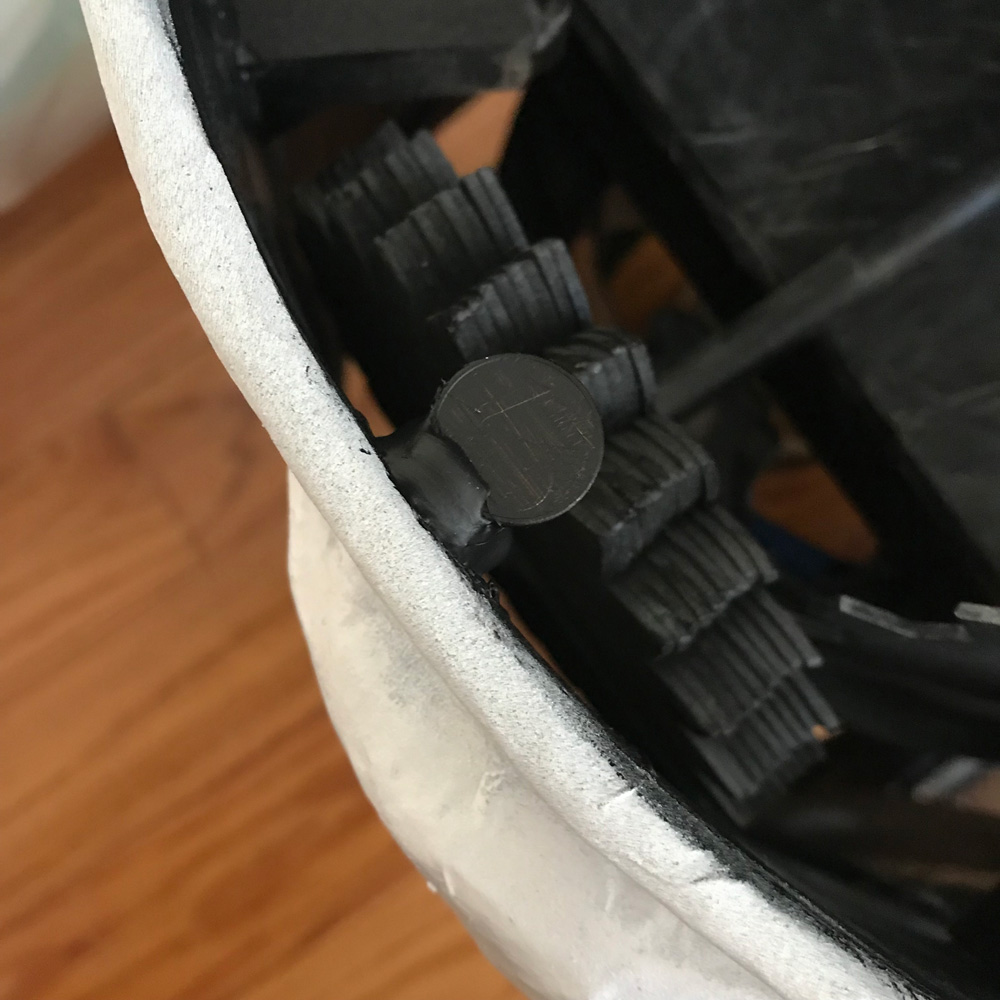
One last tiny detail: in stress-testing the gears I found that once in a while the outer ring wanted to slip off the big gear and fall down toward the inner wall of the mask. To fix this I added one last little bumper: a tiny 1-centime coin, hot glued in place on a tiny block of wood. I did this many steps later; that’s why everything in suddenly painted in the above pic.
That’s all for part one! On to part two: creating the dancing skeletons.
 About Manning Krull
 How to make a 4-foot paper maché alligator
 My violin skull mask, Mardi Gras 2015
 Three-headed paper maché dragon sculpture
April 19th, 2019 at 8:22 pm
Genius! Thx for the diagrams and photos.
April 20th, 2019 at 12:21 am
My pleasure! Good luck!