
Spider skeleton costume for Mardi Gras 2020! — part 2
Published by Manning on February 25th, 2020
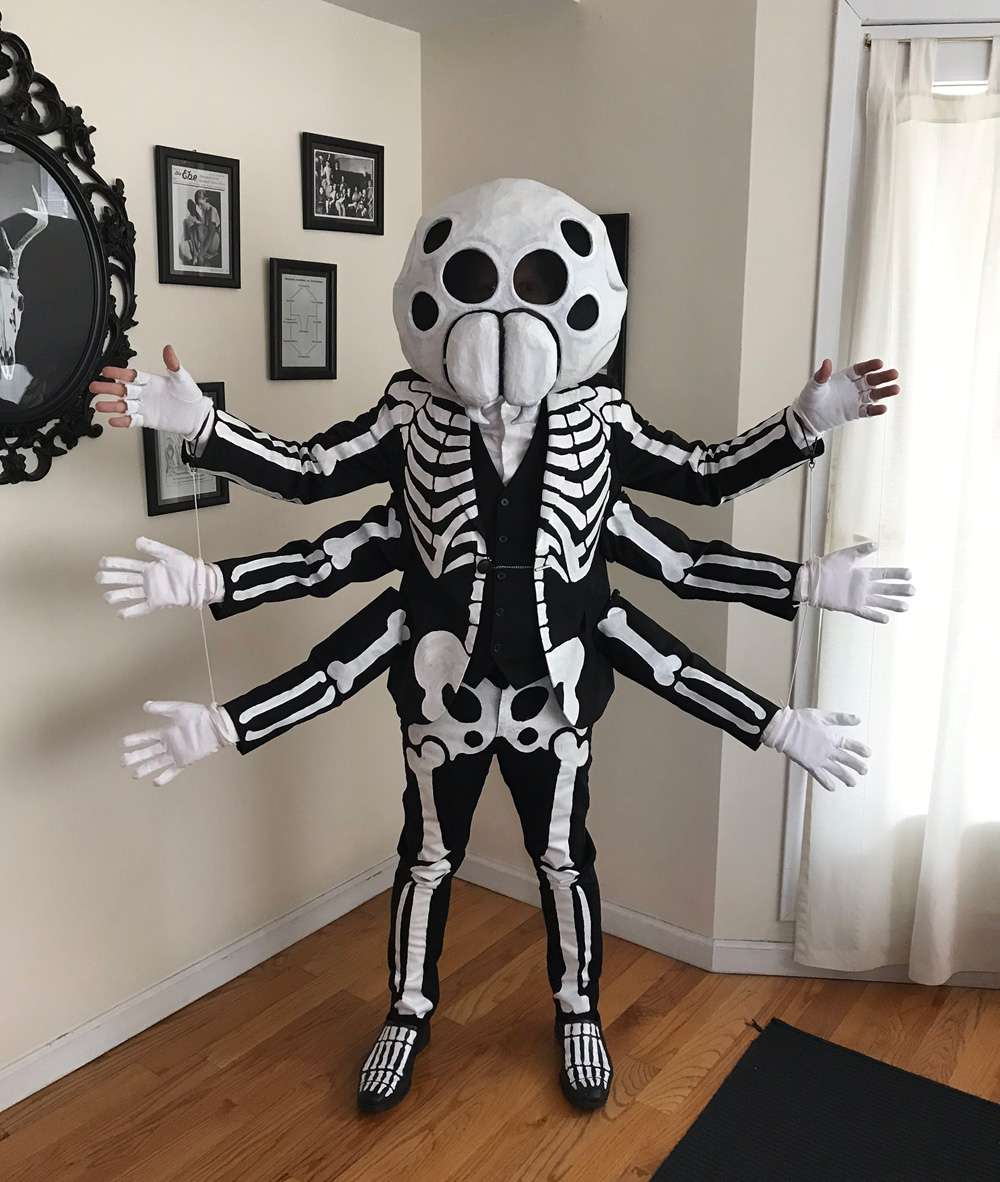
I made this six-armed spider skeleton costume for Mardi Gras 2020! This is part two; see part one here for how I made the mask. A lot of people have asked me: why only six arms, rather than eight? — ’cause with my legs that’s eight limbs total, duh! Anywhere, here’s how I made all this stuff!
Making the hands
I made up this method for making realistic fake hands back when I was working on a Freddy Krueger glove prop — check out that article for more details. Here are the basic steps…
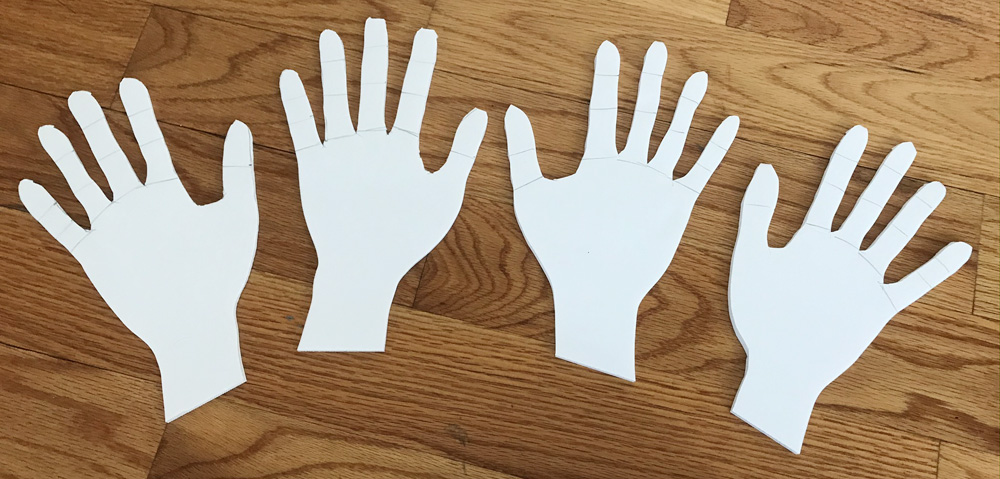
First, I traced all four of my hands onto foam board and cut them out. If you only have two hands, you can trace each of your hands twice.
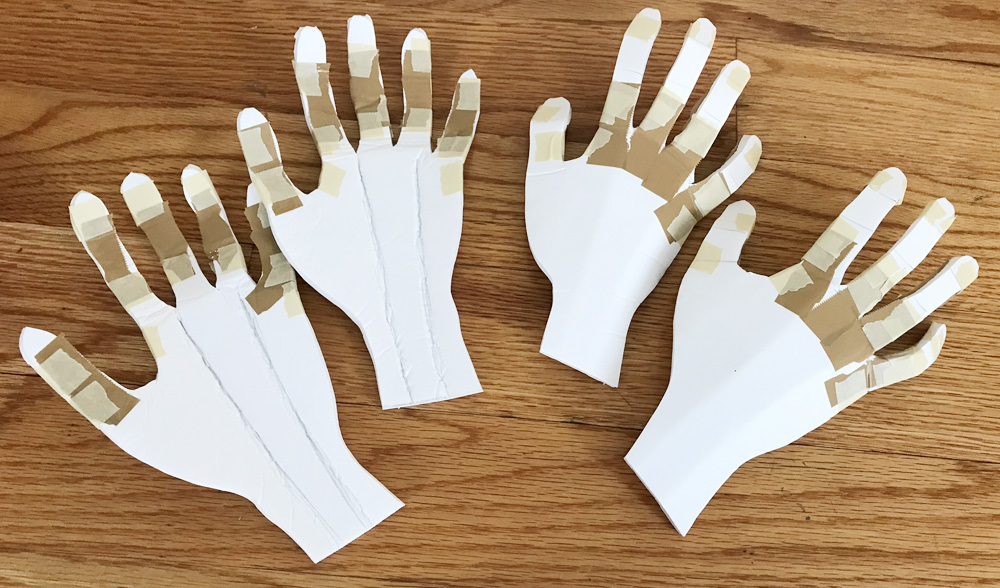
Then I bent all the finger joints and locked all the joints in position with lots of tape.
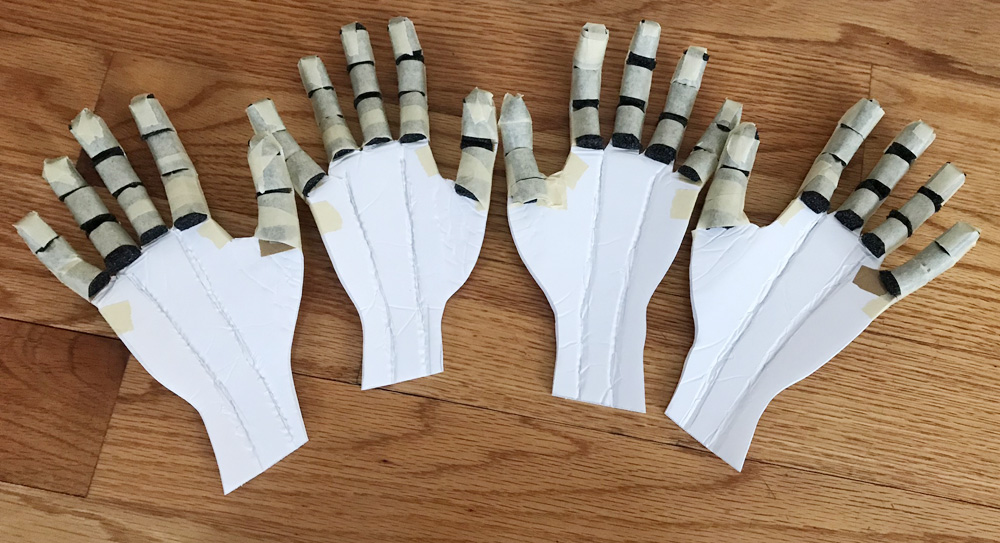
Then I grabbed some foam insulation tubing and cut out lots of little shapes to tape in place to pad out the interior surface of the fingers and palms. The above pic is just after I finished all the fingers.
Then I added a layer of craft foam to pad out the back surface of the hand, and I also added craft foam knuckles and carpal bones.
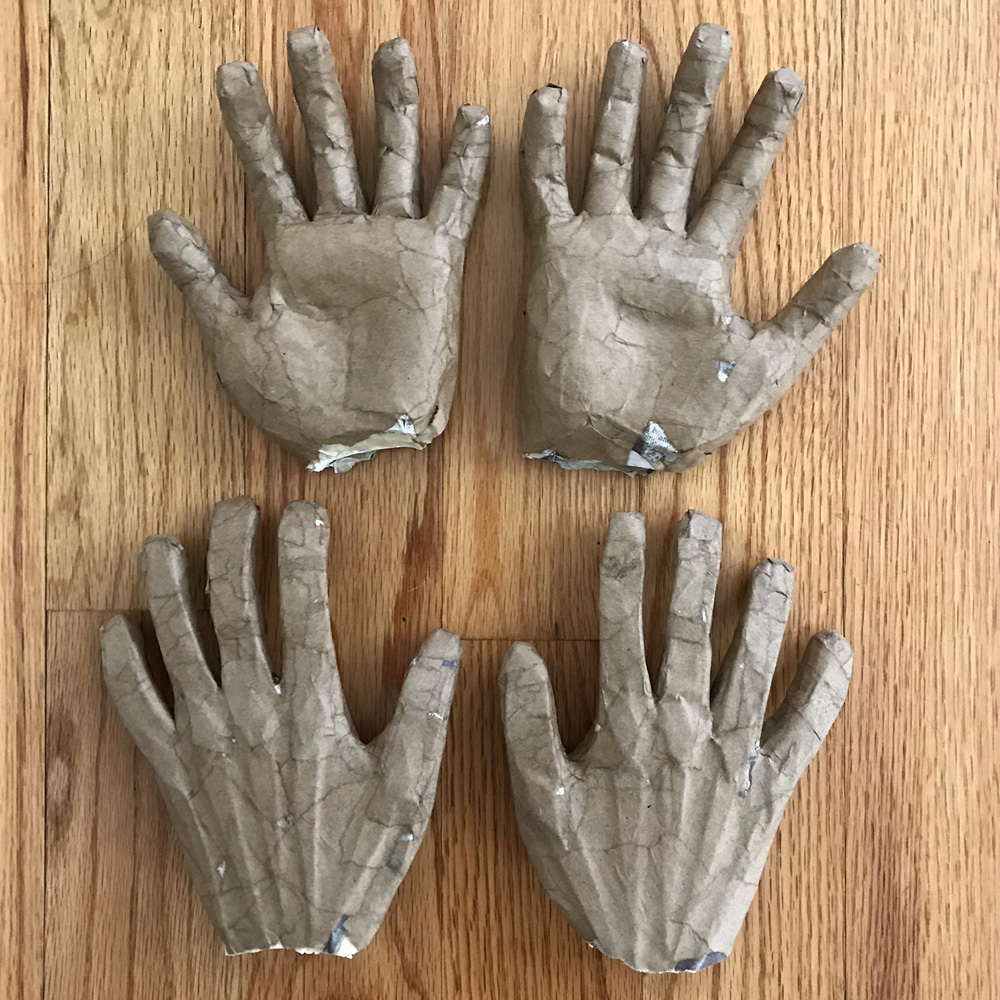
Then I covered the whole thing with two layers of paper maché.
Making the arms
I made the arms in two segments each, with a very loose elbow joint. I wanted to keep these lightweight but sturdy. Let’s start with the forearms…
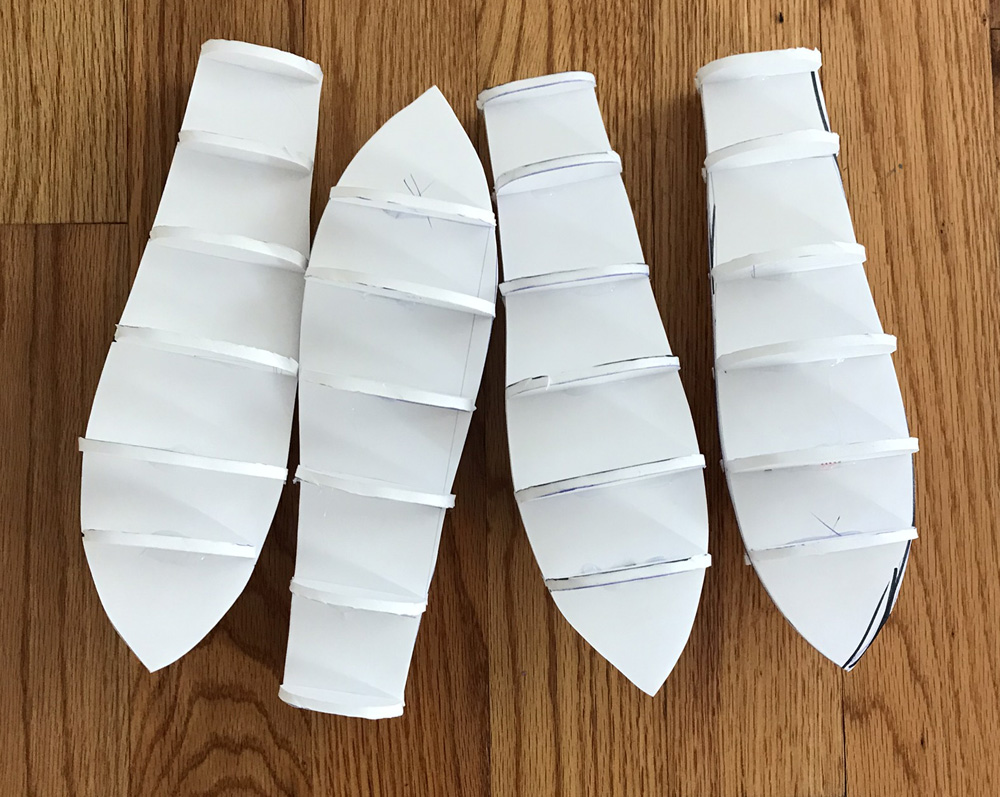
I made each forearm segment out of a piece of foam board with a few half-oval cross-section pieces, which I hot-glued in place.
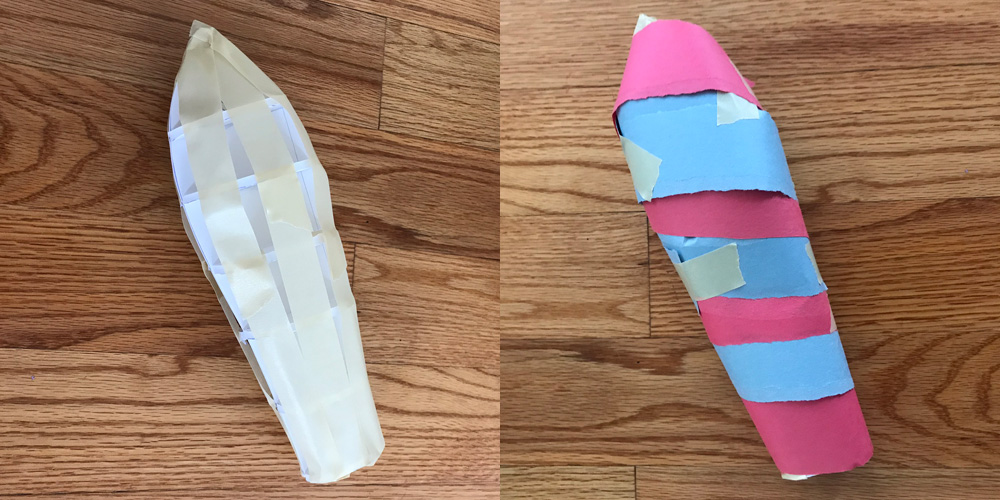
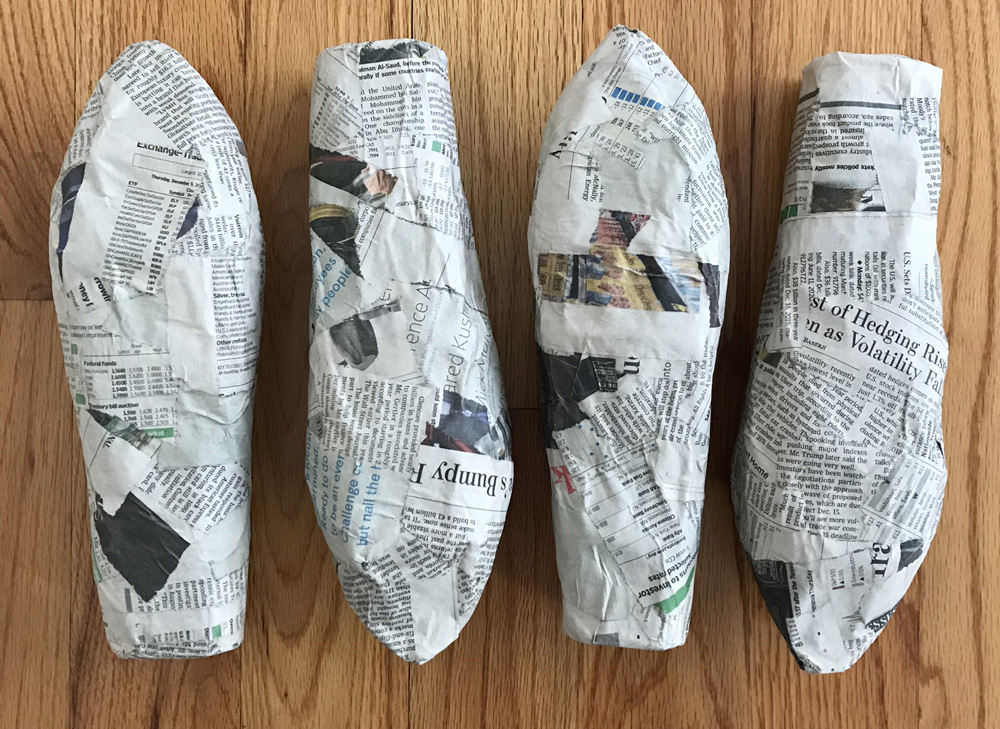
I then laid some masking tape across all the half-ovals, which allowed me to wrap the forearms with strips of construction paper. I then covered the forearms in two layers of paper maché to solidify them a bit.
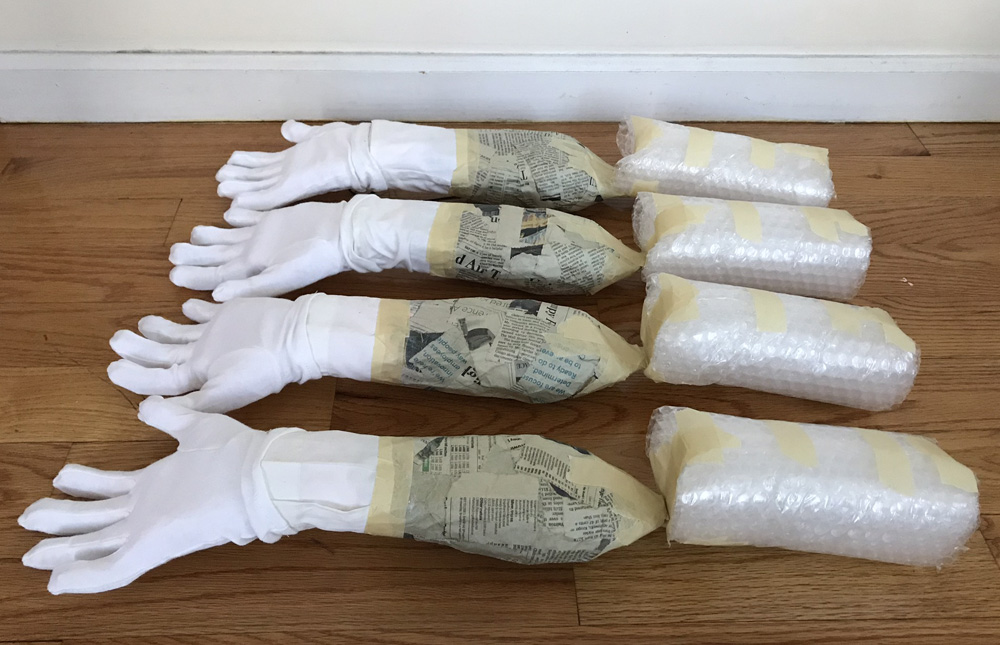
When the forearms were dry, I attached the hands to the forearms with masking tape and then covered over these connections with about four layers of paper maché.
I painted the hands and wrists a color that’s more or less close to my skin color — a sickly grotesque pale pink. I bought three pairs of cheap costume gloves off of Amazon; one pair for my real hands and two for the fake ones. I put the gloves on the fake hands and secured them with a little bit of hot glue at the wrists. The gloves are very thin material, and almost a bit see-through; that’s why I painted the hands a light pink color first.
Making the upper arms was much simpler. After some trial and error with the sleeves (more on the sleeves coming up), I realized I needed the upper arms to be much softer and more squish-able than the forearms, so that they can fill the space in the sleeves nicely and are flexible enough to allow for the movement of the arms; when I lower the arms the top part of the arms (closer to my body) needs to be able to squish a bit as that part of the sleeve becomes somewhat flattened.
So anyway, for the upper arms I simply used rolled-up bubble wrap! Easy!

I connected the forearms to the upper arms with lots of masking tape at the elbows. You can see how I taped the pieces together to allow the arms to bend somewhat naturally. You can’t see it here but I taped a piece of string in the elbows to make the joints a little stronger and less likely to fall apart.
Making the sleeves
I made the four extra sleeves out of two old blazers that I had in my closet. I cut off the sleeves and carefully hot-glued them onto disks of foam board at the shoulder openings. I bent up these foam board disks a bit to make them curve inward, so they’ll fit nicely onto the sides of the jacket.
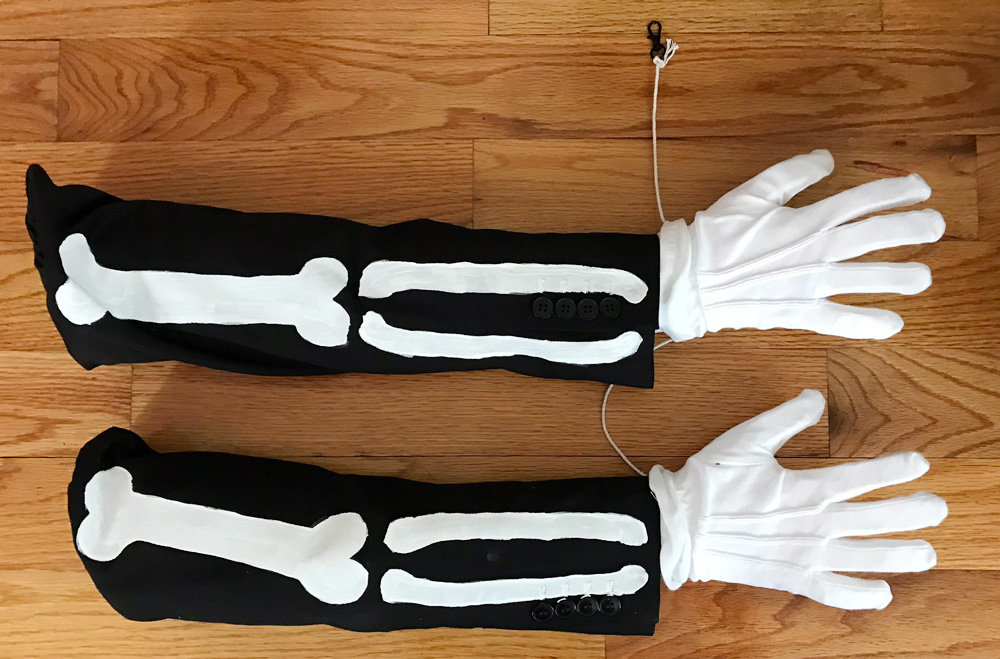
Oh yeah, I also cut up an old white dress shirt to make the cuffs for the arms; I used the actual cuffs to make one pair, and I cut some pieces off the bottom edge of the shirt to make the other pair. I hot-glued these onto the wrists, and then I secured the cuffs at the back edge with masking tape.
Using magnets to make the arms detachable
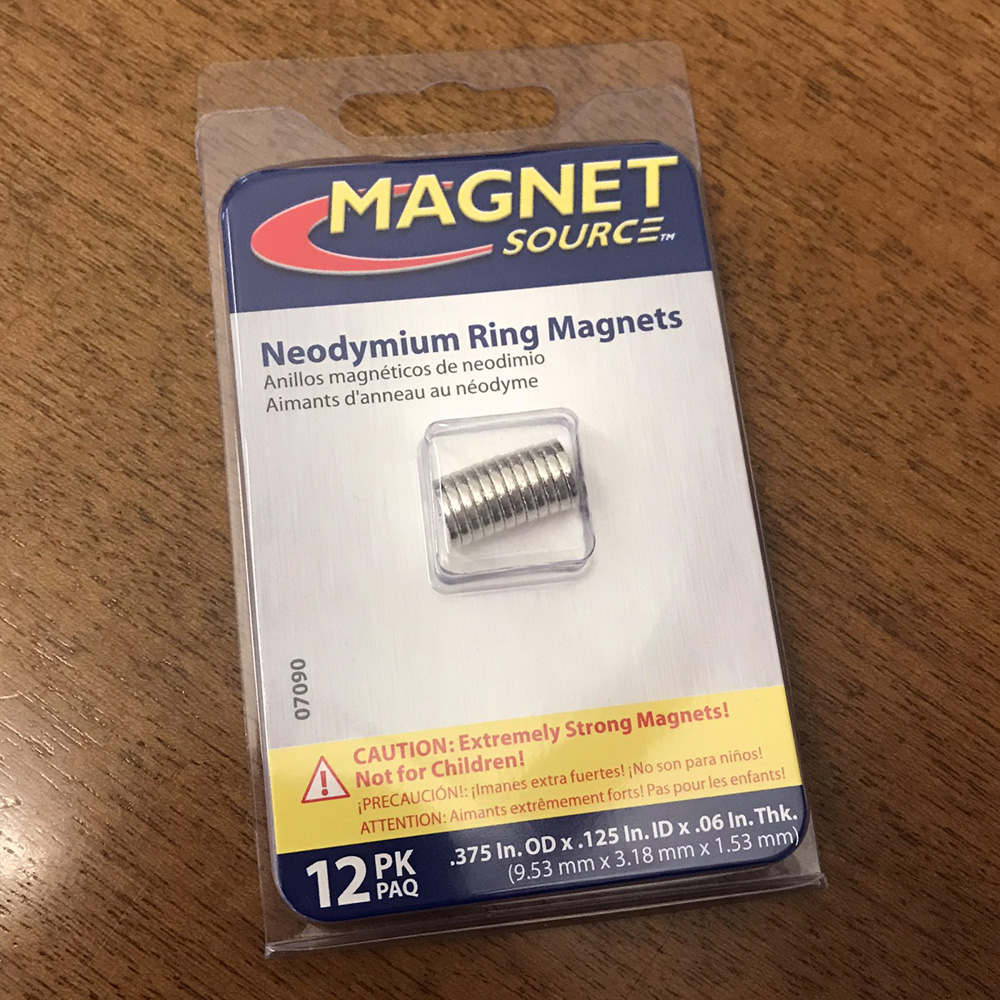
I wanted to make the arms easy to put on and take off as needed, so I decided to attach them to the jacket with magnets. I love working with magnets; they’re fun and you can do a lot of neat stuff with them. I use rare earth magnets like these; I get the ones with a hole through ’em because that makes them easier to attach to stuff.

So, I needed to attach some of the magnets on the jacket, and attach the others onto pieces of poster board that would become the base for each arm. It’s important when working with magnets that you arrange them to line up perfectly with each other or else they won’t connect very firmly. So, first I figured out exactly where I wanted to put the magnets on the jacket for each arm; I very lightly marked some dots with a white china marker, four for each arm. I sewed the magnets in place by hand — this is one example where using magnets with a hole through them really helps. All this sewing was probably the hardest part of this whole costume! (For me, anyway!)
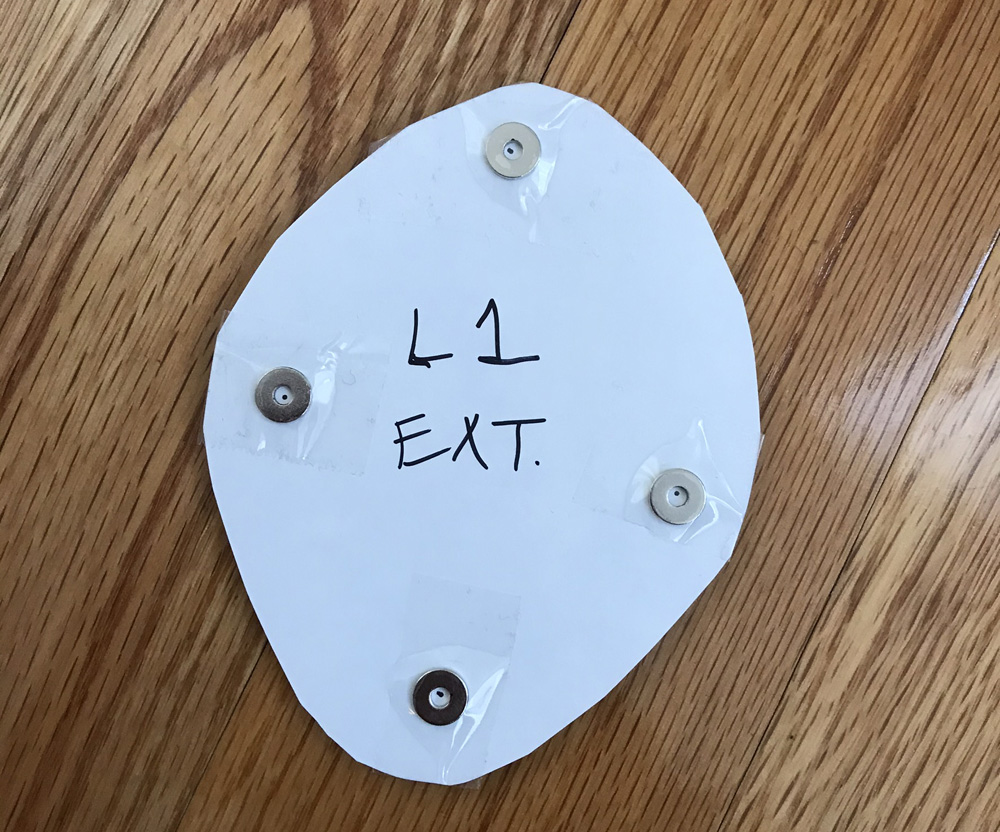
Once the magnets were sewed in place, I placed a piece of poster board over the magnets and set the other magnets onto that; the poster board will become the base for each arm. The magnets snapped right in place over their friends on the jacket. I traced their positions with a pen, and I also marked an arrow for which way is up, and I labeled which arm base was which (e.g. “R 1” for the top right arm), and I also labeled that this side of the poster board is the inside, i.e. the side facing inside the arm. I write notes and arrows and stuff on pieces of my projects all the time, ’cause I know I’m too dumb to keep track of this stuff in my head!
I took the magnets off and cut the poster board into oval shapes around the little circles I drew for the magnets.
Now, I needed to attach the magnets permanently to these poster board ovals, but I actually wanted to attach them to the other side of the poster board, i.e. the side facing the jacket. I didn’t want to have this thick poster board between the magnets in the arms and the magnets in the jacket; the less stuff in between, the stronger the connection will be.
So, how to find the precise place for the magnets on the other side of the poster board? Easy, I just held each magnet in the little circle I drew for it, and then placed another magnet on the other side of the poster board. Then I drew a circle around the magnet on that side. That’s where I needed to attach the magnets.
Once I worked all that out, I taped the magnets in place with heavy duty shipping tape; this stuff is strong enough that the magnets can’t tear through it. Note: I decided to double up my magnets here; the more magnets you stack up, the stronger they get.
When all that was done, I’d used 64 magnets — eight on the jacket for each arm, and eight inside the base for each arm. The magnets ended up being a little expensive but I’ll be able to reclaim most of them when I’m done all with this costume; I’ll definitely have plenty of uses for them for other projects in the future.
Now to reinforce the poster board ovals so they’re nice and solid and can become part of the sculpture of each arm. I placed all the ovals on the jacket, and I put the jacket on to see how it fits around my body. I curled and bent the poster board ovals a bit so they took on the curve of my torso. Then, while still wearing the jacket, I put a few layers of heavy duty shipping tape on the ovals. The tape helps keep the ovals permanently curved. I then removed the ovals from the jacket and put a few more layers of shipping tape on them. After all this they felt pretty solid.
Time for paper maché. I covered over the ovals with one layer of paper maché on both sides. When that was dry, I marked the position of the magnets with a Sharpie, and then I added four more layers of paper maché over the whole oval, everywhere except where the magnets are on the outer side. I didn’t want to add more layers of paper over the magnets because each layer of stuff weakens the connections a bit. The tape and one layer of paper maché locks them in place so they can’t tear through, and then all the rest of the paper maché around them is there to make these bases really solid and strong.
When these ovals were dry, I used Gorilla Glue to attach them to the sleeves &madsh; you’ll remember I mounted each sleeve on a disk of foam board. I glued the ovals with the magnets right onto these disks. When the glue was dry, I painted all this stuff black.
I slipped the arms into the sleeves and temporarily taped them in place at the wrists with masking tape — I didn’t want to attach them permanently until I could be sure they were the perfect length, with just the write amount of white shirt cuff sticking out. I put on the jackets and popped the arms in place. At this point I could tell that all the arms were a little too long, so I pulled them out and made some modifications. I used a small hand saw to saw off a 3/4″ segment out of the middle of each forearm. I reconnected these with hot glue and masking tape. I then used an X-acto knife to cut about 3/4″ off the back of the bubble wrap upper arms. I put the arms back in the sleeves and they fit much better!
Now I could glue the arms into the sleeve. I used Gorilla Glue — this time, the kind that doesn’t expand — to attach the forearms into the cuffs of the sleeves. I used some masking tape to hold the pieces together while the glue dried, and then I removed it.
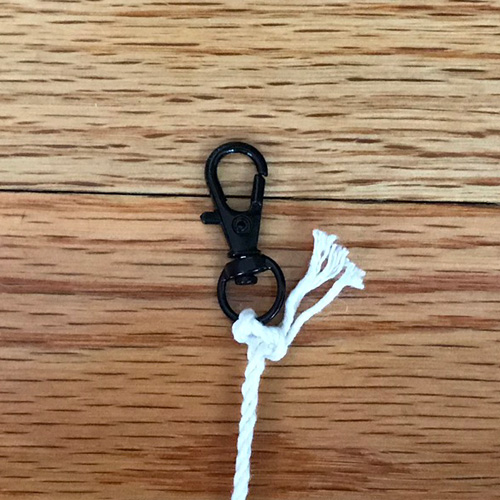
Now all four arms were done, but I still needed to connect the wrists to each other so I can move all the arms at the same time. I tied the wrists together with cotton string. I then ran another piece of string from the top fake wrist up to where my real wrists would be. I attached little metal clasps to these strings, and I wore jelly bracelets on my real wrists and simply clipped the clasps onto the bracelets.
This took a little trial and error to get the lengths of the string right; I ended up doing all this work with the string about three times, but it really didn’t take too long.
Accessorizing
I wear different combinations of black or white shirts and ties with my skeleton suit every year, depending on the look I’m going for. This year I decided to wear a white shirt to complement the white gloves. I also decided on a white bow tie for the first time, because I didn’t want something dark that would visually interfere with the look of the spider skull mask when viewed from far away. My thinking was that the fangs of the spider skull are kind of a weird shape, and if I had a black tie under them it might be a little visually confusing. I dunno! I also got a white scarf, in case it’s real cold out Mardi Gras morning.
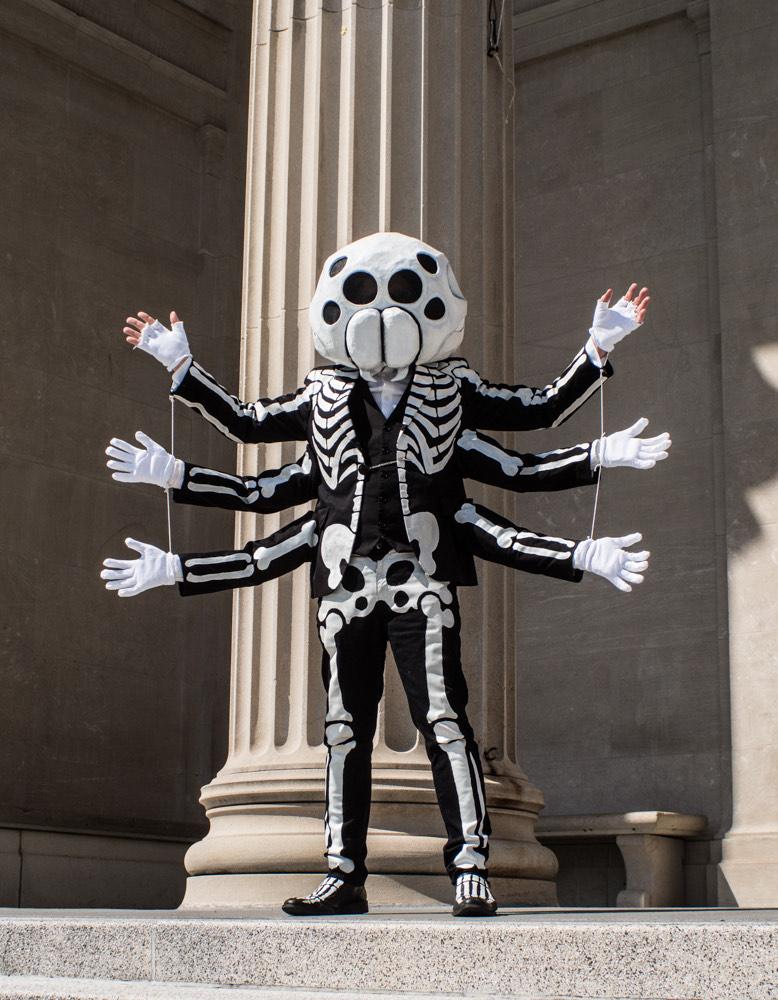
Here’s me in New Orleans a couple days before Mardi Gras! Photo by Kevin O’Mara
This whole costume was a really fun project and I learned a ton of new little things, but none of the steps were very complicated! I should mention, although I tried to keep the arms lightweight, the whole jacket and arms ended up a bit heavier than I would like, and I can see it’s probably going to give my shoulders a real workout over the course of our five-mile march. Oh well! It’s so fun to wear this thing; I’m writing this just before Mardi Gras and I can’t wait to go run around and act like a fool! Happy Mardi Gras everyone!
Update: Everything worked out great! The weather was perfect so I didn’t need the white scarf. You can see in the pic above the bow tie wasn’t really visible behind the fangs, and that was fine! I was a little worried about the strings that hold the arms up might break, or that the magnets wouldn’t be strong enough, but I had no problems at all. I can’t wait to wear this costume again in future years!
 About Manning Krull
 How to make a 4-foot paper maché alligator
 My violin skull mask, Mardi Gras 2015
 Three-headed paper maché dragon sculpture
July 31st, 2020 at 10:32 am
Hello! I came across your work via some tertiary Tweet, and have been reading your paper mache posts for hours.
I have a question about the wallpaper paste you use: how many gallon bottles does a typical large mask take?
Thanks for sharing your masks and construction techniques!
August 3rd, 2020 at 1:25 pm
Hi Lea! Thank you so much for your comment! On a typical large skull mask I use about 1/4 to 1/2 of a one-gallon jug of paste, so that’s one or two quarts. Obviously it’ll vary depending on size of the mask, how many layers I do, etc. I’ve definitely never used a full gallon on any one mask. I hope that helps!
August 3rd, 2020 at 10:00 pm
That does help! Thank you, and thanks for the twitter follow!