
Tiger piñata sculpture!
Published by Manning on April 12th, 2022
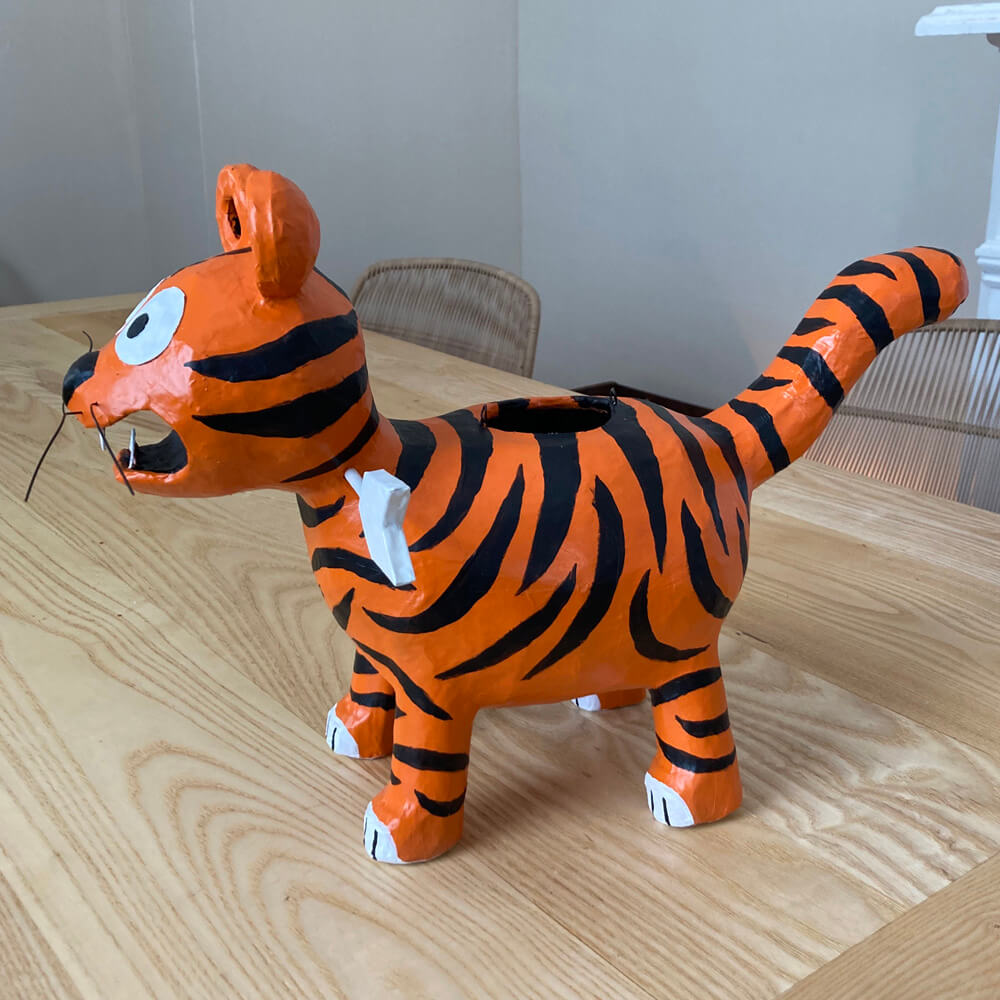
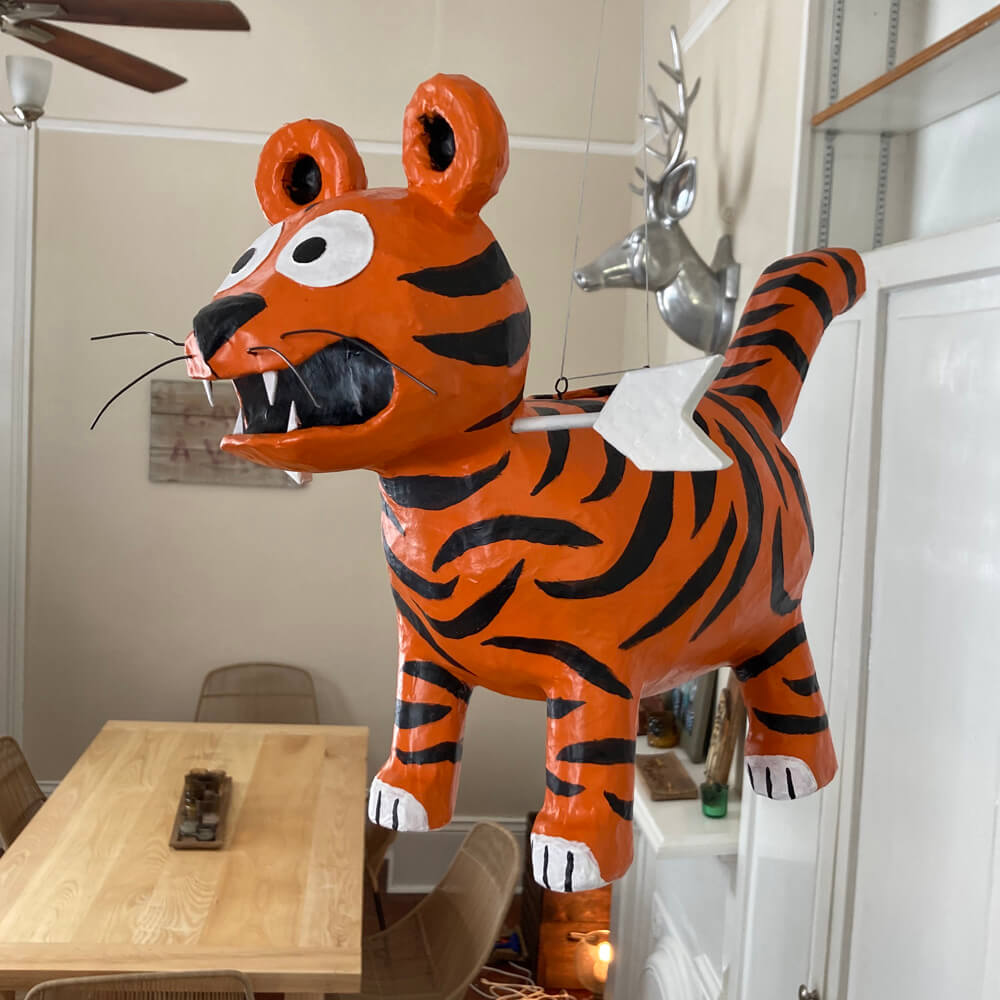
I made this lil’ tiger piñata for one of my favorite people in the world, writer and illustrator Jon Morris; it’s for his Gordo book project, which you can read about in this thread! The tiger sculpture I made isn’t a real piñata, in that it’s not (completely) hollow and it’s not intended to be destroyed. It’s just a prop that’s meant to look like a piñata. Here’s how I made the thing!
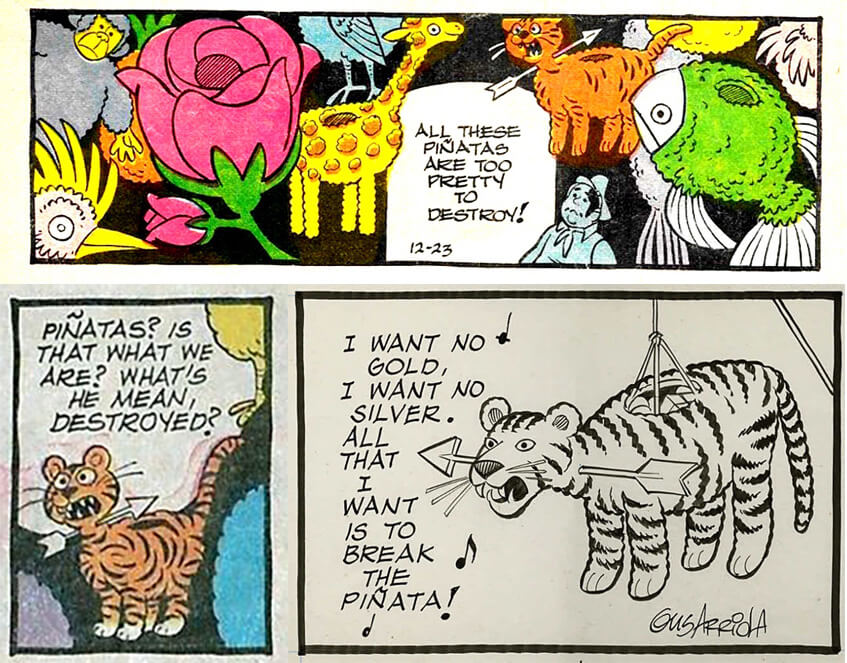
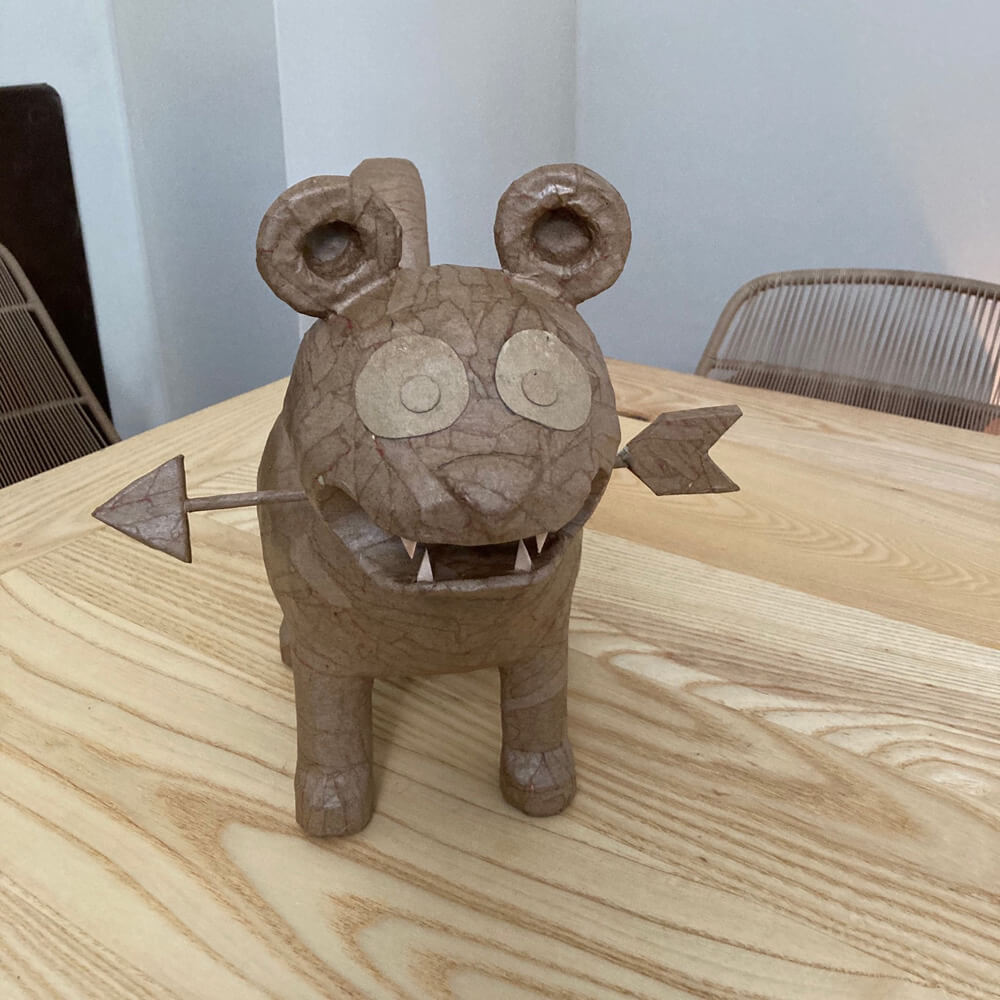
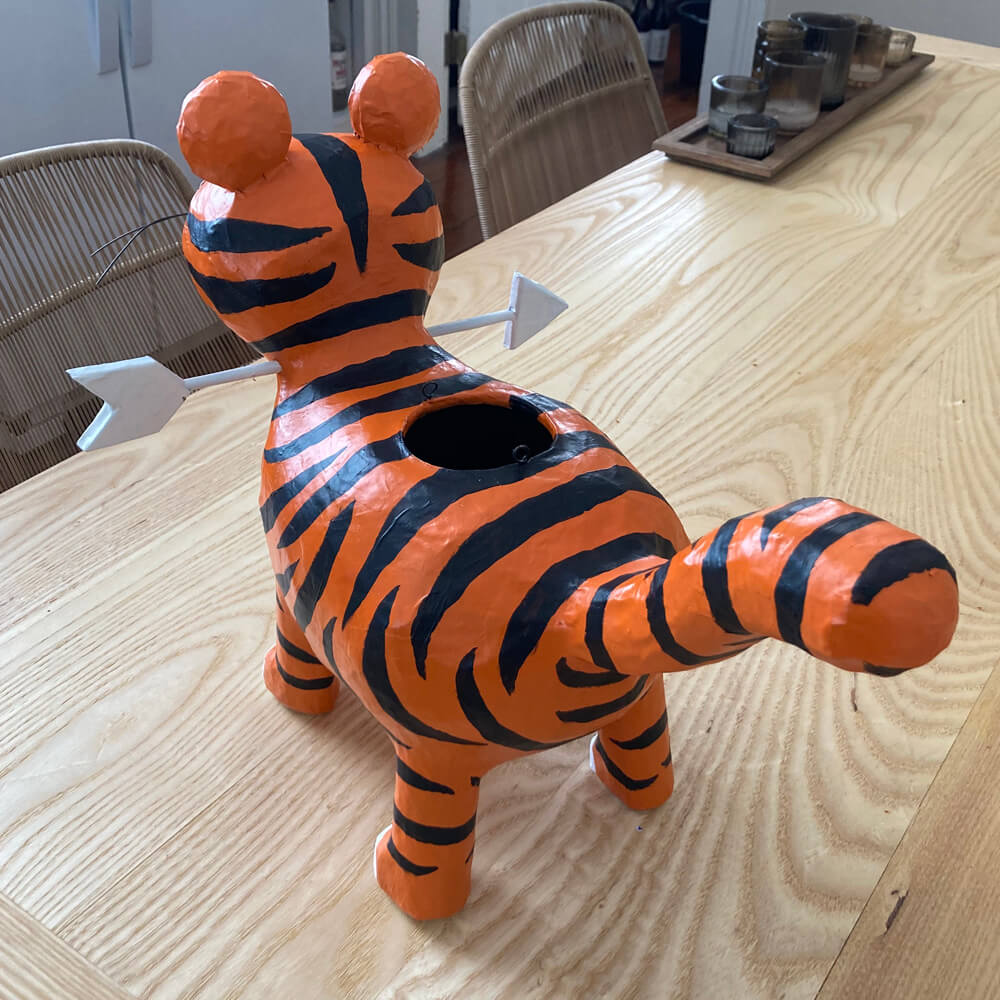
Jon sent me these three reference pics of the tiger piñata character. Each of them had some different characteristics, and Jon and I chose a certain combination of details that we wanted to shoot for. Jon mentioned that the piñata didn’t have to be hollow but that he’d like to have a recessed area on the back that gives the impression that it’s hollow. You’ll see the tiger in the comics also has an arrow through its neck; neat!!
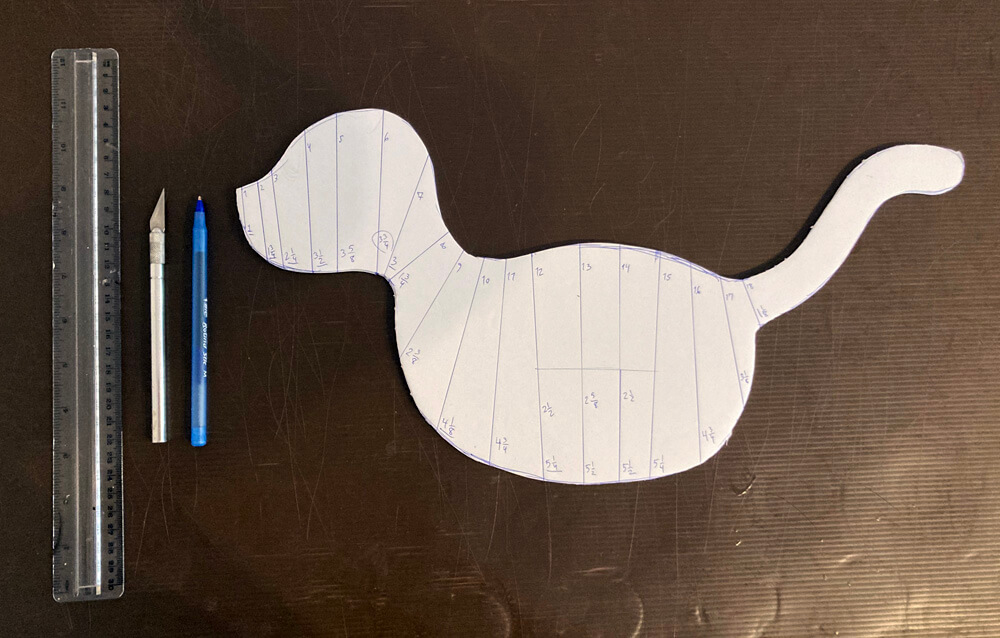
I started out by drawing the profile of the tiger (minus legs) on foam board, and I cut that out.
I drew a bunch of lines across the body shape, and I numbered them and measured them. You can see that small horizontal line in the middle; this is to show where the bottom of the recessed area will be.
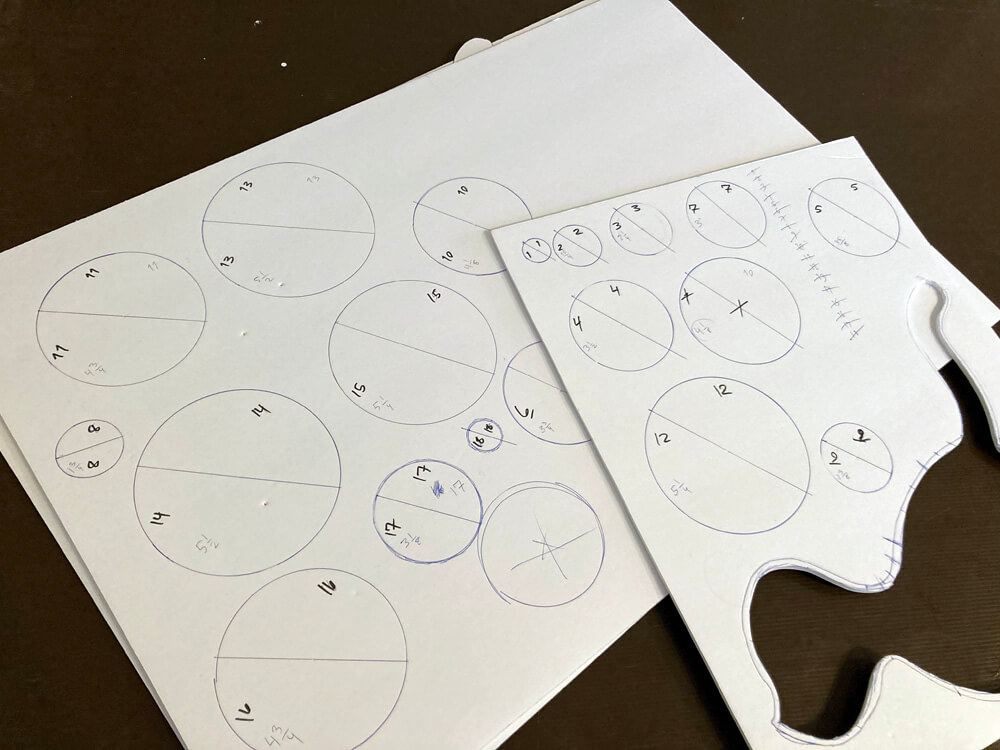
I then measured and drew and cut out a ton of circles of foam board. I used my tried and true method for drawing circles. I drew a line down the middle of each circle and cut them all in half.
I traced the tiger body shape to make a copy, and cut that out to make the other side of the body.
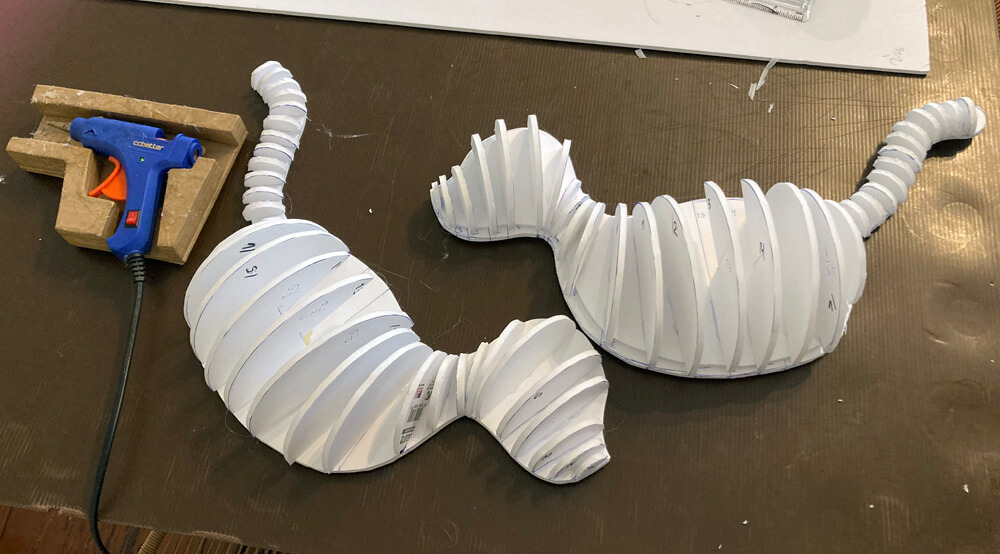
I then hot-glued half of the half-circles onto one of the side of the body, and the other half onto the other side.
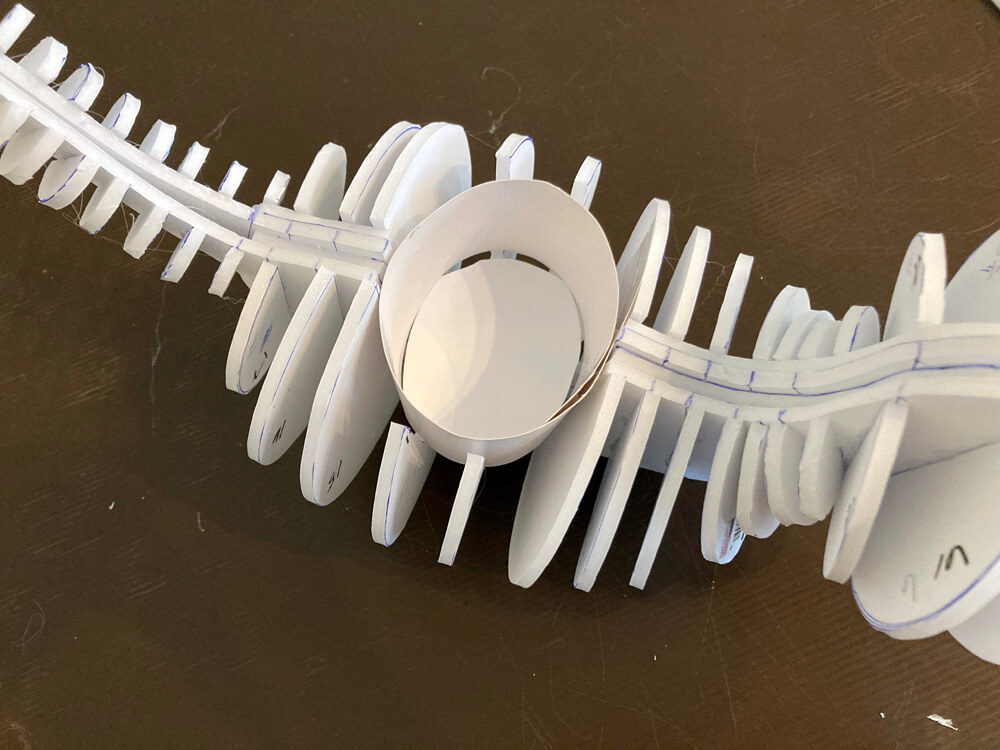
I made a tube out of poster board and inserted it onto the back; this will be the recessed area.
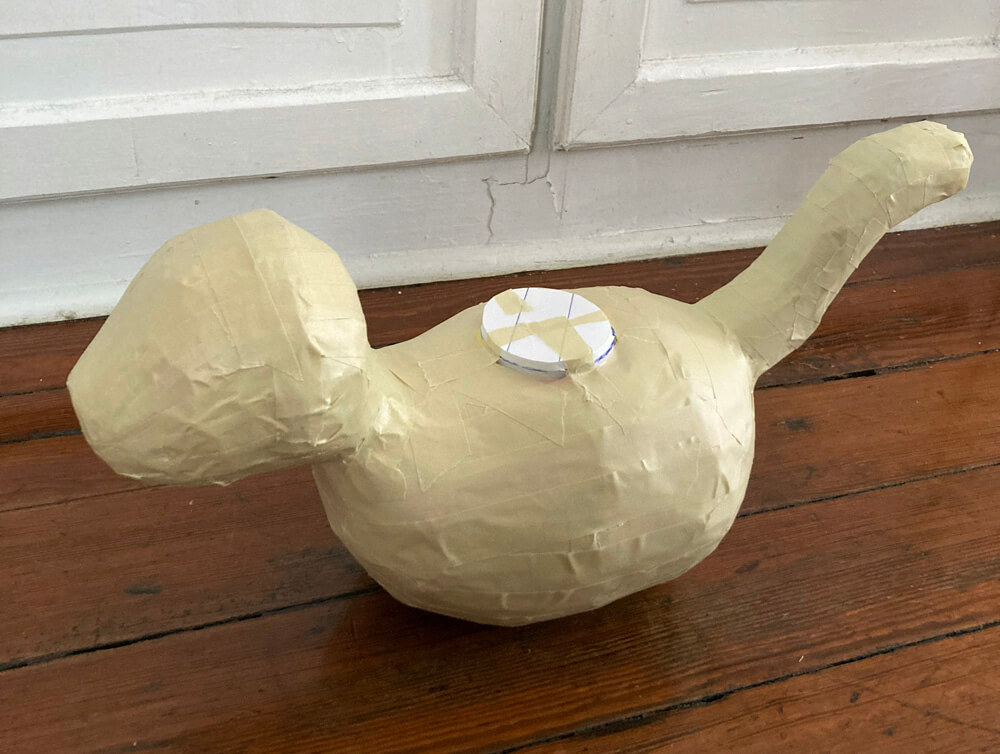
I then covered the tiger armature (for lack of a better word) with a couple different materials: First, strips of construction paper (not shown), then two layers of masking tape. All of this helps round out the bony shape of the tiger armature.
That foam board disk on the back is there to act as a guide for when I’m cutting out the paper maché later, so I’m cutting in exactly the right place to expose the recessed area I built.
I covered the piñata with just one layer of paper maché at first, just to solidify the whole thing and make it a lot more stable. You can read about my paper maché process and materials here.
I then made the legs out of pieces of foam pipe insultation tubes (not shown), covered ’em in masking tape, and taped them onto the body.
I then covered the whole tiger with six layers of paper maché.
I forgot to take a bunch of pics of the following steps!
I cut out the mouth with an X-acto knife — this meant not just cutting out the paper maché, but cutting way into the foam armature and removing lots of chunks. I built the inner surface of the mouth by spanning thin pieces of masking tape across. I covered the mouth interior with two layers of paper maché.
I made the teeth from wooden coffee stirrers, which I cut with wire cutters, and then I hot-glued ’em in place. I actually made them pointy at both ends, so I could stab one end into the gum area and leave the other end sticking out.
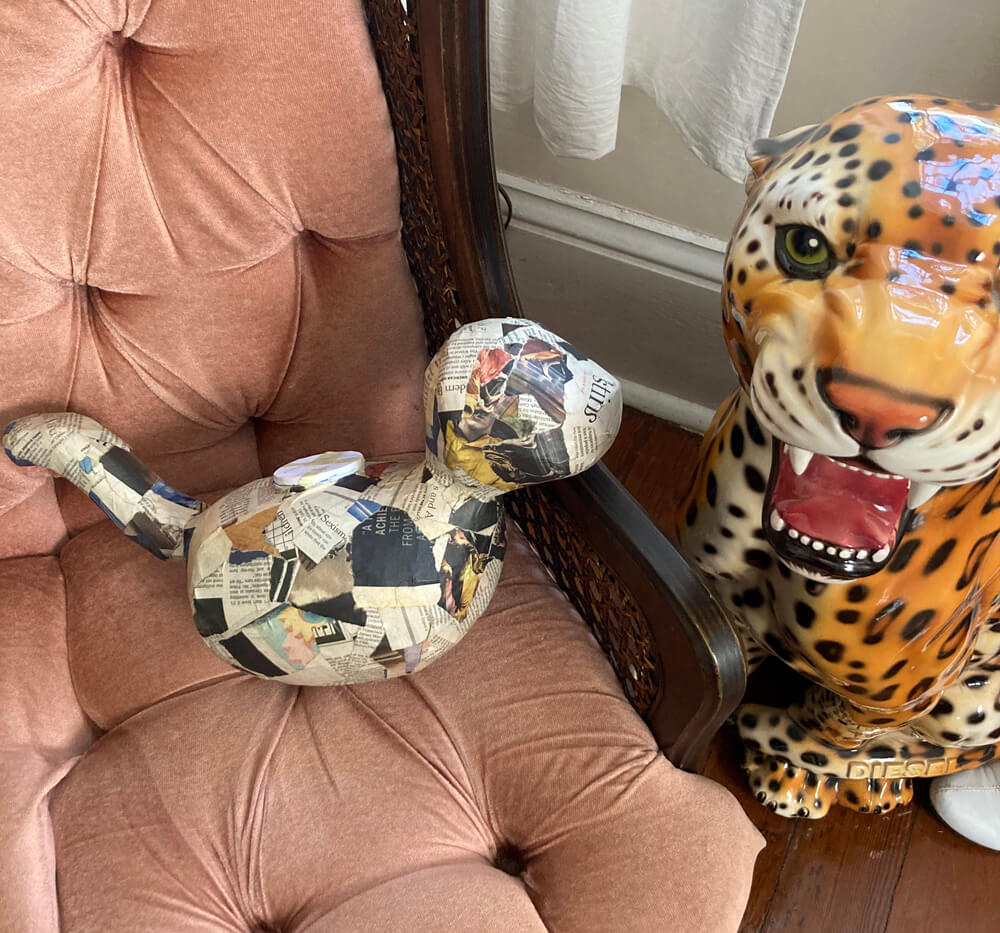
I cut the eye shapes out of a LaCroix box and pasted them in place.
The arrow shaft is just a wooden dowel that I put one layer of paper maché on. The arrowhead and the fletching are made from three layers of craft foam, covered in masking tape and then two layers of paper maché.
I cut out the recessed area on the back and built a sort of lip around it with masking tape, which I then covered with two layers of paper maché.
I made two little loops of steel wire and attached them in the front and back of the recessed area. The loops actually end in two long pieces of wire, which I curved around the edge of the recessed area and taped in place. This is to make the loops nice and strong so the wire won’t tear out when you hang the thing.
Next: painting
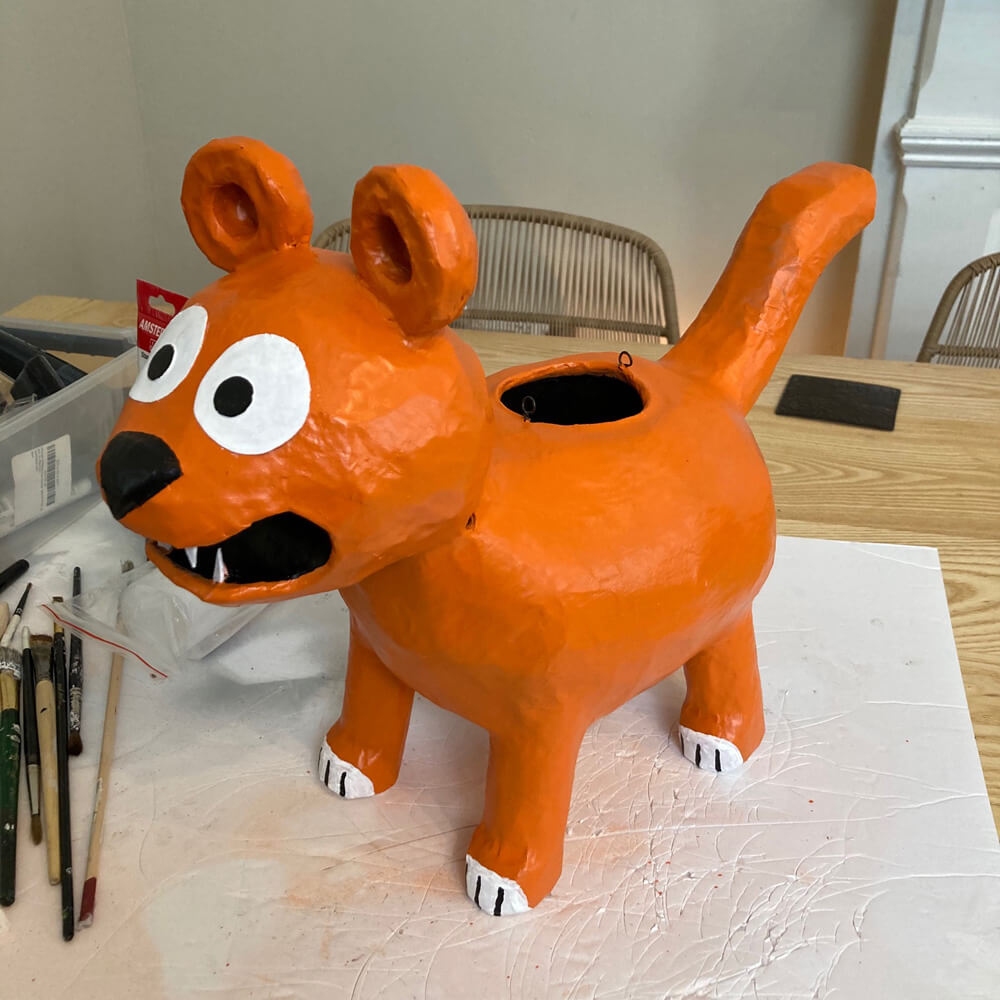
I spray-painted the tiger with a base coat of light gray spray paint, let that sit for 24 hours, and then gave it a coat of orange spray paint.
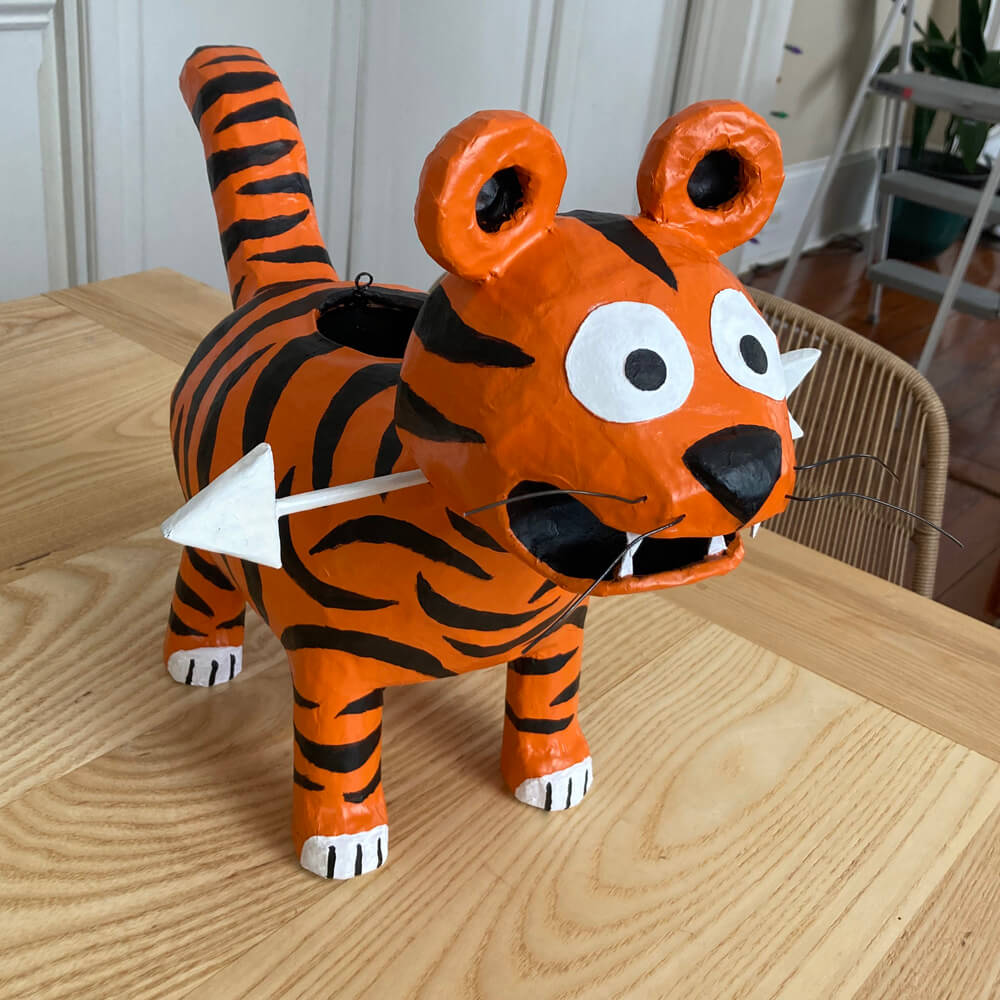
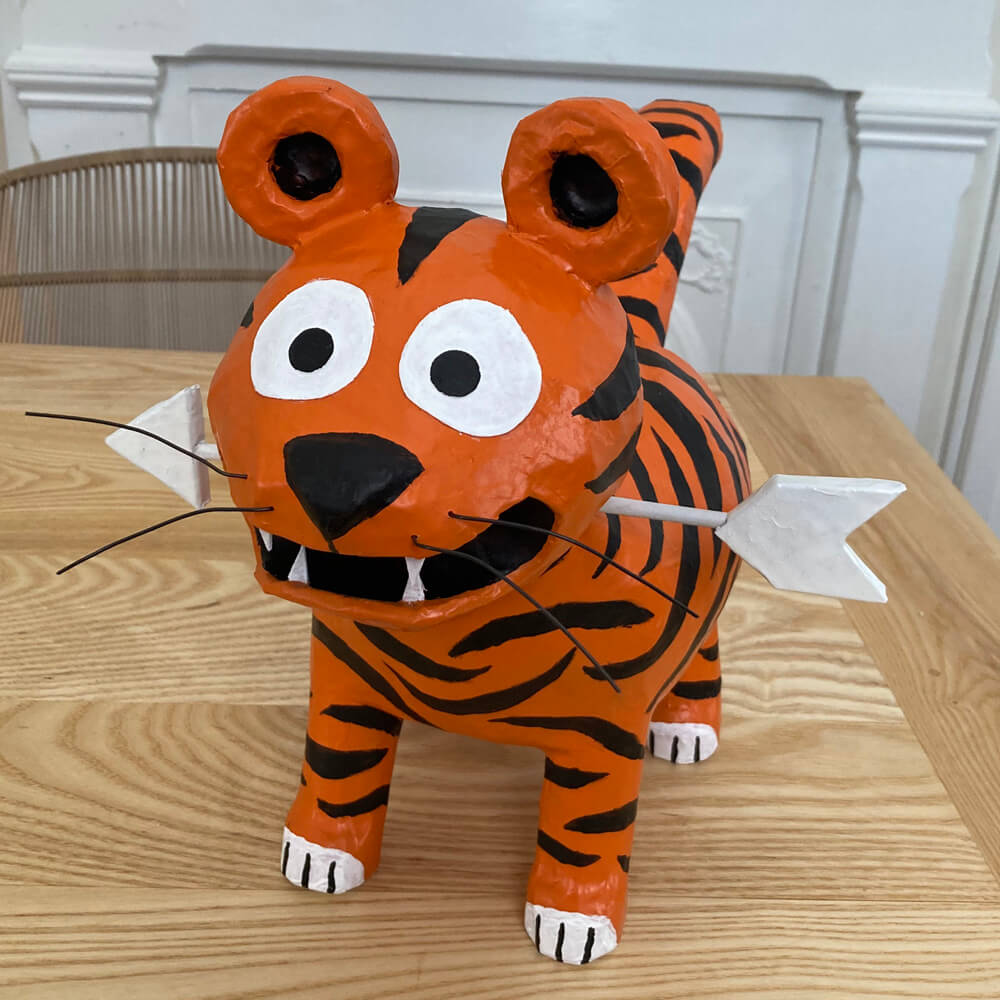
Once the orange had set, I painted all the details by hand with acrylic paint and a couple small brushes.
Last step: whiskers
I poked four holes in the tiger’s muzzle with a thick needle, and then I cut four pieces of steel wire and just inserted ’em in the holes.
This thing was really fun and easy to make! I probably went overboard with all the measuring and circles and stuff; a more normal way to make a sculpture like this would be just wadding up newspaper and paper towels and taping a bunch of blobs together. I get unnecessarily obsessed with symmetry and precision for some reason. It calms my troubled brain!
Anyway, please go follow Jon Morris on Twitter and Instagram to keep up with updates about his Gordo book project! And check out his previous books which I fucking love, The League of Regrettable Superheroes, The Legion of Regrettable Supervillains, and The League of Regrettable Sidekicks (paid links).
 About Manning Krull
 How to make a 4-foot paper maché alligator
 My violin skull mask, Mardi Gras 2015
 Three-headed paper maché dragon sculpture
Leave a comment