Simple paper maché animal masks
Published by Manning on June 22nd, 2015
For one of my Halloween parties I had the idea of creating tons of simple, spooky paper maché animal masks and hanging them up all over the walls. So my challenge was: how to make lots of masks quickly and cheaply? I came up with a plan that worked out great. Here are the materials I used:
- a few plastic animal masks from the art store
- aluminum foil
- paper towels
- Roman PRO-543 universal wallpaper adhesive (paid link)
- cardboard boxes
- heavy duty Scotch packing tape
- spray paint
Of course, I could have created the bases for my various animal heads myself, either with lots of modeling clay, or carefully wadded-up, taped-up newspaper, or something along those lines, but I wanted to make this as easy and quick as possible, so I just bought some animal masks from my local art store to use as a base. They were about $5 each; I bet you can find them even cheaper at a dollar store if you’re lucky. I bought a dog(/wolf?) mask, a cat, and a monkey.
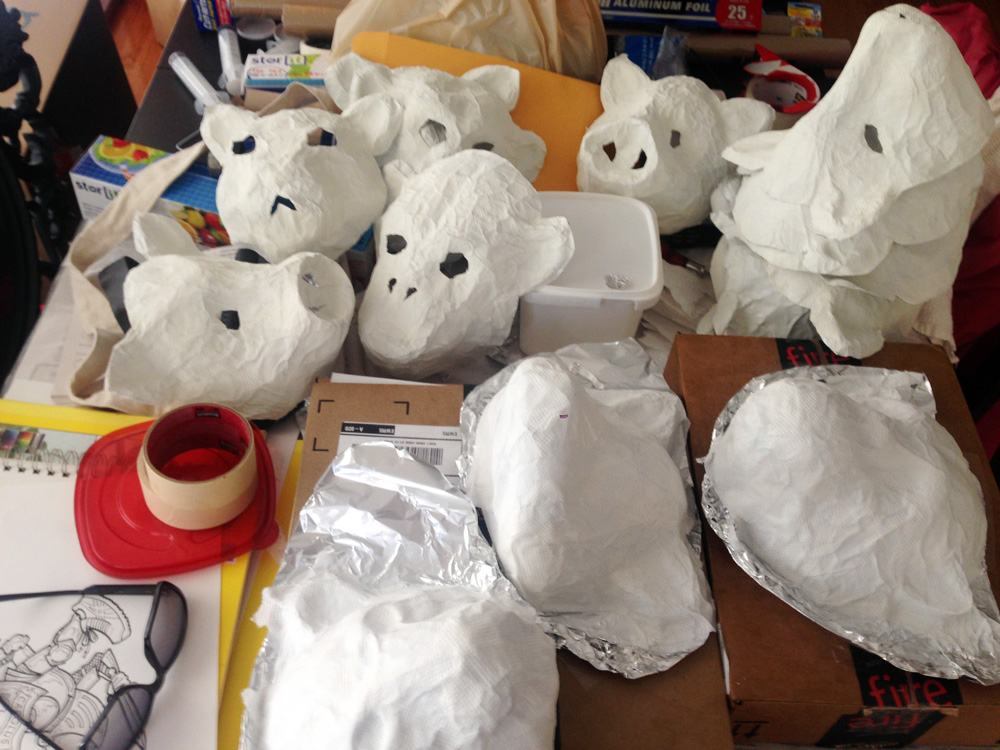
I started out by mounting each of these masks on a cardboard box. I did this by taping the edges down all the way around with heavy duty packing tape.
Now, these masks didn’t need to be sturdy enough to be worn; just strong enough to hold their shape when hanging on a wall. So I really cut corners on the paper maché. I first took a big sheet of aluminum foil and shaped that over the mask as well as possible. Then I did just one layer of paper maché, using ripped up strips of paper towels rather than my usual newspaper and craft paper. See my article about my usual paper maché process here. The short version is: I use Roman PRO-543 universal wallpaper adhesive (paid link) and in this case paper towels rather than alternating layers of newspaper and brown wrapping paper.
So the whole mask is just two layers; one of aluminum foil and one of paper maché. These masks are much less solid than my other bigger paper maché projects; they’re pretty flexible and malleable. But they stay put when they’re on the wall. (If you wanted them to be sturdy enough to wear you could just do six or so layers of paper maché, and maybe use newspaper instead of paper towels.)
And that was it! When the masks were dry, I simply lifted them off of the base and cut out the edges using scissors. I cut the eye holes and nose holes with an X-acto knife.
I then took the masks outside and spray painted them; some solid black, some solid white. (Even though the masks were already white, a coat of white spray paint made them a much more even and solid white.)
In making tons of these masks, I realized that I could push the nose of the wolf head inside out and make it a pig mask! So I got four types of animals out of three store-bought mask shapes.
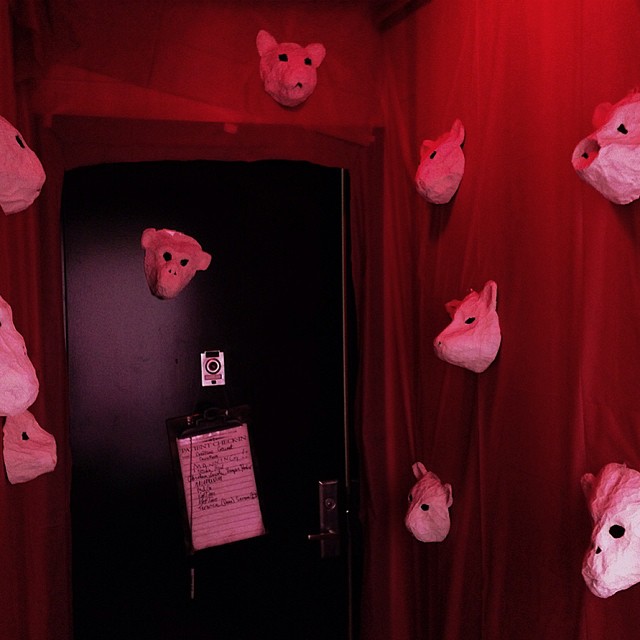
In the end I made about 36 of these simple animal masks. The majority of them were painted white and I hung them in our front hallway; I’d draped the walls of the hallway in red plastic table cloths from the dollar store, so the white masks really popped. Some of the black masks were hung inside the apartment on the white walls, so they really stood out there too. The masks were lightweight enough that they could easily be hung up with a thumbtack; I bet masking tape would do the job as well.
For some of the masks, I took a battery powered tealight candle and taped it to the wall behind it. In a darkened room you could see a flickering glow coming through the eyes and nose holes. Eerie!
This is really my favorite kind of decorating project; minimal effort used to create a really interesting effect that covers a lot of space. The finished masks were very rough and primitive if you looked at them closely, but they weren’t made to be looked at closely; they’re made to lend a cool ambiance to a room.
Enjoy!


 About Manning Krull
 How to make a 4-foot paper maché alligator
 My violin skull mask, Mardi Gras 2015
 Three-headed paper maché dragon sculpture
August 11th, 2022 at 6:27 pm
Just wanted to say thank you and tell you how wonderful your website is, and your ideas and instructions. The turning the wolf nose inside out to make a pig mask is pure genius!
All best,
Allison DeFrees