
Making big paper maché masks — advanced tips
Published October 1st, 2016
In making all my big paper maché masks I've learned a lot of important things along the way — things I could only figure out through trial and error, but now that I know about them they're a huge help in every subsequent mask I make. I'm by no means an expert! I've only made four big skull masks so far, and I have two more in the works (one skull and one non-skull) but with each one I can see them getting easier and easier to make and to wear, thanks to these tricks I've worked out over the years. Here are some of them...
Make visibility a priority!
Two eye holes might not be enough! Wearing a large mask feels really weird at first; it's not like you're wearing a tight fitting mask that's right up against your face and head. It's more like your head is in a big box! So, with a smaller mask, just eye holes are fine, because they're very close to your eyes; they give you plenty of room to see out of in all directions. However, with a big mask, there's a good chance the eye holes will actually be quite a bit out in front of your real eyes, which means you're looking forward across some empty space and through these two holes, giving you very narrow tunnel vision. Imagine holding a sheet of cardboard with two eye holes in it — hold it right up to your face and you can see through it fine, but hold it six inches in front of you and your vision is extremely limited. Because of this problem it's important to have as many holes in your mask as possible, wherever you can put 'em. To me the most important placements have been in front (obviously), to the sides, and to the bottom — it's crucial that you can see the ground in front of you while walking! (Being able to see higher than eye level really isn't very important, relatively speaking, so you can probably skip putting any holes there.)
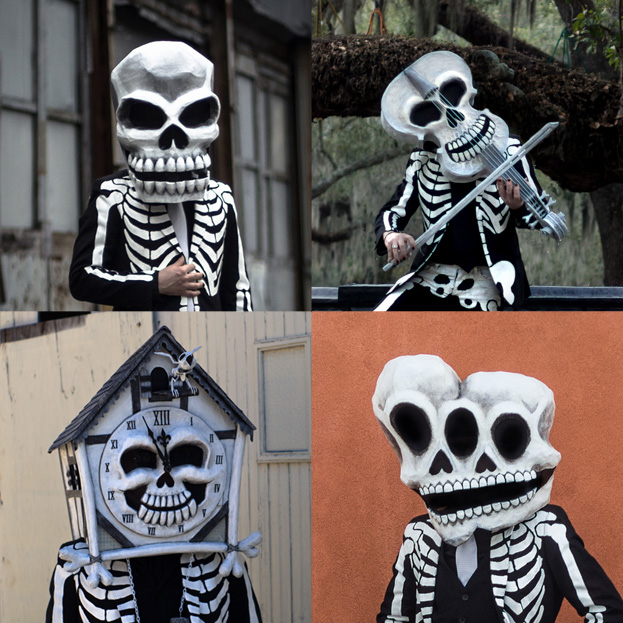
If your mask design has a nose and mouth, these are easy place to add extra holes for visibility. I've hidden them in other places too; any recessed area can work. I use pieces of plastic screen for the eye holes in all my masks — like for a screen door; you can buy it in a roll at Home Depot — and it's possible to paint the screen to match the various surfaces of your mask. It'll never match the solid paper maché areas perfectly, but you can work these screened areas into your design to be as discreet as possible. For my cuckoo clock skull mask I cut out a few panels of the house shape and put white screen in there, and for my violin skull mask I cut out several hidden areas in the outer edges of the mask, along the sides and bottom. These were tremendously helpful in walking around! And you'd really never notice them unless you were looking for them.
Think about your hearing, too
Remember what I said about how wearing a big mask is kind of like having your head in a cardboard box? That goes for hearing as well. Sound from outside is muffled, and everything inside is echo-y; your own voice and even your breathing can sound very loud. You can really help this by adding some ear holes or any kind of hidden holes in the sides of the mask. (By the way, all these holes for sight and sound really help with air circulation as well.) Honestly, when I think about a new mask design now, I try to think about making the absolute maximum area be open; the more the better, on as many different surfaces as possible.
Along with making the outside world harder to hear for you, wearing a big mask will make it much harder for people around you to hear your voice, especially in a noisy situation. So I've found that having a hole cut out for the mouth is really helpful for that too. A hole for the mouth might help with breathing too, but I think if your mask has a large opening at the bottom (like where you put your head in) you'll really never have a problem breathing in there.
Focus on keeping it lightweight!
It's easy to get carried away with a cool mask design and pile on lots of materials in order to build out the shapes you want, and then the thing ends up either being too heavy to wear for more than a short time, or it's incredibly unbalanced and just about impossible to wear, period. I know some mask makers who don't worry about this too much; they're much more willing to suffer for their art than I am! I do absolutely everything I can to decrease weight in my masks, even if it means a lot more work or, occasionally, more expensive materials. I want to be able to wear the thing for hours and not feel it in my neck or back, and I want it to be very easy to take off and put on many times throughout the day, or to carry around for extended periods. All of this is no fun if you've designed a wearable boulder!
My main objective in trying to keep the weight of the finished mask down is to design a structure where I can remove all of the base materials from the paper maché. If you can end up with a mask that's just paper maché plus a hard hat (more on the hard hat coming up) you should be in excellent shape, weight-wise. Paper maché, even eight to ten layers of it, weighs very little. However, sometimes you want to incorporate shapes that are more complex than what you can achieve with just paper maché, or you need to include base materials that will end up locked in place and not removeable, and all of this can drastically increase the weight. It'll really sneak up on you! Step by step you think you're in okay shape with the overall weight and then you put the last touches on and pick the thing up and almost throw your back out! After learning my lesson the hard way, I now make sure everything I'm designing for my base can be removed.
Some heavy things that I avoid in my designs, unless I know I can remove them after paper maché is done:
- modeling clay; I've left clay in for teeth a few times and it's surprisingly heavy!
- metal wire; a lot of my mask-making friends use thick copper or steel wire to reinforce the edges of their masks; I use plastic zip ties instead!
- any solid shapes made of plastic, wood, metal, etc.
I also saw off as much of my hard hat as possible; more on hard hats coming up...
Consider a counterweight
It's very common to design a mask that ends up much heavier on one side — this can make the mask very difficult to wear and can add a lot of tension on your neck. Sometimes this starts out not really noticeable but the longer you wear it the more you feel it — trust me, it's no fun. So, since you've designed a mask that's extremely lightweight, it doesn't do any harm to add a little bit of weight back in there in order to balance everything out. I've used pennies wrapped in tape and hidden inside the mask in whatever side needs the weight, and it's a miracle how much this can help! A well-balanced mask with a counterweight in it can actually feel lighter than the same mask without the counterweight! The evenly distributed weight makes the whole thing much much easier to wear. You can experiment with different amounts of pennies/coins/whatever to find the right balance. I usually design some sort of pocket or box inside the lower-back part of the mask so I can drop rolls of pennies in there until the thing feels balanced, then seal it up.
Hard hat versus other types of bases
Okay, so I've mentioned using a hard hat multiple times now, and I've actually used a hard hat in the base of all of my big masks, and I probably will forever. I have some friends who use other techniques, so I want to write about the various options I've seen as well. First, here are the reasons I like using hard hats in my masks:
They're very comfortable and adjustable to fit snugly on your head and keep your mask from moving around.
They're very solid so they're easy to work into your mask and create a really strong connection.
They're pretty cheap; like ten bucks at Lowe's.
The only downside to using a hard hat is that they're a little bit heavy (and you know how much I care about keeping my masks lightweight), but I think they make up for that in comfort and stability. I usually saw off as much of the hard hat as possible in order to reduce weight, leaving just a nice stable base to build my mask on. Sawing the hard hat is a lot of work but totally worth it. For each mask I figure out where the mask needs to attach to the hard hat and then remove any big pieces of plastic that I know I won't need — this often includes two big wedge-shaped slices from the left and right sides, leaving me with basically a mohawk-shape across the top which is great for attaching the mask.
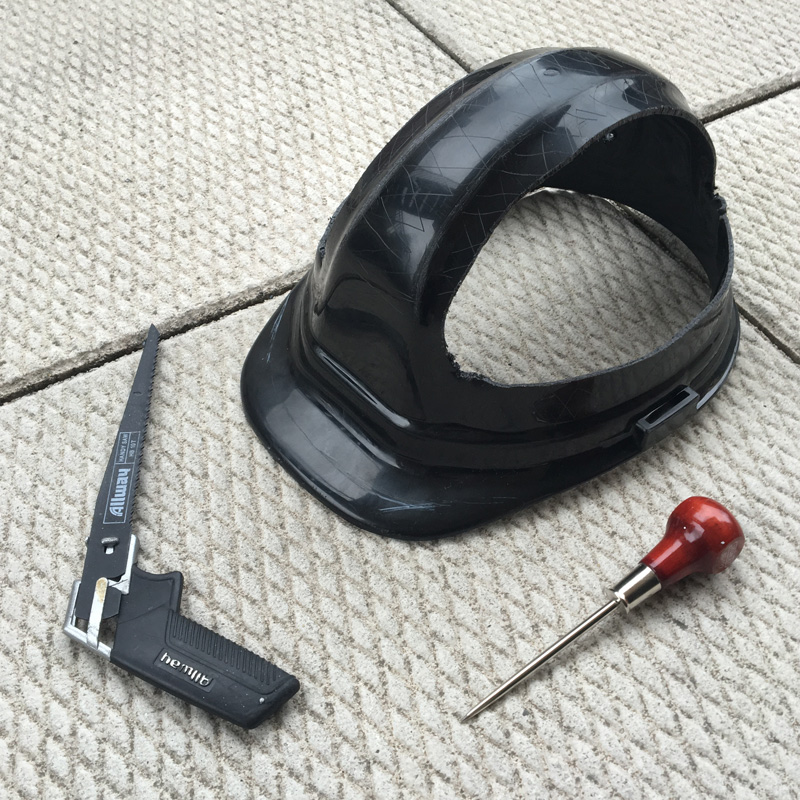
Modifying a hard hat to use in a large paper mache mask
Once you've chopped a big piece of hard hat off you'll see how thick and heavy the plastic is — very important for protecting your head from falling steel beams, but less so for a paper maché mask! I also usually remove the brim from the front. In one case I sawed off the whole top dome part of the hard hat, leaving it completely open on top, and attached the mask to the remaining outer edge. It all depends on the shape of your mark and how/where you need to attach it to the hard hat.
(Another nice benefit of removing pieces of the hard hat is that you'll improve air circulation; it can get hot in that plastic dome if you leave it completely intact.)
It can be pretty difficult to cut or saw a hard hat; the plastic is very hard and dense. The way I've done it is with a tiny hand saw. (I've also used a Dremel tool for this, but I hate the noise, and I'm worried about the Dremel slipping away from the hard plastic while it's on, so I really prefer to use a hand saw.) I mark the lines I want to cut with a grease pencil, then I poke a big hole with an awl, and then I cram the pointy end of the saw in there and start sawing. This creates a huge amount of gross plastic shavings, so you'll want to protect your work area. And be very careful while sawing! It's easy to let the saw slip if you're not careful!
A few very important notes if you plan on sawing/cutting your hard hat:
1. Wear a dust mask or N95 or whatever, plus eye protection! Lots of little plastic bits will be flying around.
2. Do your cutting before installing the interior suspension, i.e. the padded headband and straps. If not, you're liable to accidentally cut through some of that stuff and ruin them.
3. When deciding where to cut, make sure to avoid cutting the interior slots where the headband suspension gets installed. You'll see four or six slots where the tabs of the headband go; if you damage these areas you may not be able to install the suspension properly. I learned this the hard way one year and had to use a lot of Gorilla Glue to hold one of the tabs in place.
When you're finished sawing, the edges will be very rough and covered with little plastic shavings. These are easy to sand down by hand with sand paper. Wear a dust mask!
Alternatives to a hard hat
A few of my mask-making colleagues skip the hard hat and make their own suspension with foam rubber and copper or steel wire, hot-glued into place. You can start with a headband-shape of wire and attach the foam rubber inside that, and then figure out a way to attach this to the interior of the mask. I've tried this and wasn't happy with the results; it felt a bit uncomfortable and wobbly. If you try this method, I recommend also adding some cross pieces that go up and over your head, so all the weight isn't just on the headband piece. (Update: In recent years I've tried making my own headband and padding with foam board strips and makeup pads; this can work pretty well but is a lot of effort.)
For some smaller mask shapes, simply adding a sheet of foam rubber inside the top of the mask and letting that sit directly on your head can work. This wouldn't work for larger masks that are way higher up from your head, obviously. Another downside of this kind of configuration is that the mask won't move with your head very well, since it's just sitting on top of your head and not really holding on — turn your head quickly and the mask might not exactly turn with it.
For really huge masks there's also the option of having it sit on your shoulders rather than be attached to your head. This means your head is totally free to move around inside, but the mask can't turn at all. The mask is simply mounted on padded, curved shapes that fit directly over your shoulders. I've done this a couple times and it was really challenging to build the mask to fit perfectly on my shoulders and feel nice and balanced; adding some weight at the bottom, like at chest level, can really help.
I've also seen a guy make a dinosaur skull mask that was 100% paper maché and it just sat on top of his head with no padding or support whatsoever inside; it was so lightweight he said it was really comfortable, and the back-lower edge of the jaw sat on his shoulders. Not very movable but it seemed to work out totally fine.
Okay, what else...
Reinforce the edges
I mentioned this briefly above; the edges of the large hole at the bottom of your mask, where your head goes in, might be a little bit flimsy, and it's important to reinforce them. Otherwise, if you set the mask down, the bottom edges can bend and warp — maybe not over a few hours, but possibly over days/weeks. Same goes for any really large eye holes or other wide edges that are supporting a lot of weight; if you don't reinforce them, the areas above can weigh down on them and cause the holes to sag and warp. I've seen people use copper or steel wire for this, and I think this is overkill; wire adds a lot of weight and it's much stronger than what the paper maché actually needs. Depending on the area I'm reinforcing, I either use plastic zip ties or thin wooden coffee stirrers (I've stolen a ton of these from various coffee shops). The plastic zip ties are great because they're very strong but very flexible, so if you have a curved edge at the bottom of your mask you can tape the zip ties in place along the curve, and then apply paper maché over them. (Just snip the square hole part off first so they're relatively flat.) I use the wooden coffee stirrers for supporting vertical areas that I want to keep perfectly straight, like the narrow vertical beams on the sides of my cuckoo clock. If these were just paper maché, they might sag and bow outward, especially in heat/humidity. So I added the coffee stirrers on the inside with hot glue and then applied paper maché over the connection points, and they kept those areas perfectly rigid.
Engineering a mask that can open
For my cuckoo clock skull mask I designed a front panel that could open on a hinge, and this changed my life! Being able to completely see/hear/talk/drink/eat without taking my mask off made my long day of wearing it much, much more pleasant, and I'm going to try to design something like that into all my big masks going forward. It might not always be a door that opens to the side; it could be something that flips up, or opens outward from the middle. I'm currently working on a design for a mask that's mounted on rods sticking out to the left and right from the hard hat, so the whole top part of the mask can flip up and back. We'll see how it goes!
Magnets
I used magnets in my cuckoo clock skull mask and they were so useful I'm planning on using them for some future masks. For my cuckoo clock there were a couple magnets that held the face/door in place when it was closed. For any future designs where I want to have parts that move or open I'll work some magnets into the design to keep things stable. For example, I'm working on a mask with a big jaw that can open, and I plan to put magnets in the sides of the jaw as well as in two places on the side of the skull — that way the jaw can be locked in place either open or closed, with the magnets in the jaw attached to either the the top bottom magnets in the skull; get it? Of course I'll post pics of this stuff when I can.
Use brown craft paper for your first layer
This is a minor one. I generally alternate layers of newspaper and brown craft paper for all my paper maché projects; the main point of this is just so I know visually which parts I've covered. If you do two layers of the same kind of paper in a row it's hard to know if you've missed any spots on the second layer; make sense? Now, even though the interior of your mask won't be terribly visible all the time, I've found I don't like having that interior layer be newspaper, because it looks really ugly if you set the mask down upside down, or if you display it up on a shelf and people can see inside a bit. Seeing ugly newspaper in there sort of ruins the illusion a bit. I know this is very superficial! But hey, we're making art here! So anyway, it looks much much better if the interior surface of the mask is solid brown paper. Or better yet, paint the interior black; that's what I usually do. And believe it or not, newsprint can actually be kind of hard to paint over; it tends to show through a bit unless you do multiple heavy coats of paint. Whereas with brown craft paper, one quick coat of spray paint or acrylic paint will easily create a nice solid dark surface inside.
Whew, that's plenty for now! I'll add more stuff as I think of it!