
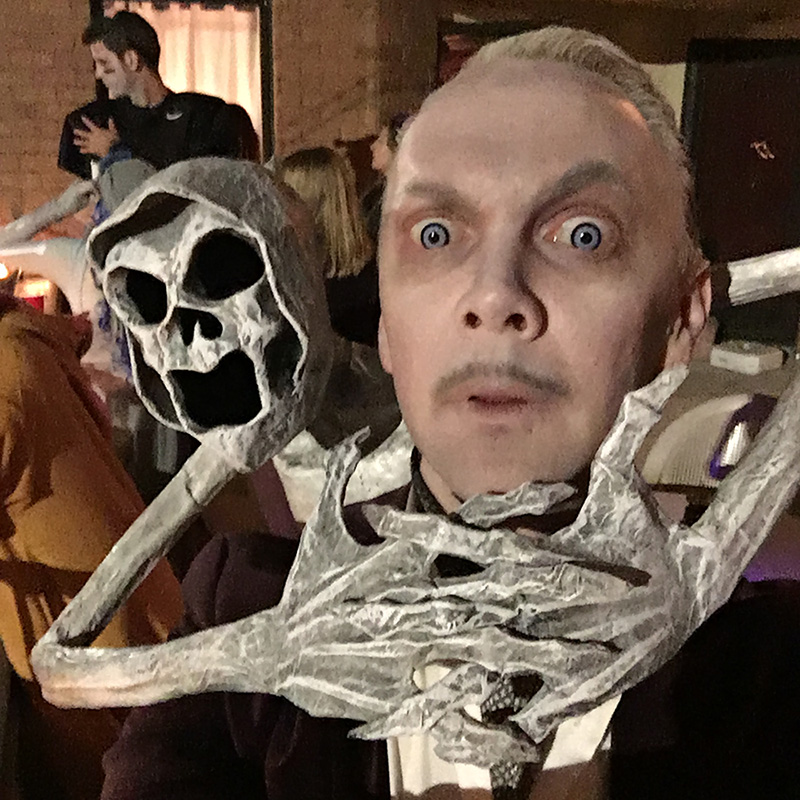
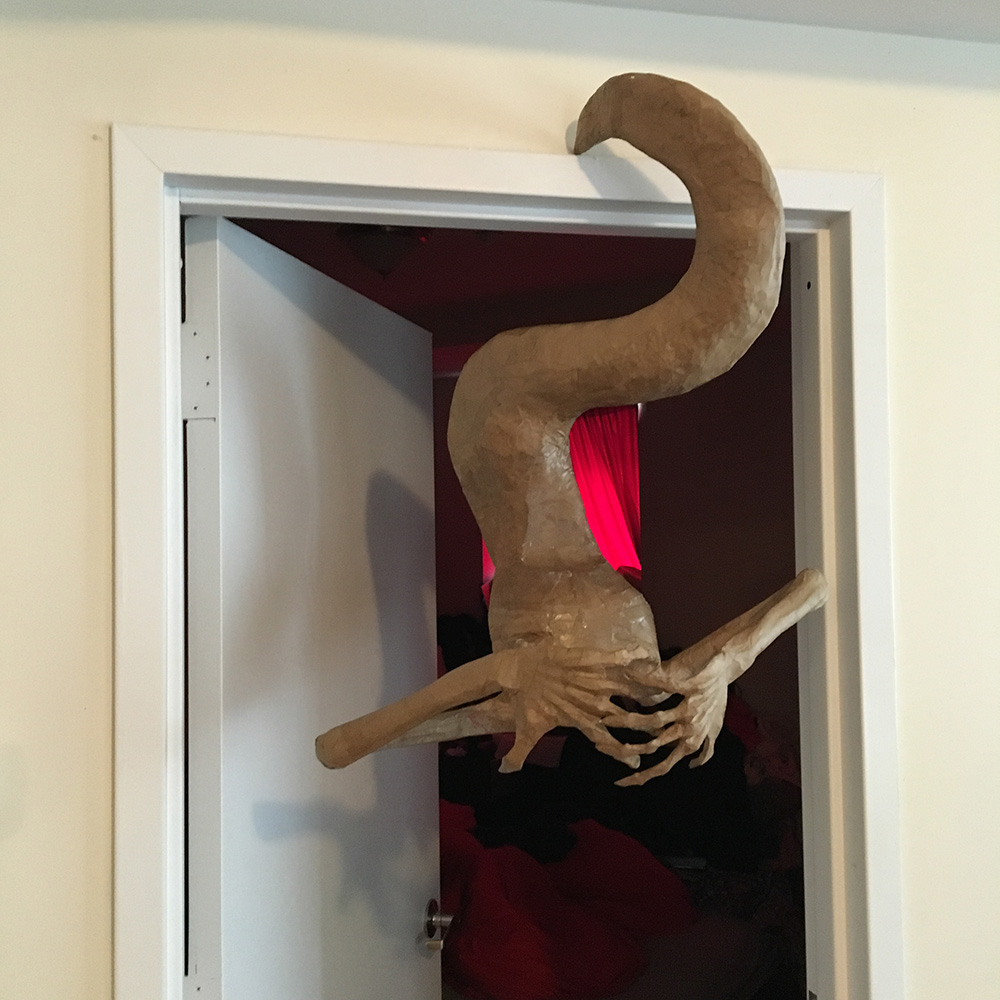
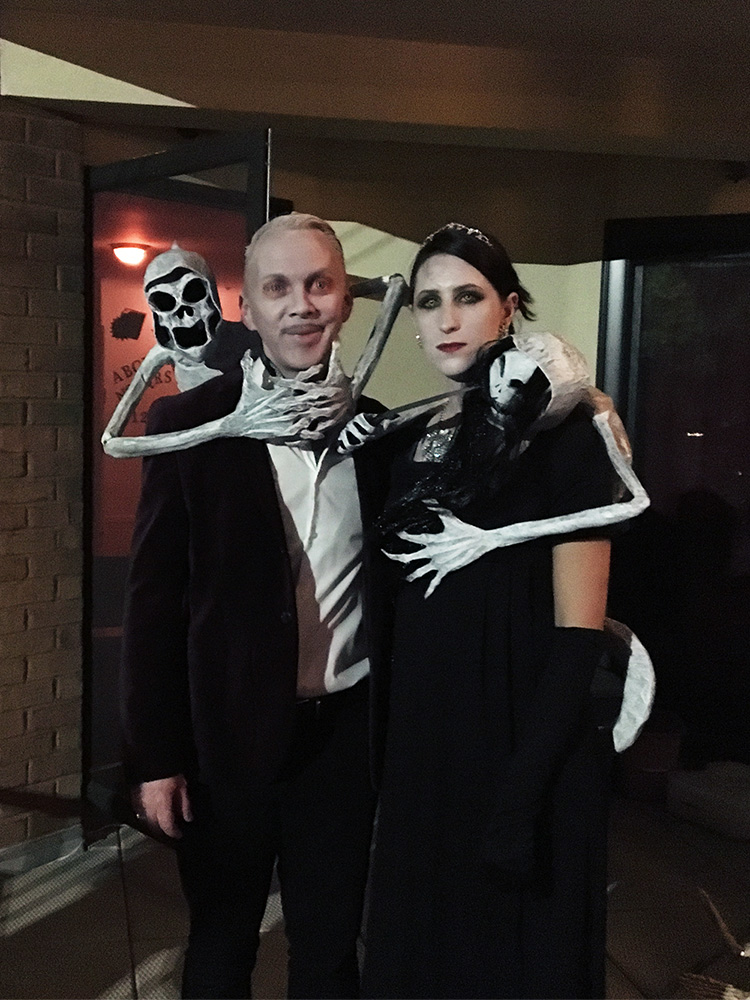
Strangler ghost costume!
Published by Manning on November 1st, 2016
Hooboy, this costume was a big undertaking! The basic concept for this costume is a lightweight ghost sculpture, made with wires inside to make it somewhat adjustable, and it’s attached to a harness worn under one’s clothes. There were so many different parts to build and so many problems to solve, and I basically made up the whole thing as I went along, jumping around from part to part in a weird order. So, I’ve put together as much info as I can about how I made this thing here…
Hands
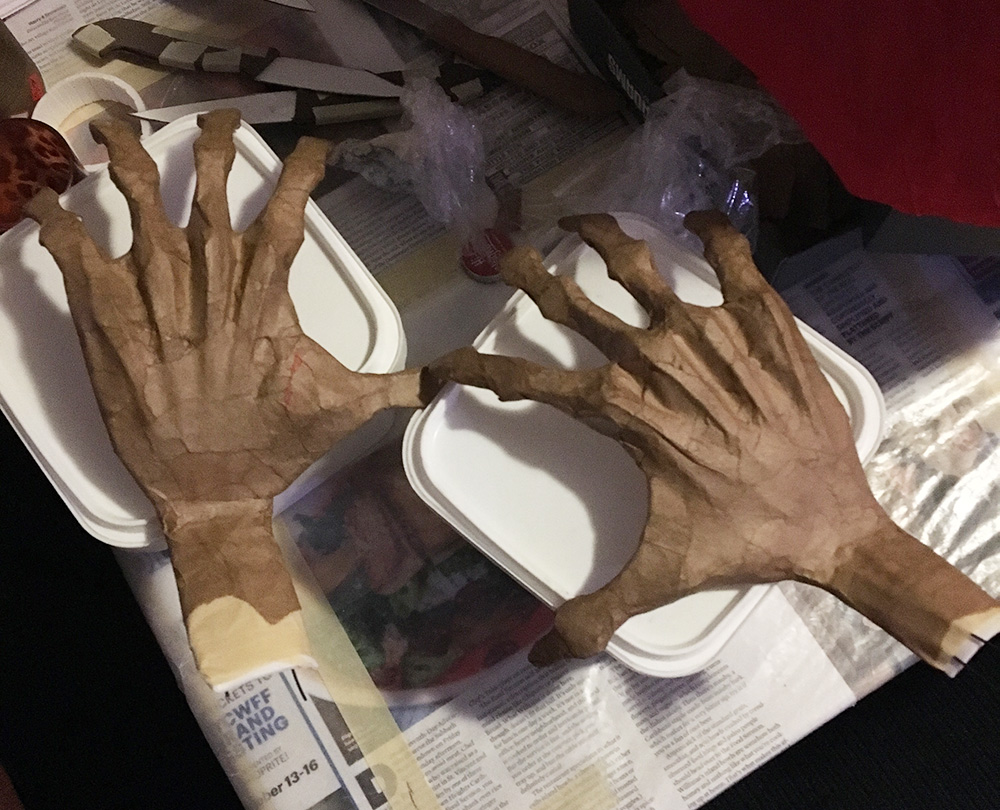
I started with the hands, for some reason! I wrote a whole article about just that, here; these could be useful for all kinds of props or decorations. These were a lot of fun to create and they make for a really impressive effect.
Harness
Before getting carried away with making the rest of the ghost, I decided to work out the harness that would support the whole thing. This would be worn under my clothes with a wire sticking up out of the back of my collar, and the ghost will be stuck onto that. I wanted to arrange this so the ghost would be easy to put on and take off as needed. The ghost has a hollow tube shape in its chest that slides down onto the wire post of the harness, and its weight keeps it in place.
I made the harness itself from a sheet foam board. I drew and cut out the harness shape, carefully peeled the paper surface off of the foam, and then covered the thing in lots of masking tape. Foam board can be curled and bent without breaking if you cover it in masking tape first; try this without masking tape and it’ll crack right away. It’s important to peel the paper surface off of the foam board first; otherwise the masking tape will peel it off and the shape won’t stay how you want. Note: I use really cheap foam board and the paper surface is really easy to peel off; this may not be the case with better quality foam board — do a test and if it won’t peel away, try wetting it with a damp cloth first. In theory the water won’t damage the foam inside at all, and the paper should lift away.
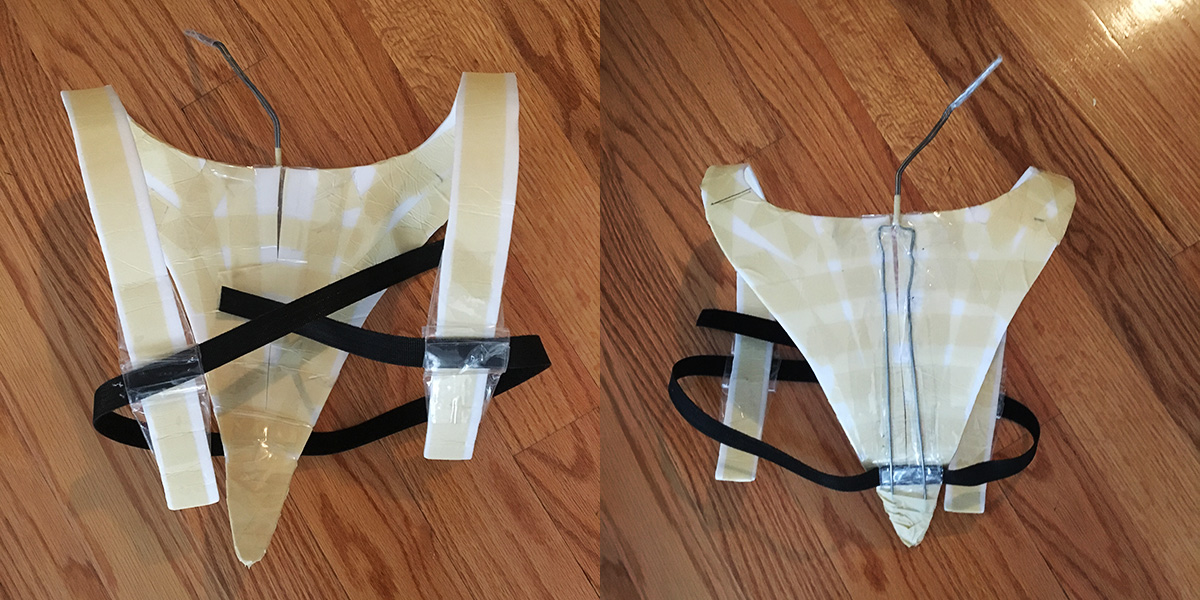
With the harness shape completed, I made three loops, sort of like belt loops, out of packing tape, and taped them in place on the harness. I then ran a long strip of velcro through them, which can attach in the front.
I added a long piece of clothes hanger wire vertically in the back to support the weight of the ghost. It’s taped in place with lots of heavy duty packing tape, with the top part sticking out; the ghost goes on that.
I went through a lot of trial and error with the harness and the wire in the back in order to get everything the right size and position. I thought I wanted the wire to stick straight up out of the collar of my jacket, but in the end I needed it to be bent way off to the side in order to hold the ghost at the angle I wanted.
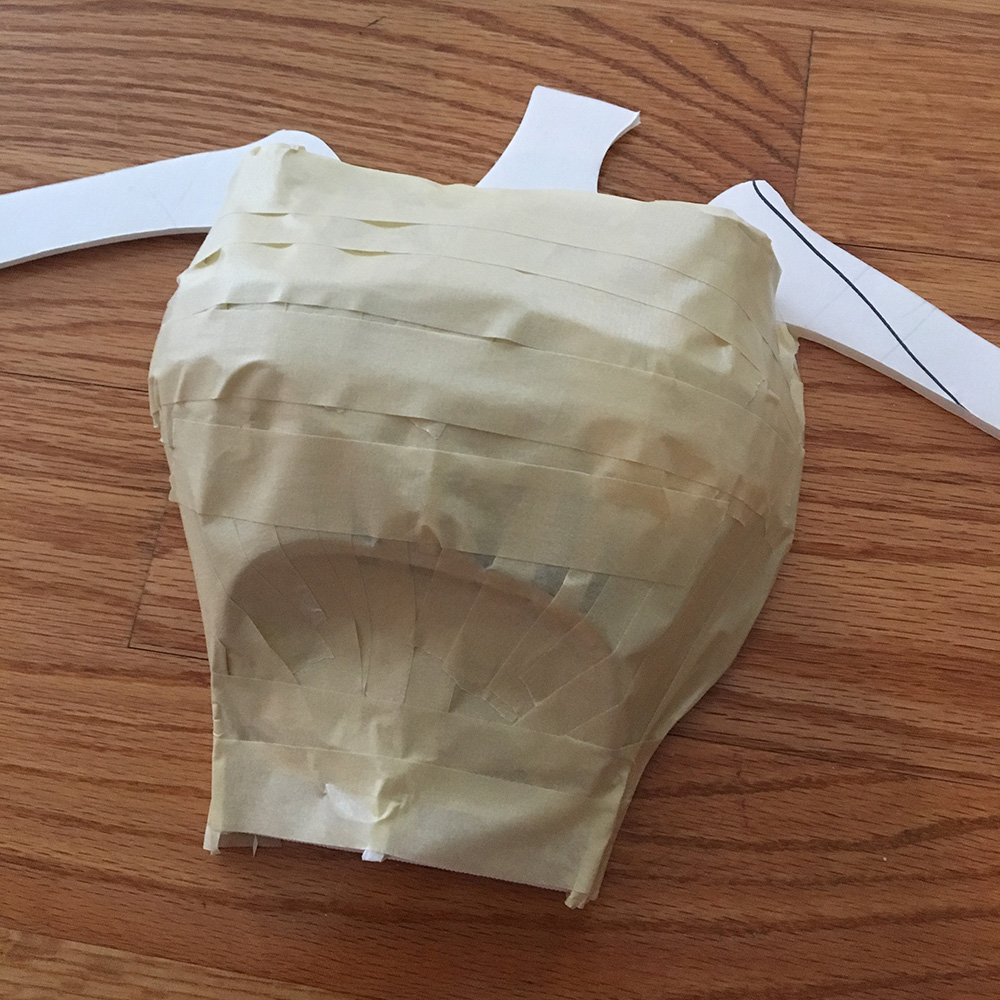
Ghost body and arms
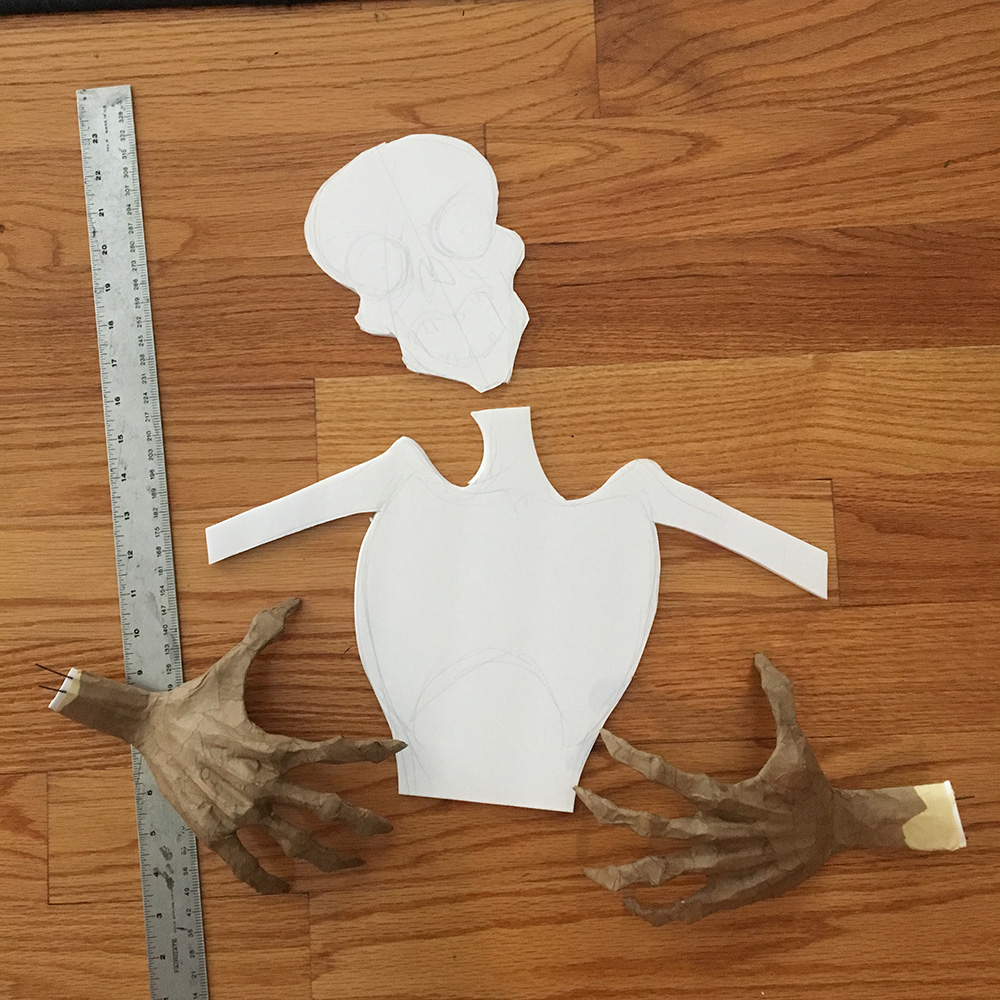
Next I tackled the ghost’s body, so I could see how it works on the harness. I started with a simple foam board shape for the chest and shoulders, and rounded it out with thin strips of foam board and lots of masking tape; very similar to how I made the body for my six-foot paper maché bat (see that page for work in progress pics).
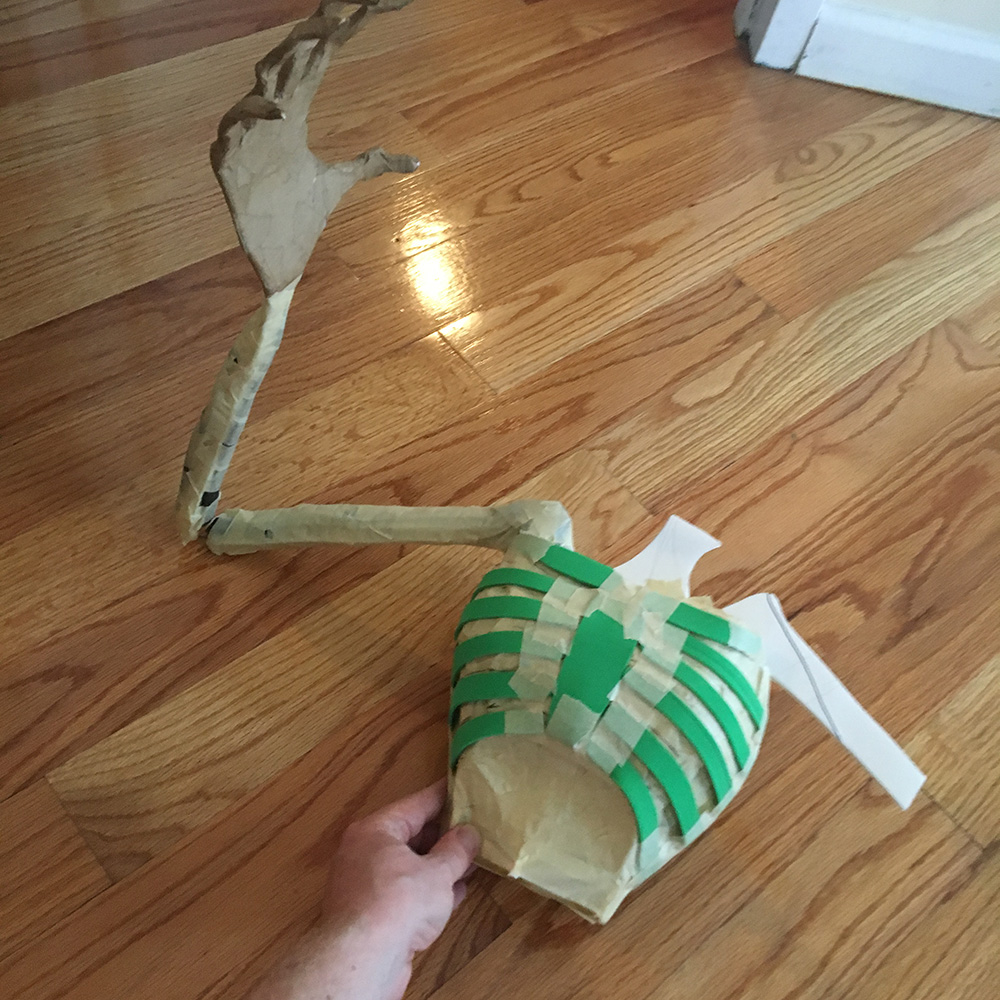
I made ribs and shoulder blades for my ghost out of craft foam, cut to shape and taped in place.
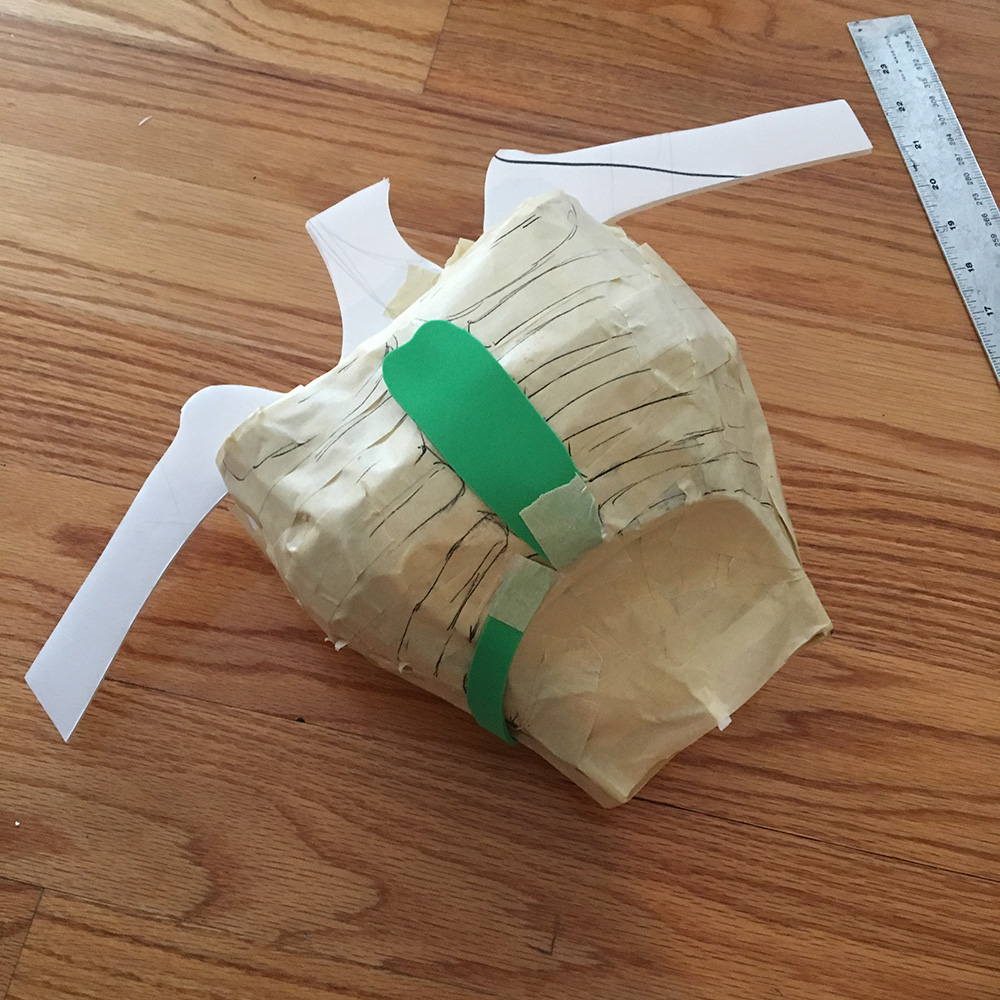
For the arms, I started with wire clothes hangers, cut to size, and then I inserted them into the wrists and wrapped some tape around to lock them in place. I cut out foam board shapes for the segments of the arms (two layers for each arm segment, to lock the wire hangers in between), and taped them in place. I used some scraps of foam pipe insulation tubing to flesh out the shapes of the arms a bit, and then wrapped everything in tons of masking tape.
I put on the harness and looked in the mirror and played around with how I wanted the ghost to be positioned on my back, and figured out where I’d need to attach the tube to the ghost that would then go over the wire post on the harness. I used a cardboard tube from a wire hanger, cut it down to about three inches long, and taped it in place at the side of the ghost’s chest with a ton of tape to hold it steady.
I needed to reposition the arms, hands, wrists, and fingers a bit in order to get everything to fit nicely while wearing the thing. Some of the joints were easy to reposition, and a few of them broke! I tore one shoulder off almost completely, and I broke a thumb (his, not mine). I repaired these with tons of masking tape, locking them in their new permanent positions. This whole process took several tries of putting on the harness and the ghost body, repositioning things, taking the whole thing off, taping a lot of stuff, repeat many times. Whew. I finally got it to a place where everything was fitting nicely and all the joints were pretty stable. So much tape.
I covered the entire ghost with one layer of paper maché. After that was dry, I added many more layers (about six total) on the areas that I wanted to make stronger; specifically the shoulders, and the place where the tube connects to the ribcage. The rest is fine with just one or two layers.
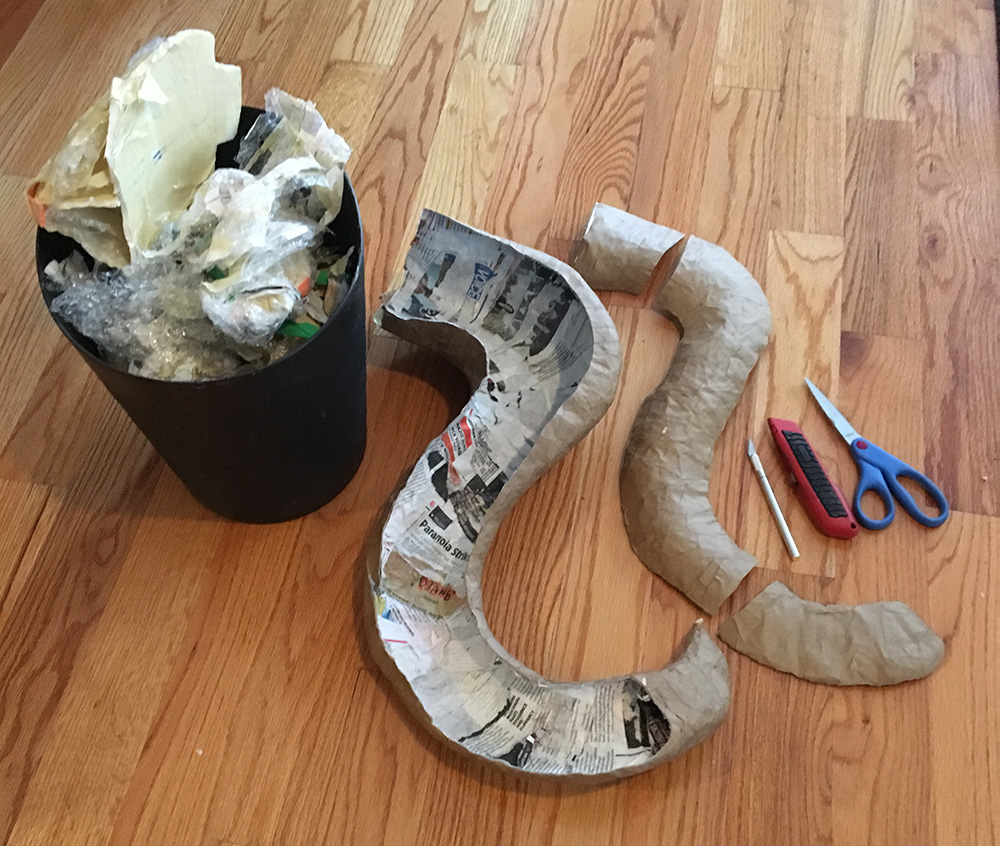
Making the tail
This part was tough, and I kind of figured it out as I went along, and unfortunately I neglected to take any pictures along the way! Here’s the basic rundown of how I made the tail.
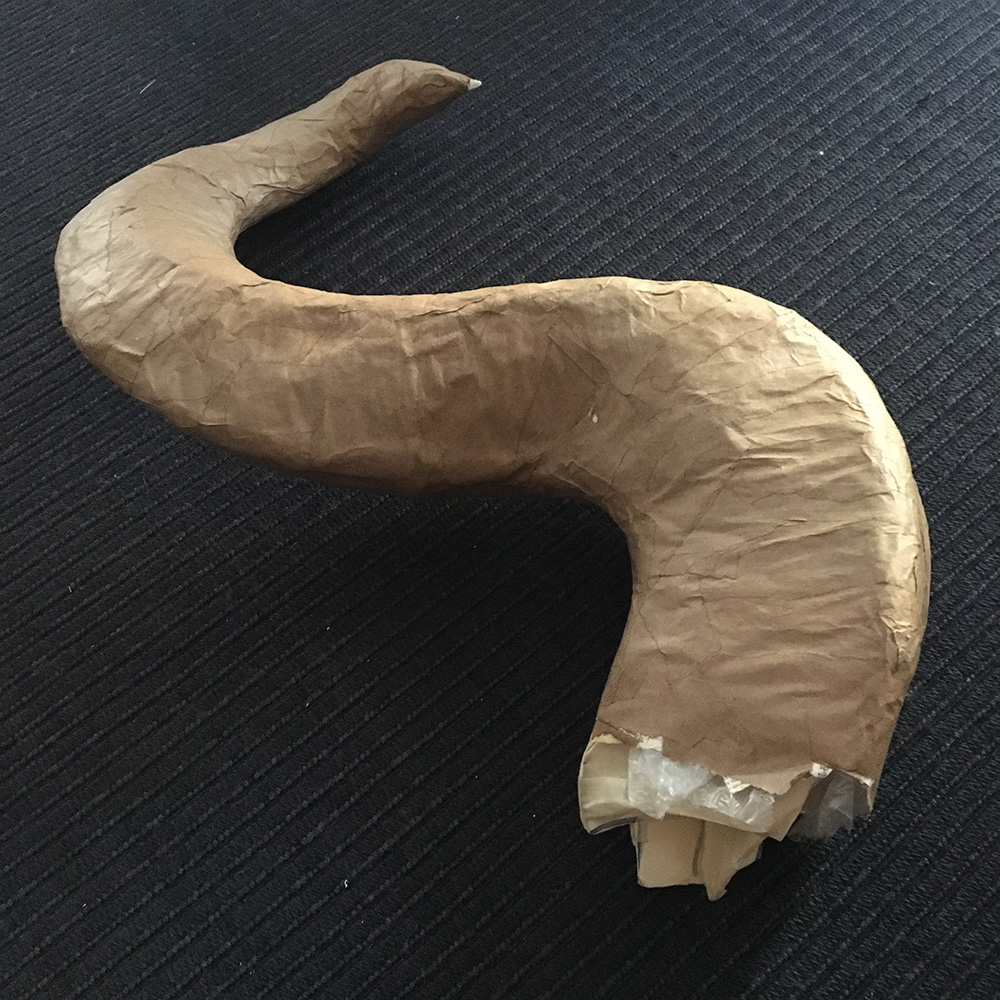
I started with a simple drawing of the tail on foam board, cut it out, and peeled the paper backing off of both sides of the foam. I left a sort of tab-shaped bit at that top which I can later insert into the body of the ghost to help lock it in place.
I wanted the tail to curve downward toward my back — since the ghost’s body sticks out at a 45-degree angle from my neck, I wanted the tail to stick out and then curve down to run more or less parallel down my back. So that meant my foam board base had to be curved.
As I mentioned above for the harness, you can curve foam board if you first cover it with lots of masking tape; the masking tape prevents it from cracking and breaking, and makes it nice and flexible and rubbery. I covered the foam board tail shape with strips of masking tape, and then rolled it up tightly to get it nice and curved. It naturally uncurled itself from there, but it kept a nice gentle curve all the way down.
In order to round out the shape, I needed to add a sort of spine of foam board, sticking up perpendicular from the tail. I do a lot of my projects this way; start with a flat foam board shape, add a foam board ridge sticking up, and then round out from there with strips of poster board and tape and whatever. This is basically how I made the body for my six-foot bat decoration (see pics there) and also the chest for this ghost. So, for this ghost tail, I added a ridge of curved foam board on each side of the tail; the side facing away from my back, and the side that’s against my back. I wrapped lots of tape around the whole tail to lock everything in place.
Now my whole tail shape was nice and bulky and three-dimensional, but there were a ton of ugly hard edges and uneven parts. The way to smooth this all out and make everything nice and rounded is to wrap it all in bubble wrap. I cut long strips of bubble wrap, about three inches wide, and wound them around the whole shape. This did the trick; the shape became nice and rounded, like you see in the finished pics. Finally, it was time to add paper maché!
My initial plan was to only add one layer of paper maché, just for texture and stability, and then paint over that. However, I ended up using so much material in building the tail shape that it was much heavier than I wanted; for reference, there are two entire rolls of masking tape in there! So I decided instead to do six layers of paper maché, and then carefully remove the interior structure, leaving a lightweight hollow paper shape — same thing I do for all my Mardi Gras skull masks. Note: the kind of wallpaper adhesive I use peels away from Scotch masking tape and bubble wrap really well, but this may not be the case with other kinds of paste or tape. See my article about my preferred paper maché materials and methods here.
I did my six layers of paper maché all in one day, not leaving time for the layers to dry in between. This means the whole thing will dry very slowly (especially against a base of bubble wrap! the plastic doesn’t let any air in from that side), but at least it freed me up to do other projects while it’s drying. I left the tail out in the sun to dry as quickly as possible. To my surprise, it took less than 24 hours to dry completely, thanks to an unusually hot and sunny day in October.
When the tail was totally dry, I made a plan for removing the interior. I decided to cut the tail open on the surface that will be against my back, so any “scars” will be less visible, ha. I sliced a long panel out of the back with my X-acto knife and carefully lifted it away, slicing bit by bit at the bubble wrap and masking tape that were holding on. It felt like I was dissecting a giant slug! Initially I thought I would leave the wide end of the tail and the pointy end untouched, to leave those parts a bit stronger, but in the end the whole shape was much stronger than I expected so I ended up cutting the opening to go the full length of the tail. That’s why the panel I removed is in three sections; I did the big one first and the smaller ones later when I could tell the shape was strong enough to allow for this.
I carefully cut away at all the interior bubble wrap, tape, and foam board with an X-acto knife and scissors, and removed everything in pieces. This is hard work but fun! You’ll be amazed at how much junk you end up removing from your sculpture; it always seems like more than what you put in! You end up with a mountain of torn-up scraps.
As I removed the guts of my sculpture I expected I’d need to leave some parts intact to protect the overall shape, but in the end I removed every last scrap of foam board, tape, bubble wrap, and styrofoam. The remaining hollow shape was extremely lightweight and felt very sturdy; perfect.
I put the panels back in place and closed up the incisions with some tape, then covered the tape with two quick layers of paper maché. Surprisingly, the incisions I’d made were now pretty much invisible.
Attaching the tail to the body
I joined the tail and body with tons of masking tape. The hardest part of this was setting up the tail and body in the right positions so I could work on the tape! I had to stack a bunch of boxes and books on some chairs to get the two big pieces to lay in the exact right positions relative to each other. Then I built up a wall of lots of tape between the tail and body, and applied four layers of paper maché to cover all the tape. Once it dried the connection was very sturdy. Very similar to how I built the neck for my six-foot bat.
Finally, the body was all done! Woo!
Making the ghost’s head
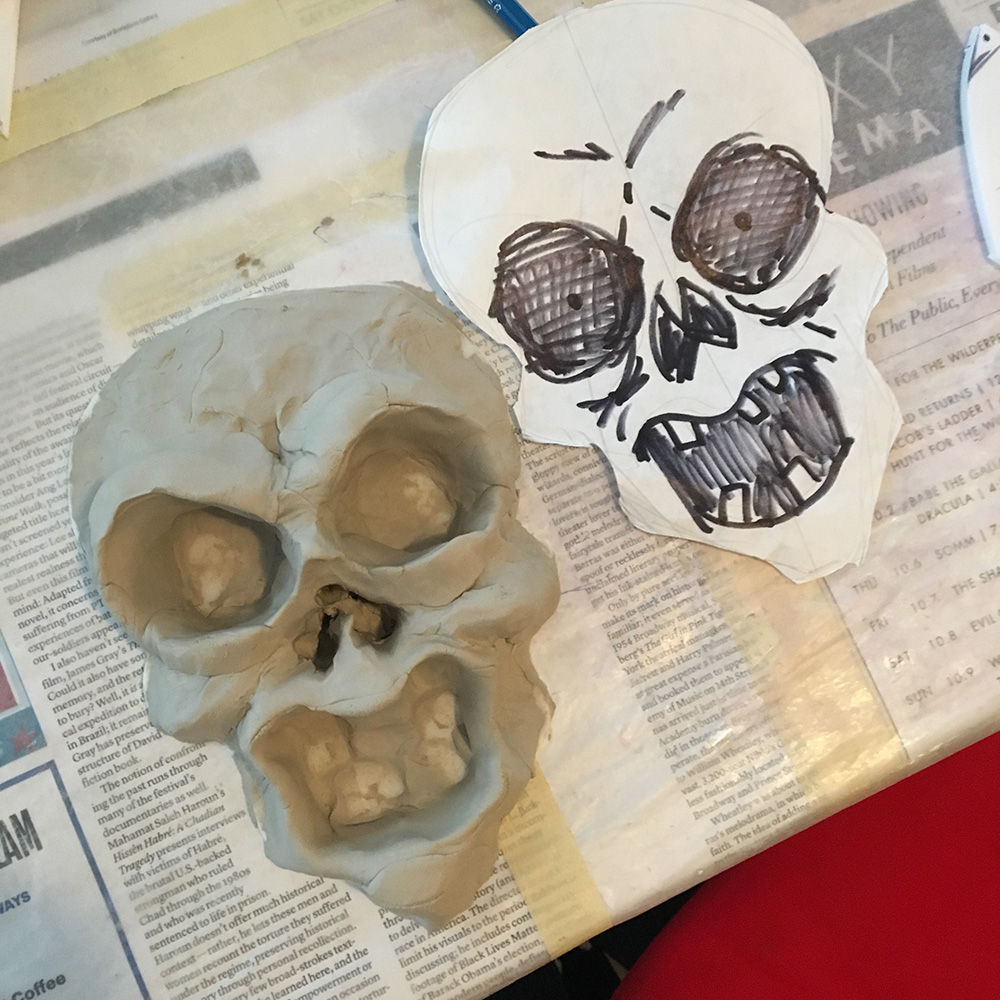
I made the head in a kind of weird way with multiple pieces; I started with just a drawing on foam board and sculpted a face onto that with clay. I let the clay dry and then covered it in plastic cling wrap (to act as a release agent) and applied paper maché onto it — this is a tricky and frustrating process! The cling wrap wants to move all over the place, at least at first; it feels like there’s no way it’ll stay in place. But if you’re patient, the longer you work at it and the more paper maché you apply, the less the cling wrap moves, and by the time you’re done it’s nice and stable. I’ve used this method a few times and it’s always very discouraging at first but in the end it always works out, and the great benefit of working this way is that your dried paper maché will lift away from the cling wrap almost effortlessly; the cling wrap doesn’t stick to the clay at all, and then it’s easy to carefully peel the cling wrap off the inside of the dried paper maché. (Fyi, if you apply paper maché directly onto dried clay, it will be basically impossible to get off.) Paper maché takes forever to dry when it’s applied over plastic wrap like this, but when it finally dried it was nice and sturdy, and I easily removed the plastic wrap, and then cut out the outer face shape and the eyes/nose/mouth with scissors and an X-acto knife.
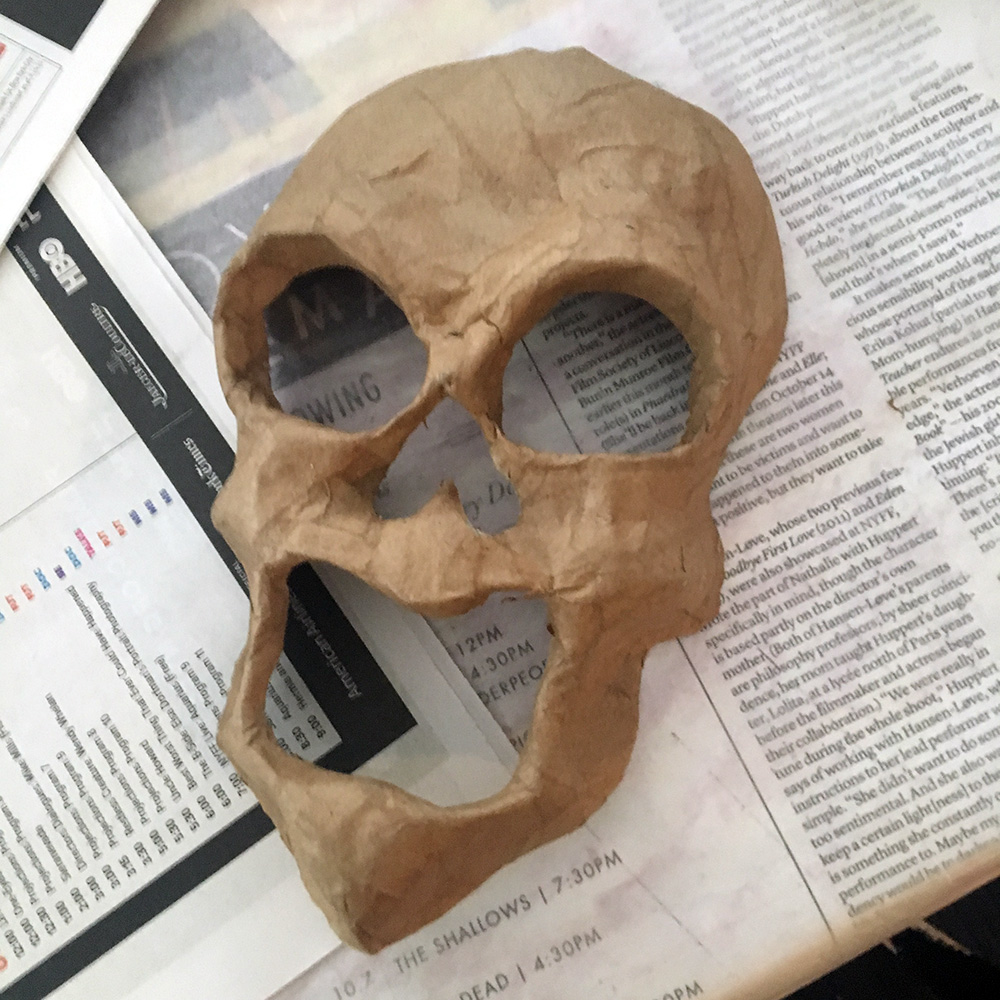
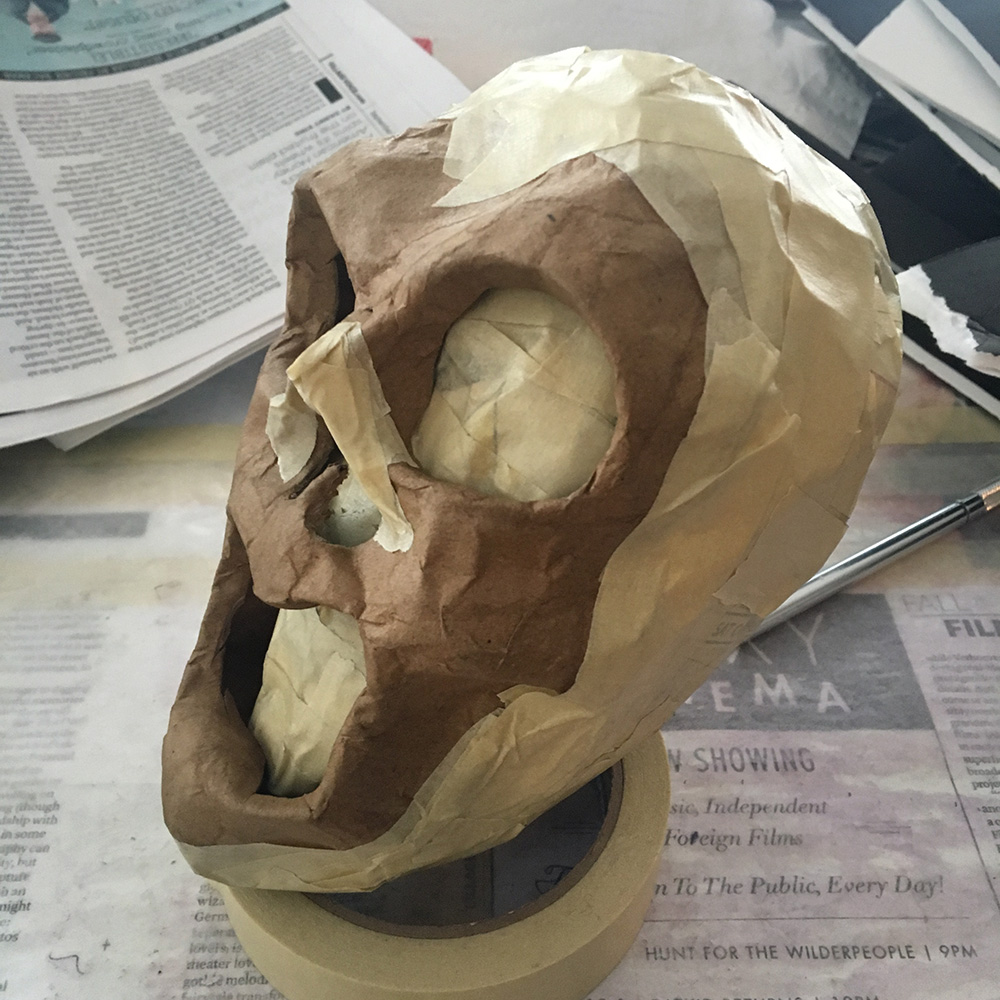
With this mask-like face done, I created a base for the head with wadded-up newspaper and masking tape. I taped the face in place on this head, and then created a hood shape with craft foam, taped in place. This part was fun! I started with a long wide strip of craft foam, taped tightly under the chin, and then pulled and stretched the craft foam into the hood shape that I wanted, and taped it in place wherever I could. I also added some tape to build up the bridge of the nose.
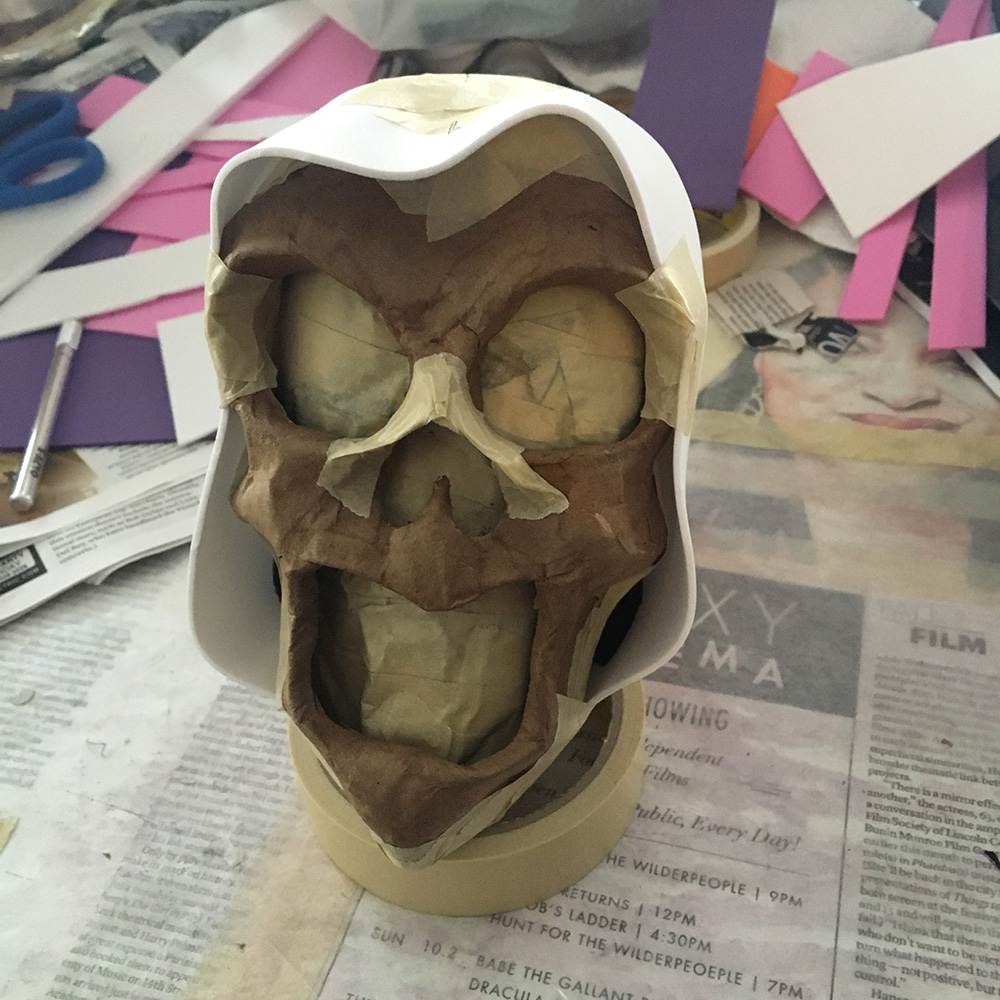
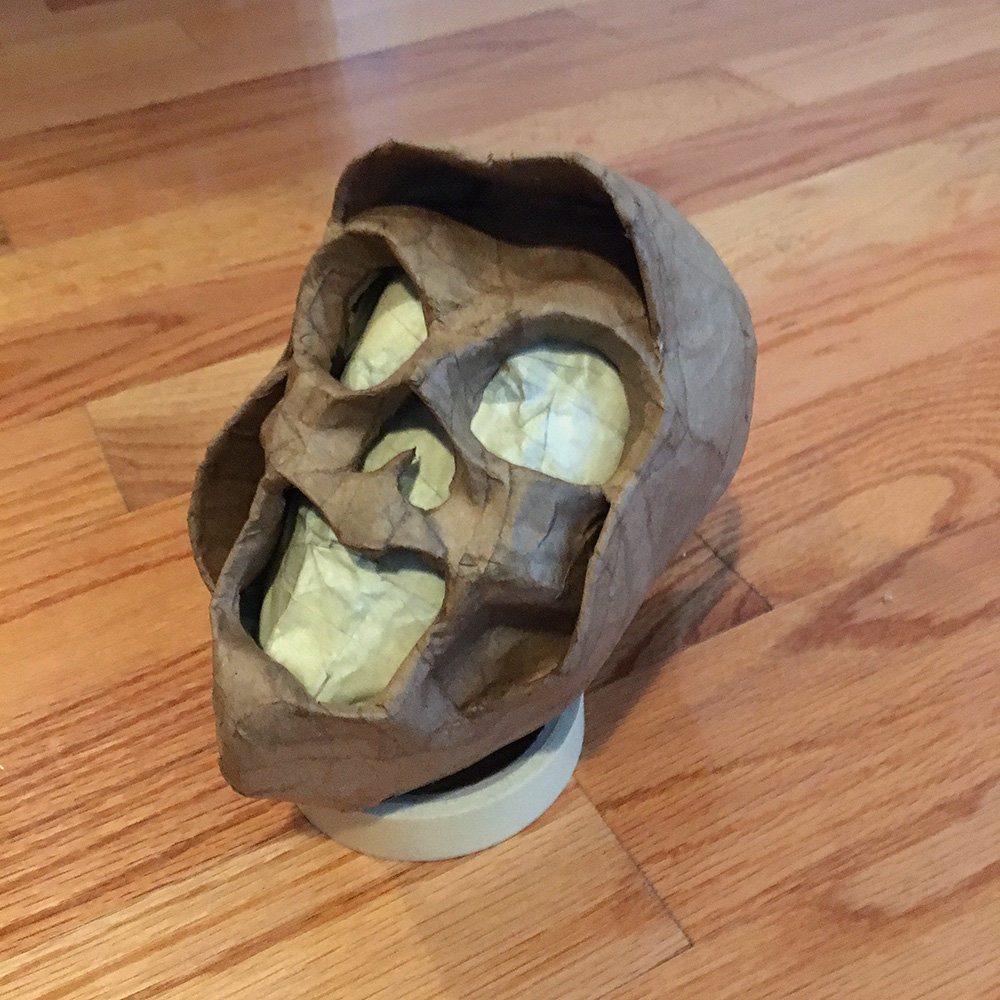
And then of course I added several layers of paper maché over the whole head. When it was dry, I cut out a big panel from the back of the head and removed as much of the interior junk as possible. Before putting the panel back on, I painted the inside of the head with black acrylic paint. Then I put the panel back on and sealed it with tape and some paper maché.
I made the neck out of some foam pipe insulation tubing along with long piece of wire hanger and lots of tape and paper maché. I made the neck extra long so it could be deeply rooted in both the body and the head; this gives it more stability which will let me bend and adjust the neck a little bit to get it in the right position once I’m wearing the thing.
Painting
I spray painted the ghost white, let it dry, and then dirtied it up with a damp sponge with black acrylic paint, followed by a very light dusting of black spray paint. When that was all dry, I used a dry brush technique with white acrylic paint to bring out the highlights all over the ghost, particularly the face and hands. I then touched up some details with a smaller brush and black acrylic. Read more about my painting methods here.
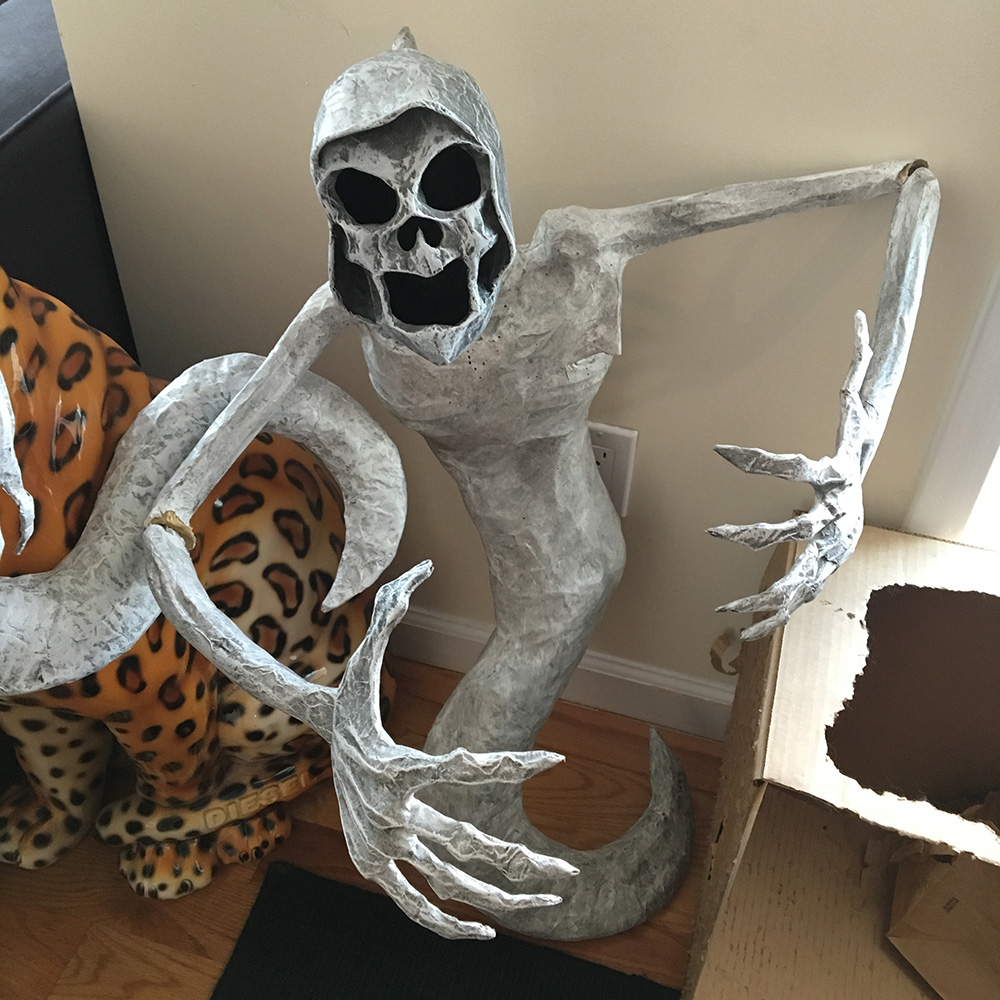
And that’s it! The finished costume is surprisingly lightweight and sturdy. It’s a little bit hard to put on — much easier with someone helping, but doable by oneself — and I should mention it’s a little uncomfortable! Another neat thing about wearing the ghost: the hands were able to lock together really well on their own. I wasn’t sure if I’d have to add a wire to tie them together or something. But it was easy to just weave the fingers together, and they held on nice and tight. The pulling of the hands against my neck wasn’t as bad as I thought it would be, as the ghost was much lighter than I expected, but it was still a little annoying. One more thing, the paper maché and wires began to sag and warp over the course of wearing this for about seven hours. By the end of our Halloween party (4:30am!) the hands were still perfectly locked but no longer pulling against my throat; they stood out in front of my neck a bit.
Next up, I made a similar ghost costume for my fiancée! Info and pics for that one coming up…
 About Manning Krull
 How to make a 4-foot paper maché alligator
 My violin skull mask, Mardi Gras 2015
 Three-headed paper maché dragon sculpture
December 5th, 2016 at 11:12 pm
Thanks for posting these detailed tutorials! I’ve done some small paper mache decorations the last few Halloweens, but your foamboard armature method is a complete eye-opener for me– now I feel like I can do some more intricate, organic designs using your techniques (I never got along too well with chicken wire).
I’m planning a ghost pirate theme for 2017. I want to do sea monster tentacles and a shark for my front yard, and I think the same method you used for the ghost’s tail will work great for the tentacles.
December 7th, 2016 at 1:18 pm
Hey Mike, thanks for your comment! I do think you could use the same technique to make tentacles; I’d love to try that sometime! To your point, I definitely find that I can get much more dynamic, organic shapes with foam board than with chicken wire. When you’re drawing your shape right on foam board, you can create a real impression of movement and tension, whereas chicken wire is just kind of blah; it never looks like there’s any tension in the shapes.
I’d love to see pics of your projects next Halloween!