
Giant scary clown Pez dispenser — part 2
Published by Manning on September 16th, 2018
This is part two of my giant scary clown Pez dispenser project! See part one here.
Making the evil clown head
For the spooky clown head, I started by cutting a panel of foam board that’s the same size as the top panel of the Pez dispenser body (see part one), to use as a base for the head, in order to ensure the head will fit nicely on the “neck.” I built the rest of the head onto this panel.

Here you can see the rectangular base panel at the bottom, and I built a triangular tower of foam board and taped it onto that, and then I taped a busted-up dented-ass old basket onto the tower. (I had this basket left over from my giant medieval key prop project; I thought I’d need this part of the basket for something else but that ended up not happening, so I used it here.) The tower shape and basket are here to give me a sturdy structure to build the head around. I’ve used a very similar method for my Anubis mask and Axe Man skull mask projects.
I forgot to photograph a big step here. After attaching the basket and tower shape, I built a tall curved wall of foam board around this base; basically a big cylinder that I trimmed to shape and curled up with my hands before taping in place. This wall had a jaw shape sticking downward from it. I then curved a thinner strip of foam board (about 4″ wide) over the top of the head from front to back like a mohawk, and a second thinner strip over the head from side to side, to start building the dome shape for the top of the head. (If you really wanna know what this looked like, leave a comment and I’ll sketch it for ya.)
I then taped tons of pieces of folded/rolled newspaper over the head to round out the shape. I did a ton of strips like this crossing over the top of the head, and a lot more across the front and back of the head. I attached these strips with shipping tape, because it sticks extremely well and doesn’t give or stretch. Masking tape is frustrating to use for this kind of work.

The loose paper strips end up feeling really flimsy, so I then covered the whole head shape in strips of masking tape, just to lock all the pieces together and stabilize everything.
I then wrapped the head shape in long 3″-wide strips of bubble wrap. I use this technique all the time to smooth out big weird lumpy shapes (like your mom); I take a 12″ roll of bubble wrap, cut off a long piece, maybe 6 feet, and cut it down the length with scissors to make four 3″ strips. I tape all these strips together end to end, tape one end in place on the head, and carefully wrap the strip around the shape, keeping it somewhat tight and being careful to make all the edges overlap slightly; I’ll add a piece of tape here or there to secure things. For the dome of the head, I taped several shorter strips over the head, crossing over each other.
When that was done, I added not one but two layers of masking tape over the whole head, and finally the head shape was done! All these steps with all these different materials — foam board, newspaper, masking tape, bubble wrap, and masking tape again — help create a shape that’s sturdy, nicely curved and organic-looking, and relatively smooth. It sounds like a lot of work but it goes pretty quick! I can usually knock out a head base like this in an hour or two.
I covered this head shape in six layers of paper maché over a few days. You can read about my paper maché process and materials here. The short version is: I use Roman PRO-543 universal wallpaper adhesive (paid link) and alternating layers of newspaper and brown wrapping paper.


One weird step here: I covered the mouth area with a layer of paper maché using black construction paper; this is so I don’t have to paint the interior of the mouth later when the teeth are in place, which would be a huge pain. When this was done I felt like the black paper wasn’t quite black enough, so I did a quick coat of cheap black acrylic paint (not shown); since the base was already black paper it was very easy to get perfect coverage in just one coat of slightly watered-down paint.

Somewhere around this time I opened up the base and removed all the materials inside — the foam board, the basket, the bubble wrap, and all that tape. I’m always surprised by how much junk comes out! After removing all the guts the head was lightweight and sturdy. I’d briefly considered leaving all that junk in there but thought that might make the whole Pez dispenser too top-heavy.
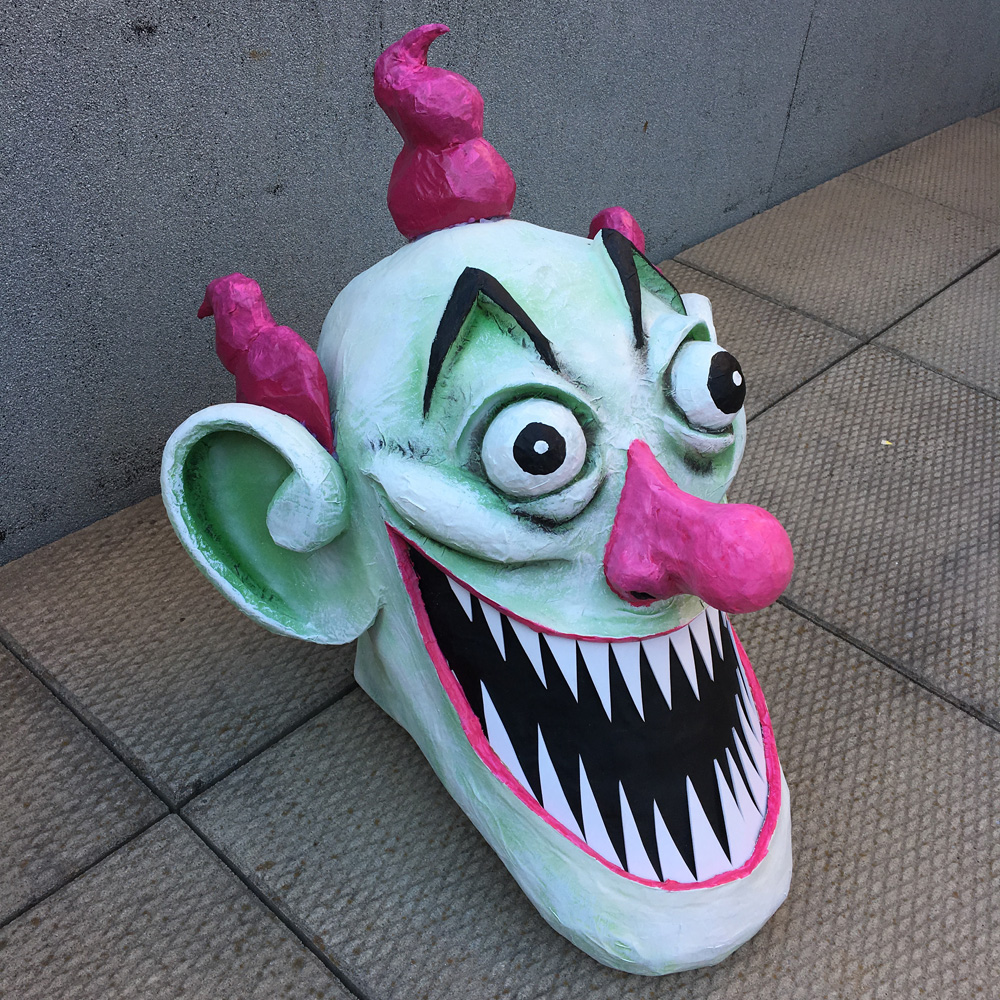
Sculpting the clown’s face
Now to add all the details to the clown’s face. To make the teeth, I started by drawing the upper and lower rows of teeth onto craft foam. I cut out the rows of teeth and laid them on the face to make sure they were the right fit, trimming them here and there to get them perfect.

I then taped the rows of teeth in place on the head. It looks like I’m making a Venom head here!
The teeth are the one part of the clown’s head that will not get covered in paper maché — mainly because this is a somewhat rushed job and I didn’t feel like getting that intricate; applying paper maché to such small complicated shapes would take hours and be really annoying. So I made a plan (starting with the black paper and paint, above) to help me avoid that hassle.
I cut out long thin pieces of foam insulation tubing to make the lips, and taped them in place over the teeth. I covered the lips in paper maché, being very careful to avoid the teeth.
Whenever I want to hide or smooth out a raised edge, like the outer edge of the lips, I tear up a bunch of little pieces of thick paper and tape them in place, and then add paper maché over that. You can just barely see some text on the paper in the above-right pic, under the masking tape. I use this trick all the time for various things.

For the eyes and nose, I started with a couple of rubber balls from the dollar store; I looked in the toys section first but didn’t find the size I wanted, and I ended up with some that happened to be in the pets section.
I used one ball for the eyes and one for the nose. For the eyes, I covered one of the balls in four layers of paper maché. When it was dry I sliced it in half and removed the ball to create two hollow half-spheres. The plastic surface of the ball came away from the paper maché very easily.

My process for the nose was very convoluted; I cut out a foam board nose shape in profile, minus the bulbous part at the end. I taped a plastic ball in place at the end, and then built out the rest of the nose shape with bits of foam pipe insulation and tons of masking tape. I had no idea what I was doing and just got there through lots of trial and error. When the nose shape was done, I covered it in five layers of paper maché. When it was dry I sliced it open down the middle and removed the base materials, and then I taped the halves back together and covered the taped areas with one more layer of paper maché. Sorry I didn’t take pictures of all these steps! As always if you have questions leave a comment below!
I cut out pieces of foam pipe insulation tubing to make the remaining parts of the face like the cheekbones, eyelids, eyebrows, etc; I taped all of these in place on the face. (Not shown here, but you’ll see in the pics coming up.)

I made the ears out of foam board, two layers each. I curled these inward slightly, and I used more strips of foam tubing to create the ridges and stuff. I covered the ears with a layer of paper maché before attaching them to the head. When they were done I hot glued them in place and covered the connections with paper maché.
Once all of this was assembled, I then covered all the exposed taped parts on the clown’s face with one layer of paper maché to unify the texture of the whole surface.
Making the clown’s hair

I made the three tufts of hair in a convoluted way (like so many things I do!). I drew the basic wavy shapes on foam board and cut them out, and then cut out a slightly larger shape from craft foam; this is hard to explain, but the larger shape of craft foam means I can curl the edges of the craft foam inward as I tape everything in place and the craft foam will soften the hard edges of the foam board — I know from experience that when you build out a 3d shape from a piece of foam board, you risk having this ugly hard edge all the way around. Anyway! Then I basically just wadded up lots of paper towels and taped them in place to round out the shape on both sides. In the pic above-left, the first tuft is half-finished so you can see the paper towels and foam board and tan craft foam. The second one there is done and covered with masking tape. When all that was done, I covered them in paper maché, and when they were dry I spray painted ’em.
For the central tuft, I used four layers of paper maché, let it dry, then sliced it half, removed the interior, taped the halves back together, and covered the tape in more paper maché. I try to do this kind of thing whenever possible in order to reduce weight — however! I got lazy with the two side bits and just covered them with one layer of paper maché and left all the materials inside. Much less hassle.
I attached the tufts of hair to the head with a hot glue gun later on after the head was painted. If this were not a rush project I would have paper maché’d them to the head before painting, so as to have a nice seamless connection. No big deal!
Making giant Pez candy
I made a few big pieces of Pez candy so I could glue one into the neck opening; see my article about making giant Pez candies for more info on that.
Painting the Pez dispenser
I painted the Pez dispenser in few big separate pieces: the head, the “body” portion, and the piece of candy sticking out.

For the body and the candy, I just spray painted ’em; easy!

For the head, I masked out the teeth and mouth with masking paper and newspaper, and spray painted the head white…

I let that dry and set, and then I did a quick dusting with green spray paint, a little heavier into all the shadow areas and lighter here and there around the head. I then did one more dusting with white spray paint to dial back this shading effect a little.

Next, I switched to acrylic paint and brushes and did a few steps. I used white acrylic paint and a big brush to do a dry brush effect all over the head, to highlight the raised areas and skip over the shadowy green areas. That helps increase the contrast and make the 3d-ness of the head really pop. I then did the details of the eyes, eyebrows, lips, etc with acrylic paint and smaller brushes.
I’m really glad I came up with that method of not having to paint the teeth and mouth! Those shapes would’ve been a huge pain to have to paint with a brush; it would’ve taken forever.

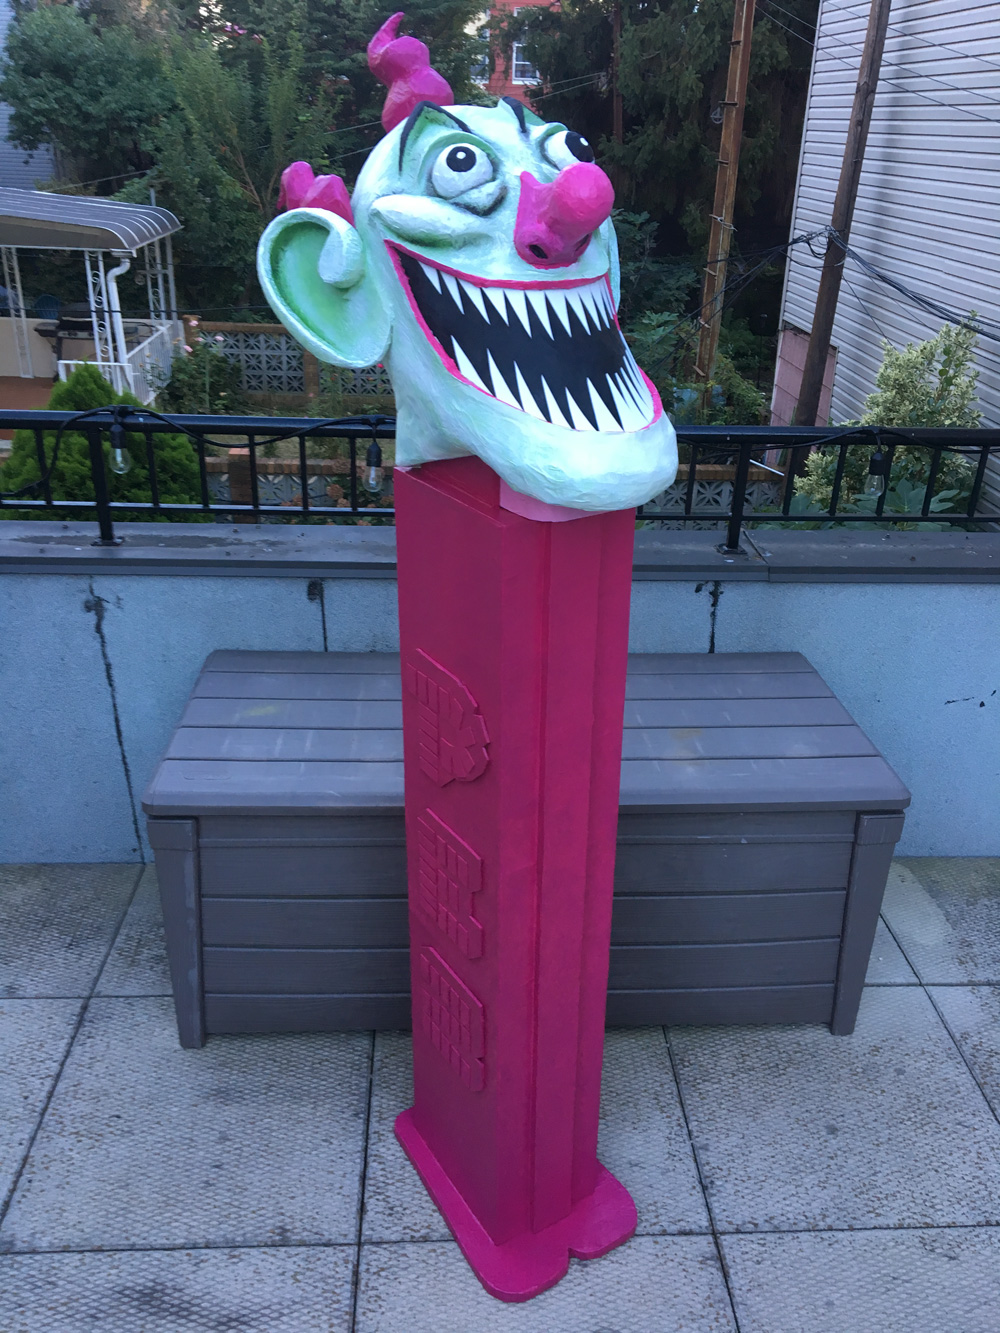
When everything was painted, I glued all the parts together — the Pez candy in the dispenser, and the head on top. It would’ve been cool to engineer the Pez dispenser to have moving parts so the head could actually flip open and the piece of candy could actually slide out, but… like… why??? Ha! That all would’ve taken twice as long, and there was really no point.
My only regret with this project is that he’s too tall! He’s about 6 feet tall at the tip of the hair, and since the head is leaning slightly back to let the Pez candy poke out a bit, the face is pointing a little more upward than I’d like. You can’t see his face very well if you look at him head-on, and if people wanna take selfies with this guy they’re going to have to do the phone-up-in-the-air-pointing-downward thing, which, actually will look pretty cool!
The pic above is position two of three that I tried for the Pez candy and the head; I started off with the head way back and the candy about halfway out, but the face wasn’t really visible at all from the front, and then I tried the above position, and in the end I settled on pushing the candy almost completely in so the jaw can rest right on the edge of the dispenser. You can still see the candy from the side but not the front, but at least now the face is a lot more visible. I took a video that I’ll post soon!
This was a super fun project, and a pretty easy one too! I love stuff like this that creates a really big fun effect with not too much work. Okay, on to the next project!
 About Manning Krull
 How to make a 4-foot paper maché alligator
 My violin skull mask, Mardi Gras 2015
 Three-headed paper maché dragon sculpture
August 21st, 2022 at 1:26 pm
Is there a list of what and how many of the items you needed to make this? Thanks.
September 5th, 2025 at 5:59 am
How did you do the part you forgot to photograph. Is it multiple 4inch pieces or is it just one 4 inch piece. An h help would be appreciated