
Skull mask with dancing skeletons, part 3
Published by Manning on March 5th, 2019
This is part three of my skull mask project with rotating gears and marching skeletons. See parts one and two.
Building the skull shape
In part one I built the whole mechanism with the gears inside of a big circular wall; this would become the outer wall of the skull mask at around ear-level (not my ears, the skull’s ears — uh, wait a minute…). I cut a segment off of a plastic trash can to use as this wall. My next task was to build the rest of the skull outward from this shape, with an open half-dome on top and the jaw and stuff on the bottom, and to connect everything as seamlessly as possible.
I had an inflatable ball left over from my paper maché globes project, and I realized it would be a perfect base for the half-dome of the skull mask.

Making the skull’s half-dome
Before inflating the ball, I measured and drew a few lines on it with a marker, with the hope that once the ball was inflated the lines would help show me how to divide the ball up evenly into halves and then quarters. I had no idea if this would work or if the ball would distort a lot as it inflated and make these lines useless. I found out during my globe project that when you have a big plain sphere it’s really hard to find where the exact “middle” is in order to draw the equator and stuff. Anyway, measuring and drawing the lines ahead of time kind of worked! It wasn’t perfect, but the lines definitely gave me a good guide for how to divide up the ball. I completed and corrected the lines a bit by hand with a marker after the ball was inflated.
So, I inflated the ball most of the way and held it up against the circular skull wall segment I’d made earlier, to make sure I’d inflated the ball to the right size. I then taped long pieces of string along the lines that separate the halves and quarters of the sphere. The string is there so that once I cover the ball with paper maché I can still easily find those lines again, since they’ll be slightly raised.
Before starting the paper maché, I used thin strips of packing tape to cover the segment of the ball that would become the left side of the skull. The tape is there to act as a release agent; the paper maché doesn’t stick to the plastic surface of the tape very well, so when the paper maché is all done I can easily remove the ball and the tape.

I covered this taped section with seven layers of paper maché over the course of a couple days. (See my article about my paper maché process and materials here.) When it was dry, I popped the ball with my X-acto knife and pulled out the ball and tape; easy!
I trimmed this paper maché half-dome using the string as a guide; I cut everything off from the string outward.

Before attaching this half-dome to the walls of the skull, I drew and cut out the eye hole; pic coming up.
I taped the finished half-dome in place on the skull with masking tape, and then I used a simple technique to hide the seam as much as possible: I taped small pieces of ripped construction paper all along the seam. The construction paper is thick enough and sturdy enough to not let the raised seam show through too much. I then covered the construction paper and tape with four layers of paper maché to smooth and strengthen everything.

Making the bottom half of the skull
I went back to the remaining part of the plastic trash can I used for the part of the mask that holds the gears. I realized it would serve as a good base for the bottom half of the skull shape, however, if I covered it with paper maché, there would be no way to remove it afterward; since it’s wider toward the top there’d be no way way to remove it through the bottom, and I couldn’t remove it through the top because the gears and rod are permanently glued across the open space there.
So I came up with a plan to make an exact copy of the trash can out of paper. I took the trash can and wrapped it in many layers of construction paper and strips of poster board, all taped in place, but not taped to the trash can. I did about five layers of construction paper all over and two layers of foam board strips at the top and bottom edges. I held all this together with tons of small pieces of masking tape, and when I was done I wrapped the entire shape with one layer of long strips of masking tape. My hope was that I’d be able to slide the trash can out and use this paper copy as a base for my skull.

Before pulling the trash can out of the paper copy, I measured and cut two foam board circles: one to fit the bottom of the trash can and one to fit the top. I taped the bottom circle in place on the bottom of the trash can, then I cut a large hole in the circle, and then I put my hand through the hole and pushed the trash can out. This worked perfectly!
The pic above shows the real trash can at left and the paper-and-tape-copy at right. At this point I was done with the real trash can; the first segment I cut off of it would remain in the mask permanently, but at this point I could discard the rest.
The bottom surface of this big empty paper shape was relatively sturdy because I’d taped the foam board circle in place before removing the trash can. However, the top edge of the paper shape was very flimsy, but this is where the other foam board circle comes in. I taped the larger foam board circle in place on top of the paper copy (I did this upside down on a counter top for support), and finally the whole shape felt relatively sturdy. You could totally crush it with your hands if you wanted to, but it was sturdy enough to stand up on its own and not wobble. Ready for me to build the skull face and apply paper maché.
I took the skull wall segment containing the gears and taped it loosely in place on top of this big tapered cylinder of paper and tape. I needed to be able to remove all this paper junk when the paper maché is finished, but the plastic walls around the gears need to stay in place, so it was important not to attach them too firmly.
To smooth out the seam between the gears segment and this paper cylinder, I used the same technique that I did when attaching the half-dome; I taped lots of strips of torn construction paper over the seam. This will all get covered with lots of paper maché later.
The whole big structure with the half-dome on top of the gears segment on top of the trash can shape was way too tall — you’ll see how big it is in the next few pics — but I’d be trimming it down to size after the face was done.
Sculpting the skull face

I made the jaw out of foam board, which I cut out and rolled up by hand to give it a curve, and then taped it in place. The jaw is actually two halves; the left side and the right side, and they meet in the middle at the bottom. I made the upper jaw area the same way. It’s also two pieces; you can see I covered the seam in the middle with pink construction paper and taped over it.
I made the cheekbones and eyelids from foam pipe insulation tubing (not shown; I forgot to take a pic), which I cut to size and covered with masking tape. For the edges of the nose, I used craft foam, cut to size and taped in place. Whenever I make a base like this I cover everything with masking tape so it can act as a release agent for the paper maché — I also ended up adding a lot of shipping tape later, which is an even better release agent. With all my big masks, the idea is that I want to remove as much of these inner materials as possible, leaving me with a mask that’s pretty much just paper. However, this particular skull mask is unusual for me because I’d be leaving some of the materials in there permanently — most importantly the plastic ring that serves as the wall around the gears mechanism. More on that coming up.
Why do all my skulls have eyelids and eyebrows?
I almost always build and/or sculpt eyelids and eyebrows for my skull masks, even though real skulls don’t have these parts. The reason I do this is, without these, a skull is basically expressionless. It’s the movement of the muscles of our eyelids and eyebrows (and cheeks and lips, etc) that shows what we’re feeling. So even though it’s not anatomically realistic, I like to include these parts so that I can try to express a feeling on the skull’s face. Cartoonists do the same trick when drawing/animation skulls or any other inanimate objects.
Teeth!
If you’ve ever read any of my other articles about my other big paper maché skull masks, you may remember I always talk about how making the teeth is the hardest/most annoying part, and I’ve tried a million different methods and materials to make skeleton teeth; they’ve all worked out fine but they’ve all been a pain! Every year I tell myself I could totally leave the face flat and just paint the teeth on, but every year I decide I really want them to be 3d for some reason. Anyway, for this mask, I knew I wanted a big wide smile with small-ish, uniform teeth, and I settled on using pieces of black foam pipe insulation tubing.
To make the teeth, I cut off a section of tubing with an X-acto knife, and then I cut that down the middle, and then cut those two halves down the middle, leaving me with four curved pieces. Each of these would become a tooth.

I used scissors to cut each foam piece into a roughly U-shaped tooth. The outer surface of the foam tube becomes the front surface of each tooth, so the teeth have a nice subtle curve in the front.
I then used an X-acto knife to slice the back of the tooth off, to make the back surface nice and flat, so I can glue it onto the skull; that’s what you’re looking at in the lower-left and lower-middle pics above.
I repeated these steps about 20 times to make the 16 teeth I needed; I always like making a few extra so I can discard the worst ones.

Next, I hot-glued the upper teeth in place on the skull. Although the teeth are connected in a curved line, I kept each tooth oriented straight up-and-down. This meant when all the teeth were in place, the bottom edges of the teeth weren’t lined up. I then trimmed these edges with scissors to create a nice smooth line.
To make a 3d gumline, I cut a lot of little v-shaped pieces of foam board and hot-glued them in place above the upper teeth — and of course I did the reverse for the lower teeth. I then covered these with masking tape to smooth them out onto the jaws.

In arranging the teeth and gums, I left a very wide space between the individual teeth and between the teeth and gums. This is because this will all get covered over with tape and paper maché, which will partially fill in the gaps and smooth out a lot of the detail.
In the pic above you can see the upper teeth with paper maché on ’em, and the lower teeth covered in masking tape and shipping tape, ready for paper maché. (This pic is from a few steps later but it’s the only close-up I have of the teeth.)
Although this method for the teeth was a little labor-intensive, it was pretty easy to do and I’m really happy with the results.
A weird plan for doing the paper maché in sections…
I ran into a weird dilemma here that I don’t know if I can explain properly. Normally with all my big paper maché masks, I build the base, add a ton (7+) of layers of paper maché, and then remove the base materials entirely. For this mask that wouldn’t be possible, because of the big plastic ring at the top — i.e. the ~6″ tall section of trash can that I built the gears mechanism in. Part of the face would be built on the outside of that plastic section, which means I couldn’t pull those pieces out later from the inside. So I had to do a few things I’ve never done before…
First, I decided that the 3d parts of the face that are over the plastic ring (cheekbones, nose, upper teeth, etc) would have to remain locked in the mask. The downside of that is they’ll add a little bit of weight that I’d normally want to remove. However, there’s an upside: I wouldn’t have to do as many layers of paper on those parts, since leaving the building materials inside will make them a little more sturdy. So I planned to only do 3 or 4 layers of paper maché on those parts.
I’d still be able to remove the base materials from the lower half of the mask; basically everything from the bottom edge of the upper teeth downward. The main structure inside of there is the fake trash can shape that I made out of paper and tape, so that part I’d be able to tear up and remove. And since that part would end up being all paper maché in the end, that means I planned to do the full 7 or 8 layers on that part.
Before starting the paper maché, I figured out where the bottom edge of the section of trash can was, and poked a dotted line of holes just underneath of it, going all the way around the mask. This would (hopefully) help me tear out the interior of the base and separate it from the top part.
I also added a layer of shipping tape to the base just before starting paper maché, but only on the surfaces from that dotted line downward. I use shipping tape as a release agent for the paper maché in a lot of my projects. The smooth plastic surface of the tape doesn’t stick to the paper maché very well, and that means when the paper maché is dry I can pull out all the base materials fairly easily. There was no reason to add shipping tape to anything above the dotted line, because all that stuff is going to remain permanently stuck in the paper maché.
Whew! That was the plan, and finally it was time for…
Paper maché!

I covered the entire skull mask with several layers of paper maché over several days; like I mentioned, 3-4 layers for the top half, and 7-8 layers for the bottom half. I opted to leave just 4 layers on teeth so as to not lose too much detail.
In the pic above you can see something I mentioned earlier — this whole structure based on the shape of the trash can is much taller than I needed. I didn’t bother covering the bottom few inches with paper maché, since I’ll be cutting that part off.

When the paper maché was 100% dry, I sliced open the jaw around the bottom edge and carefully removed all the base materials. I always love this step! It’s always surprising to see how much junk comes out. All that colorful paper is the construction paper I used to make the fake copy of the plastic trash can. You can see the black plastic ring of trash can that I removed as well.
And this stage, I used my X-acto knife to cut out the mouth hole. I also the trimmed the bottom edge of the mask with scissors to form the shape of the jaw.
During this whole project I’ve been a little concerned about the weight of the mask! I really try to keep my skull masks lightweight, since we have to walk a five-mile parade on Mardi Gras morning. With all the moving parts in this mask, and all the additional materials to keep it rigid and balanced, I was worried this one would end up very heavy, but there’s not much I could do about it. I weighed the mask during a few key stages to get an idea of how heavy it was going to end up.
Before removing the base, the skull weighed 54.6 ounces. After removing all the base materials, and cutting out the mouth and trimming the bottom edge off, the empty skull weighed just 25.6 ounces — just a pound and a half! The mask would gradually get a lot heavier as I add the hard hat, the rotating rings of skeletons, the party hat, some counterweight inside, etc. But 1.5 pounds is a great starting place for the skull and all the gears and stuff inside; much better than I expected.

Anyway, back to mask-making. I reinforced the edges of the mouth with two layers of tiny pieces of paper maché. To reinforce the bottom edge of the mask, I taped plastic zip ties in place all the way around, and then I covered them over with two layers of paper maché.
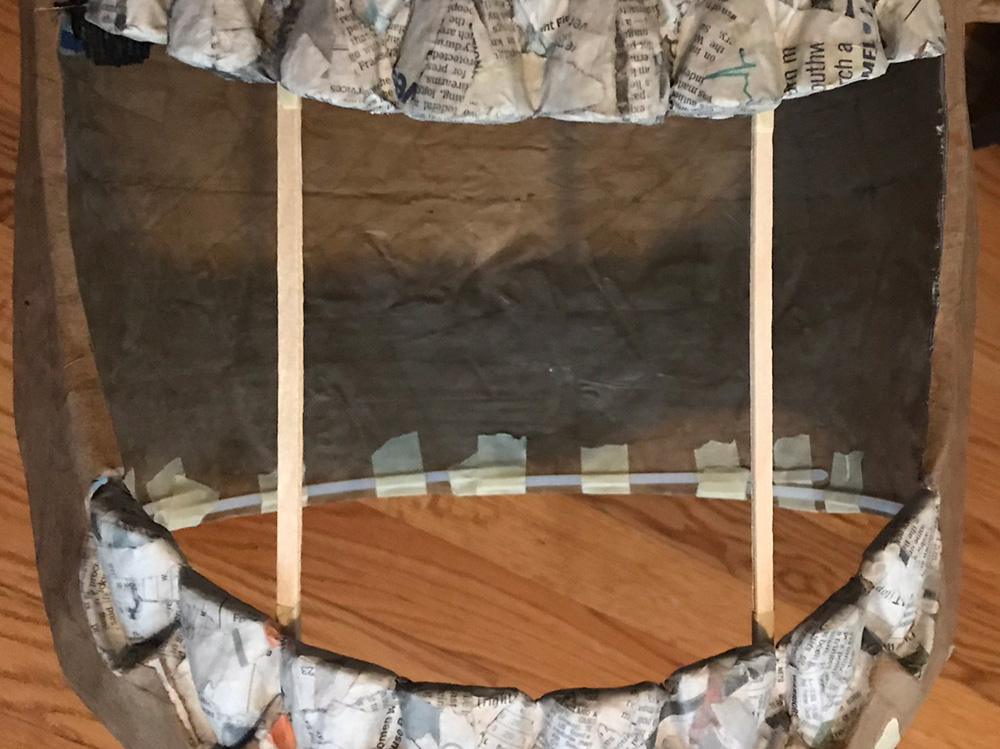
I added some wooden coffee stirrers in the mouth — these are there for two reasons: 1) to give the large mouth opening some support so it can’t warp or sag, and 2) to serve as a frame for a door I’ll be adding later; more on that in part four. You’re actually looking at two stirrers on the left and two on the right; I doubled them up to make them sturdier. I hot-glued them in place behind the teeth and then covered over the hot glue with three layers of paper maché to really lock them in place.

At this point I also added two useless gears near the front that would be visible through the eye holes. They’re connected to two of the little paper tubes on the toy car wheels, and they’re just there for decoration. Each of these gears is made out of craft foam. They’re not connected to anything other than the paper tubes; they just turn as the whole mechanism moves, just to add some additional movement. (This pic is from much later after everything was painted.)
That’s all for part three! On to part four: painting, hard hat, party hat, etc!
 About Manning Krull
 How to make a 4-foot paper maché alligator
 My violin skull mask, Mardi Gras 2015
 Three-headed paper maché dragon sculpture
Leave a comment