
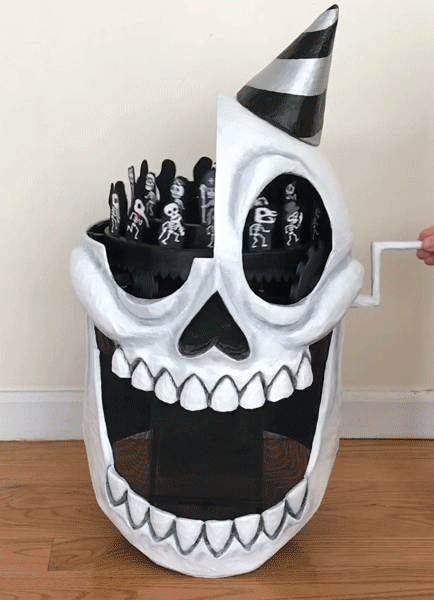
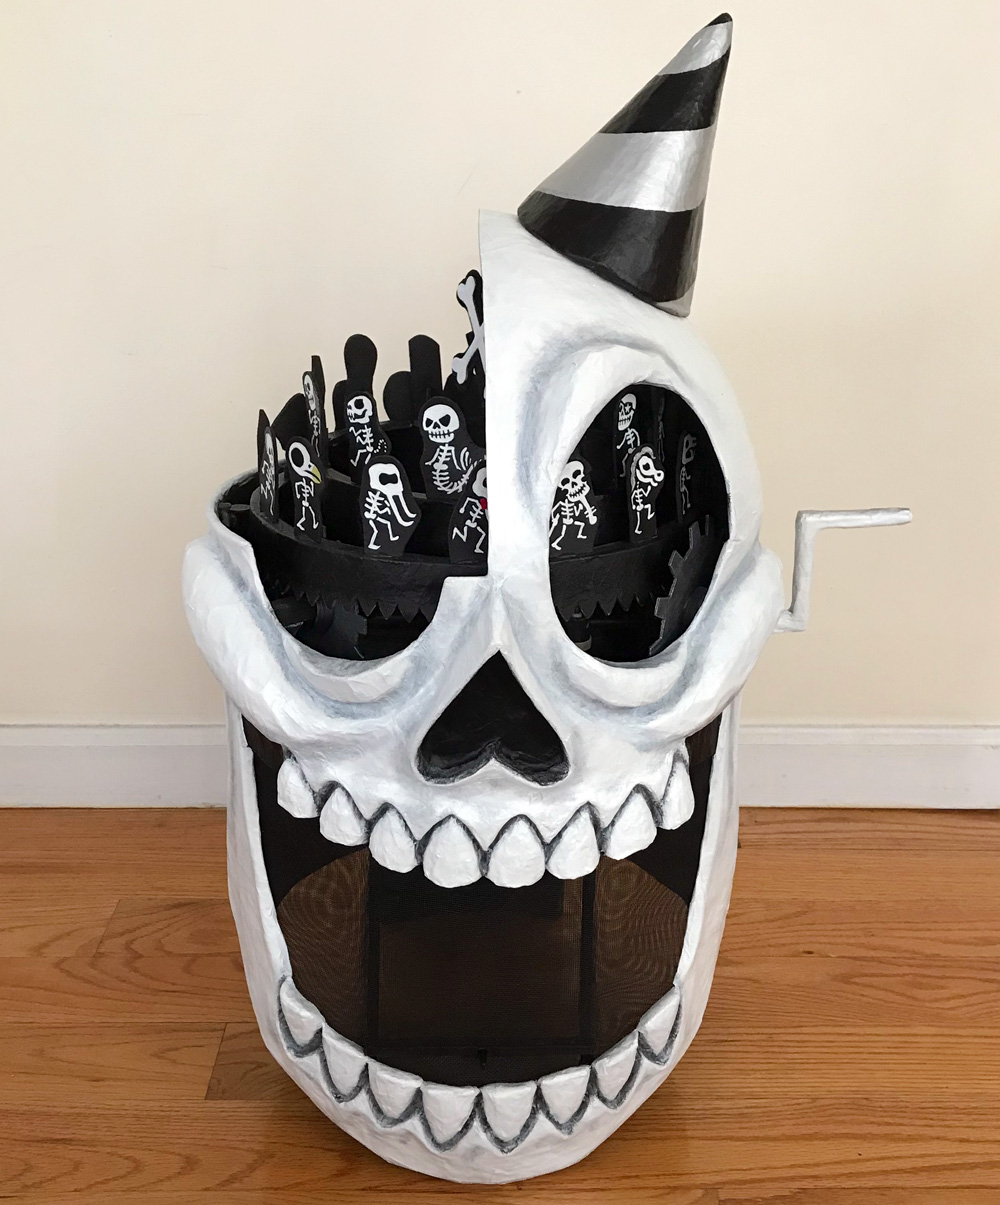
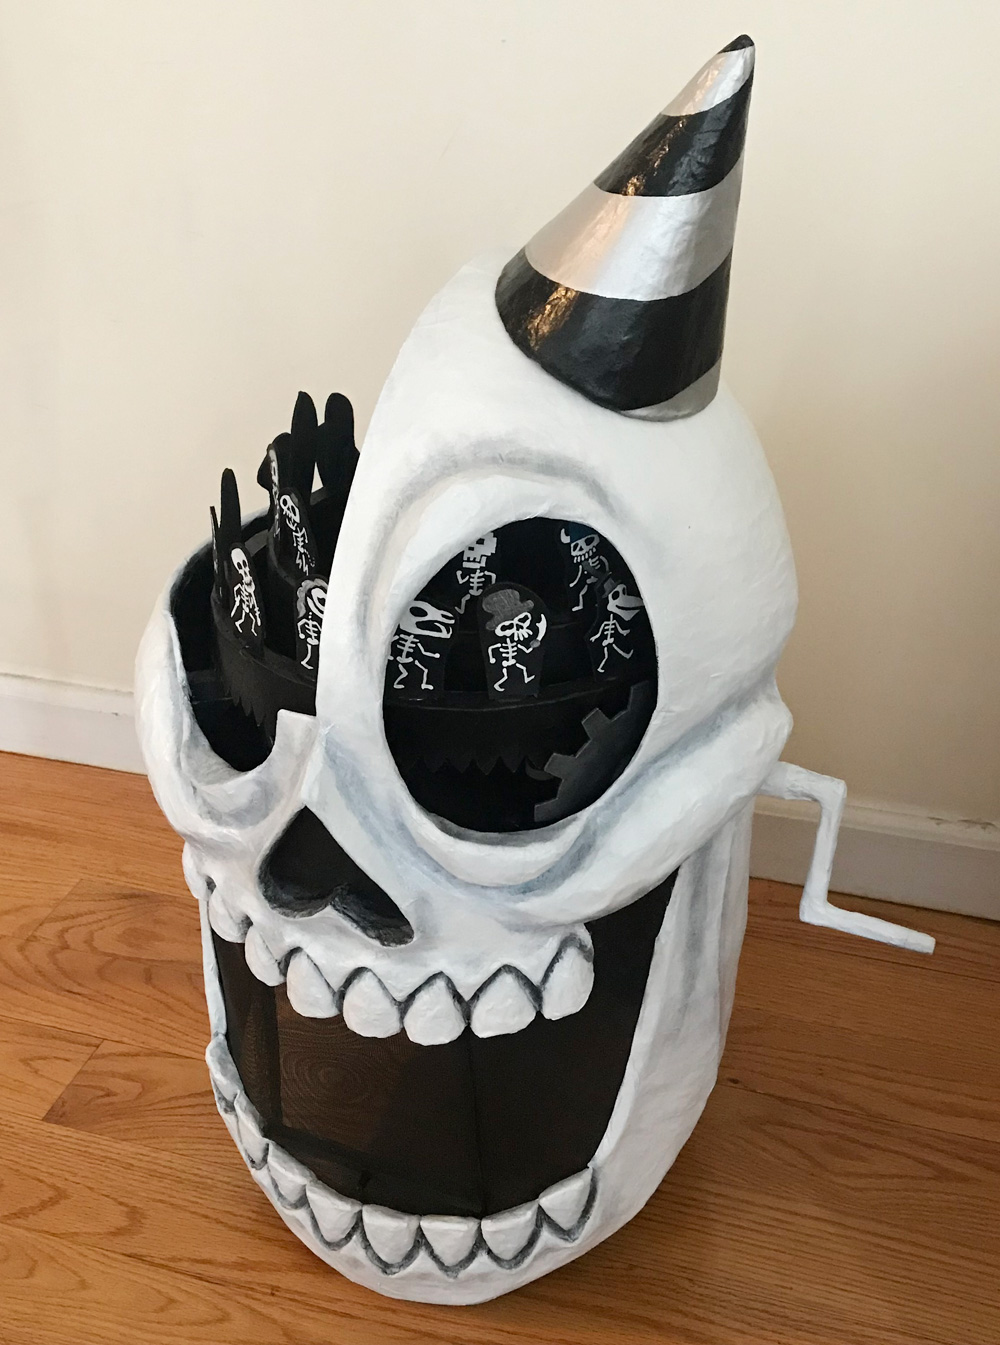
Skull mask with dancing skeletons, part 4
Published by Manning on March 5th, 2019
This is part four of my skull mask project with rotating gears and marching skeletons. See parts one, two, and three.
Installing the hard hat
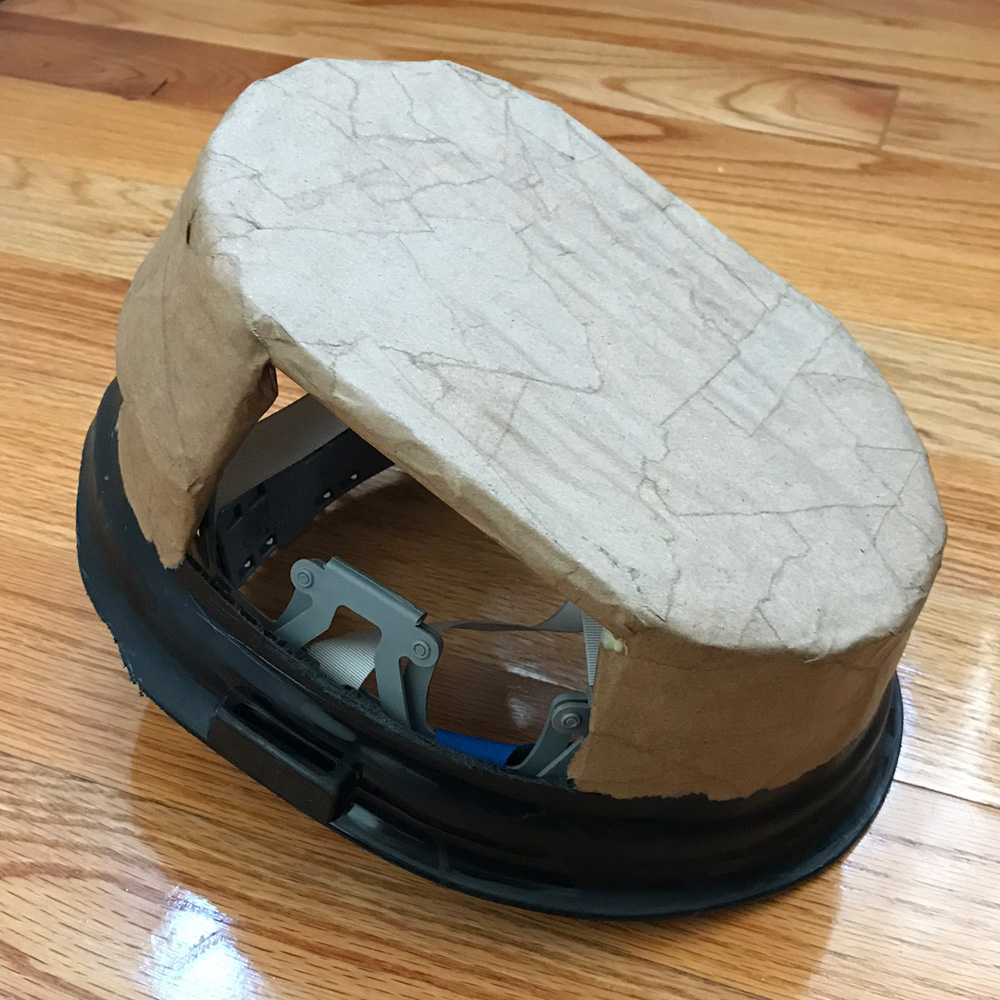
Almost all of my big paper maché masks are mounted on a hard hat. Hard hats are great because they’re cheap and they provide a lot of comfort and stability in a big mask. I usually saw off some parts of the hard hat for each mask depending on its shape, in order to reduce weight and to help the hard hat fit in the mask as well as possible. In the case of this mask, I sawed off the brim of the hard hat and the entire top dome part. Hard hats have a lot of empty space in the top to protect your head if something heavy falls on it, and in the case of this mask I wanted the hard hat to be much less tall, to allow the gears and stuff to be as low as possible over top of my head.
Before sawing the hard hat, you want to make sure to take the rigging (the straps and stuff) out first so you don’t damage them. I always draw the lines I want to cut with a white China marker, aka grease pencil. I use a dremel tool with a circular saw attachment to get the incisions started (always wear a dust mask and eye protection!), and then I use a little hand saw to do the rest of the cutting; this is actually a lot faster than using the dremel tool for the whole thing. When I’m done cutting the parts off of the hard hat, I sand the edges by hand with sand paper.
When that’s done, I install the rigging in the hard hat and glue it in place with a tiny drop of Gorilla Glue in each of the six connection points. This step isn’t totally necessary, but I like the extra security of knowing the rigging isn’t going to get pulled out while I’m handling the mask. For a lot of my masks (but not this one!), the easiest way to carry them while walking is upside-down and held by the rigging in the hard hat.
Installing the hard hat in the mask is always nerve-wracking! It’s a big step and it’s important to get it right in one go; you don’t want to glue it in there and then find out it’s tilted, or too high or low, or too far toward the front or back. So I do a ton of careful measuring and planning before connecting the hard hat permanently.
I’ve used different techniques for attaching the hard hat in different masks. This mask posed an interesting challenge because I couldn’t glue it directly into the top of the mask. I had to position it just under the rod that turns the gears.
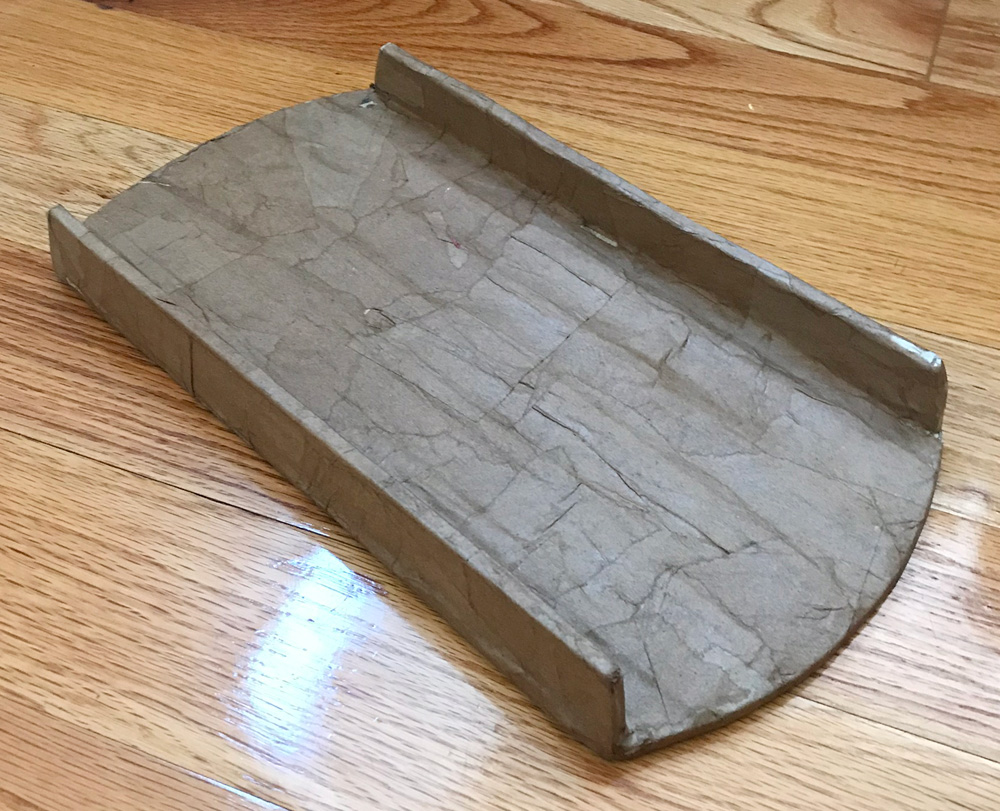
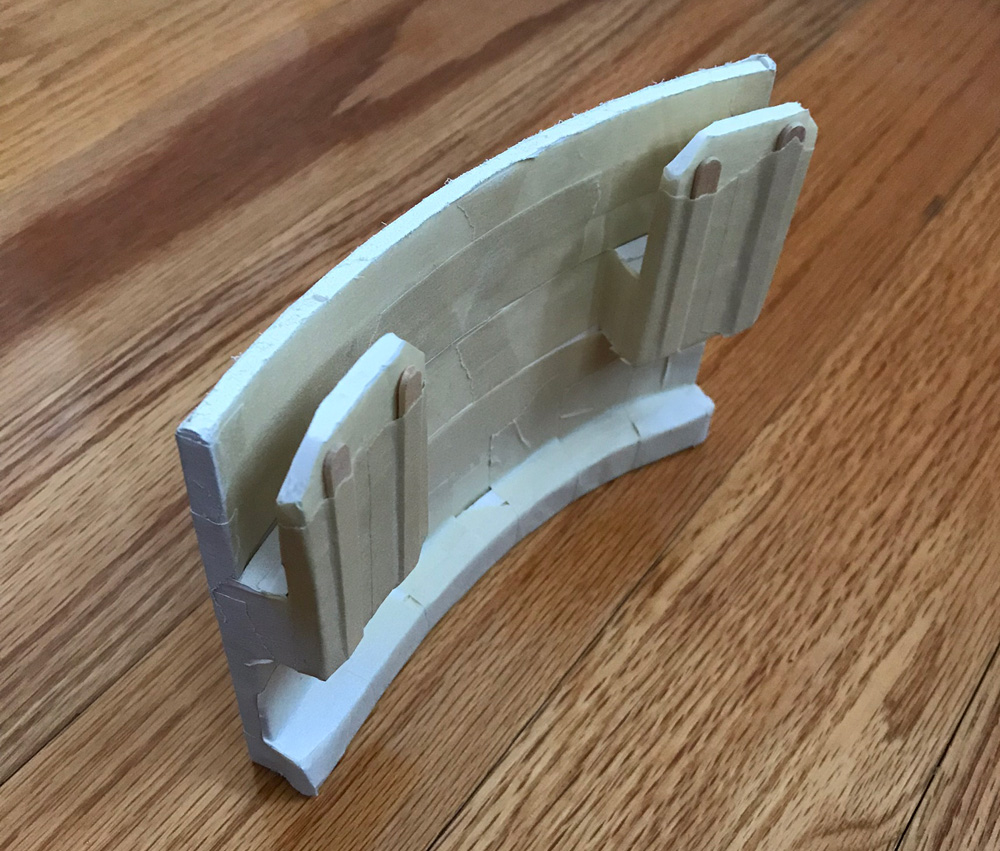
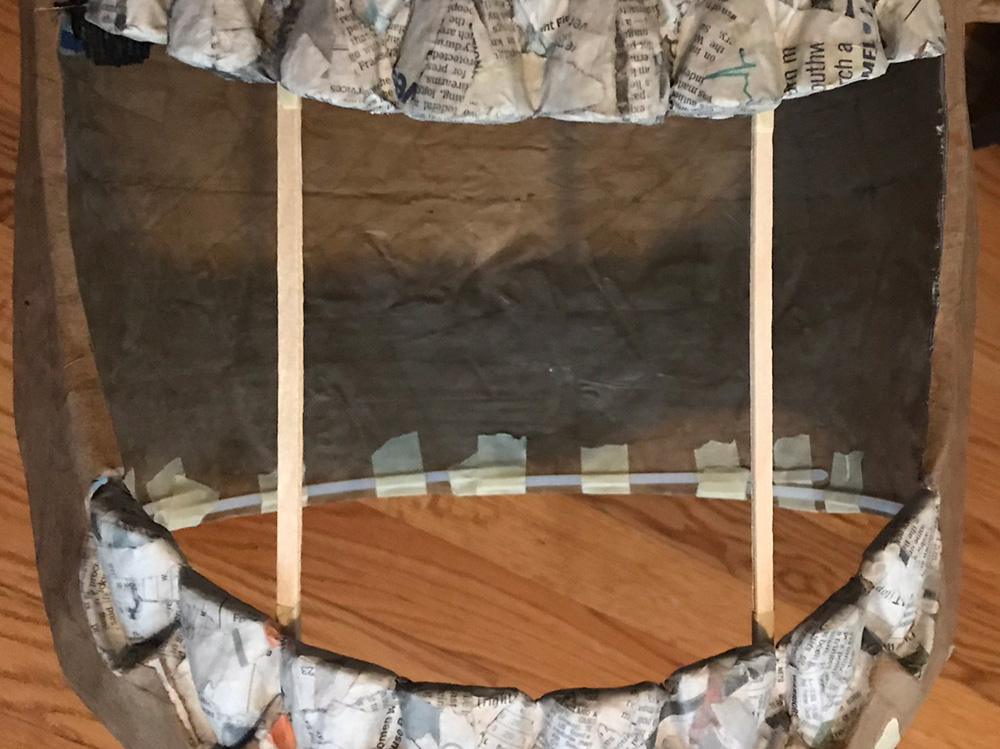
I decided to put a flat “roof” on top of the hard hat, and then create a flat structure just under the gears in the mask, and glue the hard hat to that. Like I mentioned, I’d already sawed the top dome part off of the hard hat, as well as some big pieces from the sides. I measured and cut a piece of foam board to perfectly fit across the open part of the hard hat, and taped it in place with lots of shipping tape. With anything involving foam board and weight there’s a risk of it bending/breaking, so I taped a bunch of wooden coffee stirrers along the top, and then I paper maché’d over the whole thing; four layers. When that was dry, the top of the hard hat felt very rigid and strong.
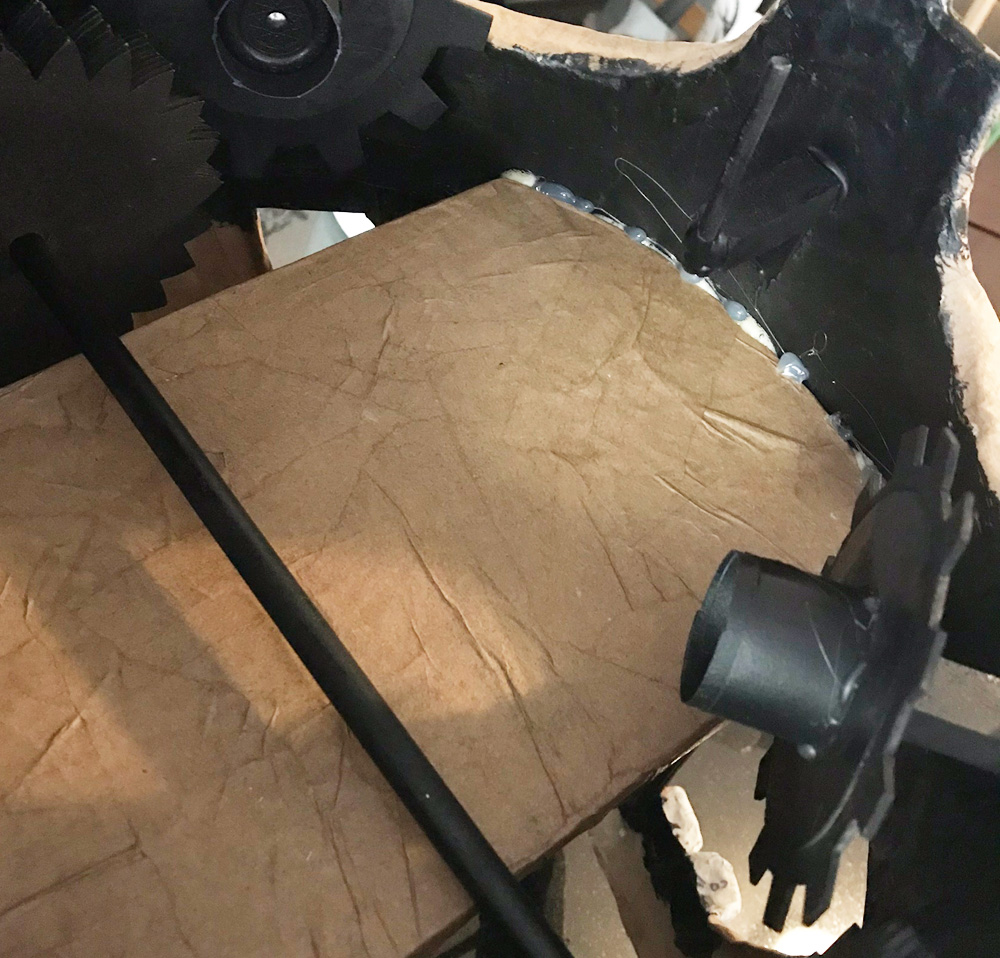
To build the platform that the hard hat would be glued on to, I measured and cut another piece of foam board, based on the diameter of the part of the plastic ring right under the gears. I based the width of this piece on the width of the roof of the hard hat, with a little bit extra so I could add some strips of foam board on either side to act as walls; these will make the platform stronger, as well as give some additional surface for the hard hat to hold on to. I hot-glued the walls in place, taped wooden coffee stirrers along the large panel, and covered this entire thing with four layers of paper maché. (In the pic above the piece is upside-down; the walls will face down when it’s in the mask, so they can hold onto the hard hat a bit.)
When dry, I positioned the platform inside the mask and hot glued it in place. To make the connection much stronger, I then added a line of Gorilla Glue all along the connection points. Gorilla Glue expands a huge amount as it dries, so as soon as I applied the glue I covered it with masking tape; this blocks the glue from expanding outward and helps encourage it to expand into the spaces between the pieces you’re gluing.
I let the glue sit for several hours to be sure it was 100% dry. I then propped up the mask upside-down, put a bunch of Gorilla Glue on the roof of the hard hat, and pressed it in place in the platform. I added some weight in the rigging of the hard hat to help hold it in place while the glue expands; if you don’t do this the glue can push your pieces apart!
After all of this was done, the hard hat felt very sturdy in the mask! And it was in the right position! Whew! That’s always a huge relief! Here’s a view (from a few steps later) of the hard hat in place inside the mask:
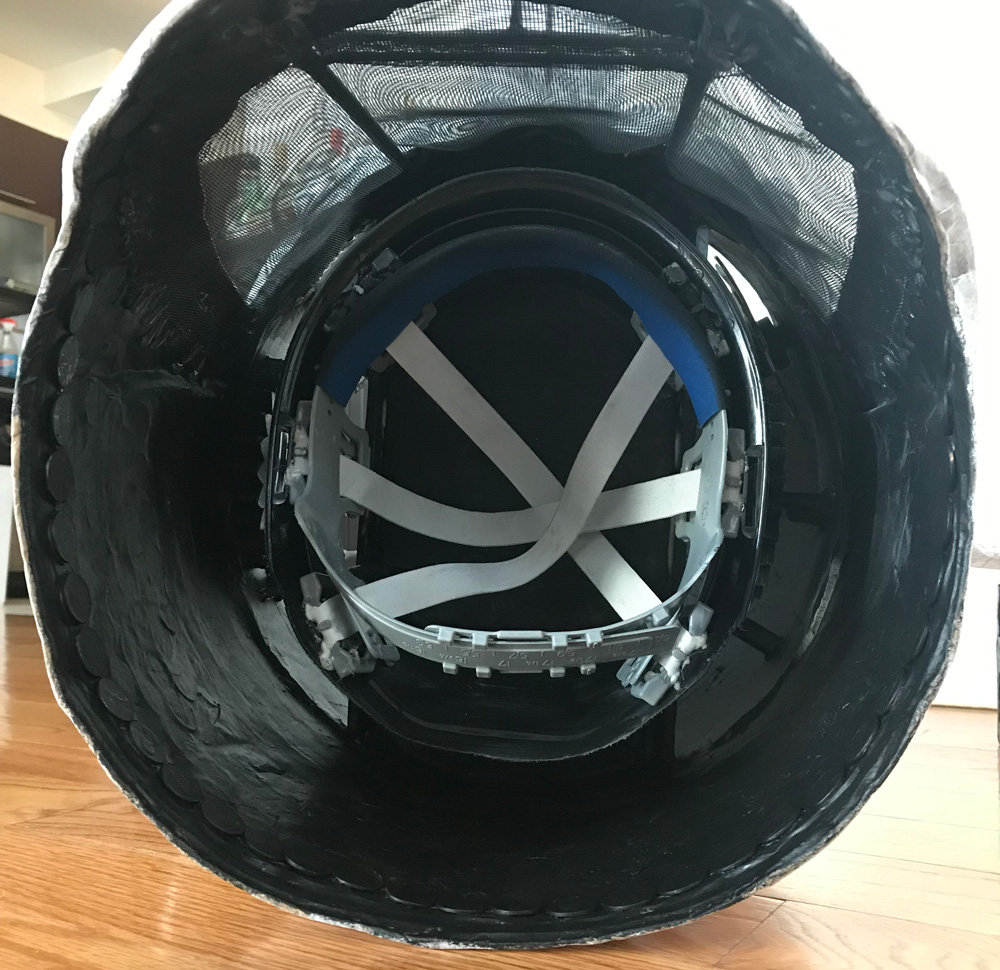
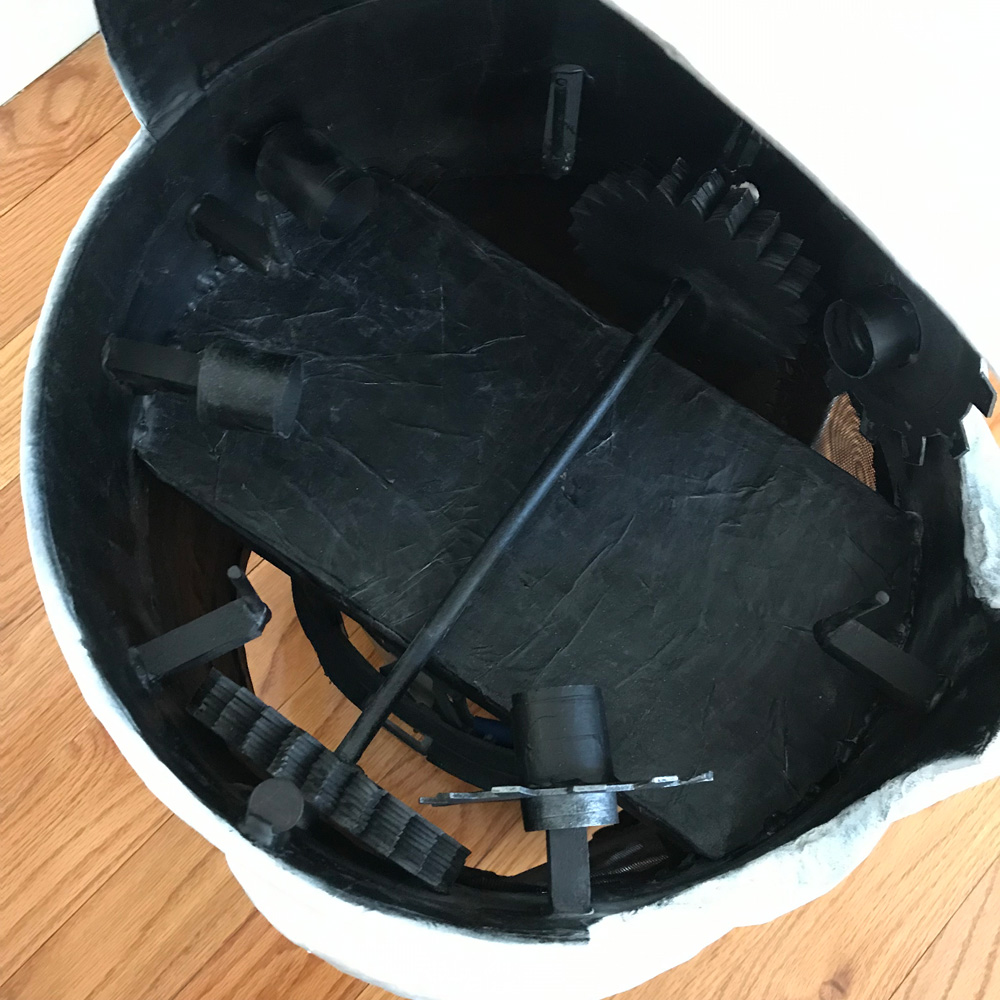
And here’s a view from above where you can see the platform that the hard hat is attached to:
Removable stand
Now that the bottom edge of the skull was no longer a straight line, I could no longer set the skull down and have it remain perfectly upright. If the mask is sitting at an angle, the gears and rotating skeletons don’t work very well. In a move that was very much out of character for me, I’d anticipated all of this and I had a plan!
I decided to make a removable stand that would allow me to set the mask down and keep it perfectly upright. The stand would be hidden inside the mask while I’m wearing it, attached with magnets inside the back of the mask. When I take the mask off I can pull the stand out and set it in place.
The stand is made from foam board, with some wooden coffee stirrers for support in a few places, and the whole thing is covered with masking tape and paper maché to make it fairly rigid. I embedded some magnets inside the foam at strategic points; I dug little holes out of the foam with an X-acto knife so the magnets can be flush with the surface of the foam. I also embedded magnets inside the back of the mask, so some of the the magnets line up when the stand is stowed away inside the mask, and others line up when the stand is in use, holding it firmly in place. I forgot to take a pic of the finished stand, but it’s not super exciting!
Party hat!
I wanted to add a party hat on top of the skull. I decided to build the hat to be removable, mostly for the purposes of packing the mask for my flight down to New Orleans.
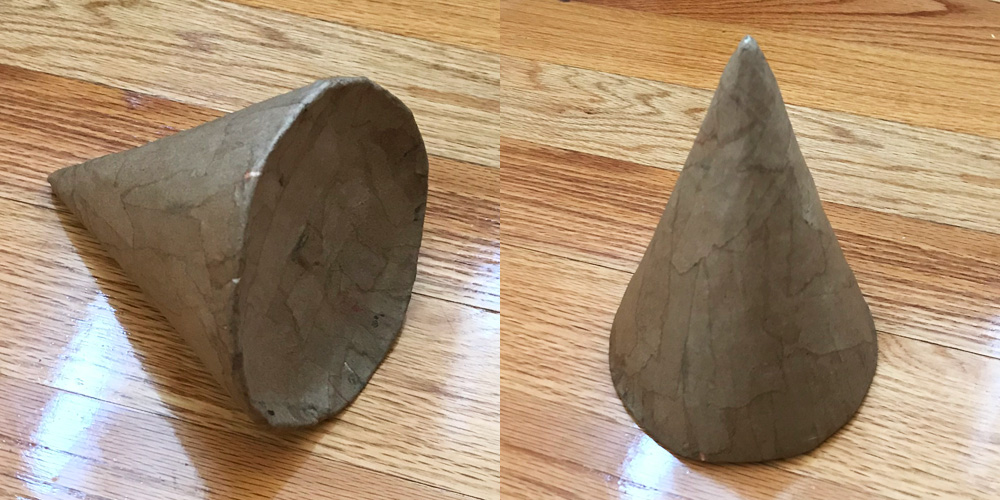
I made the hat out of a cone of construction paper that I simply rolled up and then covered completely in masking tape. I tried this shape against the rounded surface of the skull and trimmed the edges with scissors several times to get the fit I wanted.
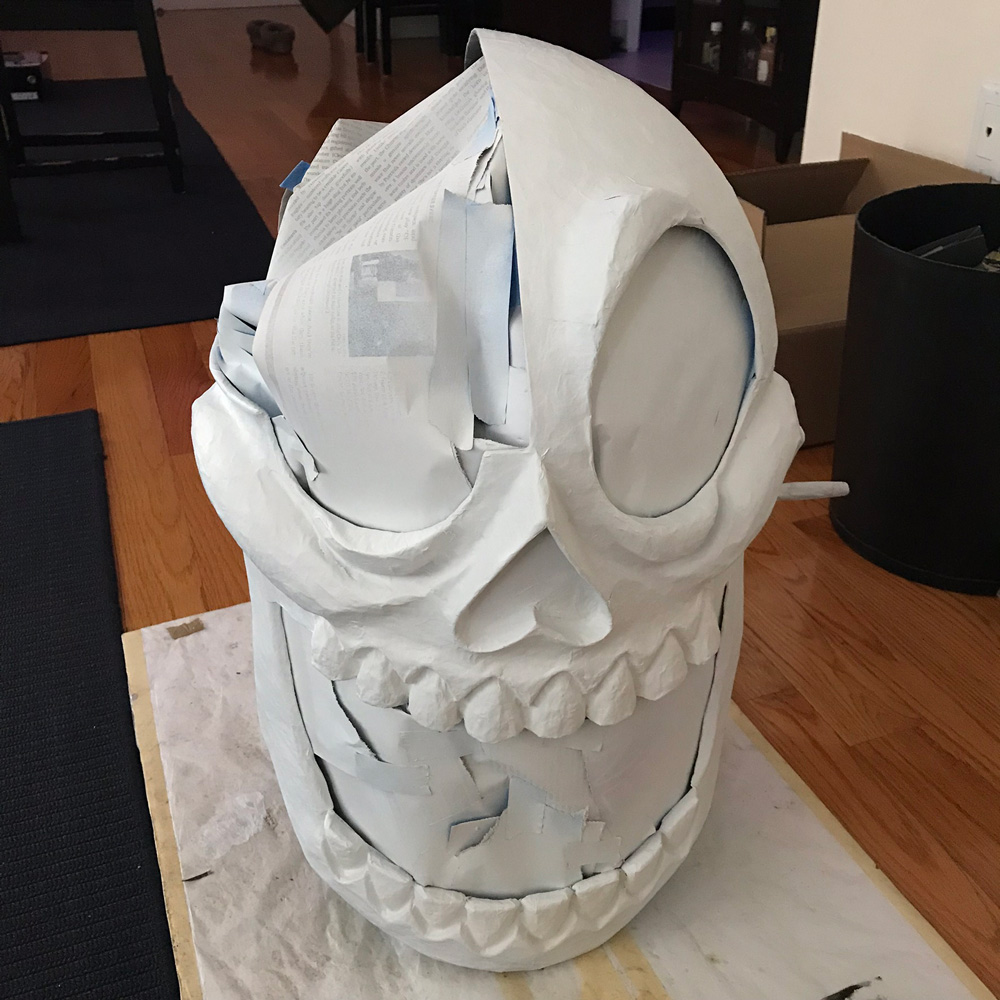
I wanted to create a bottom surface for the hat to fit perfectly onto the rounded shape of the skull. I went kind of overboard with this step! I stretched a piece of plastic wrap over the dome of the skull and taped it in place, and then I built up four layers of paper maché onto the plastic wrap. I didn’t care about the shape of this paper maché’d area, as I’d be cutting it out later.
When the paper maché was dry, I set the cone shape onto it and traced around it with a marker. I then lifted the plastic wrap off of the skull, peeled it away from the paper maché, and cut out the paper maché circle with scissors. I taped this in place on the hat. I then covered the hat all over with four layers of paper maché.
When the hat was dry, I tried setting it in place on the skull, and it was a near-perfect fit! The surfaces on the bottom of the hat and the top of the skull lined up well enough that it would be easy to attach them later.
I used magnets to connect the hat to the skull, so it could be detached for packing and traveling. I figured out the exact spot on the skull where I wanted the hat to sit, and I taped some magnets in place inside the skull — I use these tiny washer-shaped magnets that are super strong, and with any magnets, the more of them you stack up the stronger they get. I put three inside the skull and three inside the hat. I covered the magnets with a piece of shipping tape and then a layer of paper maché; the tape is there to prevent the magnets from ripping through the paper maché. When this was all dry I tried the hat and it worked perfectly!
Adding some counterweight
Finally the mask was completely assembled and I could try it on to figure out the weight and balance. I expected it to be a bit top-heavy and off-balance, and I was right! A lot of the bulk of the mask is up above my head, which makes it wanna tip over. Also, since the right half of the skull is missing, that means the left side is heavier, which makes the mask want to lean to the left. And the fact that the hard hat is toward the front means the mask want to pull backward a bit.
Luckily these problems are easy to fix by adding weight around the bottom-interior edge of the mask. In general I try to keep my masks as lightweight as possible, and you might think that adding weight would make the mask less comfortable to wear. However, a well-balanced mask with extra weight actually feels a lot more comfortable — even lighter than — a lightweight mask that’s really off-balance.
I typically use pennies for adding weight; they’re probably the cheapest/heaviest small items you can use, and they’re perfect to work with because they’re small and flat and easy to stack or line up however you need.
I hot-glued some pennies in place around the inner-bottom edge of the mask, starting with a bunch at the lower-right, since the mask wanted to tip over to the left. Once I had the right amount in there (about 25 pennies), the mask much more felt balanced but still way too top heavy. If I didn’t move at all it stayed upright, but when I moved I could feel it wanted to wobble and topple over in any direction. This was easy to fix: I simply glued a row of pennies all the way around the bottom interior edge of the mask. That made a huge improvement, but I decided it still felt a little top-heavy, so I added a second row of pennies all the way around. The mask was still pulling backward a little bit, so I added a few extra pennies in the lower jaw, and that took care of that.
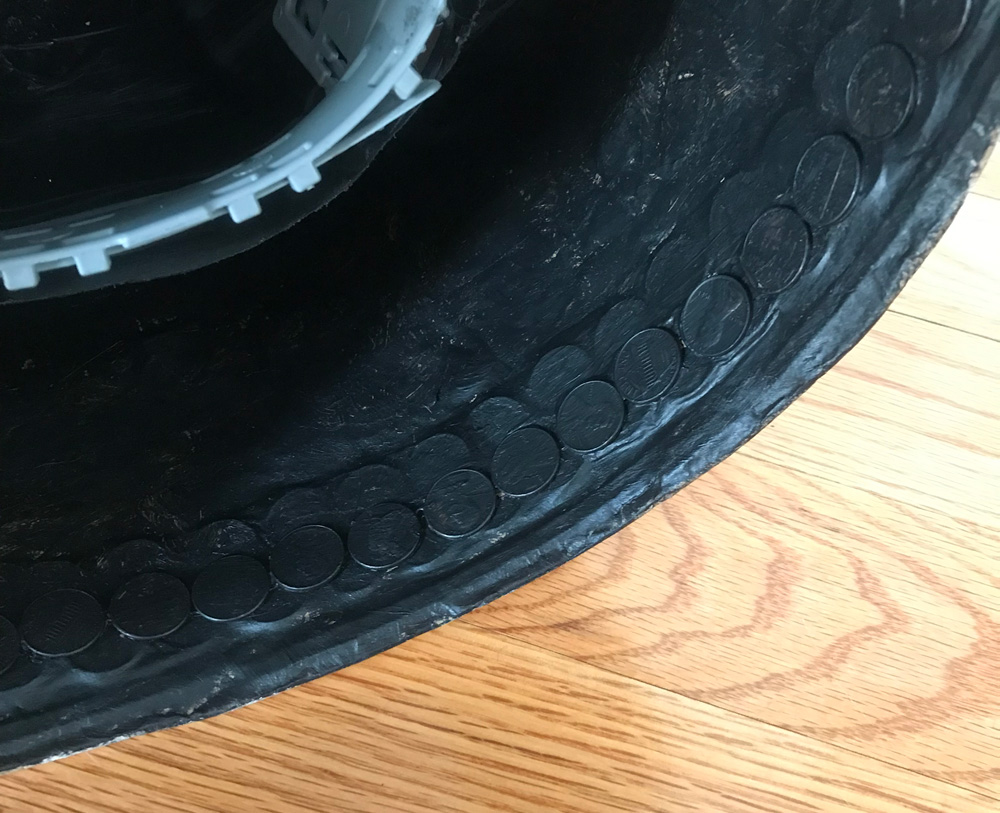
When I thought I had enough pennies glued in, I covered them over with one layer of paper maché to lock them in place, and then I painted over the paper maché with black acrylic paint to blend it with the rest of the interior of the mask. However, I later decided I needed more weight, so I hot-glued another row of pennies in there, and this time I just painted them black; no paper maché. In the end I used about 200 pennies! Quite an investment! This mask is now worth at least US $2.00.
With all that metal glued into the mask, it definitely feels surprisingly heavy when I pick it up in my hands, but when I put it on my head it feels really balanced and comfortable. Back when the mask was just paper maché with the gears inside — before I added the hard hat, pennies, rotating rings and skeletons, etc — it weighed just 1.5 pounds. Now when fully assembled it weighs a whopping 5 pounds! This is my heaviest mask yet, but it’s well-balanced enough that it really doesn’t feel heavy when I’m wearing it. However, this is me saying this before our five-mile march on Mardi Gras morning! I’ll post an update afterward…
Painting
Painting this mask was fun! Like I mentioned in part 1, I’d already spray painted part of the interior of the mask black — the gears mechanism and the inner walls — before moving on to building the whole skull. And along the way I’d been painting the other interior parts black as I finished them. But finally it was time to paint the exterior of the skull.
Before starting to paint the exterior, I protected the interior by taping newspaper in all the holes — the big opening in the top, plus the eye and the mouth.
I gave the exterior of the whole mask a couple coats of spray gesso, waiting an hour in between each coat. I did three more light coats of spray gesso on the teeth and gums, because I wanted to smooth out all those spaces a little bit. I let all the gesso air out for about four hours outside.
The gesso is white, and I also wanted to spray paint the skull white, but this presents a challenge: how can you tell you’re covering the whole thing if both coats are white? It’s impossible to tell when you’re spraying, but you can see the different between the gesso and the paint when they’re dry; the gesso is chalky-looking and the spray paint is a bit shinier. So, to make sure I applied an even coat of white spray paint, I first gave the whole skull a light dusting of dark gray spray paint (the color isn’t important; gray is just what I had handy). Then when I did the white, it was easy to see which spots I’d hit and which I hadn’t. Make sense?

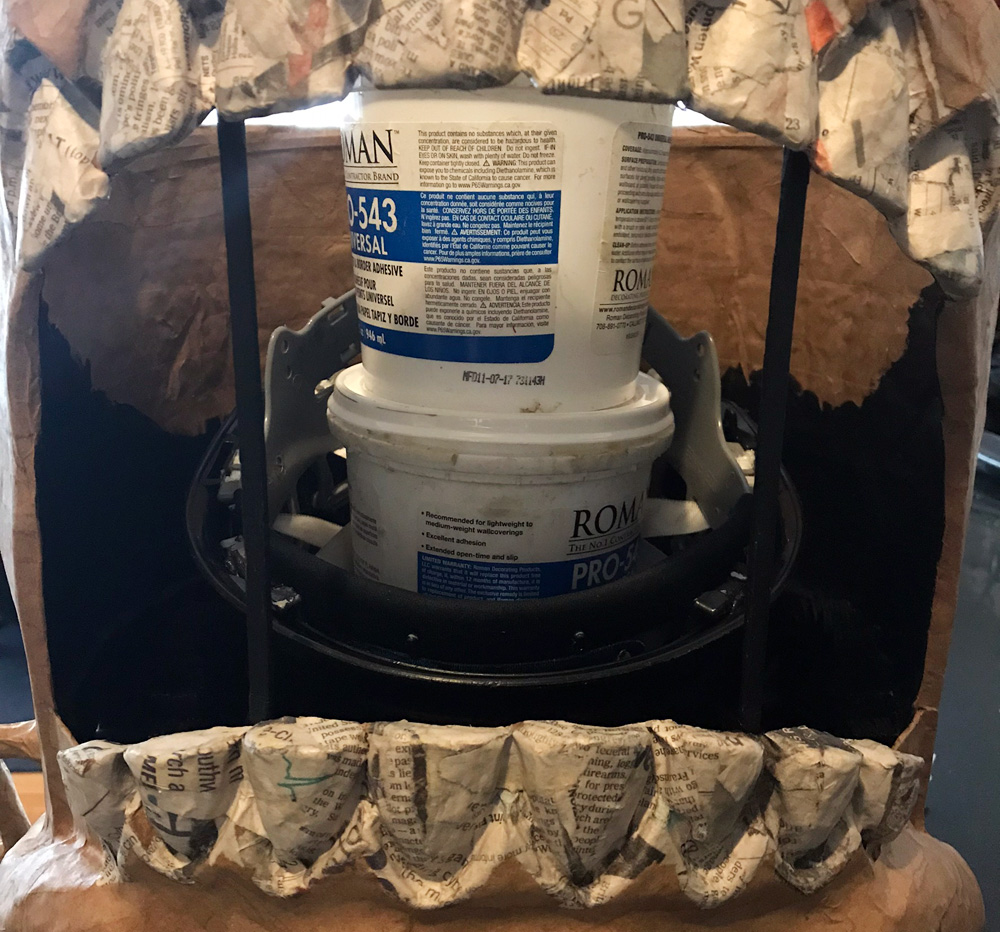
I let the spray paint air out for a full two days before bringing the mask back into the apartment. I always let my projects air out in this big storage container I have out on my terrace; I set the mask on a stand made of wine bottles, and propped the storage container open about half an inch so the air can get in and out.
I painted deep black shadows in all the recessed areas of the mask with various stiff paintbrushes and black acrylic paint. I intentionally go overboard with this step because I know I’m going to dial the black way back with white paint later. With such a small amount of paint it’ll feel dry almost right away, but it’s important to let this step set for an hour or two before the next step.

Then I went over the shadow areas with slightly-watered down white acrylic paint, also applied roughly with stiff brushes. This creates a nice layered, textured effect with the black and white to create nice soft gray shadows. I like this black-and-white shadowed look much more than just plain white spray paint; it’s much more organic and rough and textured-looking. With this technique it’s possible to go over certain areas again with more white in order to dial back the black more and more; with a little effort you can create nice gradient effects this way, so a long shadow under an eye, for example, can fade perfectly to white on both sides.
I ended up going overboard with the white all around the teeth, so a little while later I re-did the black shadow technique around the teeth, but a little lighter than the first time.
Lastly, I used a small paintbrush and some more white paint and went over the front of the teeth again, to make them extra bright and contrasty.

I painted the hat separately. First I spray painted it black and let it set for a day. Then I used blue painter’s tape to mask out a stripe, and then I spray painted the whole thing silver. When it was dry I removed the tape and touched up the edges of the line with black acrylic paint.
When all the painting was done, I took the mask and hat outside and applied a coat of matte spray to the mask and a coat of gloss spray to the hat. I then let them air out outside for a day.
Installing the screen
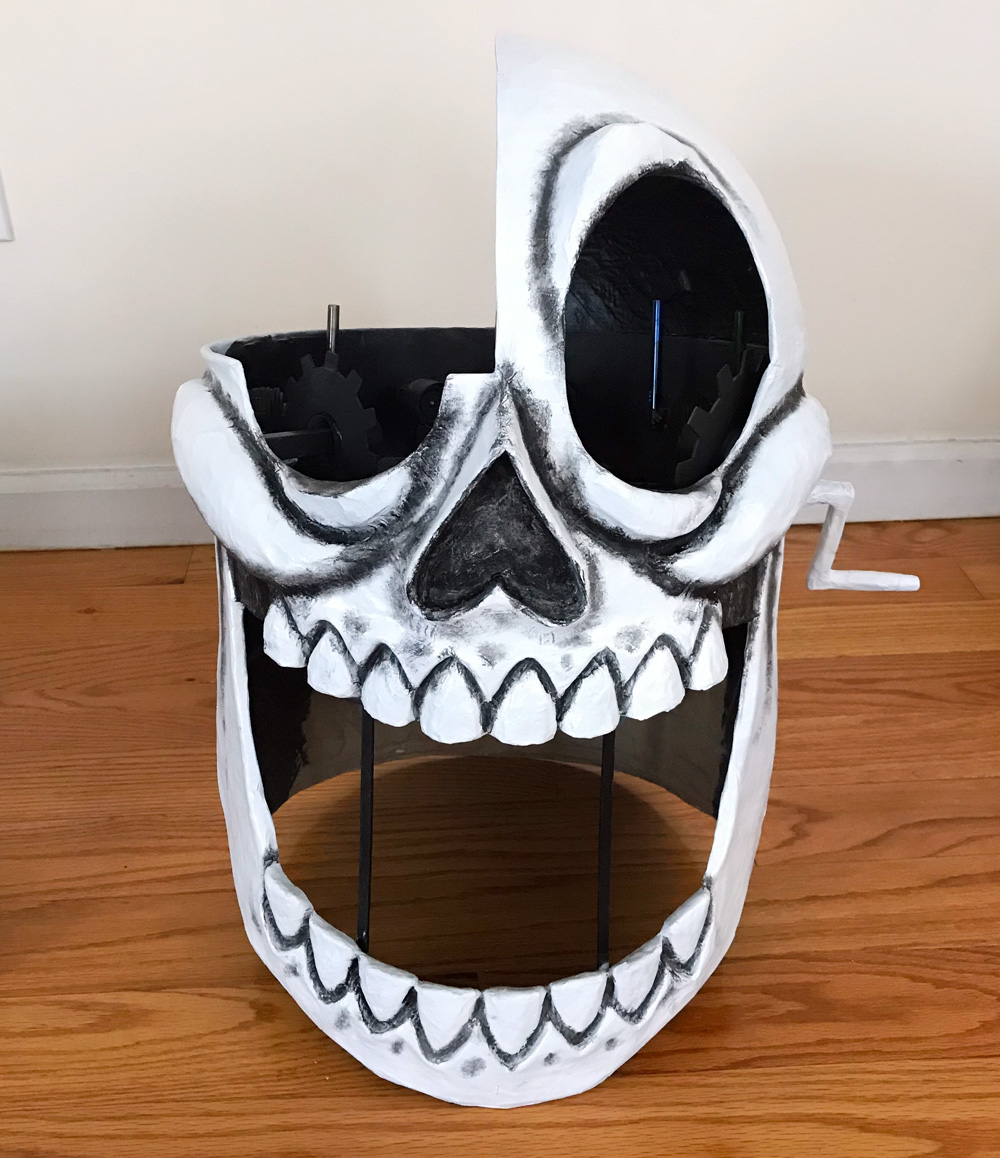
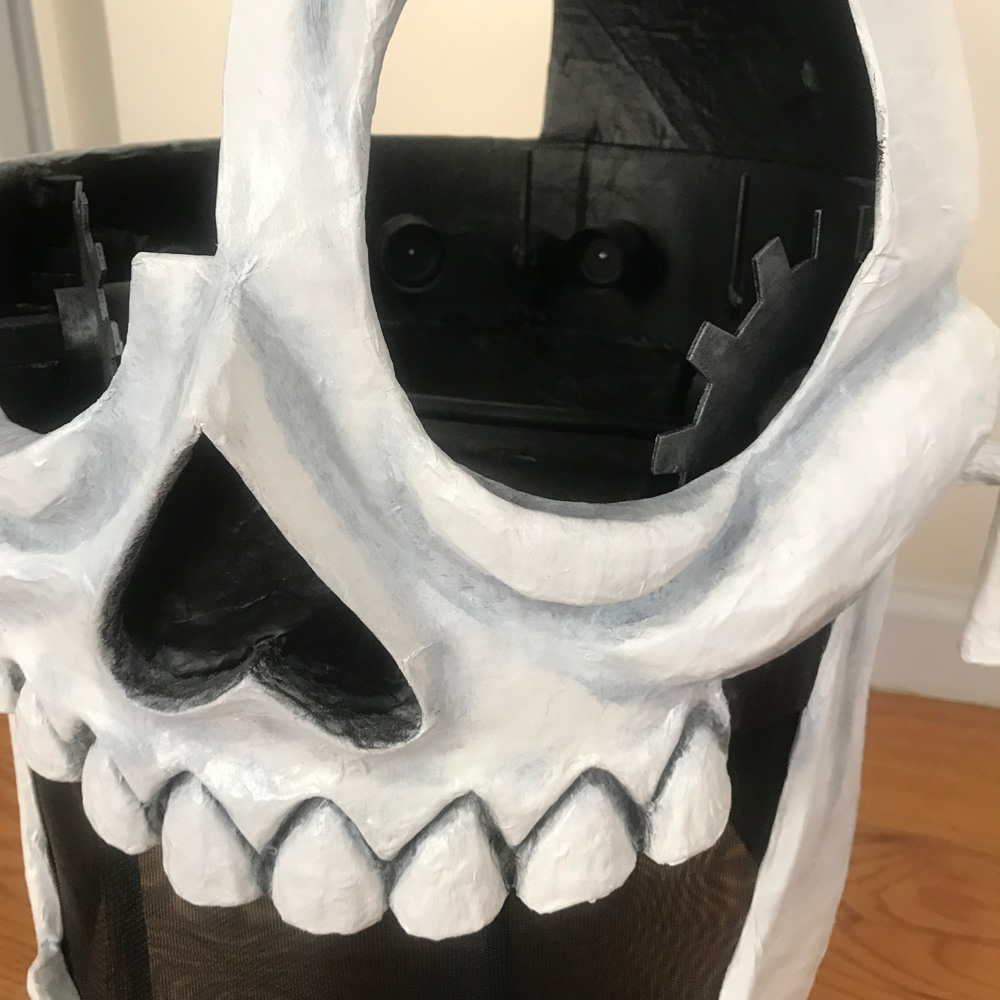
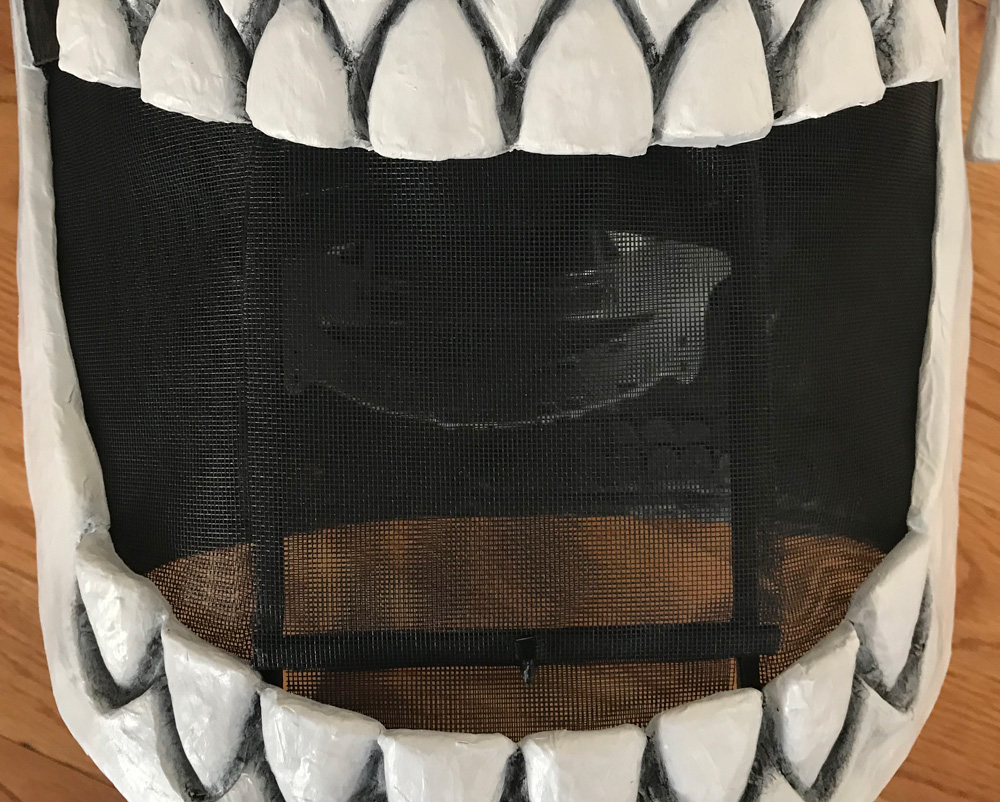
I usually glue black screen material in all the eyes/nose/mouth holes of all my skull masks, but in this case I wanted to leave the eye(s) screen-less so you can see the skeletons moving past in there, and this time the nose isn’t a hole at all. So I only put screen in the mouth, to hide my face (a valuable public service I’m more than happy to provide). I bought a roll of screen door material at Home Depot a couple years ago and have used it for the last several masks. I usually just measure and cut out the pieces of screen and hot-glue them in place inside the mask. I’ve used a few different kinds of screen, and some of them are thicker and more opaque than others. The screen I’m currently using is very thin and transparent, so I double it up.
This time I decided to make a door/flap in the mouth that I can open, very similar to what I did for my Axe Man skull mask last year. Rather than type that all up again, I’ll let you go check out that article if you’re interested.
Here’s a pic from several steps ago when I added wooden coffee stirrers to serve as sort of a door frame:
A funny lesson I learned last year: for my Axe Man skull, I’d measured the width of my flask (I always carry a flask of rum in my pocket on Mardi Gras morning) to make sure the door in the mouth was wide enough that I could easily take a swing whenever I want. In measuring the flask and designing the door, I failed to realize that the flask gets a lot wider when you flip the cap open! I found out on Mardi Gras morning that it wouldn’t fit through the door I’d made! So to take a sip I had to hold the door flap open with one hand, bow my head way down, bring the flask up to my lips, basically pressing the mask against my face, and swing my head back to let gravity do its work. It wasn’t easy, but it got the job done.
So you can imagine I was a lot more careful in my planning this time. The door on this mask easily accommodates the flask. Here’s a view of the finished door:
Anyway, believe it or not, this mask is…
All done!
Whew!
However!
Looking at the finished mask, especially from the side, something about the emptiness of the dome above the rotating skeletons really bugged me. I started wondering… would it be possible to add a third tier of rotating stuff in the middle? Without planning this at all as part of the original design? I had plenty of time left before Mardi Gras, so I decided to go for it.
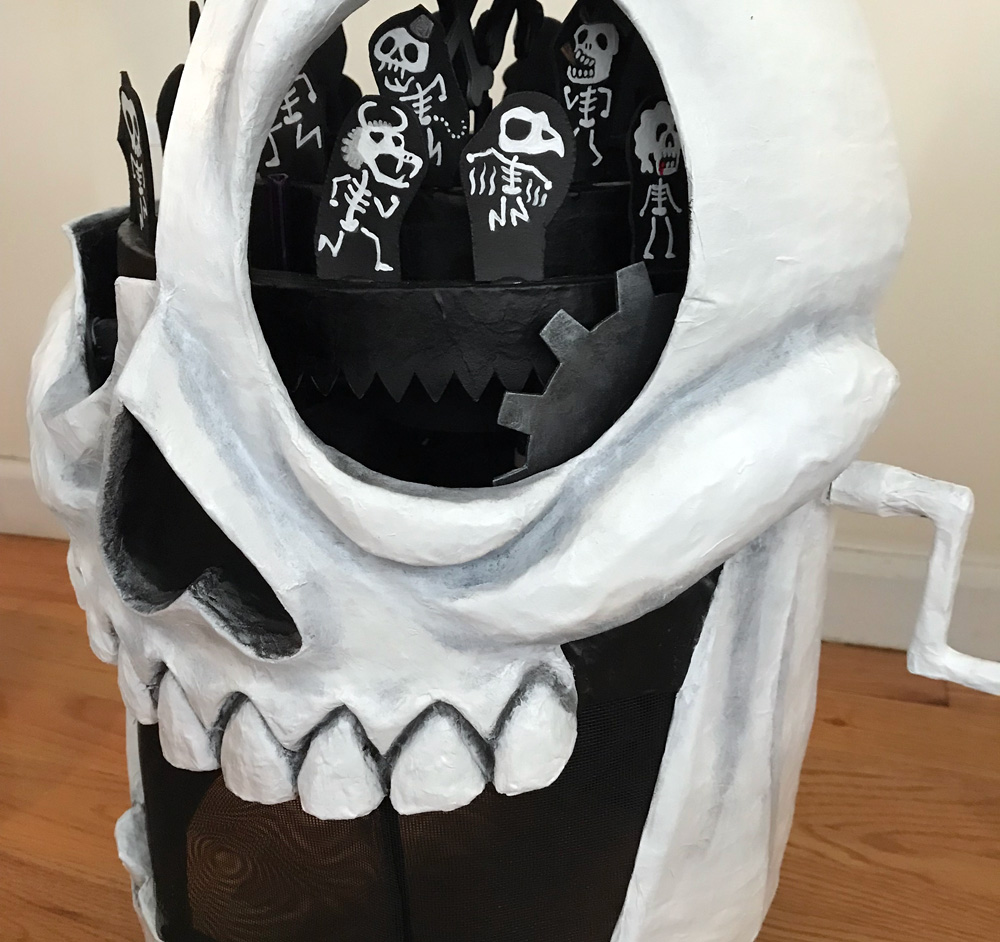
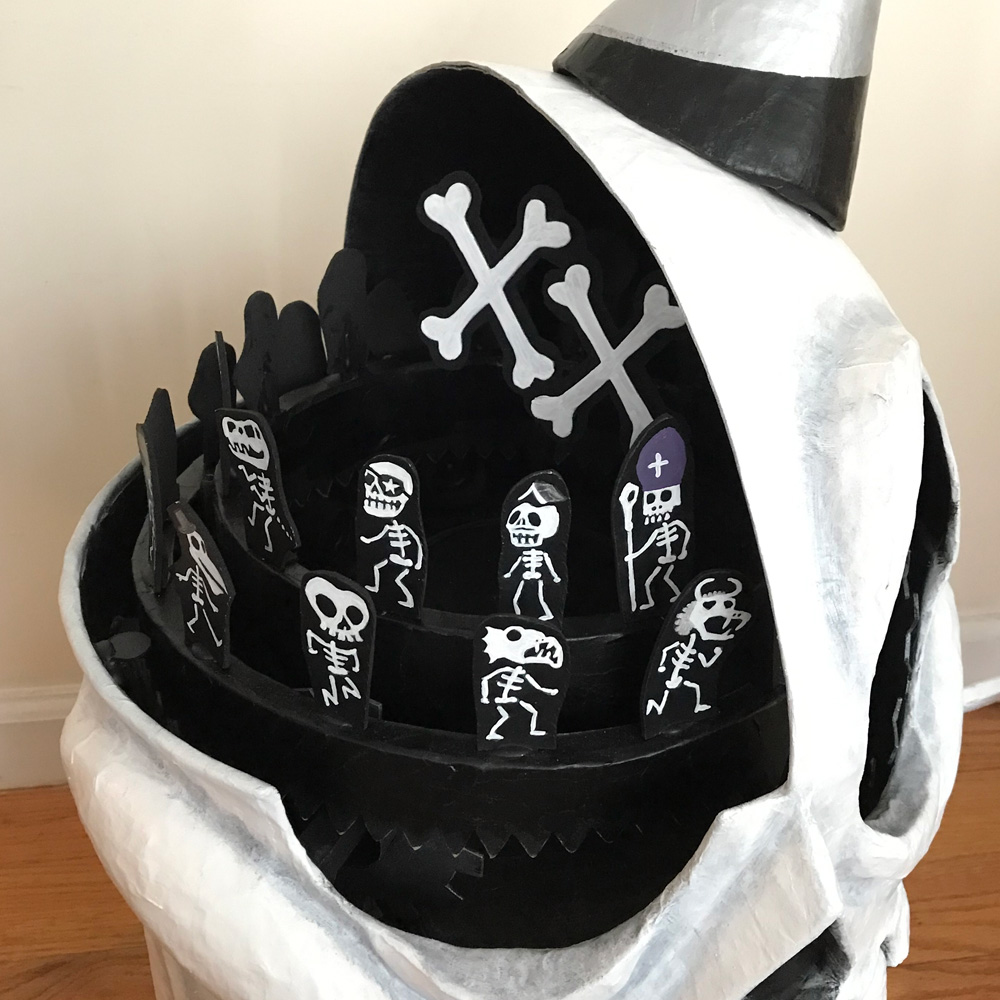
Rotating “XX” crossbones
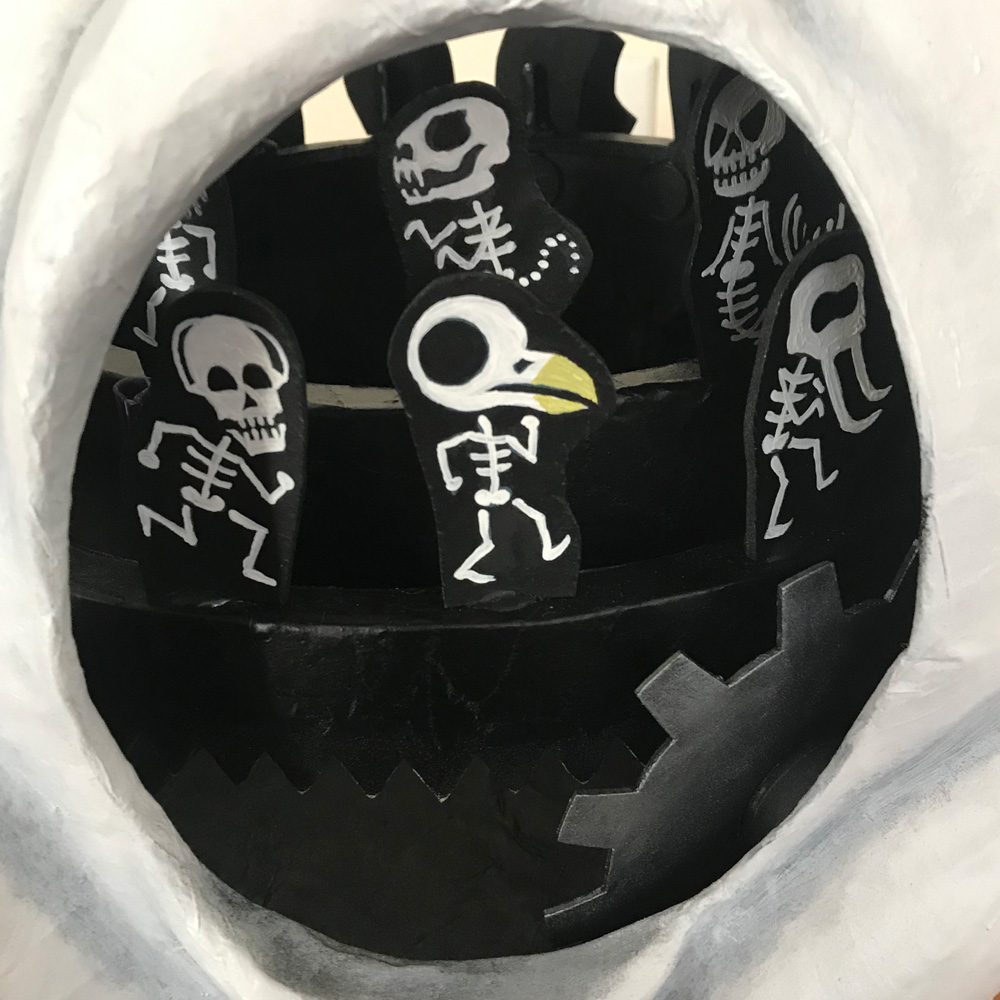
I decided to add a pair of spinning crossbones above the skeletons.
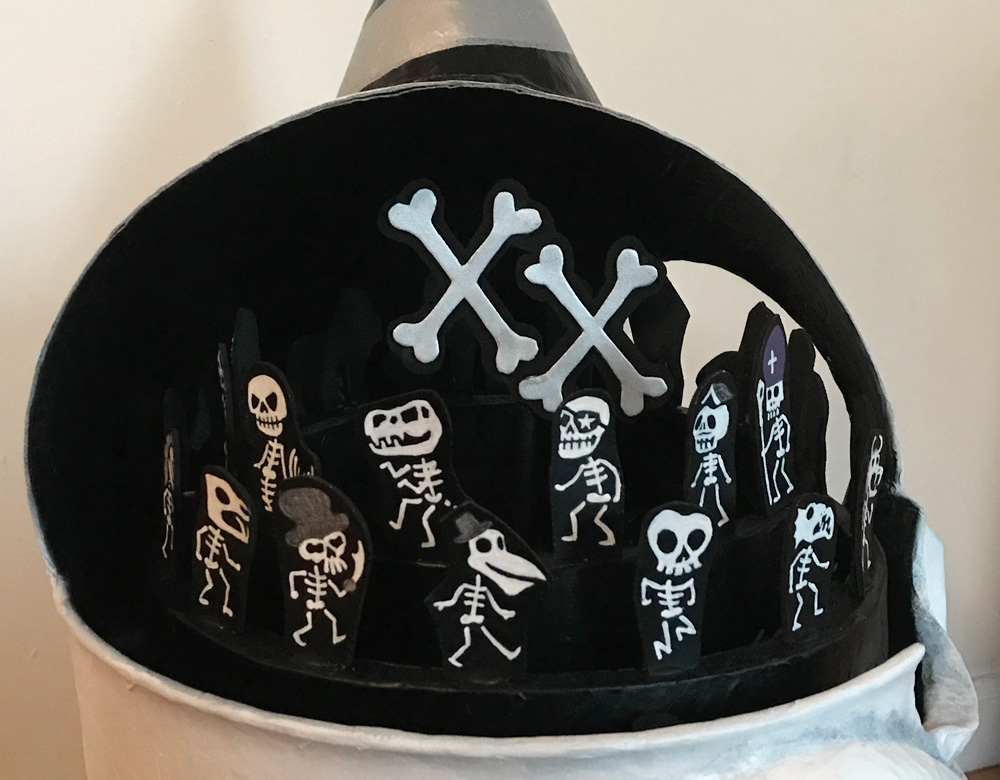
I made the crossbones out of three layers of craft foam; I painted the middle one black and the outer ones white. Easy! I hot-glued ’em all together.
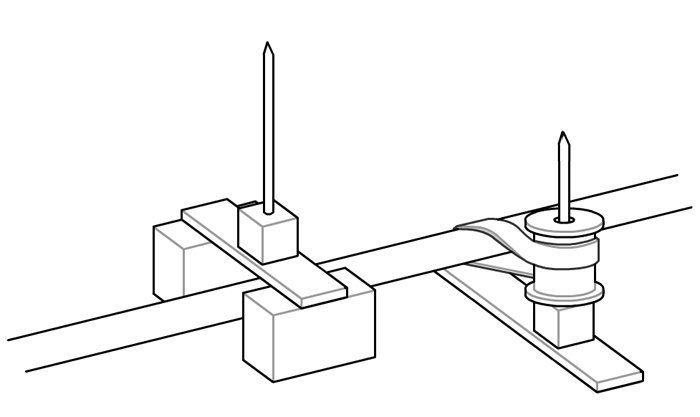
Now then, the way I made the mechanism that turns the post with the crossbones… oh man, I’m never gonna be able to explain this properly. This new third moving section is attached to the same wooden rod that turns the whole big mechanism with the little skeletons. The basic idea is that I used a rubber band to make a belt that goes around the wooden rod, this belt turns a small wheel, and that wheel turns a bigger wheel that the crossbones are mounted on.
Here’s some info on the pieces I used for this. The belt is a rubber band, like I mentioned, and I cut it to size and then stapled the ends back together.
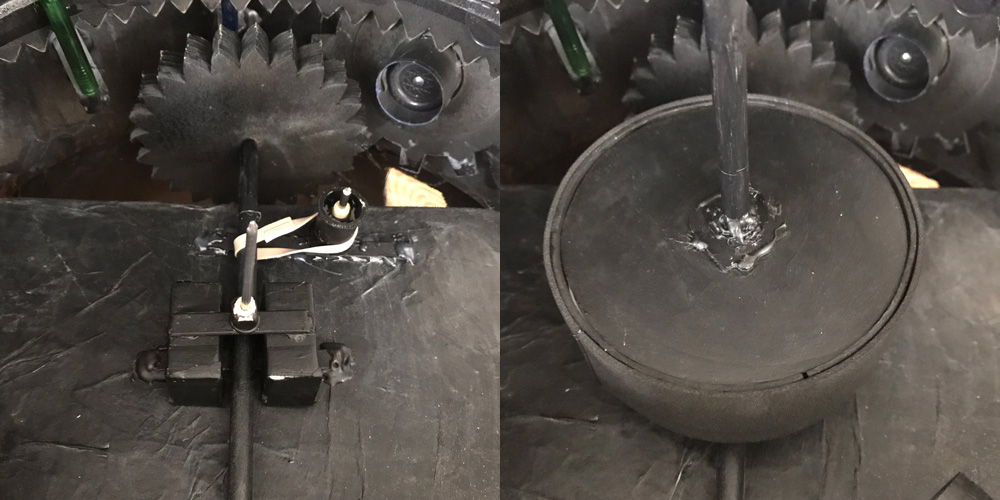
The belt goes around a plastic spool that used to hold thread. The spool is mounted on a nail, which I wrapped a bunch of masking tape around to make the fit a little more snug. The nail goes through a cube-shaped wooden bead; this is there to stabilize the nail and keep it standing at a perfect right angle. The cube and nail are hot-glued onto a popsicle stick, and the popsicle stick is hot-glued to the flat surface inside the mask, right under the wooden rod.
So the belt turns the spool, and the spool then turns another larger wheel that the crossbones are mounted on. The larger wheel is a disk I cut from foam board; I cut out four copies and glued them together so the wheel is four layers thick. I wrapped a long strip of craft foam around the edge in order to make the edge soft and friction-y(?), so it can push against the spool and easily turn. This large wheel is mounted on another nail, which is also mounted a wooden bead and a segment of a popsicle stick. This popsicle stick is glued onto two little foam board shapes so it can straddle the wooden rod and hover right over it. Everything is positioned so that the soft foam edge of the big wheel pushes gently against the rough edge of the rotating spool, giving them enough friction to turn together.
It’s way too dark and cluttered inside the mask to get a decent picture of this, so here’s a diagram I made when I was trying to figure out the logic of the thing.
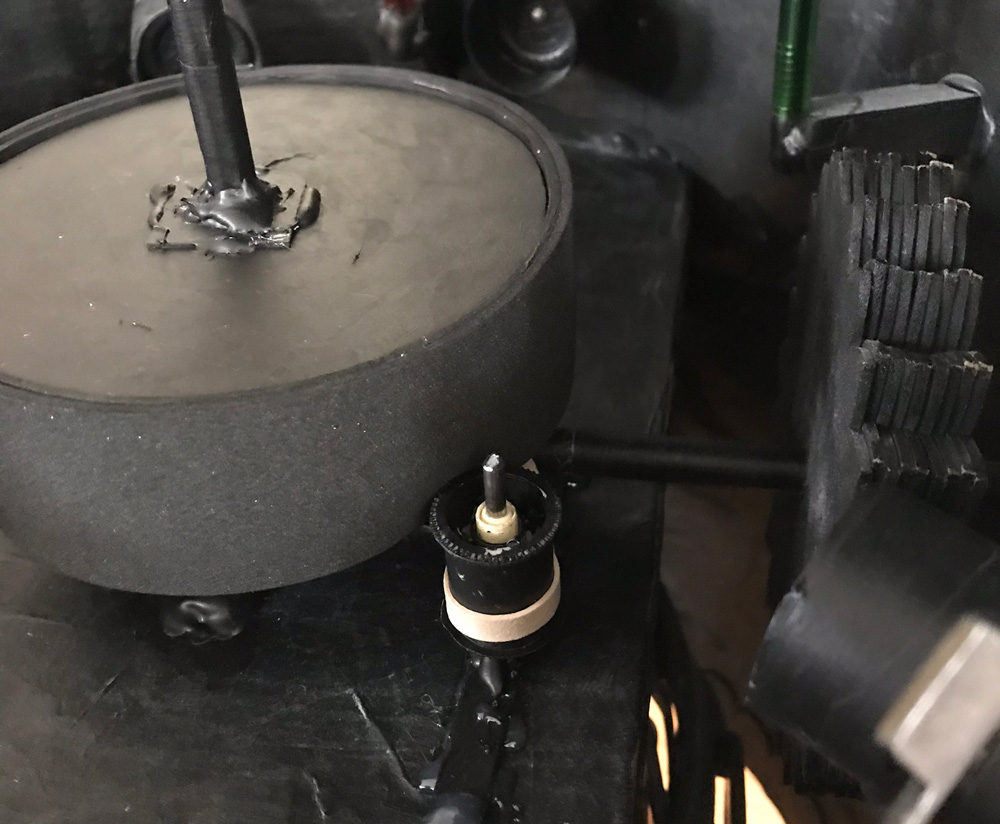
And here are a couple pics anyway; I turned the brightness up so you can see some of this junk. In this first one you’re looking from the right side of the skull toward the left side. In the middle you can see the little platform that straddles the rotating rod and holds the nail for the big wheel. Behind that is the rubber band and the spool. On the right side you can see I’ve set the big wheel in place:
This next pic is looking through the eye hole, so you can see how the top edge of the spool touches the soft foam edge of the big wheel, creating enough friction so it can turn:
I found out I could twist the rubber band the opposite way over the spool to make the whole thing turn in the other direction, so in the finished mask I’ve got all this stuff turning the other way.
The crossbones are mounted on a thin paper tube, and this is hot-glued in place on top of the larger wheel. Whew!
Now, one more layer of complexity. I needed to make this stuff easy to take apart and reassemble so I can travel with it. So the large wheel and the post with the crossbones are all held in place with magnets. The belt and the small spool are permanently glued in there.
One minor side effect of not planning this part out: I didn’t do any math to figure out what sizes to make the spool and the larger wheel in order to make them rotate at a certain speed — I wouldn’t have any idea how to do that even if I’d wanted to — and it turns out this middle piece turns much slower than the two big rotating rings of skeletons. I was kind of surprised by that! If anything, I was a little worried this part would turn too quickly because it’s smaller. So the middle part with the XX bones turns really smoothly and gently compared to the skeletons, almost to the point where you wouldn’t notice it’s moving if you only looked at it for a few seconds. Not a big deal.
Now I’m really done for real this time!
This was the most complicated skull mask I’ve ever made, and maybe the most complicated thing I’ve ever made, period! I’m thrilled with how it came out, but it was kind of exhausting, and I’m seriously thinking of giving myself a break next year. Maybe just poke some holes in a bucket and paint it black and white. That sounds really nice right now.
Here are a few more pics and a video!


I put a few more pics from Mardi Gras day in a separate post, here. Happy Mardi Gras, everyone!!!
 About Manning Krull
 How to make a 4-foot paper maché alligator
 My violin skull mask, Mardi Gras 2015
 Three-headed paper maché dragon sculpture
March 6th, 2019 at 11:20 pm
Fantastic! Glad to see it in action. My family and I arrived right when the Skeleton Krewe was leaving Jackson Square and I wondered if the little skeletons rotated.
March 7th, 2019 at 1:19 pm
Thanks Michael! I’m happy the moving parts survived all the way to Jackson Square! I knew marching five miles would jostle everything around a lot and I was worried the whole thing would lock up before we arrived there; I’m very glad I got one clip of everything working when we were hanging out in front of the Presbytère museum — I’ll post that asap!