
My mask making process
Published by Manning on March 1st, 2018
Hooboy, I’m finally typing all of this up! Here’s my basic process for making big paper maché masks, including materials, my paper maché process, etc. These are just guidelines, and I change parts of this process for almost every mask, but this the basic stuff right here.
Design
I always design my mask on paper, through tons and tons of sketches. I always draw it from the front and sides, and sometimes other angles if they’re important to the design. At some point I make sure to draw where my head will fit, to figure out where my eyes will be able to see out of the eye (or other) holes. I almost always mount my masks on a hard hat, so I also sketch how the hard hat will fit inside the mask.
Oftentimes I’ll take a picture of myself wearing a hard hat and holding up a ruler, and I’ll bring this into Photoshop along with a scan of my final sketch of the mask. This allows me to scale my drawing over my face to figure out the right size to make it fit properly, and it also allows me to figure out the exact measurements of the mask, based on the ruler I’m holding. From there I can lay out the outline of the mask at life size and print it out — this means breaking it up onto several 8.5″ x 11″ sheets, printing them out, and taping them together. It took me a long time to get good at this but now I can work it all out pretty quickly and get the size very accurate.
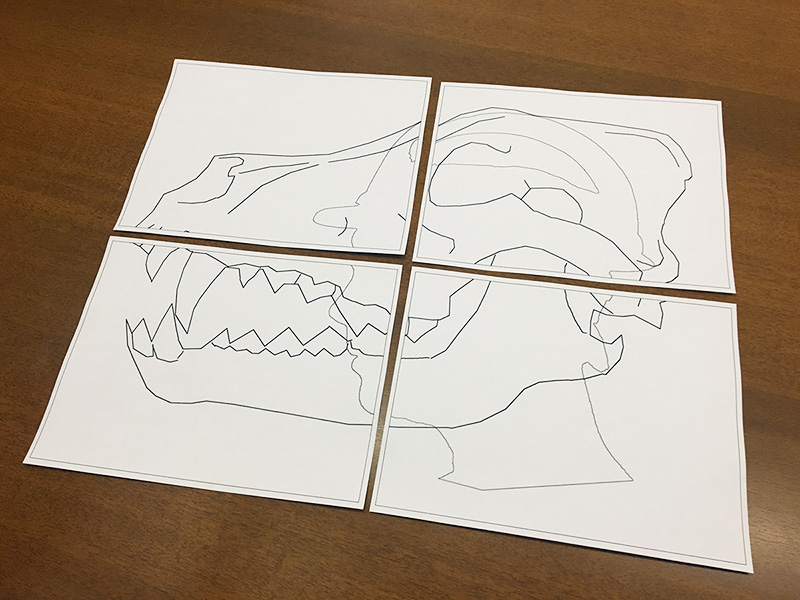
I may just use this print-out as a visual guide while making the mask, or, depending on the basic shape and style of the mask, it’s sometimes helpful to trace this life-size picture onto foam board and build my base around that. Which brings us to…
Building a base
I use a lot of different materials to build the bases for my masks, but I end up coming back to a lot of the same ones over and over again. Here are some links to a bunch of my big masks; I wrote about the materials and techniques I used for the bases in each one: Axe Man skull | Wolf skull | Twin skull masks with reusable base | Anubis mask | Cuckoo Clock skull | Violin skull | Conjoined twin skulls | My first big skull mask

Foam board (aka foam core) is my favorite material for building bases for masks and other large sculptures and stuff. I go through a ton of this stuff. I also go through a ton of masking tape and shipping tape. I cut up pieces of foam board with an X-acto knife, curl them up into different shapes as needed, and tape them together with tons and tons of tape. That’s my main process that I use for most of my projects.
I end up using lots of bowls and cups as well, as they’re nicely rounded shapes that would be hard for me to make with just foam board and tape.
I buy a lot of this foam pipe insulation tubing stuff — I love working with this stuff because it’s easy to cut into precise shapes, it’s very firm but flexible, and it takes paper maché really well. I use this junk to sculpt out a lot of the features of my masks like eyebrow ridges, cheek bones, fangs, ears, etc.
When the foam pipe insulation is too imprecise, I’ll try aluminum foil, wadded up and taped in place. When that won’t do the trick, my last resort is modeling clay. Clay is by far the easiest way to get precise shapes, but it’s expensive and heavy and it feels like cheating sometimes. If I were rich I could just sculpt the whole head out of clay before applying paper maché, right? I like working with these rougher, cheaper materials when I can manage it. One other downside to working with clay is that paper maché sticks to it way too well, and using a release agent like masking tape or shipping tape isn’t easy because the tape doesn’t stick to the clay very well. What’s a release agent? I’m glad you asked…
Release agent
A release agent is a layer of any material that you put between your base and your paper maché to help the paper maché separate easily from the base. Without a release agent, your layers of paper maché would probably get permanently glued to your base, and you’d never be able to get the materials completely out of there. A great example of a release agent is aluminum foil — you build your base of solid materials, wrap it in foil, apply many layers of paper maché over that, and when it’s dry you can open it up and the base materials come right out, because they’re not stuck to the foil. (However, the foil may be permanently stuck within the paper maché, but that’s not usually a big deal.)
Aluminum foil works great as a release agent for big masks and sculptures with big, wide, simple shapes. It doesn’t work as well on smaller projects, or on projects with small details, because it’s difficult to apply aluminum foil to small details without obscuring those details. The foil tends to smooth out fine details, or cover them entirely.
In the case of smaller details, I usually use masking tape, or heavy duty shipping tape torn into thin strips, as a release agent. This stuff is easier to wrap onto smaller details, and it separates from paper maché pretty easily. Shipping tape separates from paper maché with no problem, but it’s a little harder to wrap onto small details. Masking tape is more flexible and you can wrap it onto details pretty easily, but some cheaper kinds of masking tape can get pretty stuck in your paper maché. Lots and lots of trial and error have helped me figure out when to use aluminum foil, when to use masking tape, and when to use shipping tape.
I’ve also used plastic wrap as a release agent, and it’s got pros and cons; I don’t love it enough to use it for most things these days. But give it a try if you want! It’s nice and flexible and peels away from paper maché pretty easily, but it tends to slide around a lot while you’re applying paper maché. I’ve gotten decent results with it.
Applying paper maché
 (Above: my violin skull mask in progress)
Finally, time for paper maché! For a big mask you’ll need at least six layers, maybe more like eight or nine. I have a whole detailed article about my paper maché process and materials; check it out here. The short version is: I use Roman PRO-543 universal wallpaper adhesive (paid link) and alternating layers of newspaper and brown wrapping paper.

Removing the base
Once the paper maché is finished and 100% dry, it’s fun to remove the base materials! I love this step in every project. For a mask, this usually means opening up the bottom, where the neck hole is. I usually use an X-acto knife for this. I then very carefully remove all the materials, pulling them out slowly and firmly, and sometimes going in with scissors to cut up pieces to make them easier to pull out.

If you used aluminum foil as a release agent, you may find that a lot of the foil is impossible to get un-stuck from the interior of the paper maché. Same with masking tape. But in any case, this shouldn’t really be a problem, right? It’s inside the mask so no one will see it. You could always cover it up with a layer of paper maché, but that really seems like overkill. I do usually paint the interior of my masks, however, and that’ll at least conceal the foil or tape. More on that later.
Once you’ve completely removed the base, you may be surprised at A) how much junk came out of there, and B) how lightweight and sturdy your mask is now that it’s just paper! This step in the process is always a real pleasure.
Cutting out eye holes, et cetera
Now that your mask is just a big hollow paper shape, you can cut out the eye holes, as well as any other holes (nose/mouth/ears/etc), as well as trim the neck opening. I use an X-acto knife for this. Be very very careful to never cut toward yourself! That knife can jump! Seriously. I’ve hurt myself so many times. Be careful. Please.
Of course you should consider your vision when cutting out the holes, and this can mean cutting out more than just eye holes; any other places in the face where you can cut out holes will help your vision, like the mouth for example. The bigger your field of vision the better, even if it’s separated into several different holes youre looking out of.
You should also think about hearing and air circulation. The more holes you add around the mask the better. Does the mask have an area in the back or on the top that people won’t be able to see? Couldn’t hurt to cut a hole there as well. The more the better, to help it be less of an echo chamber in there.
Reinforcing
After all the holes are cut out, I reinforce the edges with tiny bits of masking tape, and then I cover the masking tape with tiny pieces of paper maché. These steps help hide the ugly cut edges of the paper maché, as well as make the holes stronger and less likely to tear, and they also help make the edges less sharp. You’d be surprised how shape the cut edges can be; I’ve given myself paper cuts on paper maché edges many times.
I usually reinforce the big neck opening with something to help make it sturdier; usually plastic zip ties or wooden coffee stirrers. I tape them in place along the interior edge and then cover them with paper maché. Stabilizing the neck opening like this gives a lot more solidity overall to the mask; the whole shape feels less wobbly.
Painting
Finally, time to paint! I have a whole article about this; it’s here. The broad strokes (ha!) are: spray gesso (usually), then spray paint, then acrylic paint, then matte spray. All with several hours in between each step to let the various coats set.
Installing screen
I usually install screen material in the eye(/mouth/etc) holes of my masks to help conceal the wearer’s face. I buy a roll of screen door material at the hardware store, cut the pieces I need with scissors, and hot glue them in place.
For areas that aren’t going to be used for vision — let’s use ventilation in the back as an example — I’ll layer two or even three pieces of screen and glue them in place. I set these so the grid of the screen sits at different angles, so maybe the first layer is left-right and the second is at 45 degrees, etc; this helps the screening appear more solid, but air and sound still get through just fine.
You can spray paint the screened areas and they’ll take the paint with no problem; you just want to make sure to do a fairly light dusting from pretty far away, and add coats as needed. If I’m planning on including screened areas like this that are going to be painted, I’ll glue them in place before the painting steps above.
Installing hard hat
Almost all of my big paper maché masks sit on a hard hat. Hard hats work perfectly because for masks like this because: they’re padded so they’re comfortable, they’re adjustable so they fit your head really well, they’re very stable so they don’t move around on your head too much, and they’re nice and solid so you can glue your mask onto them and it won’t budge.
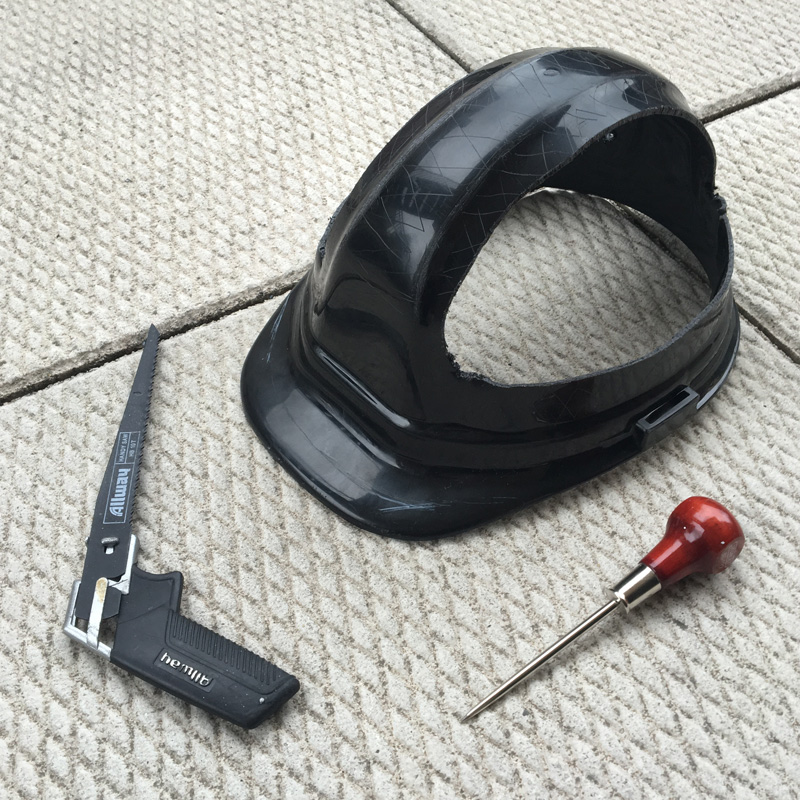
I saw as much of the plastic off the hard hat as I can get away with, depending on the design of the mask and what parts of the hard hat I need to attach everything. Removing chunks of hard hat helps reduce weight and increase airflow. Before sawing, I remove the padded rigging from inside the hard hat. I use a dremel tool to cut through the hard hat at key places and then I use a tiny hand saw to cut through and remove the pieces. I then sand the edges by hand with sandpaper.
My two favorite configurations for sawing the hard hat are: 1) cutting out two big wedge-shaped pieces from the sides, leaving a top crest that I can connect the mask two, and 2) cutting the hard hat straight across the top so it ends up just being a big plastic ring — I can then attach a flat piece of foam board across the top and connect my mask to that.
I almost always saw off the front brim, just to reduce weight a little more.
You can see in the above pic that I also scratched the hell out of this particular hard hat with an awl; this give you a surface that’s much easier for paper maché, glue, etc, to hold onto.
When the hard hat is all sawed and sanded, I glue the rigging in place with tiny drops of Gorilla Glue. Gluing the rigging permanently in place prevents it from falling out, and it lets you carry the mask upside down by the rigging.
Advanced tips
I wrote a few articles on various masking-making tips I’ve figured out, including things like adding a counterweight, making a reusable base, etc: check out part 1, part 2, and tips on making teeth for big masks.
Good luck!
 About Manning Krull
 How to make a 4-foot paper maché alligator
 My violin skull mask, Mardi Gras 2015
 Three-headed paper maché dragon sculpture
Leave a comment