
Paper maché chairs for my séance Halloween party!
Published by Manning on October 11th, 2016
For my upcoming séance party I wanted to have a few pieces of paper maché furniture stuck upside down on the ceiling — a table with a crystal ball, two chairs, maybe a little dresser with a lamp, etc. The main guidelines I set for myself are: the furniture all has to be extremely lightweight, since it’ll all be attached with thumbtacks to the ceiling, and it doesn’t have to be super realistic, since the lighting in the party will be low. I started with the chairs; here’s how I made ’em!
I have some simple Ikea chairs that I used as a model. My plan was to trace and/or draw the various pieces of a chair onto foam board, and then cut out all the pieces and assemble ’em and hope they resemble a chair.
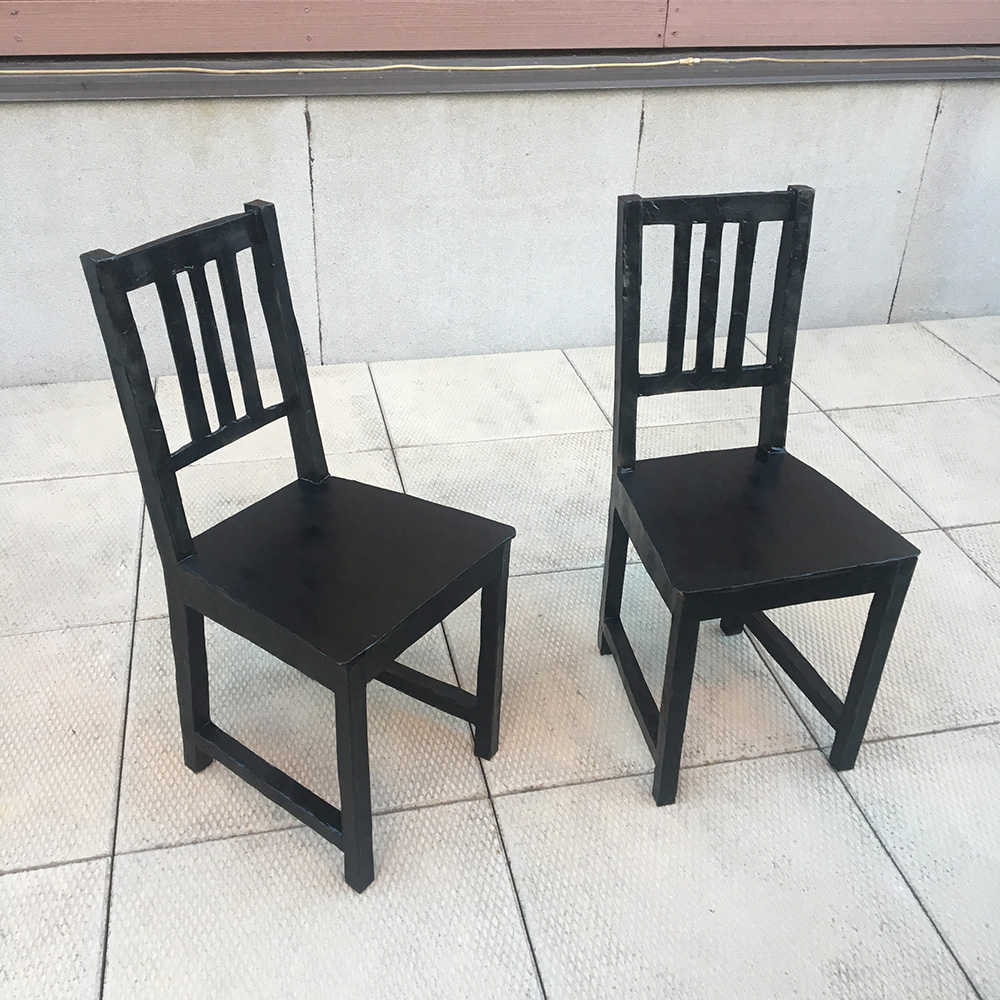
Which is the real chair and which is the fake?! Just kidding, these two are both fake! They came out pretty good, huh?
These chairs are just foam board put together with heavy duty packing tape, and covered in paper maché. You can create extremely strong shapes with just foam board and packing tape, if the shapes are cut somewhat precisely and if you tape them together really tightly. (See my article about working with foam board here.)
Each of my chairs was made with 23 cut-out foam board pieces, all taped together. Here’s a rundown of the pieces to make one chair and the order I cut and assembled them.
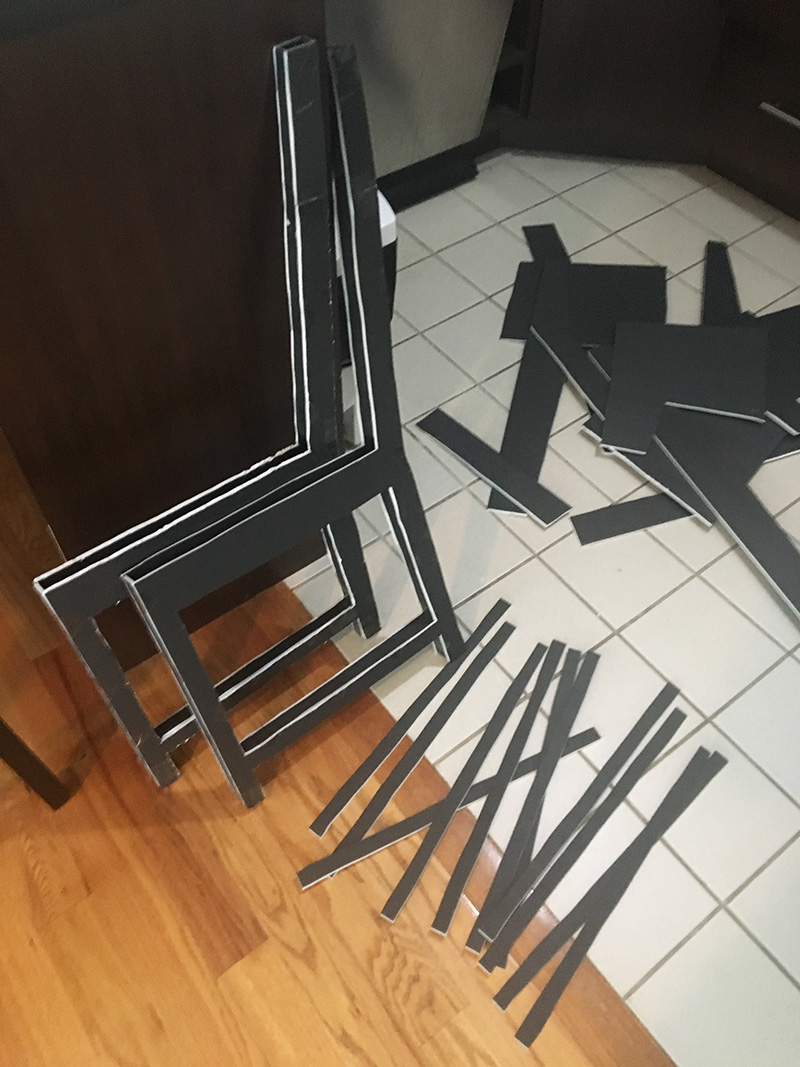
- 4 big side pieces — I started by laying a chair down sideways on a 20″x30″ piece of foam board and tracing the profile of the chair. I did this on four sheets of foam board, and cut them out. These are the pieces that are leaning against my kitchen counter in the pic above.
- 4 extra bits at the top — The chair didn’t fit completely on the 20″x30″ foam board when I was tracing it; about 6 inches of the top side pieces stuck out. So I used a small scrap of foam board and measured and traced just this top part, 4 times, and cut them out. I then taped them to the larger side pieces. In the above picture they’re already taped on.
- 14 long strips — I took a sheet of 20″x30″ foam board and measured and cut a couple dozen strips at 7/8″ wide by 20″ long. These make up all the edges that got between the 4 large side pieces I cut out. I assembled them with tape and cut them to size as I went. In adding these edges I thought about which surfaces of the chair will be visible from where they’re displayed, and I opted to not add these thin edges on parts that won’t be visible. This will help reduce weight a bit.
- seat — I simply measured the seat of my real chair with a ruler and then drew and cut out the seat from a large sheet of foam board.
- seat front and back edge — I measured the front and back edges of the seat of my real chair with a ruler; they’re nice simple rectangles so this part was easy. Taped ’em in place.
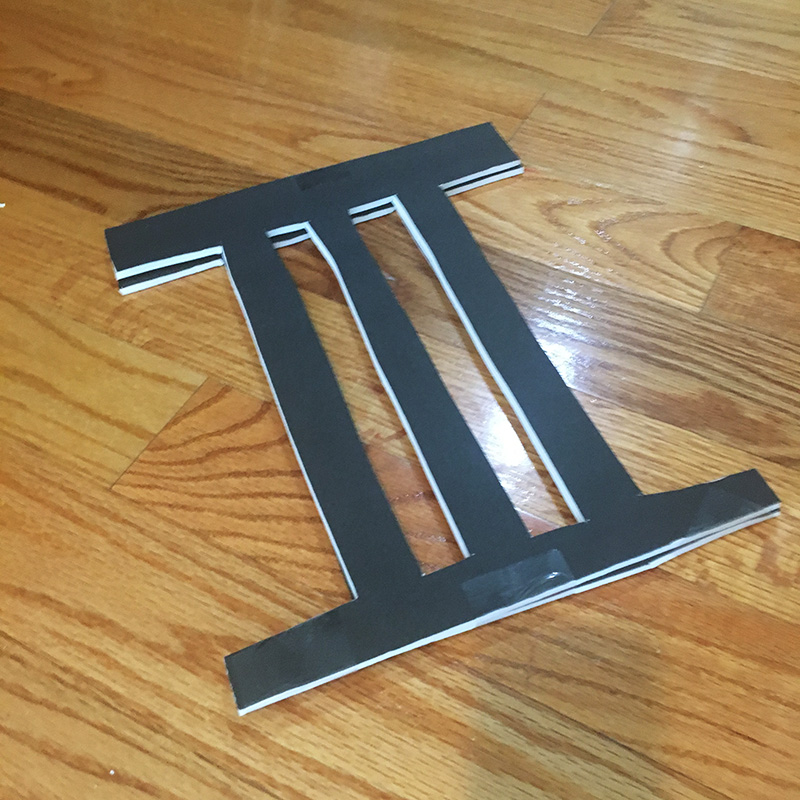
- back piece; 2 layers (pictured below) — I held a piece of foam up against the back of the chair and traced the pattern with a pencil, then cut it out, and made a second one. The back piece is just the top bar, lower bar, and the three vertical bars. I taped the two layers together, and then taped them in place between the now assembled side pieces of the chair.
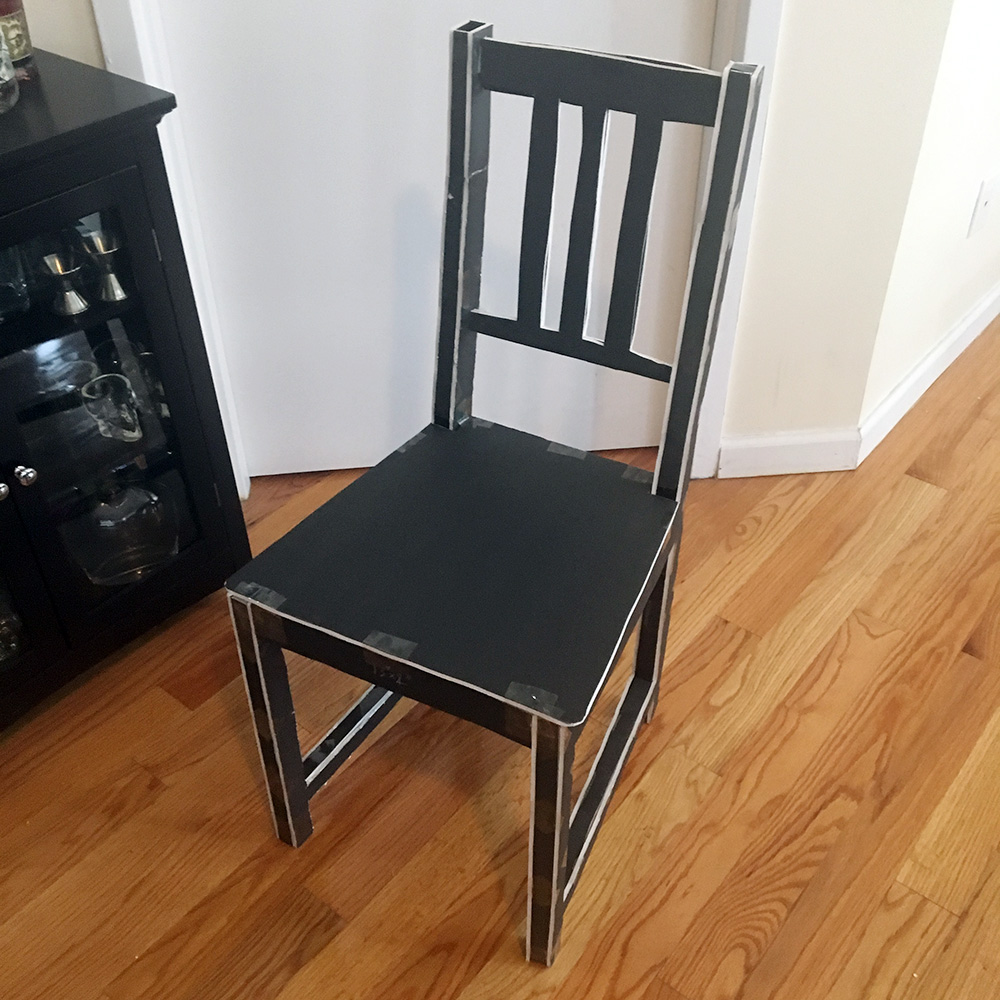
Whew! That’s a lot of cutting and taping. I then had to do this all over again for the second chair! Amazingly they came out pretty much identical; usually my second version of anything comes out a lot cleaner and nicer than the first. The tracing/measuring/cutting/taping took about an hour for each chair.
In assembling these pieces, I tried to use as little tape as possible in order to keep the weight down, and I also wasn’t super careful to make all the pieces fit together perfectly. I knew I’d be adding a layer of paper maché that will strengthen the entire shape and cover up any imperfect connections.
I did add quite a bit of extra tape at the “feet” of the chair legs; two long 5-inch strips placed over the bottom edges of the legs and running up the sides of the legs. This is to give me a strong and thin surface to stick my thumbtacks through later.
I then added one layer of paper maché on my chairs with brown wrapping paper. You can see my article about my paper maché method here. The short version is: I use Roman PRO-543 universal wallpaper adhesive (paid link), and I usually alternate layers of newspaper and brown wrapping paper, but for this project one layer was enough.

The main reason for this layer of paper maché is just to create a nice regular texture to cover the shiny tape and ugly foam board edges; I know from experience that if you paint directly over tape and foam board you can still see all the ugly mismatched surfaces. I used the minimum amount of paper in order to keep the weight down; i.e. I tried to make sure the individual scraps of paper overlapped as little as possible. I also only covered the surfaces that would be visible to the viewer, again, to reduce weight. For the large seat area, I only covered the edges, and I didn’t touch the large top and bottom surfaces at all.
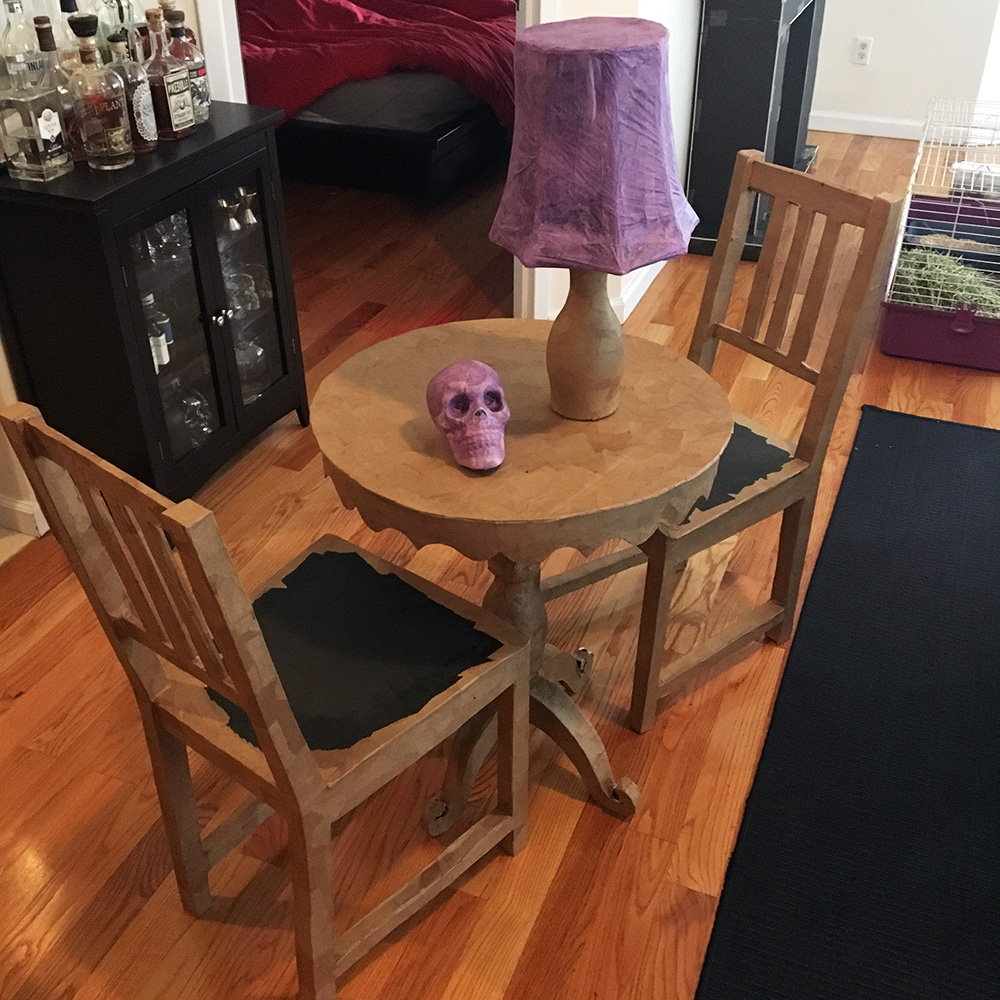
Here’s what the chairs looked like after the paper maché (and you get a sneak preview of my table and lamp; I’ll blog about those later).
When all the paper maché was dry, I spray painted the chairs black and let them dry and air out for a few days.
After painting, I cut some holes near the bottom of the chair legs to help with hanging them on the ceiling; I needed a way to get my fingers and a thumbtack in there. Hopefully the chairs are lightweight enough that nothing will tear or fall out! I’m writing this before the party, so we’ll see! They really are surprisingly light.
I’m hopeful the thumbtacks will be strong enough; if they’re not I will resort to a stronger method of hanging things in a flimsy ceiling which unfortunately leaves a much bigger hole — a toggle bolt. I discovered toggle bolts when looking for a method to hang my giant paper maché spider a few years ago. It worked like a charm. If I end up using a toggle bolt for these chairs, I’ll use just one per chair, positioned on the ceiling in the middle of all the chair legs, with fishing line running down to the bottom of the seat of the chair. With this method you could allow the chairs to spin freely, although I’ll probably still thumbtack a couple of the chair legs in place so they don’t spin.
I’ll definitely take plenty of pics of all the completed furniture when it’s on the ceiling during the party, and post ’em afterward.
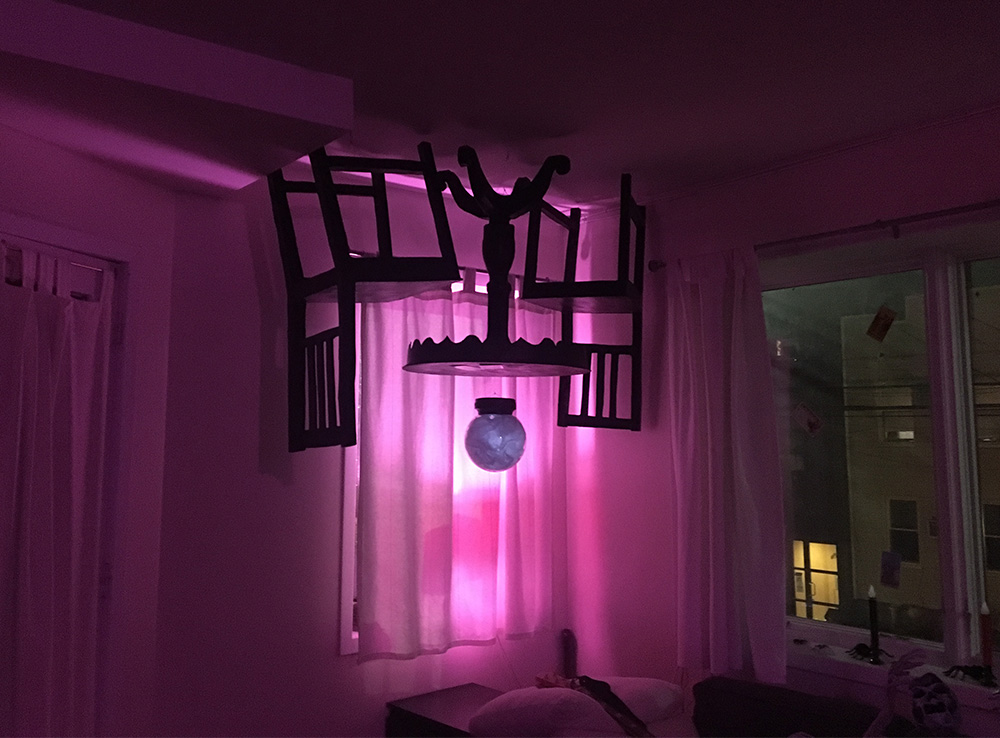
Update: Here’s everything hung up for the party!
See more paper maché furniture projects: chairs, table, mantel and fireplace, nightstand, lamp.
 About Manning Krull
 How to make a 4-foot paper maché alligator
 My violin skull mask, Mardi Gras 2015
 Three-headed paper maché dragon sculpture
Leave a comment