
Posts tagged "mardi gras":
Three-headed paper maché dragon sculpture! — part 1
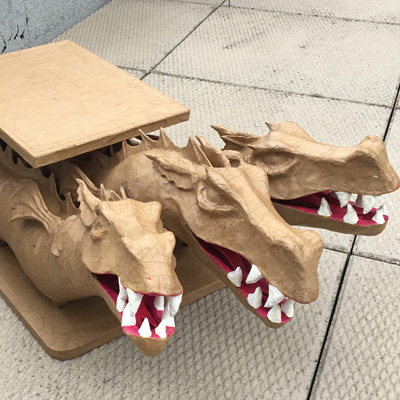
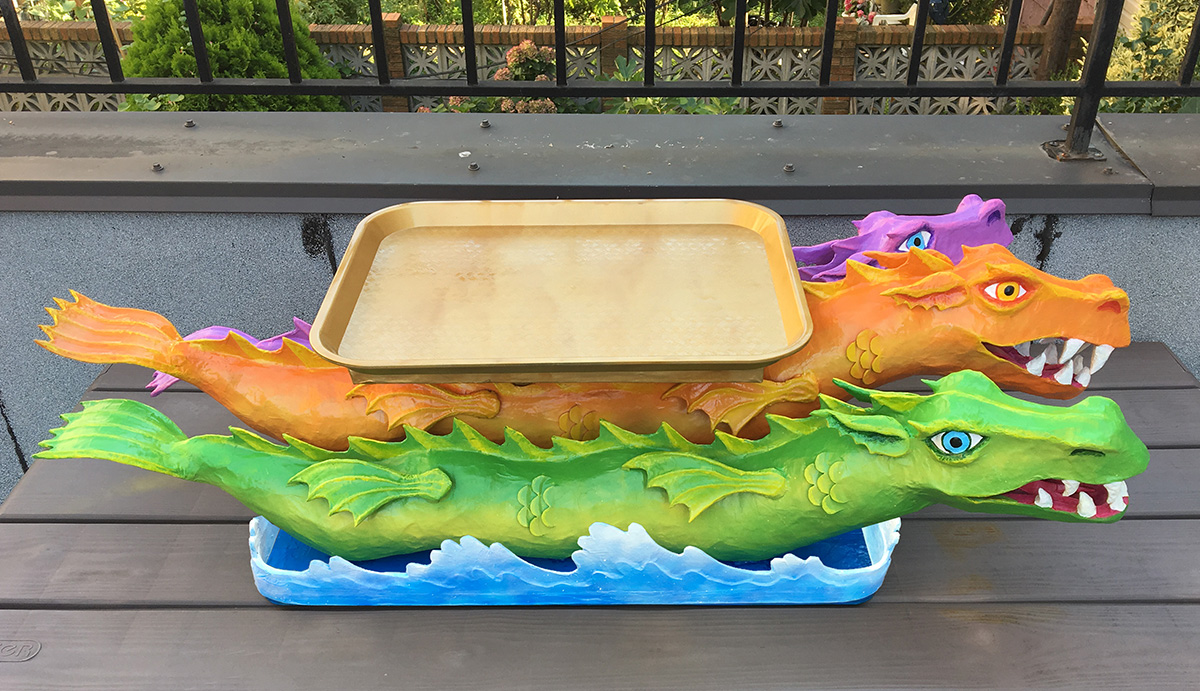
This was an incredibly fun commission piece I got to work on! I was contacted by a member of the Crewe of Columbus, a Mardi Gras crewe in Mobile, Alabama, and asked to make a sculpture of one of their parade floats — a very charming three-headed sea serpent(/dragon) named Isabella. The sculpture would have a serving tray area on top and be the centerpiece on one of the buffet tables at the group’s annual ball. The client sent me tons of photos of the Isabella float and asked for a sculpture that was approximately 40″ long from head(s) to tail(s). I couldn’t wait to get started!
Wolf skull mask — part 4; making the ears
This is part 4 of my paper maché wolf skull mask; see part 1 here.
I wanted to give my wolf skull some ears; I had this idea because in researching wolf skulls I realized that basically all carnivorous mammals’ skulls look almost indistinguishable, and the main different from one mammal head to another is the ears. So my hope is that adding ears will help people recognize my skull as a wolf (or at least a dog! I’ll settle for a dog!). Read more…
Wolf skull mask — part 3; painting, etc.
Painting the wolf skull
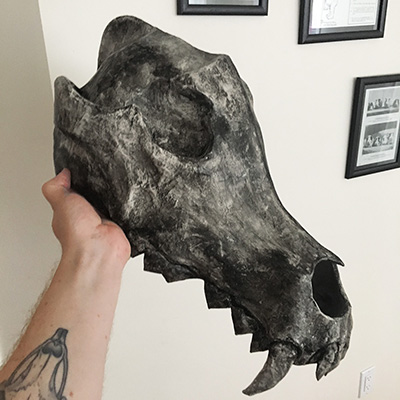
Before painting the wolf skull mask, I applied a coat of gesso over the whole thing. Gesso is a thick white paint-like substance that can help smooth out any imperfections in your paper maché surface. In this case it really helped smooth out the teeth in particular.
Paper maché wolf skull mask — part 2
What big teeth you have!
Hooboy, the teeth were one of the hardest and most time consuming parts of this whole mask project! Like I mentioned in part 1, the four big fangs were made out of foam insulation tubing and masking tape; those were pretty easy. I tried a few different methods for the other teeth; I’ll spare you my failures and just show you where I ended up…
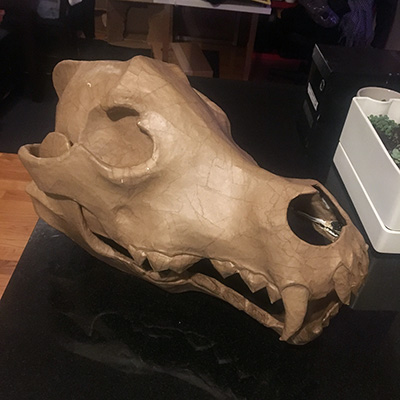
Paper maché wolf skull mask — part 1
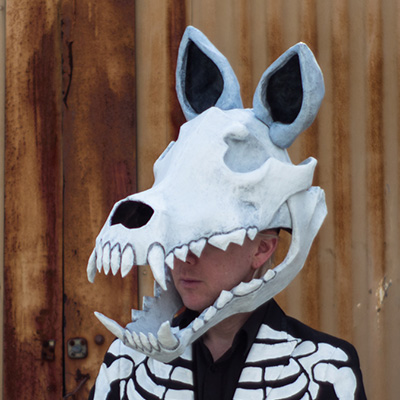
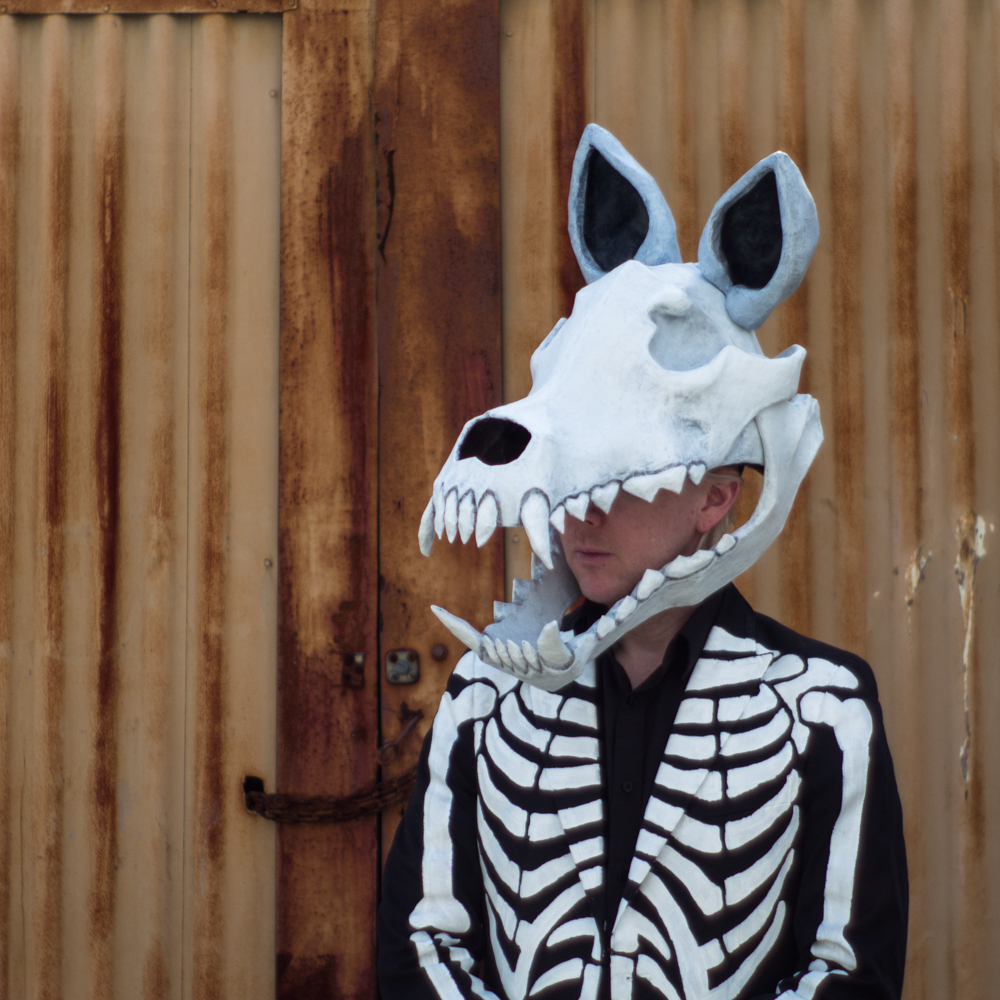
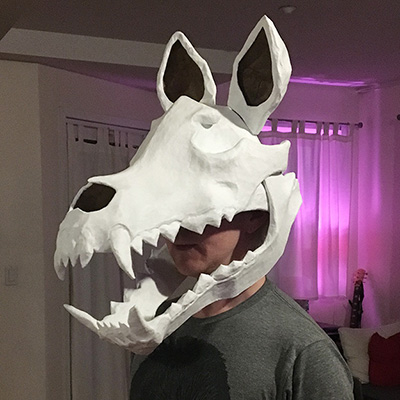
I made this here paper maché wolf skull mask for Mardi Gras 2017! It’s got detachable ears, a movable jaw, and it’s one of my most lightweight and comfortable skull masks yet. It was a lot of fun to make; here’s how I did it!
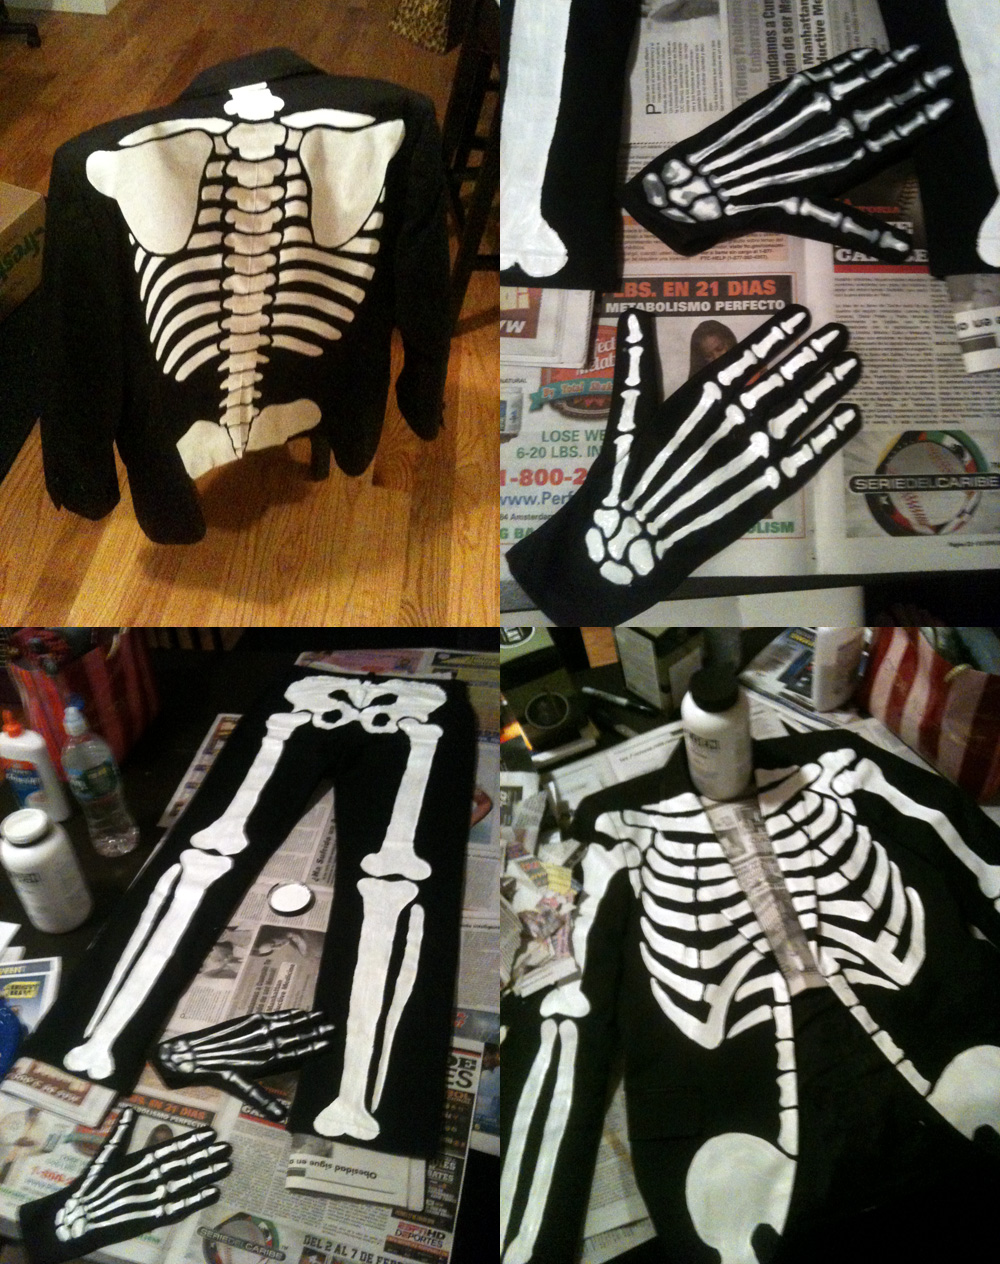
Painting new skeleton pants
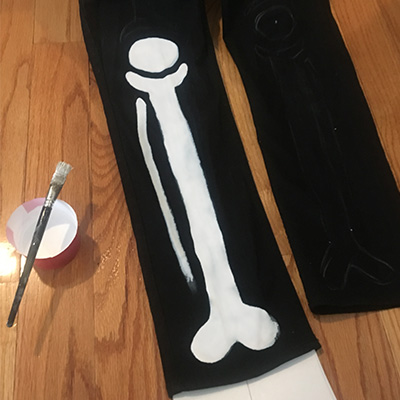
I’ve been wearing my hand-painted skeleton suit for five Mardi Gras in a row now, with a few Halloweens thrown in there as well, and for some reason the pants seem to be harder to squeeze into every year! Huh! I wonder how that could be; they must keep shrinking in the wash a little more every single year! Yeah, that’s gotta be it. So anyway, it’s reached a point where I absolutely needed to make new ones for this Mardi Gras; last year I seriously thought they might split open on me during a parade! I learned a lot from how I made these last time, and luckily this was a much more successful project my second time around…
A video of my cuckoo clock skull mask in action!
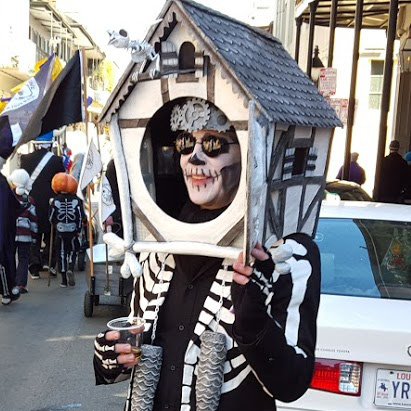
A friend of mine took this video of me opening and closing my mask on Mardi Gras morning, around 9am at Jackson Square. The hinge mechanism in the door (made from a plastic file folder and some magnets) held up great over the course of the long day. Check out parts one, two, and three of my process for making this mask, and the article I wrote about making the little cuckoo bird skeleton. Fun!
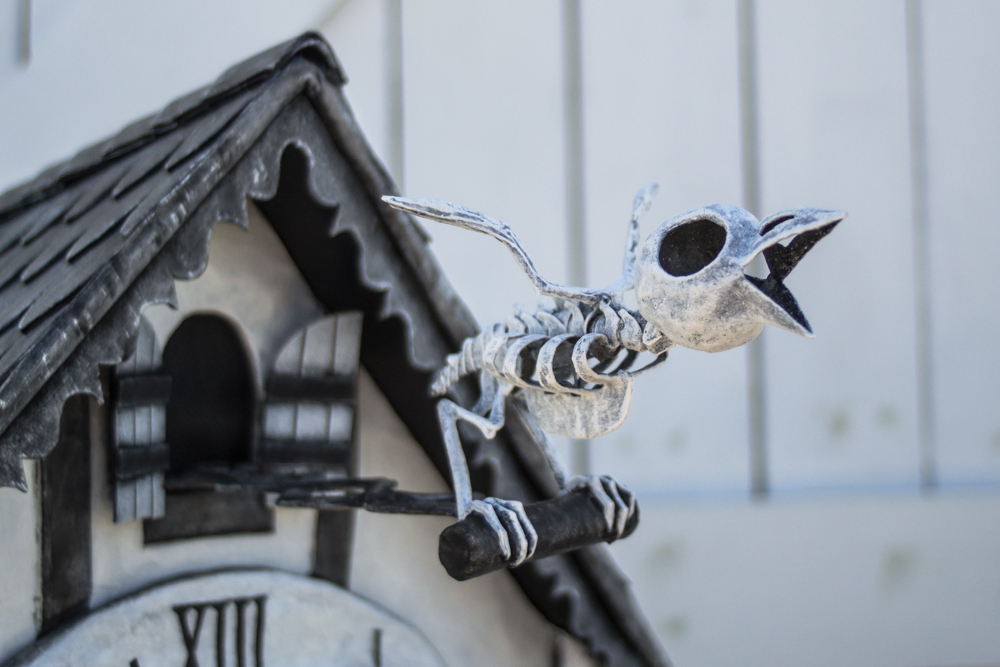
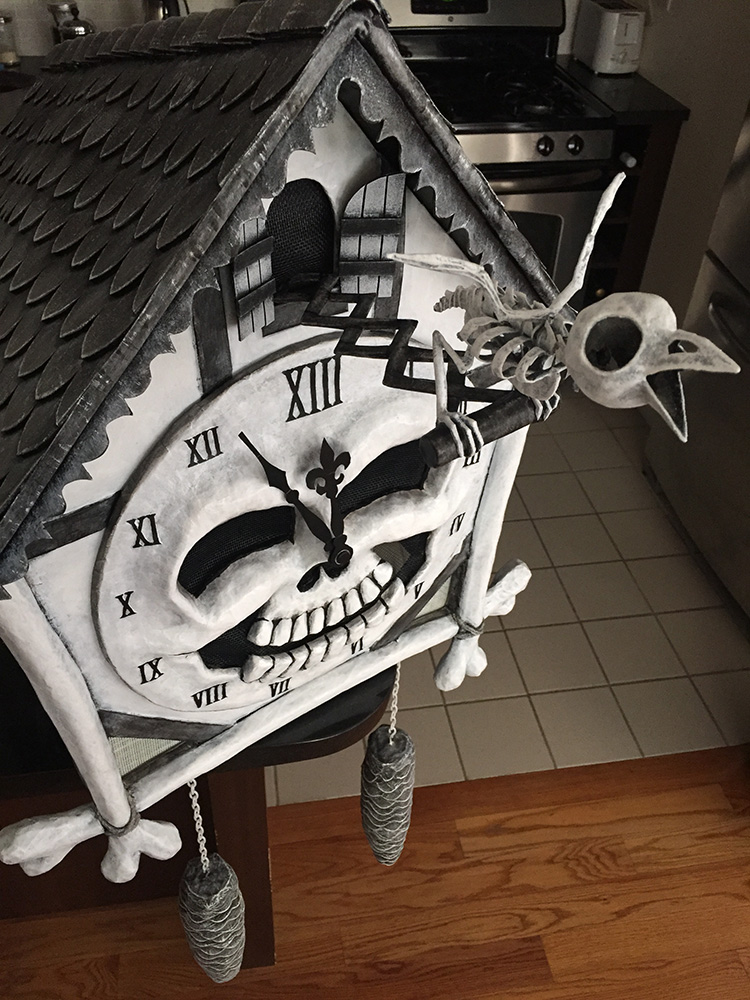
Making the bird skeleton for my cuckoo clock mask
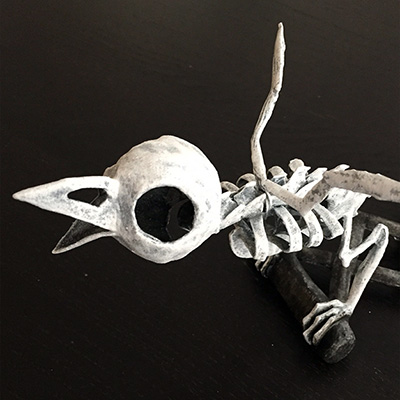
I made this bird skeleton for my cuckoo clock skull mask for Mardi Gras 2016. Making this skeleton was extremely challenging, and I basically made up all the steps as I went along. I had no idea what I was doing, but I learned a lot and I’m very happy with the end result. I didn’t take as many pictures as I should’ve along the way, so I’ve done some sketches to explain certain steps.
The main materials in the bird skeleton are:
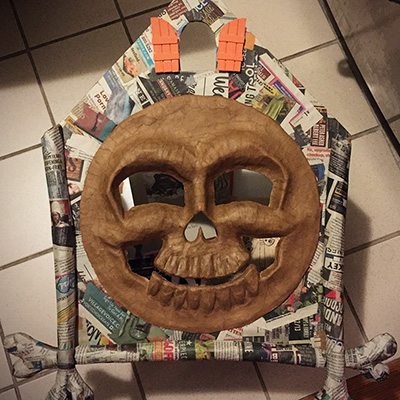
Cuckoo clock skull mask — part 3
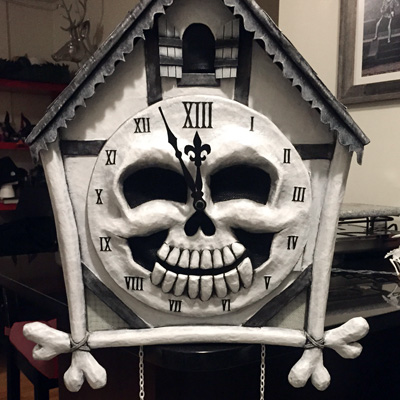
This is part three of my cuckoo clock skull mask project. See part one and part two.
Where were we? Oh yeah, it’s time to paint!
Painting the mask
I painted the clock body and the roof separately for the most part before joining them together. I first protected the screen in the eyes/nose/mouth with blue masking tape (the kind that’s really easy to remove), and then I spray painted the entire exterior of the clock white. I separately spray painted the roof black. I let these pieces air out for about three days outside.
Cuckoo clock skull mask — part 2
This is part two of my cuckoo clock skull mask project. See part one and part three.
Scale-pattern shingles on the roof
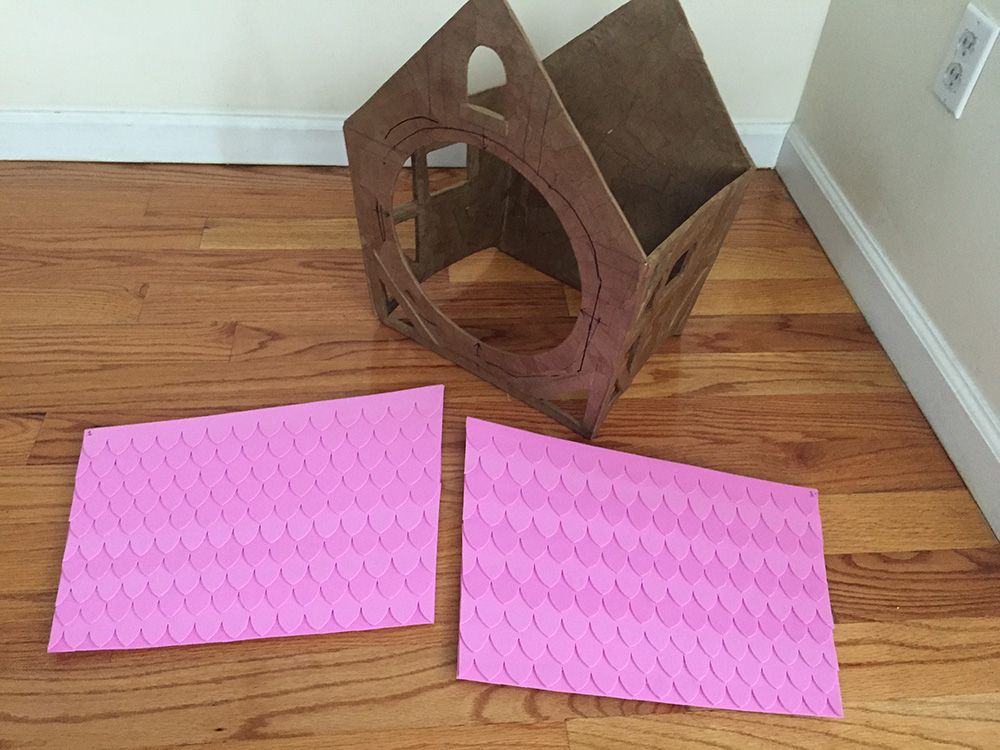
I started the roof with two foam board panels. My process for creating the scale-shaped shingles was kind of convoluted…
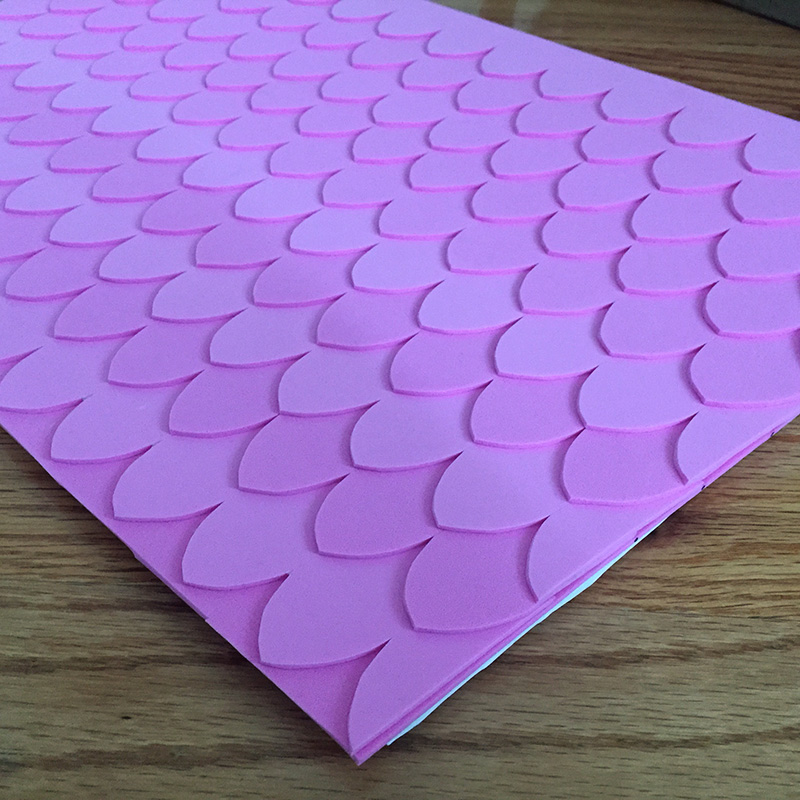
The pattern on the roof is made with a few layers of craft foam (aka Wonderfoam). I made this way harder for myself than it needed to be! Since all my wall and roof panels were irregular shapes — there isn’t a single 90-degree angle on this whole mask — I needed the scale-shaped roof tiles to start out larger near the top of the roof and get smaller toward the bottom. I ended up designing the whole roof surface in Photoshop, starting with a nice regular scale pattern on a rectangular shape (figure 1). Read more…
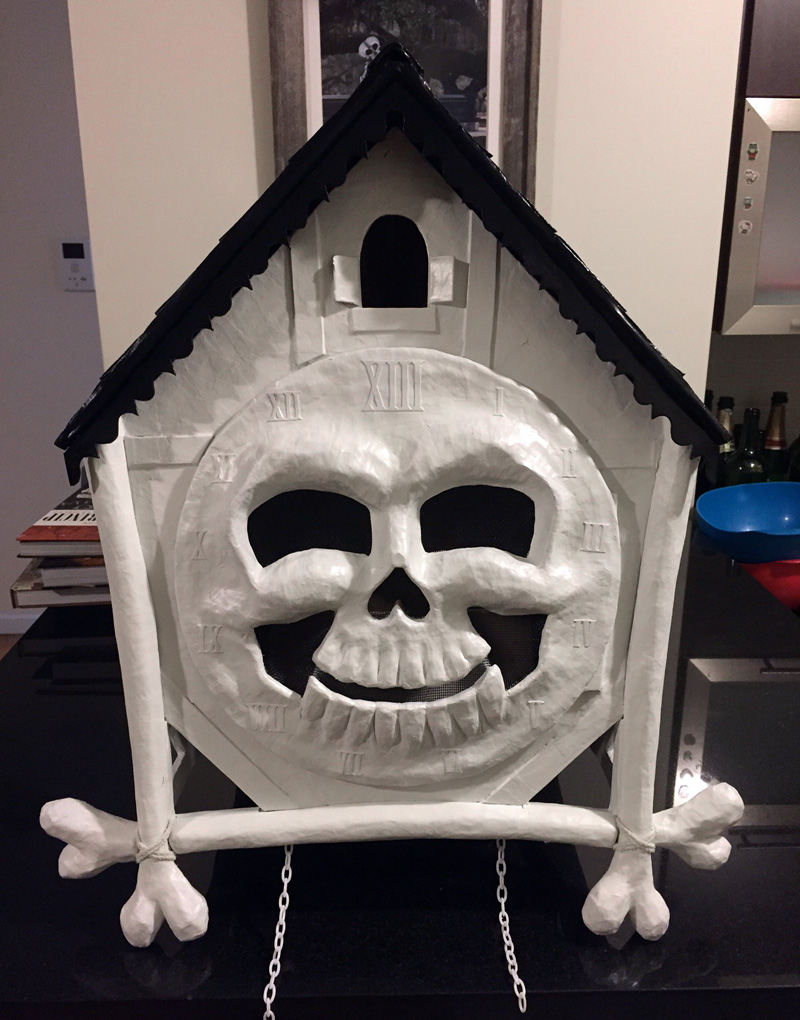
Cuckoo clock skull mask, Mardi Gras 2016
Behold my cuckoo clock skull mask for Mardi Gras 2016! Wow, this one was complicated and fun! Here’s the short version…
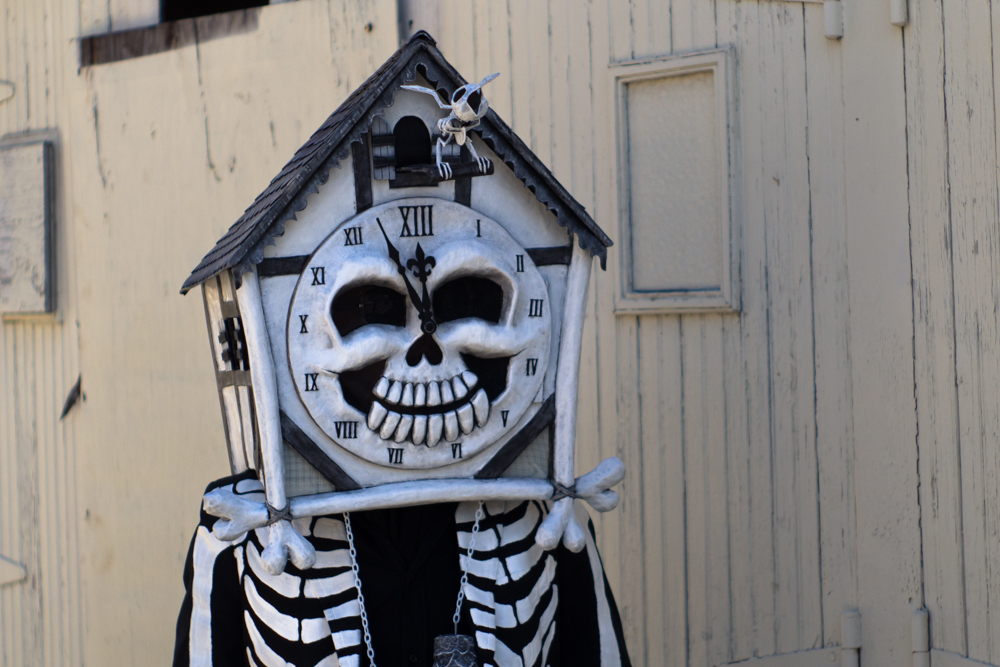
This mask was made up of a lot of individual paper maché parts that I built separately and assembled. Here’s a very quick rundown of the parts and what they’re made of:
Devil Man mask with horns — part 2

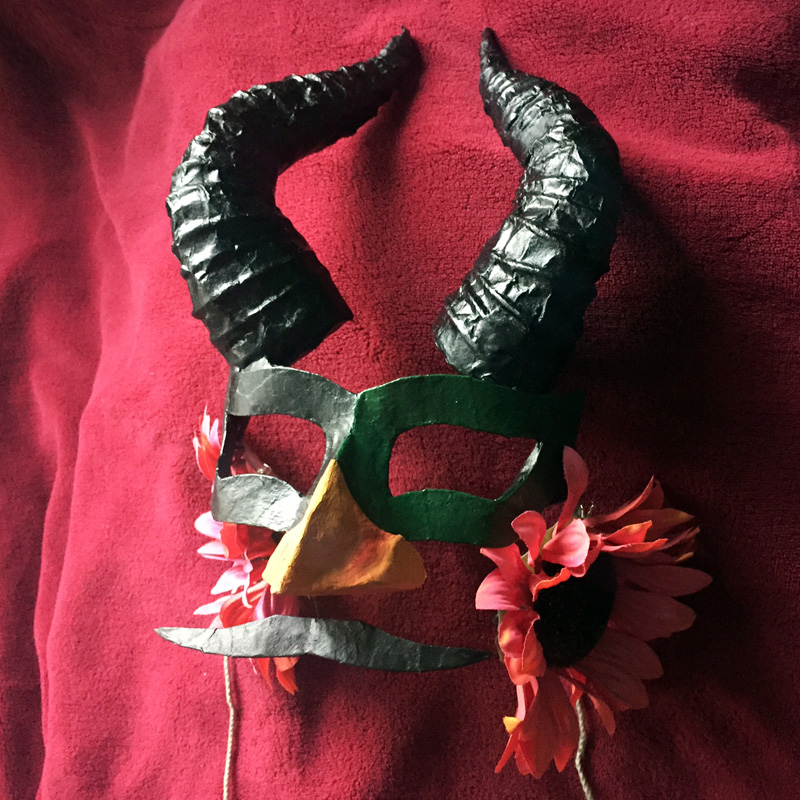
Okay, when we last left off, I’d finished the horns and the base for the mask. I neglected to take a lot of pictures of my process for putting the whole mask together, so I’ll explain all the remaining steps here.
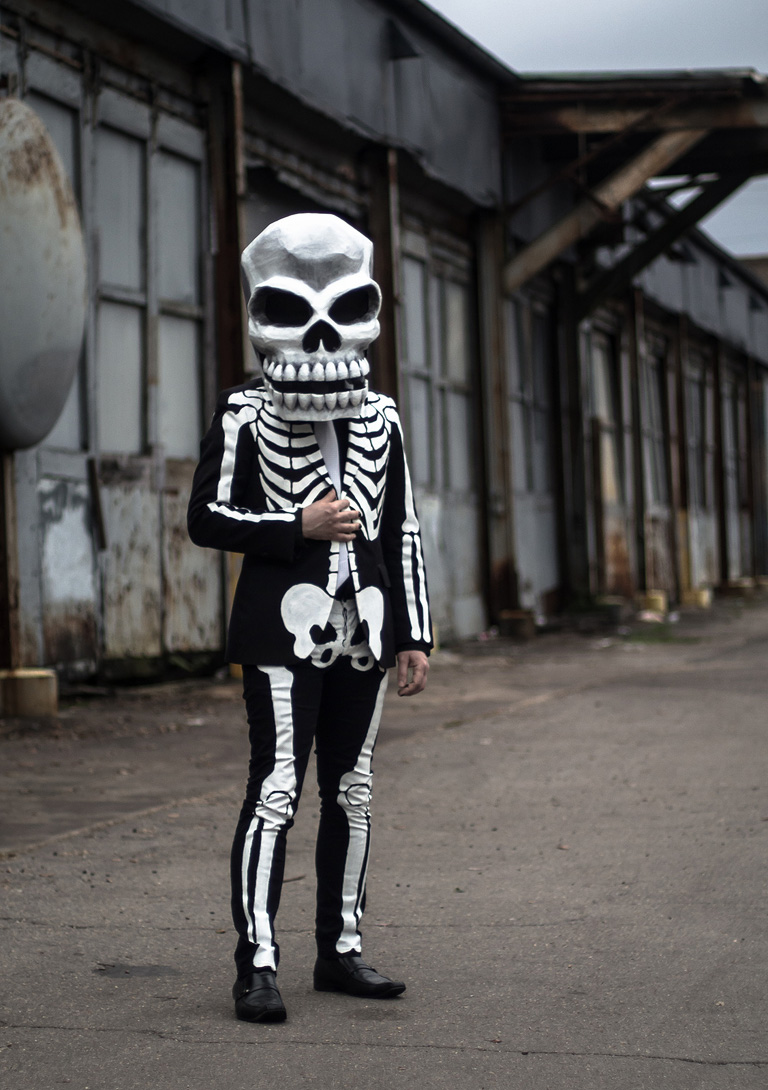
My hand-painted skeleton suit
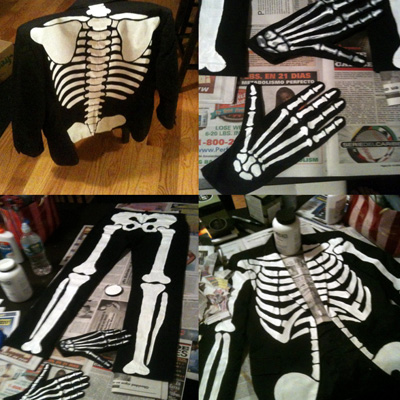
I made this skeleton suit for my first Mardi Gras (2012) and have worn it every Mardi Gras since, plus a few Halloweens here and there. Making the suit was a fun project, and a little more challenging than I expected.
I started with a thick black blazer and a black pair of cotton pants, both of which were from H&M; I already had them in my closet and chose to sacrifice them for this costume.
Read more…
Paper maché violin skull mask, Mardi Gras 2015

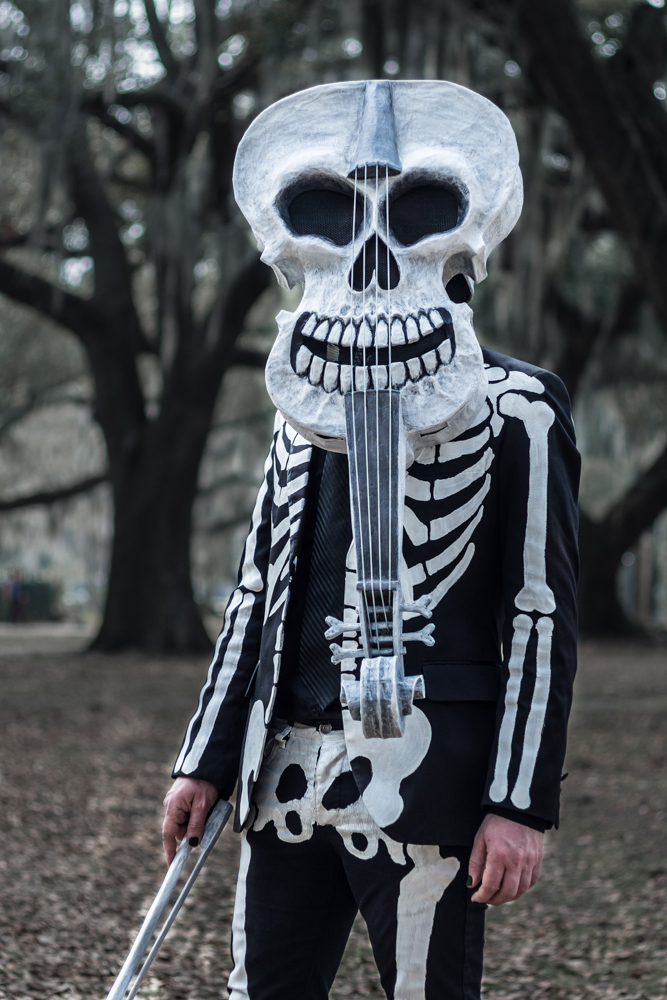
I made this violin skull mask for Mardi Gras 2015. It was one of the most complicated things I’ve ever made. I bit off more than I could chew with this one, but I’m really happy with how it came out. Check out all these steps…
Paper maché conjoined twins skull mask, Mardi Gras 2014
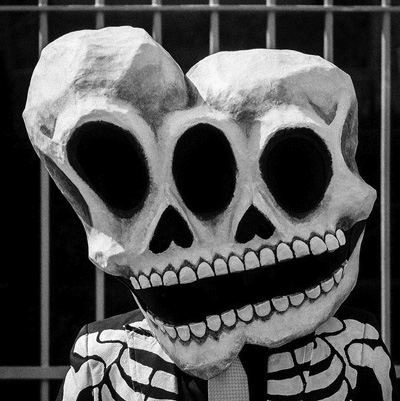
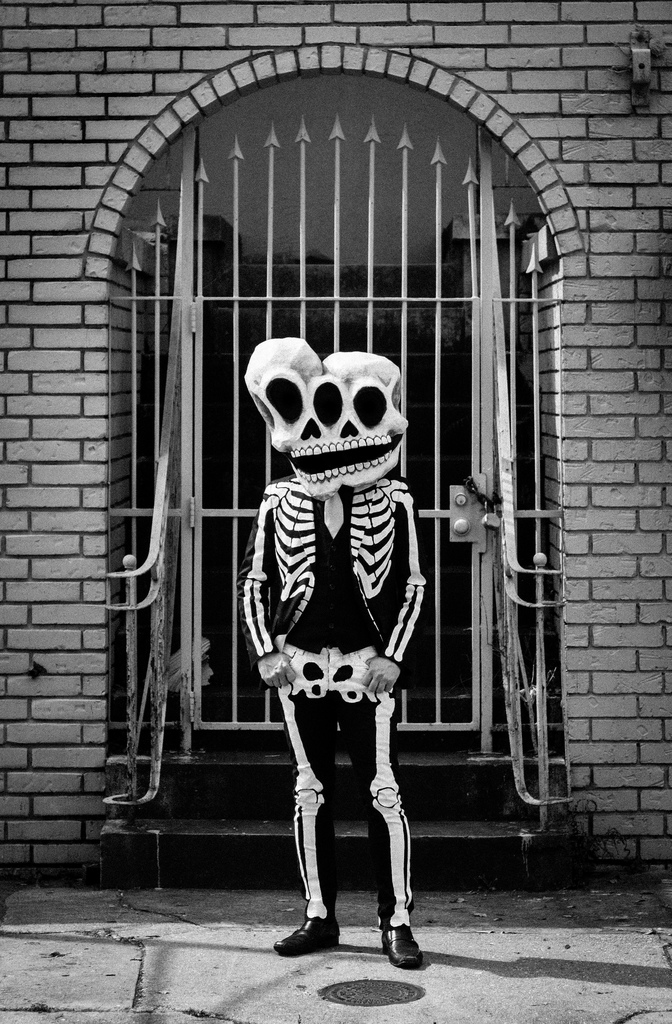
This year I was determined to give chicken wire another go, after my failed attempt the previous year. I had already sketched out my idea for this conjoined twins (aka “siamese twins”) skull, and I knew I wanted them to be different heights and sort of distorted and curved-looking. So I decided to start out with two big tubes of chicken wire.
Read more…
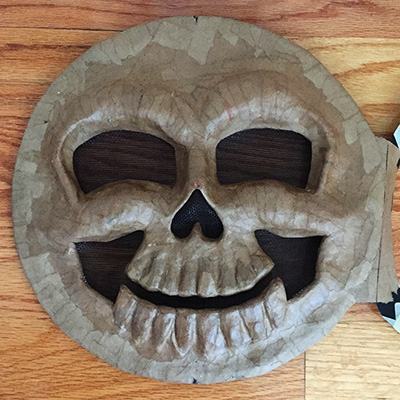
My first big paper maché skull mask, Mardi Gras 2013
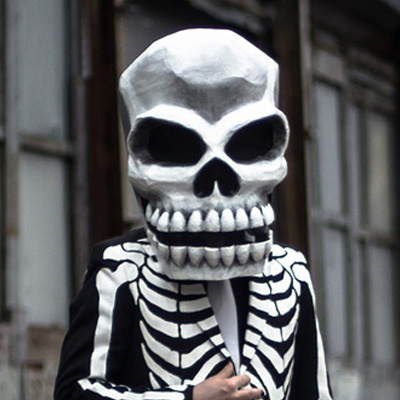
This was my first big paper maché project!
I started off by buying some chicken wire and trying to shape it into the skull shape I pictured in my head. It didn’t work out at all; I had no idea what I was doing and I just couldn’t get the chicken wire to do what I wanted. So I gave up on the chicken wire for this mask. (I used chicken wire again, with much better results, the next year!)
 About Manning Krull
 How to make a 4-foot paper maché alligator
 Three-headed paper maché dragon sculpture